

Telnyx Compute: Network — Full Documentation
Complete page content for Network (Compute section) of the Telnyx developer docs (https://developers.telnyx.com). This file: https://developers.telnyx.com/development/llms/compute-network-llms-full-txt.md · Root index: https://developers.telnyx.com/llms.txt
Private Networks
Network Overview
Source: https://developers.telnyx.com/docs/network/overview.md
Introduction
Telnyx programmable networking allows users and their application to access Telnyx SIP and API endpoints without traversing the public internet, therefore offering a path with better latency and throughput. The SIP and API endpoints are:api.telnyx.comsip.telnyx.comand their regional counterparts*.telnyxcloudstorage.comwhere*is all available storage regions, e.g.us-central-1
API Concepts
Coverage
Coverage API enumerates all the supported products at each of Telnyx’s PoP. Before creating any resources, please ensure that- There is a PoP in the vicinity from where you want to connect, and
- The desired resources are available at that PoP.
Networks
It is a logically isolated virtual network. It is a pre-requisite for the creation of other elements. Refer to the network guide for more detail.Gateways
It is a virtual node that facilitates traffic routing between your Telnyx network and an outside network. There are three types of gateways.- WireGuard Gateways (WGW); in the API, it’s named
interface - Internet Gateways (IGW)
- Private Wireless Gateways (PWG)
WireGuard Gateways
It is a virtual VPN concentrator implemented with the open source WireGuard protocol. It is similar to- Virtual Private Gateway in AWS
- VPN Gateway in GCP
- Virtual Network Gateway in Azure
Internet Gateways
It is an element that routes traffic to and from the internet, similar to Internet Gateway or NAT Gateway in AWS Refer to the Internet Gateways GuidePrivate Wireless Gateways
It is a private packet gateway that concentrates, routes, and segments traffic for a group of SIMs. Refer to private wireless gateway guide for more detail.Virtual Cross Connects
It is a virtual direct connection between a supported cloud provider and Telnyx. Refer to VXC guide for more detail.Coverage
Source: https://developers.telnyx.com/docs/network/coverage.md
Generic Coverage
Individual networking resource availability is not universal across all Telnyx regions. Hence the user must ensure the desired resource is offered at the desired region. To this end, we offer a coverage API (GET /v2/network_coverage).
The location parameter is hierarchical:
The
available_services parameter is an array of all available resources that can be created at this specific location. Possible values are:
virtual_cross_connectcloud_vpnaka wireguard interface aka wireguard gatewayprivate_wireless_gatewaypublic_internet_gateway
Querying by the desired product
Querying by the desired product with a location constraint
Querying by the desired location
Virtual Cross Connects (VXC) Coverage
In the case of virtual cross connect (VXC) there are two terminating endpoints to every single connection: a cloud provider endpoint and a Telnyx endpoint. As a result, it’s insufficient to simply perform the coverage check. For example, the above API response only indicates that one end of the VXC can be terminated at the Telnyx’s FR5 PoP. It provides no information about the other terminating endpoint. To that end, we offer a VXC coverage API (GET /v2/virtual_cross_connects_coverage) to augment the generic coverage API.
Here are some common usage patterns of this API.
Querying by fixing Telnyx endpoint
CH1 PoP, can be terminated.
Querying by fixing cloud provider endpoint
us-east-1 of AWS, can be terminated.
Here is a sample response:
available_bandwidth is in Mbps.
Networks Configuration
Source: https://developers.telnyx.com/docs/network/networks.mdA
network instance is a prerequisite for the creation of all other elements.
Here is a sample request:
Request sample
Don’t forget to updateYOUR_API_KEY here.
WireGuard Gateway Setup
Source: https://developers.telnyx.com/docs/network/gateways/wireguard-gateway.mdOn naming convention: in the API Reference, certain legacy documentations, and the Mission Control Portal, WireGuard Gateways are referred to as “Wireguard Interfaces”. In this guide and all guides under the “Networking” collection, the term WireGuard Gateway is used consistently. The devices that connect to it are referred to as WireGuard Peers or simply Peers
Introduction
WireGuard Gateway (WGW) is an element to which peers can connect and form a VPN over the public internet. It’s built on top of the WireGuard implementation.Creating a WGW
Step 1: Create a Network
Follow this guide.Step 2: Check for Coverage
Follow this guide. Usefilter[available_services][contains]=cloud_vpn to look for a desired site at which to deploy the WGW. ashburn-va is chosen for the subsequent steps.
Step 3: Create a WGW
Using the network created from Step 1 and the chosen region from Step 2, create the WGW. Once a WGW is created on a specific network, it cannot be “migrated” to another one; it needs to be recreated on the other network. Double check the correctnetwork_id is used in the following API request.
provisioning.
endpointdenotes the publicly routable IP to which peers will connect over the public internet.server_ip_addressis the private subnet range the WGW and peers will use with WGW occupying the first usable IP.
Step 4: Wait for Status Transition
The expected time forstatus to transition to provisioned is approximately 5 minutes. You can poll the WGW to check for status.
Creating Peers
In the following example, a peer is created for the WGW from the previous section.private_key is only given to you ONCE in the creation API response. It must be stored by you.
conf file template.
private_key, you can import the conf file on the peer.
[Interface] refers to the local peer.
PrivateKeyshould have the value returned in theprivate_keyparameter.Addressis the next available IP in the subnet range. In this case, since this is the first peer, it gets the next IP after the WGW.
[Peer] refers to the WGW created previously.
PublicKeyis that of the WGWAllowedIPsis the network this peer has access to. See this excellent explanation.Endpointis the publicly exposed IP to which peers can connectPersistentKeepaliveis a default parameter that can be ignored.
Configuring Peers
With theconf file, you can import that onto the host. Here are the environment specific guides:
Use Cases
In this section, we introduce 3 use cases that WGW can accommodate by itself.Use Case 1: Multi-Cloud Network
WGW can be used as a VPN concentrator server to facilitate traffic between peers. In the following example, we will construct this architecture.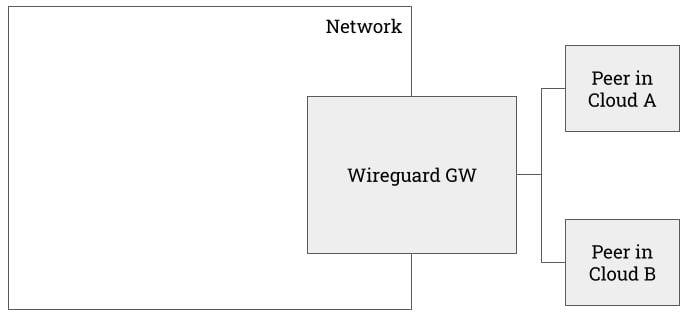
- Peer in Cloud A is an EC2 instance in AWS.
- Peer in Cloud B is a Droplet in DigitalOcean.
Peer in Cloud A
This EC2 instance runs an apache server but only allows inbound SSH traffic.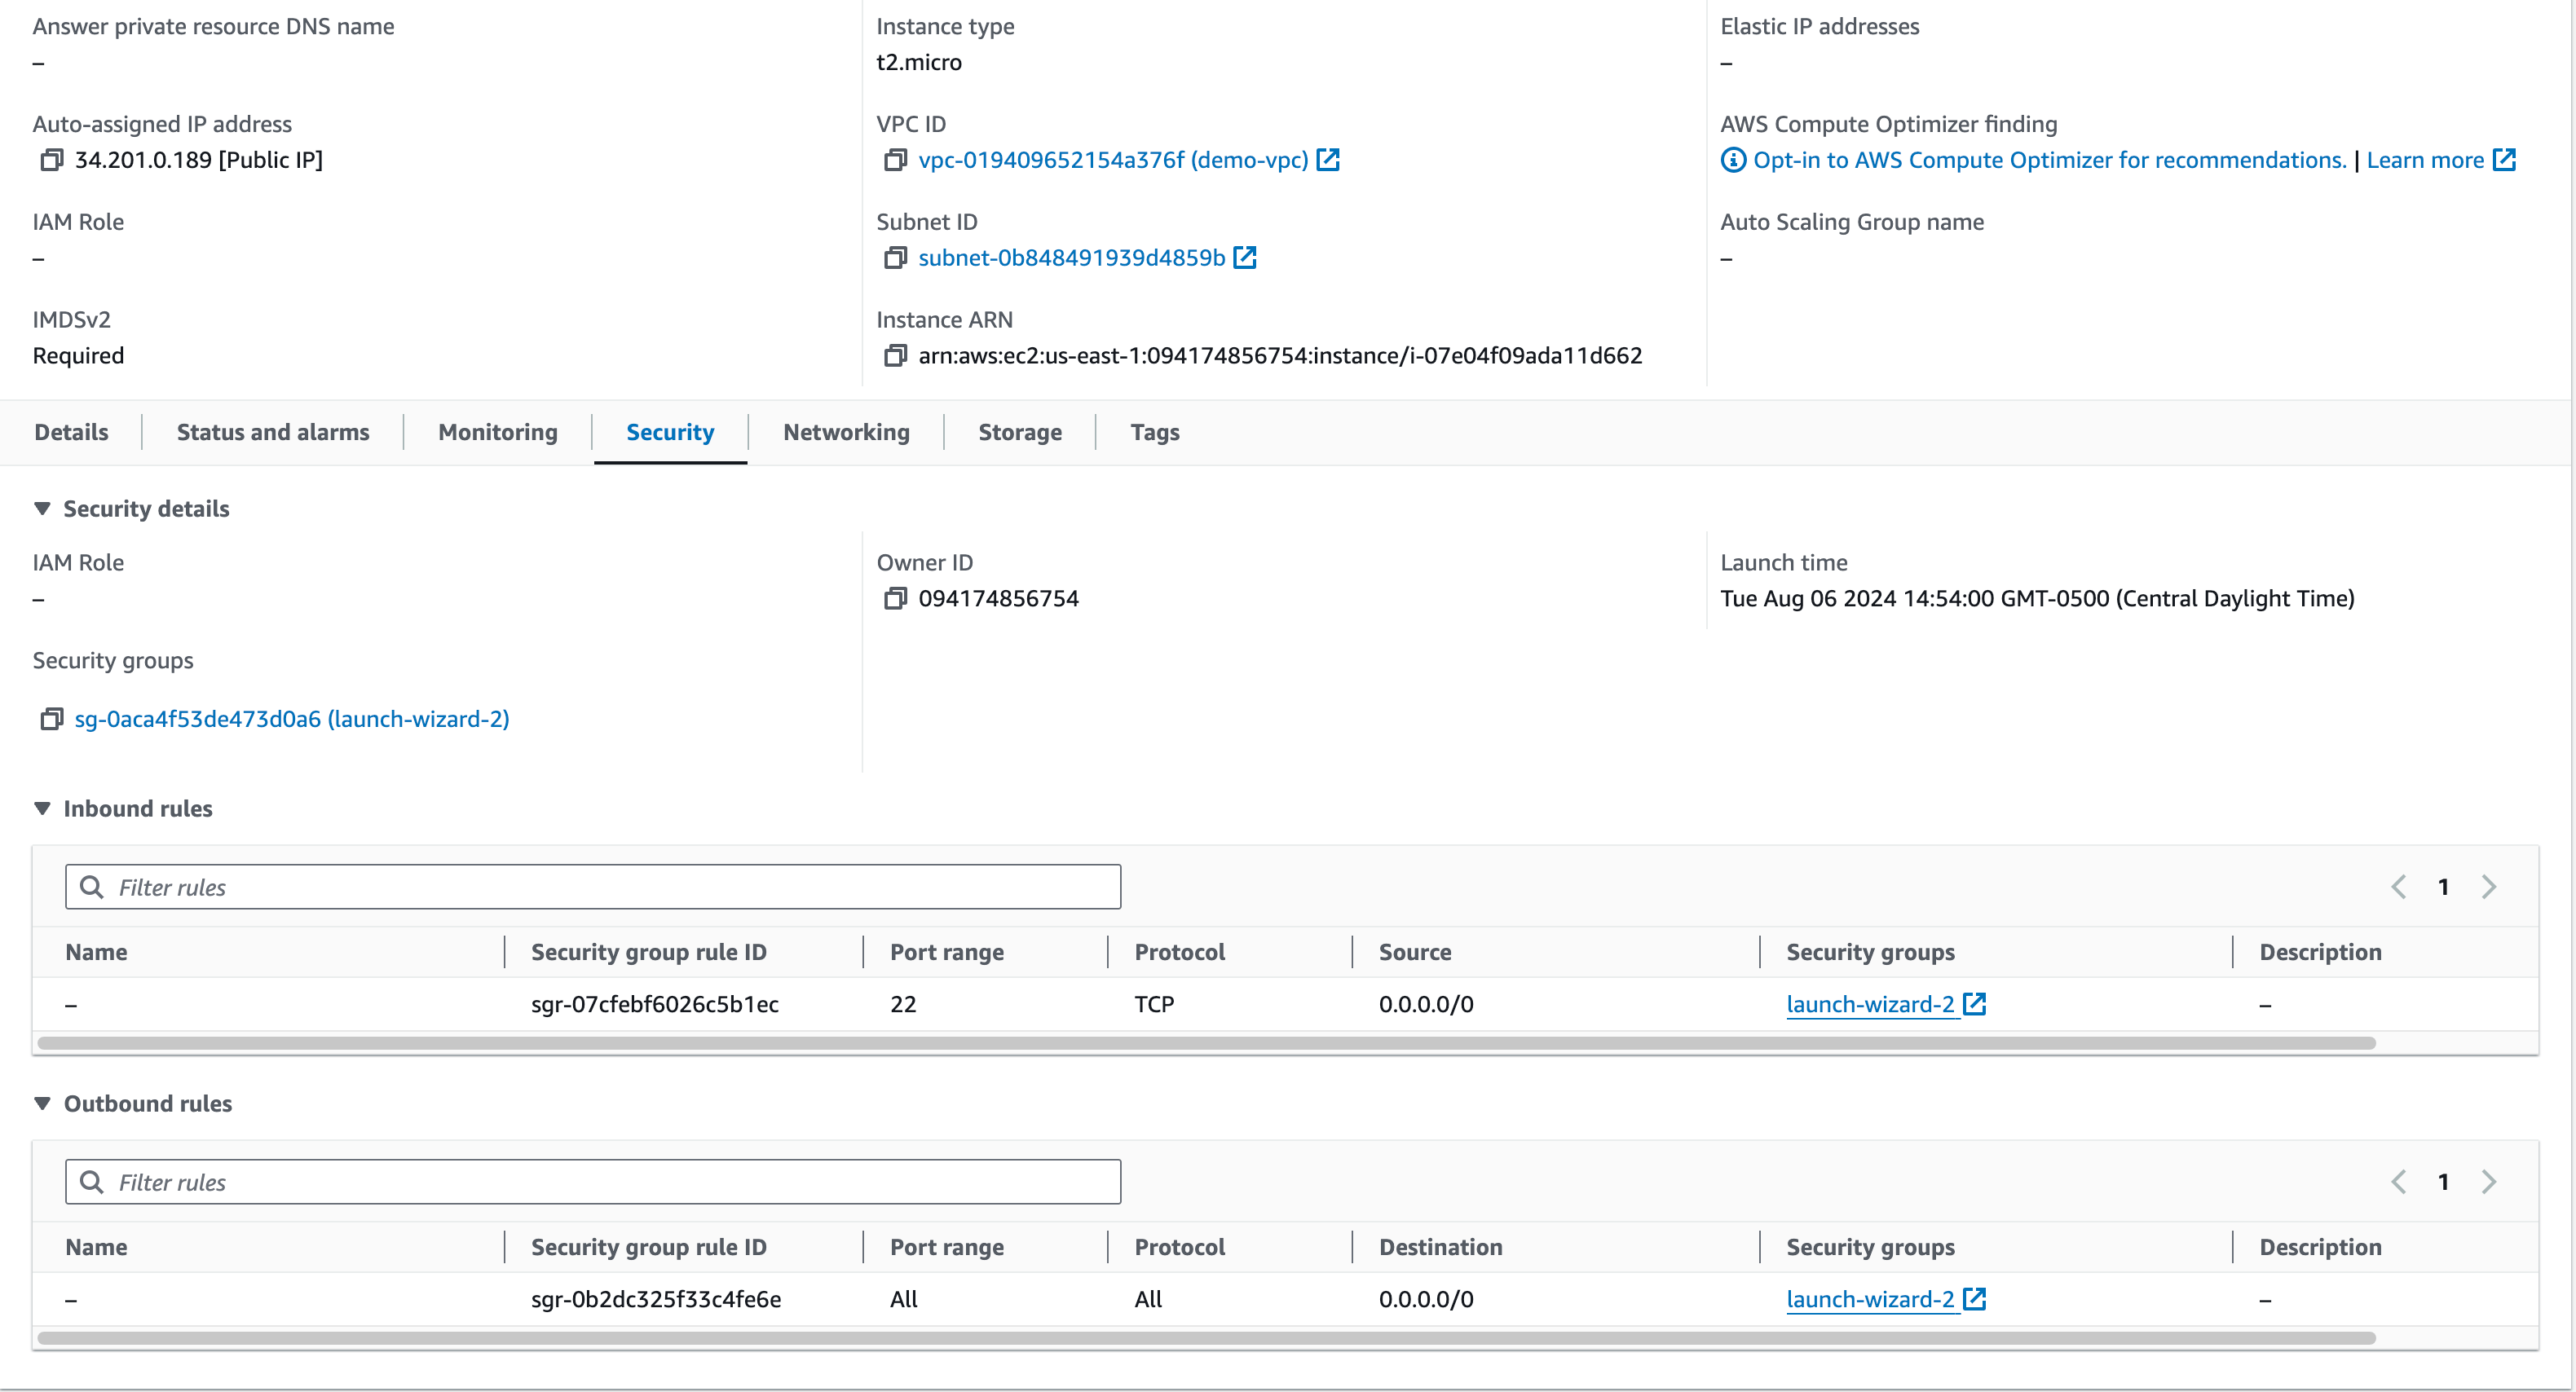
Peer in Cloud B
Similarly, this Droplet instance runs an apache server but only allows inbound SSH traffic.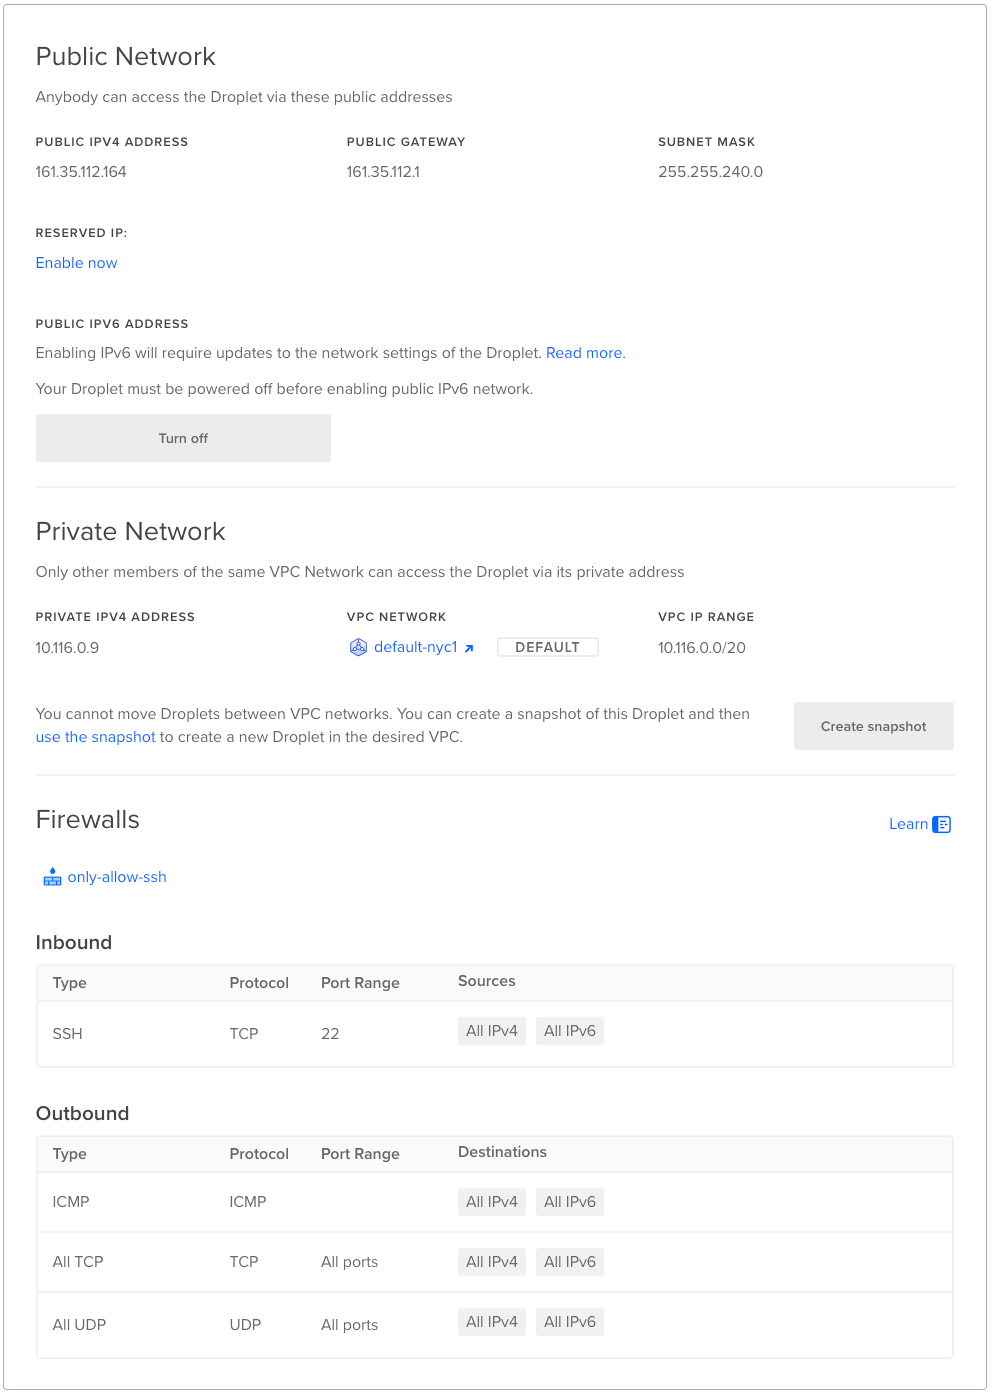
Cross Cloud Boundary
Despite of the firewall rule configs in the respective environments, Peer 1 is able to talk to Peer 2 over the WireGuard subnet. From Peer 1Use Case 2: Private Access to Other Telnyx Services
If a WGW is created withenable_sip_trunking, the WGW will enable routing for all Telnyx public API endpoints.
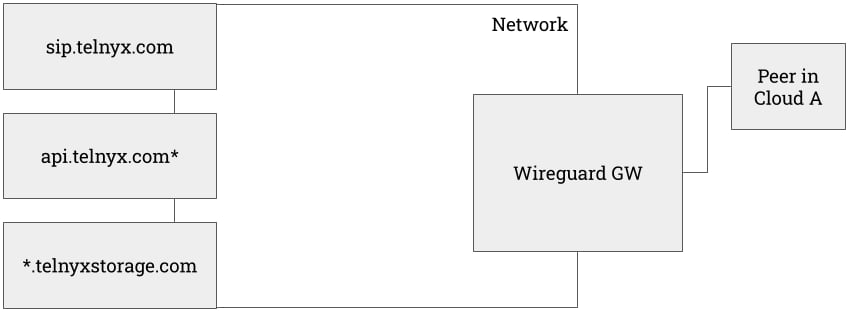
AllowedIPs.
Use Case 3: Cross-Region Network
The previous architecture can be extended to the following one.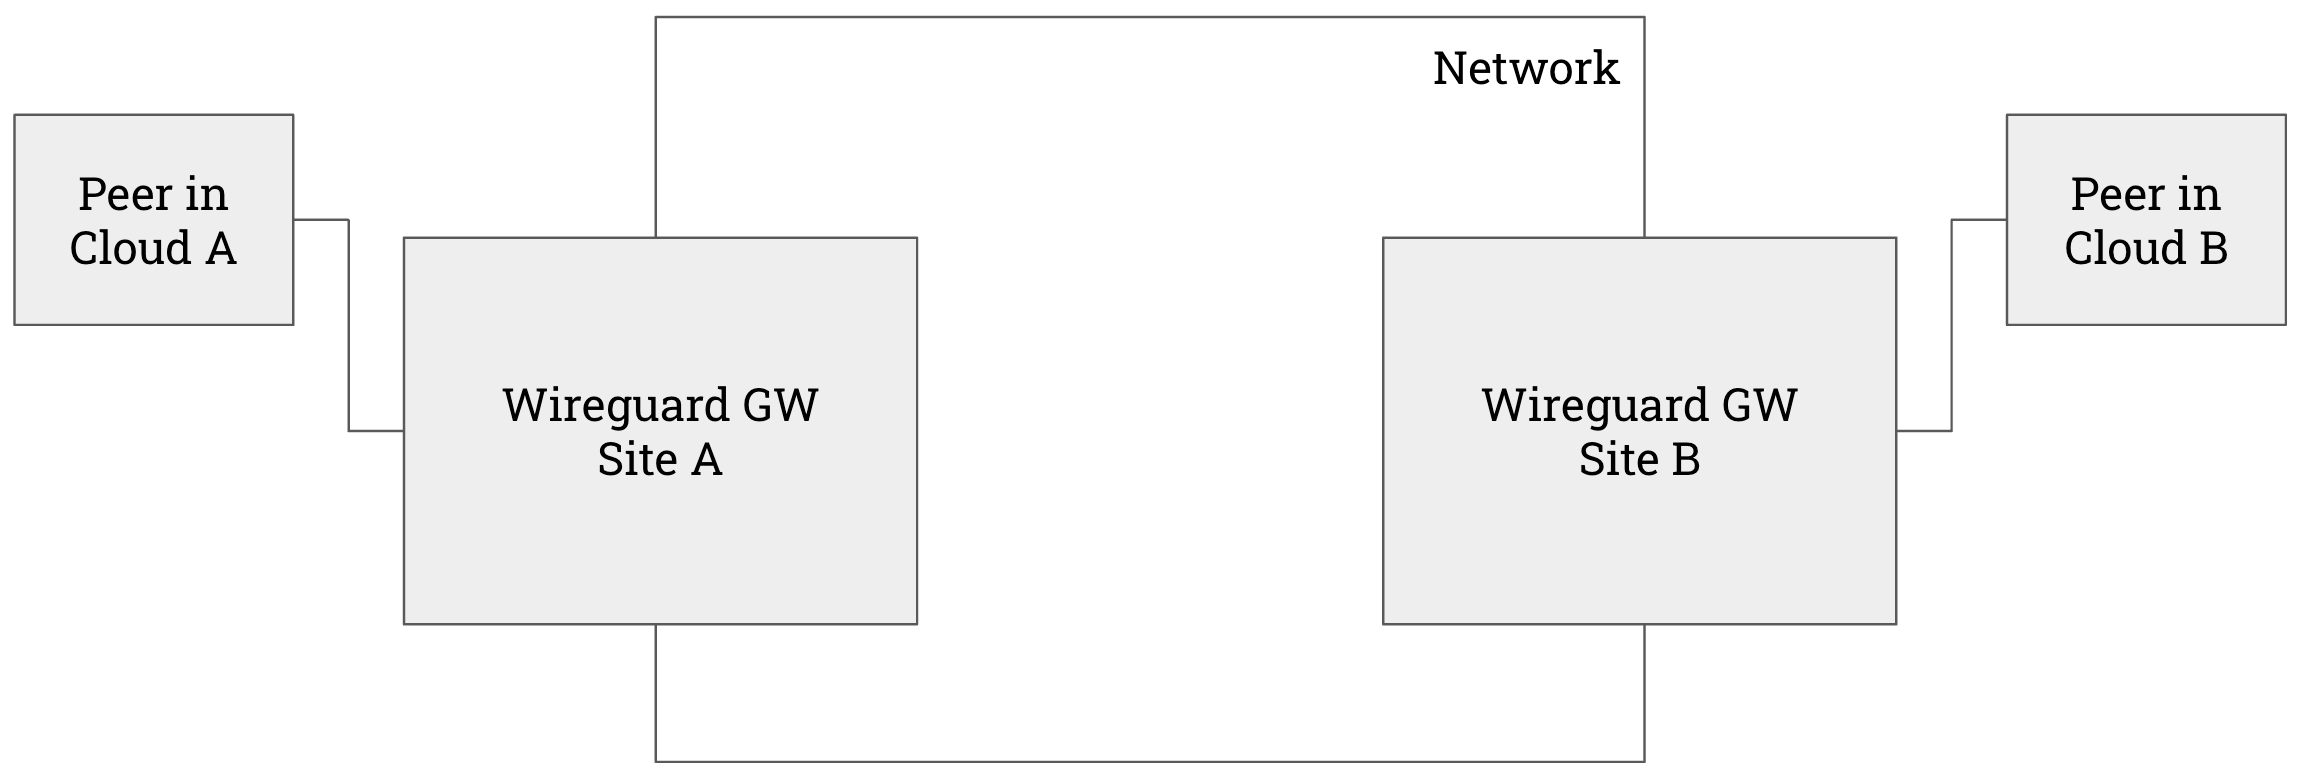
- Site A is Telnyx Ashburn
- Site B is Telnyx Amsterdam
- Cloud A is AWS
- Cloud B is Digital Ocean
Other use cases
- See Global IP (Coming Soon)
- See Internet Gateway (IGW) Guide
- See Private Wireless Gateway (PGW) Guide (Coming Soon)
Costs
- MRC for each WGW instance is $10.
- Connected Peers are free of charge.
API References
- WGW
- Peers
Linux Configuration
Source: https://developers.telnyx.com/docs/network/wireguard-peer-config/linux.md
Prerequisite
You come from here and have a.conf file ready.
Step 1: Install WireGuard
ubuntu@ip-10-10-11-10:~$ sudo apt install wireguard
Step 2: Bring up the Interface
Assuming the correct config file is located at/etc/wireguard/peer1.conf
Step 3: Validating and Testing
Next Steps
WireGuard Gateway (WGW) Guide outlines many use cases that may be valuable to you.macOS Configuration
Source: https://developers.telnyx.com/docs/network/wireguard-peer-config/macos.md
Prerequisite
You come from here and have a.conf file ready.
Step 1: Install WireGuard Client
From here, choose and install the macOS client.Step 2: Create a Tunnel
“Import Tunnel(s) from File…”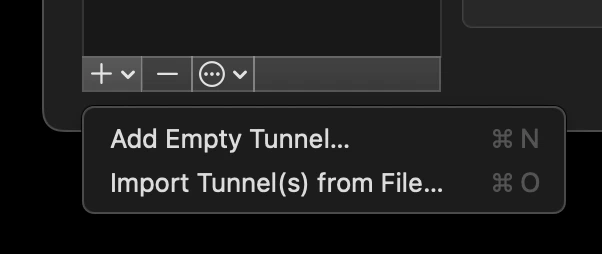
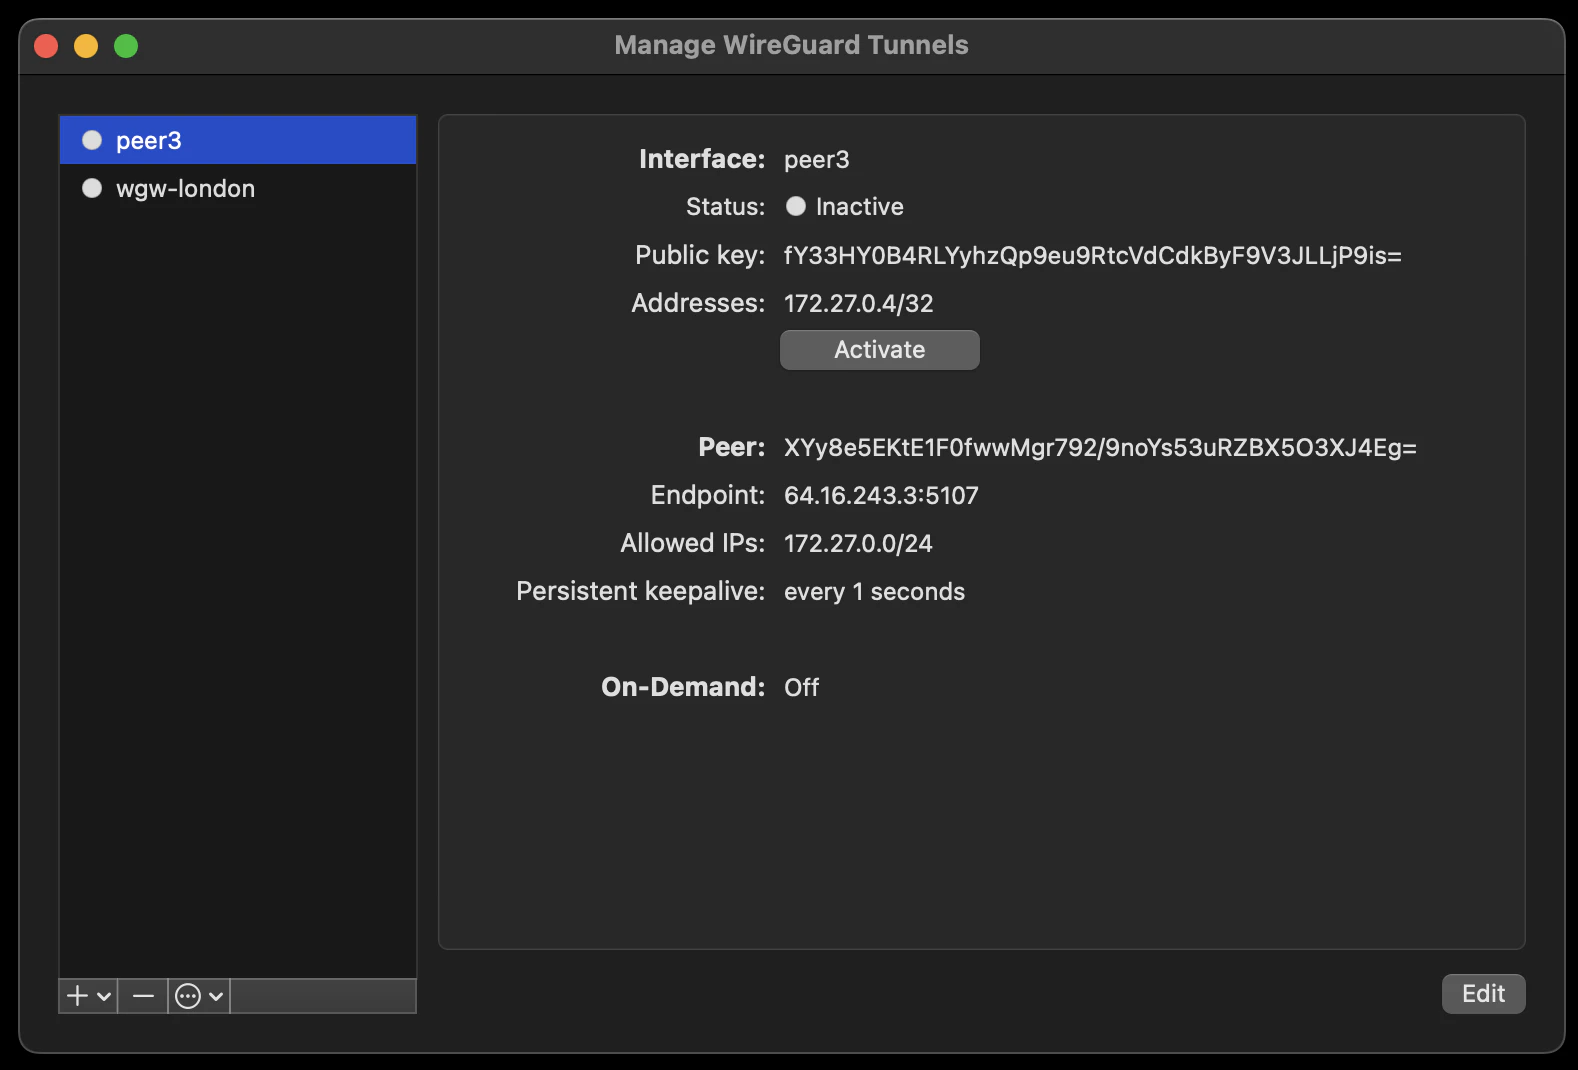
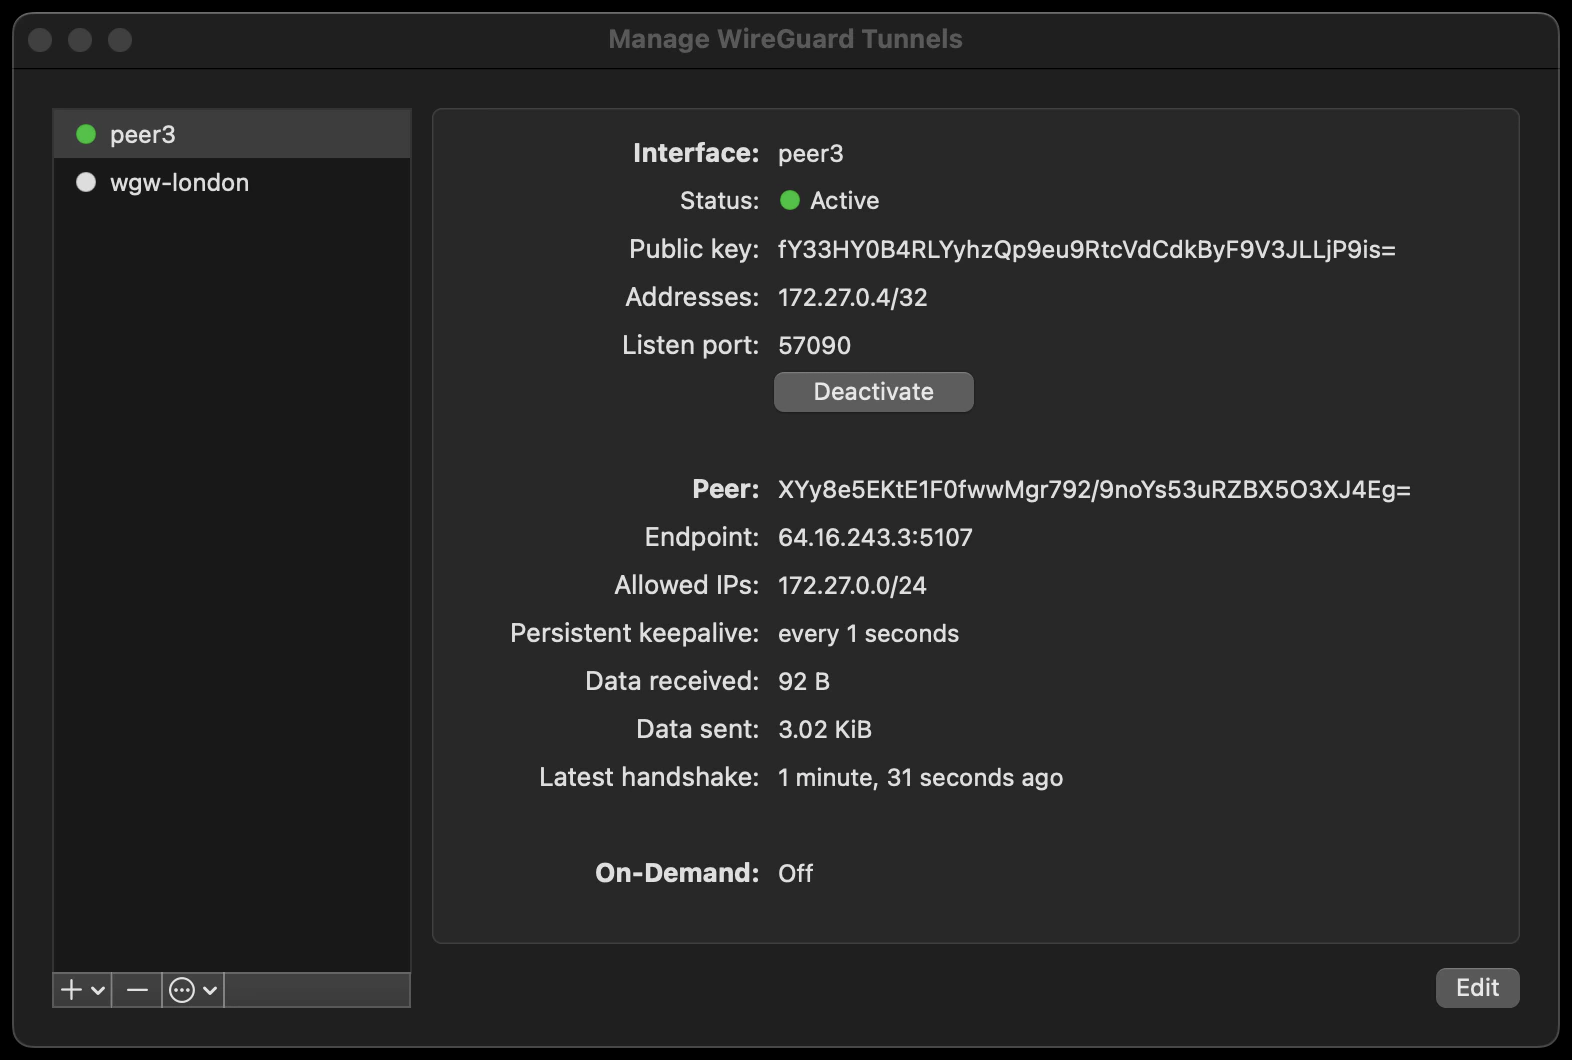
Step 3: Validating and Testing
A connected peer should be pingable.Next Steps
WireGuard Gateway (WGW) Guide outlines many use cases that may be valuable to you.Windows Configuration
Source: https://developers.telnyx.com/docs/network/wireguard-peer-config/windows.md
Prerequisite
You come from here and have a.conf file ready.
Step 1: Install WireGuard Client
From here, choose and install the Windows Installer.Step 2: Create a Tunnel
“Import Tunnel(s) from File…”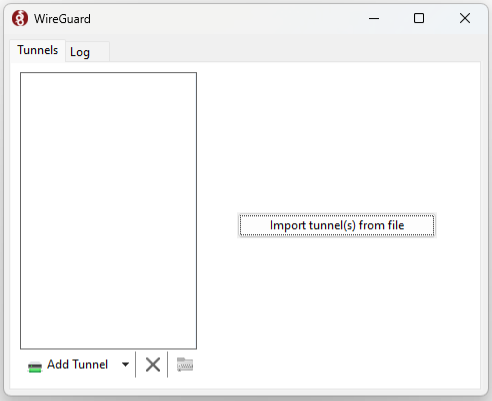
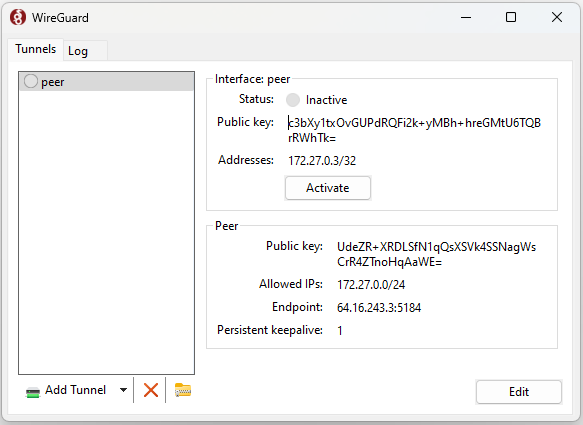
Step 3: Validating and Testing
You can try pinging to/from a connected peer. If that does not work you can also try to set up a barebones http server and hit it from the connected peer (or vice versa). An example barebones server in python:python3 server.py - assuming you saved the above example in a file named server.py) and reach it with a client / browser from the other peer:
Next Steps
WireGuard Gateway (WGW) Guide outlines many use cases that may be valuable to you.Internet Gateway (IGW)
Source: https://developers.telnyx.com/docs/network/gateways/internet-gateway.mdThis is a beta feature
Introduction
Internet Gateway (IGW) is an element that routes traffic between your Telnyx network and the internet. It is intended to be used with certain other elements.Creating an IGW
Step 1: Create a Network
Follow this guide.Step 2: Check for Coverage
Follow this guide. Usefilter[available_services][contains]=public_internet_gateway to look for a desired site at which to deploy the IGW. frankfurt-de is chosen for the subsequent steps.
Step 3: Create an IGW
Using the network created from Step 1 and the chosen region from Step 2, create the IGW. Once an IGW is created on a specific network, it cannot be “migrated” to another one; it needs to be recreated on the other network. Double check the correctnetwork_id is used in the following API request.
provisioning.
Step 4: Wait for Status Transition
The expected time for status to transition to provisioned is approximately 10 minutes. You can poll the IGW to check for status.Use Cases
Use Case 1: Pure play VPN
Internet Gateway (IGW) can be used with WireGuard Gateway (WGW) to create a simple VPN service.- Set up an IGW
- Set up a WGW and a peer.
- On the peer, amend its config with:
DNS— choose your resolver. In the following example, 8.8.8.8 is chosen.AllowedIPs— append with0.0.0.0/0so that reachability is beyond the private subnet.
Use Case 2: IGW + Private Wireless Gateway (PWG)
Coming Soon.Costs
- The monthly recurring cost (MRC) for each instance of IGW is $50.
- Traffic is not currently metered in beta phase. We will meter traffic in GA phase.
API References
Private Wireless Gateway (PGW)
Source: https://developers.telnyx.com/docs/network/gateways/private-wireless-gateway.md
Introduction
Private Wireless Gateway (PGW) is an element that routes traffic between a group of Telnyx SIMs and other network elements. Refer to this guide for more information on PGW.Creating a PGW
Step 1: Create a Network
Follow this guide.Step 2: Check for Coverage
Follow this guide. Usefilter[available_services][contains]=private_wireless_gateway to look for a desired site at which to deploy the WGW.
Currently, Ashburn, VA is the only supported site. We are working on making more sites available.
Step 3: Create a PGW
Once a PGW is created on a specific network, it cannot be “migrated” to another one; it needs to be recreated on the other network. Double check the correct network_id is used in the following API request.provisioning.
Step 4: Wait for Status Transition
The expected time forstatus.value to transition to provisioned is approximately 15 minutes. You can poll the PGW to check for status.
Step 5: Attach a SIM Group
The PGW is of little use when there is no SIMs are attached to it. Individual SIM must be added to a SIM group which then can be attached to the PGW. This is easily accomplished on the Mission Control Portal. PGW will show the SIM group after a successful attachment.Use Cases
In the following examples, abbreviations are consistently used for brevity.- PWG = Private Wireless Gateway
- WGW = WireGuard Gateway
- IGW = Internet Gateway
- VXC = Virtual Cross Connect
Use Case 1: PWG + WGW
We will construct this architecture which is useful when- Traffic to and from SIMs needs to be segmented and private, and
- They do not need high bandwidth connection back to your internal service.
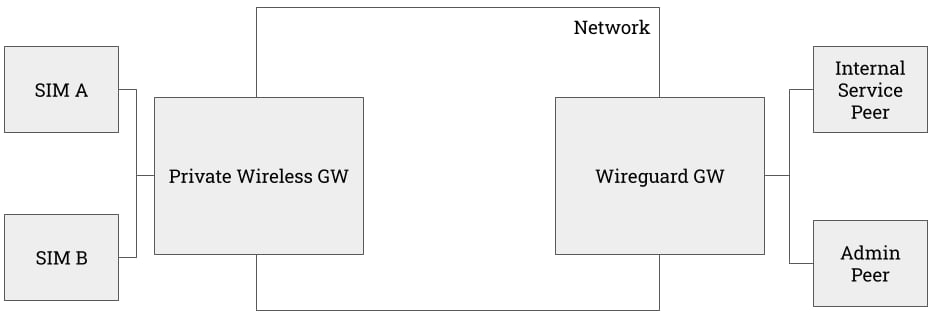
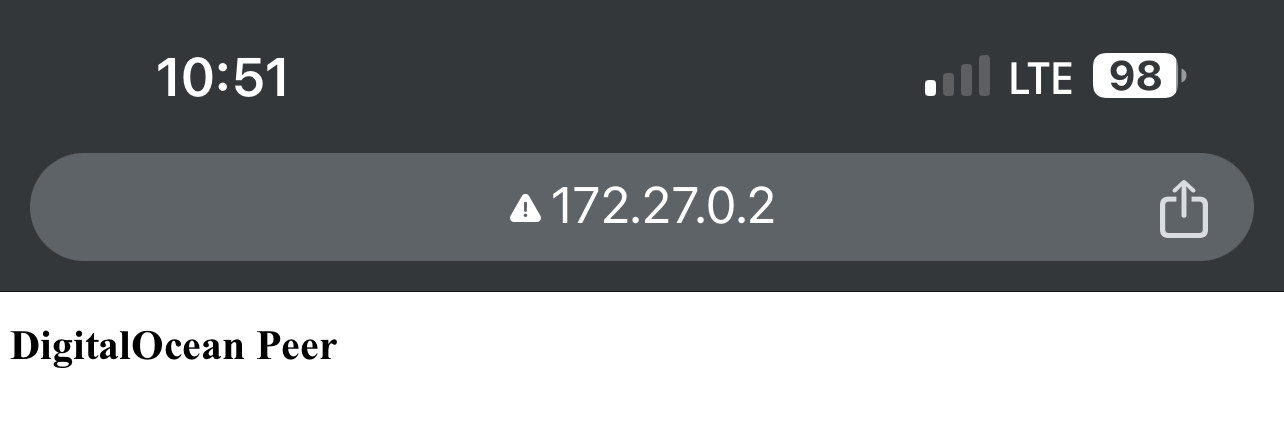
- The connected device is an iPhone.
- It only has access to the peers attached to the WGW; there exists no default route for them.
- Internal Service Peer is a Droplet on DigitalOcean that runs an toy Apache web server.
- Admin Peer is a local host.
AllowedIPs of the [Peer] config.
Use Case 2: PWG + WGW + IGW
The above architecture lacks a crucial functionality --- internet reachability. Though a workaround can be constructed by using one of the peers as an exit node for all default traffic, it’s far better to attach an IGW to the network.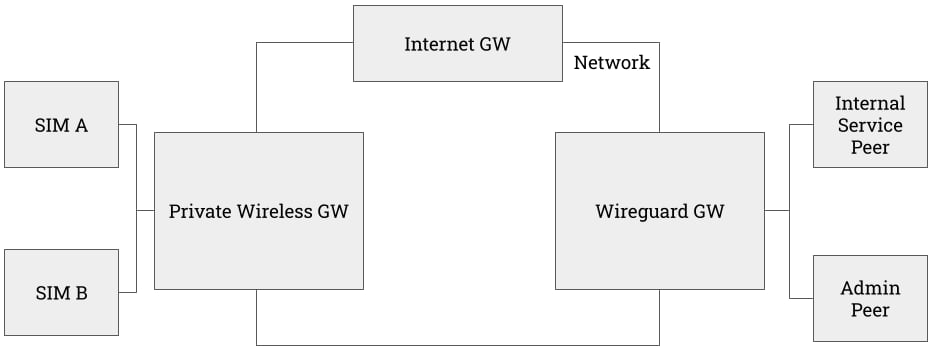
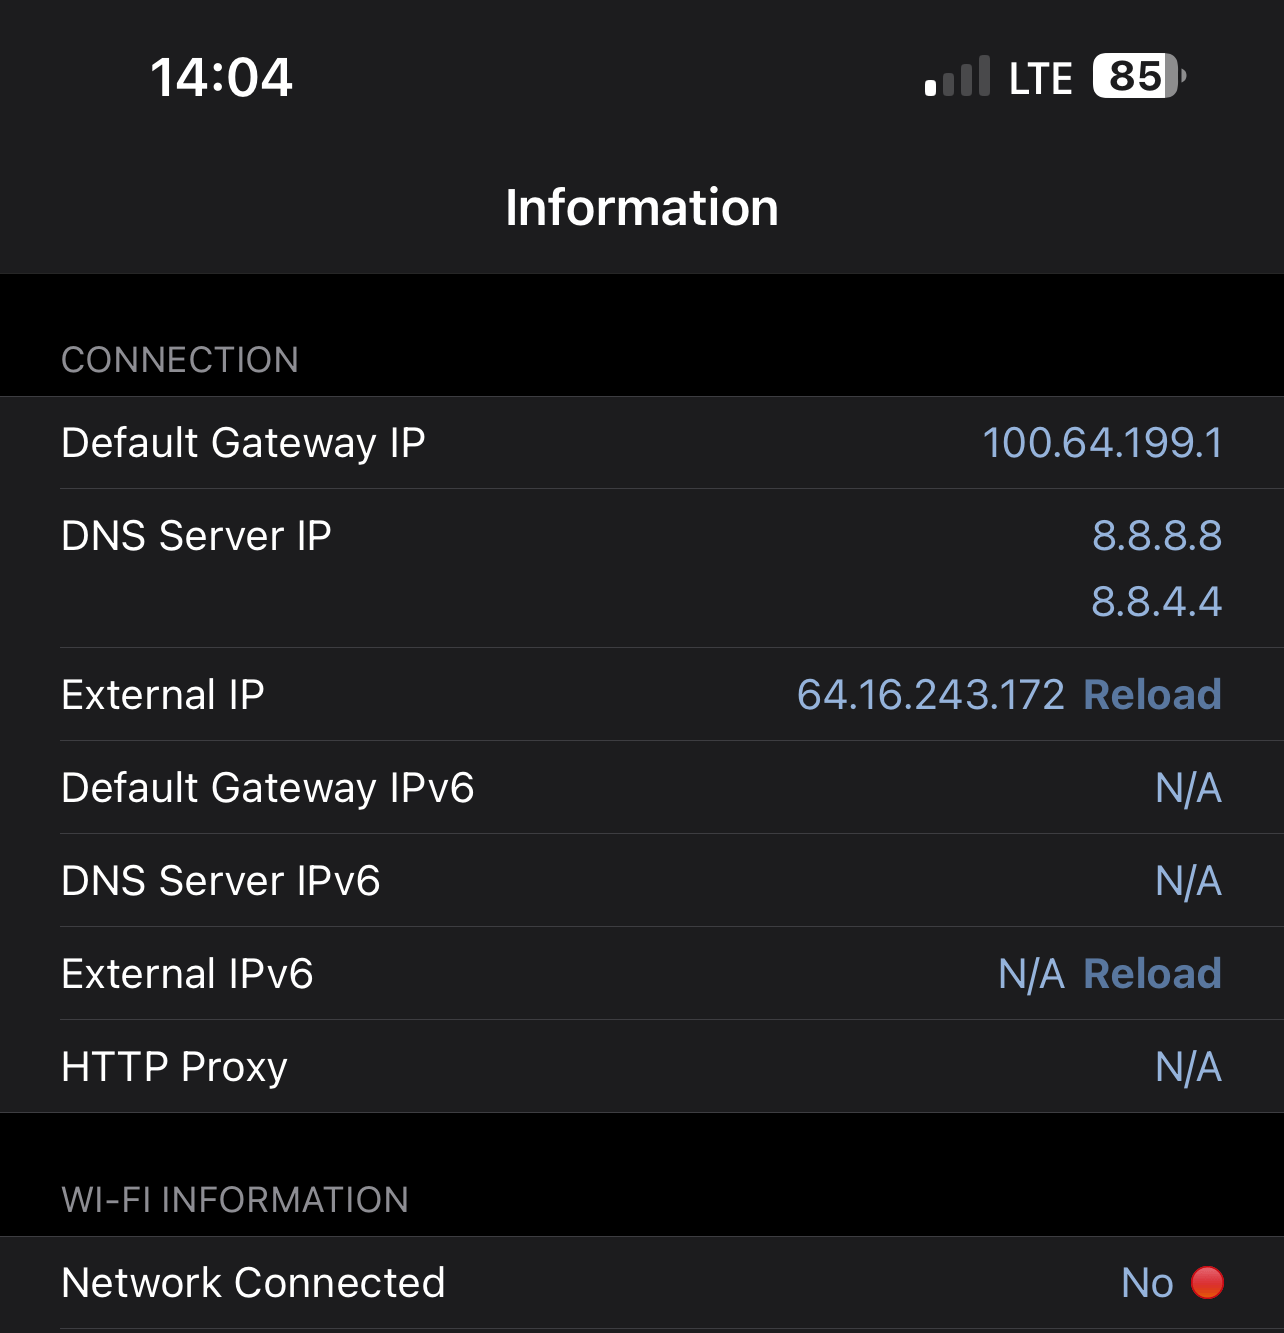
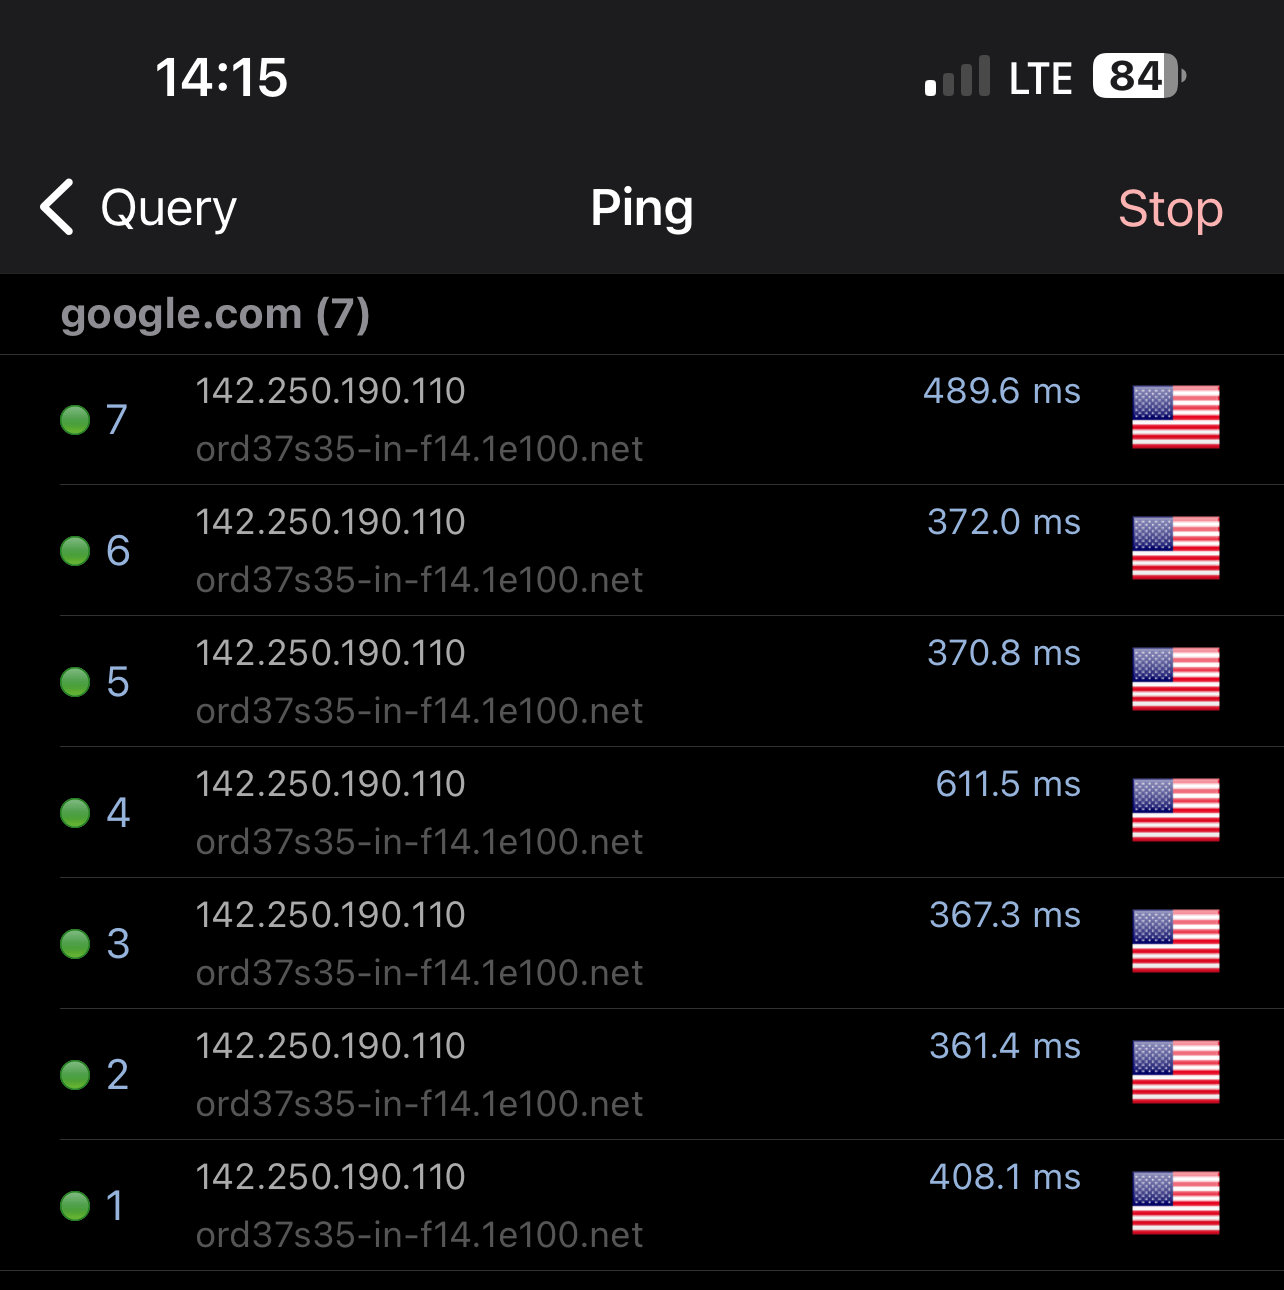
- the iPhone’s wifi is turned off
- its “Default Gateway IP” is
100.64.199.1which is that of the PGW - its “External IP” is
64.16.243.172which is that of the IGW - it can ping
google.com
Use Case 3: PWG + WGW + IGW + VXC
Currently, the PWG + WGW + IGW + VXC combination only works when WGW, IGW, and VXC are at the Frankfurt Site. We are working on expanding the coverage so it will work universally across all Telnyx sites. In the case where the user’s internal services reside in a cloud provider, the architecture can be augmented yet again. In this case, a VXC can be attached to the network to accommodate this scenario. In the following example, we will establish- a VXC from AWS
eu-central-1 - an EC2 in AWS
eu-central-1running a toy Apache server.
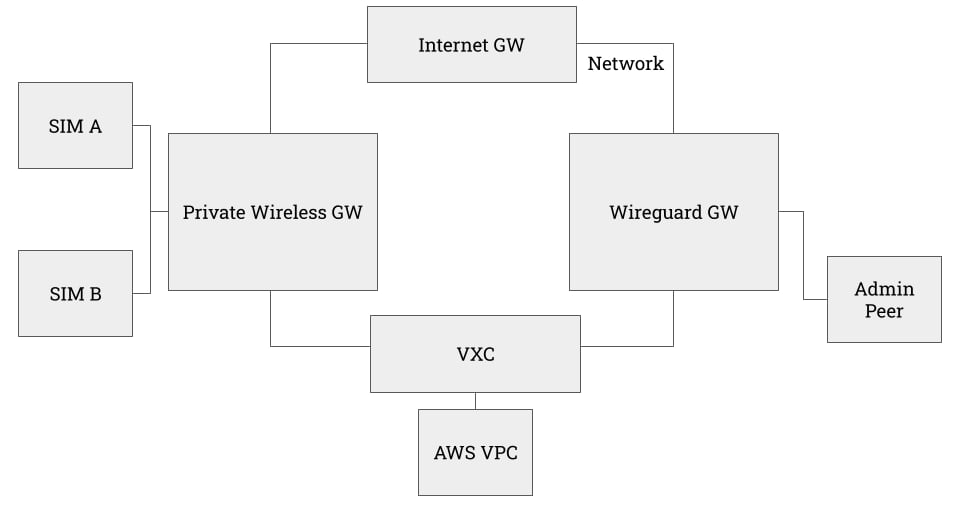
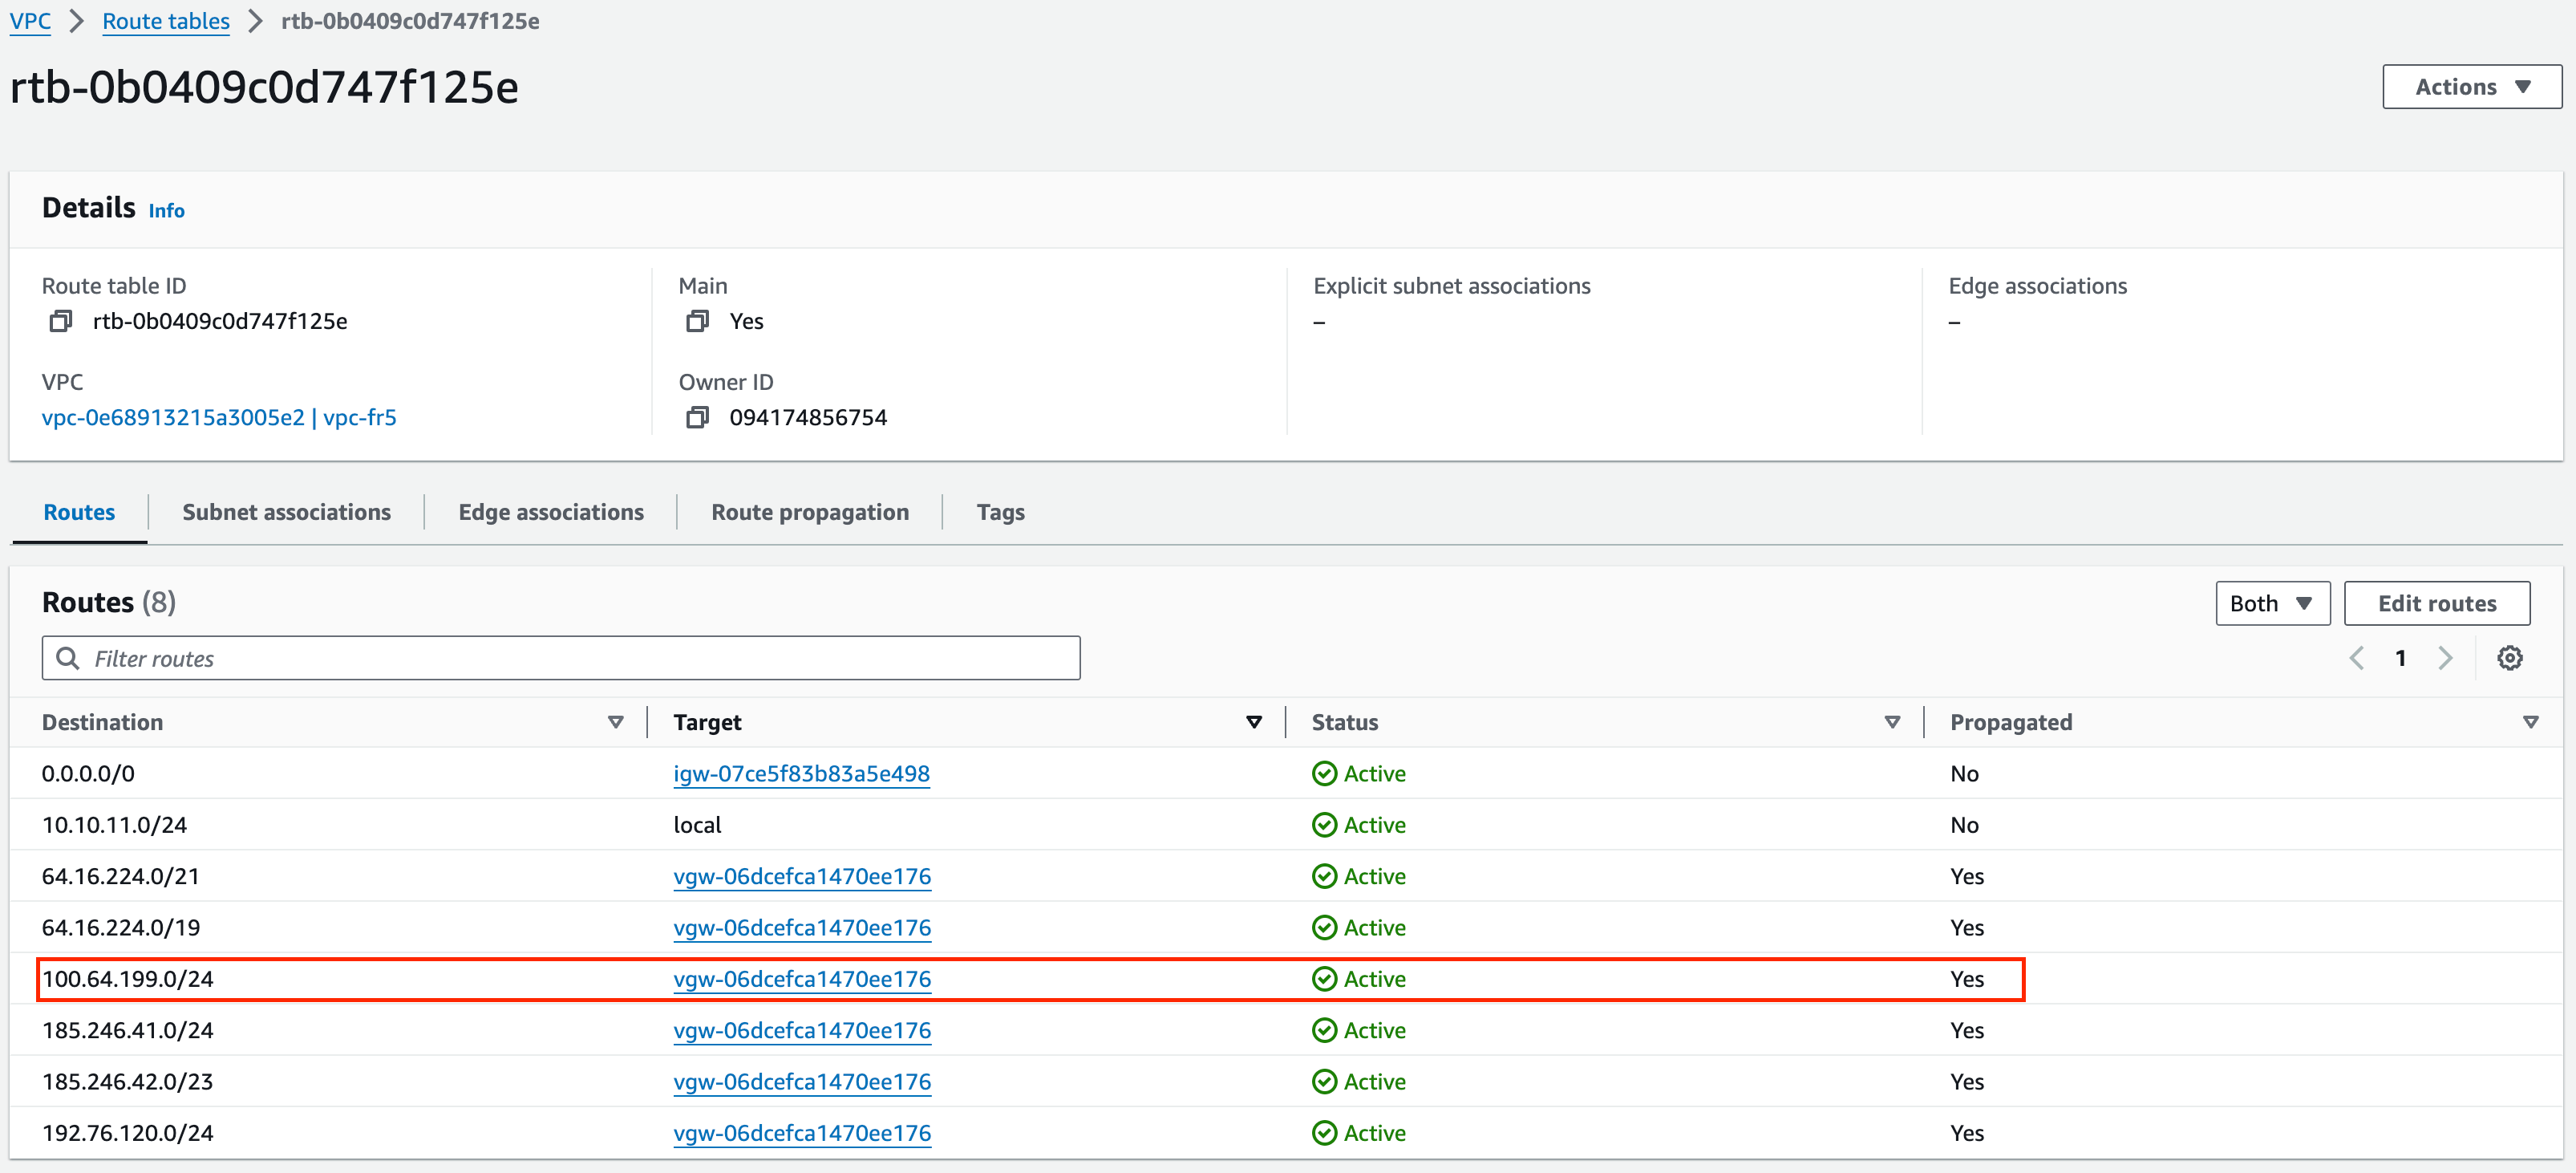
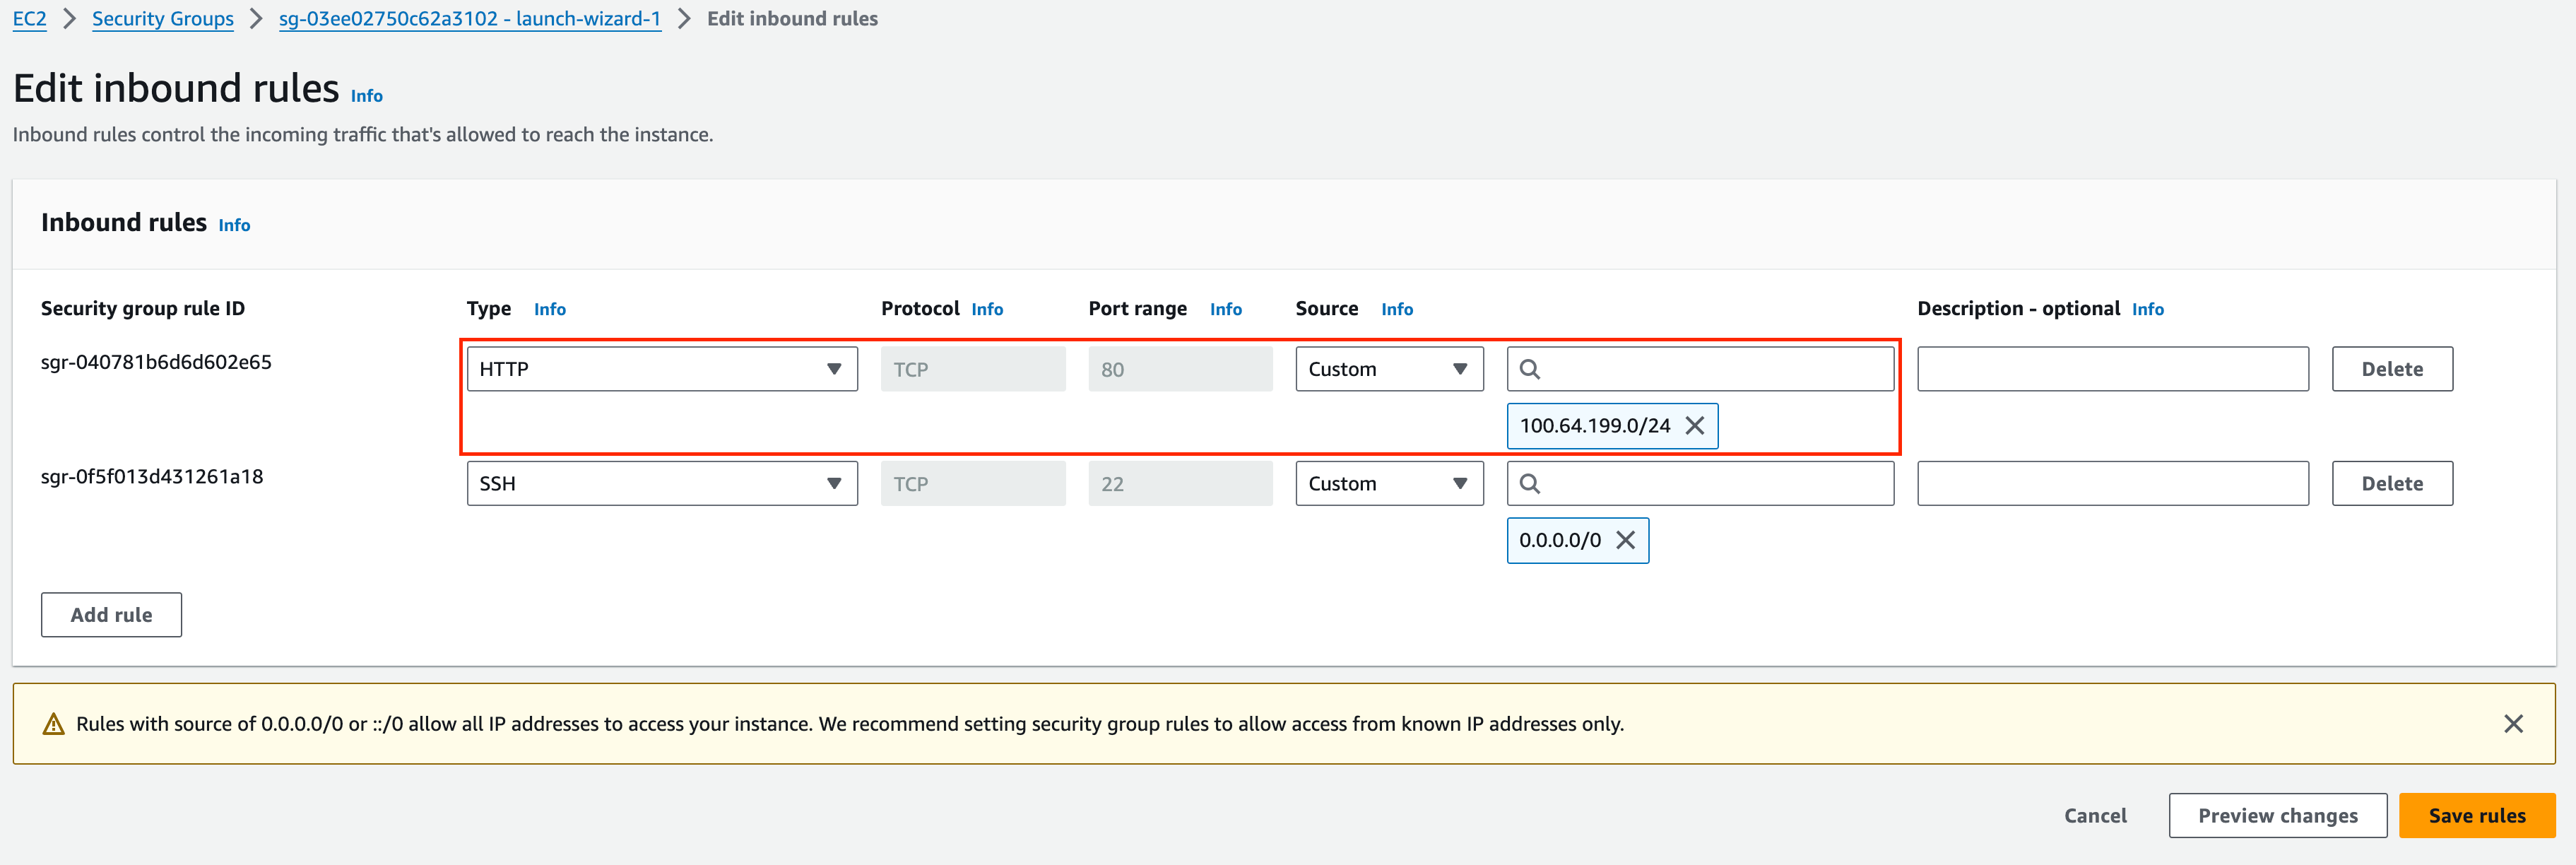
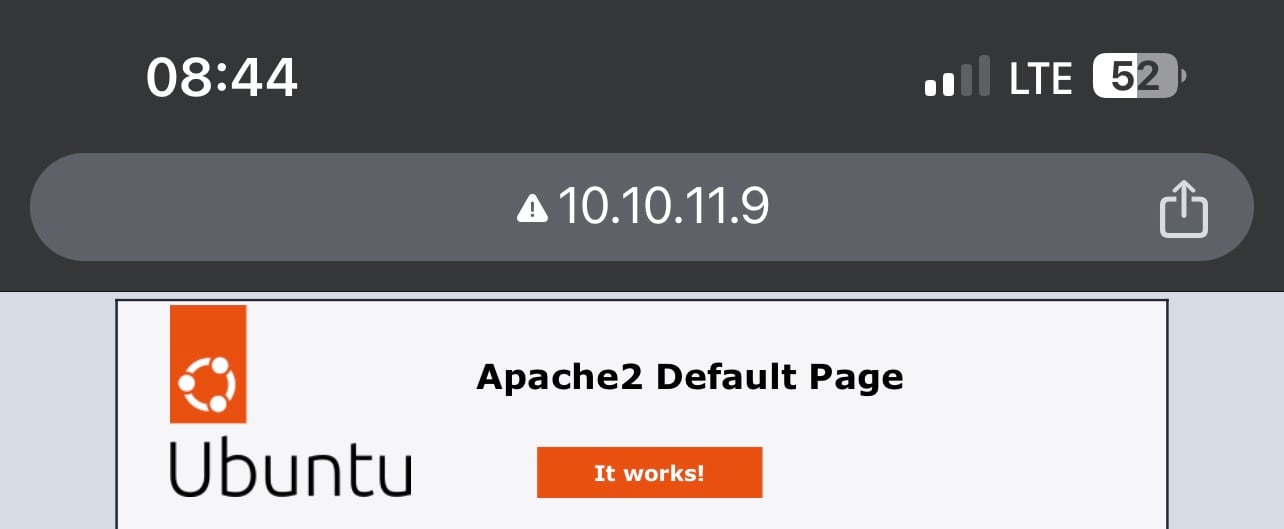
traceroute output from within the EC2 instance. Latency is high as expected since the EC2 is in Frankfurt while the device is attached to a PGW in Ashburn.
Costs
- The monthly recurring cost (MRC) for each instance of PGW is $100.
- Additional costs on SIM and data are applicable as well. Consult this guide for more detail.
API References
VXC Introduction
Source: https://developers.telnyx.com/docs/network/vxc/intro.mdThis guide first gives an overview of the product’s availability, costs, and the general API structure. Subsequently, it branches into cloud provider specific guides. The reader should only concern themselves with the section about the cloud provider that’s relevant to their use case.
Coverage & Availability
Source: https://developers.telnyx.com/docs/network/vxc/coverage.mdRefer to the coverage API to ensure the desired resource is offered at the desired region.
Pricing
Source: https://developers.telnyx.com/docs/network/vxc/cost.mdYou will be charged by Telnyx AND your cloud provider. Telnyx charges an MRC for each VXC instance according to the following schedule, which may change at our discretion according to the general T&C. We can neither interpret nor advise how your cloud provider may charge your account. Please consult your cloud provider’s documentation.
AWS
GCP
Azure
VXC API
Source: https://developers.telnyx.com/docs/network/vxc/api.mdThe API resource in question is
/v2/virtual_cross_connects. The following group of parameters needs to be provided regardless of the cloud provider.
The rest of the parameters are cloud provider specific. Please consult the subsequent sections.
AWS Direct Connect
Source: https://developers.telnyx.com/docs/network/vxc/aws.md
Architecture
We will construct the following architecture: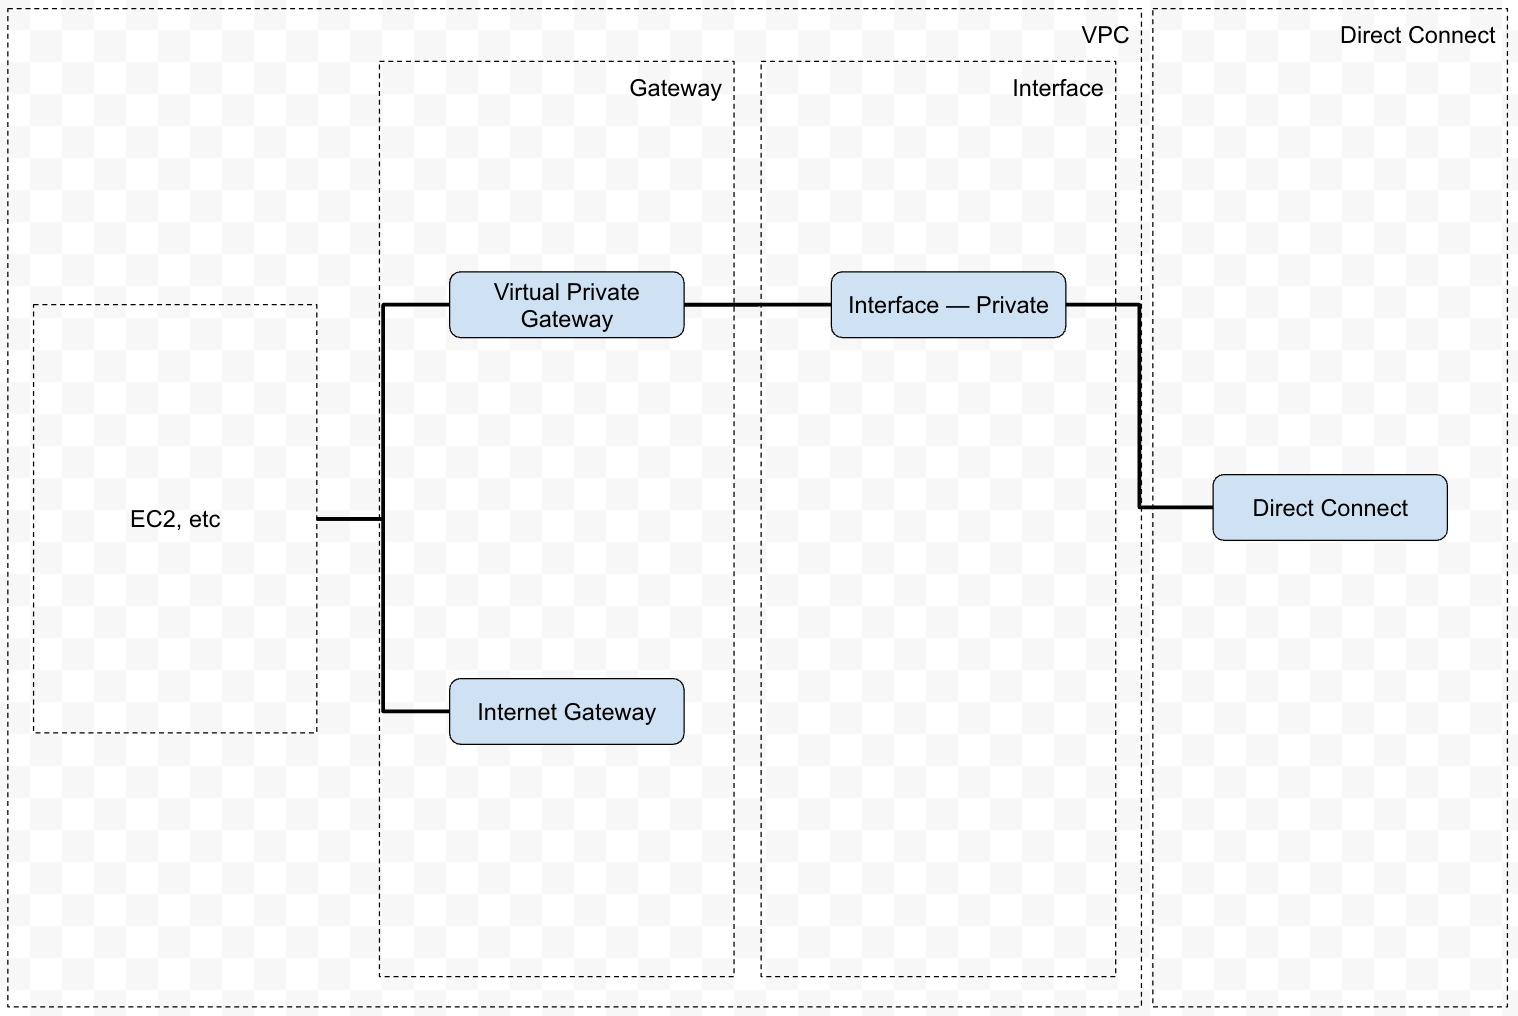
Prerequisites
VPC
This step is performed on AWS.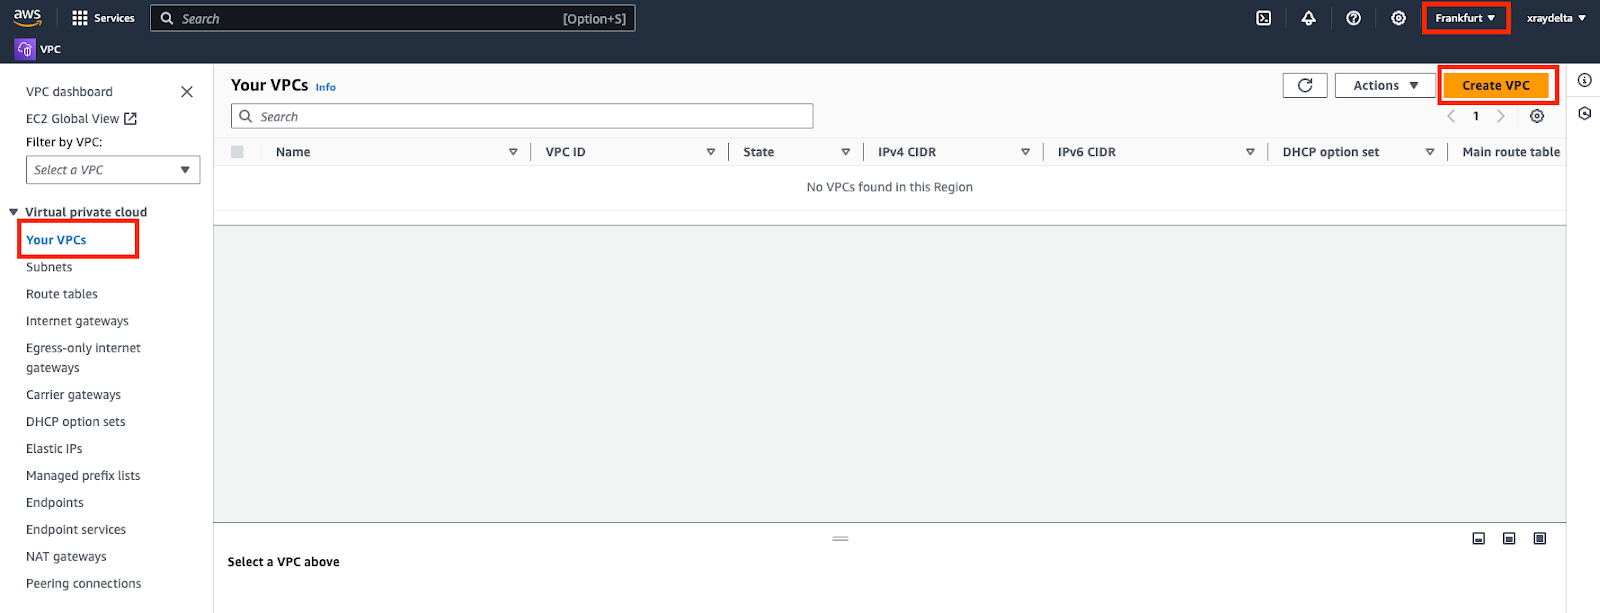
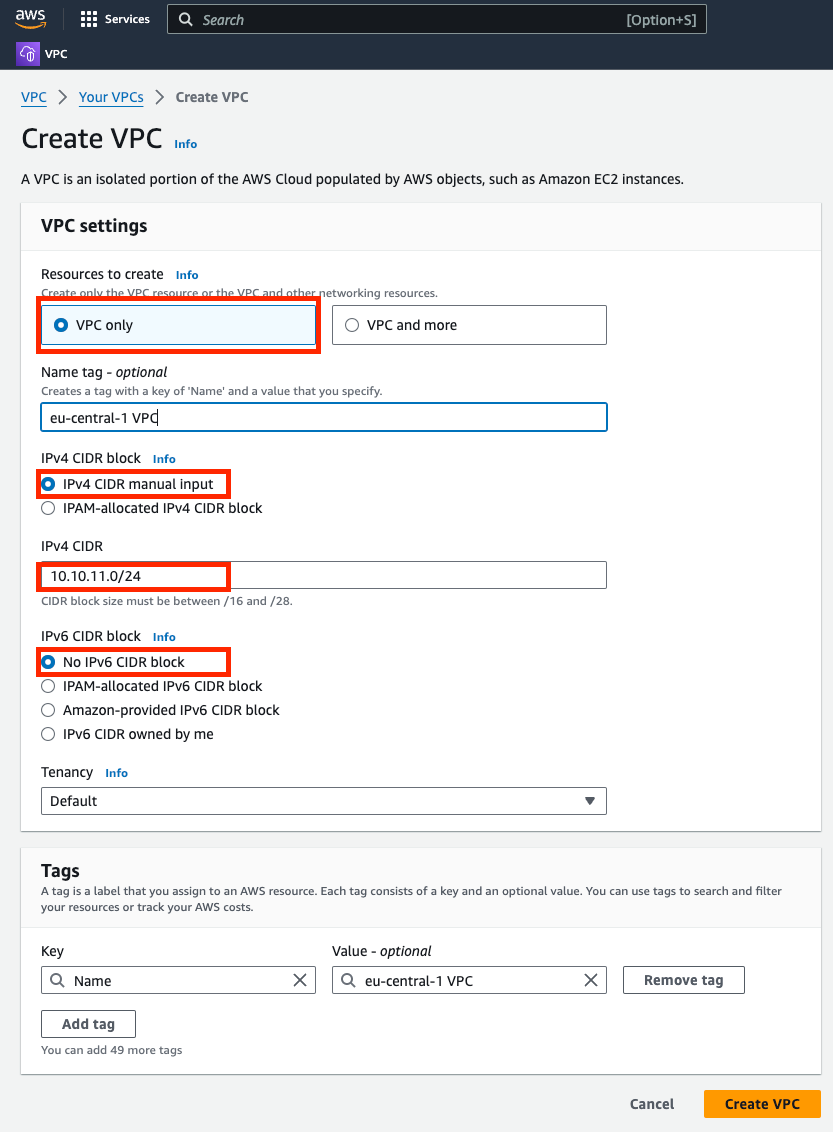
Virtual Private Gateway
This step is performed on AWS. Create and attach a virtual private gateway to the VPC created.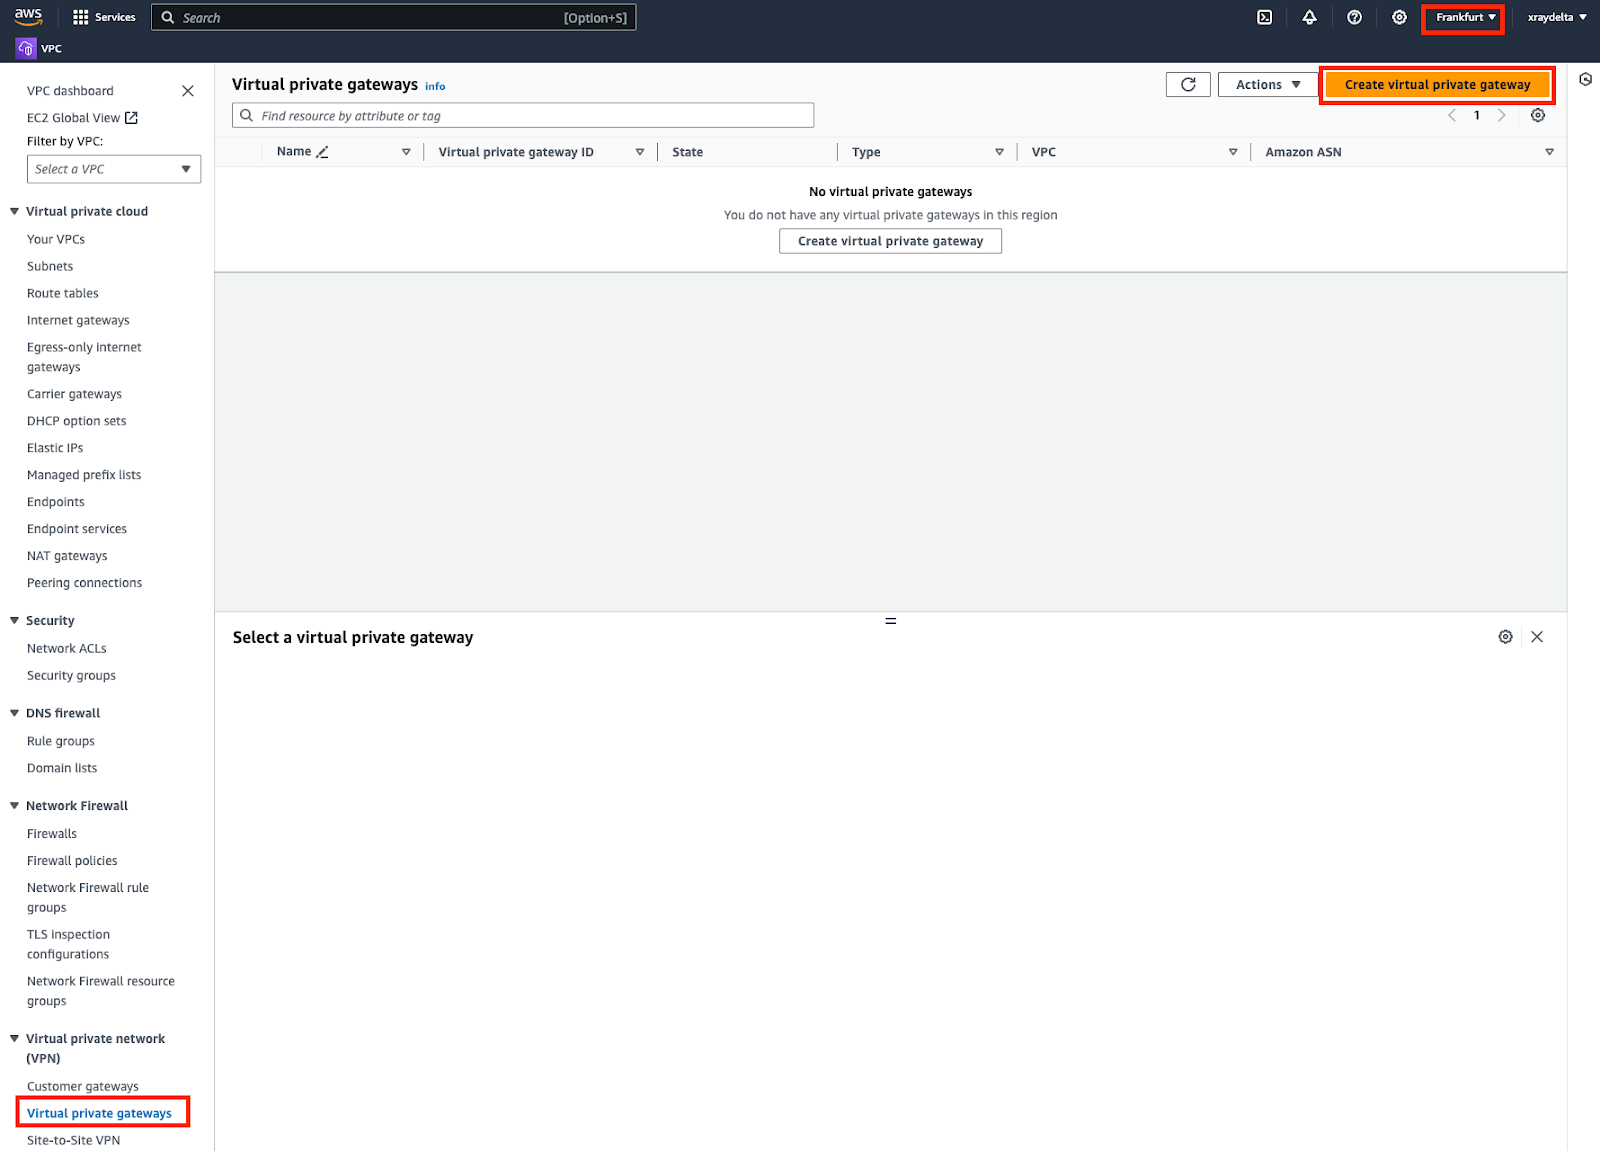
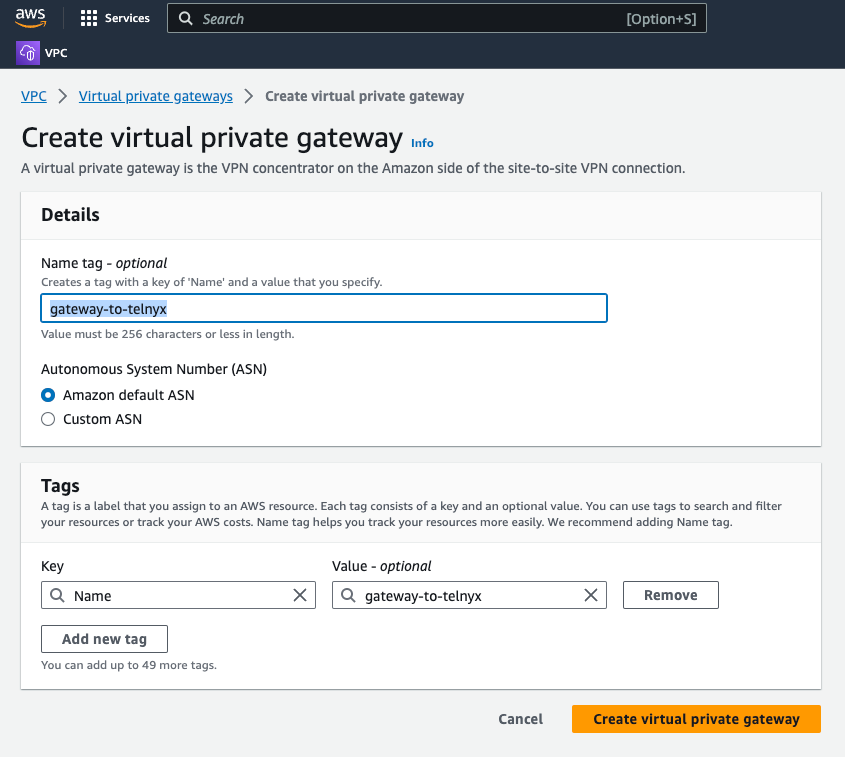
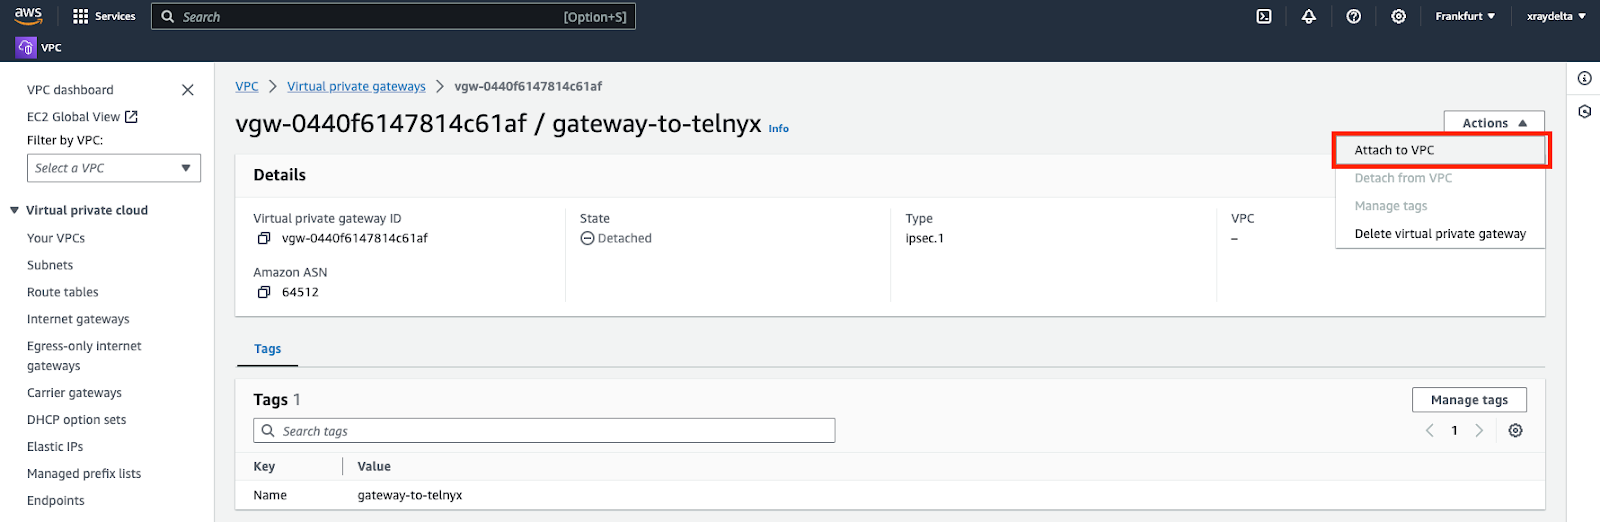
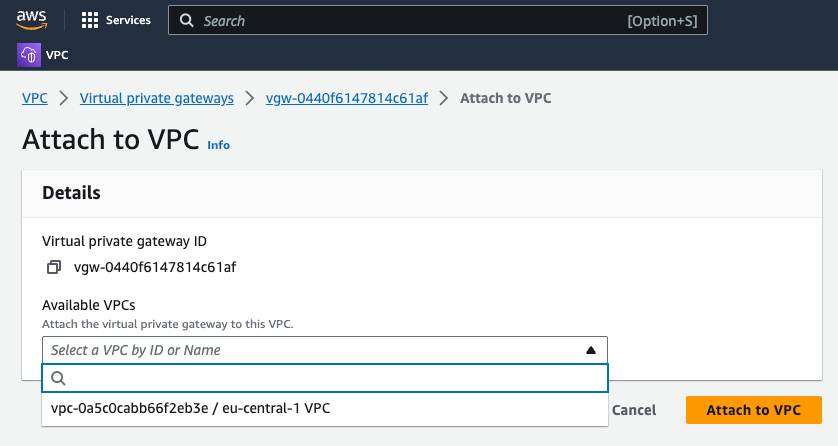
VPC Route Table
This step is performed on AWS.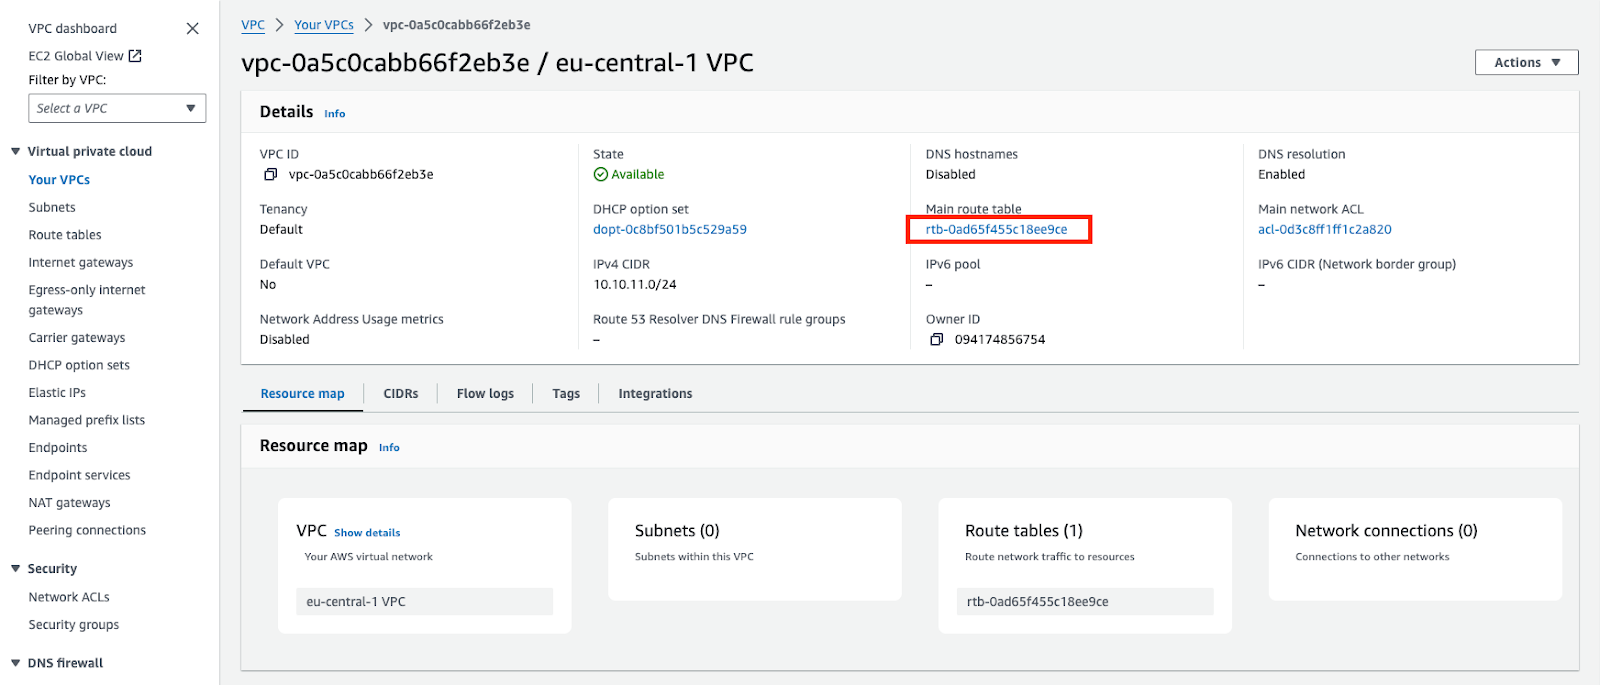
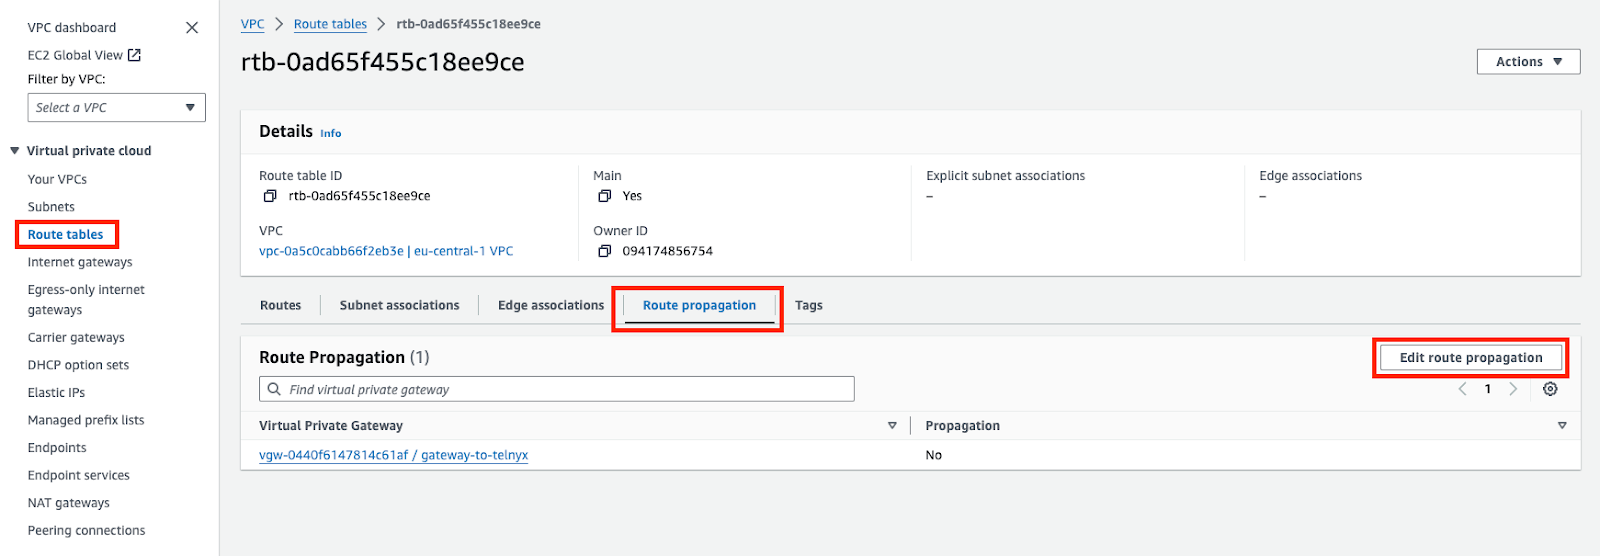

Internet Gateway
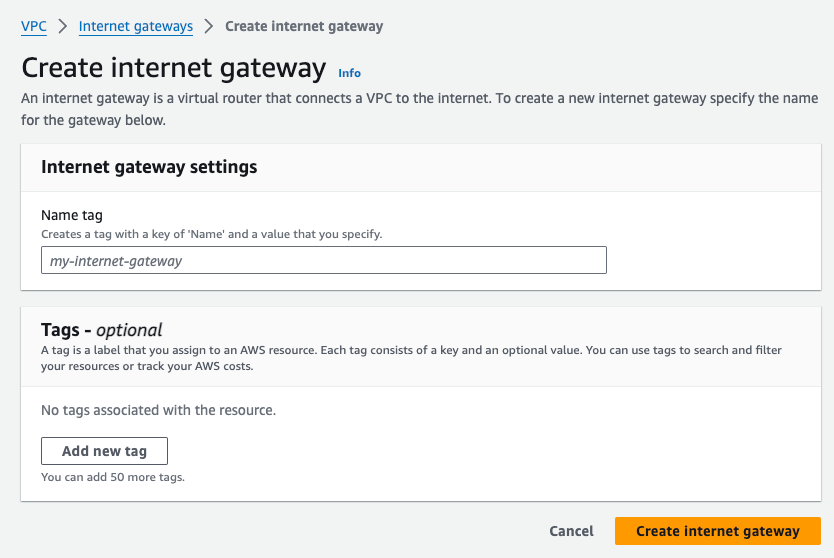
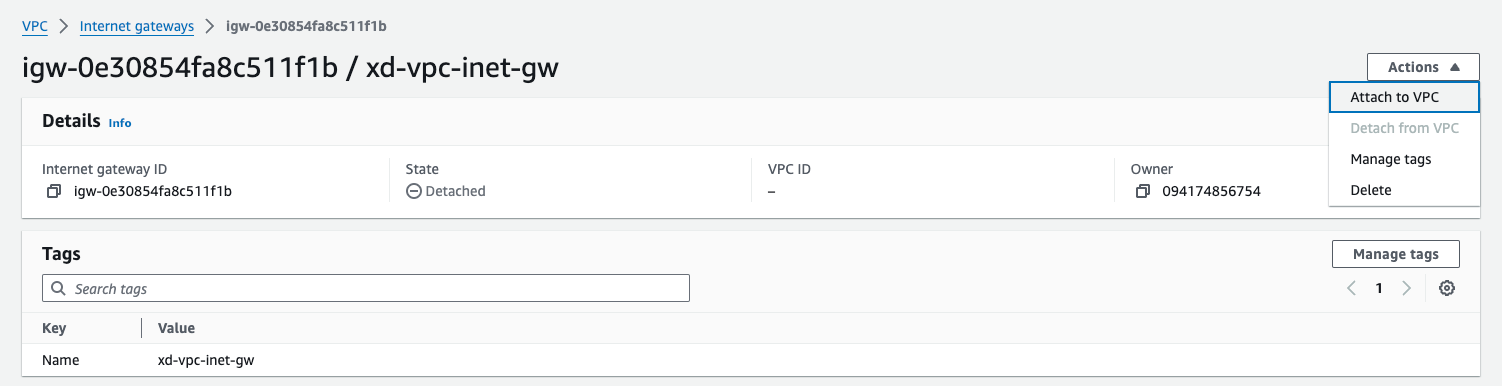
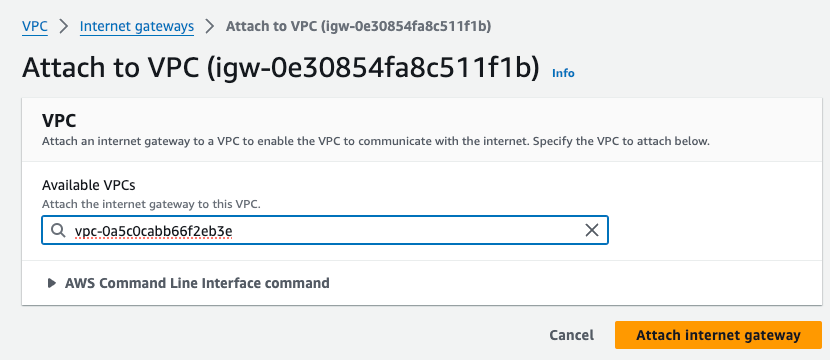
This step is performed on AWS. This is optional. Create and attach an internet gateway to the VPC created.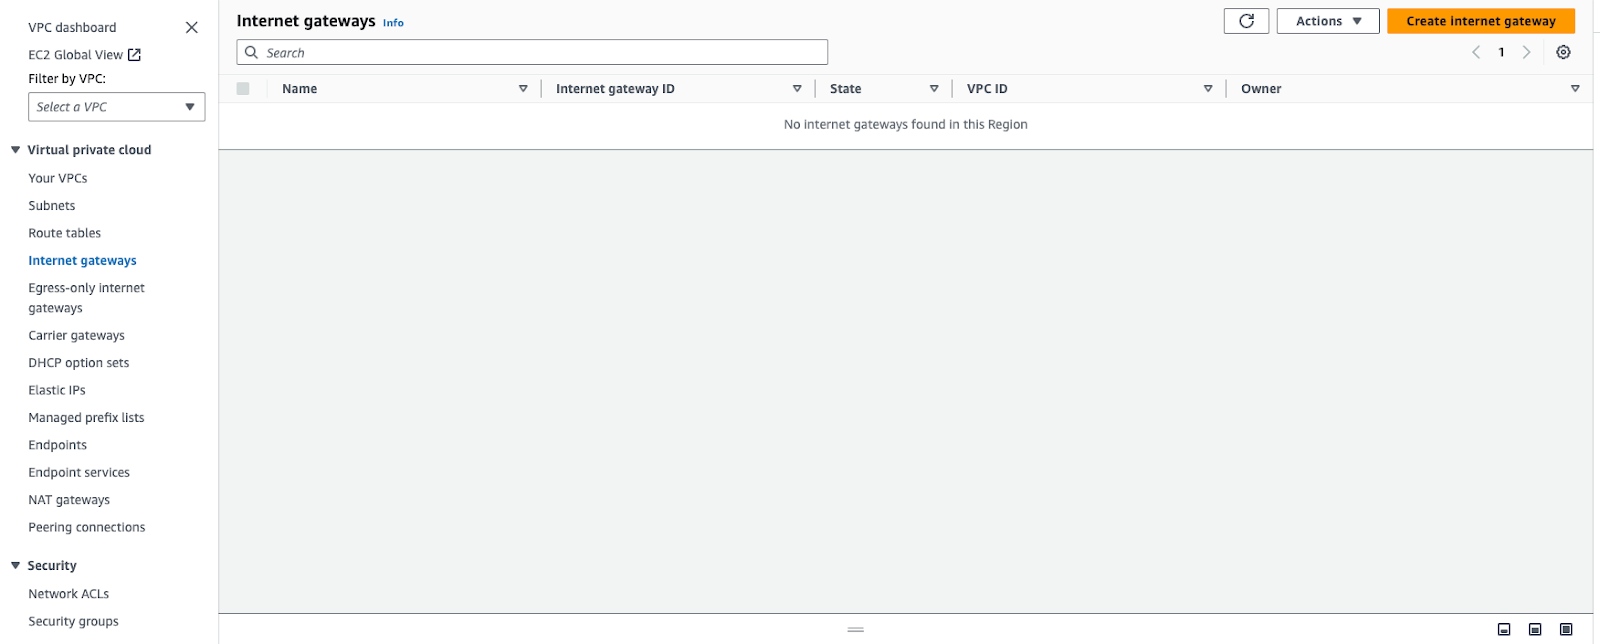
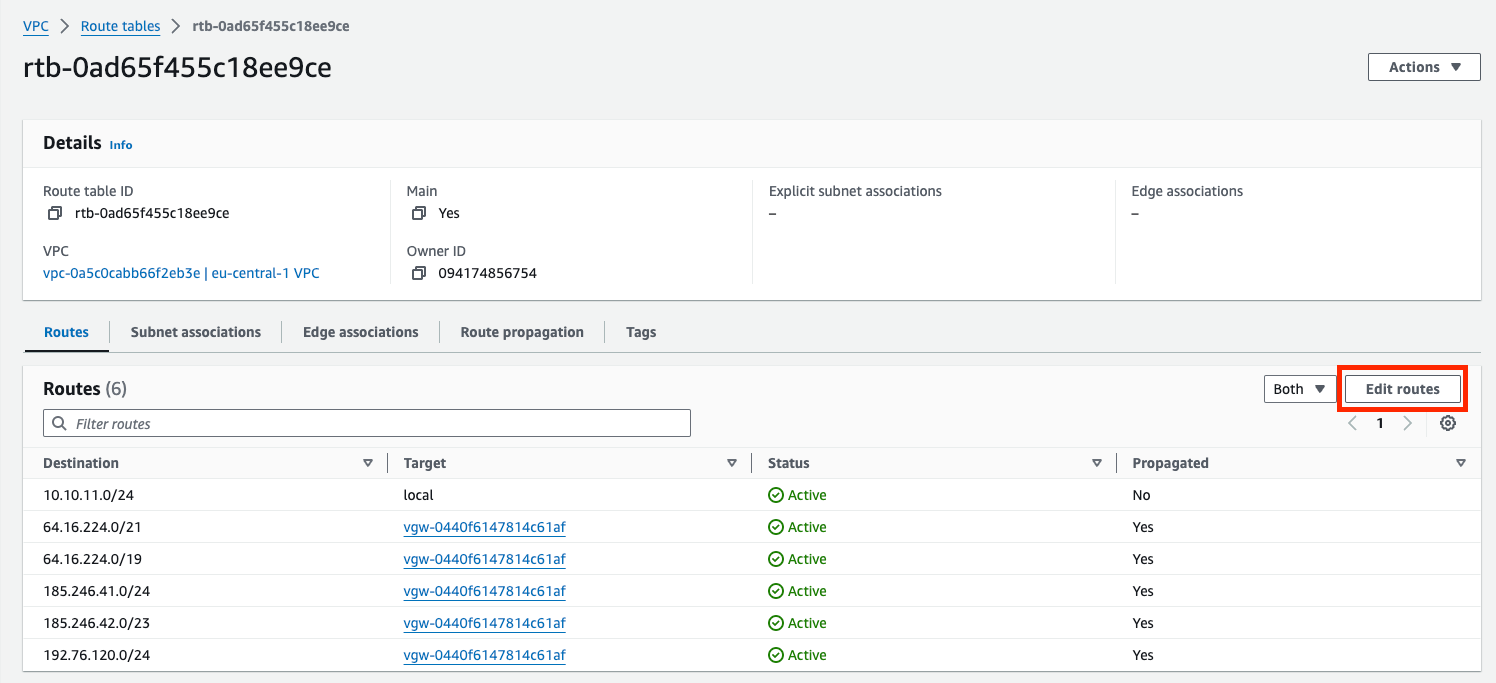
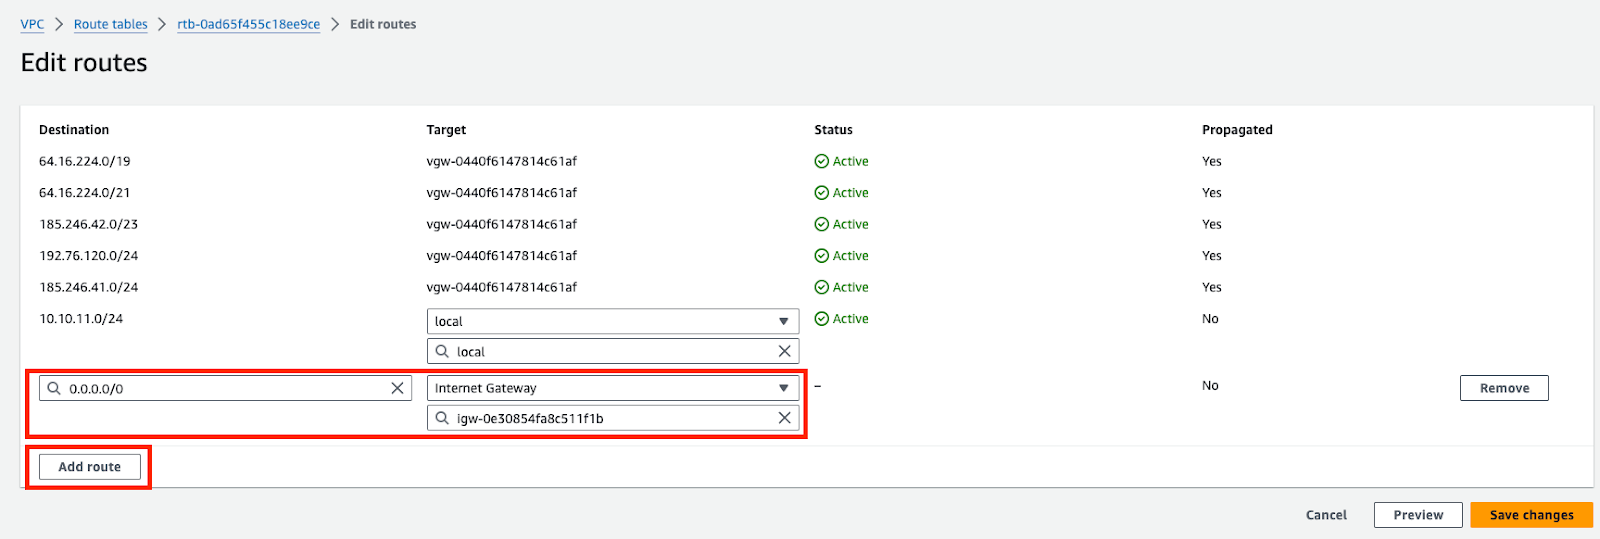
Subnet
This step is performed on AWS. Assuming you don’t have a subnet setup — Choose the VPC created. Subnet CIDR block should be chosen from within the VPC block.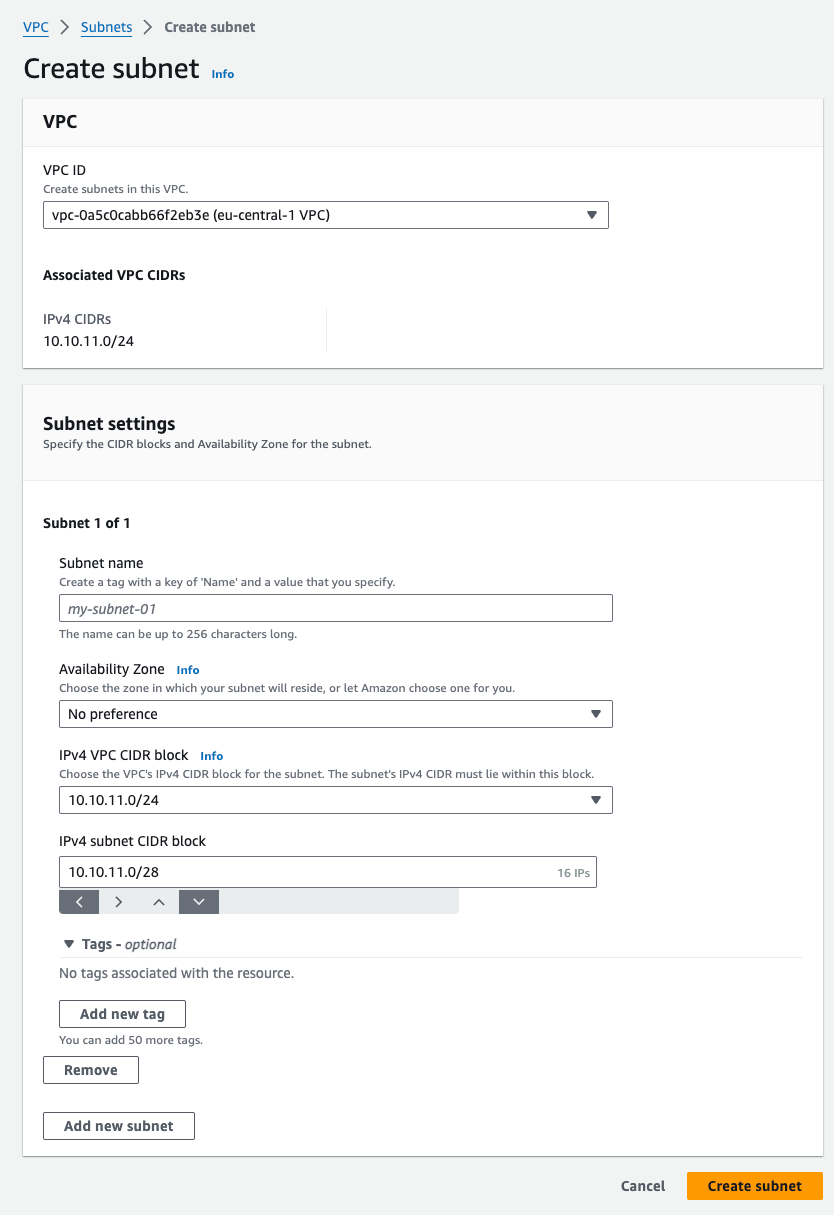
EC2
This step is performed on AWS. Assuming you don’t have an EC2 instance — spin one up in the same region. Assign the VPC and Subnet created previously. Enable public IP on the instance so you can ssh into it.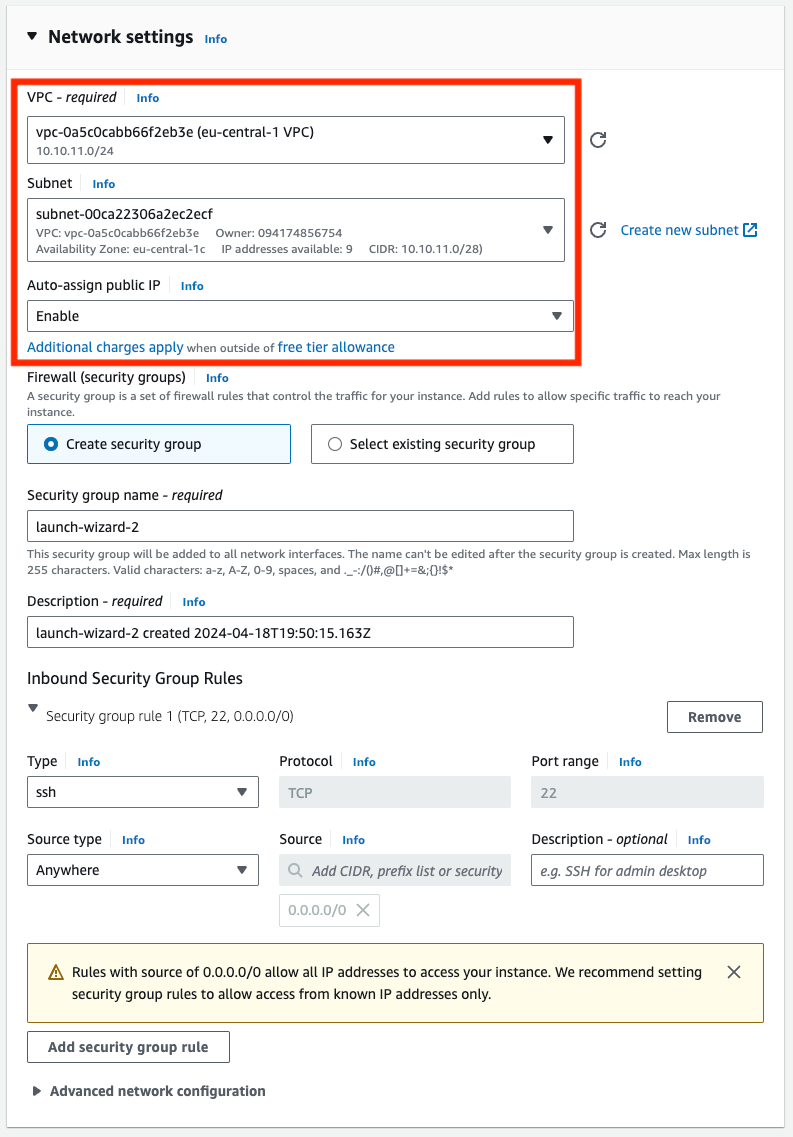
Account ID
This step is performed on AWS. ⚠️ You would need this number when you create the Telnyx VXC later.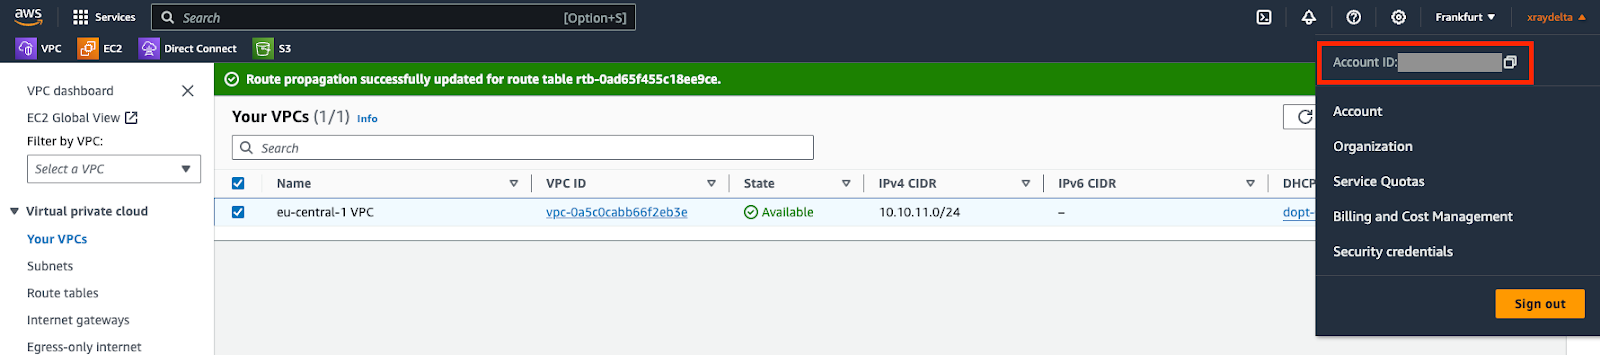
Telnyx Network
This step is performed on Telnyx. If you don’t have a network created already, you may follow this guide to create one.Procedure
Create a VXC resource
This step is performed on Telnyx.request
Take note of the VXC id returned in the response.
Direct Connect
This step is performed on AWS. If you haven’t accepted the connection from your AWS account within 1 hour of the VXC creation, the VXC would be deleted and you will have to start over.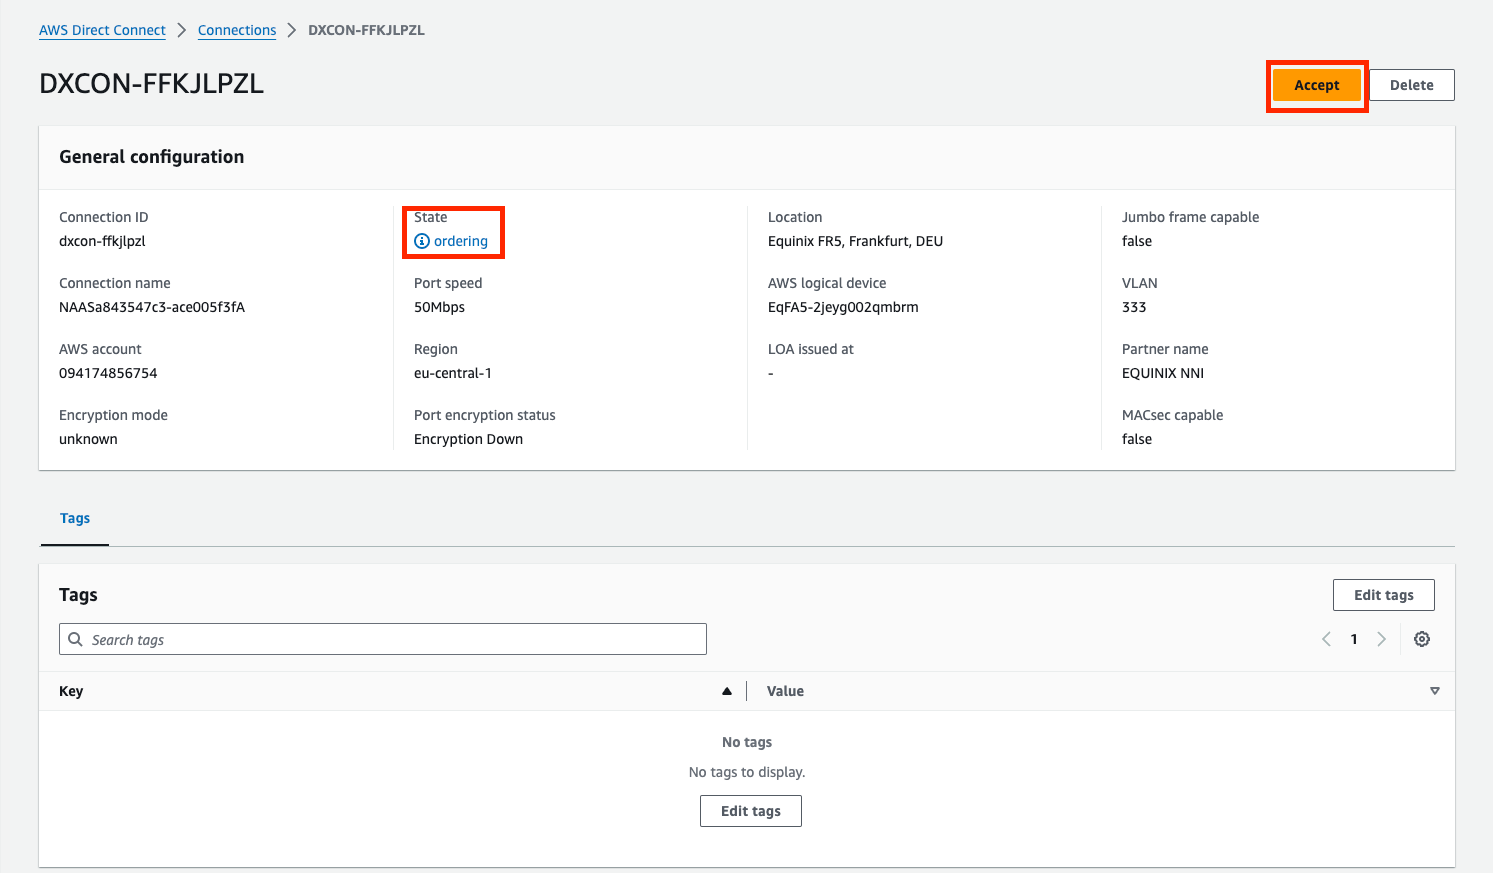
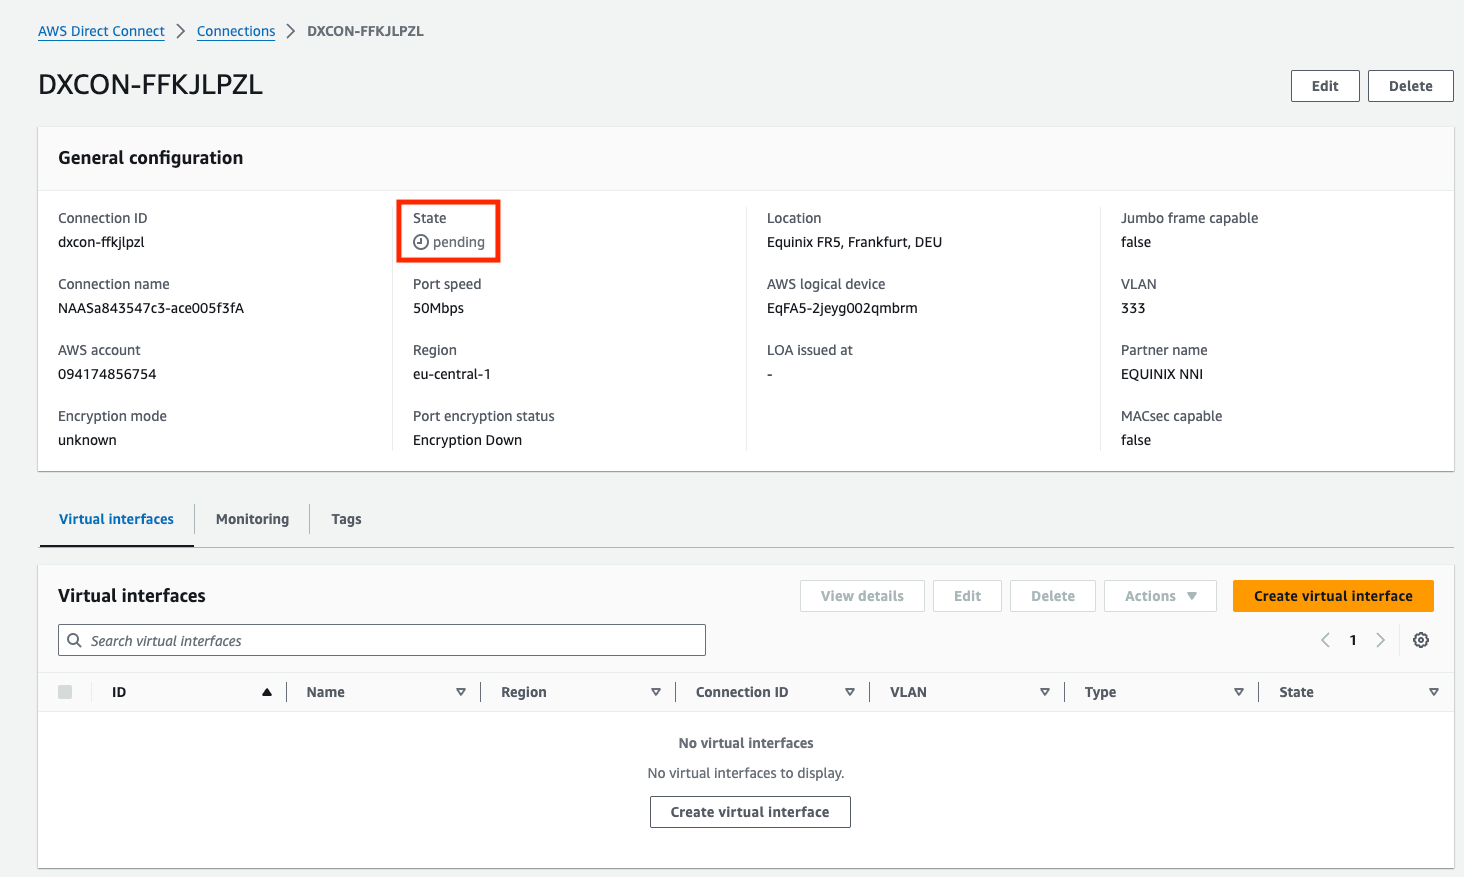
Enable Primary Connection
This step is performed on Telnyx. The connection must be enabled to be used.request
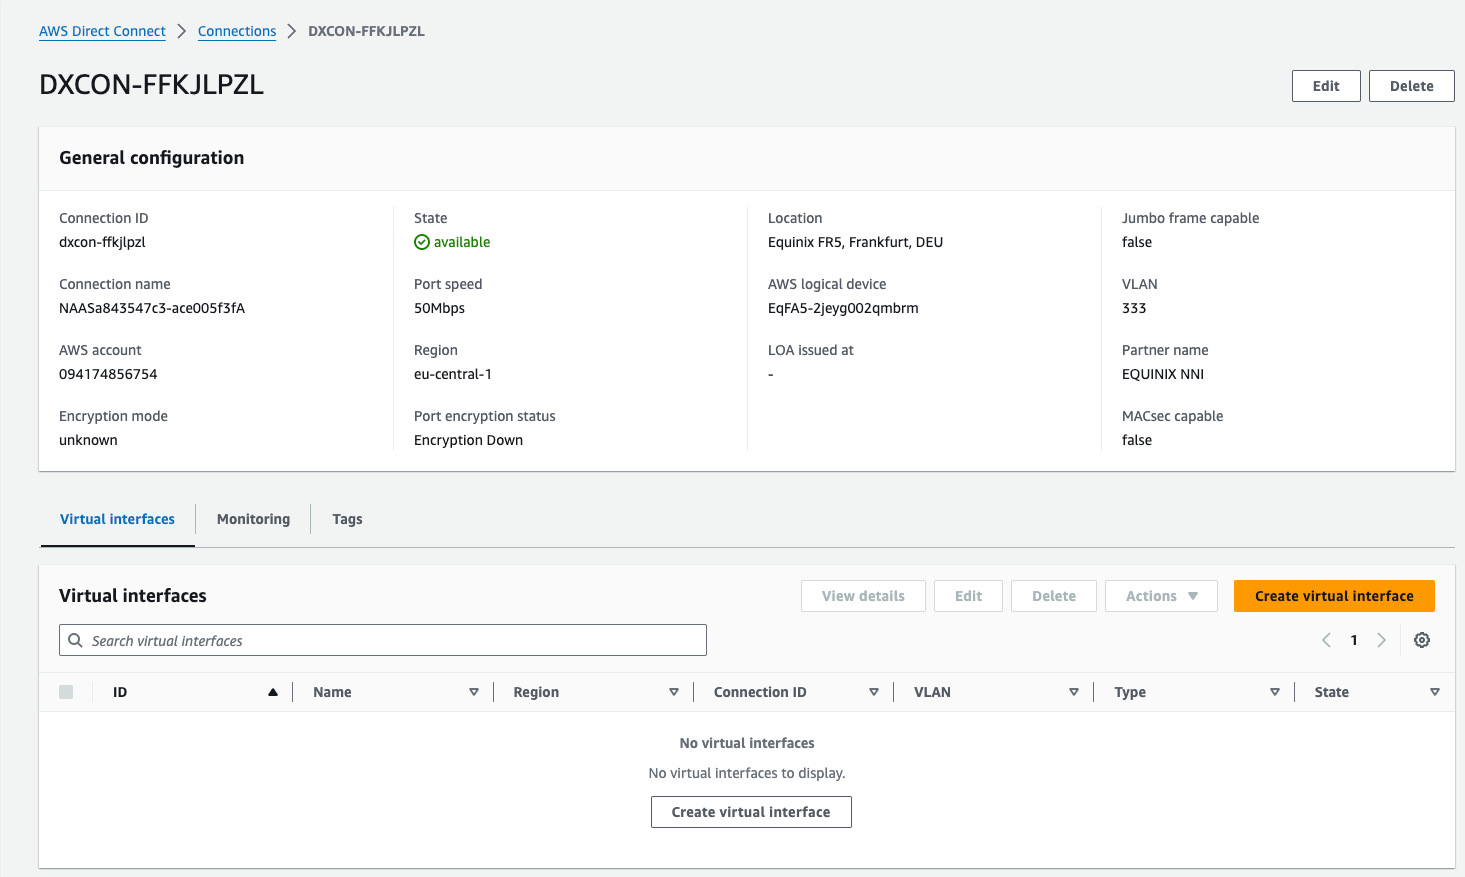
Virtual Interface
This step is performed on AWS. The connection created above needs to have an interface to which to connect.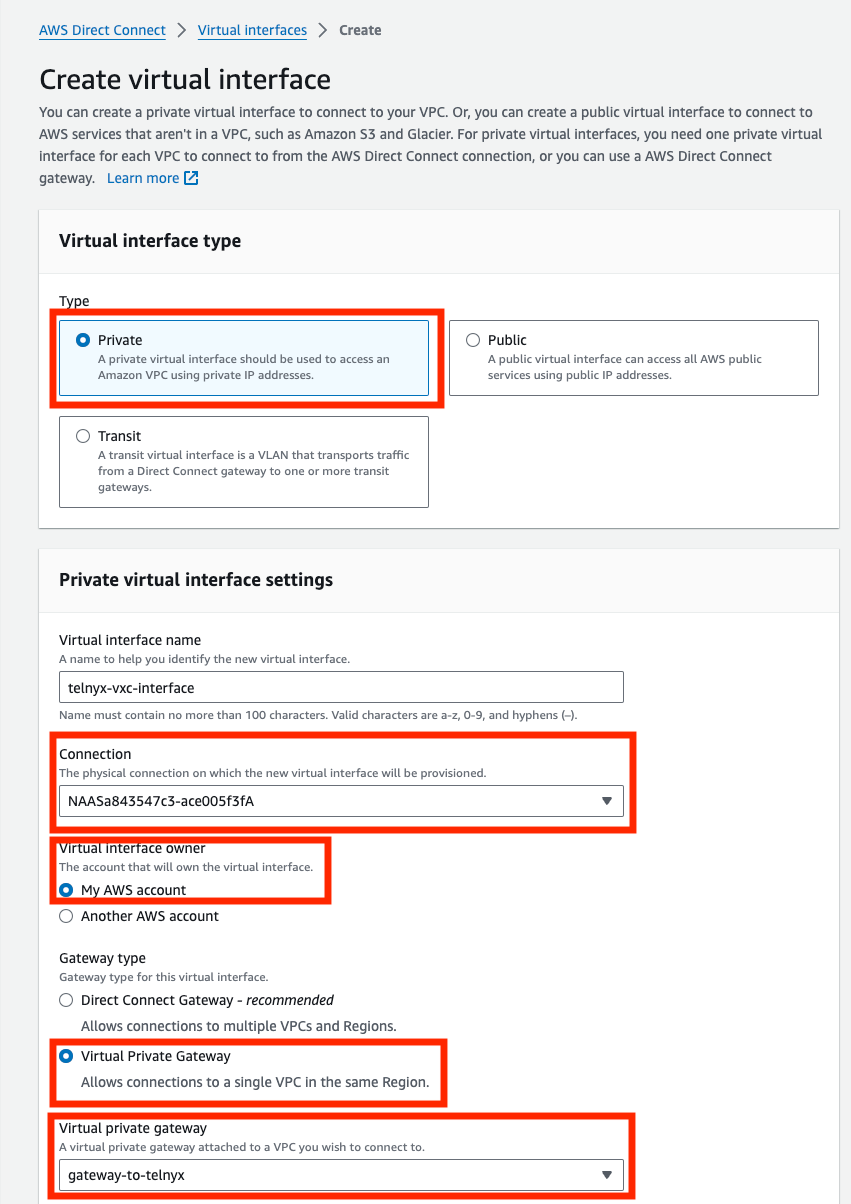
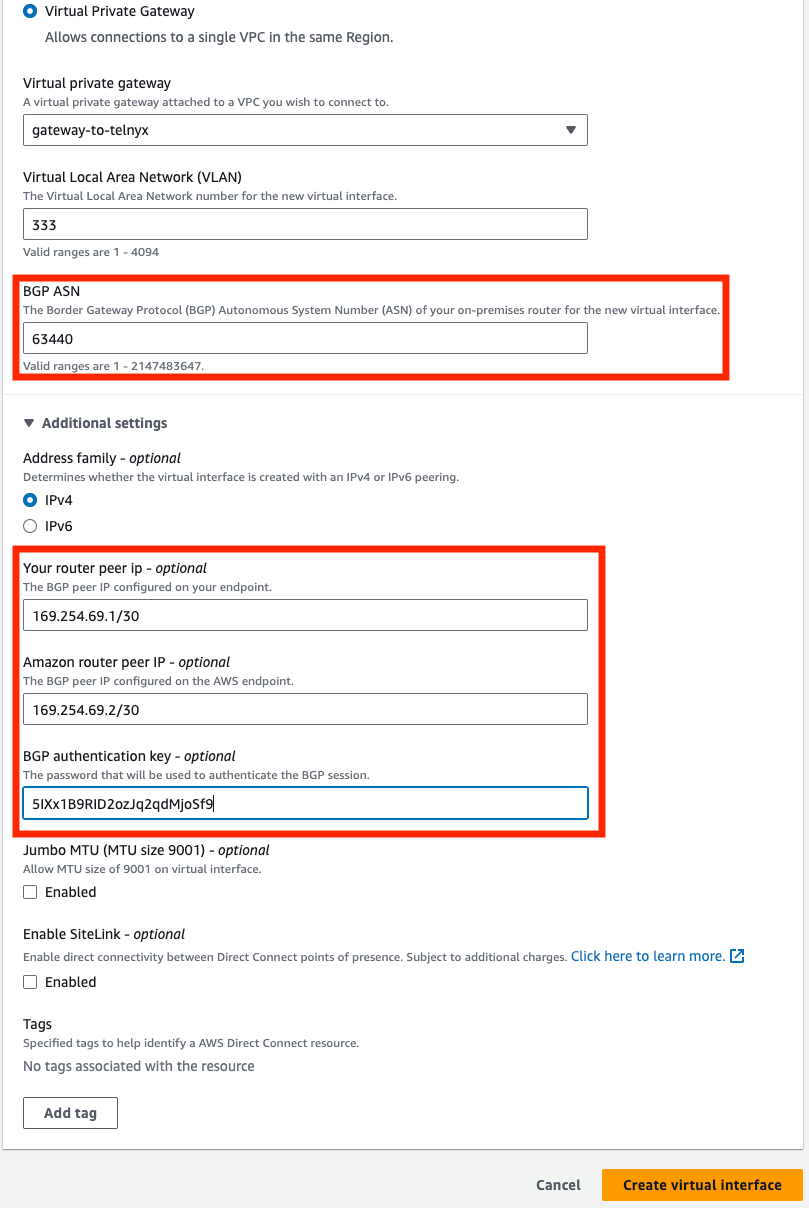
Lastly you should see the following – the interface is “available”.

Validate Connection
This step is performed on AWS. ssh into your EC2 instance and either ping or traceroute to one of the IP in the route table of the VPC. You can see the route went over the VXC instead of the public internet.
Google Cloud Interconnect
Source: https://developers.telnyx.com/docs/network/vxc/gcp.md
Architecture
We will construct the following architecture on Google Cloud.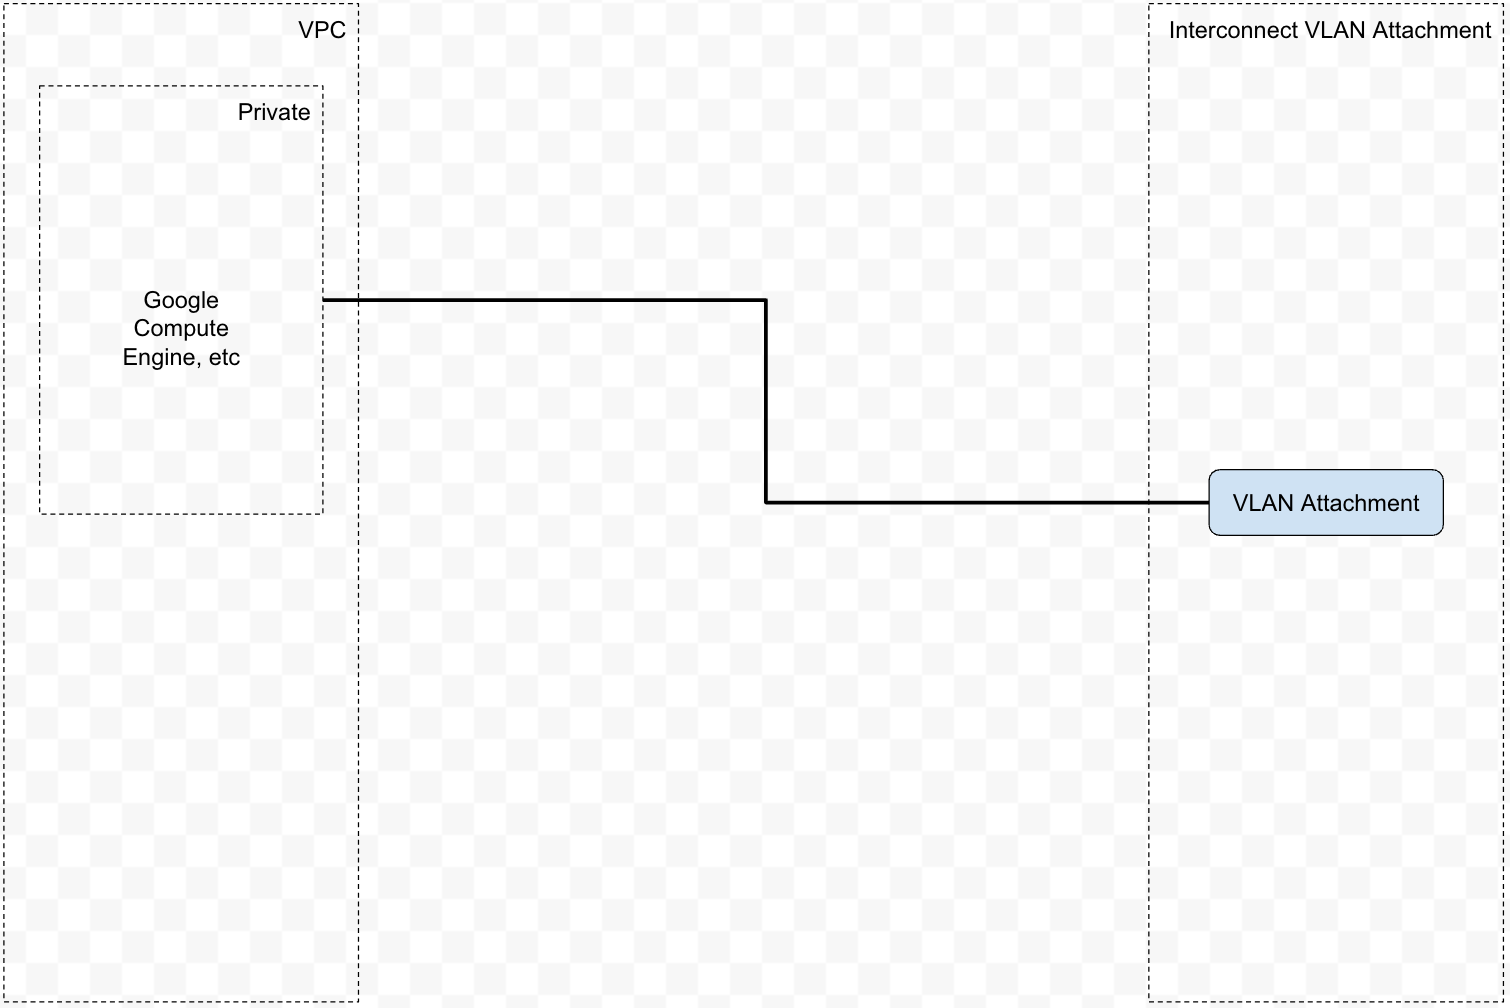
Prerequisites
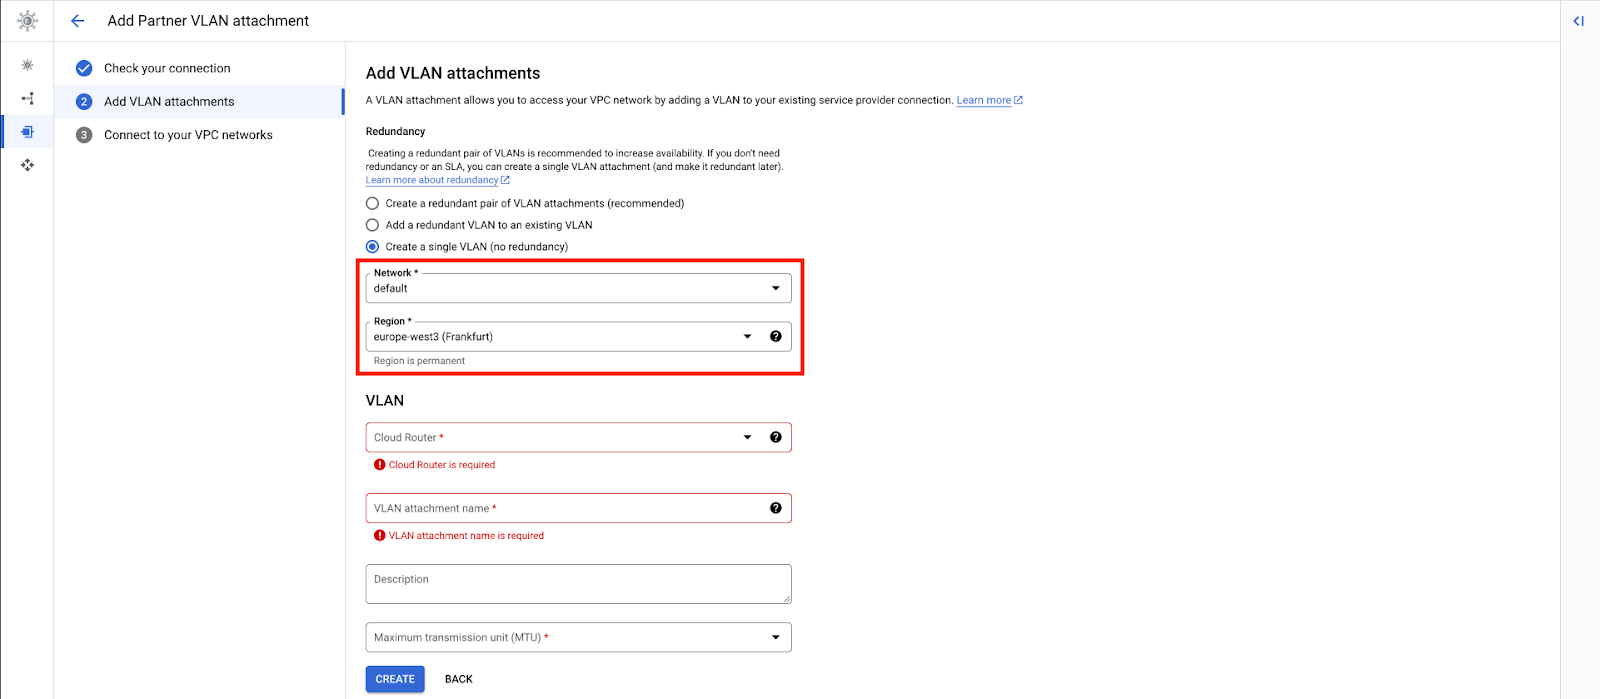
VLAN Attachment
This step is performed on Google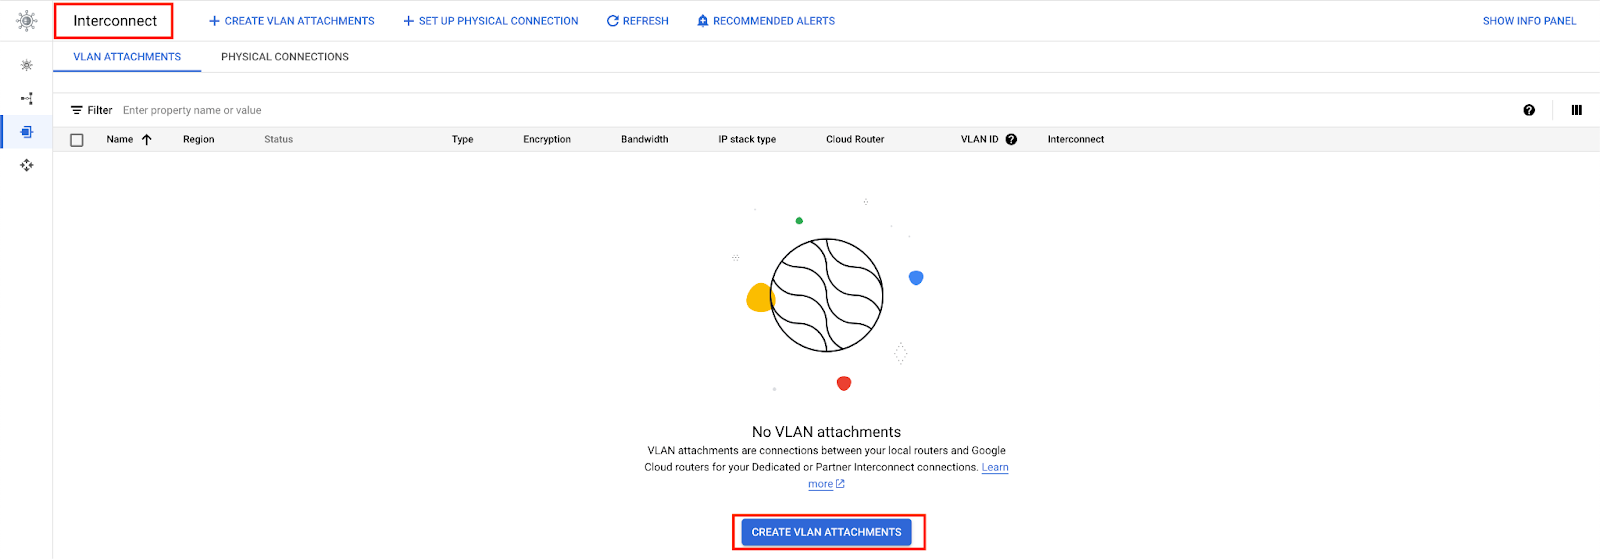
- “Partner Interconnect Connection”
- “Set up unencrypted Interconnect”


- “Network”: Choose the one you are connecting from
- “Region”: Choose the one that there is a Telnyx PoP in proximity
- “MTU”: 8896
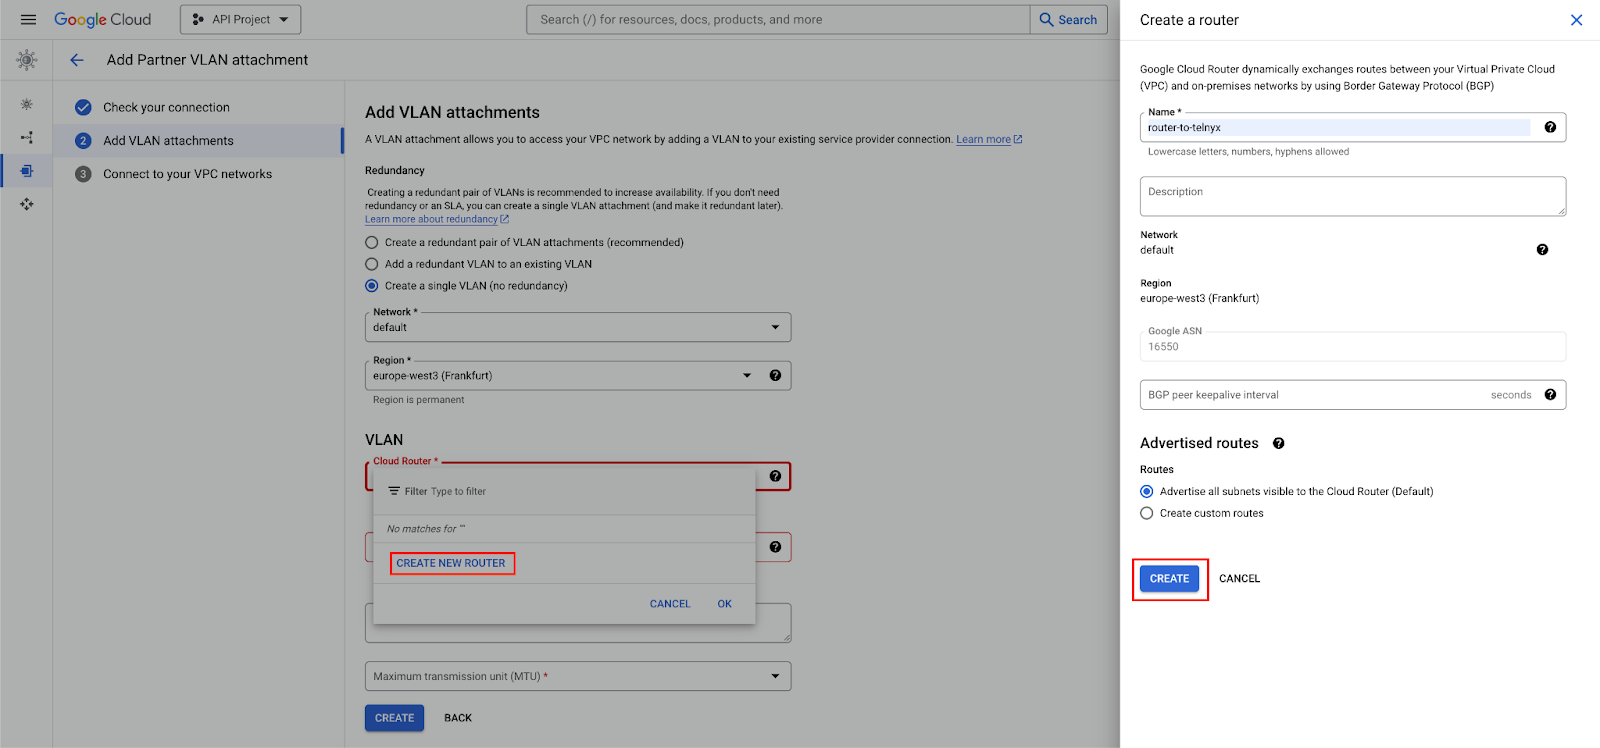
- Create a router or choose an existing one.

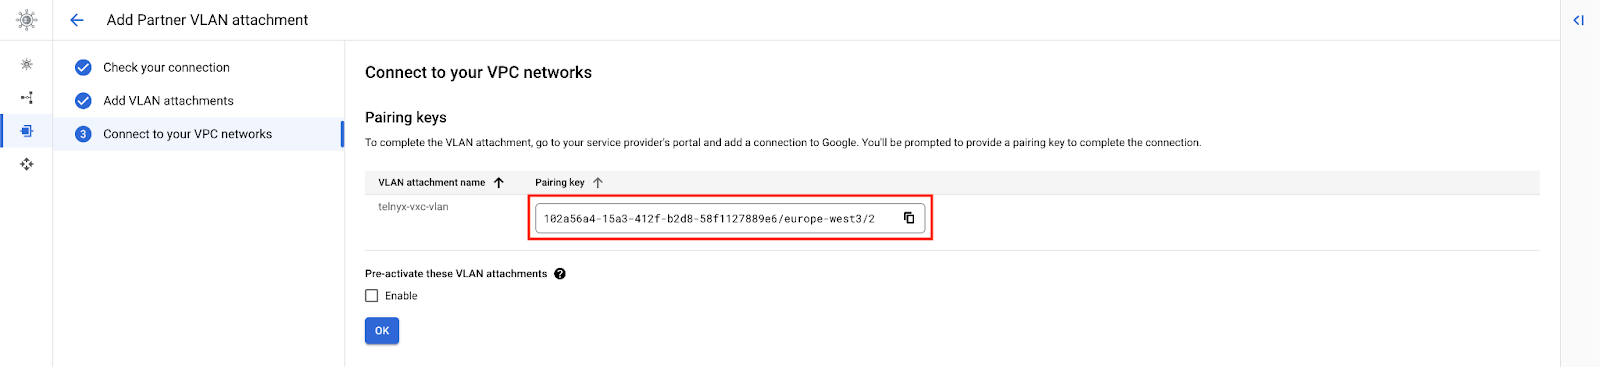
Telnyx Network
This step is performed on Telnyx. If you don’t have a network created already, you may follow this guide to create one.Procedure
Create a VXC resource
This step is performed on Telnyx.Activate Connection
This step is performed on Google.
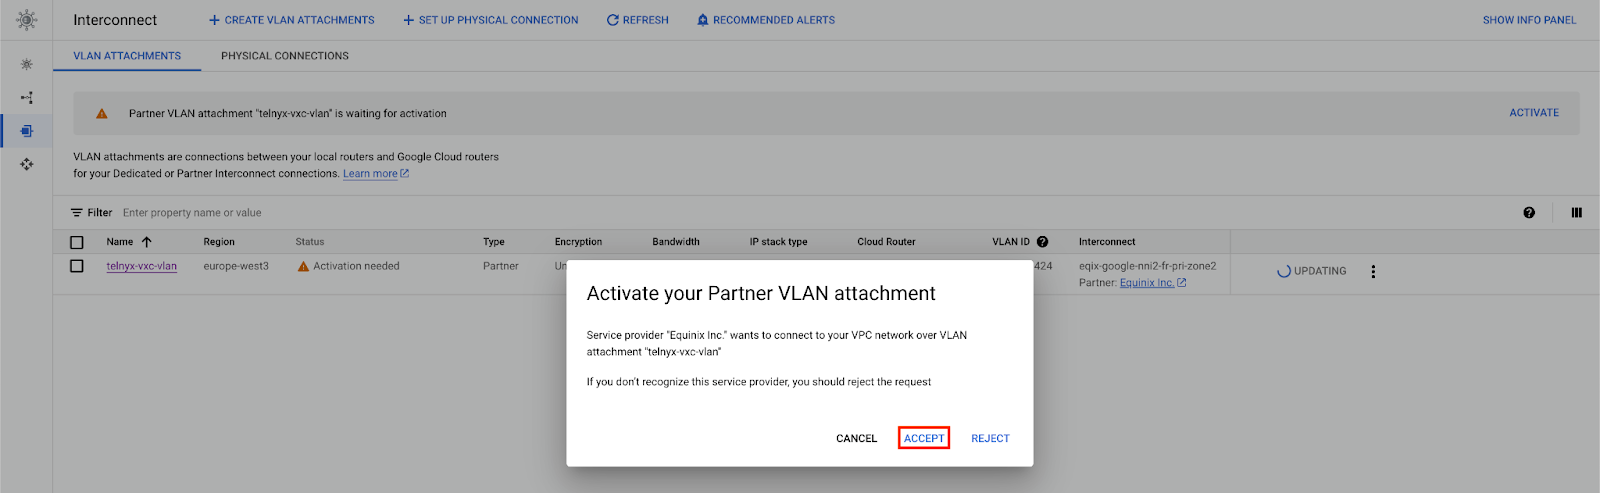

primary_bgp_key

Update BGP Peering
This step is performed on Telnyx. At this point, the connection is “Down”. We need to take the Google assigned GBP IPs and set them on the VXC.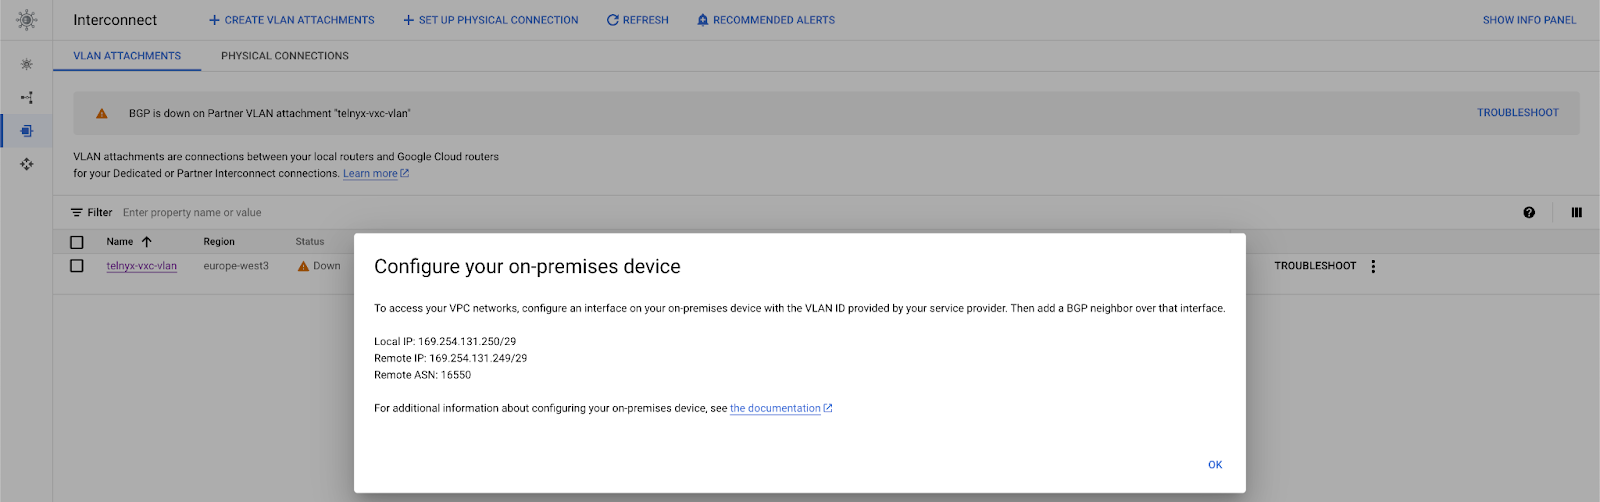
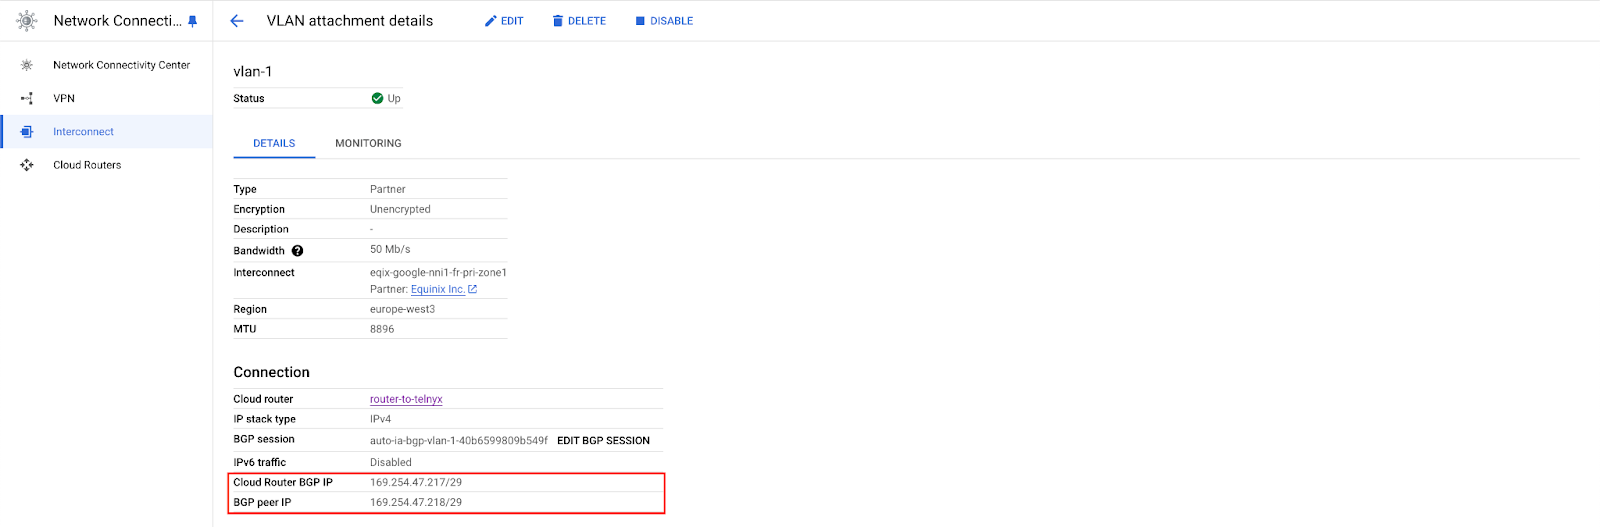
primary_cloud_ip— “Cloud Router BGP IP” or “Remote IP” in the “Troubleshooting” pageprimary_telnyx_ip— “BGP peer IP” or “Local IP”in the “Troubleshooting” page

Validate Connection
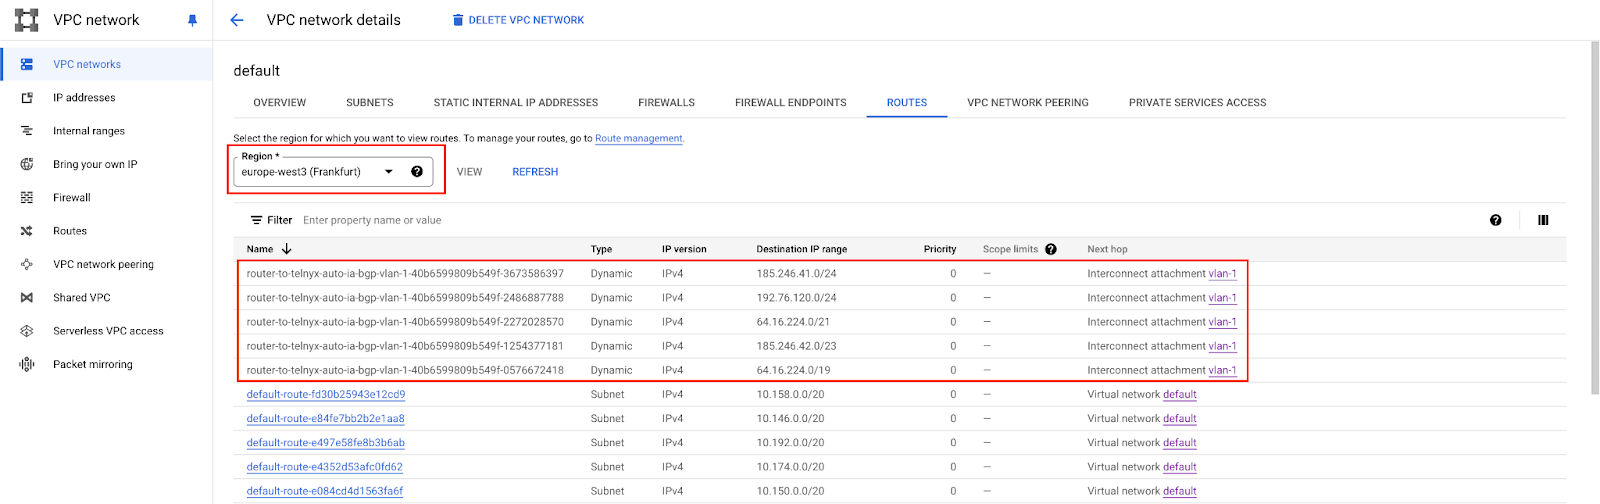
This step is performed on Google.- Under VPC networks, you should see the routes advertised over the cloud router created.
- You can also ssh in one of your instances in the same network and perform a traceroute.
Azure ExpressRoute
Source: https://developers.telnyx.com/docs/network/vxc/azure.md
Architecture
We will construct the following architecture.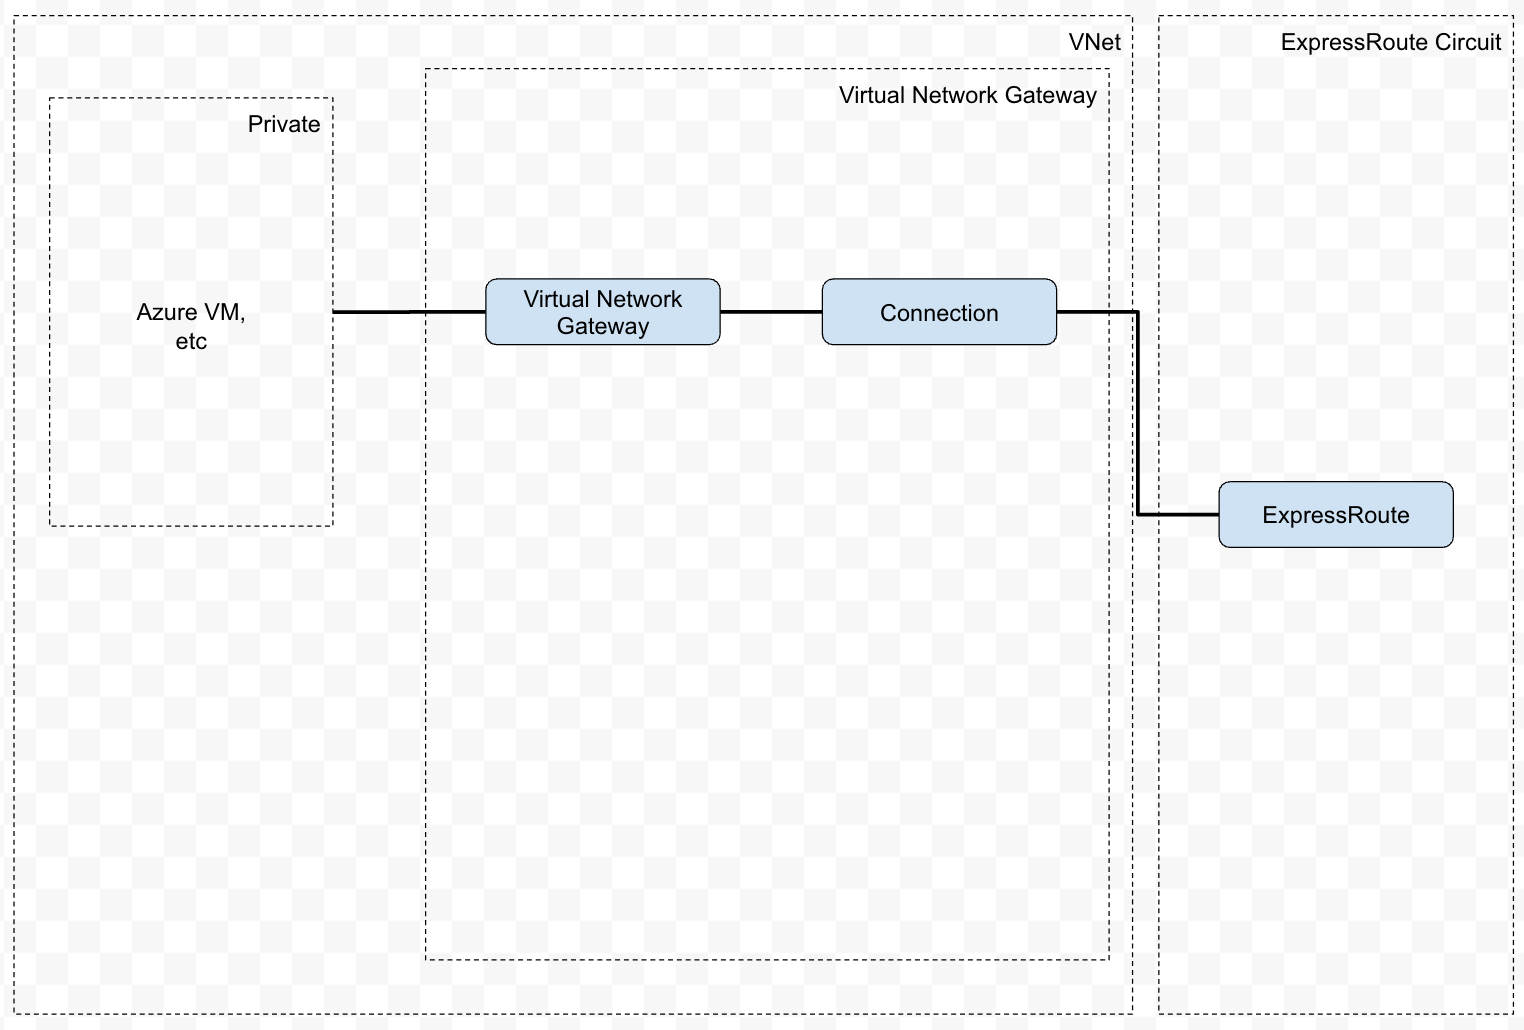
Prerequisites
Create ExpressRoute Circuit
This step is performed on Azure.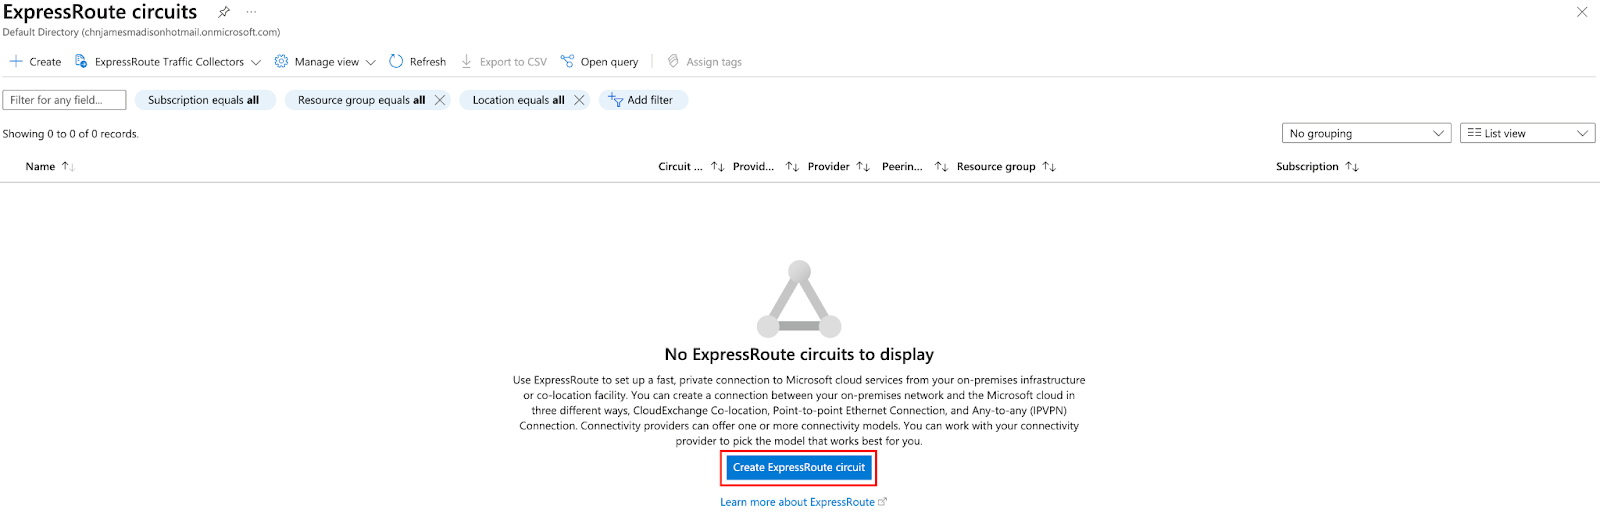
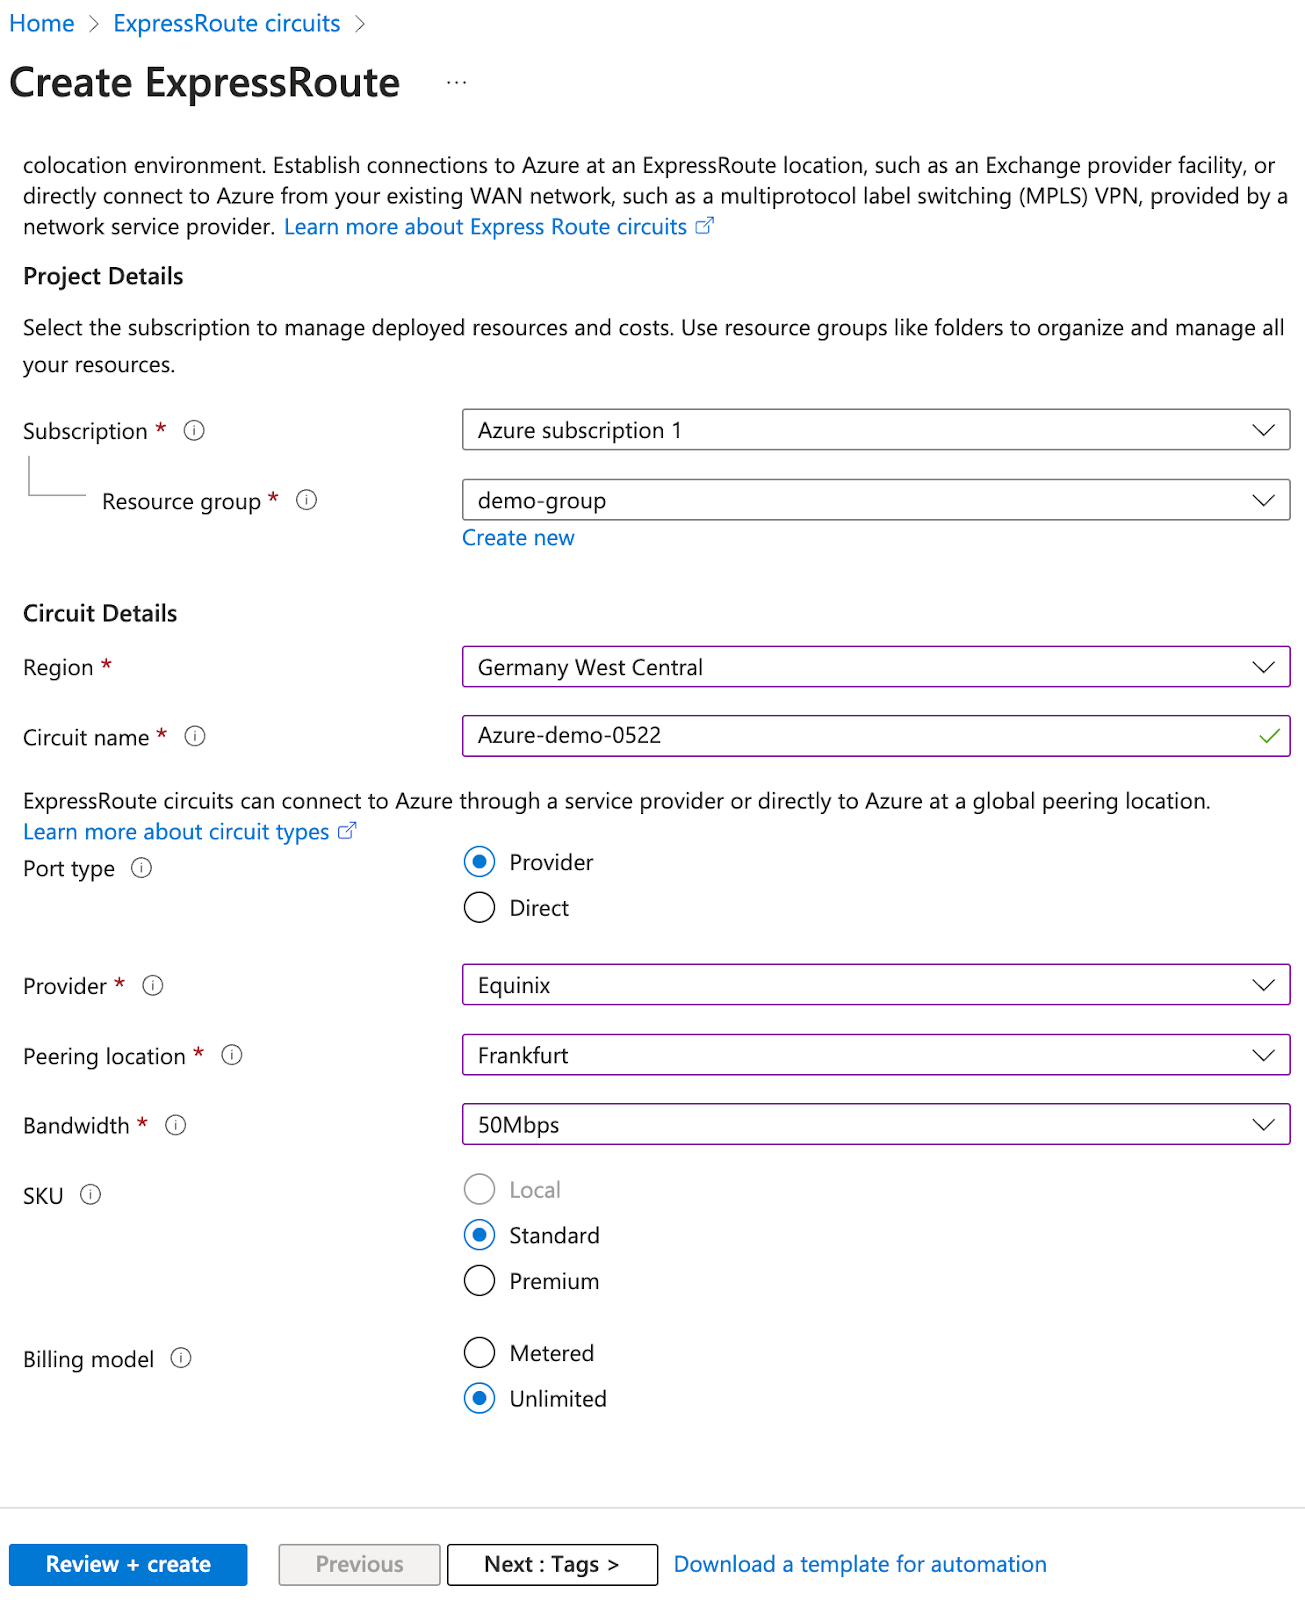
Choose the rest of the parameters at your own discretion.
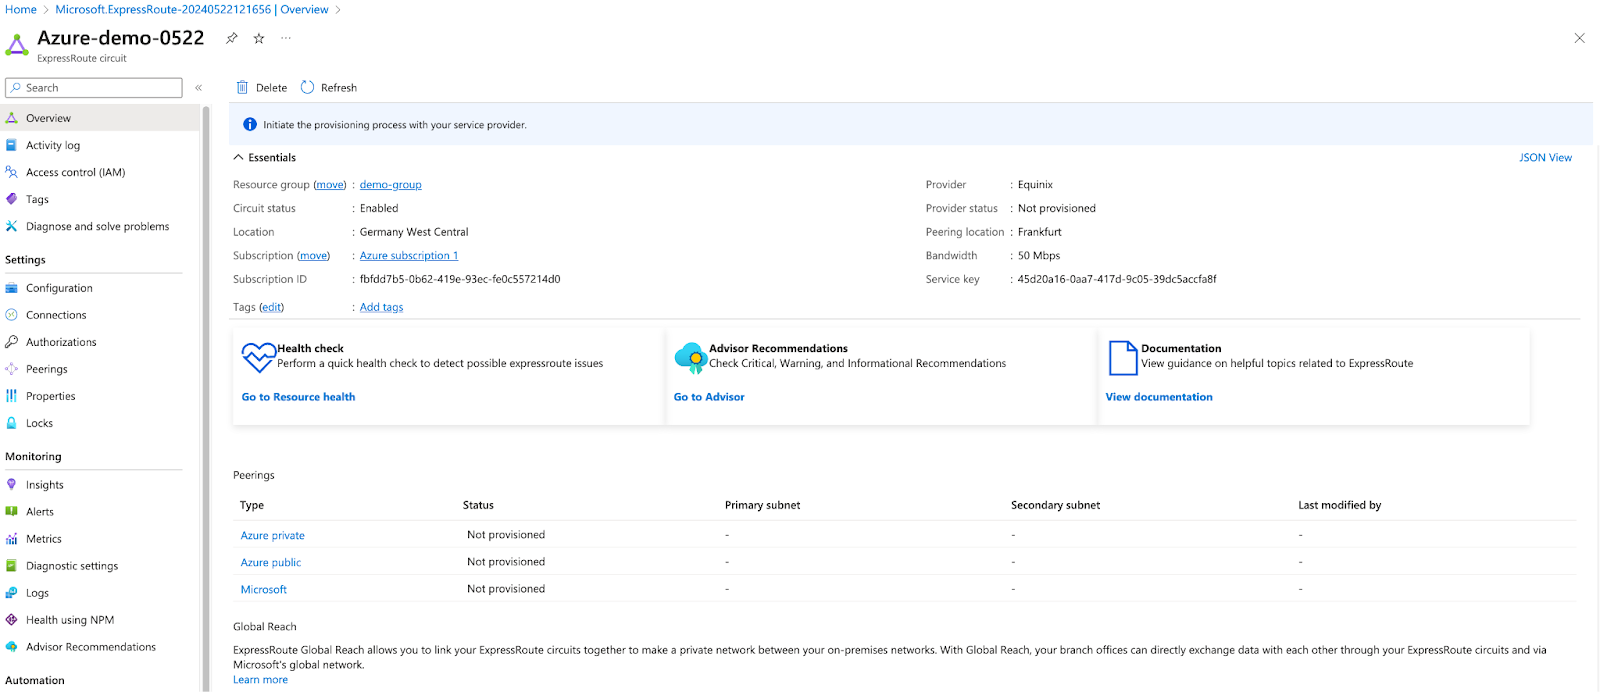
Telnyx Network
This step is performed on Telnyx. If you don’t have a network created already, you may follow this guide to create one.Procedure
Create a VXC resource
This step is performed on Telnyx.request
Take note of the following info in the response; you will need it later.
idprimary_cloud_ipprimary_bgp_key
Enable Primary Connection
This step is performed on Telnyx.request
status is provisioned before proceeding to the next step. You can poll the status using GET request on the specific VXC.
Azure Private Peering
This step is performed on Azure. “Provider status” must show “Provisioned” before performing this step.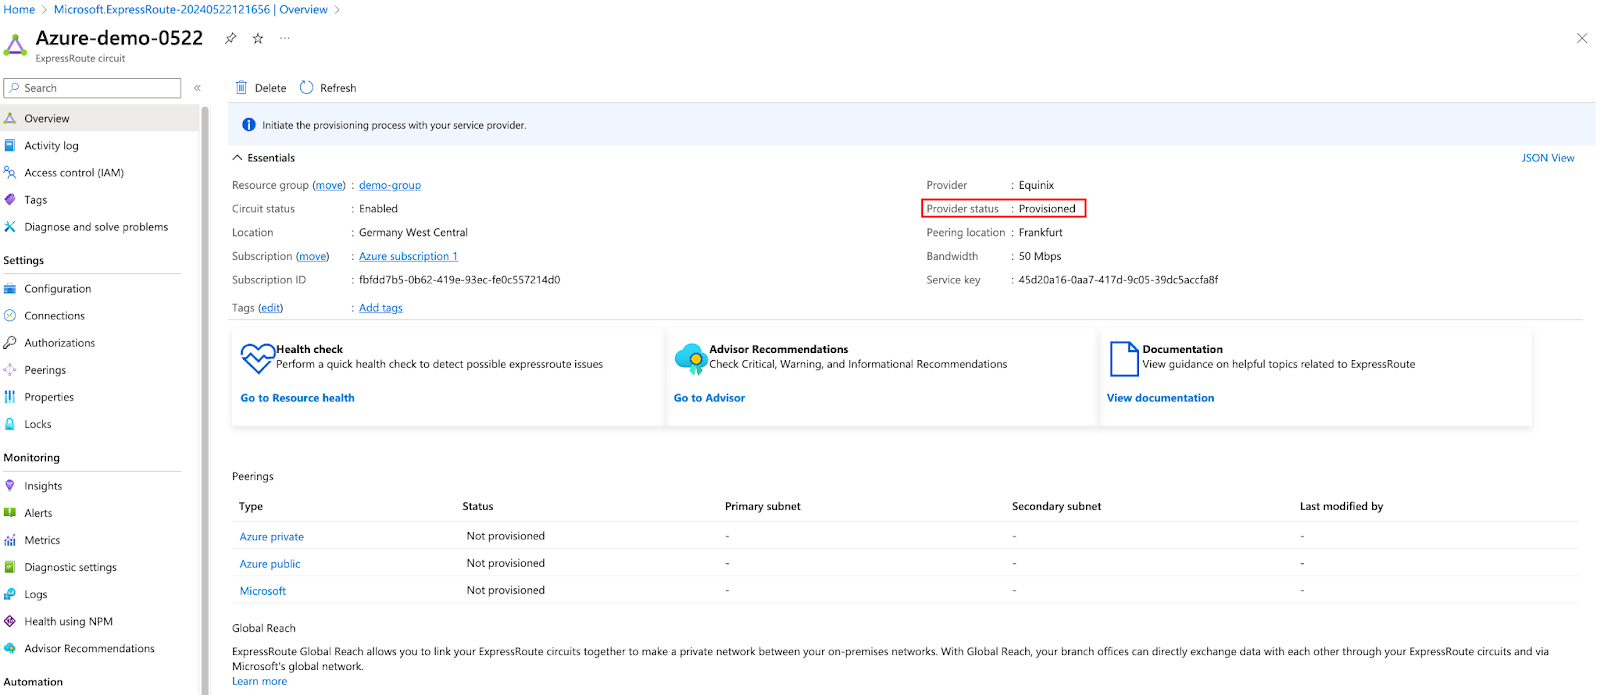
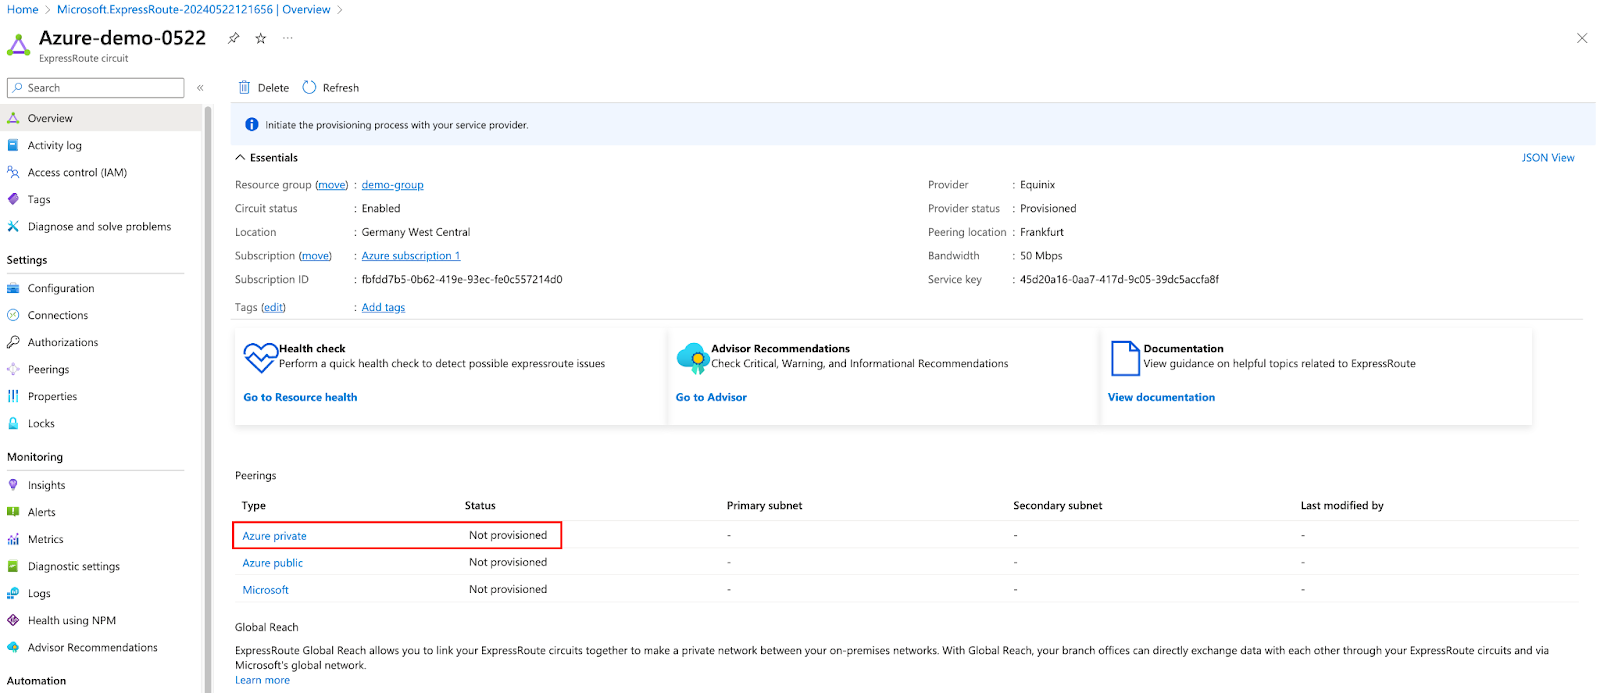
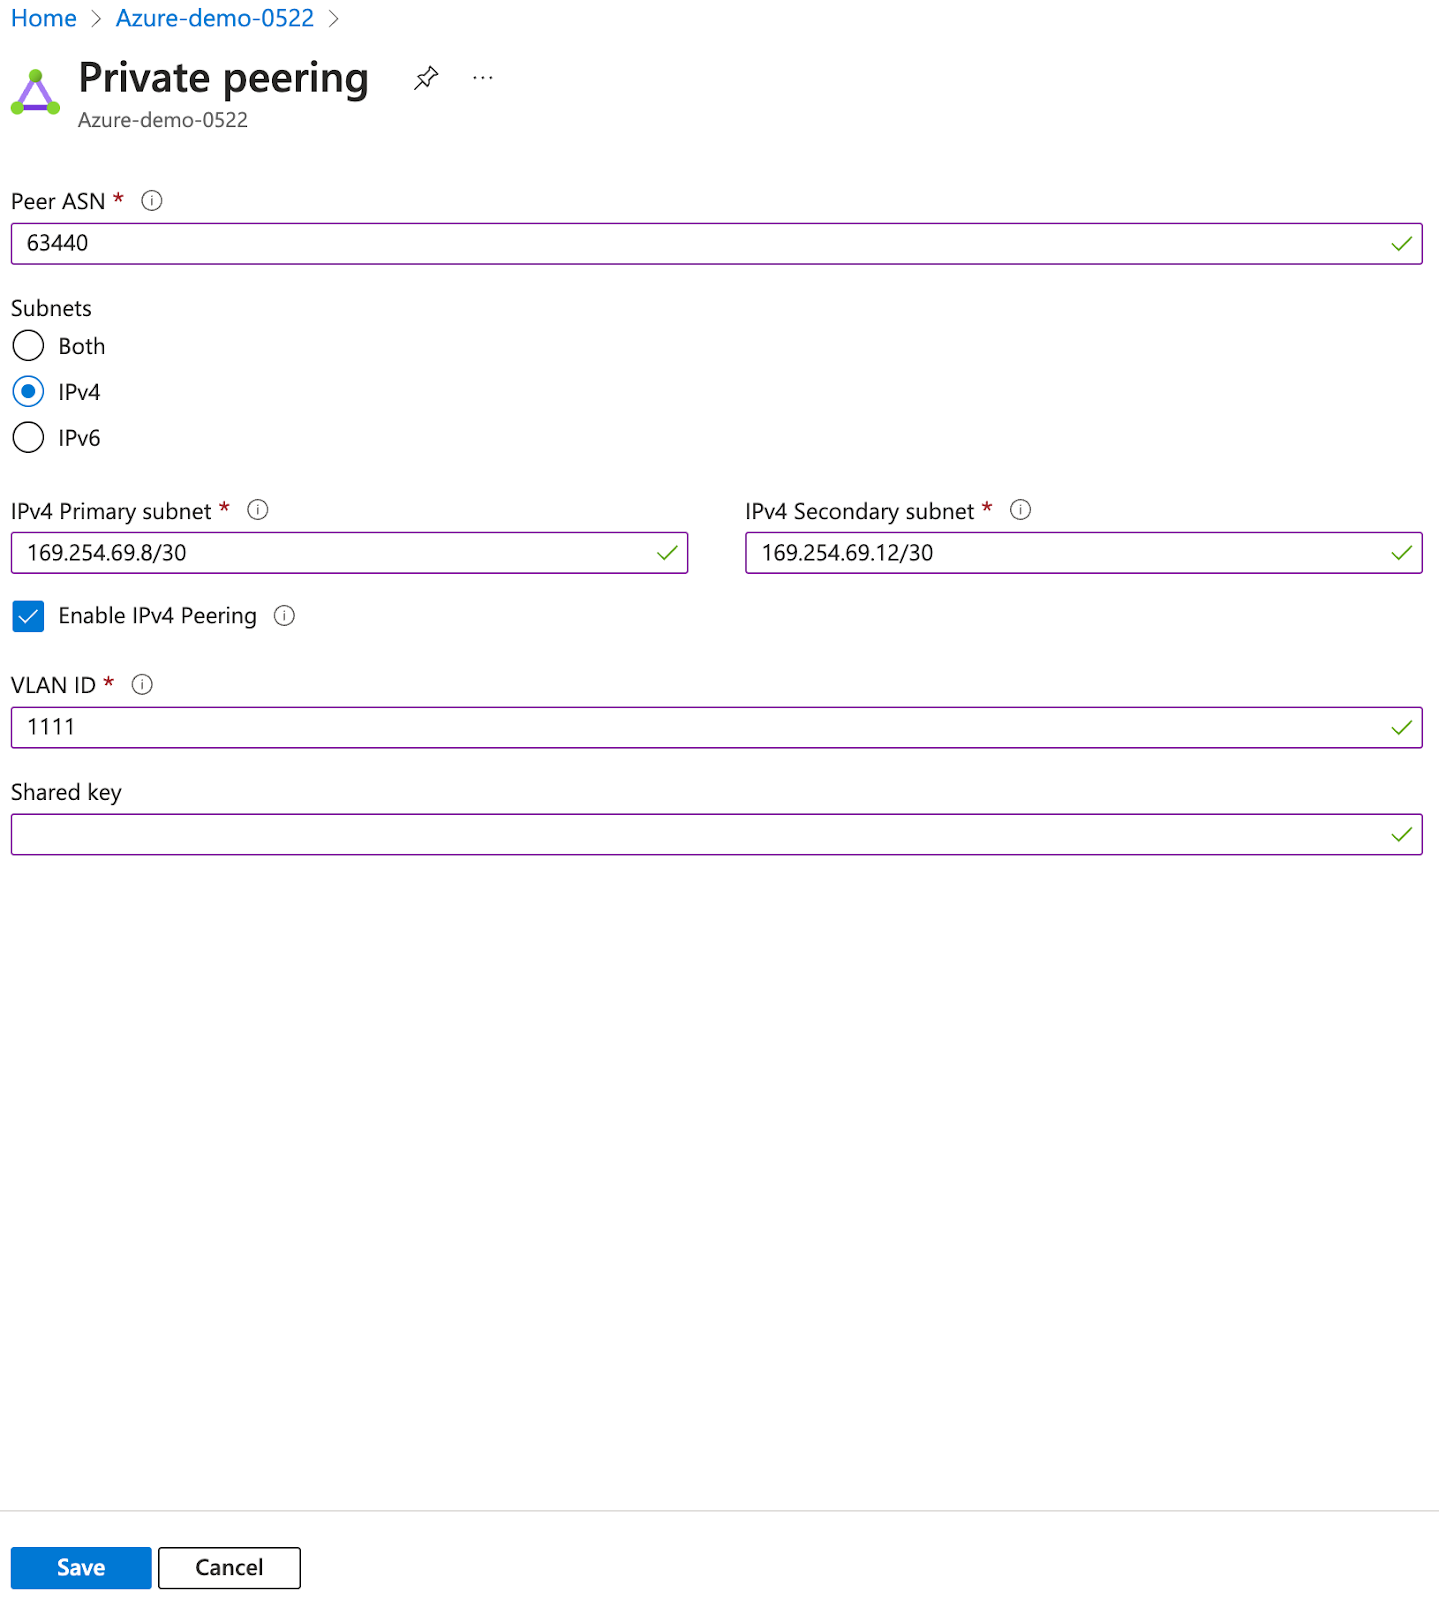
After saving, you may need to wait for some time before performing the next step.
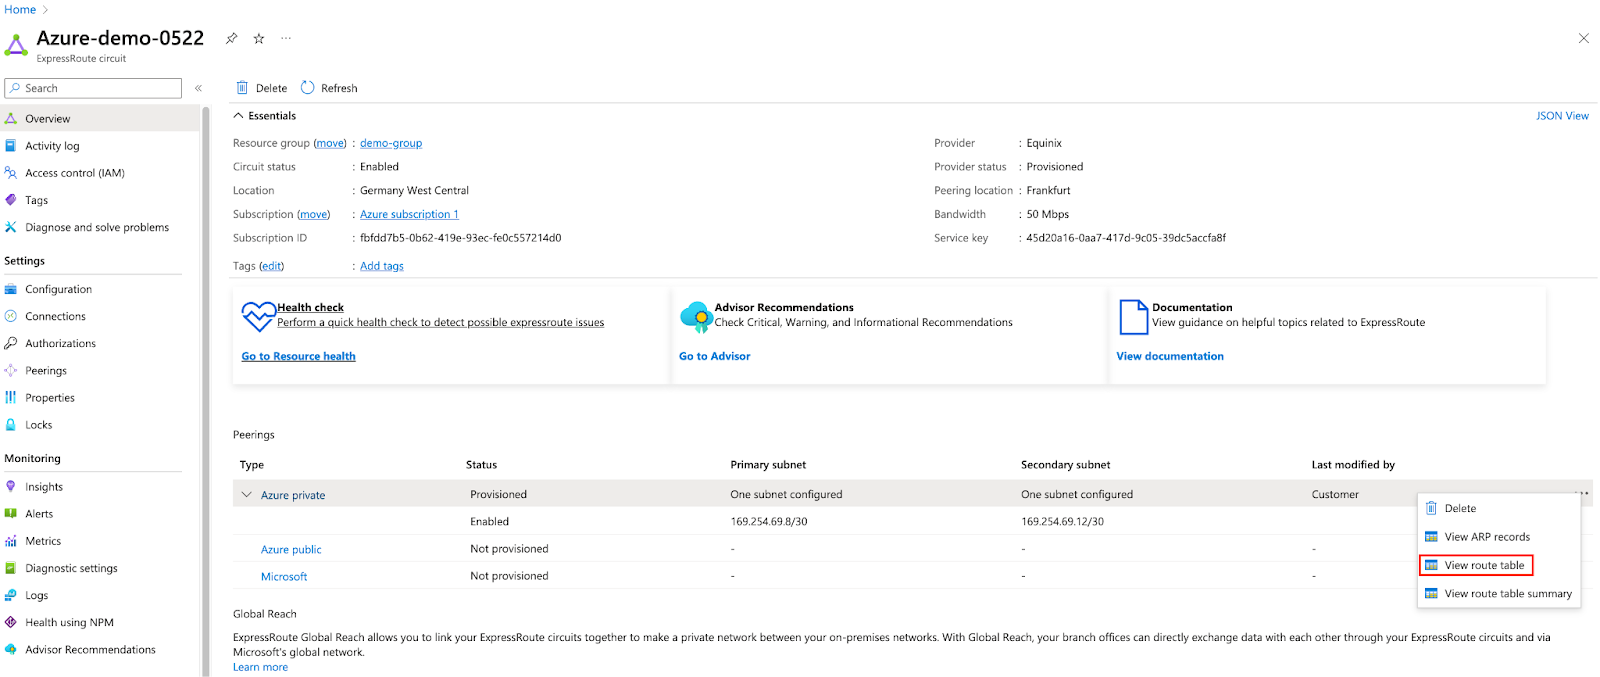

Virtual Network
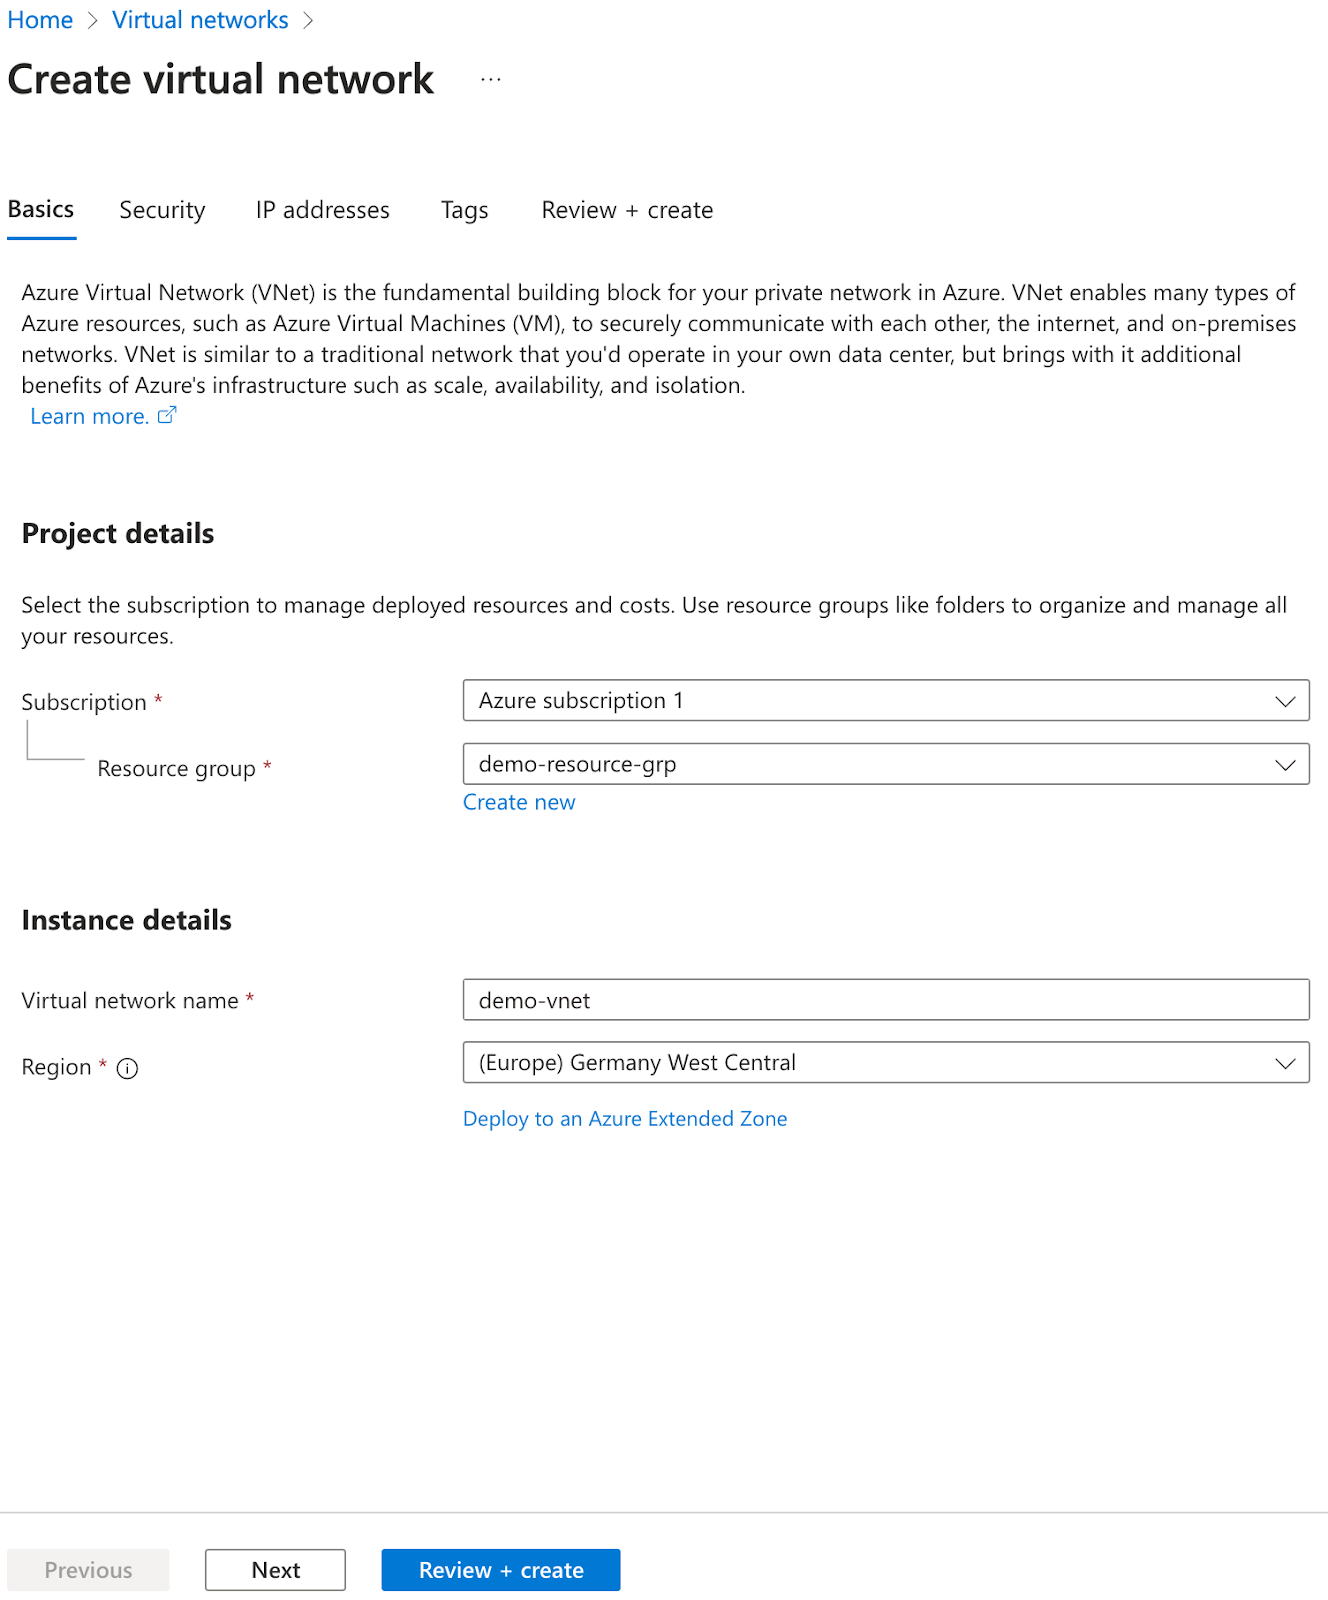
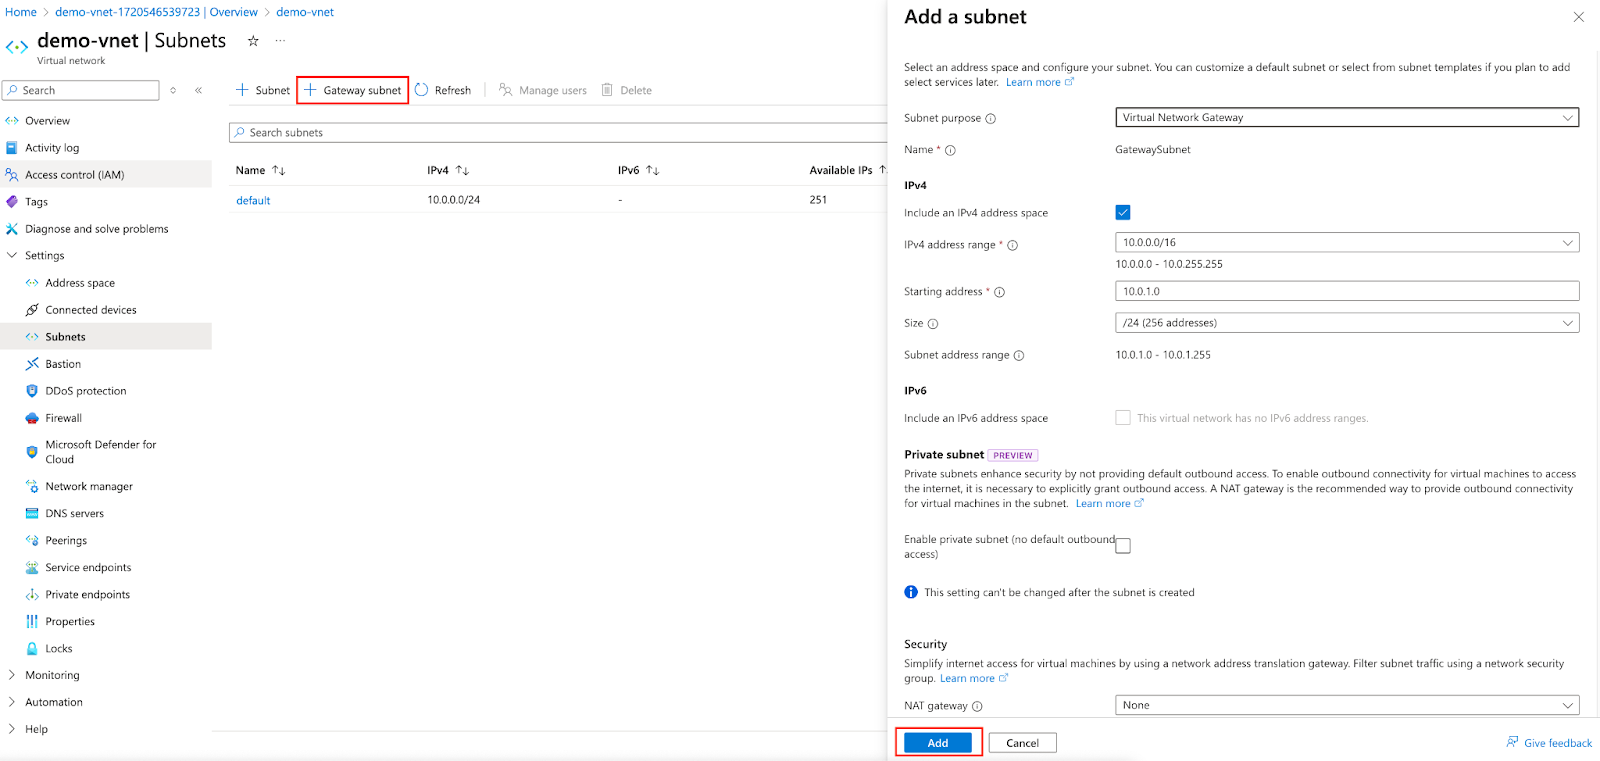
Next, add a Gateway subnet. Keep all parameters as default.
Virtual Network Gateways
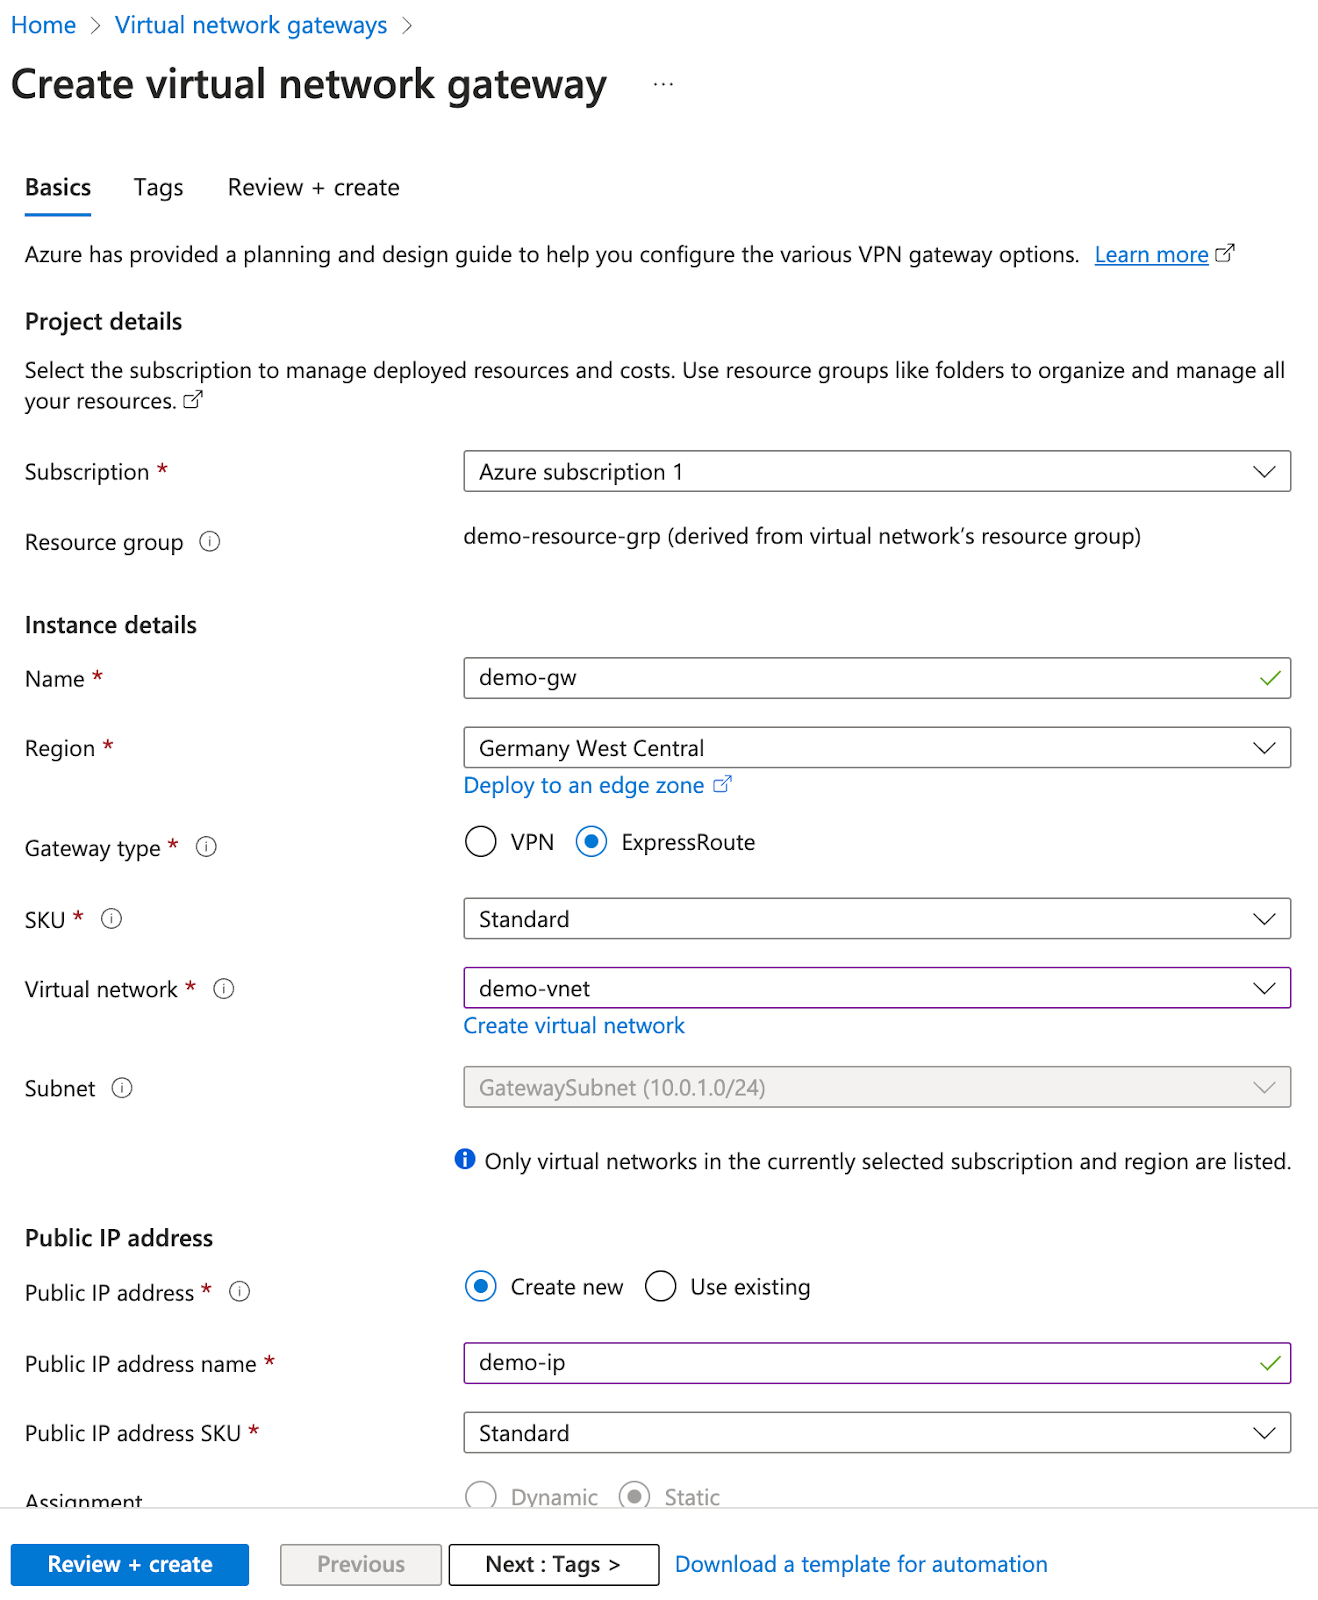
The gateway creation will take a while; upward of 20 minutes. In the meantime, you can proceed to the following step.
Virtual Machines
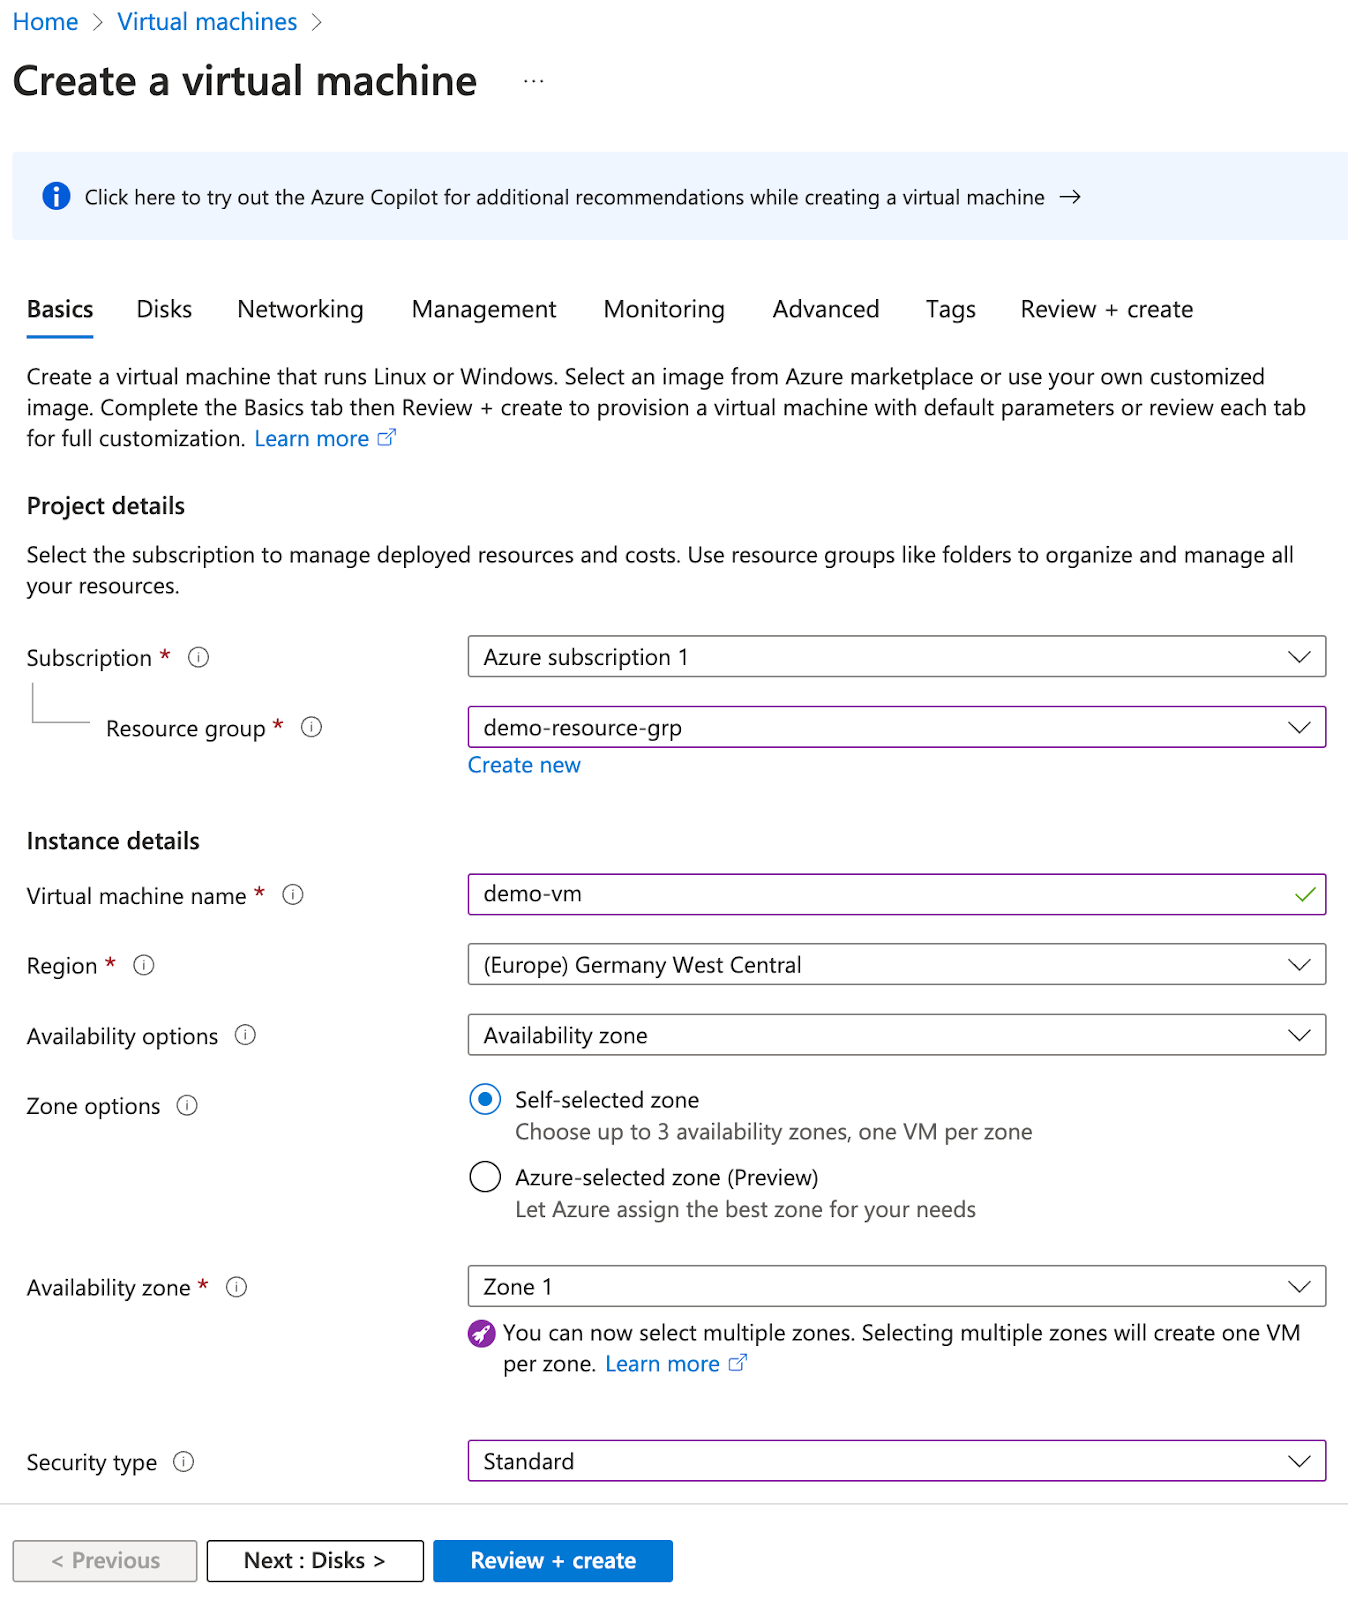
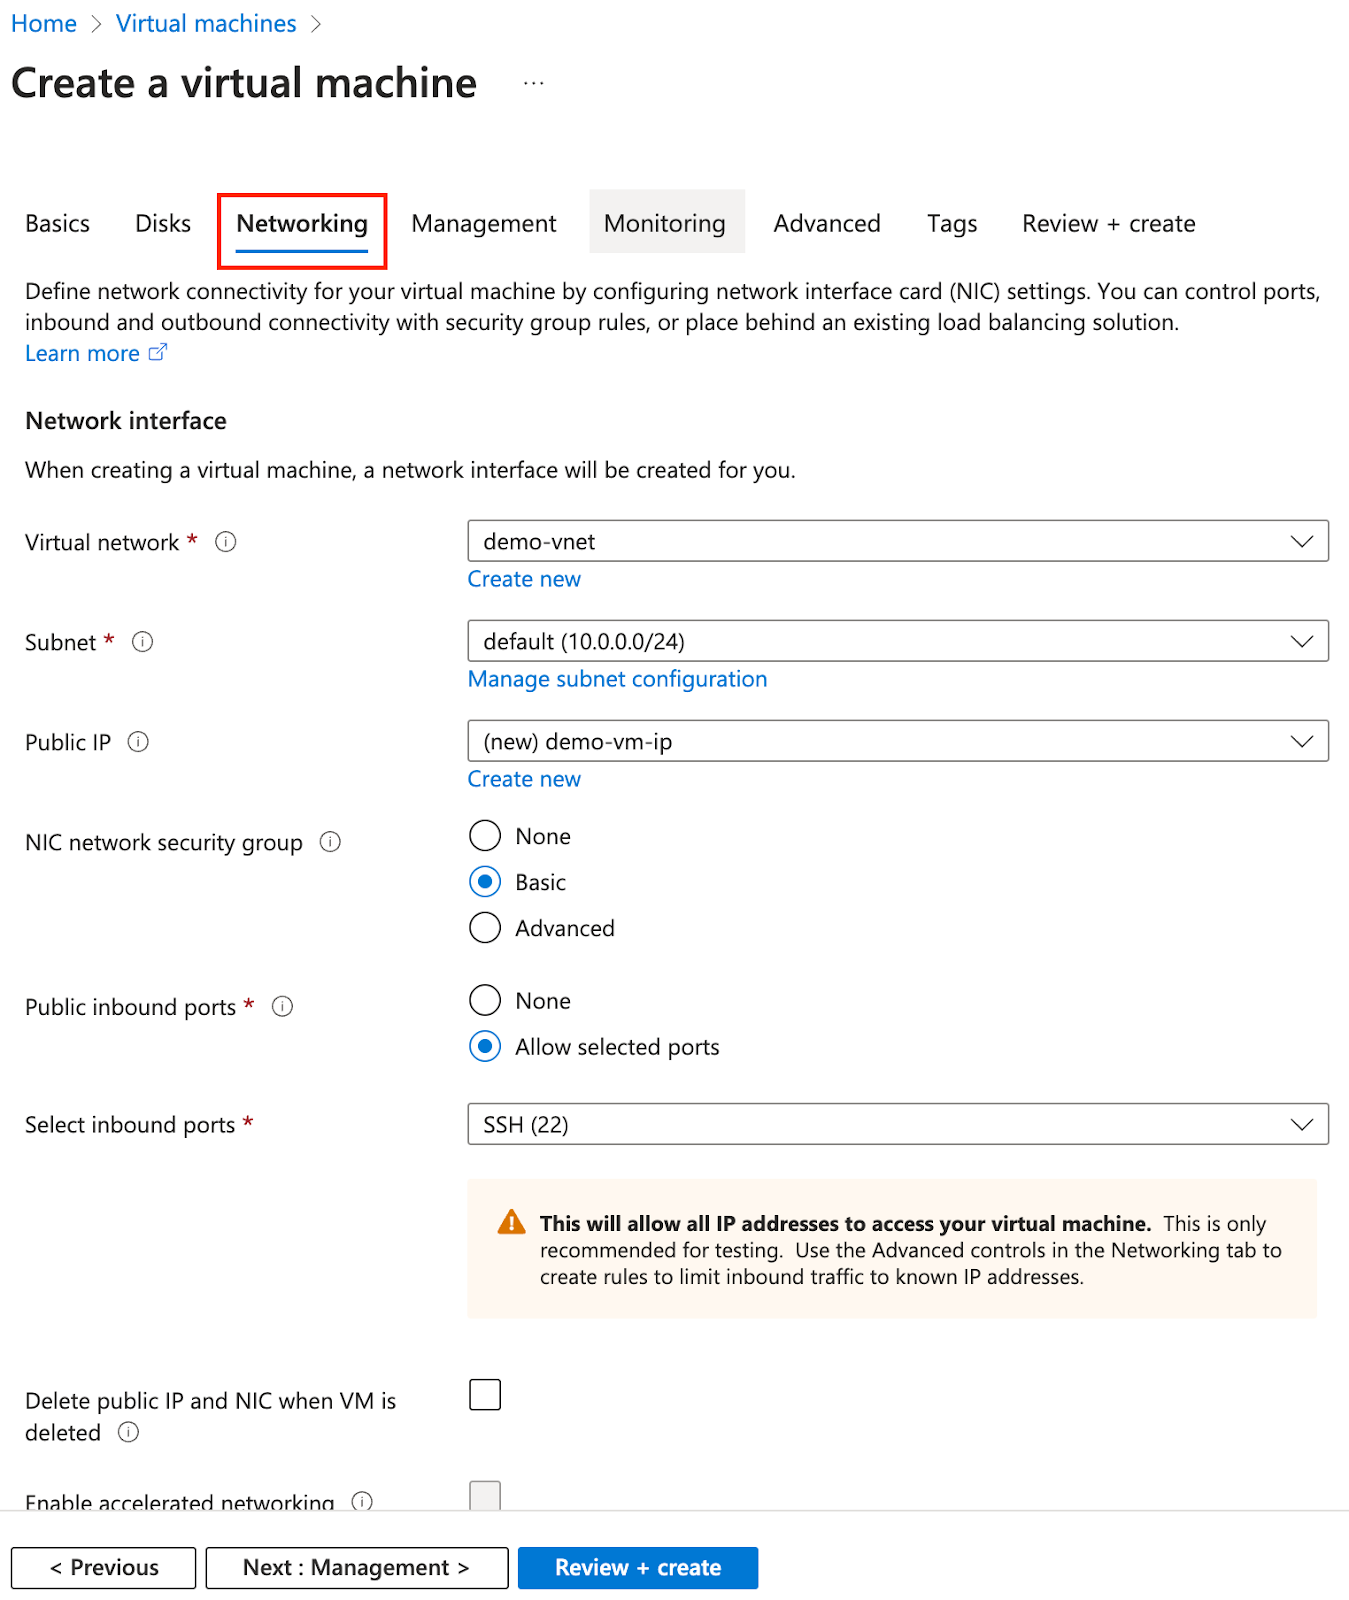
You can keep the rest default or choose at your discretion.
Add Gateway Connection
This step is performed on Azure. The Virtual Gateway you created must be successfully deployed before this step is performed.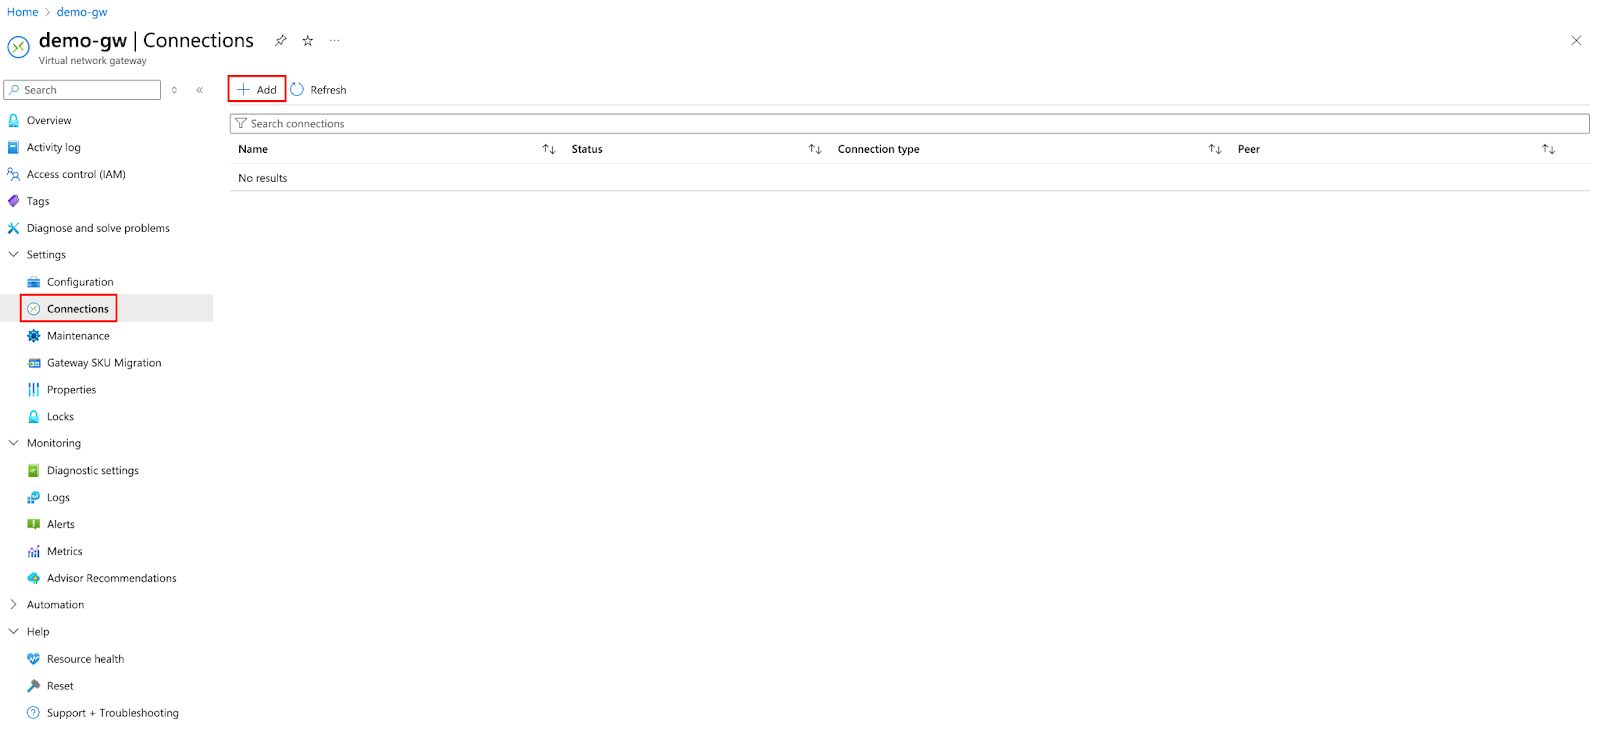
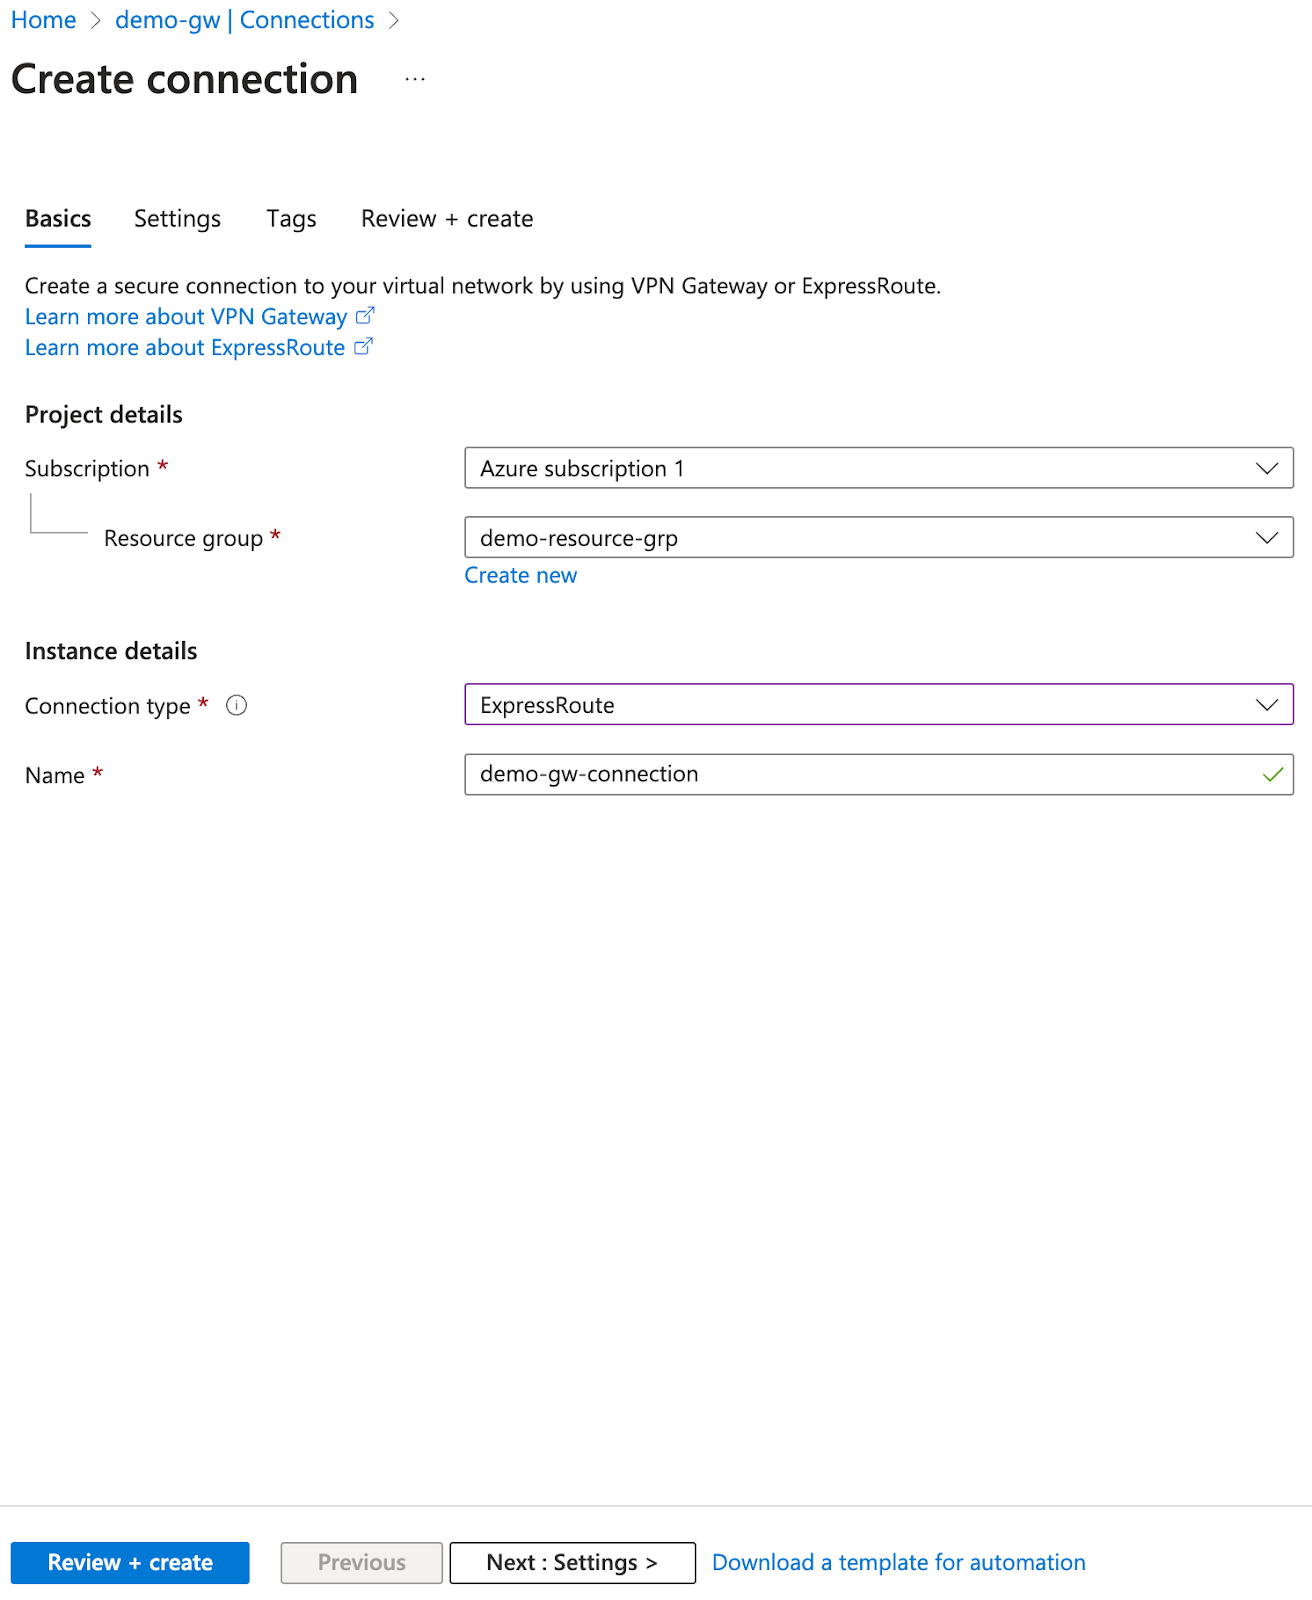
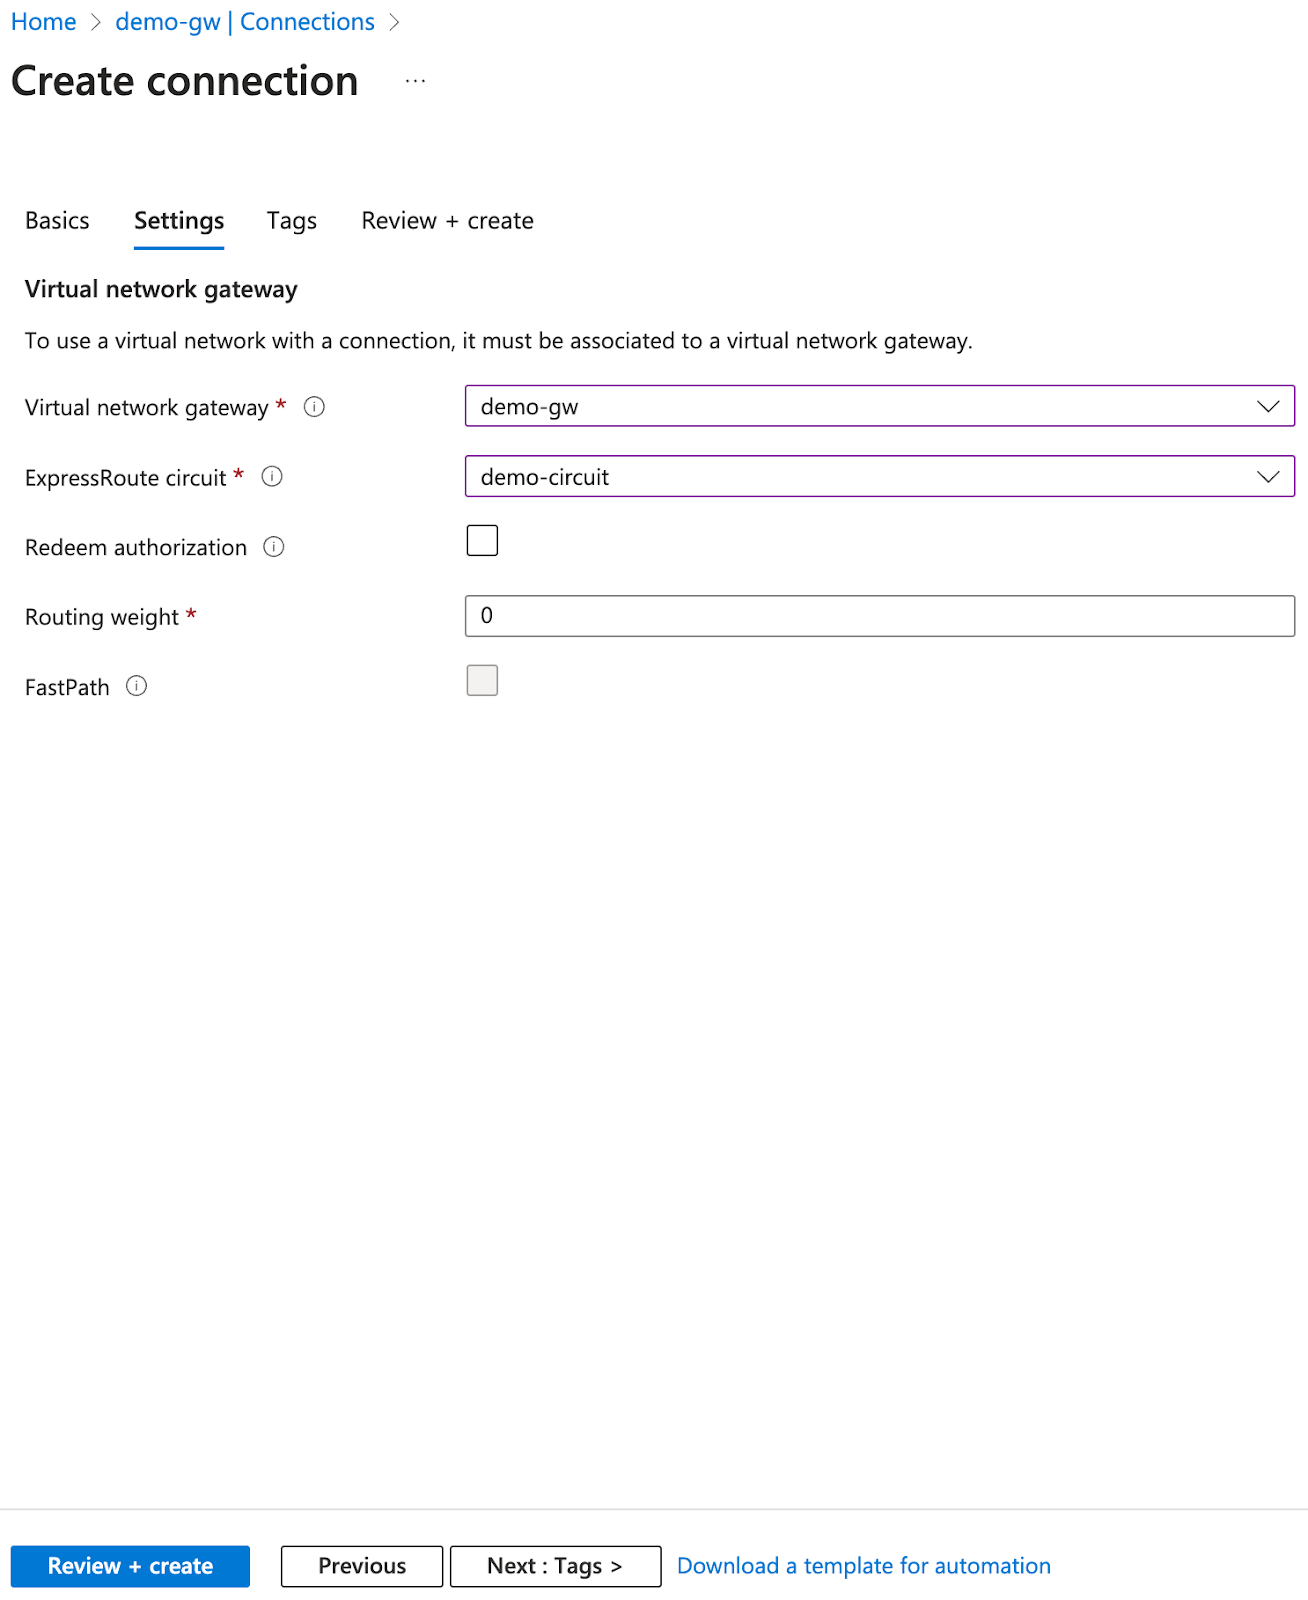
Validate Connection
This step is performed on Azure. Ensure all of the following are successfully deployed:- ExpressRoute
- Virtual network
- Virtual network gateway & connection
- Virtual machine
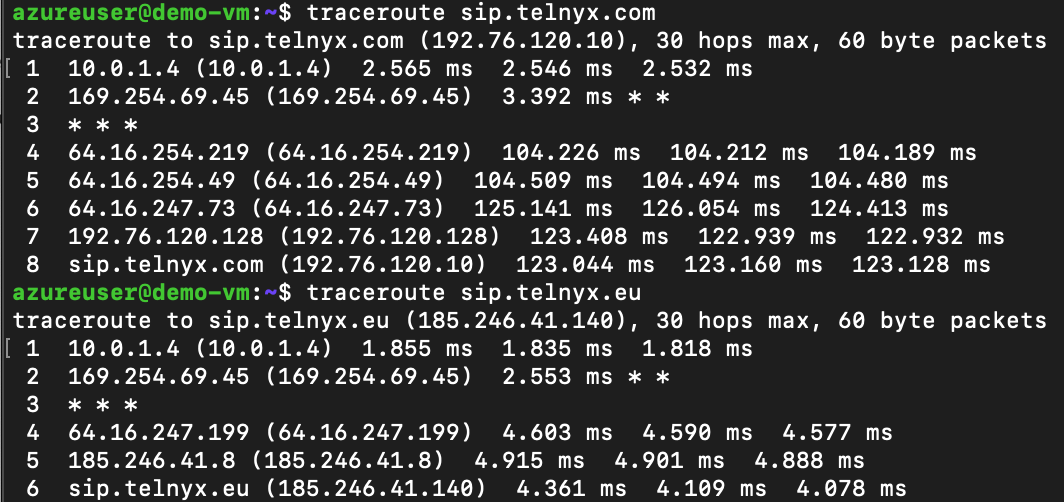
API Reference (Network)
Regions
- List all Regions: List all regions and the interfaces that region supports
Networks
- List all Networks: List all Networks.
- Create a Network: Create a new Network.
- Delete a Network: Delete a Network.
- Retrieve a Network: Retrieve a Network.
- Update a Network: Update a Network.
- Delete Default Gateway.: Delete Default Gateway.
- Get Default Gateway status.: Get Default Gateway status.
- Create Default Gateway.: Create Default Gateway.
- List all Interfaces for a Network.: List all Interfaces for a Network.
WireGuard Interfaces
- List all WireGuard Interfaces: List all WireGuard Interfaces.
- Create a WireGuard Interface: Create a new WireGuard Interface. Current limitation of 10 interfaces per user can be created.
- Delete a WireGuard Interface: Delete a WireGuard Interface.
- Retrieve a WireGuard Interfaces: Retrieve a WireGuard Interfaces.
- List all WireGuard Peers: List all WireGuard peers.
- Create a WireGuard Peer: Create a new WireGuard Peer. Current limitation of 5 peers per interface can be created.
- Delete the WireGuard Peer: Delete the WireGuard peer.
- Retrieve the WireGuard Peer: Retrieve the WireGuard peer.
- Update the WireGuard Peer: Update the WireGuard peer.
- Retrieve Wireguard config template for Peer: Retrieve Wireguard config template for Peer
Public Internet Gateways
- List all Public Internet Gateways: List all Public Internet Gateways.
- Create a Public Internet Gateway: Create a new Public Internet Gateway.
- Delete a Public Internet Gateway: Delete a Public Internet Gateway.
- Retrieve a Public Internet Gateway: Retrieve a Public Internet Gateway.
Virtual Cross Connects
- List all Virtual Cross Connects: List all Virtual Cross Connects.
- Create a Virtual Cross Connect: Create a new Virtual Cross Connect.<br /><br />For AWS and GCE, you have the option of creating the primary connection first and the secondary connection later…
- Delete a Virtual Cross Connect: Delete a Virtual Cross Connect.
- Retrieve a Virtual Cross Connect: Retrieve a Virtual Cross Connect.
- Update the Virtual Cross Connect: Update the Virtual Cross Connect.<br /><br />Cloud IPs can only be patched during the
createdstate, as GCE will only inform you of your generated IP once th… - List Virtual Cross Connect Cloud Coverage: List Virtual Cross Connects Cloud Coverage.<br /><br />This endpoint shows which cloud regions are available for the
location_codeyour Virtual Cross Connect…
Global IPs
- List all Global IPs: List all Global IPs.
- Create a Global IP: Create a Global IP.
- Delete a Global IP: Delete a Global IP.
- Retrieve a Global IP: Retrieve a Global IP.
- List all Global IP Allowed Ports: List all Global IP Allowed Ports
- Global IP Assignment Health Check Metrics: Retrieve health check metrics for your Global IP assignments.
- List all Global IP assignments: List all Global IP assignments.
- Create a Global IP assignment: Create a Global IP assignment.
- Delete a Global IP assignment: Delete a Global IP assignment.
- Retrieve a Global IP assignment: Retrieve a Global IP assignment.
- Update a Global IP assignment: Update a Global IP assignment.
- List all Global IP Health check types: List all Global IP Health check types.
- List all Global IP health checks: List all Global IP health checks.
- Create a Global IP health check: Create a Global IP health check.
- Delete a Global IP health check: Delete a Global IP health check.
- Retrieve a Global IP health check: Retrieve a Global IP health check.
- Global IP Latency Metrics: Retrieve latency metrics measured for your Global IPs.
- List all Global IP Protocols: List all Global IP Protocols
- Global IP Usage Metrics: Retrieve usage metrics for your Global IPs.
- Global IP Assignment Usage Metrics: Retrieve usage metrics for your Global IP assignments.
Private Wireless Gateways
- Get all Private Wireless Gateways: Get all Private Wireless Gateways belonging to the user.
- Create a Private Wireless Gateway: Asynchronously create a Private Wireless Gateway for SIM cards for a previously created network. This operation may take several minutes so you can check the P…
- Delete a Private Wireless Gateway: Deletes the Private Wireless Gateway.
- Get a Private Wireless Gateway: Retrieve information about a Private Wireless Gateway.