> ## Documentation Index
> Fetch the complete documentation index at: https://developers.telnyx.com/llms.txt
> Use this file to discover all available pages before exploring further.
# WireGuard Gateway (WGW)
> Configure a WireGuard Gateway (WGW) on Telnyx Networking to terminate WireGuard VPN tunnels from clients into your private cloud network.
On naming convention: in the [API Reference](/api-reference/wireguard-interfaces/list-all-wireguard-interfaces), certain legacy documentations, and the Mission Control Portal, WireGuard Gateways are referred to as "Wireguard Interfaces".
In this guide and all guides under the "Networking" collection, the term **WireGuard Gateway** is used consistently.
The devices that connect to it are referred to as **WireGuard Peers** or simply **Peers**
## Introduction
WireGuard Gateway (WGW) is an element to which peers can connect and form a VPN over the public internet. It's built on top of the [WireGuard](https://www.wireguard.com/) implementation.
## Creating a WGW
### Step 1: Create a Network
Follow [this guide](https://developers.telnyx.com/docs/network/networks).
### Step 2: Check for Coverage
Follow [this guide](https://developers.telnyx.com/docs/network/coverage). Use `filter[available_services][contains]=cloud_vpn` to look for a desired site at which to deploy the WGW. `ashburn-va` is chosen for the subsequent steps.
### Step 3: Create a WGW
Using the network created from Step 1 and the chosen region from Step 2, create the WGW.
Once a WGW is created on a specific network, it cannot be "migrated" to another one; it needs to be recreated on the other network. Double check the correct `network_id` is used in the following API request.
```
POST /v2/wireguard_interfaces HTTP/1.1
Host: api.telnyx.com
Content-Type: application/json
Authorization: Bearer XXX
Content-Length: 115
{
"network_id": "91446ee3-9f6a-49ed-8d9b-1bd3e1529324",
"name": "wgw-08071029",
"region_code": "ashburn-va"
}
```
It's not yet ready to be used immediately after the creation since its status is `provisioning`.
```
{
"data": {
"name": "wgw-08071029",
"status": "provisioning",
"public_key": "XXX",
"created_at": "2024-08-07T15:29:52.068774Z",
"network_id": "91446ee3-9f6a-49ed-8d9b-1bd3e1529324",
"enable_sip_trunking": false,
"id": "b6a10cb9-6c1a-40bd-96e3-d4f8eb2bd6c5",
"region_code": "ashburn-va",
"updated_at": "2024-08-07T15:29:53.493104Z",
"region": {
"code": "ashburn-va",
"name": "Ashburn VA, US",
"record_type": "region"
},
"record_type": "cloud_vpn",
"endpoint": "64.16.243.3:5107",
"server_ip_address": "172.27.0.1/24"
}
}
```
* `endpoint` denotes the publicly routable IP to which peers will connect over the public internet.
* `server_ip_address` is the private subnet range the WGW and peers will use with WGW occupying the first usable IP.
### Step 4: Wait for Status Transition
The expected time for `status` to transition to `provisioned` is approximately 5 minutes. You can poll the WGW to check for `status`.
```
GET /v2/wireguard_interfaces/b6a10cb9-6c1a-40bd-96e3-d4f8eb2bd6c5 HTTP/1.1
Host: api.telnyx.com
Authorization: Bearer XXX
```
## Creating Peers
In the following example, a peer is created for the WGW from the previous section.
```
POST /v2/wireguard_peers HTTP/1.1
Host: api.telnyx.com
Content-Type: application/json
Authorization: Bearer XXX
Content-Length: 102
{
"name": "mbp-local-peer",
"wireguard_interface_id": "b6a10cb9-6c1a-40bd-96e3-d4f8eb2bd6c5"
}
```
In the response, you are given the key pair with which to configure your peer. `private_key` is only given to you **ONCE** in the creation API response. It must be stored by you.
```
{
"data": {
"name": "mbp-local-peer",
"public_key": "ZZZ",
"last_seen": null,
"created_at": "2024-08-07T15:45:13.569576Z",
"id": "7fc4c14e-ff94-4a97-b156-35f1feeb29b8",
"wireguard_interface_id": "b6a10cb9-6c1a-40bd-96e3-d4f8eb2bd6c5",
"updated_at": "2024-08-07T15:45:13.922425Z",
"record_type": "wireguard_peer",
"private_key": "YYY"
}
}
```
Simpler still, you may use the following API to obtain the `conf` file template.
```
GET /v2/wireguard_peers/7fc4c14e-ff94-4a97-b156-35f1feeb29b8/config HTTP/1.1
Host: api.telnyx.com
Authorization: Bearer XXX
```
After inserting the `private_key`, you can import the `conf` file on the peer.
```bash theme={null}
# Telnyx CloudVPN config. Target OS: Linux
[Interface]
PrivateKey = YYY
Address = 172.27.0.2/32
[Peer]
PublicKey = XXX
AllowedIPs = 172.27.0.0/24
Endpoint = 64.16.243.3:5107
PersistentKeepalive = 1
```
`[Interface]` refers to the local peer.
* `PrivateKey` should have the value returned in the `private_key` parameter.
* `Address` is the next available IP in the subnet range. In this case, since this is the first peer, it gets the next IP after the WGW.
`[Peer]` refers to the WGW created previously.
* `PublicKey` is that of the WGW
* `AllowedIPs` is the network this peer has access to. See [this excellent explanation](https://github.com/pirate/wireguard-docs?tab=readme-ov-file#allowedips).
* `Endpoint` is the publicly exposed IP to which peers can connect
* `PersistentKeepalive` is a default parameter that can be ignored.
## Configuring Peers
With the `conf` file, you can import that onto the host. Here are the environment specific guides:
* [Linux-like environment](https://developers.telnyx.com/docs/network/wireguard-peer-config/linux)
* [macOS](https://developers.telnyx.com/docs/network/wireguard-peer-config/macos)
## Use Cases
In this section, we introduce 3 use cases that WGW can accommodate by itself.
### Use Case 1: Multi-Cloud Network
WGW can be used as a VPN concentrator server to facilitate traffic between peers.
In the following example, we will construct this architecture.
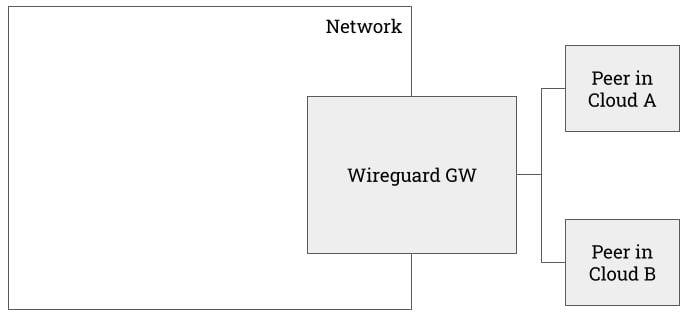 * Peer in Cloud A is an EC2 instance in AWS.
* Peer in Cloud B is a Droplet in DigitalOcean.
It will be demonstrated that it's ***extremely trivial*** to set up a "multicloud" network.
#### Peer in Cloud A
This EC2 instance runs an apache server but only allows inbound SSH traffic.
* Peer in Cloud A is an EC2 instance in AWS.
* Peer in Cloud B is a Droplet in DigitalOcean.
It will be demonstrated that it's ***extremely trivial*** to set up a "multicloud" network.
#### Peer in Cloud A
This EC2 instance runs an apache server but only allows inbound SSH traffic.
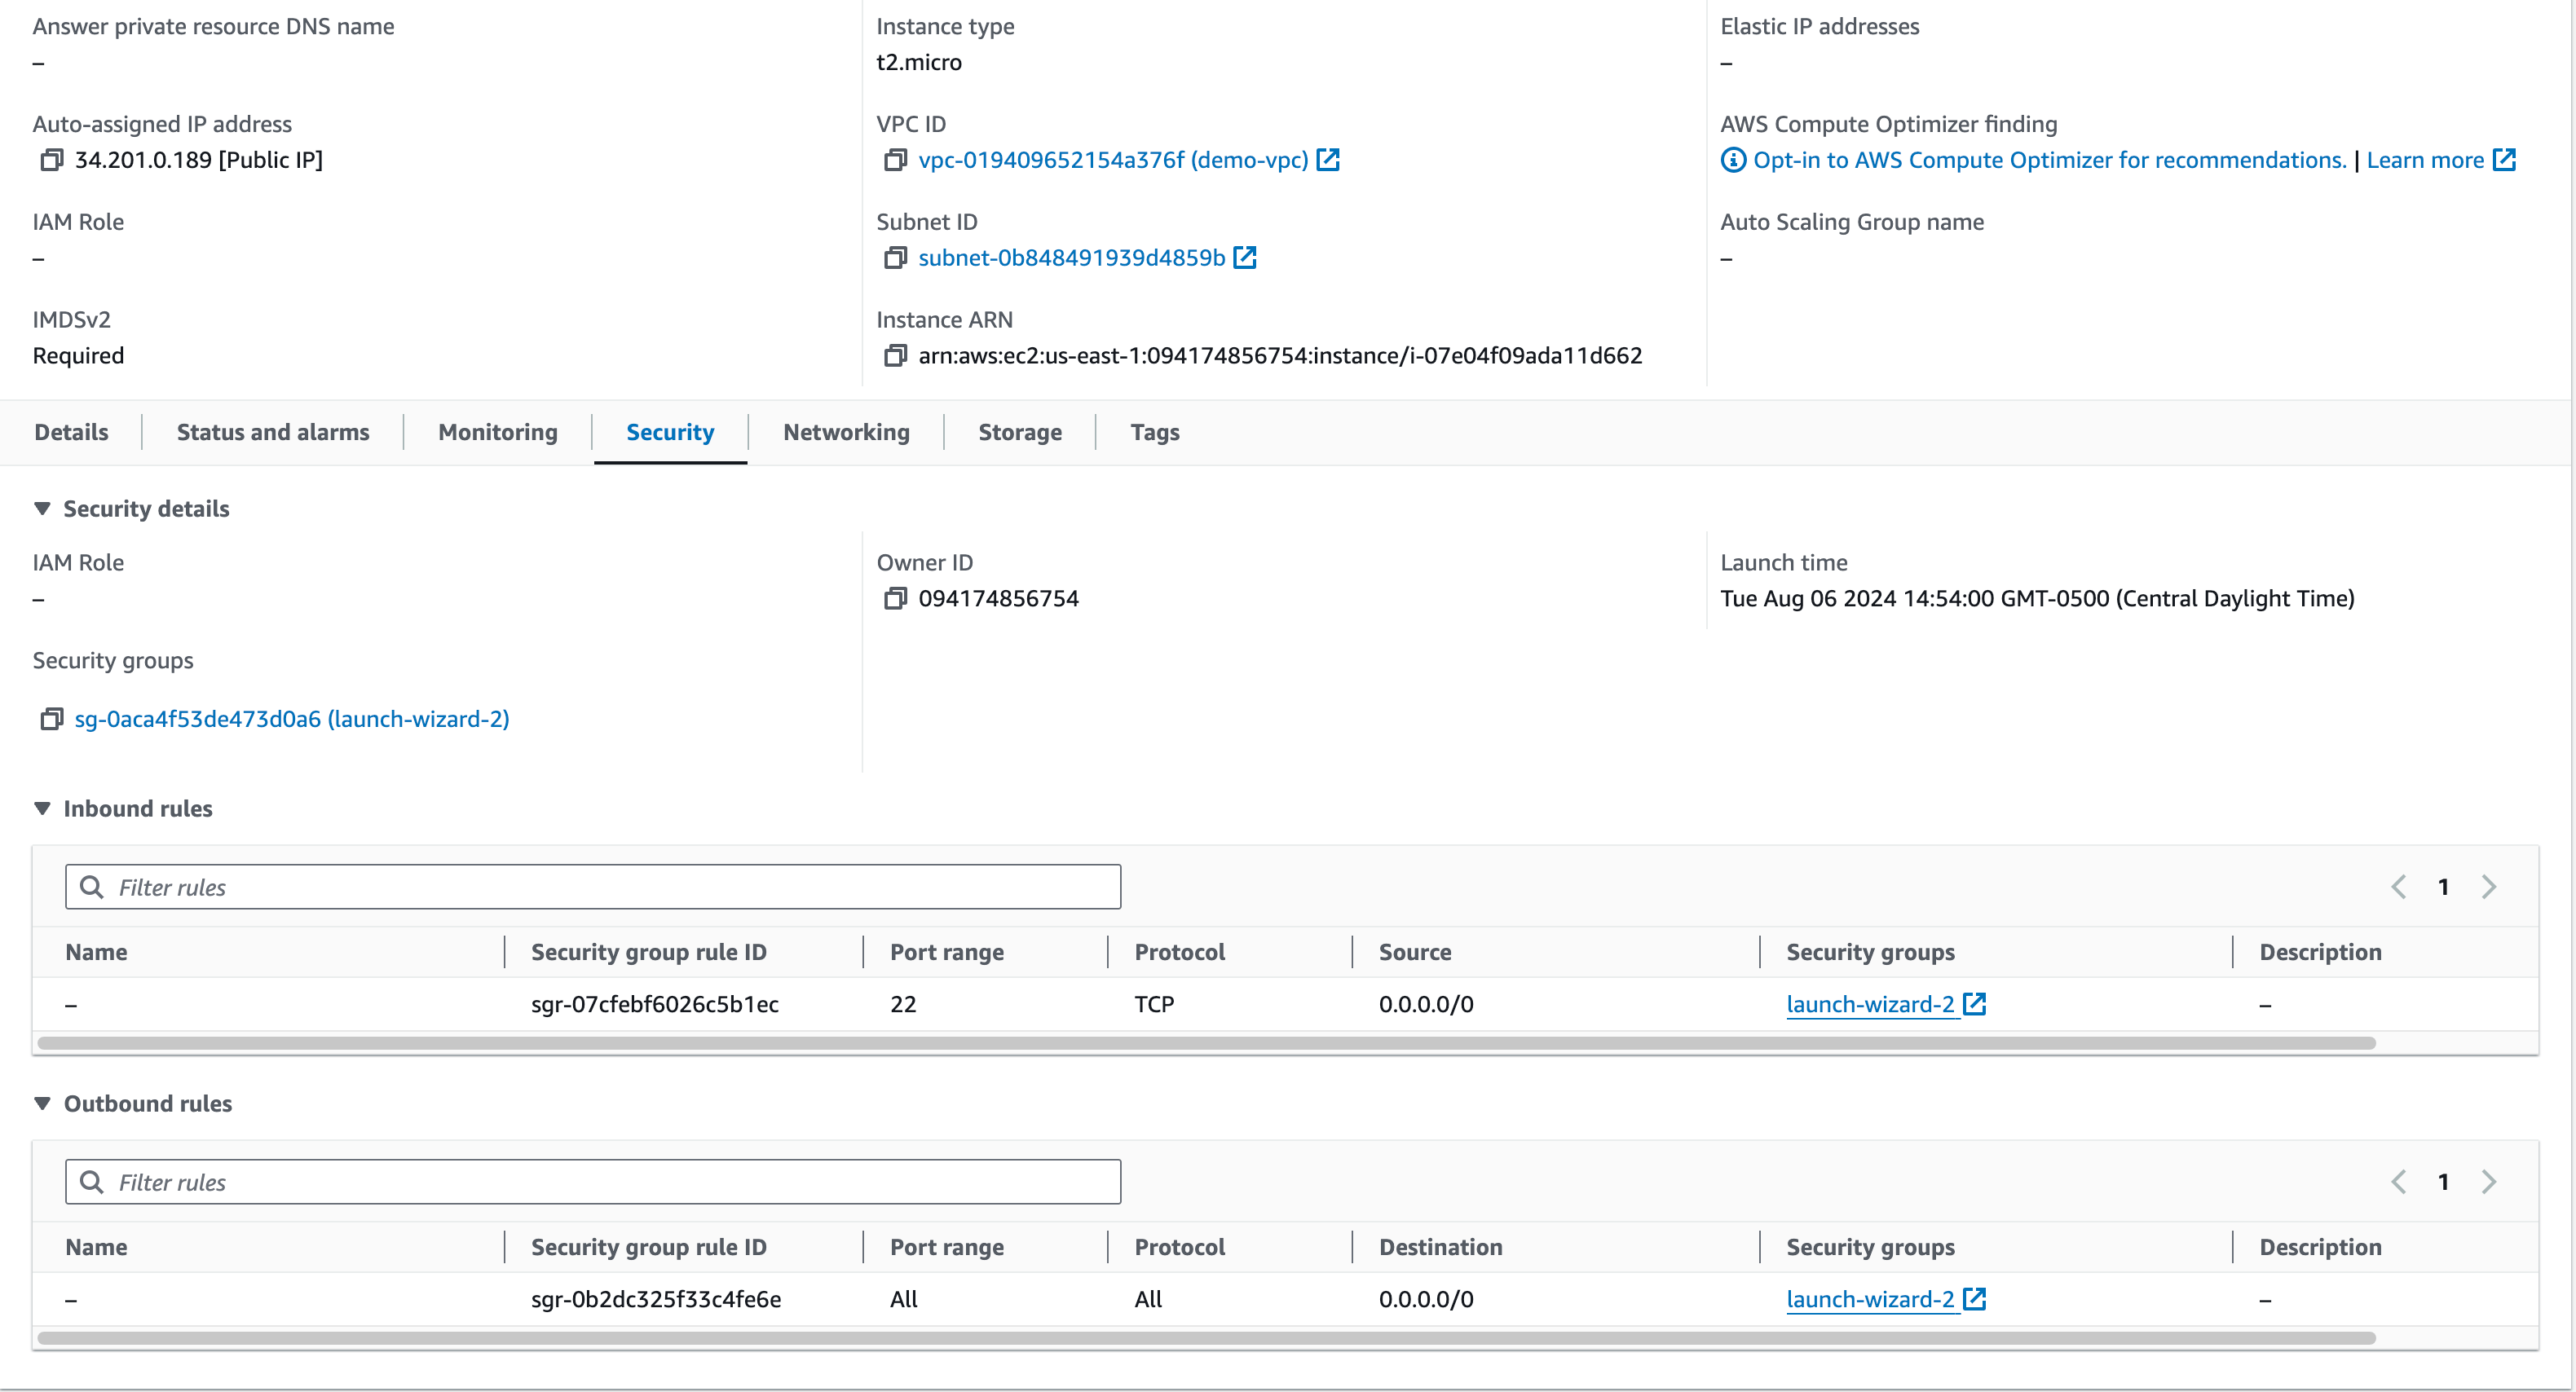 As a result, it's unreachable from the public internet.
```bash theme={null}
user@localhost ~ % ping 34.201.0.189
PING 34.201.0.189 (34.201.0.189): 56 data bytes
Request timeout for icmp_seq 0
Request timeout for icmp_seq 1
^C
--- 34.201.0.189 ping statistics ---
3 packets transmitted, 0 packets received, 100.0% packet loss
user@localhost ~ % curl 34.201.0.189
^C
```
However, it's connected to the WGW we created earlier.
```bash theme={null}
ubuntu@ip-10-10-11-10:~$ sudo wg show
interface: peer1
public key: Jt1zAJD6W2BZgOwtUsNY2KrMO0oRfUmfAEZGNEUZKiQ=
private key: (hidden)
listening port: 33174
peer: XYy8e5EKtE1F0fwwMgr792/9noYs53uRZBX5O3XJ4Eg=
endpoint: 64.16.243.3:5107
allowed ips: 172.27.0.0/24
latest handshake: 14 seconds ago
transfer: 124 B received, 596 B sent
persistent keepalive: every 1 second
```
#### Peer in Cloud B
Similarly, this Droplet instance runs an apache server but only allows inbound SSH traffic.
As a result, it's unreachable from the public internet.
```bash theme={null}
user@localhost ~ % ping 34.201.0.189
PING 34.201.0.189 (34.201.0.189): 56 data bytes
Request timeout for icmp_seq 0
Request timeout for icmp_seq 1
^C
--- 34.201.0.189 ping statistics ---
3 packets transmitted, 0 packets received, 100.0% packet loss
user@localhost ~ % curl 34.201.0.189
^C
```
However, it's connected to the WGW we created earlier.
```bash theme={null}
ubuntu@ip-10-10-11-10:~$ sudo wg show
interface: peer1
public key: Jt1zAJD6W2BZgOwtUsNY2KrMO0oRfUmfAEZGNEUZKiQ=
private key: (hidden)
listening port: 33174
peer: XYy8e5EKtE1F0fwwMgr792/9noYs53uRZBX5O3XJ4Eg=
endpoint: 64.16.243.3:5107
allowed ips: 172.27.0.0/24
latest handshake: 14 seconds ago
transfer: 124 B received, 596 B sent
persistent keepalive: every 1 second
```
#### Peer in Cloud B
Similarly, this Droplet instance runs an apache server but only allows inbound SSH traffic.
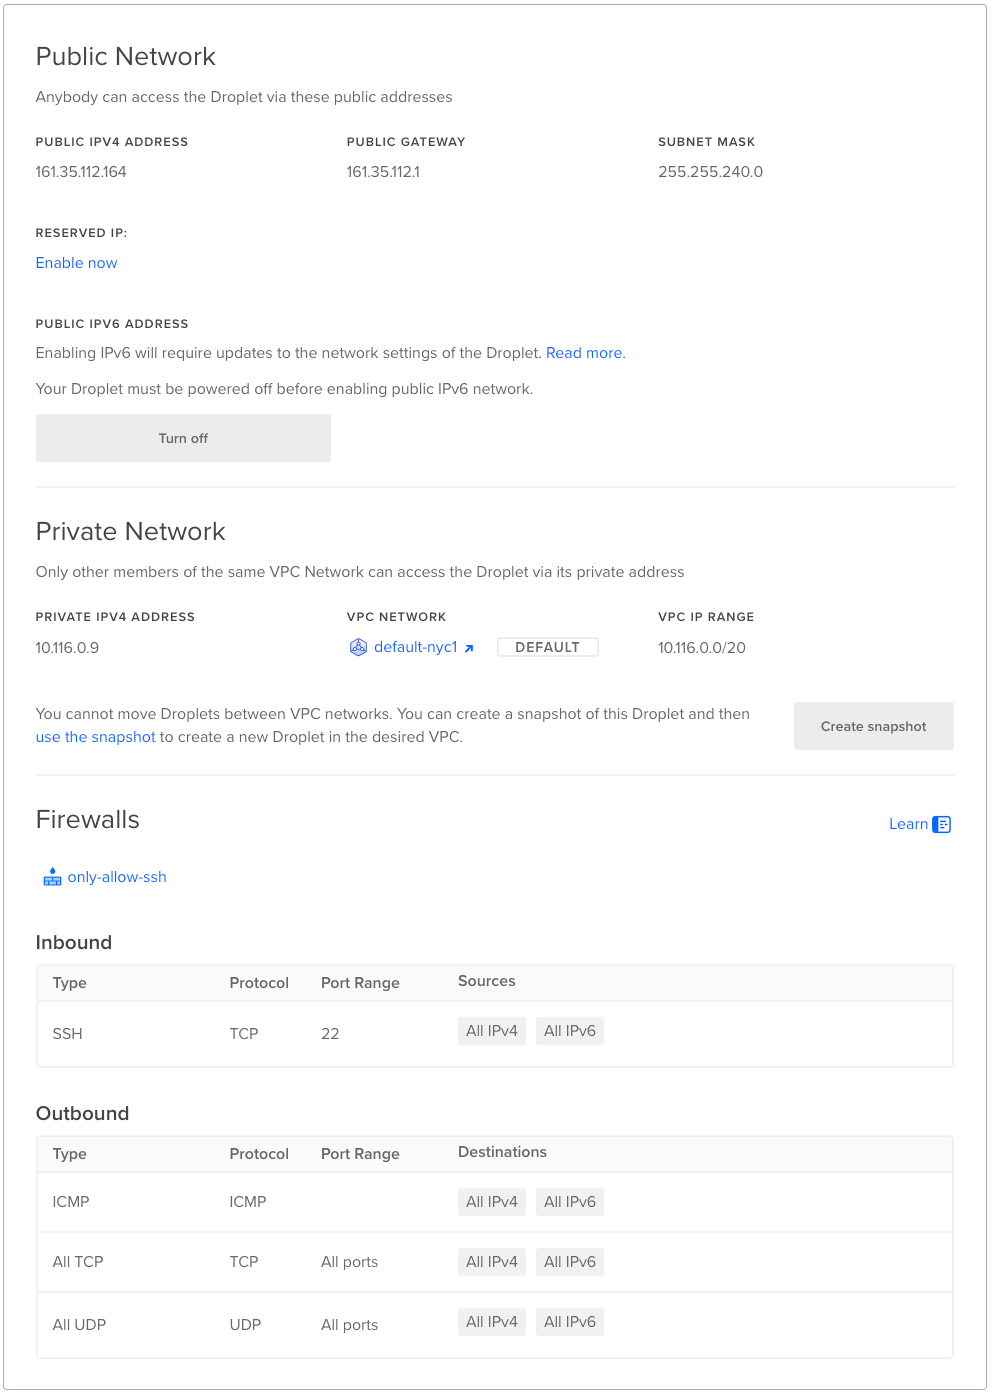 As a result, it's unreachable from the public internet.
```bash theme={null}
user@localhost ~ % ping 161.35.112.164
PING 161.35.112.164 (161.35.112.164): 56 data bytes
Request timeout for icmp_seq 0
Request timeout for icmp_seq 1
^C
--- 161.35.112.164 ping statistics ---
3 packets transmitted, 0 packets received, 100.0% packet loss
user@localhost ~ % curl 161.35.112.164
^C
```
However, it's connected to the WGW we created earlier.
```bash theme={null}
root@ubuntu-s-1vcpu-512mb-10gb-nyc1-01:~# sudo wg show
interface: peer2
public key: eAvskX/cBw10DpxPPcvItsFcBr2meAKOVgwFjysZnF4=
private key: (hidden)
listening port: 33951
peer: XYy8e5EKtE1F0fwwMgr792/9noYs53uRZBX5O3XJ4Eg=
endpoint: 64.16.243.3:5107
allowed ips: 172.27.0.0/24
latest handshake: 4 seconds ago
transfer: 124 B received, 308 B sent
persistent keepalive: every 1 second
```
#### Cross Cloud Boundary
Despite of the firewall rule configs in the respective environments, Peer 1 is able to talk to Peer 2 over the WireGuard subnet.
From Peer 1
```bash theme={null}
ubuntu@ip-10-10-11-10:~$ curl 172.27.0.3
I am the Droplet Peer in DigitalOcean
```
From Peer 2
```bash theme={null}
root@ubuntu-s-1vcpu-512mb-10gb-nyc1-01:~# curl 172.27.0.2
I am the EC2 Peer in AWS
```
This is readily extensible to peers running web services in various environments.
### Use Case 2: Private Access to Other Telnyx Services
If a WGW is created with `enable_sip_trunking`, the WGW will enable routing for all Telnyx public API endpoints.
As a result, it's unreachable from the public internet.
```bash theme={null}
user@localhost ~ % ping 161.35.112.164
PING 161.35.112.164 (161.35.112.164): 56 data bytes
Request timeout for icmp_seq 0
Request timeout for icmp_seq 1
^C
--- 161.35.112.164 ping statistics ---
3 packets transmitted, 0 packets received, 100.0% packet loss
user@localhost ~ % curl 161.35.112.164
^C
```
However, it's connected to the WGW we created earlier.
```bash theme={null}
root@ubuntu-s-1vcpu-512mb-10gb-nyc1-01:~# sudo wg show
interface: peer2
public key: eAvskX/cBw10DpxPPcvItsFcBr2meAKOVgwFjysZnF4=
private key: (hidden)
listening port: 33951
peer: XYy8e5EKtE1F0fwwMgr792/9noYs53uRZBX5O3XJ4Eg=
endpoint: 64.16.243.3:5107
allowed ips: 172.27.0.0/24
latest handshake: 4 seconds ago
transfer: 124 B received, 308 B sent
persistent keepalive: every 1 second
```
#### Cross Cloud Boundary
Despite of the firewall rule configs in the respective environments, Peer 1 is able to talk to Peer 2 over the WireGuard subnet.
From Peer 1
```bash theme={null}
ubuntu@ip-10-10-11-10:~$ curl 172.27.0.3
I am the Droplet Peer in DigitalOcean
```
From Peer 2
```bash theme={null}
root@ubuntu-s-1vcpu-512mb-10gb-nyc1-01:~# curl 172.27.0.2
I am the EC2 Peer in AWS
```
This is readily extensible to peers running web services in various environments.
### Use Case 2: Private Access to Other Telnyx Services
If a WGW is created with `enable_sip_trunking`, the WGW will enable routing for all Telnyx public API endpoints.
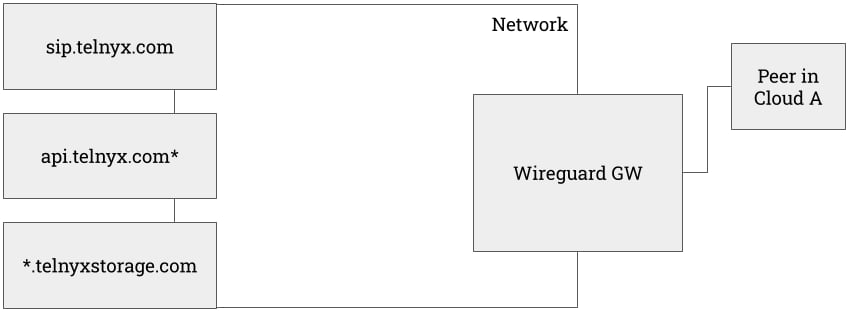 On the peer config, additional routes are added under `AllowedIPs`.
```
[Interface]
PrivateKey = XXX
Address = 172.27.0.2/32
[Peer]
PublicKey = jSSaLXXVEzYUM8N8IM+65YuuScL+Sf2DytZCdLhFSGo=
AllowedIPs = 172.27.0.0/24, 64.16.250.10/32, 64.16.250.11/32, 64.16.250.13/32, 103.115.244.145/32, 103.115.244.146/32, 185.246.41.140/32, 185.246.41.141/32, 192.76.120.10/32, 192.76.120.11/32, 192.76.120.31/32, 64.16.226.0/24, 64.16.227.0/24, 64.16.228.0/24, 64.16.230.0/24, 64.16.248.0/24, 64.16.249.0/24, 50.114.144.0/21, 185.246.41.128/25, 103.115.244.128/25, 64.16.239.98/32, 64.16.239.39/32, 64.16.239.82/32, 64.16.224.44/32
Endpoint = 64.16.243.15:5016
PersistentKeepalive = 1
```
As a result, traffic between a connected peer to Telnyx API, SIP, and Storage services will flow through the WGW (172.27.0.1) onto the Telnyx network as demonstrated below.
```
user@localhost ~ % traceroute sip.telnyx.com
traceroute to sip.telnyx.com (192.76.120.10), 64 hops max, 40 byte packets
1 172.27.0.1 (172.27.0.1) 6.708 ms 7.726 ms 7.133 ms
2 *^C
user@localhost ~ % traceroute api-direct.telnyx.com
traceroute to api-direct.telnyx.com (64.16.224.44), 64 hops max, 40 byte packets
1 172.27.0.1 (172.27.0.1) 7.673 ms 6.239 ms 6.488 ms
2 *^C
user@localhost ~ % traceroute us-central-1.telnyxcloudstorage.com
traceroute to us-central-1.telnyxcloudstorage.com (64.16.239.39), 64 hops max, 40 byte packets
1 172.27.0.1 (172.27.0.1) 6.885 ms 6.898 ms 6.621 ms
2 * *^C
user@localhost ~ % aws s3api list-buckets --profile "*.telnyxcloudstorage.com" --endpoint-url https://us-central-1.telnyxcloudstorage.com
{
"Buckets": [
{
"Name": "bucket1",
"CreationDate": "2024-03-26T17:54:09.271000+00:00"
},
{
"Name": "bucket2",
"CreationDate": "2024-03-26T16:51:51.967000+00:00"
},
{
"Name": "bucket3",
"CreationDate": "2023-11-29T13:50:59.837000+00:00"
}
],
"Owner": {
"DisplayName": "xxx",
"ID": "xxx"
}
}
```
This arrangement is extremely useful in the case where we have to lock down public routing in the event of an extreme DDoS attack.
### Use Case 3: Cross-Region Network
The previous architecture can be extended to the following one.
On the peer config, additional routes are added under `AllowedIPs`.
```
[Interface]
PrivateKey = XXX
Address = 172.27.0.2/32
[Peer]
PublicKey = jSSaLXXVEzYUM8N8IM+65YuuScL+Sf2DytZCdLhFSGo=
AllowedIPs = 172.27.0.0/24, 64.16.250.10/32, 64.16.250.11/32, 64.16.250.13/32, 103.115.244.145/32, 103.115.244.146/32, 185.246.41.140/32, 185.246.41.141/32, 192.76.120.10/32, 192.76.120.11/32, 192.76.120.31/32, 64.16.226.0/24, 64.16.227.0/24, 64.16.228.0/24, 64.16.230.0/24, 64.16.248.0/24, 64.16.249.0/24, 50.114.144.0/21, 185.246.41.128/25, 103.115.244.128/25, 64.16.239.98/32, 64.16.239.39/32, 64.16.239.82/32, 64.16.224.44/32
Endpoint = 64.16.243.15:5016
PersistentKeepalive = 1
```
As a result, traffic between a connected peer to Telnyx API, SIP, and Storage services will flow through the WGW (172.27.0.1) onto the Telnyx network as demonstrated below.
```
user@localhost ~ % traceroute sip.telnyx.com
traceroute to sip.telnyx.com (192.76.120.10), 64 hops max, 40 byte packets
1 172.27.0.1 (172.27.0.1) 6.708 ms 7.726 ms 7.133 ms
2 *^C
user@localhost ~ % traceroute api-direct.telnyx.com
traceroute to api-direct.telnyx.com (64.16.224.44), 64 hops max, 40 byte packets
1 172.27.0.1 (172.27.0.1) 7.673 ms 6.239 ms 6.488 ms
2 *^C
user@localhost ~ % traceroute us-central-1.telnyxcloudstorage.com
traceroute to us-central-1.telnyxcloudstorage.com (64.16.239.39), 64 hops max, 40 byte packets
1 172.27.0.1 (172.27.0.1) 6.885 ms 6.898 ms 6.621 ms
2 * *^C
user@localhost ~ % aws s3api list-buckets --profile "*.telnyxcloudstorage.com" --endpoint-url https://us-central-1.telnyxcloudstorage.com
{
"Buckets": [
{
"Name": "bucket1",
"CreationDate": "2024-03-26T17:54:09.271000+00:00"
},
{
"Name": "bucket2",
"CreationDate": "2024-03-26T16:51:51.967000+00:00"
},
{
"Name": "bucket3",
"CreationDate": "2023-11-29T13:50:59.837000+00:00"
}
],
"Owner": {
"DisplayName": "xxx",
"ID": "xxx"
}
}
```
This arrangement is extremely useful in the case where we have to lock down public routing in the event of an extreme DDoS attack.
### Use Case 3: Cross-Region Network
The previous architecture can be extended to the following one.
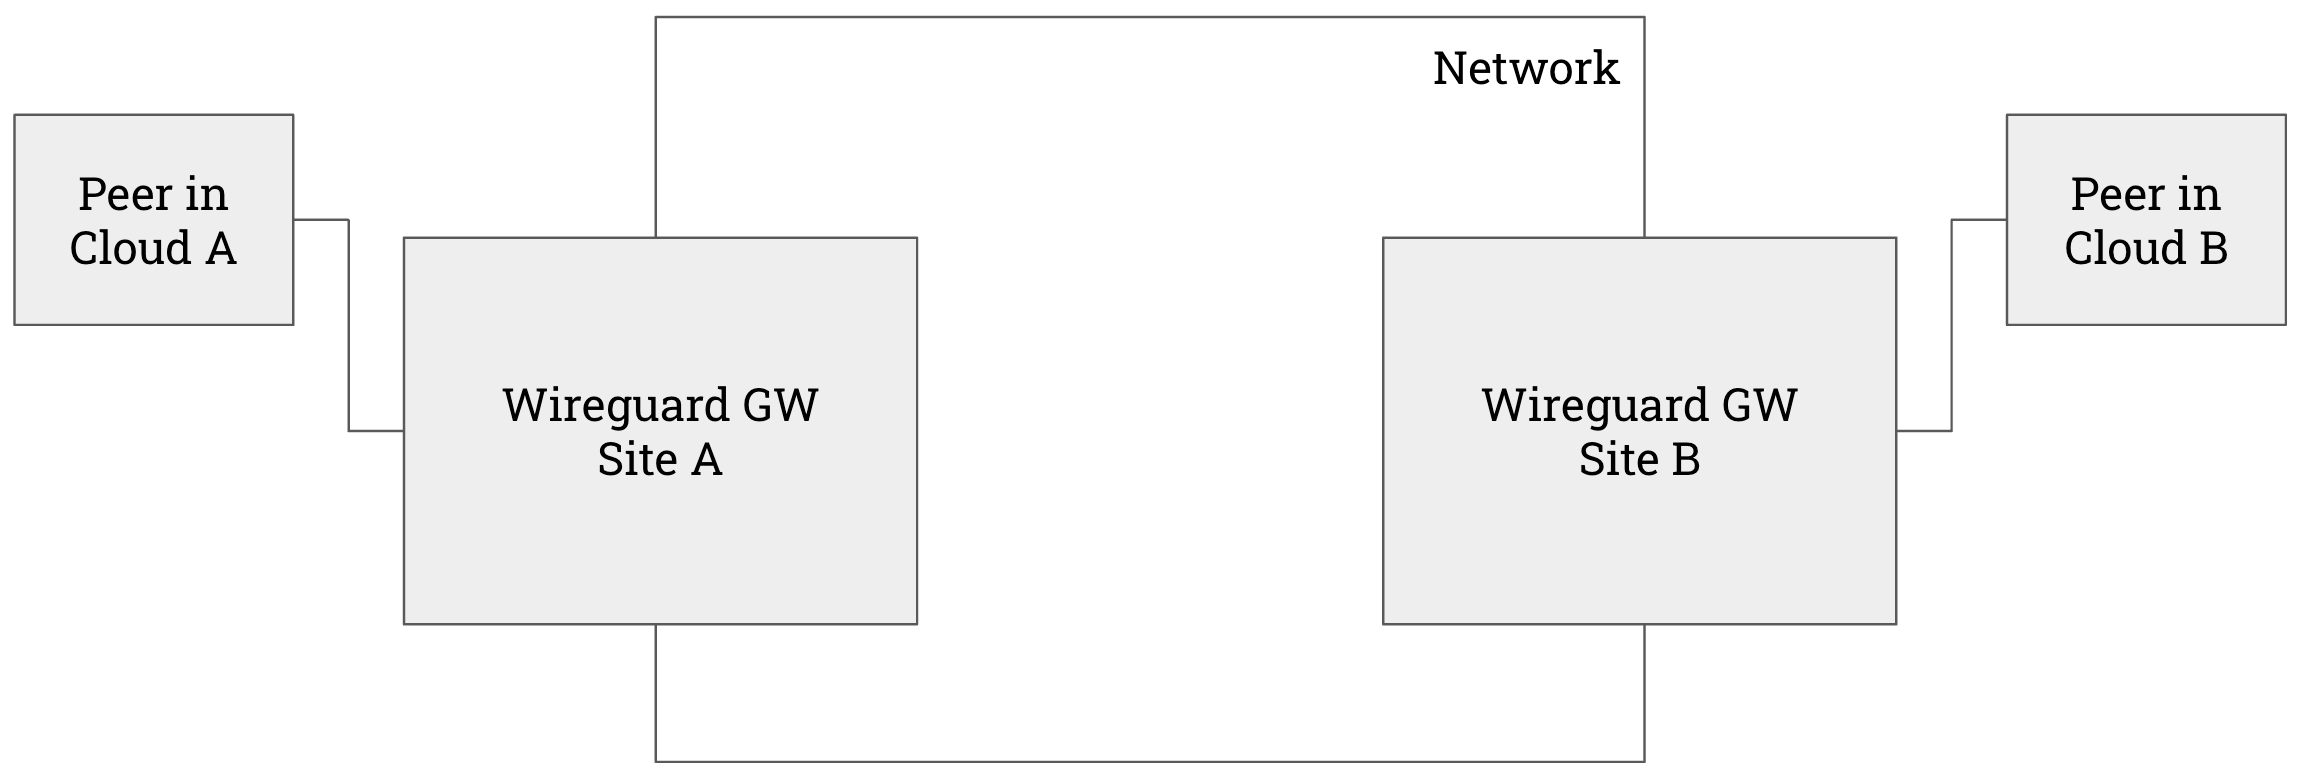 In this example ---
* Site A is Telnyx Ashburn
* Site B is Telnyx Amsterdam
* Cloud A is AWS
* Cloud B is Digital Ocean
Traffic between the two peers ride the Telnyx backbone between Ashburn and Amsterdam.
Coming Soon.
### Other use cases
* See Global IP (Coming Soon)
* See [Internet Gateway (IGW) Guide](https://developers.telnyx.com/docs/network/gateways/internet-gateway)
* See Private Wireless Gateway (PGW) Guide (Coming Soon)
## Costs
* MRC for each WGW instance is \$10.
* Connected Peers are free of charge.
## API References
* [WGW](/api-reference/wireguard-interfaces/create-a-wireguard-interface)
* Peers
In this example ---
* Site A is Telnyx Ashburn
* Site B is Telnyx Amsterdam
* Cloud A is AWS
* Cloud B is Digital Ocean
Traffic between the two peers ride the Telnyx backbone between Ashburn and Amsterdam.
Coming Soon.
### Other use cases
* See Global IP (Coming Soon)
* See [Internet Gateway (IGW) Guide](https://developers.telnyx.com/docs/network/gateways/internet-gateway)
* See Private Wireless Gateway (PGW) Guide (Coming Soon)
## Costs
* MRC for each WGW instance is \$10.
* Connected Peers are free of charge.
## API References
* [WGW](/api-reference/wireguard-interfaces/create-a-wireguard-interface)
* Peers