
Wireguard Gateway (WGW)

CAUTION

On naming convention: in the API Reference, certain legacy documentations, and the Mission Control Portal, Wireguard Gateways are referred to as "Wireguard Interfaces". In this guide and all guides under the "Networking" collection, the term Wireguard Gateway is used consistently. The devices that connect to it are referred to as Wireguard Peers or simply Peers

Introduction

Wireguard Gateway (WGW) is an element to which peers can connect and form a VPN over the public internet. It's built on top of the Wireguard implementation.

Creating a WGW

Step 1: Create a Network

Follow this guide.

Step 2: Check for Coverage

Follow this guide. Use filter[available_services][contains]=cloud_vpn to look for a desired site at which to deploy the WGW. ashburn-va is chosen for the subsequent steps.

Step 3: Create a WGW

Using the network created from Step 1 and the chosen region from Step 2, create the WGW.

CAUTION

Once a WGW is created on a specific network, it cannot be "migrated" to another one; it needs to be recreated on the other network. Double check the correct network_id is used in the following API request.

POST /v2/wireguard_interfaces HTTP/1.1
Host: api.telnyx.com
Content-Type: application/json
Authorization: Bearer XXX
Content-Length: 115

{
"network_id": "91446ee3-9f6a-49ed-8d9b-1bd3e1529324",
"name": "wgw-08071029",
"region_code": "ashburn-va"
}

It's not yet ready to be used immediately after the creation since its status is provisioning.

{
"data": {
"name": "wgw-08071029",
"status": "provisioning",
"public_key": "XXX",
"created_at": "2024-08-07T15:29:52.068774Z",
"network_id": "91446ee3-9f6a-49ed-8d9b-1bd3e1529324",
"enable_sip_trunking": false,
"id": "b6a10cb9-6c1a-40bd-96e3-d4f8eb2bd6c5",
"region_code": "ashburn-va",
"updated_at": "2024-08-07T15:29:53.493104Z",
"region": {
"code": "ashburn-va",
"name": "Ashburn VA, US",
"record_type": "region"
},
"record_type": "cloud_vpn",
"endpoint": "64.16.243.3:5107",
"server_ip_address": "172.27.0.1/24"
}
}
  • endpoint denotes the publicly routable IP to which peers will connect over the public internet.
  • server_ip_address is the private subnet range the WGW and peers will use with WGW occupying the first usable IP.

Step 4: Wait for Status Transition

The expected time for status to transition to provisioned is approximately 5 minutes. You can poll the WGW to check for status.

GET /v2/wireguard_interfaces/b6a10cb9-6c1a-40bd-96e3-d4f8eb2bd6c5 HTTP/1.1
Host: api.telnyx.com
Authorization: Bearer XXX

Creating Peers

In the following example, a peer is created for the WGW from the previous section.

POST /v2/wireguard_peers HTTP/1.1
Host: api.telnyx.com
Content-Type: application/json
Authorization: Bearer XXX
Content-Length: 102

{
"name": "mbp-local-peer",
"wireguard_interface_id": "b6a10cb9-6c1a-40bd-96e3-d4f8eb2bd6c5"
}

In the response, you are given the key pair with which to configure your peer. private_key is only given to you ONCE in the creation API response. It must be stored by you.

{
"data": {
"name": "mbp-local-peer",
"public_key": "ZZZ",
"last_seen": null,
"created_at": "2024-08-07T15:45:13.569576Z",
"id": "7fc4c14e-ff94-4a97-b156-35f1feeb29b8",
"wireguard_interface_id": "b6a10cb9-6c1a-40bd-96e3-d4f8eb2bd6c5",
"updated_at": "2024-08-07T15:45:13.922425Z",
"record_type": "wireguard_peer",
"private_key": "YYY"
}
}

Simpler still, you may use the following API to obtain the conf file template.

GET /v2/wireguard_peers/7fc4c14e-ff94-4a97-b156-35f1feeb29b8/config HTTP/1.1
Host: api.telnyx.com
Authorization: Bearer XXX

After inserting the private_key, you can import the conf file on the peer.

# Telnyx CloudVPN config. Target OS: Linux

[Interface]
PrivateKey = YYY
Address = 172.27.0.2/32

[Peer]
PublicKey = XXX
AllowedIPs = 172.27.0.0/24
Endpoint = 64.16.243.3:5107
PersistentKeepalive = 1

[Interface] refers to the local peer.

  • PrivateKey should have the value returned in the private_key parameter.
  • Address is the next available IP in the subnet range. In this case, since this is the first peer, it gets the next IP after the WGW.

[Peer] refers to the WGW created previously.

  • PublicKey is that of the WGW
  • AllowedIPs is the network this peer has access to. See this excellent explanation.
  • Endpoint is the publicly exposed IP to which peers can connect
  • PersistentKeepalive is a default parameter that can be ignored.

Configuring Peers

With the conf file, you can import that onto the host. Here are the environment specific guides:

Use Cases

In this section, we introduce 3 use cases that WGW can accommodate by itself.

Use Case 1: Multi-Cloud Network

WGW can be used as a VPN concentrator server to facilitate traffic between peers.

In the following example, we will construct this architecture.

Multi Cloud Peers

  • Peer in Cloud A is an EC2 instance in AWS.
  • Peer in Cloud B is a Droplet in DigitalOcean.

It will be demonstrated that it's extremely trivial to set up a "multicloud" network.

Peer in Cloud A

This EC2 instance runs an apache server but only allows inbound SSH traffic.
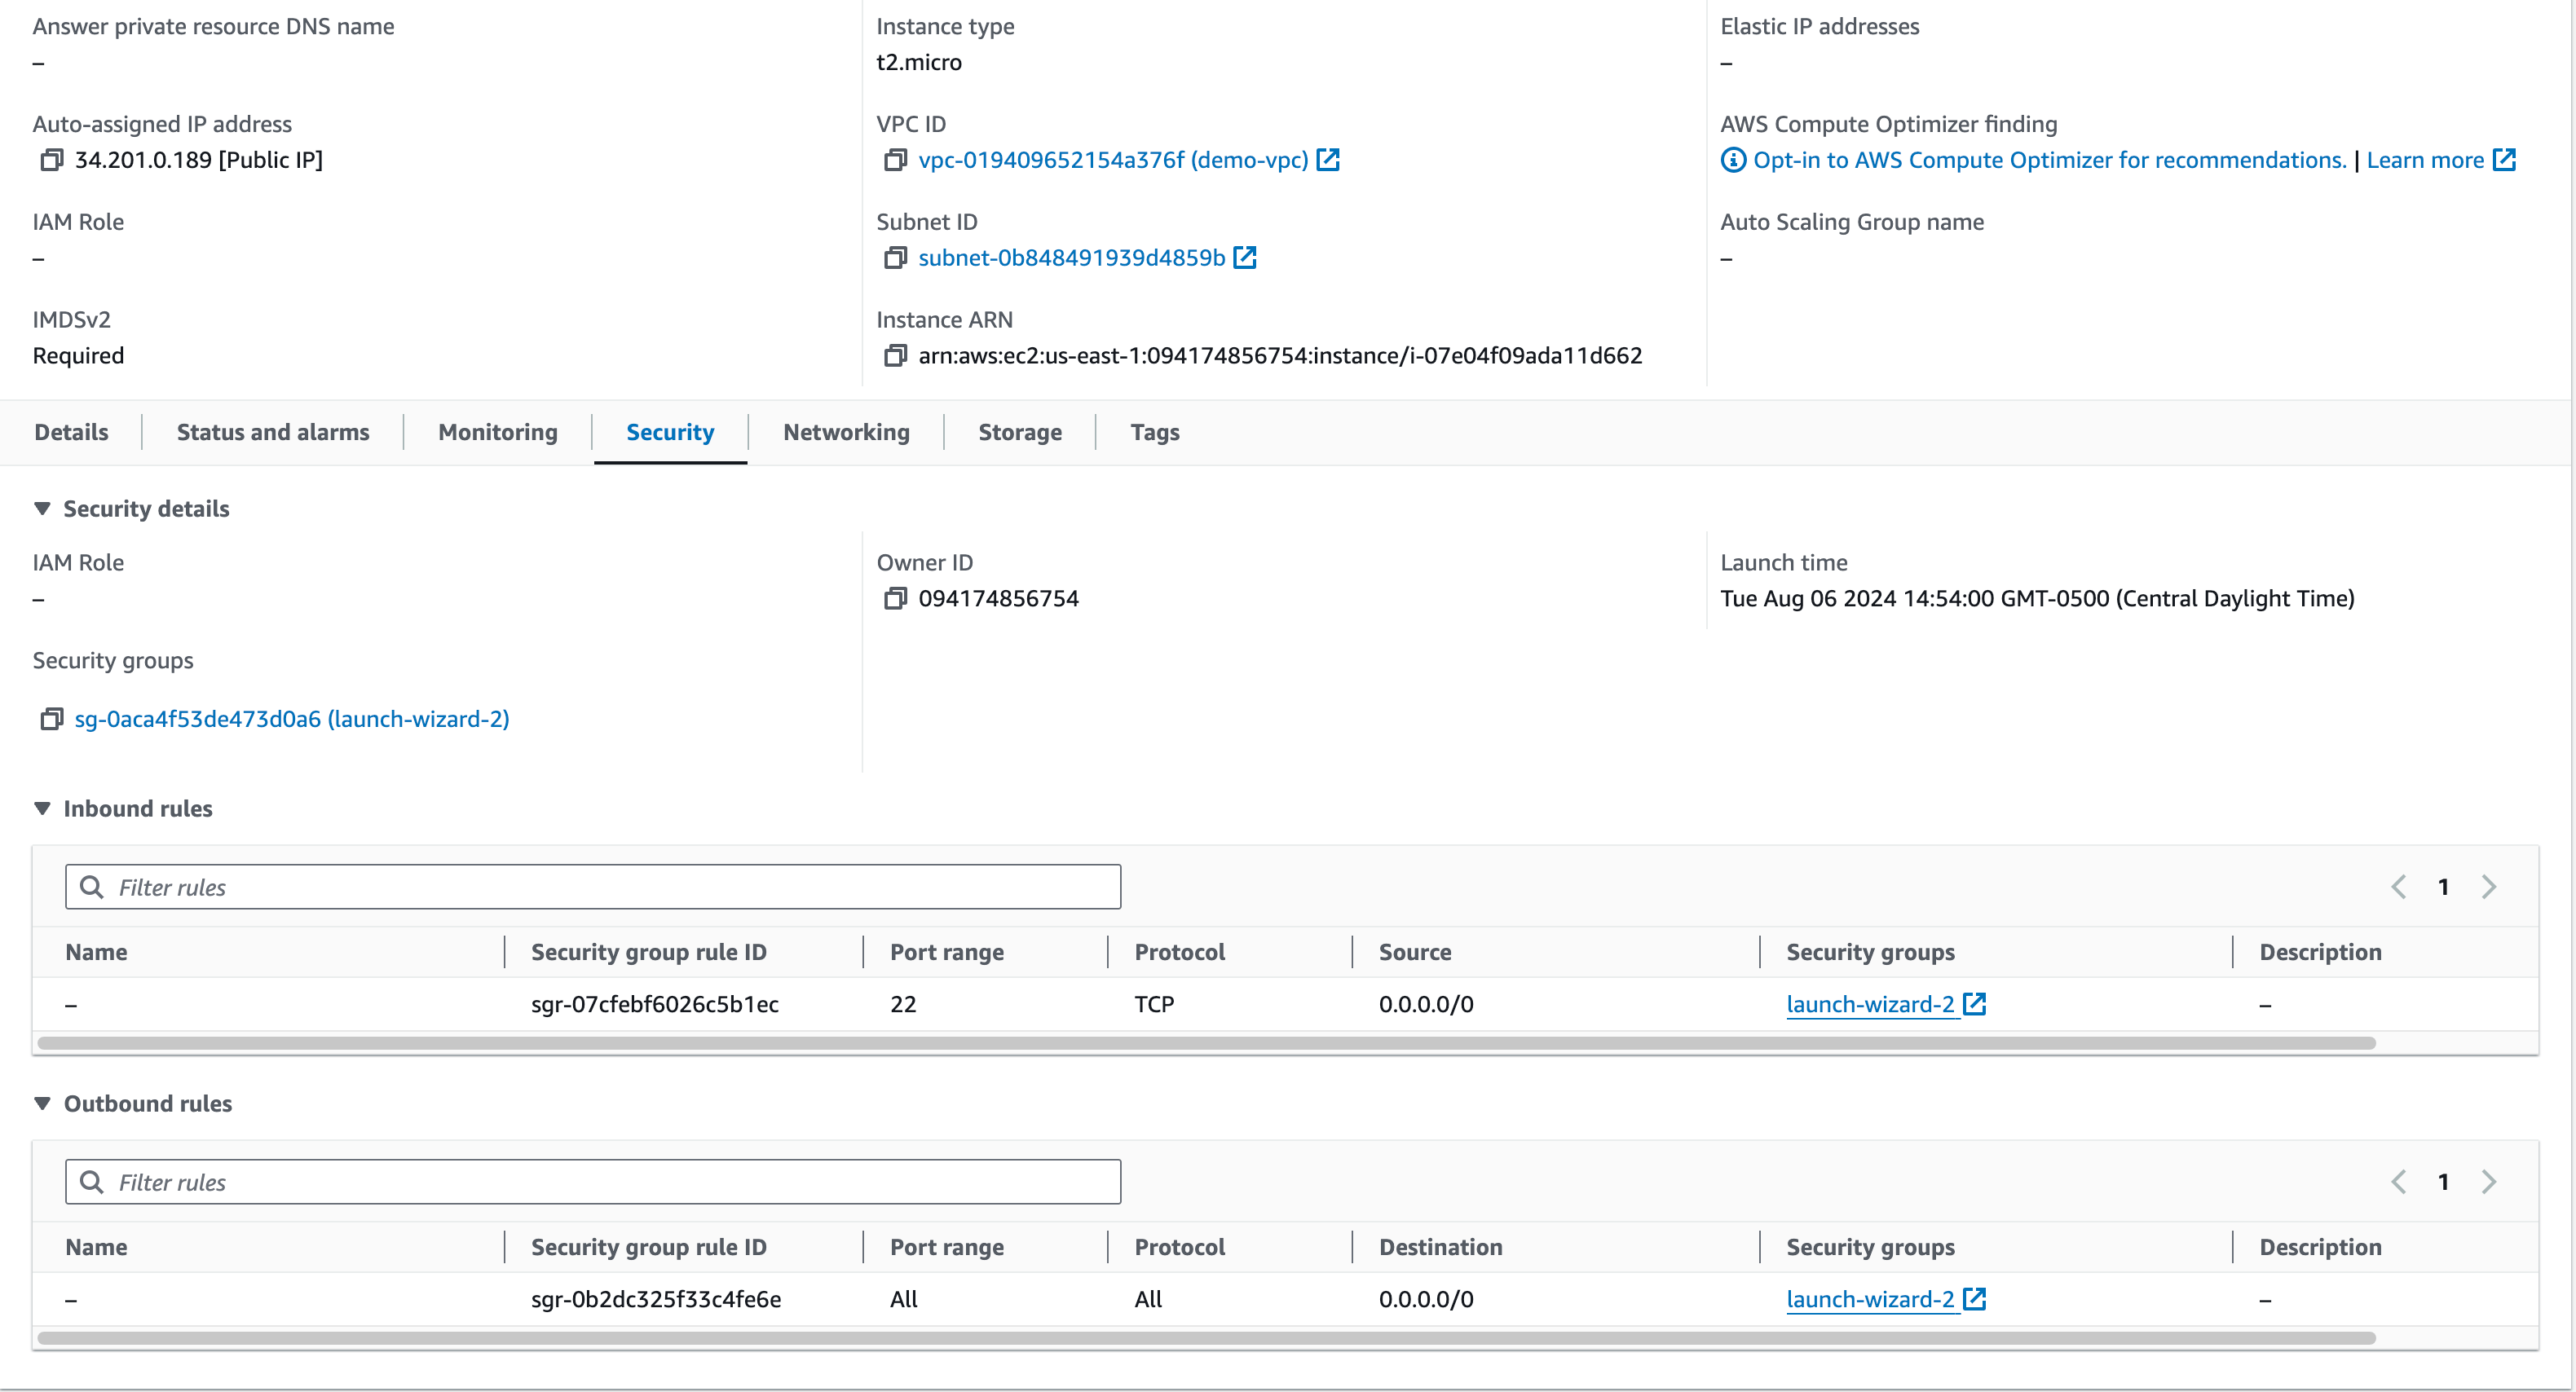
EC2 Peer

As a result, it's unreachable from the public internet.

user@localhost ~ % ping 34.201.0.189
PING 34.201.0.189 (34.201.0.189): 56 data bytes
Request timeout for icmp_seq 0
Request timeout for icmp_seq 1
^C
--- 34.201.0.189 ping statistics ---
3 packets transmitted, 0 packets received, 100.0% packet loss
user@localhost ~ % curl 34.201.0.189
^C

However, it's connected to the WGW we created earlier.

ubuntu@ip-10-10-11-10:~$ sudo wg show
interface: peer1
public key: Jt1zAJD6W2BZgOwtUsNY2KrMO0oRfUmfAEZGNEUZKiQ=
private key: (hidden)
listening port: 33174

peer: XYy8e5EKtE1F0fwwMgr792/9noYs53uRZBX5O3XJ4Eg=
endpoint: 64.16.243.3:5107
allowed ips: 172.27.0.0/24
latest handshake: 14 seconds ago
transfer: 124 B received, 596 B sent
persistent keepalive: every 1 second

Peer in Cloud B

Similarly, this Droplet instance runs an apache server but only allows inbound SSH traffic.

Droplet Peer

As a result, it's unreachable from the public internet.

user@localhost ~ % ping 161.35.112.164
PING 161.35.112.164 (161.35.112.164): 56 data bytes
Request timeout for icmp_seq 0
Request timeout for icmp_seq 1
^C
--- 161.35.112.164 ping statistics ---
3 packets transmitted, 0 packets received, 100.0% packet loss
user@localhost ~ % curl 161.35.112.164
^C

However, it's connected to the WGW we created earlier.

root@ubuntu-s-1vcpu-512mb-10gb-nyc1-01:~# sudo wg show
interface: peer2
public key: eAvskX/cBw10DpxPPcvItsFcBr2meAKOVgwFjysZnF4=
private key: (hidden)
listening port: 33951

peer: XYy8e5EKtE1F0fwwMgr792/9noYs53uRZBX5O3XJ4Eg=
endpoint: 64.16.243.3:5107
allowed ips: 172.27.0.0/24
latest handshake: 4 seconds ago
transfer: 124 B received, 308 B sent
persistent keepalive: every 1 second

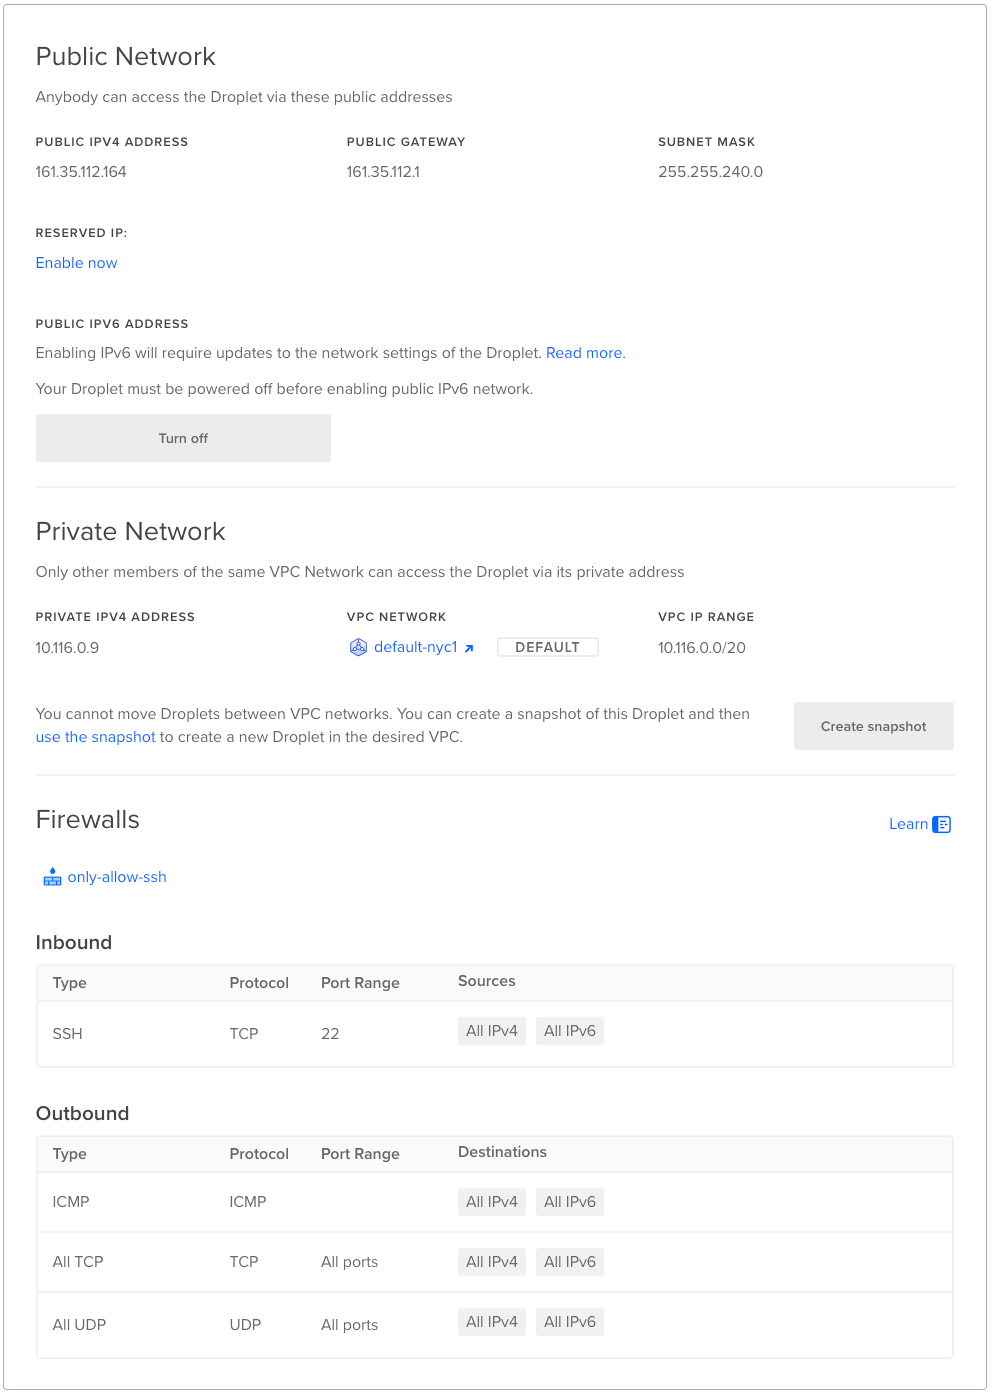
Cross Cloud Boundary

Despite of the firewall rule configs in the respective environments, Peer 1 is able to talk to Peer 2 over the Wireguard subnet.

From Peer 1

ubuntu@ip-10-10-11-10:~$ curl 172.27.0.3
<!DOCTYPE html>
<html>
<head>
<title>I am the Droplet Peer in DigitalOcean</title>
</head>
</html>

From Peer 2

root@ubuntu-s-1vcpu-512mb-10gb-nyc1-01:~# curl 172.27.0.2
<!DOCTYPE html>
<html>
<head>
<title>I am the EC2 Peer in AWS</title>
</head>
</html>

This is readily extensible to peers running web services in various environments.

Use Case 2: Private Access to Other Telnyx Services

If a WGW is created with enable_sip_trunking, the WGW will enable routing for all Telnyx public API endpoints.

Private Access

On the peer config, additional routes are added under AllowedIPs.

[Interface]
PrivateKey = XXX
Address = 172.27.0.2/32

[Peer]
PublicKey = jSSaLXXVEzYUM8N8IM+65YuuScL+Sf2DytZCdLhFSGo=
AllowedIPs = 172.27.0.0/24, 64.16.250.10/32, 64.16.250.11/32, 64.16.250.13/32, 103.115.244.145/32, 103.115.244.146/32, 185.246.41.140/32, 185.246.41.141/32, 192.76.120.10/32, 192.76.120.11/32, 192.76.120.31/32, 64.16.226.0/24, 64.16.227.0/24, 64.16.228.0/24, 64.16.230.0/24, 64.16.248.0/24, 64.16.249.0/24, 50.114.144.0/21, 185.246.41.128/25, 103.115.244.128/25, 64.16.239.98/32, 64.16.239.39/32, 64.16.239.82/32, 64.16.224.44/32
Endpoint = 64.16.243.15:5016
PersistentKeepalive = 1

As a result, traffic between a connected peer to Telnyx API, SIP, and Storage services will flow through the WGW (172.27.0.1) onto the Telnyx network as demonstrated below.

user@localhost ~ % traceroute sip.telnyx.com        
traceroute to sip.telnyx.com (192.76.120.10), 64 hops max, 40 byte packets
1 172.27.0.1 (172.27.0.1) 6.708 ms 7.726 ms 7.133 ms
2 *^C
user@localhost ~ % traceroute api-direct.telnyx.com
traceroute to api-direct.telnyx.com (64.16.224.44), 64 hops max, 40 byte packets
1 172.27.0.1 (172.27.0.1) 7.673 ms 6.239 ms 6.488 ms
2 *^C
user@localhost ~ % traceroute us-central-1.telnyxstorage.com
traceroute to us-central-1.telnyxstorage.com (64.16.239.39), 64 hops max, 40 byte packets
1 172.27.0.1 (172.27.0.1) 6.885 ms 6.898 ms 6.621 ms
2 * *^C
user@localhost ~ % aws s3api list-buckets --profile "*.telnyxstorage.com" --endpoint-url https://us-central-1.telnyxstorage.com
{
"Buckets": [
{
"Name": "bucket1",
"CreationDate": "2024-03-26T17:54:09.271000+00:00"
},
{
"Name": "bucket2",
"CreationDate": "2024-03-26T16:51:51.967000+00:00"
},
{
"Name": "bucket3",
"CreationDate": "2023-11-29T13:50:59.837000+00:00"
}
],
"Owner": {
"DisplayName": "xxx",
"ID": "xxx"
}
}

This arrangement is extremely useful in the case where we have to lock down public routing in the event of an extreme DDoS attack.

Use Case 3: Cross-Region Network

The previous architecture can be extended to the following one.

Cross Regional Network

In this example ---

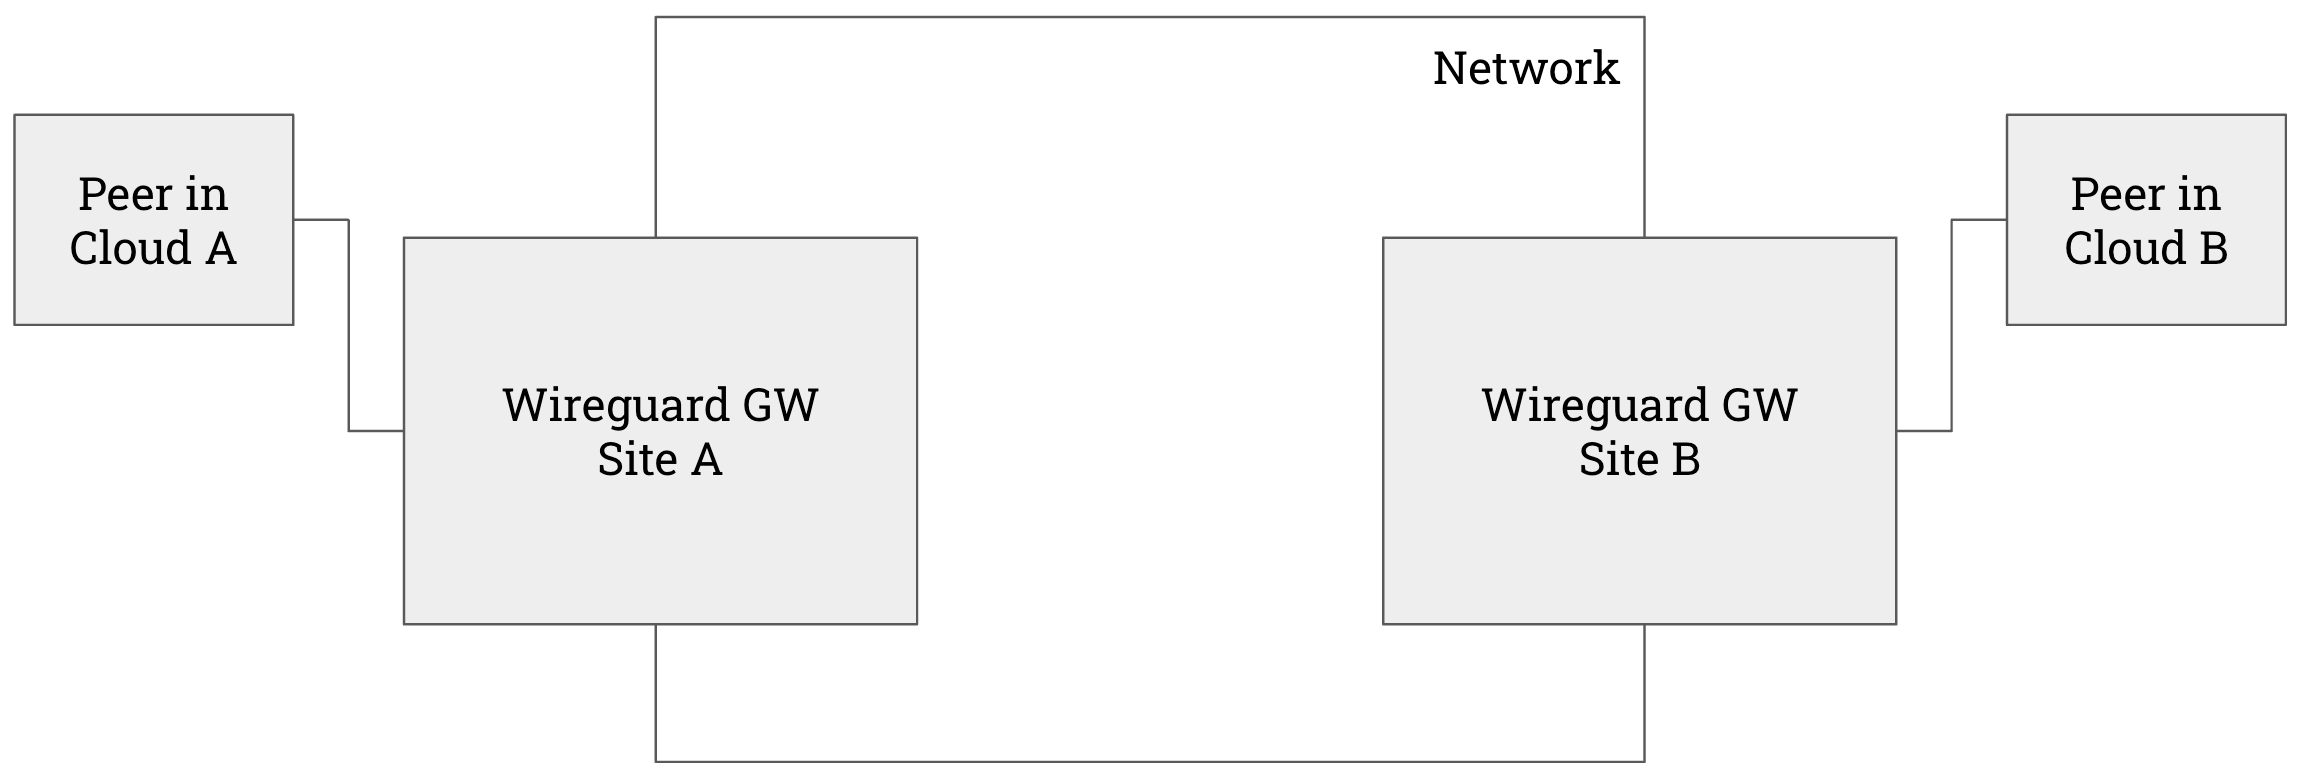
  • Site A is Telnyx Ashburn
  • Site B is Telnyx Amsterdam
  • Cloud A is AWS
  • Cloud B is Digital Ocean

Traffic between the two peers ride the Telnyx backbone between Ashburn and Amsterdam.

Coming Soon.

Other use cases

Costs

  • MRC for each WGW instance is $10.
  • Connected Peers are free of charge.

API References