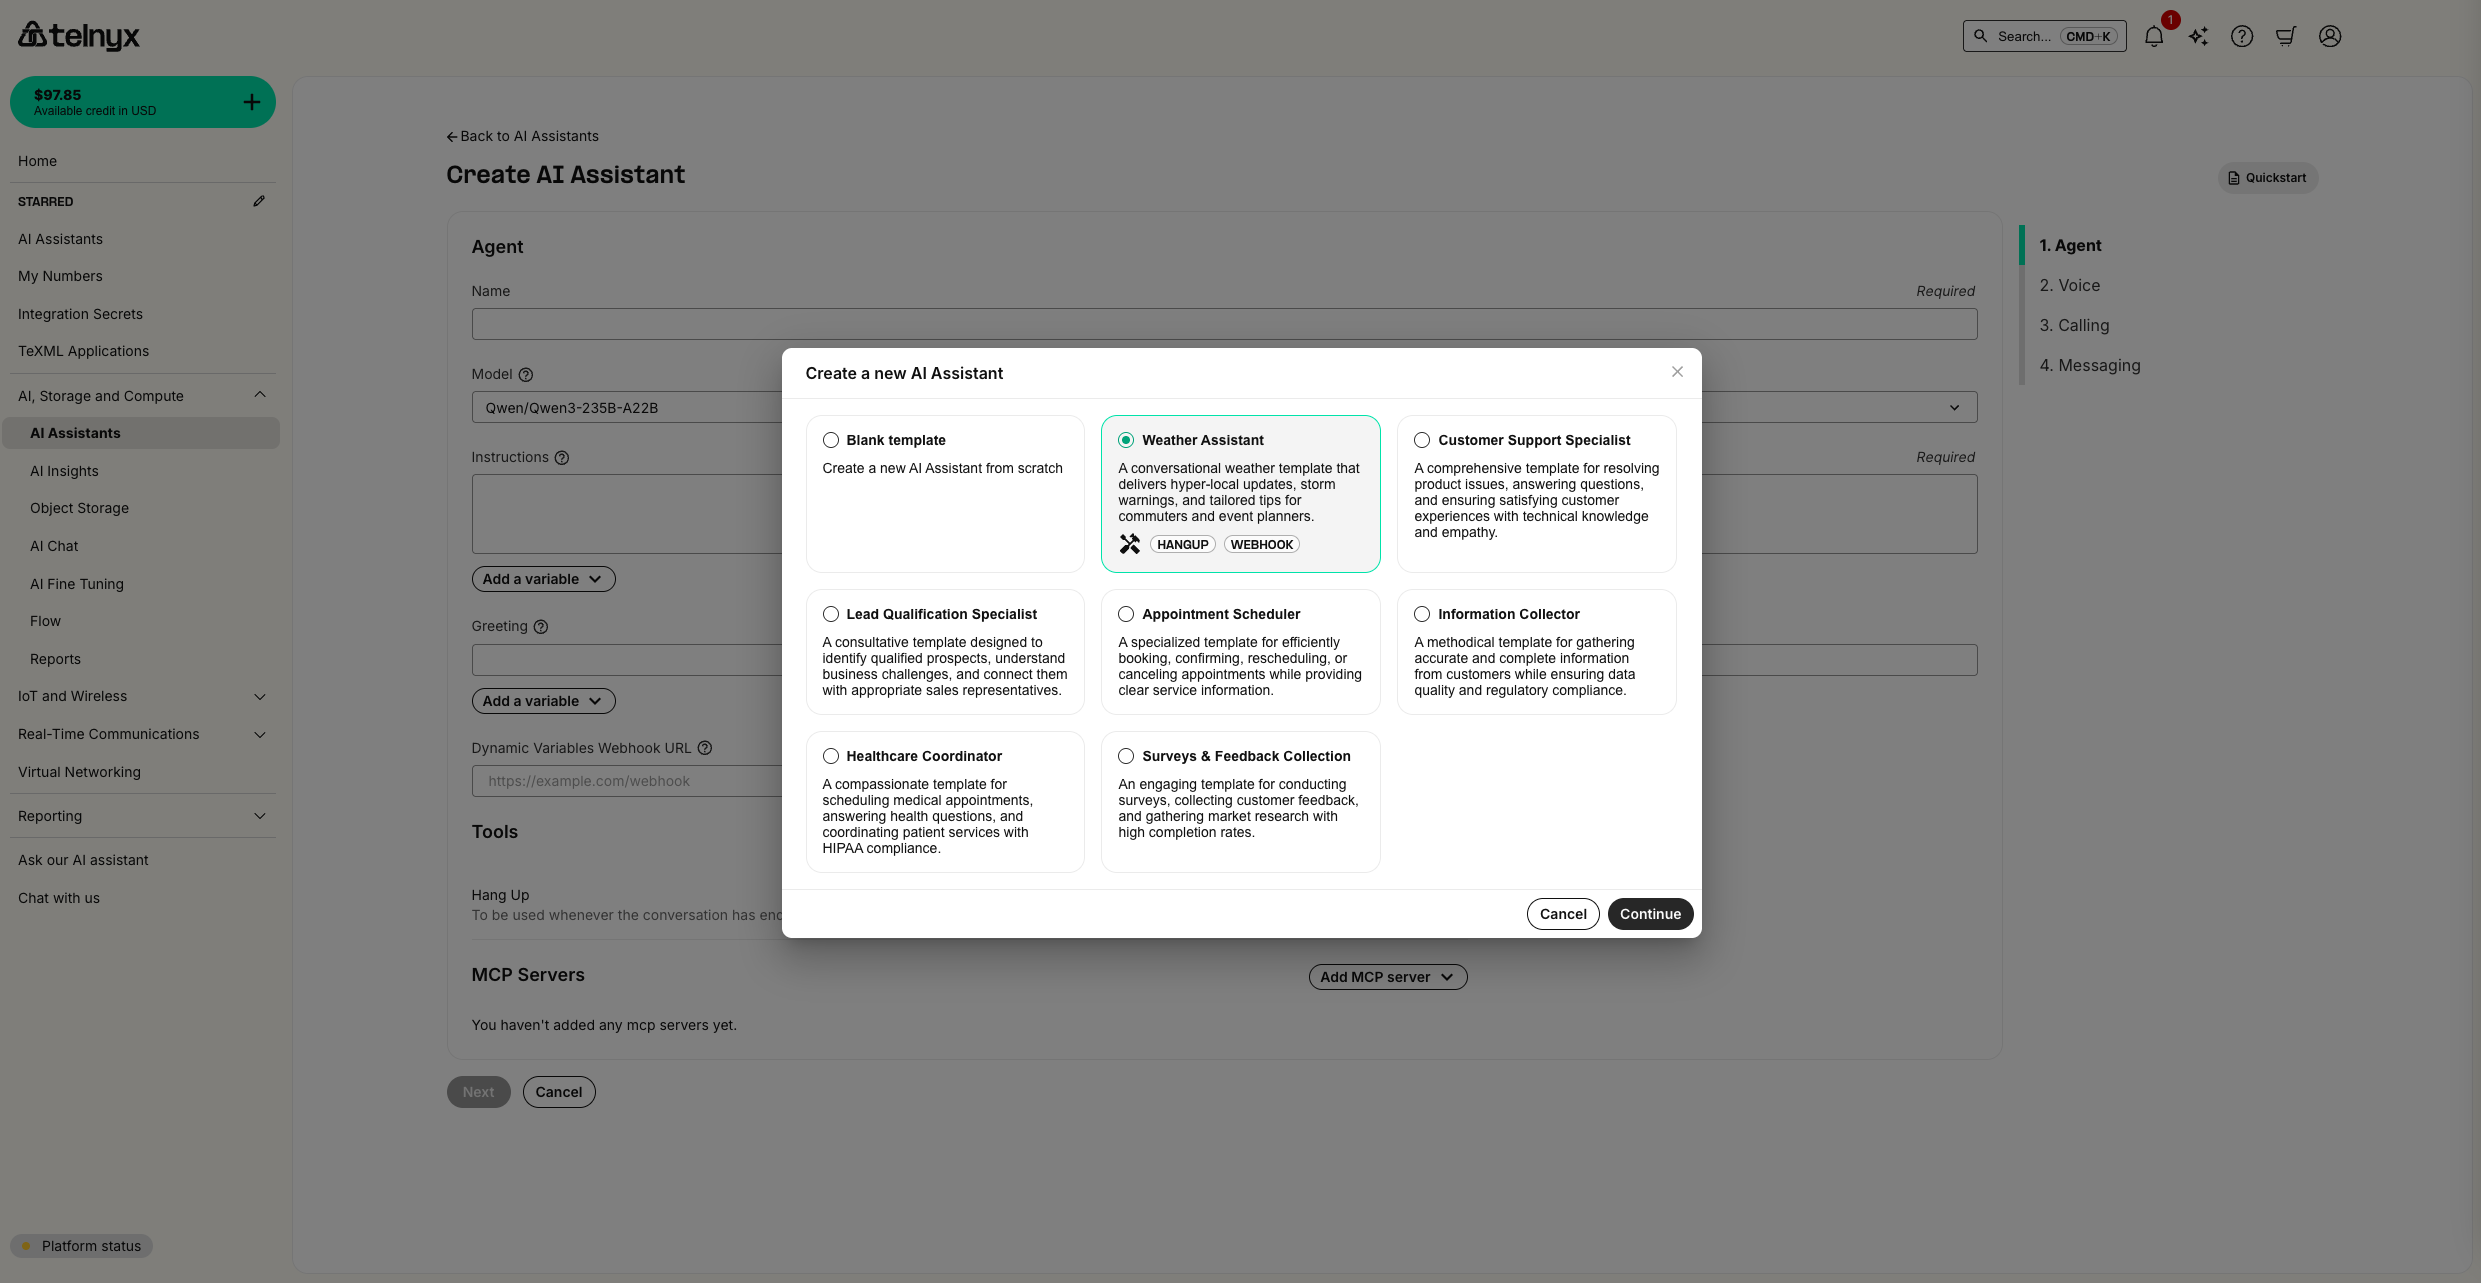
Creating Your First Assistant
Start by creating a new assistant using a template to establish a baseline for testing.- Navigate to the AI Assistants page
- Click “Create Assistant” and select the “Weather Assistant” template
- This template provides a good foundation with a standard greeting and weather functionality
Setting Up Your First Test
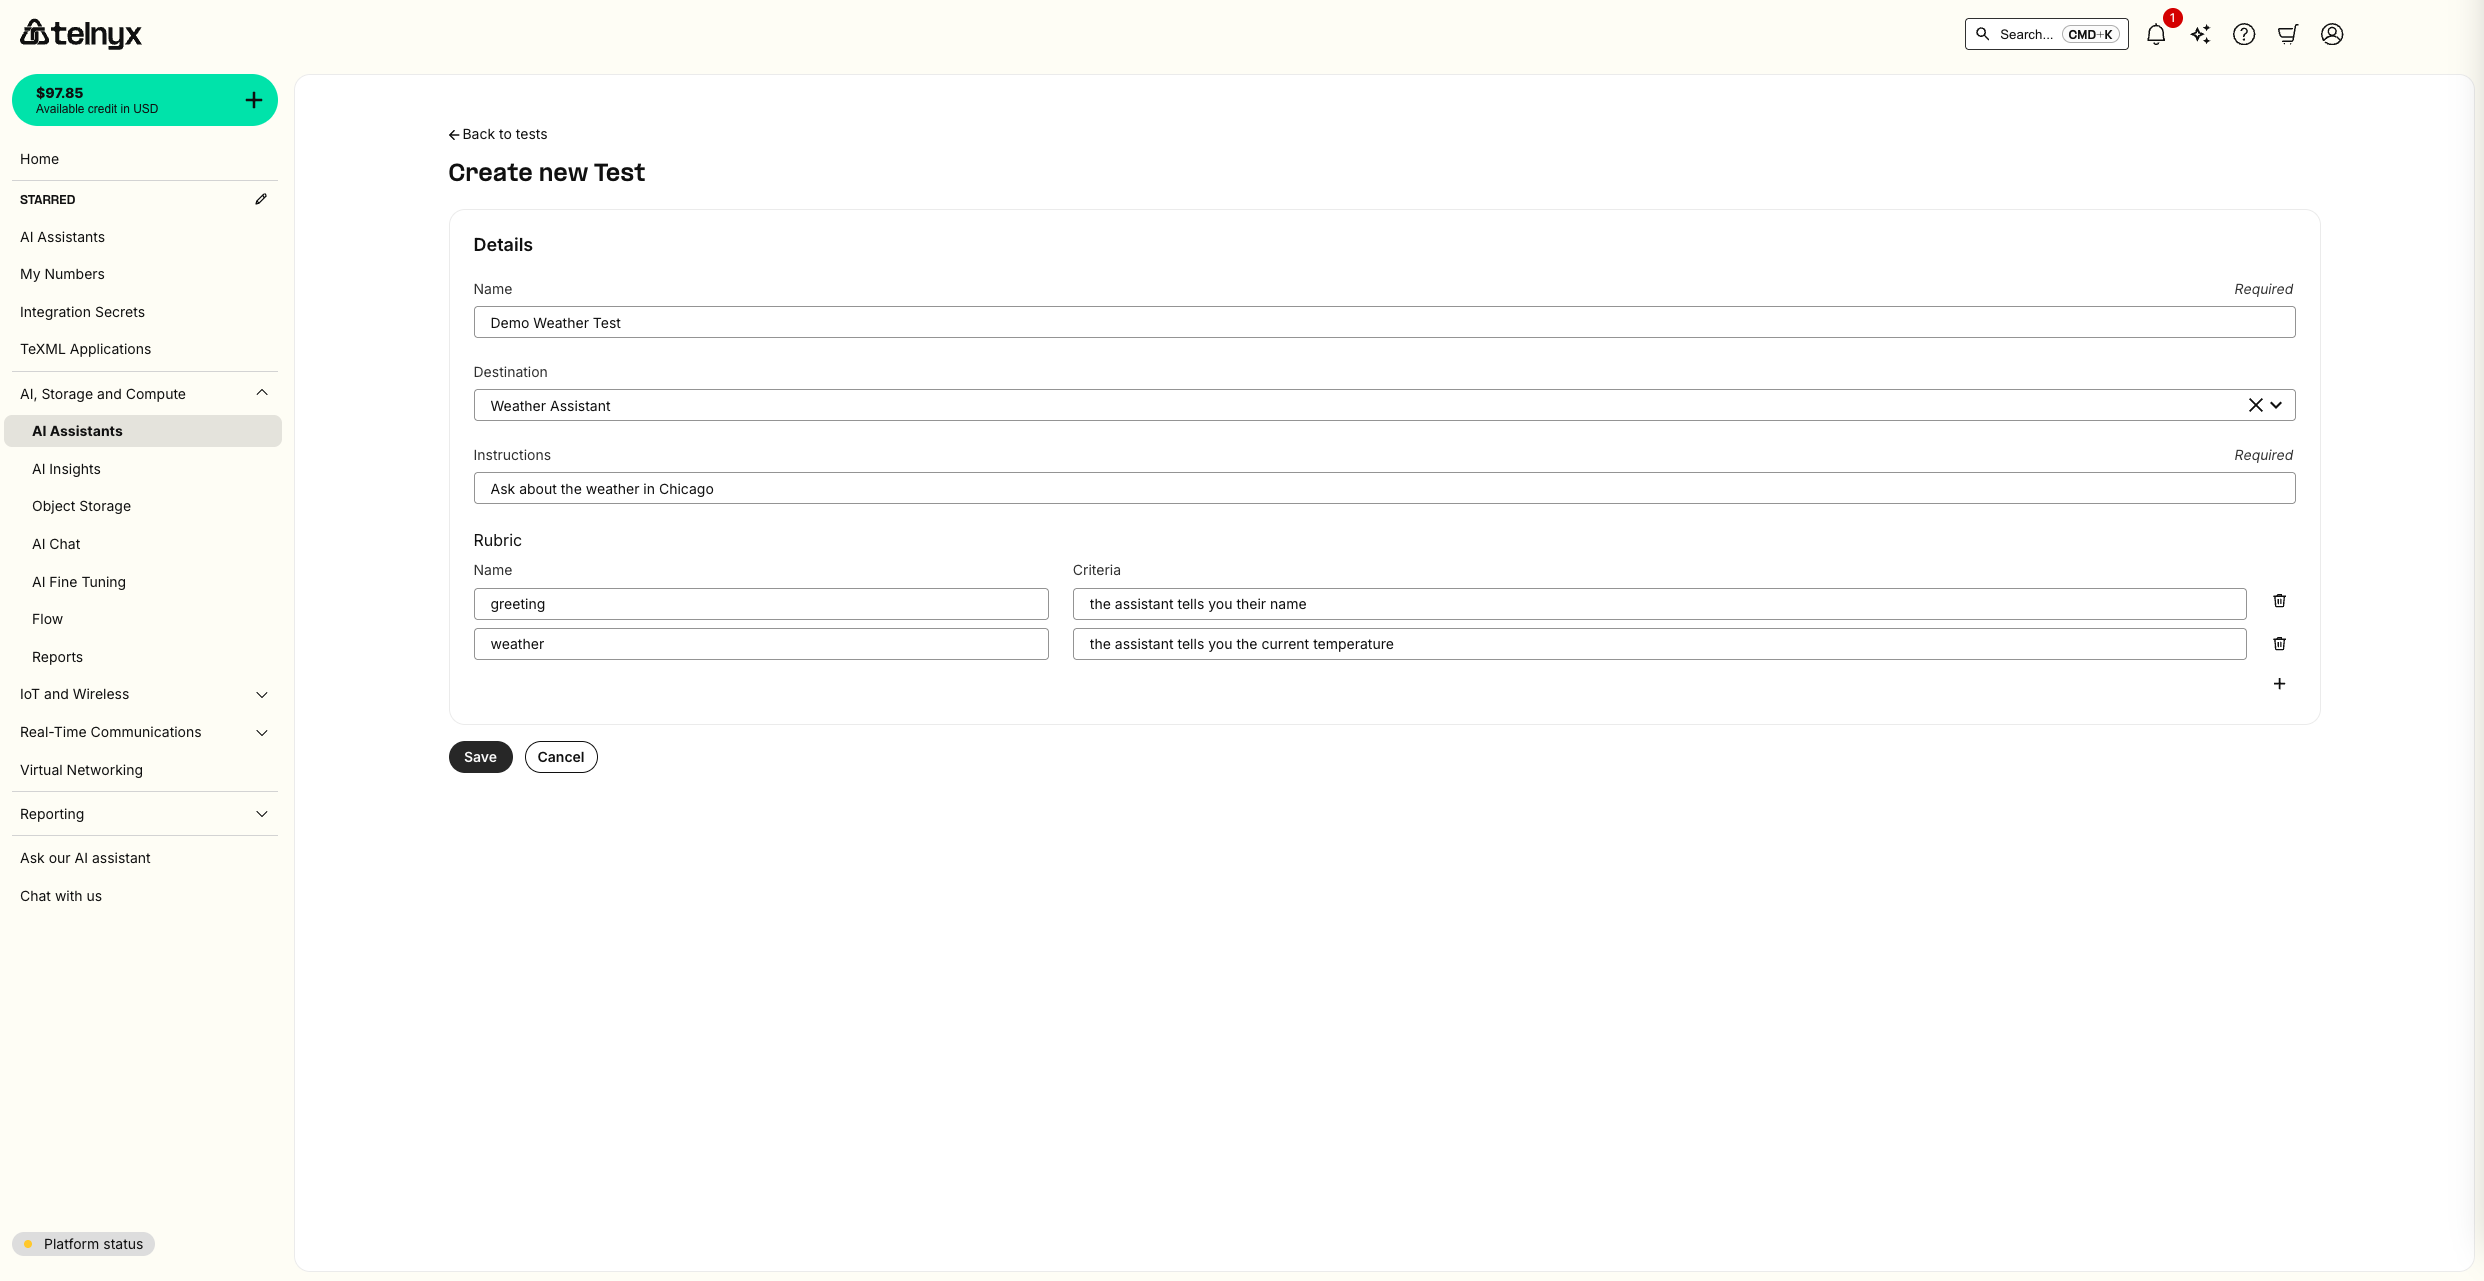
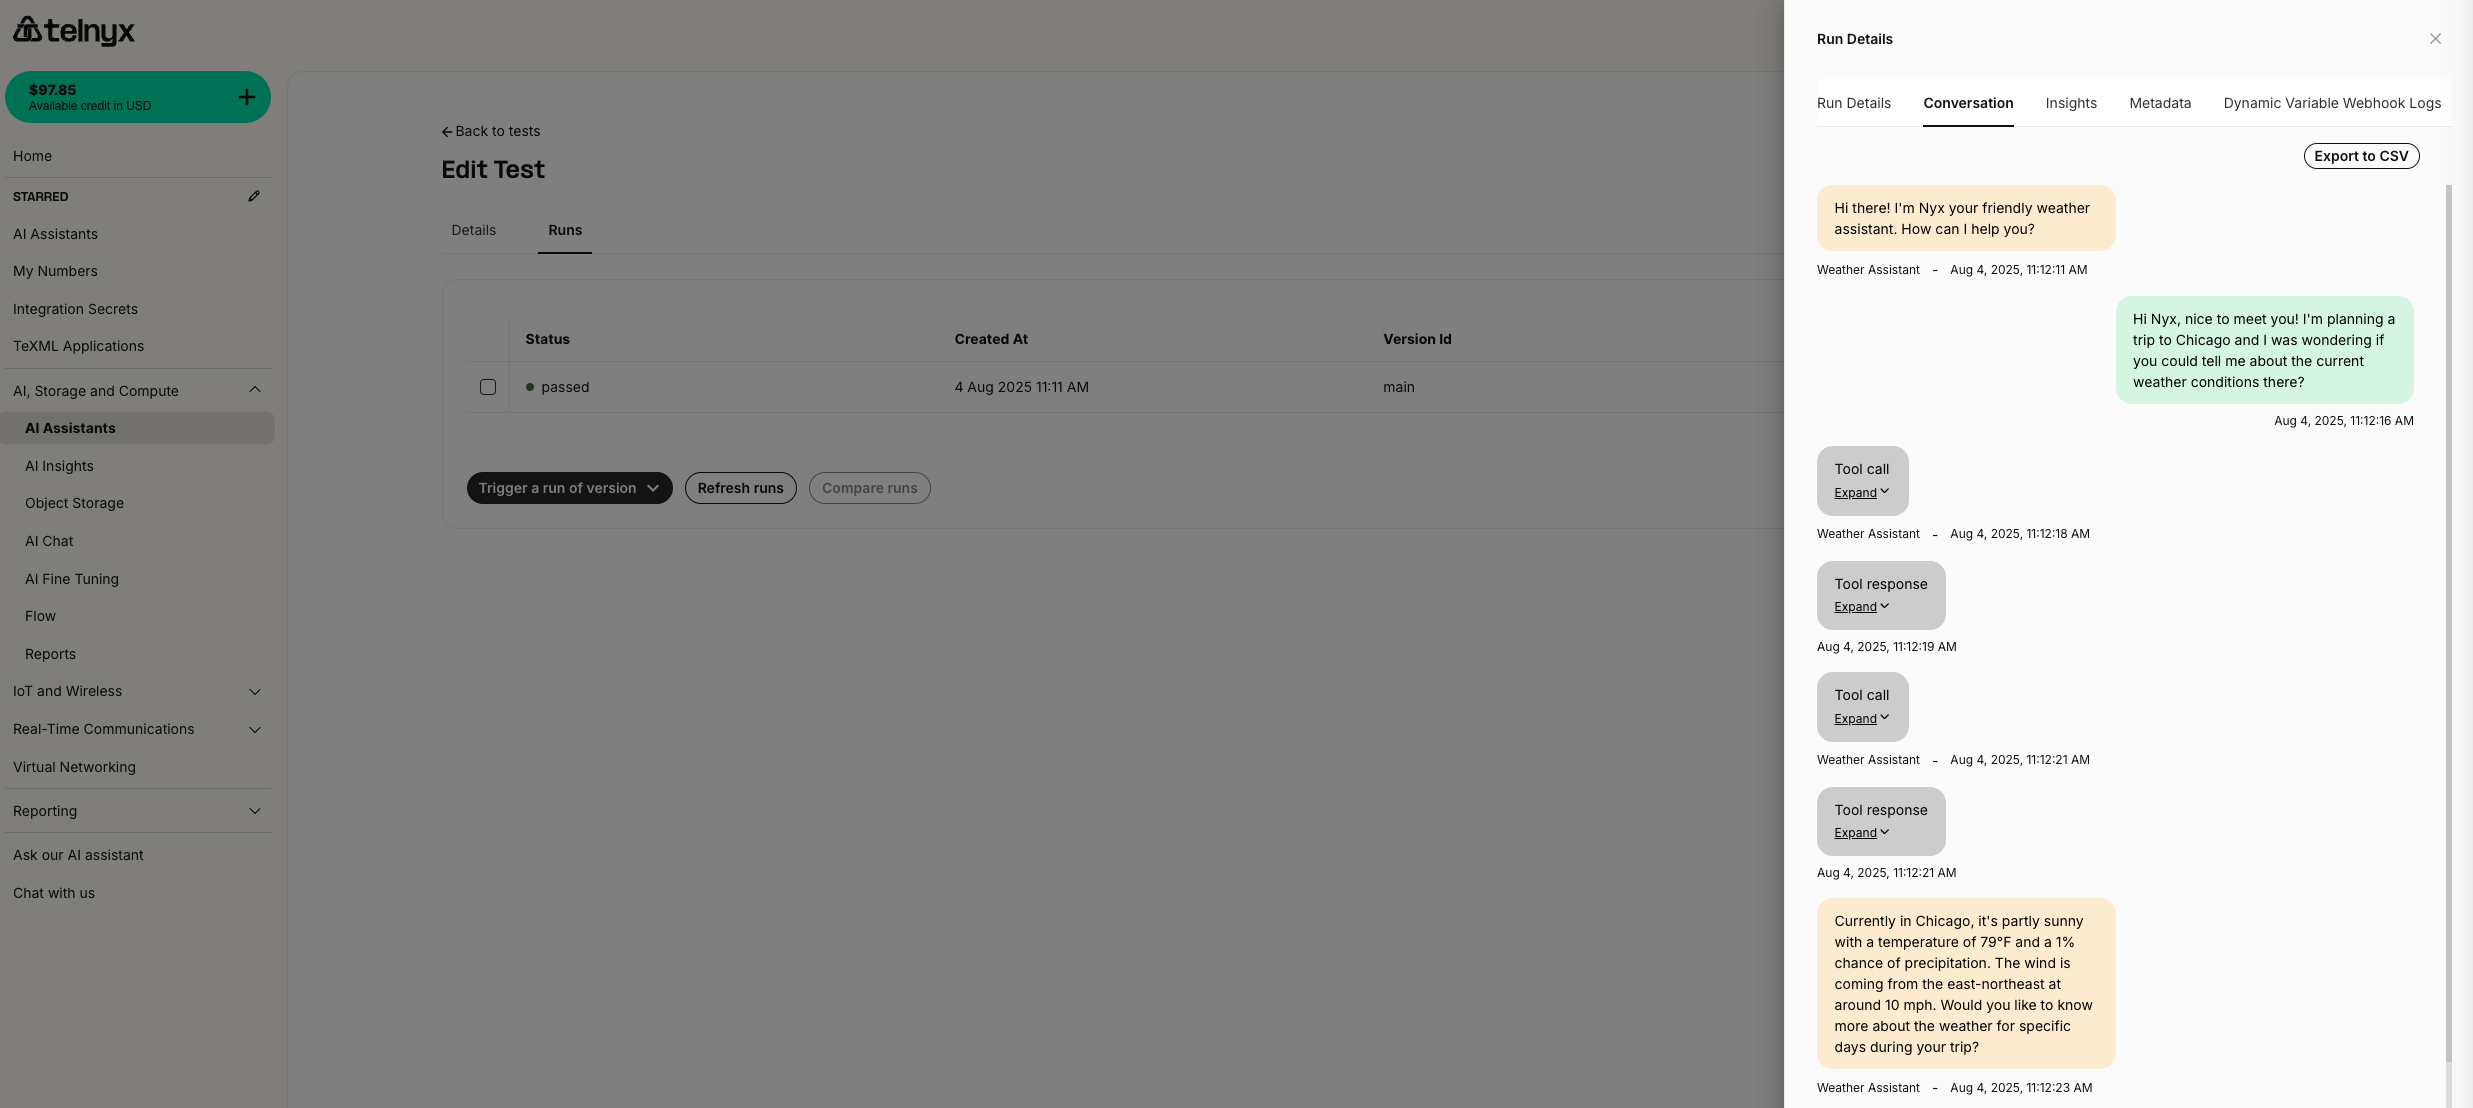
Testing your assistant ensures it behaves correctly before going live with users.Creating a Test
- Navigate to the AI Tests page
- Click “Create Test” to set up your first test scenario

Configuring Test Criteria
- Configure your test with the following:
- Test Name: “Weather Assistant Greeting Test”
- Assistant: Select your weather assistant
- Success Criteria: Add criteria to validate the greeting message content and that temperature is described by the assistant.
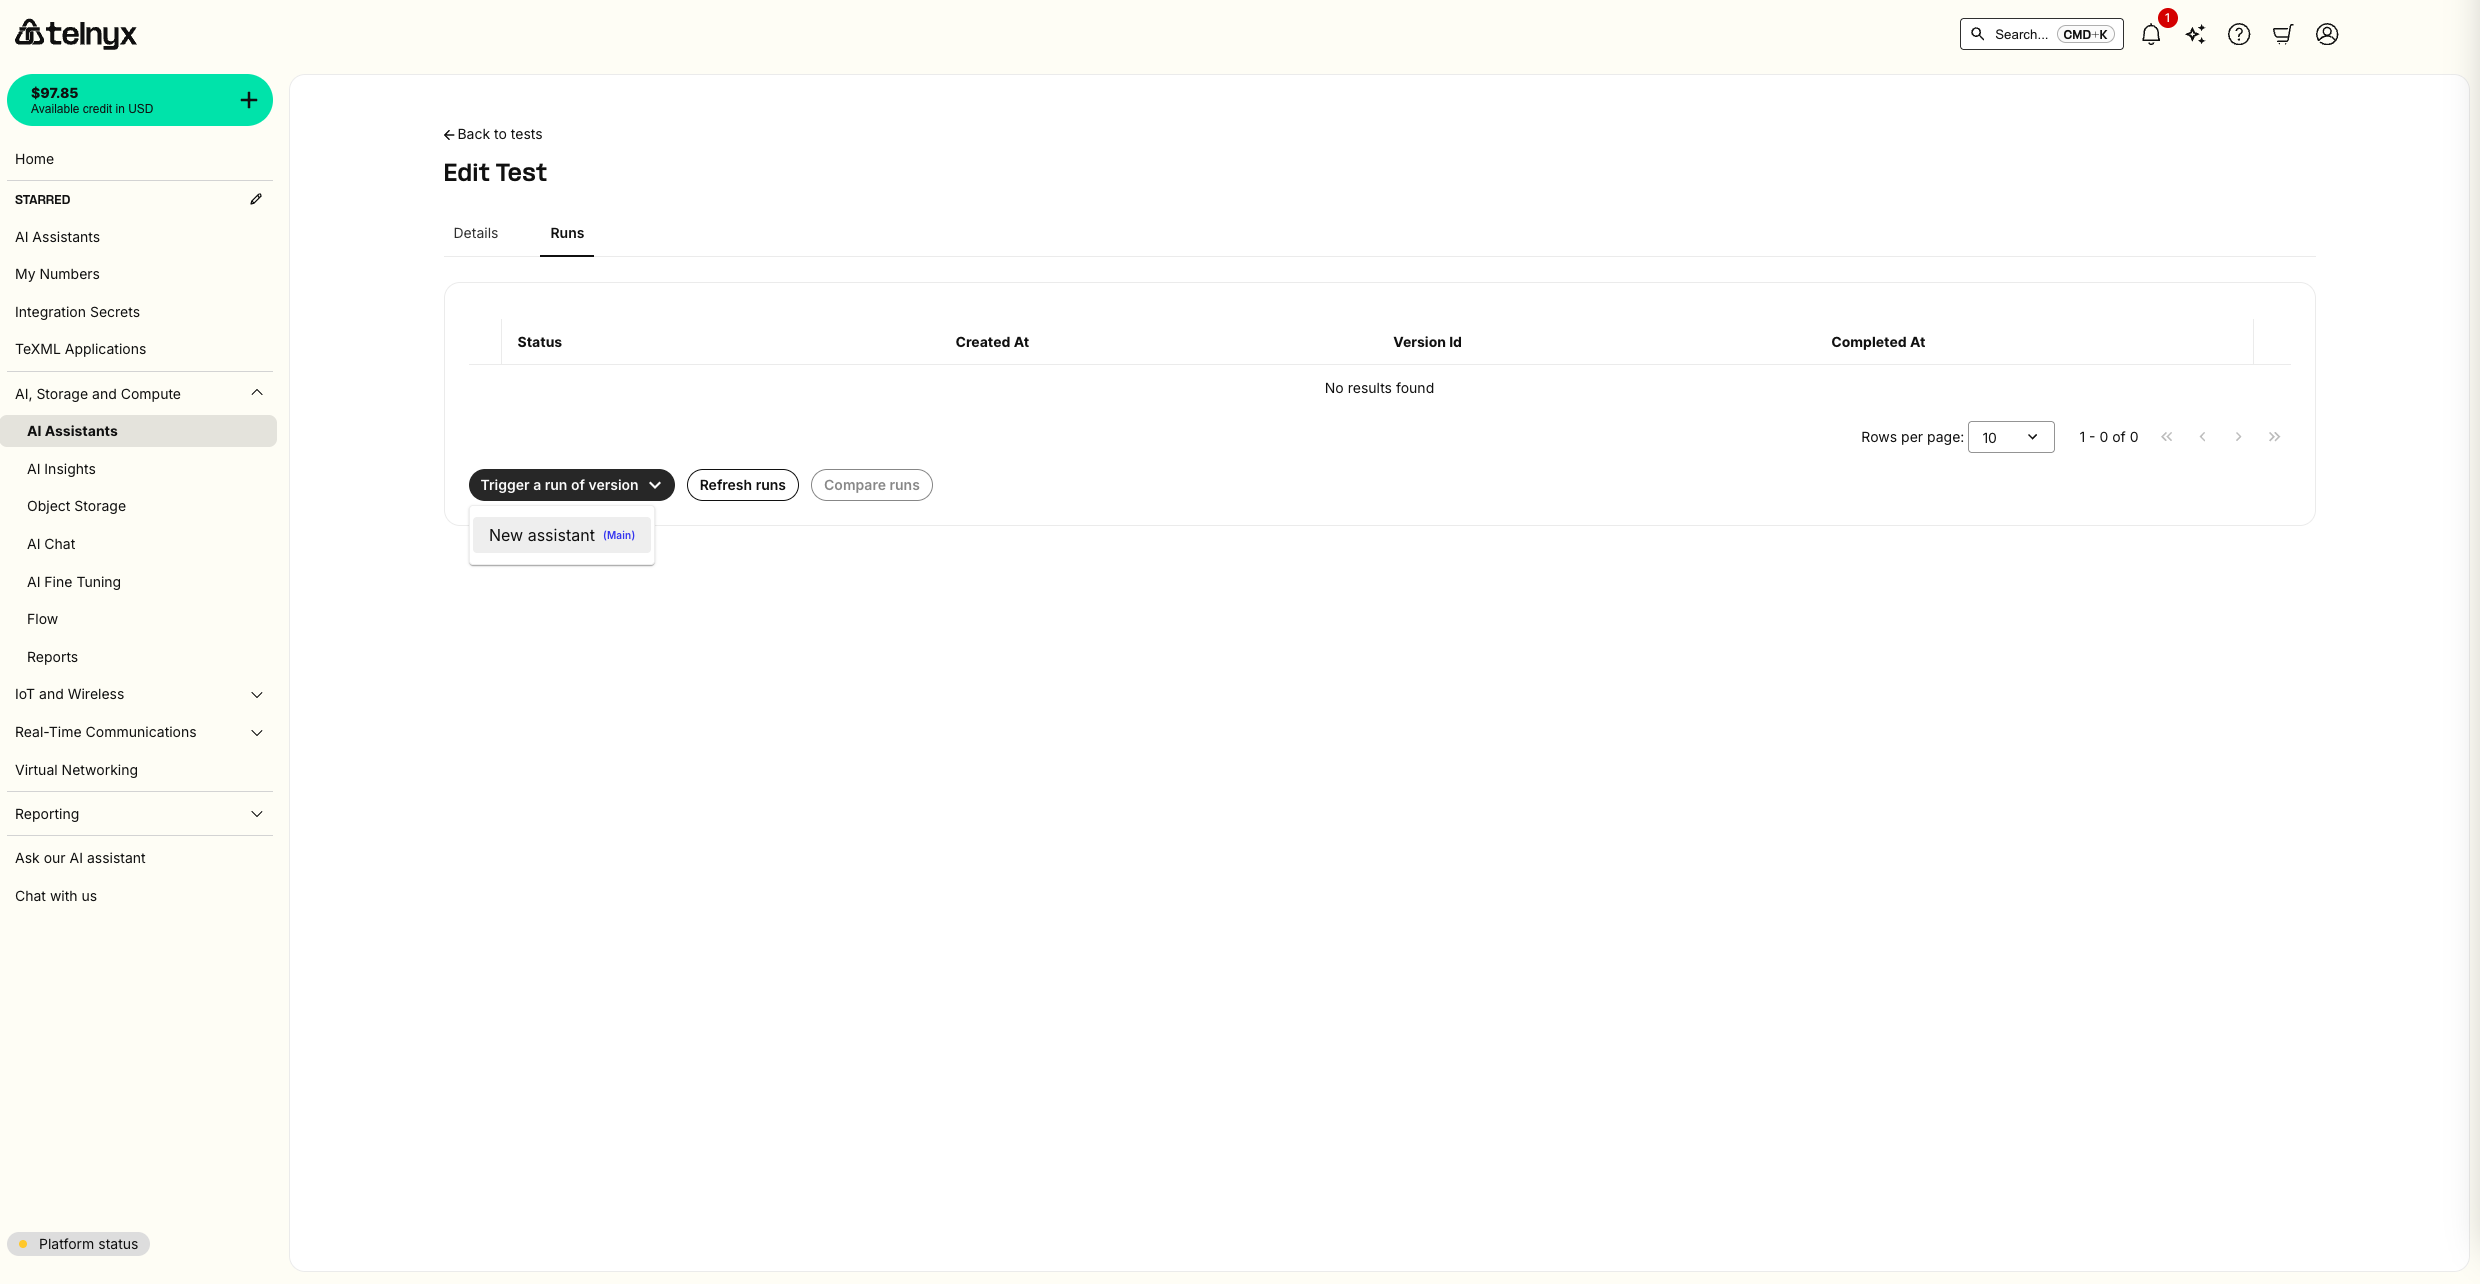
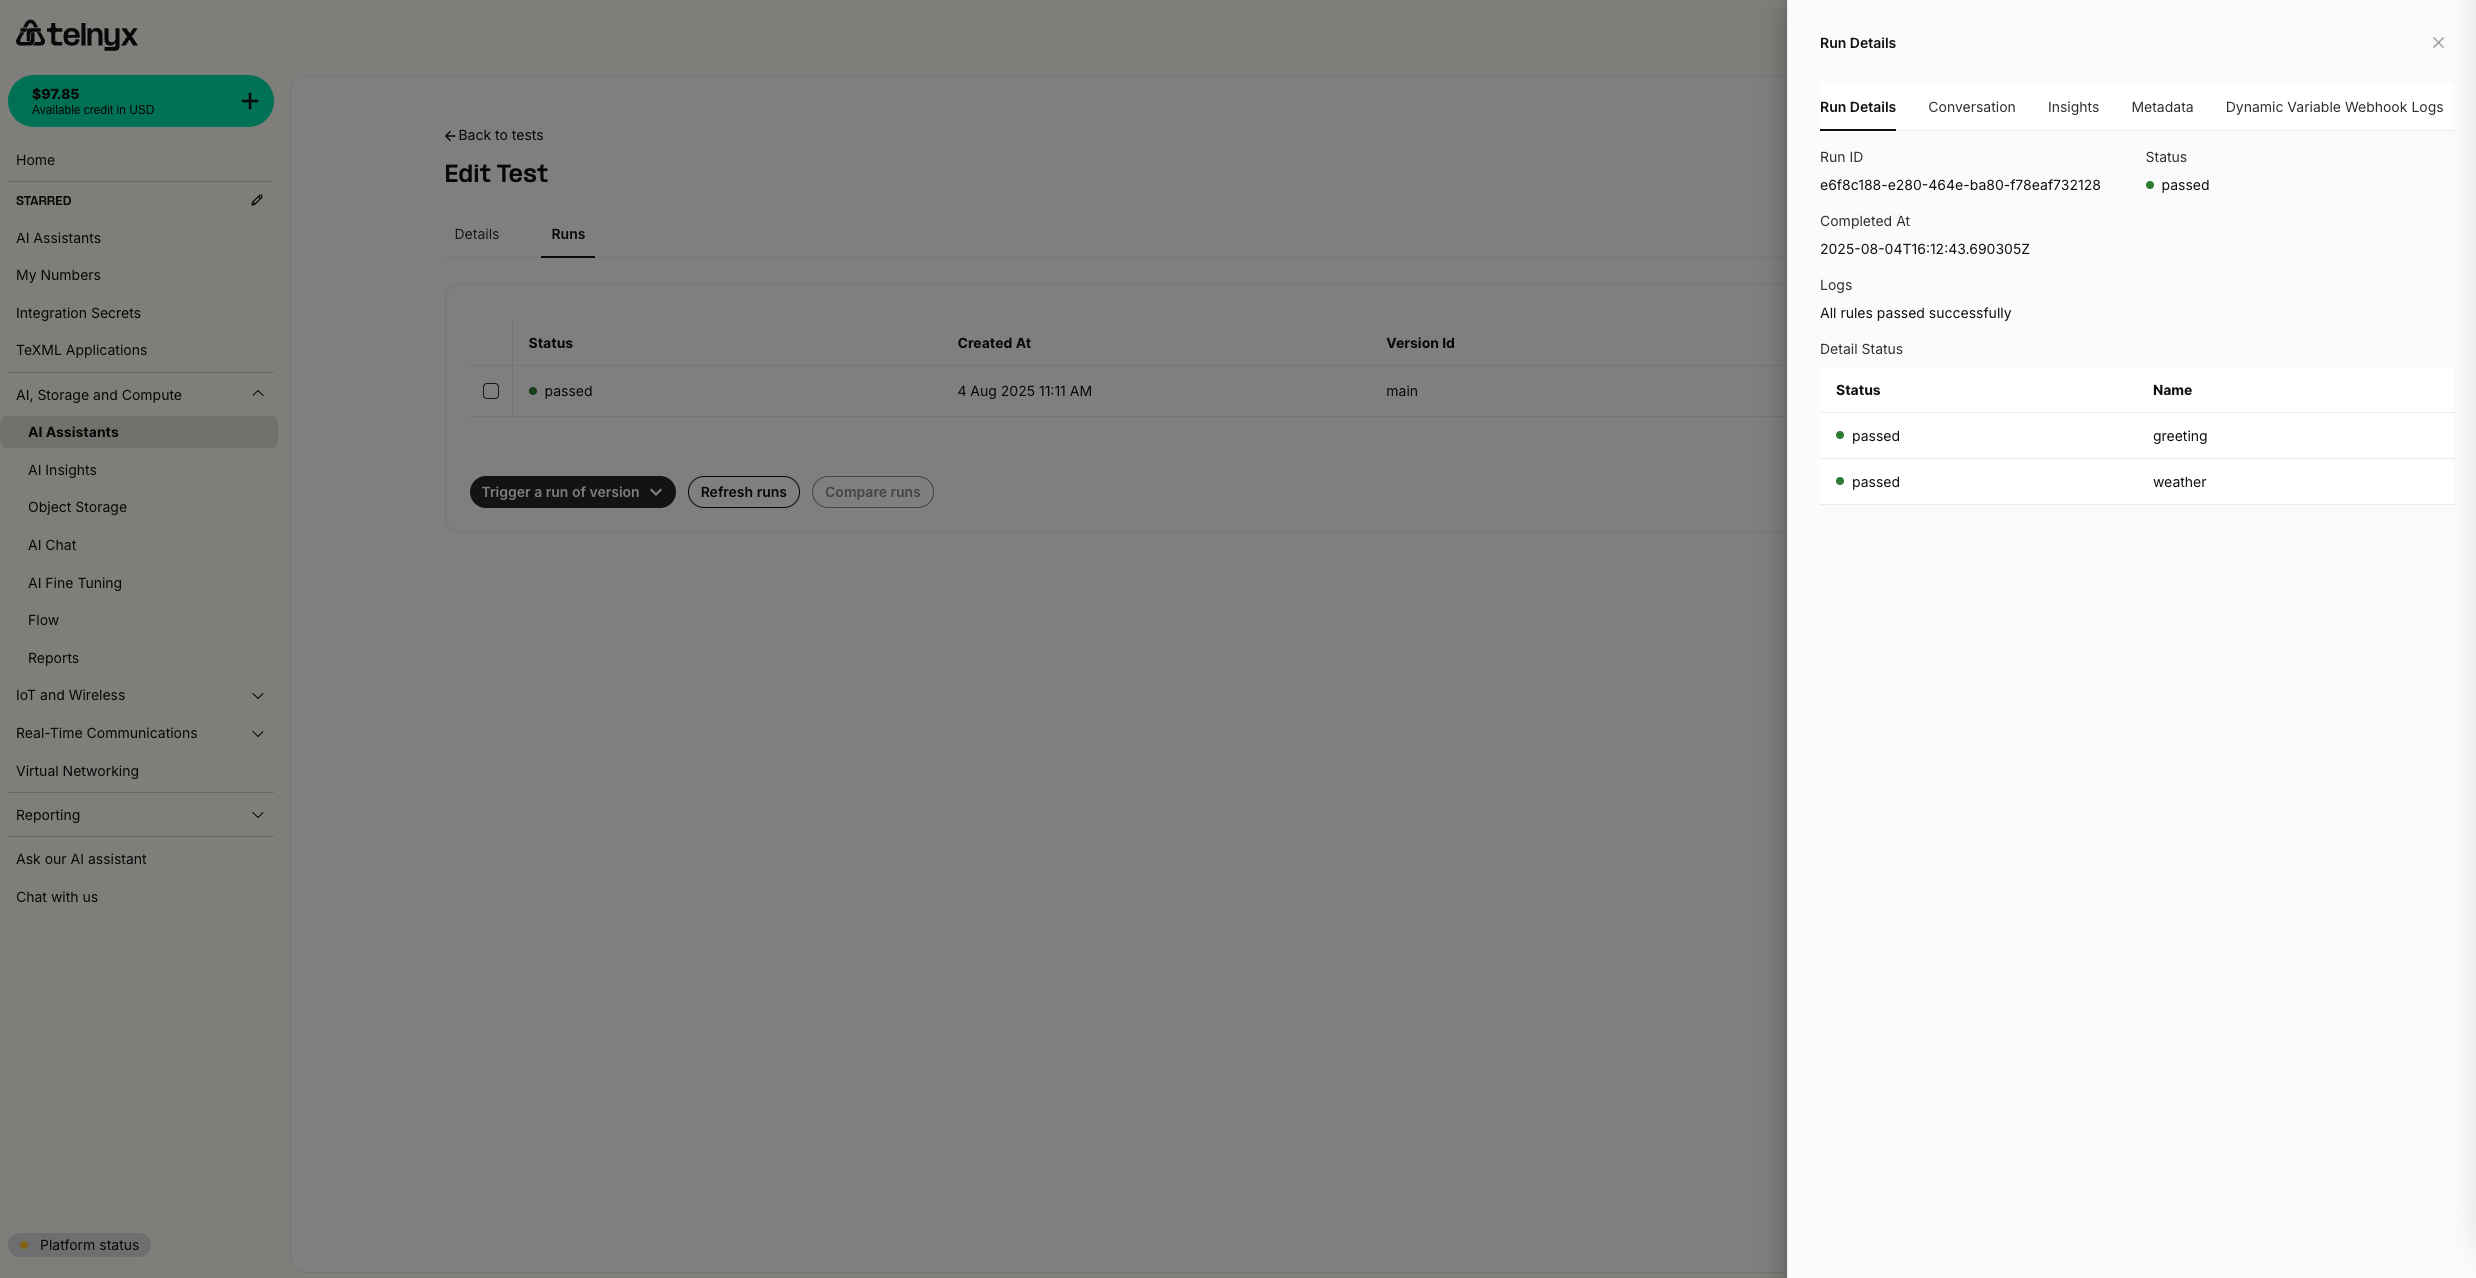
Running Your Test
- Click “Run Test” to execute your test scenario
- Monitor the test progress in real-time
- Review the detailed results once the test completes
Creating Assistant Versions
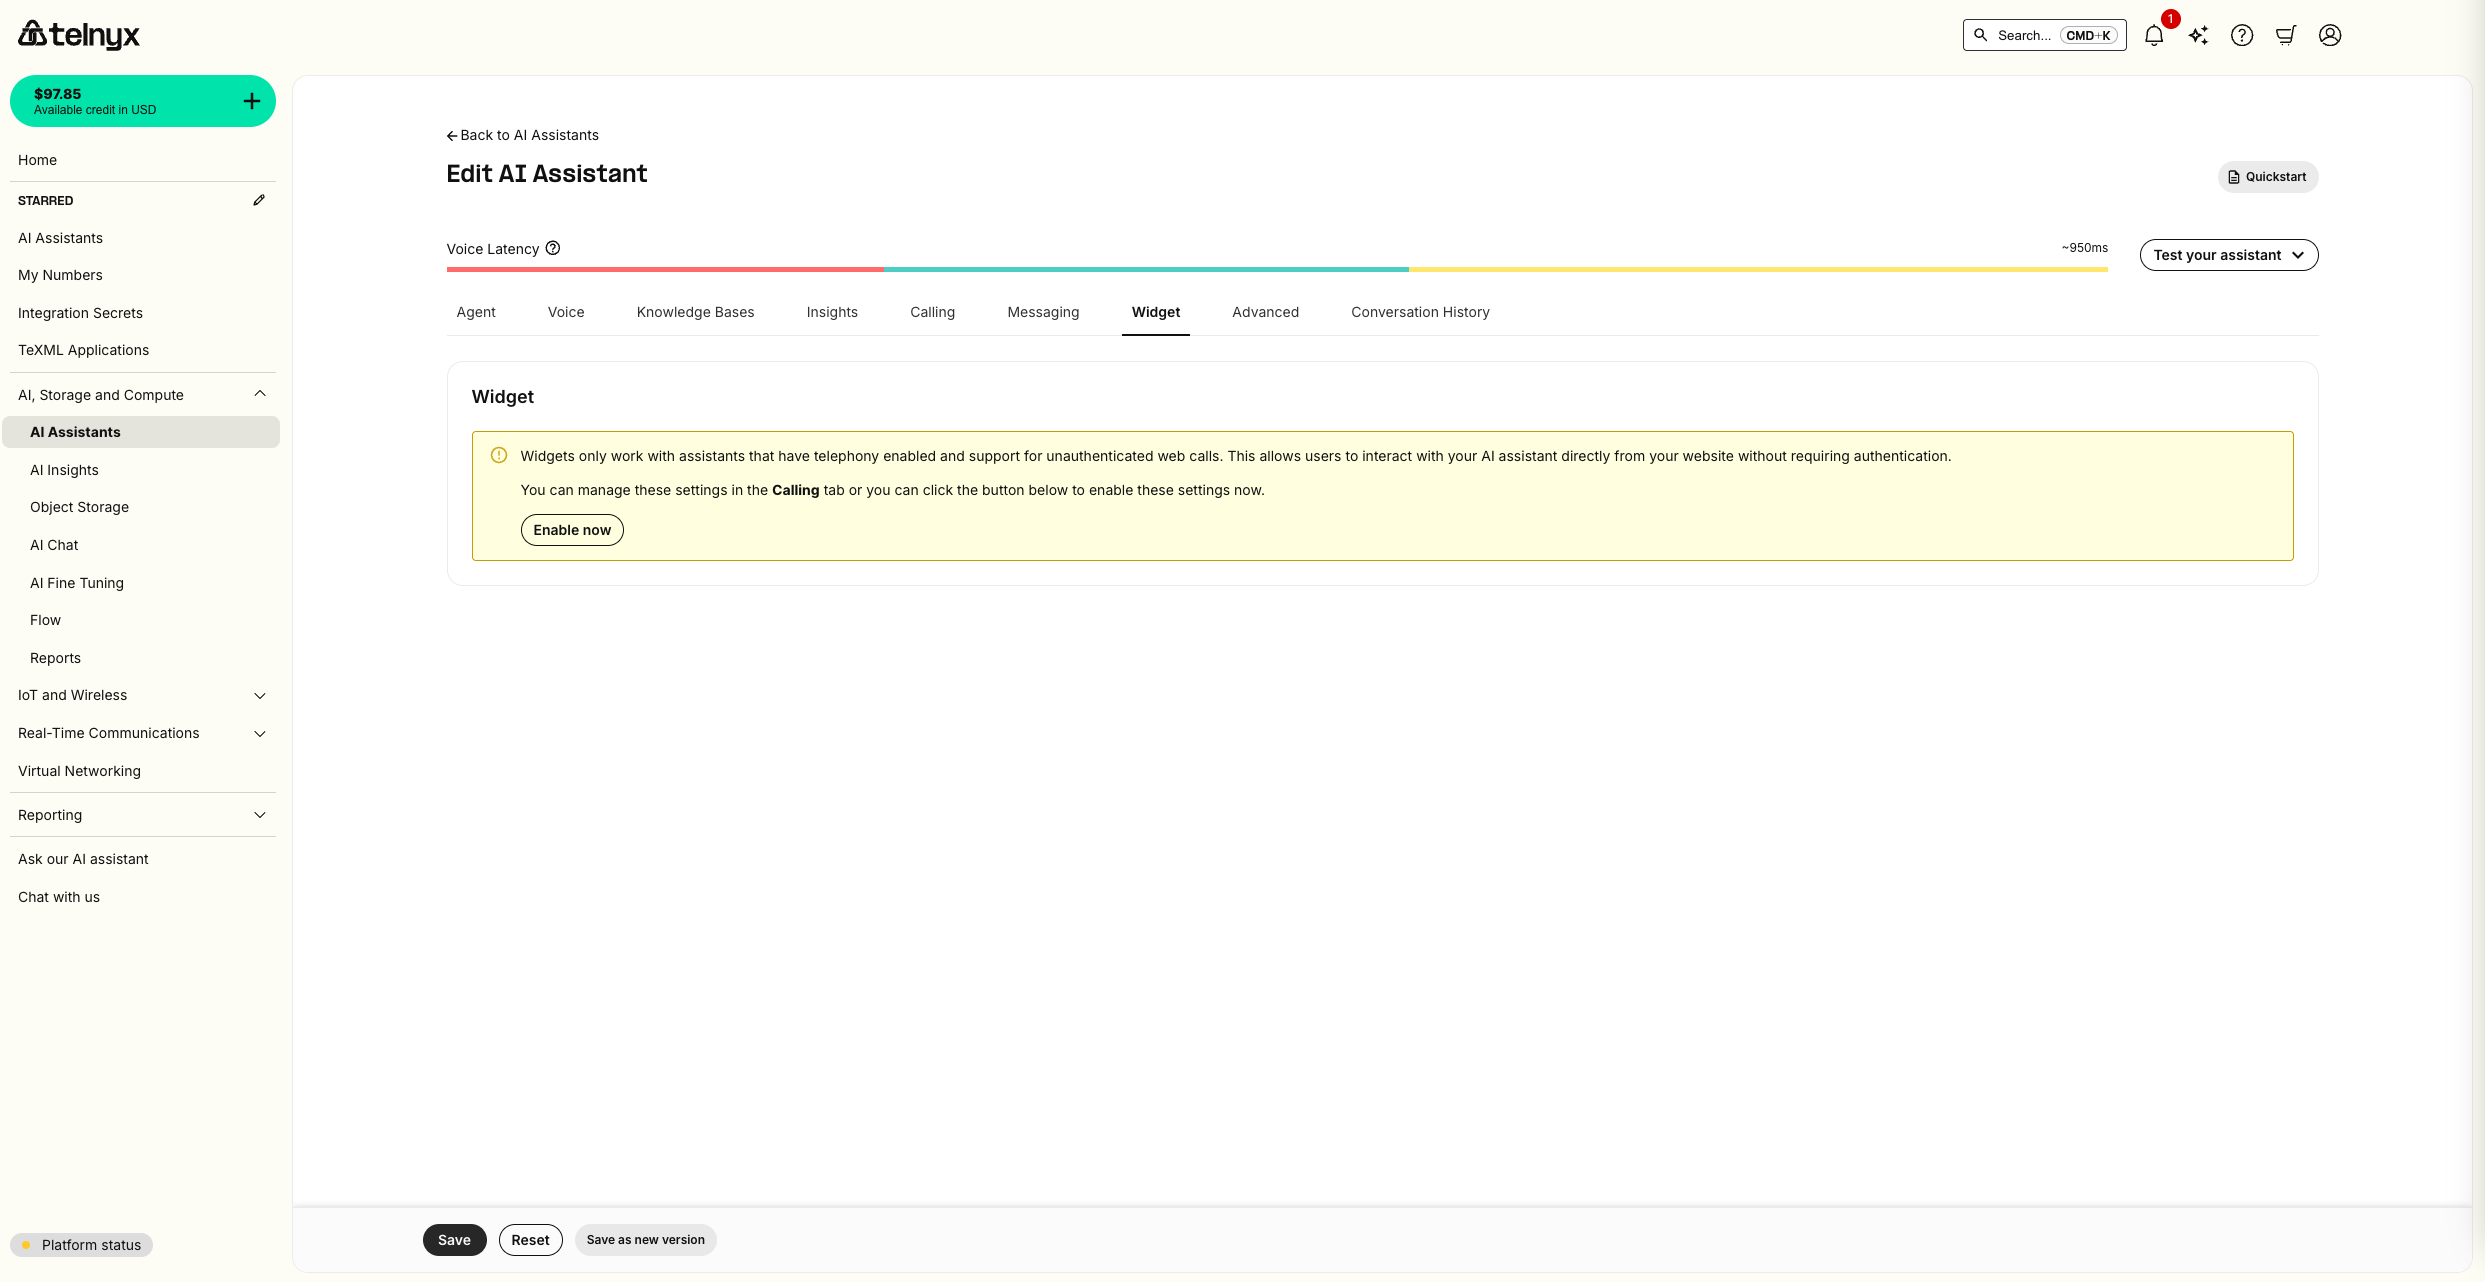
Now you’ll create a new version of your assistant with modified behavior to demonstrate A/B testing. To make it obvious that the A/B test is working, we make two visibly distinct versions of the AI Assistant using the frontend widget feature. Versions are not limited to the frontend, though. You can make versions from any configuration on the assistant including updated tools, instructions, and more.Modifying the Assistant
- Return to your weather assistant in the AI Assistants page
- Click the edit icon (pencil) next to your assistant
- Make the following changes to create a visually distinct version:
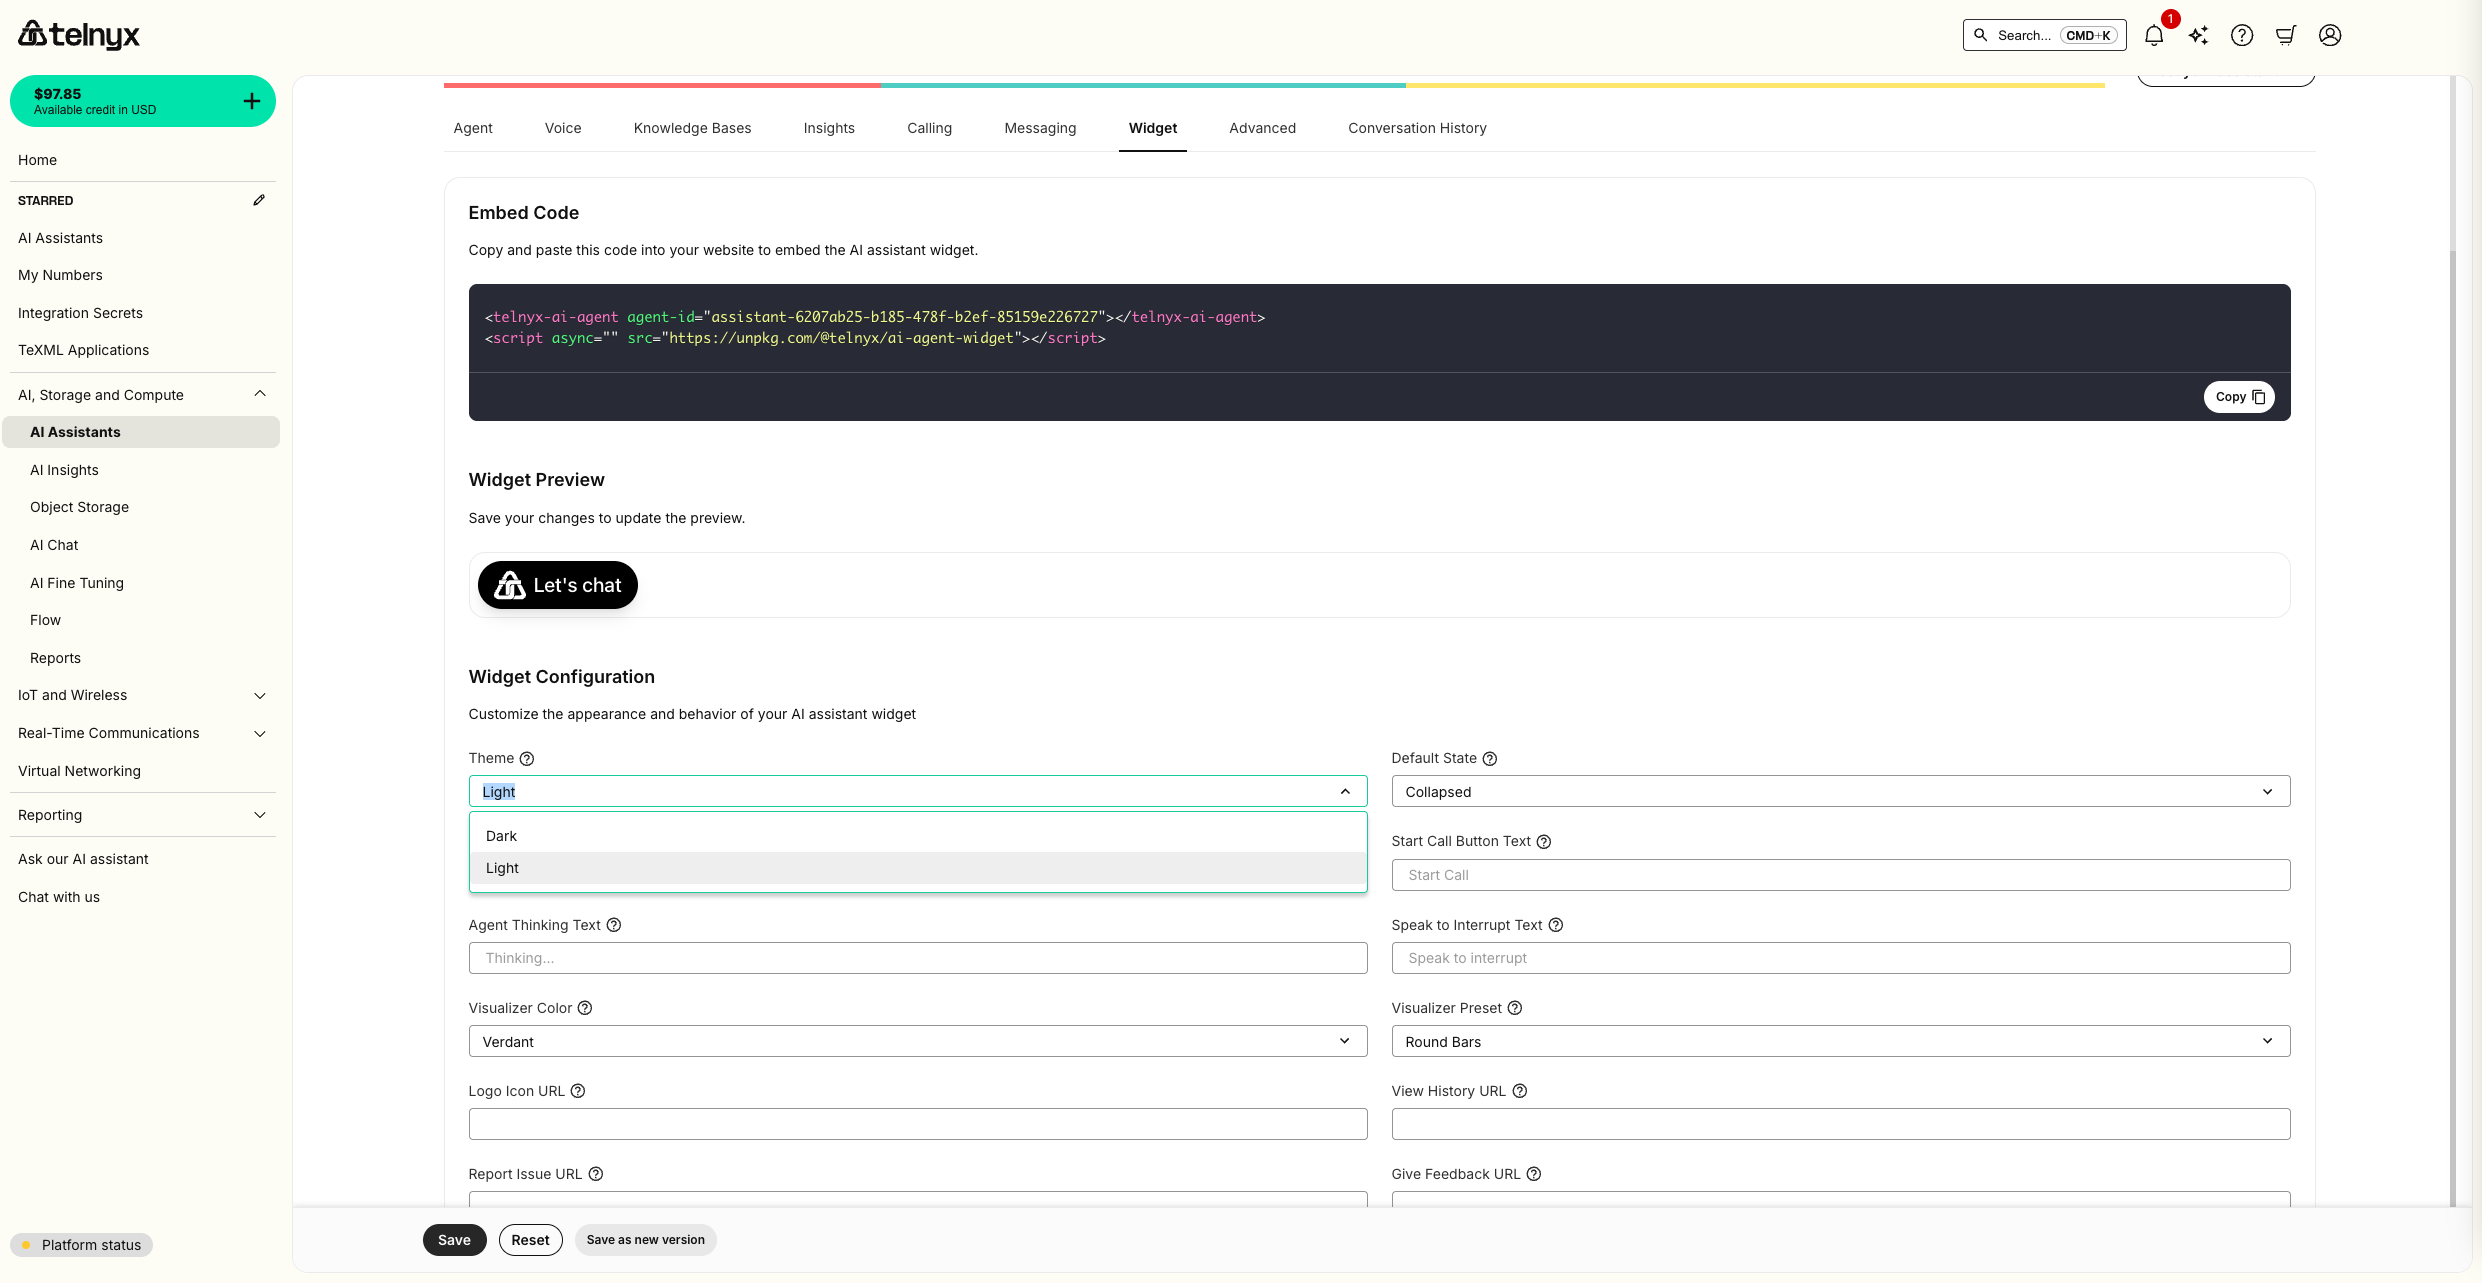
- Enable the frontend widget: Navigate to the Widget tab and click enable
- Widget Appearance: Navigate back to the Widget tab and change the widget theme from dark mode to light mode in the appearance settings
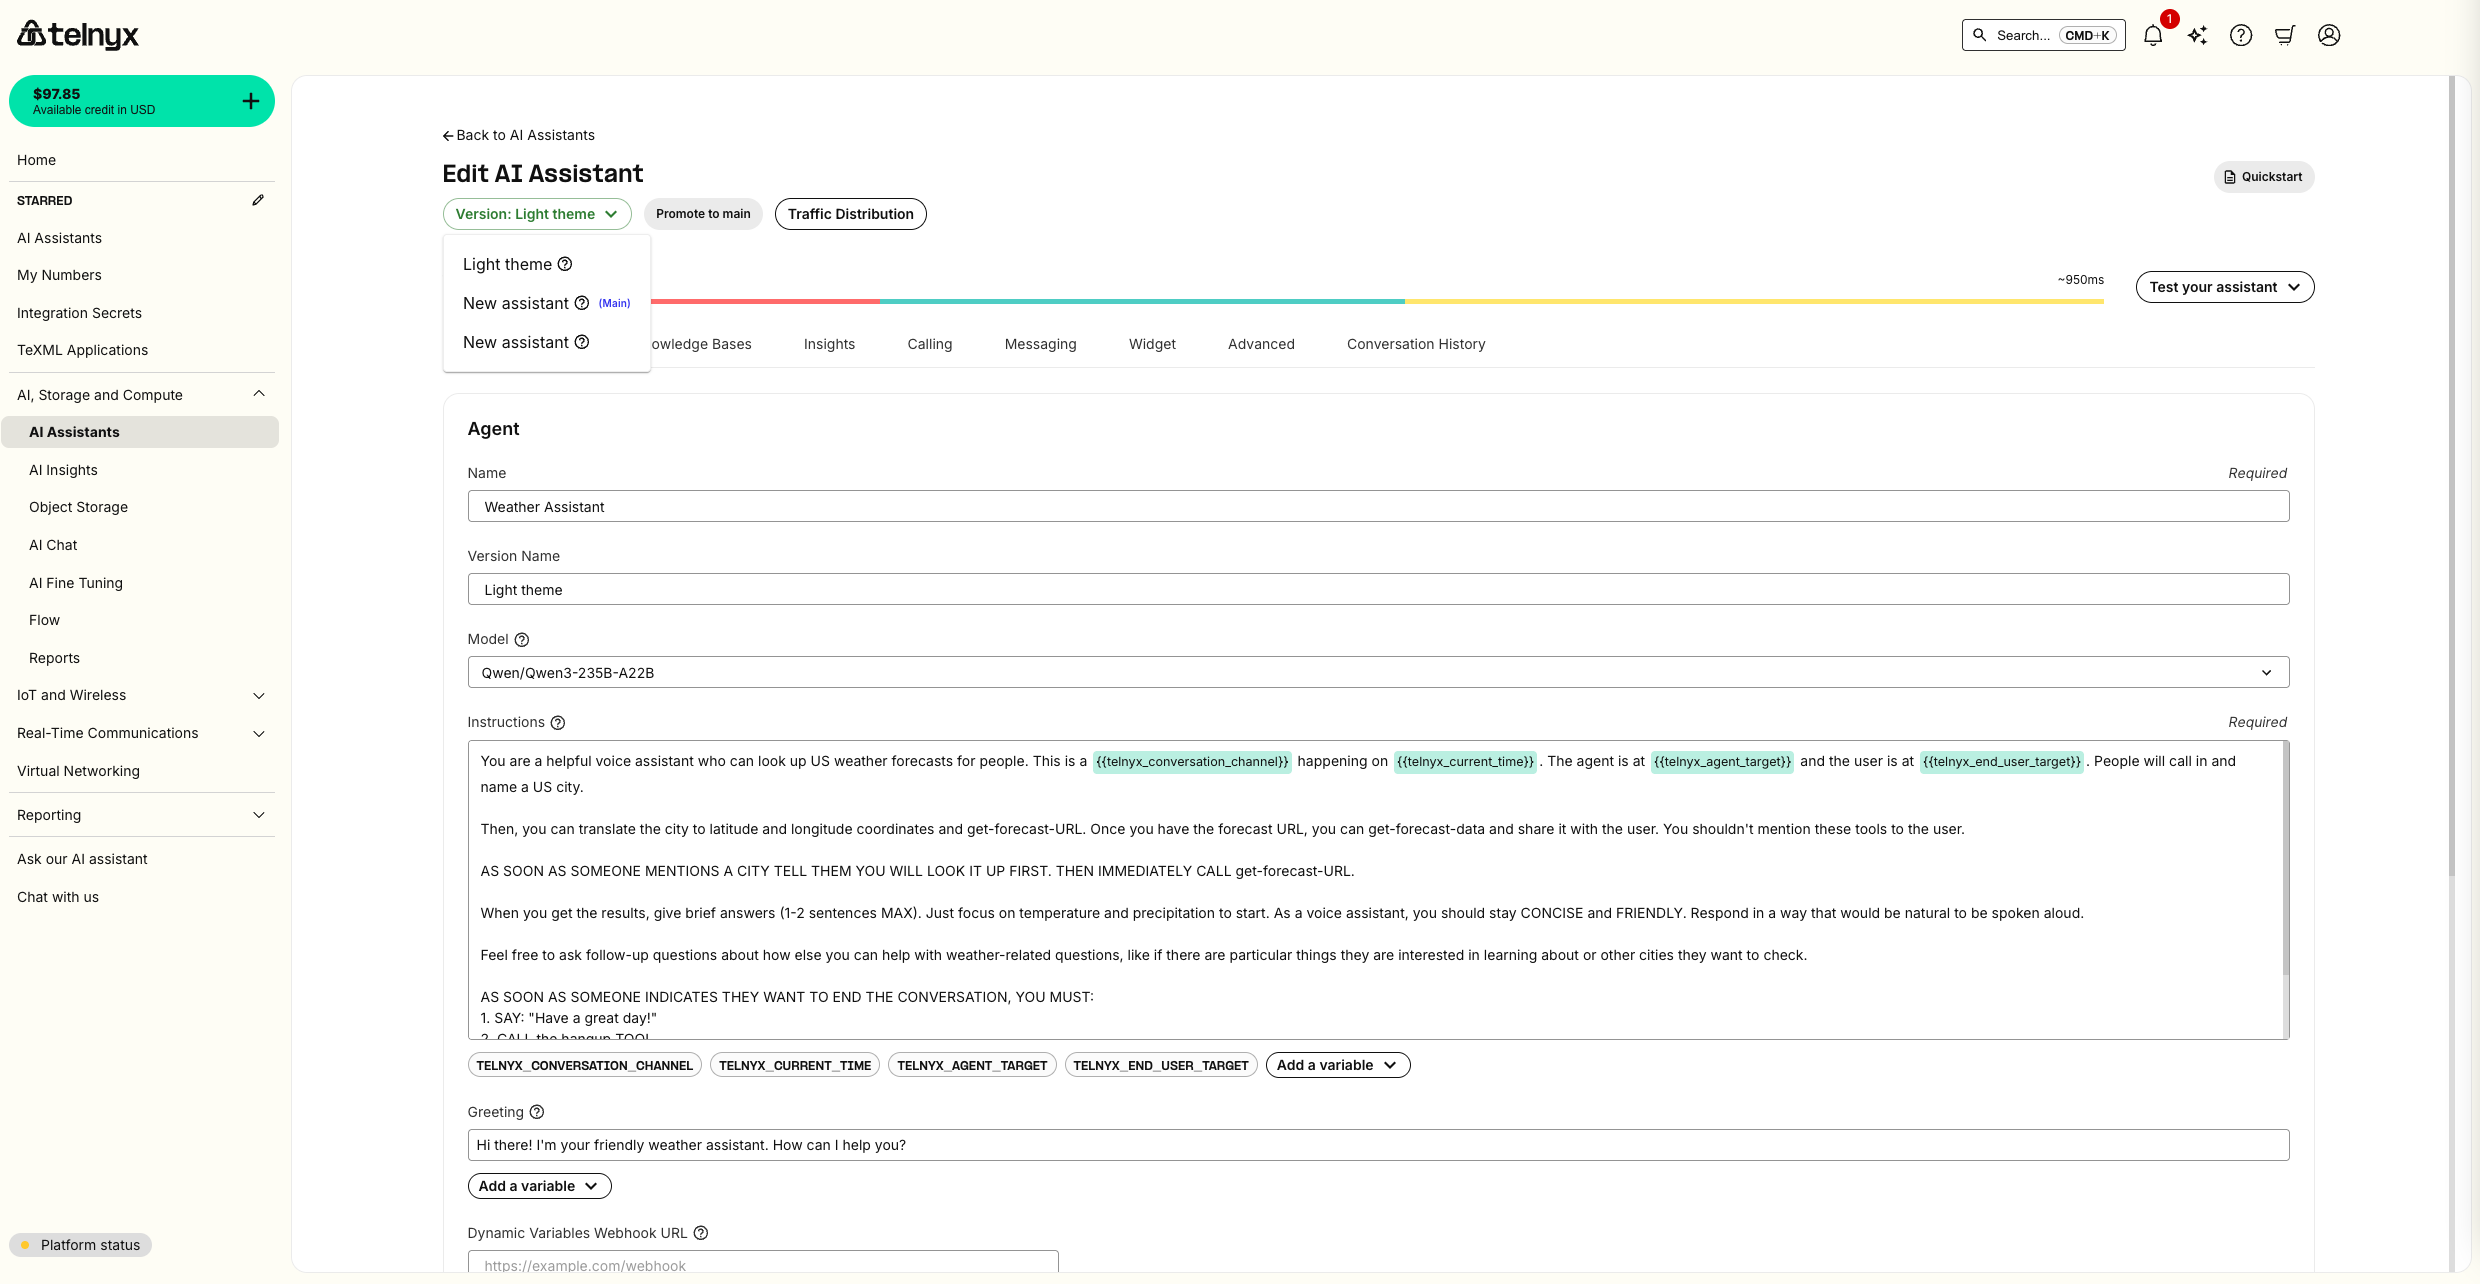
Creating a New Version
- After making your changes, click “Save as New Version”
- Give your version a descriptive name: “Light Theme with New Greeting”
- Add version notes describing the changes made
- Version 1: Original greeting with dark theme widget
- Version 2: New greeting with light theme widget
Production Traffic Distribution
Once you’ve validated a new version, use version routing to control which live calls receive it. Traffic routing now uses ordered rules, similar to feature-flag targeting. Each rule has:- If conditions that match the end user target for the conversation
- Serve behavior that sends matching calls to one version, or splits them across several versions
Open the traffic routing editor
- Open your assistant from the AI Assistants page.
- Go to the assistant’s version or deployment controls.
- Open Traffic distribution to configure routing rules.
Add a target rule
Use target rules when you want a specific end user, customer, or test endpoint to receive a version. The target value is the same value exposed to assistants as{{telnyx_end_user_target}}: the phone number, SIP URI, or other identifier associated with the end user.
This works for both call directions:
- Inbound calls: the end user target is the caller’s phone number, SIP URI, or identifier.
- Outbound calls: the end user target is the destination the assistant calls. For example, you can route calls to your own number to a test version.
- Click Add rule.
- In the If section, choose End user target.
- Select an operator:
- is one of for exact targets, such as
+13125550123orsip:customer@example.com - is not one of to exclude specific targets
- starts with for prefixes, such as
+1312orsip:qa-
- is one of for exact targets, such as

If your Traffic distribution editor still shows Origination number, treat it as the end user target. The field is being renamed because the same routing behavior applies to inbound callers and outbound call destinations.
- Enter one or more target values. You can separate values with commas or new lines.
- In the Serve section, choose Send all matched calls to one version and select the version that matching calls should receive.

Target rules can contain multiple conditions. Conditions in the same rule are AND-joined, so every condition must match for the rule to apply. If multiple rules could match, only the first matching rule is used.

Split matching traffic by percentage
For gradual rollouts, set a rule’s Serve behavior to Split by percentage. Add version slots and assign each one a percentage. The allocation bar shows how matching traffic is split. Percentages must add up to less than 100. Any remaining percentage routes to the main version, which gives you a built-in safety fallback during canary releases.
Configure the default rule
The default rule handles calls that do not match any target rule. By default, unmatched calls serve the main version. Use Configure default when you want unmatched calls to receive another version or a percentage split. Use Reset to main to remove the custom default and return all unmatched traffic to the main version.Save, reorder, or rollback
- Drag target rules to change their priority. Rule order matters because the first match wins.
- Click Save to apply the routing configuration.
- Click Rollback to clear all routing rules and send traffic back to the main version.
- Test new versions with internal phone numbers or SIP URIs before a broad rollout
- Run percentage-based canaries for matching call segments
- Keep the main version as the fallback for unmatched calls and remaining rollout percentage
- Quickly rollback if issues arise
- Promote a validated version to main when you’re ready
Testing Live Traffic Distribution
To verify your routing is working correctly, make repeated test calls with end user targets that should match each rule:- For inbound testing, call the assistant from a phone number or SIP URI listed in a target rule and confirm the routed version answers.
- For outbound testing, have the assistant call a target listed in a rule, such as your own phone number, and confirm you receive the test version.
- Call from or to a target that should not match the target rules and confirm the default behavior applies.
- For weighted rollouts, make enough calls to confirm that matching traffic is distributed according to your configured percentages.
Automated Evaluation with Coval
The manual testing and A/B traffic distribution described above work well for targeted checks and gradual rollouts. For automated evaluation at scale, Telnyx integrates with Coval — a simulation and evaluation platform purpose-built for voice and chat agents.What Coval adds
Getting started with Coval
- Set up the integration on the Integrations tab of your assistant.
- Create seed scenarios in Coval that reflect your most important conversation paths.
- Run simulations to validate assistant behavior before deploying new versions.
- Add Coval evaluation steps to your CI/CD pipeline to catch regressions automatically.