

Telnyx Storage — Full Documentation
S3-compatible cloud storage with buckets, SDKs, and migration from AWS. Complete page content for the Storage section of the Telnyx developer docs (https://developers.telnyx.com). Root index: https://developers.telnyx.com/llms.txt · Lightweight index for this section: https://developers.telnyx.com/development/llms/storage-llms-txt.md
Object Storage
Overview
Source: https://developers.telnyx.com/docs/cloud-storage/overview.mdS3-compatible object storage for files, media, backups, and static assets — reached over the AWS S3 API you already know, or directly from inside a Telnyx Edge Function. With Telnyx Cloud Storage, you can:
- Use your existing S3 tooling — the AWS SDKs, AWS CLI, and third-party S3 clients work unchanged; authenticate with your Telnyx API key
-
Store data in the US or EU — buckets in
us-central-1,us-east-1,us-west-1, andeu-central-1 - Reach buckets from Edge Compute — bind a bucket to a function and read or write objects with no S3 keys in your code
- Control access and lifecycle — presigned URLs, public buckets, object lock and retention, SSE-C encryption, and lifecycle rules
- Pay for what you use — a monthly free tier plus simple usage-based pricing Create a bucket, generate S3 credentials, and upload your first object Bind a bucket and read or write objects with no S3 keys in your code Copy-paste examples for Node, Python, Java, Go, Ruby, PHP, .NET, and Elixir Regional endpoints and how requests are routed
Ways to access
From inside a Telnyx Edge Function — pre-authenticated, no S3 keys Node, Python, Java, Go, Ruby, PHP, .NET, or Elixir Scripting and one-off operations from a terminal Move data at scale without codeLearn the essentials
Some behavior differs from AWS S3 — review these before going to production:- Compatibility matrix — which S3 operations are supported, by region
- Authentication — your Telnyx API key as the S3 credential
- Presigned URLs — the Telnyx-specific way to generate them safely
- Billing — storage and request pricing
Quick Start Guide
Source: https://developers.telnyx.com/docs/cloud-storage/quick-start.mdThere are five ways to get started on Telnyx cloud storage:
- Cloud Storage binding — from inside a Telnyx Edge Function
- AWS SDK
- AWS CLI
- S3-compatible third-party tools
- Telnyx Mission Control Portal
Available Regions
Specify the region via the
--endpoint-url flag in the AWS CLI or the equivalent SDK configuration. See API Endpoints & Organization for details on regional behavior.
Some features are currently US-only, including presigned URLs, public buckets, and SSL certificates. See the compatibility matrix for full details.
Use a Cloud Storage binding
Bind an existing bucket to a Telnyx Edge Function and read, write, and list objects through a pre-authenticatedenv binding — the runtime injects the credential, so your code holds no S3 keys. This is the fastest path if your code already runs on Telnyx Edge Compute.
See Use a bucket from an Edge Function to declare the binding and call env.MY_BUCKET.get/put/head/delete/list.
Use the AWS SDK
Telnyx Cloud Storage is S3-compatible, so the AWS SDKs work against it. See the ready-to-run examples for Node, Python, Java, Go, Ruby, PHP, .NET, and Elixir.Use the AWS CLI
Follow the procedure here. Use a recent AWS CLI v2. The Cloud Storage endpoint accepts the AWS CLI’s default checksums (CRC64NVME) on bothput-object and aws s3 cp multipart uploads.
- Inject your Telnyx API key twice, once as access key and once as secret key.
- Leave the region as blank; regionality is specified via
--endpoint-urlas shown subsequently.
BucketAlreadyExists error is expected on first attempt.
Use S3-compatible third-party tools
Many excellent tools exist to upload data at scale without any code. You can find the configuration guides here.Use the Telnyx Mission Control Portal
Follow this support article. The Mission Control Portal is not the right tool to: Use theaws s3 cp CLI command or multipart upload API for more concurrency, better reliability, and bigger throughput.
Use one of the S3 compatible third party tools when moving large object counts.
Read these documentations
Some key differences exist between Telnyx cloud storage and AWS S3. It’s advisable that they are reviewed and comprehended prior to Telnyx cloud storage is put into production.- Understand API endpoints & organizations
- Review supported API methods
- Heed the warning on presigned URL
- Pay attention to billing
- Know the restrictions on policy and ACL
Additional Resources
- All available AWS S3 CLI Commands
API Endpoints & Organization
Source: https://developers.telnyx.com/docs/cloud-storage/api-endpoints.mdThere exists two suites of Storage APIs:
- S3 compatible, and
- JSON companion
S3 Compatible APIs
This suite of APIs is compatible with AWS S3; as a result, minimal changes to existing integration are needed for migration to Telnyx. Endpoint URL Region us-central-1.telnyxcloudstorage.com us-central-1 us-east-1.telnyxcloudstorage.com us-east-1 us-west-1.telnyxcloudstorage.com us-west-1 eu-central-1.telnyxcloudstorage.com eu-central-1ListBuckets and GetBucketLocation are global: any regional endpoint returns every bucket in your account regardless of the region it is homed in. However, all other API methods need to be directed at the regional endpoint that the bucket is homed. Otherwise an error will be returned. Hence, it is advisable to query the location of the bucket first before forming the correct regional endpoint for all subsequent API operations.
Supported S3 APIs are documented in this table.
JSON Companion API
This suite of APIs is an extension to the S3 API, accommodating the following functionalities: API endpoint to be used isapi.telnyx.com.
Authentication
Source: https://developers.telnyx.com/docs/cloud-storage/authentication.mdAPI requests are authenticated with API Keys. Telnyx Storage requires passing an AWS Signature Version 4 authorization header in the API request. Telnyx Storage also requires that the Telnyx API key is substituted into the authorization header as the
access-key-id. When an API request is made, Telnyx will parse the API key from the header, validate it, and then authorize the request.
The remaining components of the authorization header (date, aws-region, aws-service, secret-key) are irrelevant to us. These values, as well as the generated signature from the secret key are all ignored. They only remain in the authorization header to maintain S3 compatibility. As long as you are passing an AWS Signature Version 4 authorization header, and the Telnyx API key is substituted into the header as the access-key-id, the request can be authenticated.
An example is shown below, where {{your_telnyx_api_key_here}} is where you will substitute in your Telnyx API Key:
AWS CLI and S3 third party applications
A general rule of thumb when trying to use Telnyx Storage with a third party application is:Access Key→ substitute in the Telnyx API tokenSecret Access Key→ either leave blank, or type something random in as a placeholder, or duplicate Telnyx API tokens
Bucket Addressing
Source: https://developers.telnyx.com/docs/cloud-storage/bucket-addressing.md
Path-style requests
https://[region].telnyxcloudstorage.com/[bucketname]/[objectname]
Virtual-hosted-style requests
https://[bucketname].[region].telnyxcloudstorage.com/[objectname]
Node.js
Source: https://developers.telnyx.com/docs/cloud-storage/sdk/node.mdRecent AWS SDK v3 versions work against Cloud Storage with default checksum settings. If you hit a checksum error on an older v3 release, set all checksum calculation and validation options to
WHEN_REQUIRED (as shown in the client config below).
The following example shows how the AWS Node.js SDK can be used to interact with Telnyx Cloud Storage.
Python
Source: https://developers.telnyx.com/docs/cloud-storage/sdk/python.mdRecent boto3 versions (1.36+) work against Cloud Storage with default checksum settings. If you hit a checksum error, disable checksum calculation and verification with the
Config shown below.
The following example shows how AWS Python SDK can be used to interact with Telnyx Cloud Storage.
Java
Source: https://developers.telnyx.com/docs/cloud-storage/sdk/java.mdIf you hit a checksum error with AWS SDK for Java v2 (2.30+), set request checksum calculation and response checksum validation to
WHEN_REQUIRED, as shown in the client builder below.
The following example shows how AWS Java SDK can be used to interact with Telnyx Cloud Storage.
Add Dependency
Create S3 Bucket
Upload an Object
List Objects
Download Object
Generate Presigned URLs for Upload and Download
In order for this part to work, we will need to add json decoding library and http client. Any libraries will do, but for this example we picked: gson and okhttp3.Go
Source: https://developers.telnyx.com/docs/cloud-storage/sdk/golang.mdThe following example shows how AWS Golang SDK can be used to interact with Telnyx Cloud Storage.
Ruby
Source: https://developers.telnyx.com/docs/cloud-storage/sdk/ruby.mdThe following example shows how AWS Ruby SDK can be used to interact with Telnyx Cloud Storage.
PHP
Source: https://developers.telnyx.com/docs/cloud-storage/sdk/php.mdThe following example shows how AWS PHP SDK can be used to interact with Telnyx Cloud Storage.
.NET
Source: https://developers.telnyx.com/docs/cloud-storage/sdk/dotnet.mdChunk encoding is not supported by the Cloud Storage API. Please set
putObjectRequest.UseChunkEncoding = false.
The following example shows how AWS .Net SDK can be used to interact with Telnyx Cloud Storage.
Elixir
Source: https://developers.telnyx.com/docs/cloud-storage/sdk/elixir.mdThe following example shows how AWS Elixir SDK can be used to interact with Telnyx Cloud Storage. This example requires the following dependencies be added to your mix.exs file
Third Party Applications
Source: https://developers.telnyx.com/docs/cloud-storage/third-party.mdAll S3 third-party tools, applications, clients, and libraries can be used to interact with Telnyx Cloud Storage. This includes popular applications like Cyberduck, S3 Browser, Wal-G, and many others. Visit our support page to find configuration guides for many of these commonly used third-party tools. If you don’t see a guide for a particular application, please don’t hesitate to reach out to us through our contact page. We would be happy to create a configuration guide for you.
Edge Function Binding
Source: https://developers.telnyx.com/docs/cloud-storage/bindings.mdA Cloud Storage binding gives a Telnyx Edge Function a pre-authenticated handle to one of your buckets. You declare the binding in
func.toml; the runtime resolves it to env. and injects the credential — your code holds no access key or secret key, and nothing sensitive appears in your bundle or logs.
The handle is a small, focused surface — get, put, head, delete, list. It is the in-function counterpart of the S3-compatible API: same buckets, same objects, reached from inside a function instead of over HTTP.
Cloud Storage bindings are TypeScript-only — the typed env handle comes from the @telnyx/edge-runtime SDK (≥ 0.5.0). Other runtimes (JS, Go, Python) don’t get a typed binding.
This guide builds one complete function end to end: a small file API backed by a bucket — PUT, GET, and DELETE an object by key, and list objects by prefix.
1. Scaffold the function
Create a TypeScript function. You also need an existing bucket for it to use — the binding points at a bucket, it doesn’t create one. If you don’t have one, create it first via the Mission Control portal, the AWS CLI, or an S3 SDK.2. Declare the binding
Add a[storage.cloudstorage.] block to the generated func.toml. The block key is a name you choose — it becomes the property on env. Here it’s ASSETS, reached as env.ASSETS:
[storage.cloudstorage.] becomes env..
3. Install and generate types
new-func already lists @telnyx/edge-runtime and @aws-sdk/client-s3 in package.json. Install them, then generate the typed env:
telnyx-edge types writes telnyx-env.d.ts, which types env.ASSETS as CloudStorageBucket so the calls below type-check.
4. Write the function
Replaceindex.ts with the complete file API. Every bucket operation — list, put, get, delete — goes through env.ASSETS; there are no credentials anywhere in the code.
5. Ship it
6. Try it
WithURL set to your function’s invoke URL:
Beyond the basics
This file API sticks to the coreget/put/delete/list calls. The same binding also does ranged and conditional reads, batch delete, hierarchical (folder) listing, multipart uploads for objects past the request/response size cap, and SSE‑C customer-key encryption — all on env.. See the Binding API reference for every method, option, and object type.
Related
- Binding API reference — every method, option, and object type
- Bindings overview — how bindings work across Telnyx API, Secrets, KV, and Cloud Storage
- S3-compatible quick start — the same buckets over HTTP
Binding API Reference
Source: https://developers.telnyx.com/docs/cloud-storage/bindings/reference.md
env. (a CloudStorageBucket) is the in-function handle to a Cloud Storage bucket, declared with a [storage.cloudstorage.] block. It’s a pre-authenticated wrapper over the bucket — the runtime injects the credential, so your code holds no S3 access key or secret key.
This reference tracks @telnyx/edge-runtime ≥ 0.5.0. Ranged and conditional reads, batch delete, hierarchical listing, SSE-C, and the version / writeHttpMetadata object fields need ≥ 0.4.0; multipart uploads need ≥ 0.5.0.
- Missing keys read as
null—getandheadresolve tonullfor a key that doesn’t exist, not an error. - A failed conditional read returns a body-less object — when a
getonlyIfprecondition isn’t met,getresolves to a plainCloudStorageObject(metadata only, nobodyand no readers) so you can reuse your cached copy. Check for a body before reading it. deleteis idempotent — deleting a missing key (single or in a batch) succeeds and resolves tovoid.putreturns partial metadata — the resolved object carrieskey,etag,httpEtag,version, and any metadata you set, but notsizeoruploaded. Useheadto read those after a write.- Custom metadata keys are lower-cased on read —
x-amz-meta-*header names are stored lower-cased, socustomMetadatakeys come back lower-cased (uploadedBy→uploadedby). - SSE-C applies to US-region buckets —
ssecKeyis honored for buckets in US regions.
get(key, options?)
Read an object and its body. Returns null if the key does not exist.
CloudStorageObjectBody — a CloudStorageObject plus the body stream and one-shot readers arrayBuffer(), text(), json(), and blob().
Ranged reads
Passrange to fetch part of an object instead of the whole thing — byte-range streaming, reading a header, or resuming a download. The resolved object echoes the requested range.
Conditional reads
PassonlyIf to read only when a precondition holds — cache revalidation and “only fetch if changed.” A CloudStorageConditional maps to If-Match / If-None-Match / If-Unmodified-Since / If-Modified-Since; you can also pass a Headers object directly.
onlyIf applies to get/head only.
put(key, body, options?)
Write an object. Resolves to a CloudStorageObject describing the write.
key, etag (unquoted MD5 for a single-part write), httpEtag (the quoted, header-ready form), version (when bucket versioning is enabled), and the metadata you set. size and uploaded are not populated on the put result — read them back with head if you need them.
head(key, options?)
Read an object’s metadata without its body. Returns null if the key does not exist. Accepts the same onlyIf preconditions as get.
put, head returns the full CloudStorageObject including size and uploaded.
delete(key | keys)
Remove one object, or many in a single call. Idempotent — deleting a missing key resolves normally.
list(options?)
Enumerate objects (metadata only — list does not return bodies).
truncated is true, pass the returned cursor back in list({ cursor }) to fetch the next page.
By default a list entry carries only key, size, etag, and uploaded. Pass include to also populate httpMetadata and/or customMetadata on each returned object — a heavier listing, so ask for it only when you need it.
Hierarchical (“folder”) listing
Setdelimiter to / to browse one level of a key hierarchy: keys below the current level collapse into delimitedPrefixes, and only keys directly at the level appear in objects.
Multipart upload
Upload a large object in parts from inside a function — for objects past the Edge Compute request/response size cap, or for parallel/resumable uploads. Available on US-region buckets.createMultipartUpload(key, options?)starts the upload and returns a handle.optionstakes the samehttpMetadata/customMetadata/ssecKeyasput.uploadPart(partNumber, body, options?)uploads one part and returns its{ partNumber, etag }. Parts are numbered from 1; every part except the last must be at least 5 MiB.complete(parts)assembles the object. You may pass the parts in any order — they’re sorted bypartNumber.abort()discards an in-progress upload and its parts.resumeMultipartUpload(key, uploadId, options?)rebuilds a handle for an existinguploadId(no server round-trip) so you can upload more parts orcomplete()/abort()from a later invocation.
Server-side encryption (SSE-C)
PassssecKey on get, put, and multipart calls to encrypt with a customer-provided key. The key is a 256-bit (32-byte) AES key, given as an ArrayBuffer or a 64-character hex string. Supply the same key on read that you used on write; the object exposes ssecKeyMd5 (hex) so you can identify which key encrypted it. SSE-C applies to US-region buckets.
Object types
head and each list entry populate size and uploaded; put’s result does not. The body readers on CloudStorageObjectBody consume the stream once — call a single one per get, and bodyUsed flips to true once you do. writeHttpMetadata is handy for serving an object straight back out of a function with its stored headers:
Related
- Use a bucket from an Edge Function — declare the binding and get started
- Bindings overview — bindings across Telnyx API, Secrets, KV, and Cloud Storage
- S3-compatible API reference — the same buckets over HTTP
Multipart Upload
Source: https://developers.telnyx.com/docs/cloud-storage/multipart-upload.mdLarge objects should be uploaded to your bucket via multipart upload.
Using AWS CLI
Assuming you have AWS CLI set up already:~/Projects/s3-test/testdata/10Gfileis the path to the raw bytes stored locallys3://target-bucket/10Gfileis the target bucket name and the object key (aka object name)
Using AWS API/SDK
The general procedure to use the API/SDK is as follows: Initiate the upload session with CreateMultipartUpload. Stream each chunk with UploadPart. Finalize the transfer by calling CompleteMultipartUpload.Presigned URLs
Source: https://developers.telnyx.com/docs/cloud-storage/presigned-urls.mdThis is currently supported only for buckets located in the US. We do NOT follow how AWS does authentication — hence, you MUST NOT use the existing AWS SDK or CLI to generate presigned URLs. Otherwise, you will expose your API key to the public. Please use the JSON companion API to generate ephemeral presigned URLs to allow anonymous downloads and uploads of objects to your bucket(s). In addition, creating long-lived presigned URL is a privileged action. Non-verified accounts are limited to presigned URLs with TTL no greater than 5 minutes. To verify your account, request and obtain Level 2 verification status.
Examples
Considering8f0nh1jk8qvf as an example of a presigned URL token, you can perform the following actions:
Downloading an object using a presigned URL
Uploading an object using a presigned URL
a-new-object.bin is the file you want to upload in my-bucket. If the object already exists, it will be overwritten.
Object Encryption
Source: https://developers.telnyx.com/docs/cloud-storage/object-encryption.mdThis is currently supported only for buckets located in the US. On non-US buckets the SSE-C headers are silently ignored: the object is stored unencrypted and can be retrieved without the key. We support SSE-C. Here is an example on how to
PutObject with encryption.
PutObject with SSE-C
Don’t forget to update--sse-customer-key here.
Public Buckets
Source: https://developers.telnyx.com/docs/cloud-storage/public-buckets.mdThis is currently supported only for buckets located in the US. Making a bucket public (via policy or ACL) is a privileged action. Follow the following procedure: Request and obtain Level 2 verification status. Use the CLI, API, or SDK to apply the desired policy to your bucket.
HTTPS with Custom Domain
Source: https://developers.telnyx.com/docs/cloud-storage/ssl-certificates.mdThis is currently supported only for buckets located in the US.
1. Validate availability of bucket
You must ensure the subdomain is available as a bucket name. If so, you may create the bucket. In this example, we created asset.gardening-homes.com.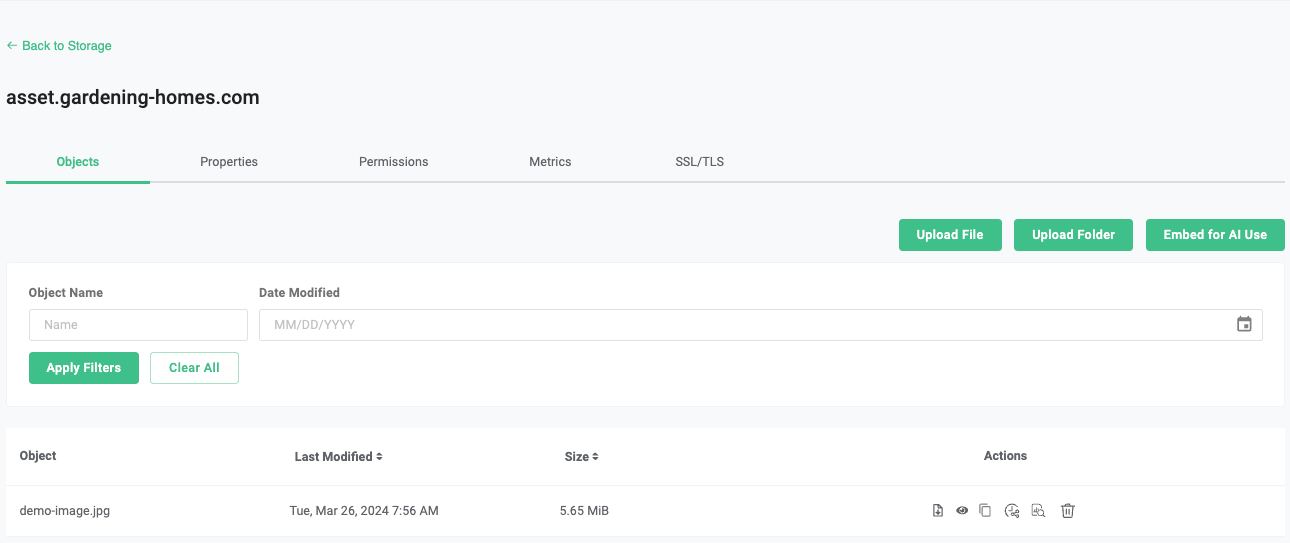
2. Make the bucket public
Since the content of this bucket will be publicly accessible, you need to apply a public read policy to it. Follow the instructions here: Put Bucket Policy
3. Configure DNS
Through your domain/DNS provider, you need to set up an alias to the bucket with virtual addressing style (Bucket Addressing)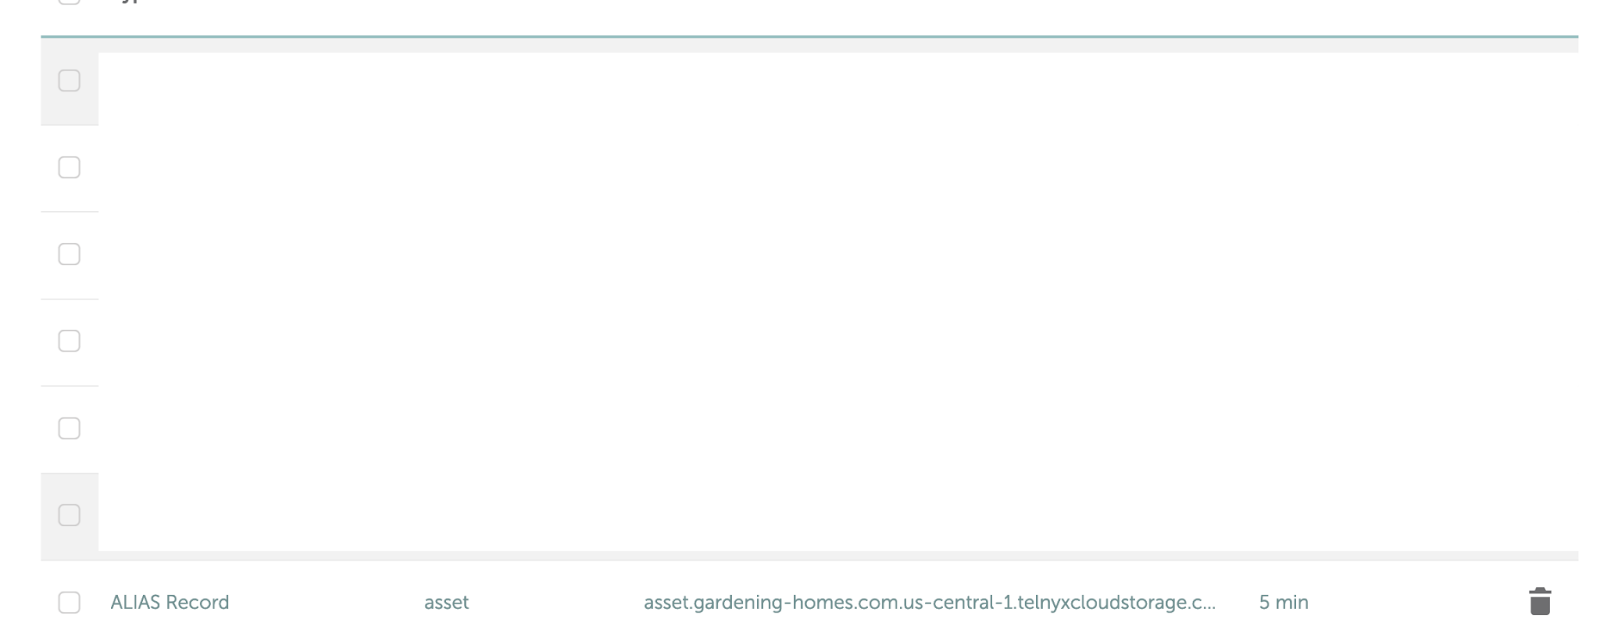
4. Upload Certificate and Matching Key
Select the bucket you created, under SSL/TLS, upload the certificate and matching key.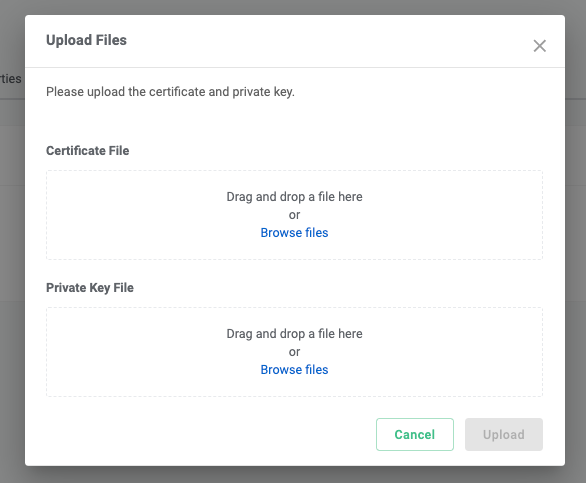
- The bucket name must match one of the certificate SNIs (Server Name Indication) exactly. If you have a wildcard SNI *.example.com, help.example.com will work, but example.com will not work.
- If you have intermediate certificates, you must include them in the certificate file with the leaf certificate being at the top.
- You may omit the root certificate, as we will verify known root certificates automatically. However, if you’d like to guarantee that your certificate will be accepted, it is better to include it.
5. Test
Assuming all of the above is successful and there is an object named demo-image.jpg in the bucket, you may put https://asset.gardening-homes.com/demo-image.jpg in your browser and expect the following- The image shows up in your browser, and
- Your browser will show “Connection is secure” and “Certificate is valid”

Data Protection & Retention
Source: https://developers.telnyx.com/docs/cloud-storage/lock-and-retention.mdThis is currently supported only for buckets located in the US. To enable this feature, object lock MUST be enabled at bucket creation time.
Emptying Buckets
Source: https://developers.telnyx.com/docs/cloud-storage/emptying-bucket.mdWhen a bucket has more than 1000 objects, it’s burdensome to empty it synchronously. The best solution is to take advantage of lifecycle rules which asynchronously operate on destination bucket. Here is a sample lifecycle rule
Sample lifecycle rule
lifecycle.json and you can apply that to the bucket you intend to empty ---
AWS S3 Compatibility
Source: https://developers.telnyx.com/docs/cloud-storage/aws-s3-compatibility.mdThis table documents all the supported S3 APIs. When an unsupported API method is invoked, an S3-compatible, XML-formatted
NotImplemented error response is returned.
For the supported API methods documented, not all of the AWS S3 parameters, headers, and body XML elements are supported.
AWS S3 PutObject
For example, AWS S3 PutObject supports many headers. However, we only support what’s documented under the PutObject section. They are unsupported by default unless otherwise explicitly specified.Compatibility Matrix
Source: https://developers.telnyx.com/docs/cloud-storage/supported.md
Migration from AWS S3
Source: https://developers.telnyx.com/docs/cloud-storage/migrating-from-aws.mdThe migration API moves all data from a source AWS S3 bucket to a destination Telnyx Storage bucket without the user incurring a data egress charge by AWS. This is currently supported only for buckets located in the US.
Feature
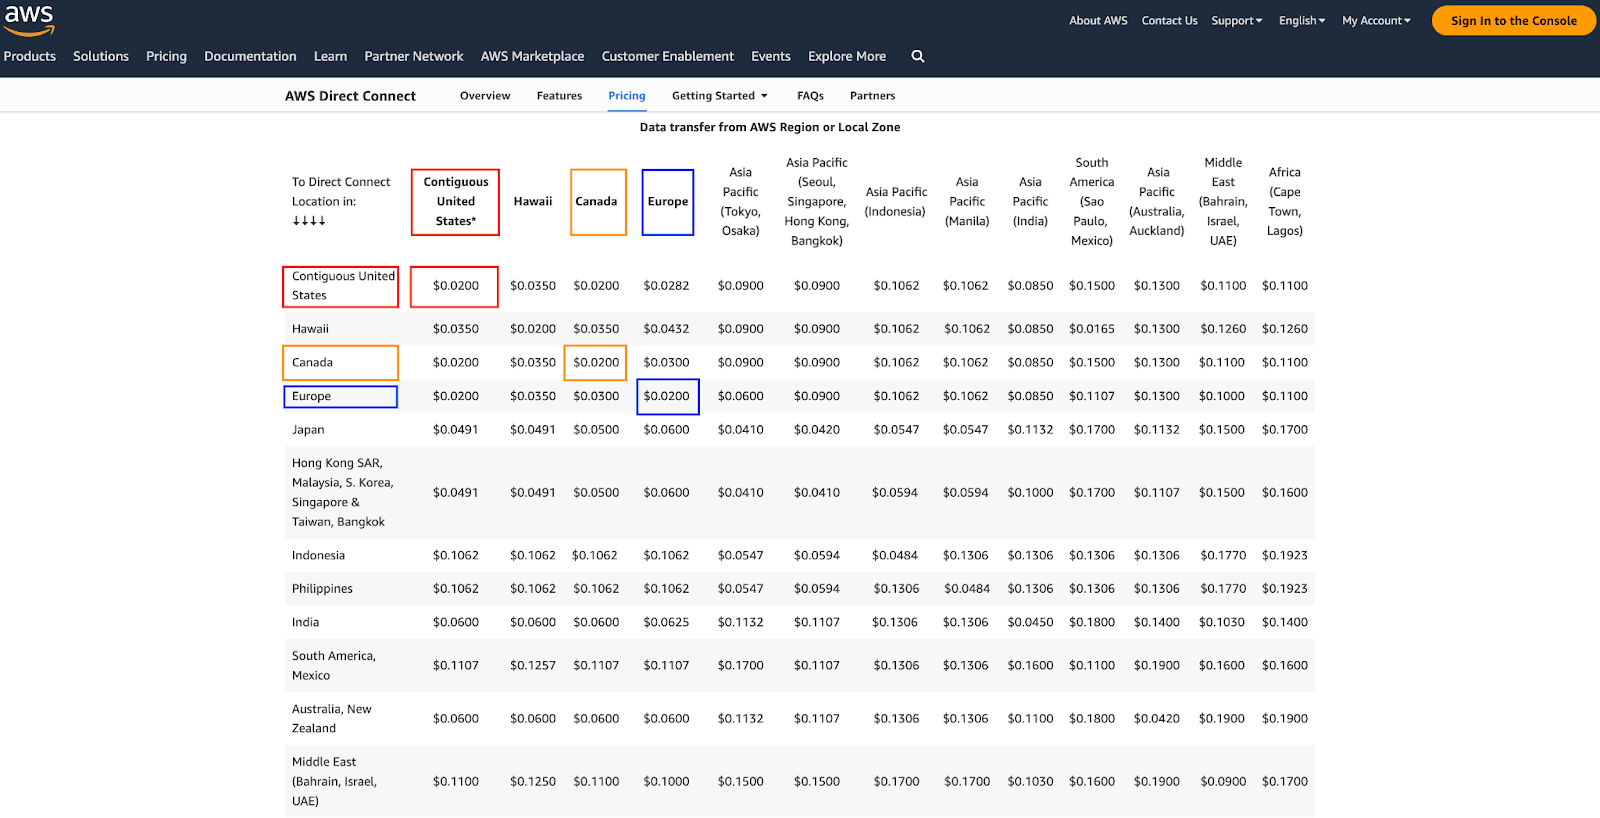
The owner of the AWS account does not get charged by AWS on data transfer to Telnyx when this API is employed.Achieving minimal costs
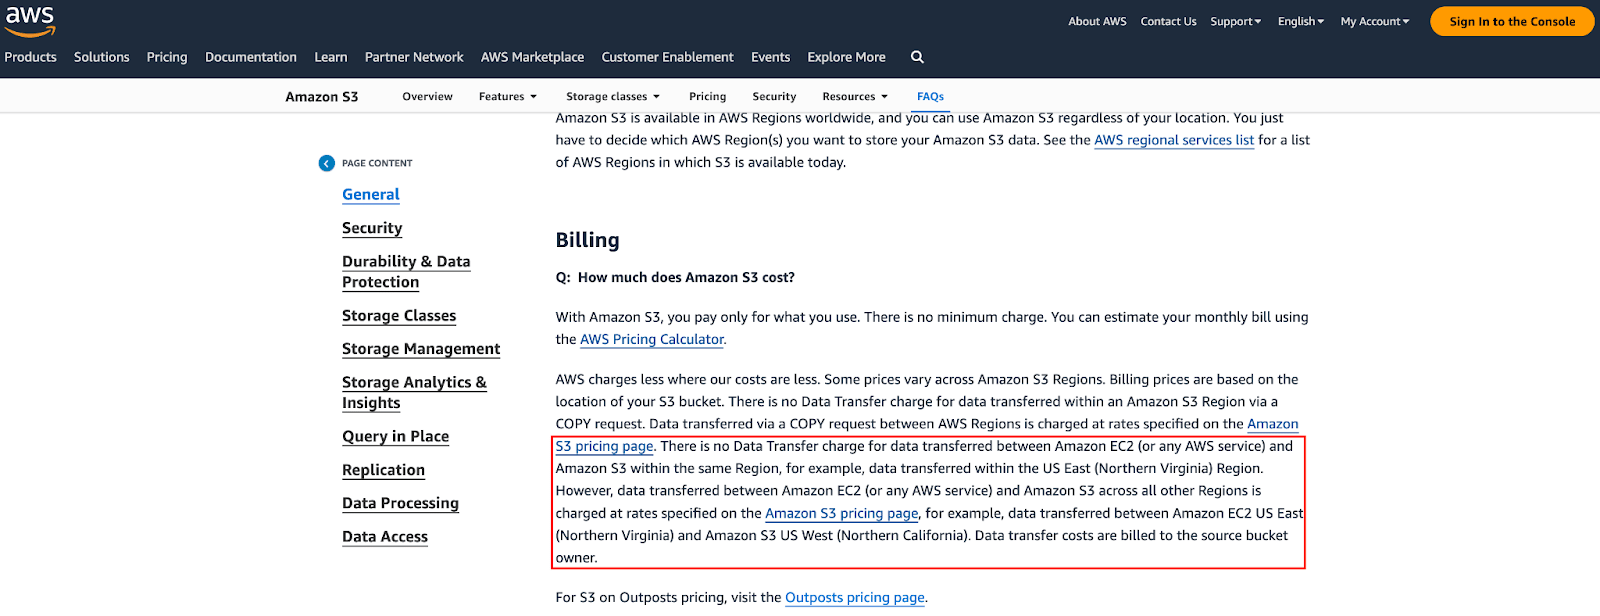
There are 3 components to this data pipeline: User’s AWS S3 bucket in AWS Region X. Telnyx’s migration engine in the same AWS Region X. Telnyx’s direct connects with AWS used to transfer the data. Cost minimization is achieved via the following billing practices by AWS. Intra-region data transfer between S3 and EC2, within the same account, or across different accounts, is free of charge.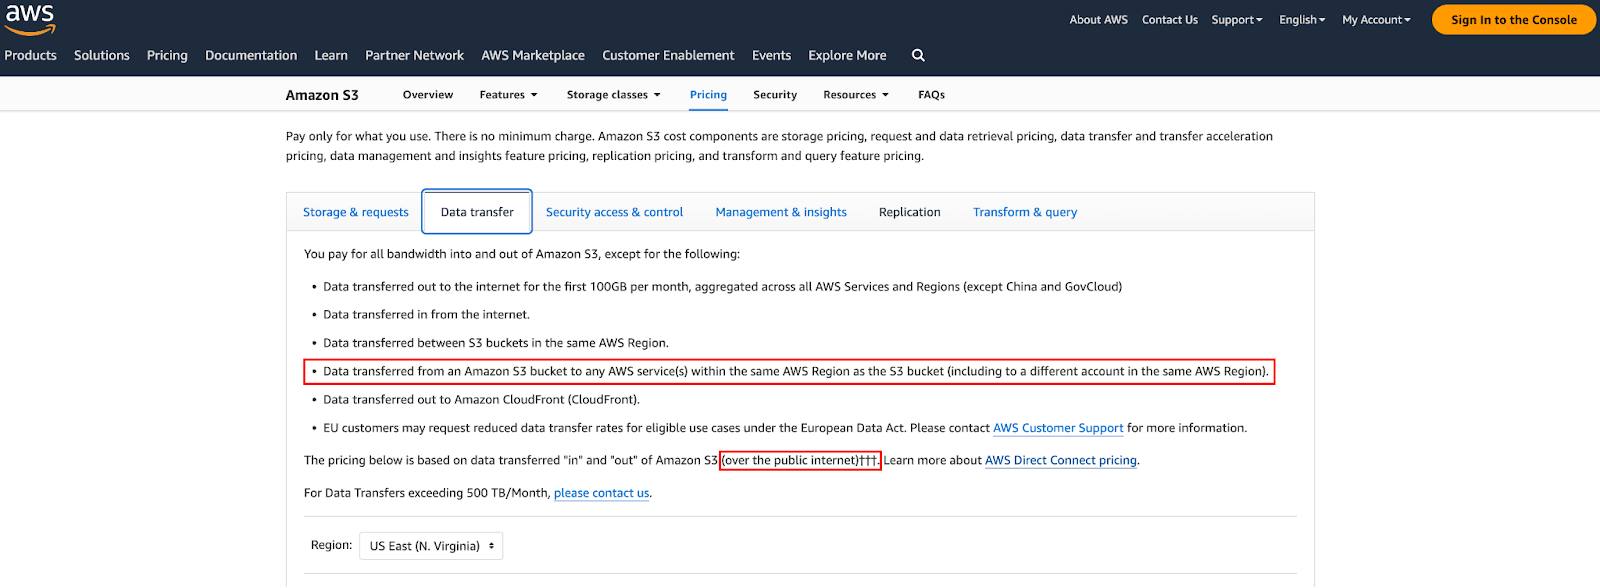
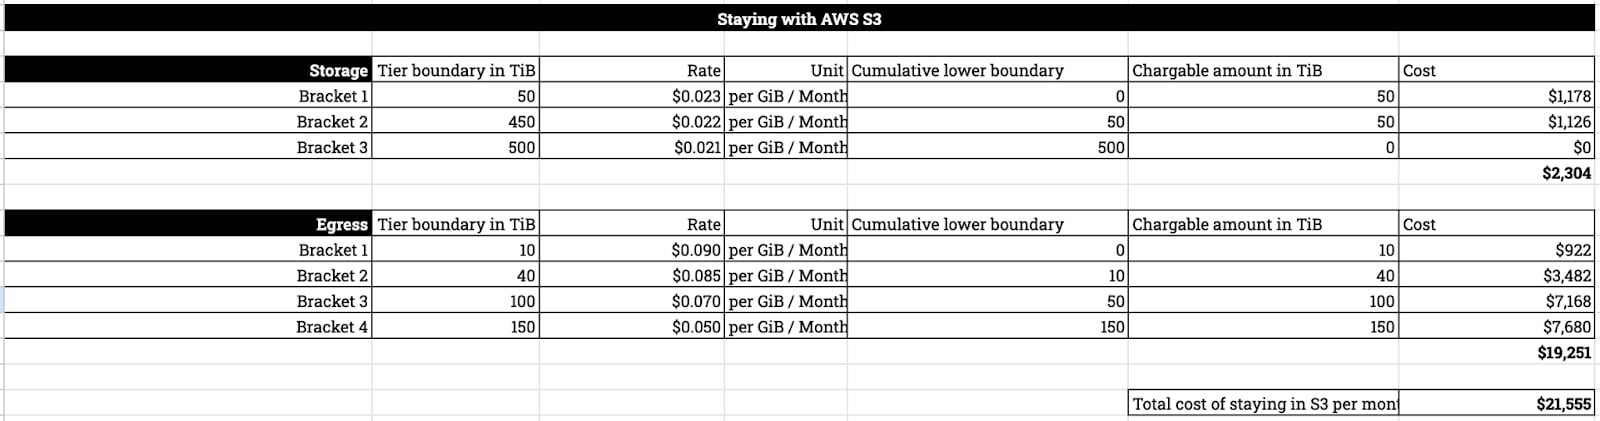
AWS S3 vs Telnyx Storage Costs Revisited
Assume a user has the following pattern in us-east-2 Ohio.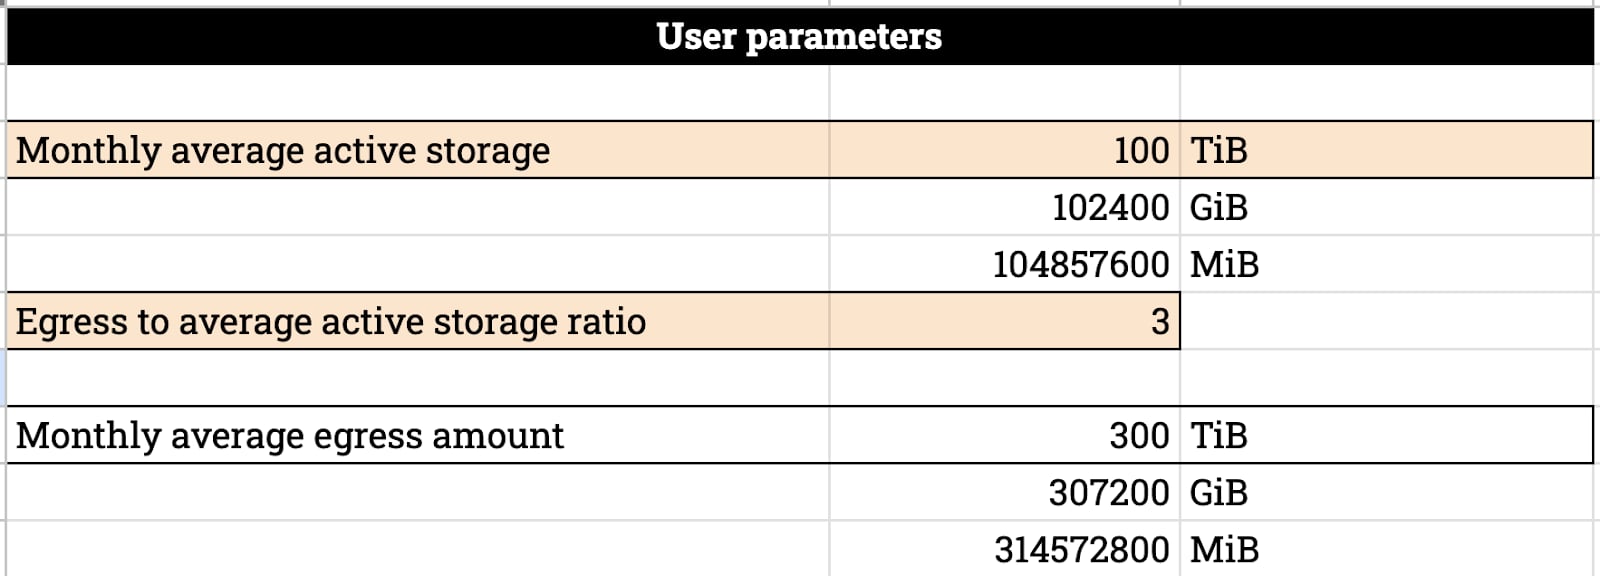

API Concepts and Procedure
Coverage
This API shows you the supported AWS S3 regions. Prior to using the API for migration, ensure the AWS S3 bucket you want to migrate is among the supported regions.Migration Sources
Only standard class is supported. Restore data in glacier before attempting migration. This API allows you to define the source bucket in AWS. In order to use this API, you need to provide it with a pair of AWS access key and secret access key. We advise you to create an IAM role with a Read Only user for this purpose.Migrations
Lastly, you can create a migration. If the target bucket doesn’t exist, the API will attempt to create it for you. If the desired bucket name is not available or invalid, you will receive an error right away. In addition, you do not have to match source bucket region to target bucket region; in other words, you can migrate data from an AWS source bucket in us-west-1 to Telnyx target bucket in us-east-1. You will not be charged for DTO by AWS as the API will use a migration engine in us-west-1. When the refresh parameter is set to false, a one time migration will be created. Otherwise, the API will periodically synchronize the source and destination bucket.Checking Migration Progress
You can periodically poll the API to see its status.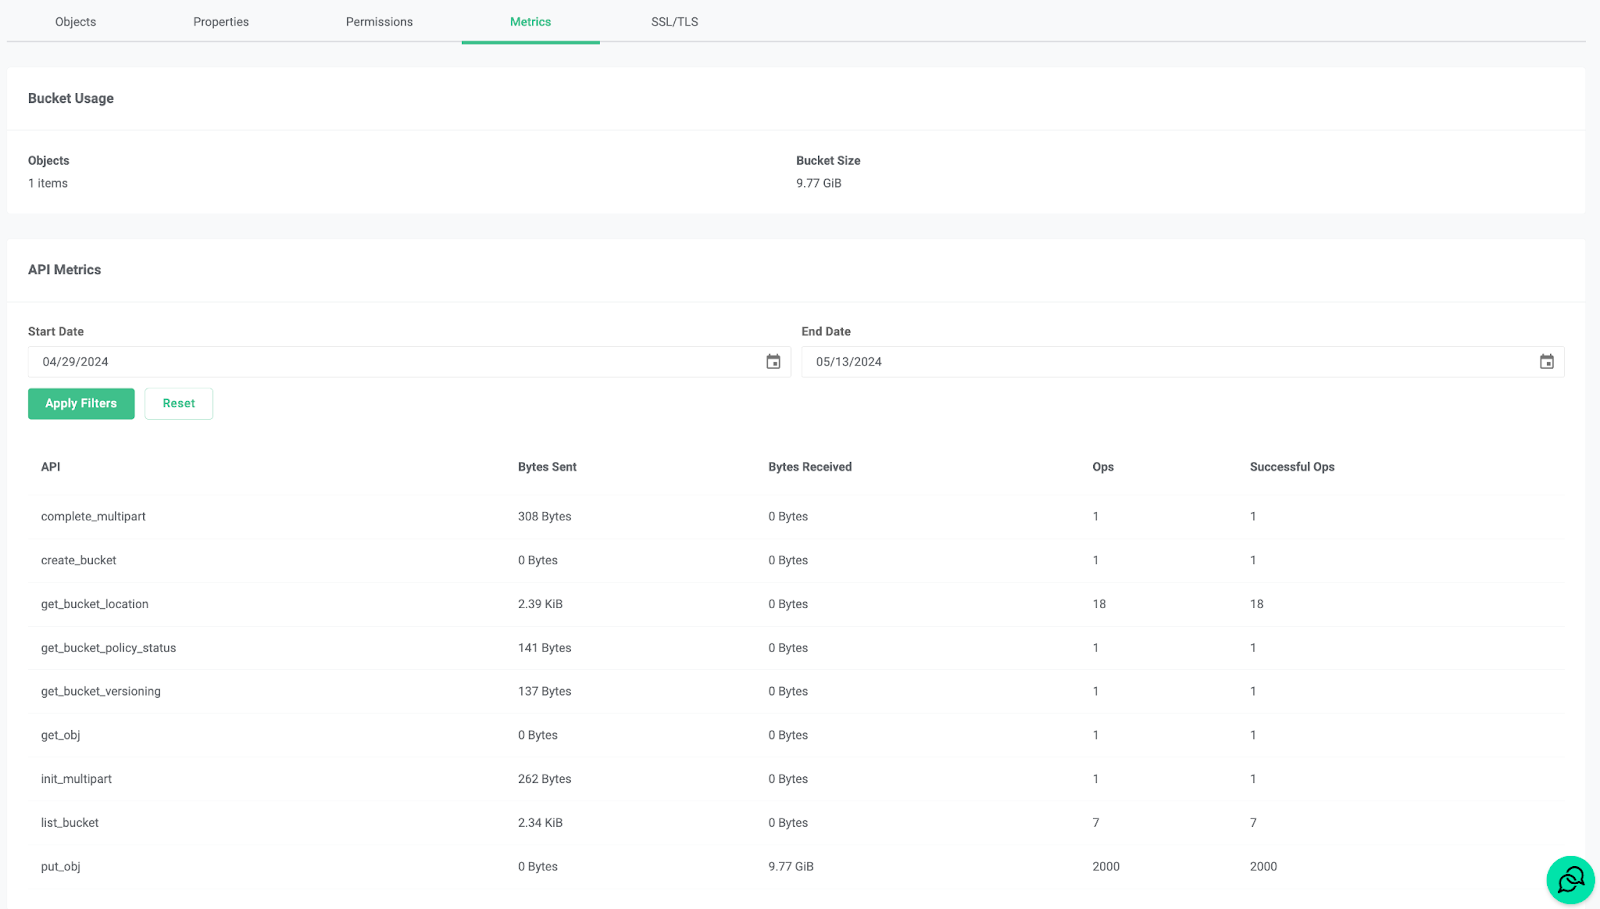
Limits & Quotas
Source: https://developers.telnyx.com/docs/cloud-storage/limits.md
General API limits
These limits are subject to change. If you require higher throughput, please contact support to discuss your use case.
Specific limits
- Max count of buckets per account is 100
- Max size of single object upload via PUT request is 5 GB
- Max size of single part upload of a multi-part upload is 5 GB
- Min size of single part upload of a multi-part upload is 5 MiB, except for the final part
- Max count of parts of a multi-part upload is 10,000
- Max size of a completed multi-part upload is 5 TiB
- Max count of objects per bucket is 50 million
Billing & Pricing
Source: https://developers.telnyx.com/docs/cloud-storage/billing.mdYou are billed on two things
- The bytes stored
- The count of API operations invoked
Storage billing explained
The minimum billable object size is 4 KiB. Here is an example — if you have two 11-byte objects in a bucket, they will be counted as 4 KiB each, i.e. 8 KiB in total. Storage consumed by each bucket is billed in multiples of 4 KiB, rounded up; Metadata counts towards storage consumed.US Storage
Every month, your first 10 GiB is free of charge. Any bytes beyond that are billed at:- $0.006 per GiB per month for regular storage
- $0.60 per GiB per month for AI embedded storage
EU Storage
EU storage has no free tier and is billed at:- $0.025 per GiB per month for regular storage
- $0.60 per GiB per month for AI embedded storage
- You have a $10 balance in your account.
- At time
t, you uploaded 11 GiB of objects into various buckets in your account. - At the next whole clock hour after time
t- a snapshot of your total storage is recorded as 11 GiB
- your usage is calculated as (11 GiB - 10 GiB) x ($ 0.006 / 30 days / 24 hrs)
- that usage is then debited from your $10 balance
- You have a $10 balance in your account
- Through usage of Voice and Messaging API, you’ve depleted your balance and resulted in a negative available credit of -0.1 USD.
- You will not be able to create a bucket and upload objects until your available credit is restored.
API operations billing explained
API operations are classified and billed the following way —US Storage
Categories Applicable API Ops Prices Class A PUT, COPY, POST, LIST requests Every month, the first 1 Million is free of charge, thereafter 0.04 per 1 MillionEU Storage
Categories Applicable API Ops Prices State-change operations PUT, COPY, POST, LIST requests 0.40 per 1 MillionAccount suspension and loss of data
When an account’s available credit becomes negative:- You will be notified via email of insufficient balance.
- Your data is still retained in the system but API requests will fail with error message
UserSuspended. - Access will be restored when available credit is made positive via payment.
Relevant companion APIs
Two companion APIs exist to allow for querying of usage:- Bucket Snapshot is a snapshot of the bytes your bucket is taking up at the moment of query.
- API Usage shows the stats of your API requests.
Query bucket snapshot
Example RequestQuery API usage
Example RequestPerformance Benchmarks
Source: https://developers.telnyx.com/docs/cloud-storage/performance-benchmarks.md
Storage benchmark summary
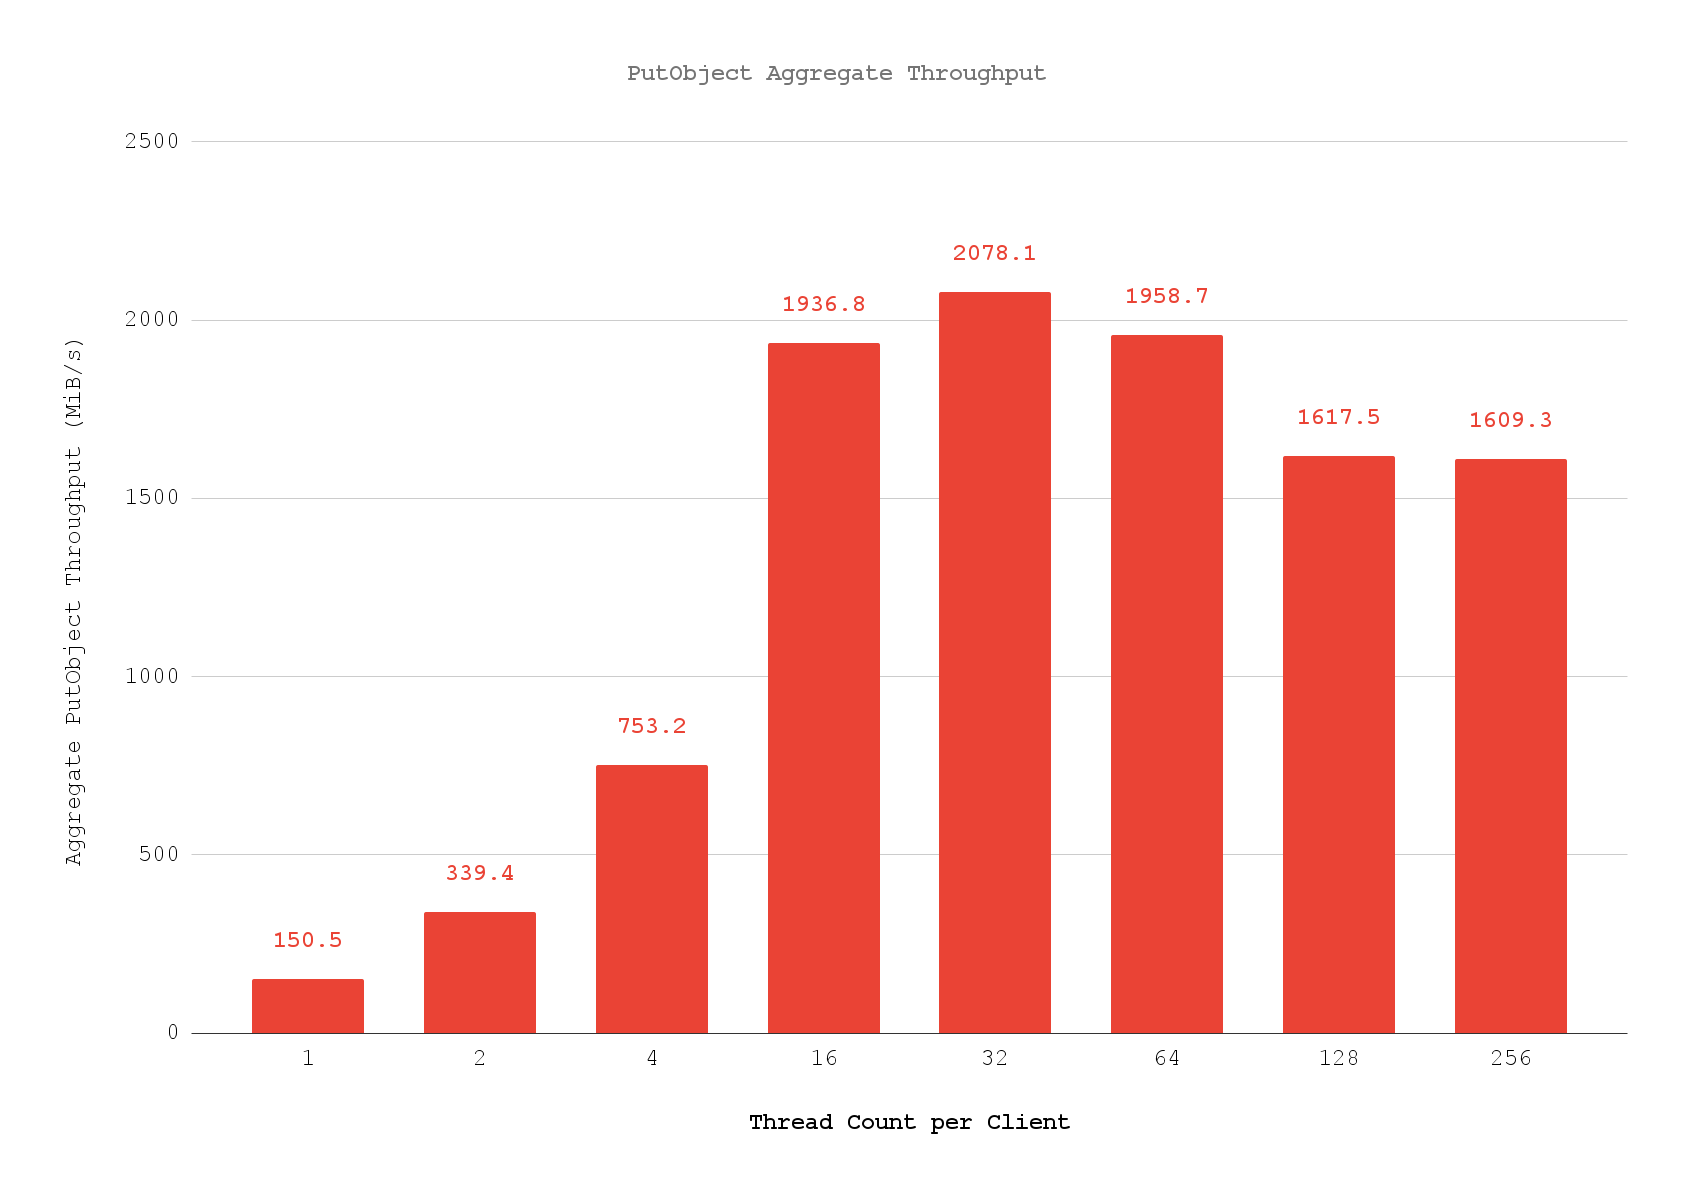
We achieved the following throughput results given the bench test setup described in the subsequent sections.- PutObject Aggregate: 2.029 GiB/s
- GetObject Aggregate: 2.714 GiB/s
- We did not exhaustively search the client configuration that produces the highest achievable throughputs.
- This result is only indicative of what can be achieved with the available testbed hardware specifications and arrangement.
- The test clients are not subjected to the limits outlined in the previous section.
- As we launch new sites, we will continuously update our test results and methodology.
Benchmark environment explained
Client hardware
(8) of the following bare metal machines are used as clients initiating requests to one of the regional endpoints. They are located off network with 100 Gbps uplink to the public internet. Type Count of nodes CPU Mem Storage Network Type 1 4 64 2 TiB 4 x 6.4TiB NVMe 100 Gbps Type 2 4 32 2 TiB 1 x 960GiB NVMe 100 Gbps No special optimizations are made on the client OS.Benchmark Software
https://github.com/wasabi-tech/s3-benchmarkClient Setup
Each client bare metal reads and writes to their individual bucket.Results

Create bucket
Source: https://developers.telnyx.com/docs/cloud-storage/api-reference/bucket-operations/create-bucket.md
CreateBucket
CreateBucket - Amazon Simple Storage ServiceSupported headers and XML elements
✅Supported Headersx-amz-acl
privatepublic-read
LocationConstraint
- must be unique.
- cannot be formatted as IP address.
- can be between 3 and 63 characters long.
- must not contain uppercase characters or underscores.
- must start with a lowercase letter or number.
- can contain a dash (-).
- must be a series of one or more labels. Adjacent labels are separated by a single period (.). Bucket names can contain lowercase letters, numbers, and hyphens. Each label must start and end with a lowercase letter or a number.
Delete bucket
Source: https://developers.telnyx.com/docs/cloud-storage/api-reference/bucket-operations/delete-bucket.md
DeleteBucket
DeleteBucket - Amazon Simple Storage ServiceExample DeleteBucket request
Delete bucket CORS
Source: https://developers.telnyx.com/docs/cloud-storage/api-reference/bucket-operations/delete-bucket-cors.md
DeleteBucketCors
Example DeleteBucketCors request
Delete bucket lifecycle
Source: https://developers.telnyx.com/docs/cloud-storage/api-reference/bucket-operations/delete-bucket-lifecycle.md
DeleteBucketLifecycle
DeleteBucketLifecycle - Amazon Simple Storage ServiceExample DeleteBucketLifecycle request
Delete bucket policy
Source: https://developers.telnyx.com/docs/cloud-storage/api-reference/bucket-operations/delete-bucket-policy.md
DeleteBucketPolicy
DeleteBucketPolicy - Amazon Simple Storage ServiceExample DeleteBucketPolicy request
Delete bucket tagging
Source: https://developers.telnyx.com/docs/cloud-storage/api-reference/bucket-operations/delete-bucket-tagging.md
DeleteBucketTagging
DeleteBucketTagging - Amazon Simple Storage ServiceExample DeleteBucketTagging request
Get bucket ACL
Source: https://developers.telnyx.com/docs/cloud-storage/api-reference/bucket-operations/get-bucket-acl.md
GetBucketAcl
GetBucketAcl - Amazon Simple Storage ServiceExample GetBucketAcl request
Example GetBucketAcl Response
Get bucket CORS
Source: https://developers.telnyx.com/docs/cloud-storage/api-reference/bucket-operations/get-bucket-cors.md
GetBucketCors
Example GetBucketCors request
Get bucket lifecycle configuration
Source: https://developers.telnyx.com/docs/cloud-storage/api-reference/bucket-operations/get-bucket-lifecycle-configuration.md
GetBucketLifecycleConfiguration
GetBucketLifecycleConfiguration - Amazon Simple Storage ServiceExample GetBucketLifecycleConfiguration request
Example GetBucketLifecycleConfiguration response
Get bucket location
Source: https://developers.telnyx.com/docs/cloud-storage/api-reference/bucket-operations/get-bucket-location.md
GetBucketLocation
GetBucketLocation - Amazon Simple Storage ServiceExample GetBucketLocation request
Example GetBucketLocation response
Get bucket policy
Source: https://developers.telnyx.com/docs/cloud-storage/api-reference/bucket-operations/get-bucket-policy.md
GetBucketPolicy
GetBucketPolicy - Amazon Simple Storage ServiceExample GetBucketPolicy request
Get bucket policy status
Source: https://developers.telnyx.com/docs/cloud-storage/api-reference/bucket-operations/get-bucket-policy-status.md
GetBucketPolicyStatus
GetBucketPolicyStatus - Amazon Simple Storage ServiceExample GetBucketPolicyStatus request
Get bucket tagging
Source: https://developers.telnyx.com/docs/cloud-storage/api-reference/bucket-operations/get-bucket-tagging.md
GetBucketTagging
GetBucketTagging - Amazon Simple Storage ServiceExample GetBucketTagging request
Example GetBucketTagging response
Get bucket versioning
Source: https://developers.telnyx.com/docs/cloud-storage/api-reference/bucket-operations/get-bucket-versioning.md
GetBucketVersioning
GetBucketVersioning - Amazon Simple Storage ServiceExample GetBucketVersioning request
Example GetBucketVersioning response
Head bucket
Source: https://developers.telnyx.com/docs/cloud-storage/api-reference/bucket-operations/head-bucket.md
HeadBucket
HeadBucket - Amazon Simple Storage ServiceExample HeadBucket request
Example HeadBucket response
List buckets
Source: https://developers.telnyx.com/docs/cloud-storage/api-reference/bucket-operations/list-bucket.md
ListBuckets
ListBuckets - Amazon Simple Storage ServiceExample ListBuckets request
Example ListBuckets response
Put bucket ACL
Source: https://developers.telnyx.com/docs/cloud-storage/api-reference/bucket-operations/put-bucket-acl.md
PutBucketAcl
Warning: Only verified users can update bucket policy. To request KYC on your account, go to Portal Account Verifications PutBucketAcl - Amazon Simple Storage Service ✅ Supported Headersx-amz-acl
privatepublic-read
Example PutBucketAcl request
Put bucket CORS
Source: https://developers.telnyx.com/docs/cloud-storage/api-reference/bucket-operations/put-bucket-cors.md
PutBucketCors
Example PutBucketCors request
Prepare a JSON file like this
Then apply it to the target bucket
Put bucket lifecycle configuration
Source: https://developers.telnyx.com/docs/cloud-storage/api-reference/bucket-operations/put-bucket-life-cycle-configuration.md
PutBucketLifecycleConfiguration
PutBucketLifecycleConfiguration - Amazon Simple Storage Service ✅ Supported XML ElementsIDStatusPrefixExpirationAbortIncompleteMultipartUpload
Example PutBucketLifecycleConfiguration request — Non-versioned bucket
Example PutBucketLifecycleConfiguration request - versioned bucket
Put bucket policy
Source: https://developers.telnyx.com/docs/cloud-storage/api-reference/bucket-operations/put-bucket-policy.md
PutBucketPolicy
PutBucketPolicy - Amazon Simple Storage Service Warning: Only verified users can update bucket policy. To request KYC on your account, go to Portal Account VerificationsExample PutBucketPolicy request
Create a bucket where the objects stored in there can be read publicly without authentication Create a JSON file locally, e.g.public_read_policy.json
Prepare a JSON file like this
Then apply that to an existing bucket
Put bucket tagging
Source: https://developers.telnyx.com/docs/cloud-storage/api-reference/bucket-operations/put-bucket-tagging.md
PutBucketTagging
PutBucketTagging - Amazon Simple Storage ServiceExample PutBucketTagging request
Put bucket versioning
Source: https://developers.telnyx.com/docs/cloud-storage/api-reference/bucket-operations/put-bucket-versioning.md
PutBucketVersioning
PutBucketVersioning - Amazon Simple Storage Service ✅ Supported XML elementStatus
Example PutBucketVersioning request
Delete object
Source: https://developers.telnyx.com/docs/cloud-storage/api-reference/object-operations/delete-object.md
DeleteObject
DeleteObject - Amazon Simple Storage ServiceExample DeleteObject Request
Delete object tagging
Source: https://developers.telnyx.com/docs/cloud-storage/api-reference/object-operations/delete-object-tagging.md
DeleteObjectTagging
DeleteObjectTagging - Amazon Simple Storage ServiceExample DeleteObjectTagging request
Delete objects
Source: https://developers.telnyx.com/docs/cloud-storage/api-reference/object-operations/delete-objects.md
DeleteObjects
DeleteObjects - Amazon Simple Storage ServiceExample DeleteObjects request (using AWS S3 CLI)
- Originally 3 objects exists in this bucket
- Delete 2 objects
Get object
Source: https://developers.telnyx.com/docs/cloud-storage/api-reference/object-operations/get-object.md
GetObject
GetObject - Amazon Simple Storage Service ✅ Supported HeadersIf-Match``If-Modified-SinceIf-None-MatchIf-Unmodified-SinceRange
Example GetObject request
Get object ACL
Source: https://developers.telnyx.com/docs/cloud-storage/api-reference/object-operations/get-object-acl.md
GetObjectAcl
GetObjectAcl - Amazon Simple Storage ServiceExample GetObjectAcl request
Example GetObjectAcl response
Get object tagging
Source: https://developers.telnyx.com/docs/cloud-storage/api-reference/object-operations/get-object-tagging.md
GetObjectTagging
GetObjectTagging - Amazon Simple Storage ServiceExample GetObjectTagging request
Example GetObjectTagging response
Head object
Source: https://developers.telnyx.com/docs/cloud-storage/api-reference/object-operations/head-object.md
HeadObject
HeadObject - Amazon Simple Storage Service ✅ Supported HeadersIf-MatchIf-Modified-SinceIf-None-MatchIf-Unmodified-SinceRange
Example HeadObject request
Example HeadObject response
List object versions
Source: https://developers.telnyx.com/docs/cloud-storage/api-reference/object-operations/list-object-versions.md
ListObjectVersions
ListObjectVersions - Amazon Simple Storage Service ✅ Supported Parametersprefixdelimitermarkermax-keys
Example ListObjectVersions request
Example ListObjectVersions response
List objects
Source: https://developers.telnyx.com/docs/cloud-storage/api-reference/object-operations/list-objects.md
ListObjects
ListObjects - Amazon Simple Storage Service ✅ Supported Parametersprefixdelimitermarkermax-keys
Example ListObjects request
Example ListObjects response
Put object
Source: https://developers.telnyx.com/docs/cloud-storage/api-reference/object-operations/put-object.md
PutObject
PutObject - Amazon Simple Storage Service ✅ Supported Headersx-amz-acl
privatepublic-read
x-amz-storage-class
STANDARD
x-amz-meta-*
x-amz-server-side-encryption-customer-algorithm
x-amz-server-side-encryption-customer-key
x-amz-server-side-encryption-customer-key-MD5
Put object ACL
Source: https://developers.telnyx.com/docs/cloud-storage/api-reference/object-operations/put-object-acl.md
PutObjectACL
Warning: Only verified users can update bucket policy. To request KYC on your account, go to Portal Account Verifications PutObjectAcl - Amazon Simple Storage Service ✅ Supported Headersx-amz-acl
privatepublic-read
versionId
Example PutObjectACL request
Put object tagging
Source: https://developers.telnyx.com/docs/cloud-storage/api-reference/object-operations/put-object-tagging.md
PutObjectTagging
PutObjectTagging - Amazon Simple Storage Service ✅ Supported HeadersversionId
Example PutObjectTagging request
Abort multipart upload
Source: https://developers.telnyx.com/docs/cloud-storage/api-reference/multipart-operations/abort-multipart-upload.md
AbortMultipartUpload
AbortMultipartUpload - Amazon Simple Storage Service ✅ Supported ParametersuploadId
Example AbortMultipartUpload Request
Complete multipart upload
Source: https://developers.telnyx.com/docs/cloud-storage/api-reference/multipart-operations/complete-multipart-upload.md
CompleteMultipartUpload
CompleteMultipartUpload - Amazon Simple Storage Service ✅ Supported ParametersuploadId
Etag``PartNUmber
Example CompleteMultipartUpload request
Example CompleteMultipartUpload response
Create multipart upload
Source: https://developers.telnyx.com/docs/cloud-storage/api-reference/multipart-operations/create-multipart-upload.md
CreateMultipartUpload
CreateMultipartUpload - Amazon Simple Storage Service ✅ Supported Headersx-amz-acl
privatepublic-read
x-amz-storage-class
STANDARD
Example CreateMultipartUpload request
Example CreateMultipartUpload response
List multipart uploads
Source: https://developers.telnyx.com/docs/cloud-storage/api-reference/multipart-operations/list-multipart-uploads.md
ListMultipartUploads
ListMultipartUploads - Amazon Simple Storage Service ✅Supported Parametersprefixdelimiterkey-markemax-keysmax-uploadsupload-id-marker
Example ListMultipartUploads request
Example ListMultipartUploads response
Upload parts
Source: https://developers.telnyx.com/docs/cloud-storage/api-reference/multipart-operations/upload-part.md
UploadPart
UploadPart - Amazon Simple Storage Service ✅Supported ParameterspartNumberuploadId
Example UploadPart request
List parts
Source: https://developers.telnyx.com/docs/cloud-storage/api-reference/multipart-operations/list-parts.md
ListParts
ListParts - Amazon Simple Storage Service ✅ Supported ParametersuploadIdmax-partspart-number-marker
Example ListParts request
Example ListParts response
KV
KV
Source: https://developers.telnyx.com/docs/edge-compute/kv.mdKV is a globally distributed key-value store: you write bytes under a string key and read them back, fast, from anywhere. It is built for read-heavy edge workloads — session data, cached responses, feature flags, and other small values a function needs on every request. A value is opaque bytes. You choose the serialization (text, JSON, binary); KV stores exactly what you send and returns it byte-for-byte. There is no envelope, no base64 encoding, and no server-side interpretation of the value.
Two Ways to Use KV
The same namespaces and keys are reachable two ways. Pick based on where your code runs.
Both hit the same store, so a value written through the binding is immediately readable over REST and vice versa. The binding is a thin, pre-authenticated wrapper over the same REST endpoints — it just means your function never handles an API key. The complete endpoint reference — namespaces and keys, with request/response schemas and code samples — is generated from the OpenAPI spec and lives in the REST API group of this KV section in the sidebar.
The
env KV binding is TypeScript-only and requires @telnyx/edge-runtime ≥ 0.2.2. Go, JS, Python, and Quarkus functions use the REST API directly.
Next Steps
- Quick Start — Create a namespace, bind it, read and write
- How KV Works — Keys, TTL, and the consistency model
- Examples — Session storage, caching, and feature flags
- Runtime API — the
envbinding surface (KvNamespace) - CLI Commands — Manage KV from the command line
- Pricing — Free tier and paid plans
Related Resources
Quick Start
Source: https://developers.telnyx.com/docs/edge-compute/kv/quick-start.mdGet up and running with KV: create a namespace, then use it from a TypeScript function through an
env binding, or from anywhere through the REST API.
1. Create a Namespace
A namespace is an isolated key space. Create one with the CLI or the API.id (a UUID) — you’ll need it in the next step.
{/* COMPUTE-312: drop this Note if create is changed to block until provision_ok (or a distinct provisioning signal ships) */}
A new namespace starts in status: "pending" and isn’t writable yet: writes return 409 ("Namespace is not ready (status: pending)") until provisioning finishes, which typically takes a few seconds and can stretch to ~20. If you’re scripting, poll GET https://api.telnyx.com/v2/storage/kvs/{id} until "status": "provision_ok" before your first write. (With the binding path below you rarely notice — editing func.toml and deploying already takes longer than provisioning.)
Path A: The Function Binding
Recommended for TypeScript edge functions. The runtime injects the credential, so your code holds no API key.2. Bind the Namespace
Declare the namespace infunc.toml. The block key is a name you choose — it’s not a reserved word — and it becomes the property on env. This example uses MY_KV, so the binding is reached as env.MY_KV:
@telnyx/edge-runtime (≥ 0.2.2) to your package.json dependencies, then regenerate the environment types:
[storage.kv.] block becomes env.: KvNamespace in the generated telnyx-env.d.ts — declare as many namespaces as you need. KV type generation requires CLI ≥ v0.2.3 (earlier releases report the block as an unrecognized key and write an empty Env). The binding itself resolves at runtime from func.toml — types are for the compiler, and a stale telnyx-env.d.ts doesn’t affect the deployed function.
3. Use env.MY_KV in Your Code
list() returns key metadata, not values — { keys: [{ name, sizeBytes, updatedAt }], list_complete, cursor? }. Paginate by passing the returned cursor back in list({ cursor }). On 0.2.1 entries carry only name; 0.2.0 throws a response-shape error.
put’s expirationTtl option requires ≥ 0.2.2 — earlier versions accept it but silently ignore it. The metadata option is deprecated and ignored on every version. See Key Expiration.
Path B: The REST API
Use this anywhere outside a TypeScript edge function — a non-TypeScript function (Go, JS, Python, Quarkus), your own backend, or tooling. Authenticate with yourTELNYX_API_KEY (the SDKs read it from the environment). Whether you use an SDK or plain HTTP, the value is the raw request/response body — no base64, no envelope.
KV support landed in the official server SDKs in telnyx-node ≥ 7.5.0, telnyx-python ≥ 4.166.0, telnyx-php ≥ 7.88.0 (see the PHP tab for the required version pin), telnyx-ruby ≥ 5.152.0, and telnyx-go ≥ v4.85.0 — on earlier versions the storage resource is object storage (buckets) only. The Java SDK doesn’t cover KV yet; call the endpoints over plain HTTP as in the curl tab.
composer require "telnyx/telnyx-php:^7.88" guzzlehttp/guzzle. The pin matters: the semver-highest tag v8.0.0 predates KV, so an unpinned composer require telnyx/telnyx-php installs a version with no storage->kvs at all. Guzzle (or any PSR-18 client) is required because the SDK doesn’t bundle one — without it new Client() throws a discovery exception.
gem install base64 — telnyx 5.152.0 loads it but doesn’t yet declare it as a dependency.
ttl_secs), its error cases, and an inspectable application-level alternative are covered in Key Expiration.
list returns key names and per-key metadata, never values:
meta.has_more is true, pass the returned meta.cursor back as ?cursor= (in the SDKs, the cursor parameter) to fetch the next page — key listing does not auto-paginate in any SDK.
Inside an edge function, the org binding injects TELNYX_API_KEY (and a base-URL proxy) at runtime, so REST calls from a function authenticate without you shipping a key.
Next: Best Practices for key naming, serialization, and error handling.
How KV Works
Source: https://developers.telnyx.com/docs/edge-compute/kv/concepts/how-kv-works.mdKV is a single global key-value store optimized for low-latency reads from edge functions. A value is opaque bytes — you choose the serialization (text, JSON, binary), and KV stores exactly what you send and returns it byte-for-byte, with no envelope, base64 encoding, or server-side interpretation.
Keys
A key is a path-like string. Allowed characters area-z, A-Z, 0-9, and - _ / = .. Use / to group related keys (for example user/123, session/abc). Colons (:) are not allowed.
Expiration (TTL)
By default a value lives until you delete it. You can also set a server-side TTL so a key expires automatically: passexpirationTtl on a binding put (env.MY_KV.put(key, value, { expirationTtl: 30 }), requires @telnyx/edge-runtime ≥ 0.2.2), ttl_secs on a REST write (PUT …/keys/{key}?ttl_secs=N), or --ttl on the CLI (telnyx-edge storage kv key put … --ttl 30s). The TTL is a whole number of seconds; once it elapses the key is gone and reads return null/404. See Key Expiration.
{/* revisit if per-key metadata is ever supported (no REST support today; binding option deprecated in 0.2.2) */}
No Per-Key Metadata
KV has no per-key metadata. The binding’sput accepts a metadata option so older code keeps compiling, but it is ignored (deprecated as of 0.2.2), and list never returns metadata.
Consistency and Regionality
KV is a single global store. There is no region to choose at creation time and no per-region copies to reconcile — every namespace is one logical dataset reachable from every edge location. Writes are replicated for durability and committed by quorum before they’re acknowledged.- Read-your-writes from a given location is reliable: once a write returns, a subsequent read sees it.
- Across locations, a read issued immediately after a write elsewhere may briefly observe the previous value; treat cross-location visibility as near-real-time rather than instantaneous.
- Distance costs latency, not staleness — a location far from where the data is coordinated pays network round-trip on the request, but reads the same authoritative data as everywhere else.
- No transactions or compare-and-swap. Don’t use KV for atomic read-modify-write, counters, or coordination — concurrent writers to one key are last-write-wins.
Key Expiration
Source: https://developers.telnyx.com/docs/edge-compute/kv/ttl-and-metadata.mdKV supports server-side expiration (TTL): set a TTL on a write and the key is deleted automatically once it elapses. Without a TTL, a value lives until you delete it. KV has no per-key metadata.
Server-Side TTL
PassexpirationTtl on a binding put, a ttl_secs query parameter on a REST write, or --ttl on the CLI. The value is a whole number of seconds (1–9223372036); the key expires roughly that many seconds after the write, after which reads return null/404.
ttl_secs (non-integer, 0, or negative) is rejected with 422 and the key is not written. The binding never produces that 422: it floors expirationTtl to a whole number of seconds and, if the result is less than 1, sends no TTL at all — the write succeeds and the key does not expire. There is no way to read the remaining TTL back — a get/list on a live key does not report its expiry.
expirationTtl requires @telnyx/edge-runtime ≥ 0.2.2. Earlier versions accept the option but silently ignore it — the key is written without a TTL.
No Per-Key Metadata
KV stores values as opaque bytes and has no per-key metadata. The binding’sput still accepts a metadata option so older code keeps compiling, but it is ignored (and marked @deprecated as of @telnyx/edge-runtime 0.2.2), and list never returns metadata. Anything you put in the value itself (including JSON that looks like those fields) is stored verbatim, not interpreted.
Application-Level Expiry
Server-side TTL deletes the key and tells you nothing else — there is no way to read a key’s remaining lifetime. Use this pattern instead when you want an absoluteexpires_at timestamp you can inspect on read (or when you’re pinned to @telnyx/edge-runtime < 0.2.2, where expirationTtl is ignored). Wrap your value with the timestamp and check it when you read; if it’s in the past, treat the key as missing (and optionally delete it).
ttl_secs above. Build this envelope on top of the REST API examples from the Quick Start only when you need the inspectable expires_at.
Notes on this pattern:
- Reads do the enforcing. An expired key still occupies storage until it’s read (and lazily deleted) or you delete it explicitly. Prefer native TTL (
expirationTtl/ttl_secs) for eager server-side cleanup; if you do need a sweep, drive it from an external scheduler hitting your function over HTTP — HTTP is the only function trigger today. - Use a consistent clock.
Date.now()on the edge node is fine for coarse expiry; don’t rely on it for sub-second precision. - Keep the envelope small. You pay for stored bytes, so the wrapper adds a little overhead per key.
Session Storage
Source: https://developers.telnyx.com/docs/edge-compute/kv/examples/session-storage.mdStore user sessions at the edge and expire them after a day. This uses the KV binding (bound as
MY_KV) with a server-side TTL: pass expirationTtl on the write and KV deletes the session automatically once it elapses. Each write renews the TTL, so an active session slides forward and an abandoned one expires. Requires @telnyx/edge-runtime ≥ 0.2.2.
ttl_secs parameter on a REST API write. If you need to inspect when a session expires, use the application-level envelope instead — see Key Expiration.
API Response Caching
Source: https://developers.telnyx.com/docs/edge-compute/kv/examples/api-response-caching.mdCache expensive upstream responses for a few minutes. This uses the KV binding (bound as
MY_KV) with a server-side TTL: pass expirationTtl on the write and KV deletes the key automatically once it elapses — no cleanup code. Requires @telnyx/edge-runtime ≥ 0.2.2.
ttl_secs parameter on a REST API write. If you need to inspect when an entry expires, use the application-level envelope instead — see Key Expiration.
Feature Flags
Source: https://developers.telnyx.com/docs/edge-compute/kv/examples/feature-flags.mdRead flags on the request path — no expiry needed, so use the KV binding (
env.MY_KV) directly.
Overview
Source: https://developers.telnyx.com/docs/edge-compute/kv/reference.mdThe types in this reference are exported from
@telnyx/edge-runtime (TypeScript) and describe version ≥ 0.2.2 — the first release where expirationTtl is applied and list() entries carry sizeBytes/updatedAt. They describe the env binding — the in-function surface. To read or write KV from another language or outside a function, use the REST API.
The KV Runtime API is a single binding type and the small set of option/result types its methods take. A namespace declared as [storage.kv.] in func.toml resolves on env. as a KvNamespace.
Getting the Binding
func.toml; run telnyx-edge types (CLI ≥ v0.2.3) after editing the manifest to regenerate telnyx-env.d.ts, which types env. as a KvNamespace.
Related Resources
KvNamespace— the method-by-method reference- Bindings — how bindings resolve on
env - REST API — the same operations over HTTP
- Key Expiration — server-side TTL via
expirationTtl,ttl_secs, or--ttl
KvNamespace
Source: https://developers.telnyx.com/docs/edge-compute/kv/reference/kv-namespace.md
env. (a KvNamespace) is the in-function handle to a KV namespace. It’s a thin, pre-authenticated wrapper over the KV REST API — the runtime injects the credential, so your code holds no API key.
- Values are opaque bytes —
putstores the string you pass verbatim (no base64, no envelope);getreturns it byte-for-byte. - Missing keys read as
null—getresolves tonullfor a key that doesn’t exist, not an error. deleteis idempotent — deleting a missing key succeeds.- Read-your-writes — a read after a successful
putfrom the same location reflects it. See Consistency. - Errors throw — a non-2xx from the store (other than the
404→nullonget) rejects the promise with anErrordescribing the operation and status.
get(key, options?)
Read a value. Two overloads, selected by options.type:
null if the key does not exist. With { type: "json" }, a malformed stored value throws from JSON.parse.
put(key, value, options?)
Write a value. value is a string, stored verbatim. Resolves once the write is acknowledged.
expirationTtl maps to the REST API’s ?ttl_secs= parameter: the key is deleted server-side roughly that many seconds after the write. The value is floored to a whole number of seconds; anything below 1 is not sent — the write succeeds without a TTL. See Key Expiration.
expirationTtl requires @telnyx/edge-runtime ≥ 0.2.2 — earlier versions accept it but silently ignore it. metadata is ignored on every version (KV has no per-key metadata); it remains on the type, deprecated, so code that sets it keeps compiling.
delete(key)
Remove a key. Idempotent — deleting a missing key resolves normally.
list(options?)
Enumerate keys (names only — list does not return values).
list() requires @telnyx/edge-runtime ≥ 0.2.1 — on 0.2.0 it throws Unexpected KV list response shape, because that release’s parser predates the current API list format. sizeBytes and updatedAt are populated from 0.2.2; on 0.2.1 entries carry only name.
KvKeyInfo.metadata is never populated — KV has no per-key metadata. It remains on the type, deprecated, so code that reads it keeps compiling.
Related
- Overview — the KV Runtime API surface at a glance
- Quick Start — declare the binding and type it
- REST API — the same operations over HTTP
CLI
Source: https://developers.telnyx.com/docs/edge-compute/kv/cli.mdManage KV namespaces and keys using the
telnyx-edge CLI.
Namespace Management
Key Operations
The value is stored verbatim — pass it as a positional argument, or use--path to store the contents of a file.
Key Put Flags
Key List Flags
Keys may contain
a-z, A-Z, 0-9, and - _ / = . (no colons). Use --ttl for server-side expiry (see Key Expiration). KV has no per-key metadata, so there is no --metadata flag.
Best Practices
Source: https://developers.telnyx.com/docs/edge-compute/kv/best-practices.mdPractical guidance for working with KV, whether through the
env binding or the REST API.
Key Naming
Keys may containa-z, A-Z, 0-9, and - _ / = . (no colons). Use / to group related keys:
list({ prefix: "user/" }) (or ?prefix=user/ over REST).
Value Serialization
KV stores values verbatim, so serialize complex values yourself (no base64 needed):Missing Keys
get returns null for a key that doesn’t exist — handle it explicitly:
Keep Values Small
KV is built for many small values read on the request path, not for large blobs. A value is capped at 1 MiB (1,048,576 bytes) — a larger write is rejected with413. Store big or binary objects in Cloud Storage and keep only the key or a small reference in KV.
Limits
Don’t Rely on Atomicity
KV has no transactions or compare-and-swap, and concurrent writers to one key are last-write-wins. Don’t use it for counters, locks, or coordination — see Consistency.Pricing
Source: https://developers.telnyx.com/docs/edge-compute/kv/pricing.mdKV pricing is based on operations and storage. Egress is free.
Pricing
Egress is free. No charges for data transferred out of KV.
CloudFS (Beta)
CloudFS
Source: https://developers.telnyx.com/docs/edge-compute/cloudfs.mdCloudFS is a POSIX filesystem you mount on any host or container. Once mounted, it behaves like a local directory —
read, write, mkdir, rename, git init — but every byte is stored durably in Telnyx Cloud Storage, and the same filesystem can be mounted by many clients at once — a fleet of agents reading and writing it concurrently.
You mount it with the open-source JuiceFS Community Edition client (Apache-2.0), which you run yourself — Telnyx does not host or bundle it. JuiceFS has no server process: the client does all the filesystem work and talks directly to a metadata database and to object storage, so no JuiceFS component runs on the Telnyx side. Telnyx provides and authenticates the two managed backends — the metadata database and object storage — and hands you a ready-to-mount filesystem.
The target use case is a shared, persistent filesystem for AI agents: provision one CloudFS, mount it once, and every file, repo, and checkpoint an agent produces is there — and still there on the next mount, from anywhere.
Do not touch the cloudfs-fs-* bucket directly. A CloudFS filesystem’s data lives in a bucket named cloudfs-fs- inside your own Telnyx Cloud Storage account — it appears alongside your other buckets and is reachable with your API key. Its objects are opaque JuiceFS blocks (chunks/… plus internal bookkeeping), not your files. Deleting, renaming, or editing objects in that bucket out of band corrupts the filesystem — a missing block is unrecoverable and there is no repair path. Manage a CloudFS filesystem only through the CloudFS API and a JuiceFS mount; treat its bucket as internal, hands-off storage.
CloudFS is in beta. The API surface and behavior may still change as it moves toward general availability.
Next Steps
- Quick Start — Create a filesystem and mount it end-to-end
- How CloudFS Works — The two-lane architecture and credentials
- Mounting — The verified
juicefs mountrecipe - Serving Without FUSE — A WebDAV endpoint for hosts that can’t mount
- Concurrent Access — Mount the same filesystem from many clients at once
- API Reference — The
/v2/storage/cloudfsendpoints
Related Resources
- Cloud Storage authentication — How the API key is used as the S3 access key
- Object Storage — The S3-compatible storage CloudFS is backed by
Quick Start
Source: https://developers.telnyx.com/docs/edge-compute/cloudfs/quickstart.mdGet up and running with CloudFS: create a filesystem over the API, then mount it with the JuiceFS client inside a Linux container and use it like any local directory — write files, read them back, run
git. The whole path below is verified end-to-end against production.
CloudFS is built on JuiceFS Community Edition (see How CloudFS Works for the architecture). There is no server process to run: the JuiceFS client on your host talks directly to a per-filesystem metadata database and to Telnyx Cloud Storage. That means you hold two credentials — the meta_token (returned on create) and your TELNYX_API_KEY — and the client does the rest.
1. Create a Filesystem
POST /v2/storage/cloudfs. The Idempotency-Key header is required (a request without it is rejected with 400), and so is region — there is no default. Allowed regions are us-central-1, us-east-1, and us-west-1.
Idempotency-Key returns the same filesystem instead of creating a second one. A 201 response looks like this:
meta_url (with the token inline as the password) and the standalone meta_token are returned only on create and on rotate. GET /v2/storage/cloudfs/{id} returns meta_url without the token and no meta_token at all — it cannot be read back. Store the token securely now; if you lose it, rotate to get a new one.
You’ll use two values from this response to mount:
meta_url— the full connection string, token included. This is the metadata endpoint; the host is alwaysus-east-1.telnyxcloudfs.comregardless of the filesystem’s region.id— the filesystem UUID, for later API calls (detail, rename, rotate).
s3_bucket (cloudfs-fs-) is in your Telnyx Cloud Storage account, but it holds CloudFS’s internal blocks — not your files. Never modify or delete its objects directly; that corrupts the filesystem. Read and write only through the mount below. See How CloudFS Works.
2. Mount It with JuiceFS
CloudFS pre-formats the volume during provisioning — the bucket already contains the JuiceFS volume metadata. Do not runjuicefs format. The filesystem is already formatted; running format against it fails with cannot update volume name. Go straight to juicefs mount. (The one exception: if the filesystem’s status is needs_format, it does need a one-time juicefs format before mounting — see Mounting.)
Mount inside a Linux container with FUSE — a portable path that runs the same anywhere and needs no FUSE install on the host. (You can also mount natively on any Linux or macOS host that has FUSE/macFUSE installed.) The data lane authenticates to Telnyx Cloud Storage over S3: your TELNYX_API_KEY is the access key, and the secret key can be any non-empty placeholder (Telnyx Storage ignores the SigV4 signature, but JuiceFS’s AWS SDK rejects an empty secret). See Cloud Storage authentication for why the secret is ignored.
/tmp/juicefs.log for progress. Once mounted, df -h /mnt/agentfs shows the volume.
3. Smoke-Test Over POSIX
The mount is a normal directory. Write a file, read it back, and initialize a git repo — all standard POSIX, no CloudFS-specific calls.chunks/… in the filesystem’s bucket, and persists across unmount and remount — remount with the same meta_url and your files are still there.
Next Steps
- How CloudFS Works — the metadata and data lanes, the two credentials, and the on-disk layout
- Mounting — the mount recipe in depth, FUSE requirements, and remount
- API Reference — the full endpoint surface, including rotate and delete
- Overview — what CloudFS is and when to use it
Filesystems From First Principles
Source: https://developers.telnyx.com/docs/edge-compute/cloudfs/concepts/filesystems-from-first-principles.mdCloudFS gives you a POSIX filesystem you mount on any host or container, backed by Telnyx Cloud Storage. To understand how it works — and why it is shaped the way it is — these Concepts pages build the idea from the bottom up:
- What a filesystem is and how a local one is built (this page)
- Why past network filesystems fall short, and how the early cluster filesystems reframed storage (NFS and AFS → GFS, HDFS, MooseFS)
- How CloudFS puts it together
What a Filesystem Actually Is
Strip away the tooling and a filesystem is two abstractions:- A file is a linear array of bytes with a low-level name — a number, the inode number. The operating system does not care whether those bytes are a JPEG or C source; it stores them and hands them back intact.
- A directory is itself a file, but its contents are specific: a list of
(human-readable name → inode number)pairs. Nest directories inside directories and you get the tree you navigate every day.
/home/agent/work.log, a filesystem is really two things: an index that maps names to inodes and inodes to the location of bytes, and the bytes themselves. Everything else — open/read/write/close, permissions, hard and symbolic links — is built on top of those two.
How a Local Filesystem Is Built
On a single disk, those two things live in two different places. OSTEP’s teaching filesystem, vsfs, divides the disk into an inode table plus small bitmaps that track which inodes and blocks are free — this is the metadata index — and a much larger data region of fixed-size blocks that holds file contents. Each inode is a compact record of metadata (permissions, timestamps, size) plus a multi-level index of pointers to the file’s data blocks. Reading a file means reading its inode to find the block pointers, then reading the blocks; writing a file may also flip an allocation bit and rewrite the inode. The Fast File System added the lesson that where you place those blocks matters: the original Unix filesystem treated the disk like RAM and paid for it in seeks, so FFS made the filesystem “disk-aware” — keep an inode near its data, keep files of one directory together, respect the physical medium. The durable takeaway is this: a filesystem is a metadata index over a pile of data blocks — two kinds of state with two very different access patterns. Metadata is small, hot, and demands consistency: an inode is either allocated or it is not. Data is large and wants throughput. Hold onto that split; it is the key to everything that follows.Staying Consistent Across Crashes
The metadata index has one more demand: it must survive a crash. A single logical operation — appending a block to a file, say — touches several structures (the allocation bitmap, the inode, the data block), but the disk writes them one at a time. Lose power in between and the index is left inconsistent: a block marked used by no file, or an inode pointing at garbage. Early filesystems repaired this after the fact with fsck, scanning the whole disk on reboot — which stops scaling as disks grow. The durable fix, journaling (write-ahead logging), is borrowed straight from databases: write your intended changes to a log and commit them there first, then apply them to their real homes; after a crash, replay the committed log. Recovery then costs the size of the log, not the size of the disk. Keep this one in mind — it is the cleanest argument for where CloudFS keeps its metadata. And the medium underneath can lie: a sector rots, or silently returns the wrong bytes. Filesystems and storage layers defend against it with checksums and scrubbing; CloudFS leaves that to the object store, which does it for you.Further Reading
- Operating Systems: Three Easy Pieces — Files and Directories, File System Implementation, Locality and the Fast File System, Crash Consistency: FSCK and Journaling, and Data Integrity and Protection.
Network Filesystems
Source: https://developers.telnyx.com/docs/edge-compute/cloudfs/concepts/network-filesystems.mdA local filesystem is a metadata index over a pile of data blocks. To share one between machines you must move one or both of those halves across a network — and decades of distributed filesystems show that is where the difficulty lives.
NFS: Stateless, and Brittle Over the WAN
Sun’s Network File System makes the filesystem a client/server protocol. Its central design goal is simple, fast crash recovery, achieved by making the server stateless — it keeps no per-client state, so every request carries everything needed to service it (aREAD sends the explicit offset; the client, not the server, tracks position). Most operations are idempotent, so the failure handler collapses to a single rule: set a timer, and if no reply arrives, retry. Elegant — but it has costs that bite hard over a wide-area network:
- Weak cache consistency. Clients cache and buffer writes for performance, which introduces the update-visibility problem. NFS papers over it with flush-on-close and an attribute cache with a timeout (~3 seconds), so whether a client sees the latest version of a file “depends on whether the cache entry has timed out” — the source of NFS’s notorious occasional stale reads.
- The hang. Because the client simply retries until the server answers, an unresponsive or partitioned server makes the client block indefinitely. A
read()that never returns takes the calling process — and often a whole pipeline — down with it. A network partition is indistinguishable from a crash. - Small files are easy; large files are not. Over a LAN with small files NFS is fine. Over a WAN, file seeks and mid-file updates on large files get ugly, and rapid writes suffer under lost packets.
fileserver crashes or the network partitions, any process that so much as stats a path under /mnt/shared blocks in uninterruptible sleep — ls /mnt/shared hangs, shrugs off Ctrl-C, and the console fills with NFS server fileserver not responding, still trying. The mount doesn’t return an error; it waits, and takes the caller down with it. That is tolerable on a quiet LAN with a reliable server; for agents scattered across the internet — where partitions are routine and every mount is one flaky link from a hung process — it is the wrong default.
AFS: Whole-File Caching, and Stateful Bookkeeping
The Andrew File System was built for scale. Onopen() it fetches the whole file to the client’s local disk and serves subsequent reads and writes locally; on close() it ships the whole file back. To avoid clients constantly polling “has this changed?”, AFS added callbacks — a promise from the server to notify a client when a cached file changes — giving close-to-open consistency. It scales better than NFS, but the design fights our use case:
- Callback state is awkward for clients that come and go. A client that was offline may have missed an invalidation and must revalidate its whole cache on return; a rebooted server does not know which clients cache what and must have everyone re-validate. Ephemeral agents — containers that appear, work, and vanish — are exactly the clients this bookkeeping handles worst.
- Whole-file caching punishes the workload we care about. Fetching and rewriting an entire file just to append one line to a shared worklog, or to touch a small region of a large file, is precisely what AFS does poorly. AFS itself notes that its baseline consistency is not enough for concurrent updates to something like a shared code repository — you still need explicit file-level locking.
Separating Metadata From Data
By the early 2000s a different design had emerged — built for a fleet of cheap, failure-prone machines from the start, rather than making a single server’s disk look remote.Google File System
Google File System (GFS, 2003) split the problem cleanly in two:- a single master holds all the metadata — the namespace and the map from each file to its chunks — in memory, and
- a fleet of chunkservers holds the file data as large chunks (64 MB), replicated for durability.
HDFS and MooseFS
HDFS is the open-source realization of that design: a NameNode holds the namespace and the file→block map — “user data never flows through the NameNode” — while DataNodes store the blocks (128 MB) and serve reads and writes directly to clients. MooseFS applied the same master-plus-chunkservers split but exposed a full POSIX filesystem you mount, closing the gap back to the local-filesystem interface. These systems fixed what NFS and AFS could not: they stopped pretending one server owns a disk, and instead let an authoritative metadata service coordinate a scalable pool of data storage. What they still asked of you was to run that metadata master and that fleet of data servers yourself — which is exactly the operational burden CloudFS removes.Further Reading
- Sun’s Network File System (NFS) and The Andrew File System (AFS), from OSTEP.
- The Google File System (Ghemawat, Gobioff, Leung), Apache Hadoop / HDFS, and MooseFS.
How CloudFS Works
Source: https://developers.telnyx.com/docs/edge-compute/cloudfs/concepts/how-cloudfs-works.mdThis page is the destination of a short arc. If you want the reasoning behind the design, read the background first:
- Filesystems From First Principles — a filesystem is a metadata index over a pile of data blocks.
- Network Filesystems — why bolting a network onto a disk-owning server is brittle, and how GFS, HDFS, and MooseFS split an authoritative metadata service from a scalable pool of data storage.
How CloudFS Does It
CloudFS is built on JuiceFS, which — in its authors’ words — was “inspired by Google File System, HDFS and MooseFS.” JuiceFS takes the metadata/data split those systems proved at cluster scale and replaces each half with a managed cloud primitive, so you operate neither a metadata master nor a fleet of data servers:- The metadata index — the master’s job in GFS, the NameNode’s in HDFS — becomes a transactional database. The database provides strong consistency for the small, hot, correctness-critical half: an entry is committed or it is not, and every client reads the same tree. This is the direct answer to NFS’s stale-attribute cache and AFS’s callback bookkeeping — put the index in one consistent place that all clients share, rather than caching copies and trying to keep them in sync. It also inherits the database’s transactions: the crash-consistency machinery a local filesystem hand-builds as journaling — write-ahead log, commit, replay — is simply what the database already does, so a metadata change is one atomic transaction with no partial-update window and no
fsck-style recovery scan. - The data blocks — the chunkservers’ job — become object storage (Telnyx Cloud Storage). JuiceFS splits every file into a chunk → slice → block hierarchy and writes the blocks as ordinary objects; object storage supplies the durability and throughput for the large half. The blocks are opaque — you cannot reassemble a file from the bucket alone, because the index that orders them lives in the metadata database. Object storage also rewards writing new immutable objects over rewriting in place, so JuiceFS follows a log-structured discipline: each write becomes a new slice, never an overwrite, and a background compaction later merges overlapping slices and reclaims the garbage — exactly the cleaner a log-structured filesystem runs.
- There is no CloudFS server in the data path. JuiceFS is a “rich client”: like AFS’s client and MooseFS’s FUSE mount, all the filesystem logic — the directory tree, inode allocation, splitting files into blocks, caching — runs in the process that mounts the volume. But instead of caching whole files and chasing callbacks, it reads and writes the shared metadata database directly, so consistency comes from the database rather than from a promise a server has to remember. When you
juicefs mount, the client opens one connection to the metadata database and one to object storage, and serves POSIX calls from those two.
The Two Lanes
Concretely, a CloudFS mount talks to two backends over two independent lanes, each with its own credential. There is no CloudFS server in the request path — your client connects to both directly.The Metadata Lane
The client reaches metadata over the connection string CloudFS gives you asmeta_url:
- You connect to a managed metadata endpoint, not to the database directly. The public host
us-east-1.telnyxcloudfs.com:5432is a pooled front end to a per-filesystem metadata database (fs_). The database server itself is not directly reachable. - TLS is required. The connection uses
sslmode=require; there is no plaintext metadata path. - The
meta_tokenis the password. In themeta_urlabove, thecloudfs_tok_...embedded before the@is themeta_tokenused as the connection password. It is a managed, rotatable credential (see The Metadata Token Lifecycle) — not the underlying database’s own credential, which you never handle.
us-central-1 or us-west-1 filesystem still has its metadata host set to us-east-1.telnyxcloudfs.com. Always use the host embedded in meta_url.
Because metadata lives only in us-east-1, a client mounting from another region pays a network round-trip on every metadata operation, so metadata-heavy work (listing large trees, many small files) is slower the farther you mount from us-east-1. Data throughput is unaffected — that lane goes to your region’s storage endpoint.
The Data Lane
File contents go to a per-filesystem bucket namedcloudfs-fs- on Telnyx Cloud Storage, reached through the S3 endpoint for the filesystem’s region (s3_endpoint, e.g. https://us-east-1.telnyxcloudstorage.com). JuiceFS splits every file into 4 MiB block objects and writes them under chunks/… in that bucket; a 10 MiB file plus a small git repo, for example, lands as dozens of block objects. The blocks are opaque to S3 — reconstructing a file requires the chunk/slice index from the metadata lane.
That bucket lives in your own Telnyx Cloud Storage account — it shows up in your bucket list and is reachable with your TELNYX_API_KEY, exactly like any other bucket you own. But its contents are CloudFS’s internal state, not your files: the chunks/… objects are opaque 4 MiB JuiceFS blocks, and a small juicefs_uuid object holds the volume format. Do not delete, rename, move, or edit objects in a cloudfs-fs-* bucket by hand. An out-of-band change corrupts the filesystem — a missing or altered block cannot be reconstructed, and there is no fsck to repair it. Read and write your files through the mount, and leave the bucket to JuiceFS.
Authentication to the data lane reuses your account credentials, following the Telnyx Cloud Storage model:
- The S3 access-key is your
TELNYX_API_KEY. - The S3 secret-key is ignored — Telnyx Storage does not verify the SigV4 signature (see Cloud Storage authentication). You must still supply some non-empty secret, because JuiceFS’s AWS SDK rejects empty static credentials.
juicefs_uuid object and formats the volume (JuiceFS volume name cloudfs-fs-). Do not run juicefs format against a ready filesystem — it is already formatted, and re-formatting fails with cannot update volume name. Just mount. The one exception is a filesystem whose status is needs_format, which was provisioned without the final format step: format it once as described in Mounting, then mount.
Two Credentials, One API Key
Putting the lanes together, a mounting client holds exactly what it needs and nothing more:
The point of splitting the credentials this way is that the client never holds a raw database credential. It talks to the metadata endpoint with a managed
meta_token that Telnyx can rotate independently of the underlying metadata database, and it never connects to the database server directly. Your API key, meanwhile, only ever reaches object storage. Compromising a mount host exposes a rotatable metadata token and your (already-scoped) API key — not standing database credentials.
Create and rotate are the only responses that return the meta_token (and the token-bearing meta_url). GET detail returns meta_url without the token, and list returns neither. Store the token when you create the filesystem — there is no way to read it back.
Regions
You choose a data region at create time:us-central-1, us-east-1, or us-west-1. That region is required — there is no default — and it determines the S3 endpoint (s3_endpoint) and where the file blocks physically live. It is the only region choice you make.
Metadata is always in us-east-1. Picking us-west-1 for data does not move the metadata database; that filesystem’s metadata host is still us-east-1.telnyxcloudfs.com. Mount as close to us-east-1 as your data region allows if metadata latency matters to your workload.
The Metadata Token Lifecycle
Themeta_token is the one credential in the system designed to be rolled. Rotation is a control-plane action:
POST /v2/storage/cloudfs/{id}/actions/rotate-meta-token (Idempotency-Key required) issues a new meta_token and returns a new token-bearing meta_url. Rotation touches only the token — the metadata database and the S3 bucket are unchanged, so no data moves and no files are re-encrypted or re-keyed.
The cutover is connection-scoped, which makes rotation safe to run against a live filesystem:
- The old token stops authenticating on the next metadata connection — any new
juicefs mount(or reconnect) must use the newmeta_url. - An already-mounted client is unaffected on its existing connection. It keeps working with the connection it opened before rotation; you only need the new token the next time it reconnects.
meta_url is stored (secrets, deploy config) before your mounts next reconnect.
Filesystem Status
Each filesystem carries astatus:
The steady states are
ready, needs_format, and failed; provisioning and deleting are transitional. There is no soft-delete or trash lifecycle — deleted is terminal and permanent.
Further Reading
- JuiceFS — the open-source filesystem CloudFS is built on: architecture and how JuiceFS stores files.
- OSTEP on the ideas CloudFS reuses: Crash Consistency: FSCK and Journaling — why the metadata index belongs in a transactional database — and Log-structured File Systems — write-new-never-overwrite, and the cleaner behind JuiceFS compaction.
Next Steps
- Quick Start — Create a filesystem and mount it
- Mounting — The verified
juicefs mountrecipe - Concurrent Access — Many clients mounting one filesystem, and file locking
- API Reference — The six control-plane endpoints
- Overview — What CloudFS is and when to use it
Mounting a Filesystem
Source: https://developers.telnyx.com/docs/edge-compute/cloudfs/mount.mdA CloudFS filesystem is mounted with the JuiceFS Community Edition client: give it the metadata URL and S3 credentials below, and it exposes a POSIX filesystem at a mountpoint through FUSE. This page is the end-to-end mount recipe for each environment, verified against a live filesystem. If your host can’t do FUSE at all, serve the filesystem over WebDAV instead — no kernel support needed. If you haven’t created a filesystem yet, start with the Quick Start. For the two-lane architecture behind the credentials, see How CloudFS Works.
Prerequisites
- The JuiceFS Community Edition client. Install it per the JuiceFS docs. This page was verified end-to-end with JuiceFS CE 1.4.0.
- An existing CloudFS filesystem (create one), and the
meta_urlandmeta_tokenfrom its create response. The token is returned only at create (and on rotate) — if you didn’t store it, you cannot reconstruct it and must rotate to get a new one. - FUSE. A usable
/dev/fuseon Linux, or macFUSE on macOS. (Serving Without FUSE needs neither.)
Credentials the Client Needs
The client holds three things. None of them is a raw database password — the metadata token is the password, embedded in the URL.
The
meta_url returned by create already has the token inline as the password:
meta_url returned by GET /v2/storage/cloudfs/{id} is the same string without the token:
meta_token in as the password (postgres://fs_:@...). The host is always the region metadata host us-east-1.telnyxcloudfs.com — metadata is centralized there regardless of the filesystem’s data region.
Set the Environment
AWS_ACCESS_KEY_ID / AWS_SECRET_ACCESS_KEY at mount time. Set them explicitly. Telnyx Cloud Storage authenticates on the access key alone and ignores the SigV4 signature, so the secret can be any non-empty string — see Cloud Storage authentication. An empty secret fails: JuiceFS’s AWS SDK rejects it with static credentials are empty.
The same environment also feeds Serving Without FUSE.
Do not run juicefs format against a filesystem whose status is ready. Provisioning already formats the volume (the bucket ships with a juicefs_uuid object and a fixed volume name), and re-formatting fails with cannot update volume name. The one exception is a filesystem in needs_format — see Formatting a needs_format filesystem.
Mount with FUSE
The first positional argument is the metadata URL; the second is the mountpoint. Mount in the background and write logs to a file so the mount doesn’t block your terminal — on success the command returns immediately and the filesystem is live at the mountpoint. Needs a usable/dev/fuse, which stock kernels have.
/tmp/juicefs.log for the mount status and any warnings.
The most portable way to mount — no FUSE install on the host, identical behavior everywhere. The container needs FUSE and the juicefs binary: run it privileged and pass the FUSE device through with --device /dev/fuse.
--privileged and --device /dev/fuse are what let FUSE mount inside the container. Without them the mount fails to open /dev/fuse. If you bake the juicefs binary and fuse into your own image, you can skip the install step and go straight to juicefs mount.
With macFUSE installed and its system extension approved, the recipe is the same — pick a mountpoint in your home directory:
--no-usage-report flag opts out of JuiceFS’s anonymous usage reporting. By default the JuiceFS client reports core metrics (such as its version) to the JuiceFS project on mount; it does not include user data. These docs pass --no-usage-report on every mount so CloudFS filesystems don’t phone home by default — drop the flag if you’d like to share usage data with the upstream project.
Formatting a needs_format Filesystem
If GET /v2/storage/cloudfs/{id} reports "status": "needs_format", the bucket and metadata database exist but the volume was never formatted, and mounting fails with database is not formatted, please run juicefs format ... first. This is the one case where you run juicefs format — once, then mount as normal:
and come from the filesystem’s detail response, and the JuiceFS volume name must be the s3_bucket value (cloudfs-fs-) — any other name is rejected. Keep AWS_ACCESS_KEY_ID / AWS_SECRET_ACCESS_KEY exported (format probes the bucket over S3) and leave --access-key / --secret-key unset: the stored volume config then carries no credentials, same as a factory-formatted filesystem. Note that --no-usage-report is a mount flag — format doesn’t accept it.
Verify the Mount
The checks below are written for Linux with the/mnt/agentfs mountpoint. On macOS, substitute yours (e.g. ~/agentfs), check with mount | grep agentfs in place of mountpoint, and hash with md5 in place of md5sum.
git init and git commit inside the mountpoint behave as expected.
Unmount
META_URL brings all files back.
Troubleshooting
Next Steps
- Serving Without FUSE — serve the filesystem over WebDAV on hosts that can’t mount
- Concurrent Access — mount the same filesystem from many clients at once, and coordinate writers with locks
- How CloudFS Works — the metadata and data lanes, and what lives where
- API Reference — create, list, get, update, delete, and rotate the metadata token
- Overview — what CloudFS is and when to reach for it
Serving Without FUSE
Source: https://developers.telnyx.com/docs/edge-compute/cloudfs/serve.mdA WebDAV-served filesystem is not full POSIX. Everyday file operations work, but the POSIX surface a FUSE mount provides does not survive the HTTP hop. Good for: reading and writing files, shuttling them between machines, browsing in Finder, everyday
ls / cd / cp / mv / mkdir, and any app that speaks WebDAV directly.
No good for: git working trees (git init fails), executing binaries in place (noexec), coordinating writers with file locks (flock is local-only), or anything that needs faithful permissions and ownership. For those, mount with FUSE.
Mounting a filesystem goes through FUSE, and not every host has FUSE to give: a managed Mac whose MDM policy blocks macFUSE, a container you can’t run with --device /dev/fuse, a host where you aren’t root. The same JuiceFS client can serve the filesystem instead: juicefs webdav is an ordinary user-space process listening on a TCP port — it holds the same two backend connections a mount holds and exposes the filesystem as a WebDAV endpoint over HTTP, with no kernel support at all.
Serving is not mounting — no path on the host becomes the filesystem; clients speak HTTP to a port. On macOS you can then mount that endpoint with the OS’s built-in WebDAV client and get a Finder-visible volume anyway. A serve process is a full JuiceFS client, so it coexists with every other client of the filesystem — FUSE mounts elsewhere, many clients at once — with the same close-to-open consistency between clients as between mounts. Verified end-to-end with JuiceFS CE 1.4.0 against a live filesystem.
Prerequisites
- The JuiceFS Community Edition client. Install it per the JuiceFS docs.
- An existing CloudFS filesystem (create one), and the same environment a mount takes — the tokenized
META_URLplus theAWS_*pair. Set them per Set the Environment on the mount page.
Start the WebDAV Server
OK, service is ready on "127.0.0.1:9007" and returns. The filesystem is now an HTTP endpoint — round-trip a file to confirm:
127.0.0.1 — only processes on the same host can reach it. To serve beyond localhost, set WEBDAV_USER and WEBDAV_PASSWORD in the server’s environment before starting it; the server then returns 401 unless the request carries matching Basic credentials (curl -u agent:...). Basic auth over plain http:// sends the password — and your files — readable on the wire, so pair it with TLS (juicefs webdav serves HTTPS with --cert-file / --key-file) or keep the port reachable only over a private network or SSH tunnel.
--background daemonizes the server, which is convenient interactively. Under a supervisor (launchd, systemd, a container entrypoint), drop --background and run it in the foreground — the supervisor then owns restarts, and startup errors land in its logs instead of a detached daemon’s.
Mount the WebDAV Endpoint in Finder (macOS)
macOS ships its own WebDAV filesystem — it’s what Go → Connect to Server uses. It is part of the OS, so an MDM policy that blocks third-party system extensions (the reason macFUSE won’t install) doesn’t apply to it. Point it at the local server and you get a real mounted volume — a mount of the endpoint, one hop in front of CloudFS:http://127.0.0.1:9007. If Finder prompts for credentials against an anonymous server, connect as Registered User with any username and an empty password — the Guest option is rejected. Unmount with umount ~/CloudFS.
What Works Through the Mount — and What Doesn’t
Everyday file operations behave like a local directory:ls, cd, mkdir, cp, mv, cat, editing files, working in Finder — all verified against a live filesystem. But it is WebDAV underneath, not POSIX, and the difference shows at the edges:
- No executing in place. The volume is mounted
nodev,noexec,nosuid— you can read and write binaries, but running one from the mount fails withpermission denied. Copy it out first. - Listings lag a few seconds. Apple’s WebDAV client caches directory listings, so a file another client just wrote may take a moment (or a Finder refresh) to appear.
- Git working trees don’t work.
git initinside the mount fails writing.git/config(Invalid argument). Keep repositories on a FUSE mount, which handles them fine. - File locks coordinate nothing.
flockcalls succeed, but the lock is local to your machine — the cross-client lock coordination that FUSE mounts get through the shared metadata does not ride over WebDAV. Don’t rely on locks taken through this mount. - Permissions are cosmetic. Every entry appears owned by your local user with
-rwx------modes, whatever a POSIX client would see.
Troubleshooting
Next Steps
- Mounting a Filesystem — the FUSE recipe, and the environment setup this page reuses
- Concurrent Access — many clients on one filesystem, and what consistency they get
- How CloudFS Works — the metadata and data lanes every client connects to
Concurrent Access
Source: https://developers.telnyx.com/docs/edge-compute/cloudfs/concurrent-access.mdCloudFS is a shared filesystem: the same filesystem can be mounted by many clients at once — a fleet of agents, a set of containers, several hosts — and they read and write it concurrently. Because the metadata index lives in one consistent store that every client reads and writes directly (rather than each client keeping its own copy and reconciling later), all mounts converge on the same directory tree.
Mount the Same Filesystem on Many Clients
Every client mounts with the samemeta_url (token included) and the same TELNYX_API_KEY. There is nothing per-client to set up — a mount holds no server-side state — so you can add or remove clients at any time. Run the mount recipe on each host:
meta_url.
What One Client Sees of Another’s Writes
CloudFS gives close-to-open consistency, the standard for shared filesystems: when a client writes a file and closes it, other clients see the new contents the next time they open it. Directory operations — create, rename, delete — commit to the metadata store immediately and become visible to other clients within about a second (the lifetime of a client’s kernel metadata cache). With client A and client B both mounted at/mnt/shared:
Coordinating Writers on the Same File
Two clients writing the same file (or the same byte range) at the same time is the one case that needs coordination — as on any shared filesystem, uncoordinated overlapping writes resolve last-writer-wins. Use file locks: CloudFS supports both BSD locks (flock) and POSIX record locks (fcntl), and JuiceFS coordinates them across clients through the shared metadata. A lock held on one host blocks a conflicting lock on another.
flock exits non-zero and B’s command doesn’t run — so a fleet can serialize access to a shared resource (a worklog, a build output directory, a leader-election file) without any external coordinator.
Worked Example: Two Clients, One Filesystem
Two containers, each an independent client, mounting the same filesystem:Caveats
- Same-file, uncoordinated concurrent writes resolve last-writer-wins on overlapping regions. Use the locks above whenever more than one client may write the same file.
- Metadata latency. Every metadata operation — open, create, rename, lock — is a round-trip to
us-east-1(see The Metadata Lane). Coordination-heavy or many-small-file workloads run faster the closer clients mount to us-east-1; bulk data throughput is unaffected. - One credential set per filesystem. All clients share the same
meta_tokenand API key; there is no per-client scoping within a filesystem.
Next Steps
- Mounting a Filesystem — the full mount recipe each client runs
- How CloudFS Works — why one consistent metadata store makes shared access work
- Quick Start — create a filesystem and mount it
API Reference (Storage)
Presigned Object URLs
- Create Presigned Object URL: Returns a timed and authenticated URL to download (GET) or upload (PUT) an object. This is the equivalent to AWS S3’s “presigned” URL. Please note that Telnyx…
Bucket SSL Certificate
- Get Bucket SSL Certificate: Returns the stored certificate detail of a bucket, if applicable.
- Add SSL Certificate: Uploads an SSL certificate and its matching secret so that you can use Telnyx’s storage as your CDN.
- Remove SSL Certificate: Deletes an SSL certificate and its matching secret.
Bucket Usage
- Get API Usage: Returns the detail on API usage on a bucket of a particular time period, group by method category.
- Get Bucket Usage: Returns the amount of storage space and number of files a bucket takes up.
Data Migration
- List Migration Source coverage
- List all Migration Sources
- Create a Migration Source: Create a source from which data can be migrated from.
- Get a Migration Source
- Delete a Migration Source
- List all Migrations
- Create a Migration: Initiate a migration of data from an external provider into Telnyx Cloud Storage. Currently, only S3 is supported.
- Get a Migration
- Stop a Migration
kv namespaces
- List KV namespaces: Lists the KV namespaces for the authenticated user’s organization. Results use page-based pagination (
page[number]/page[size]). - Create a KV namespace: Creates a new KV namespace. Provisioning is asynchronous: the namespace is returned with status
pendingand becomes usable once it reachesprovision_ok. - Get a KV namespace: Retrieves a KV namespace by its ID, including its provisioning status.
- Delete a KV namespace: Deletes a KV namespace and all of the keys it contains. Deletion is asynchronous: the namespace is returned with status
deleting. Deleting a namespace whose…
kv keys
- List keys: Lists the keys in a namespace. Returns key names and metadata only, never values. Results are paginated with
limitand an opaquecursor. - Get a key’s value: Returns the raw stored value for a key. The response body is the value exactly as it was written; the
Content-Typeheader echoes the value’s stored content t… - Set a key’s value: Creates or replaces the value for a key. The request body is stored verbatim as the value — no base64, no JSON envelope — up to 1 MiB. The request’s `Content-T…
- Delete a key: Deletes a key. Idempotent: deleting a key that does not exist still succeeds. The namespace itself must exist and be provisioned.
cloudfs filesystems
- List CloudFS filesystems: Lists the CloudFS filesystems for the authenticated user’s organization. Results use cursor-based pagination: fetch the next page by passing `meta.cursors.afte…
- Create a CloudFS filesystem: Creates a CloudFS filesystem. Provisioning is synchronous — typically a few seconds, up to a few minutes — and the filesystem is returned with status
ready,… - Get a CloudFS filesystem: Retrieves a CloudFS filesystem by its ID. The returned
meta_urlomits the credential — the metadata token is only ever returned by create and rotate-meta-tok… - Update a CloudFS filesystem: Updates a CloudFS filesystem. Only
namecan be changed; other fields are immutable and unknown fields are rejected with a400. Renaming to a name that alre… - Delete a CloudFS filesystem: Permanently deletes a CloudFS filesystem, removing its S3 bucket and its metadata database. Deletion is synchronous: the response returns the filesystem’s fina…
- Rotate the metadata token: Issues a new metadata access token for the filesystem and returns the full filesystem, including the new
meta_tokenand credential-bearingmeta_url. The pr…