

Telnyx Calling: WebRTC — Full Documentation
Complete page content for WebRTC (Calling section) of the Telnyx developer docs (https://developers.telnyx.com). This file: https://developers.telnyx.com/development/llms/calling-webrtc-llms-full-txt.md · Root index: https://developers.telnyx.com/llms.txt
Getting Started
Fundamentals
Source: https://developers.telnyx.com/docs/voice/webrtc/fundamentals.md
What & Why
These SDKs enable client-side applications to instantiate and control a Telnyx call leg. As a result, developers of applications integrated with Telnyx voice platform are no longer constrained to working with inflexible and uncustomizable SIP UAs such as PBX, Asterisk, Zoiper etc. Instead they can embed native voice capabilities client-side to work seamlessly with their voice application and achieve end to end visibility and control of the user experience.How
These SDKs- Utilize the native client-end (browser or device) WebRTC API for cross browser/device compatibility, …
- Adhere to the WebRTC standardization where Media is transported via RTP over DTLS, aka SRTP, aka DTLS-SRTP, … and
- Implements the WebRTC session negotiation, aka signaling, via JSON-RPC messages over Secure WebSocket (WSS).
Availability
The following SDKs are offeredArchitecture
Source: https://developers.telnyx.com/docs/voice/webrtc/architecture.mdTo properly architect solutions and/or troubleshoot issues, one must understand how WebRTC Voice SDK fits among Telnyx’s product portfolio.
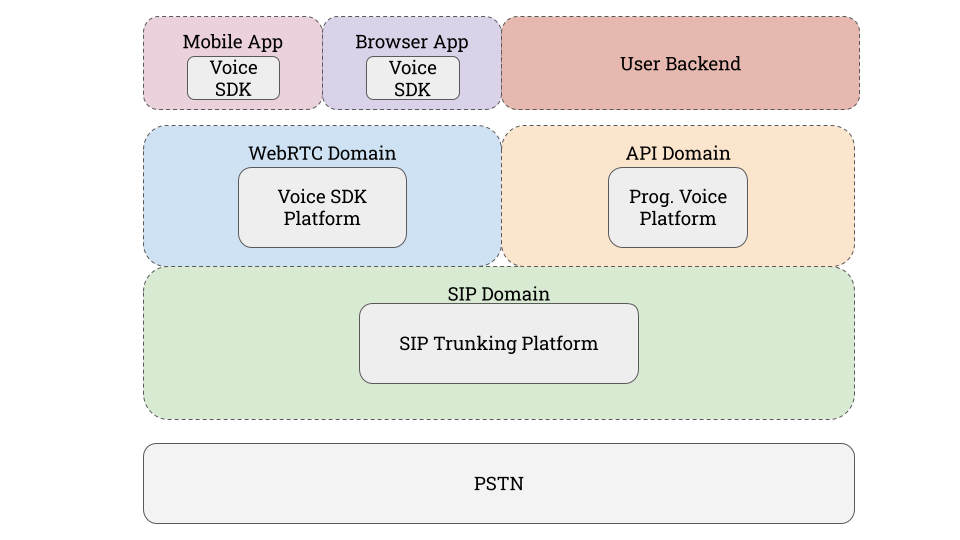
WebRTC Voice SDKs CANNOT be used on its own for calling
They merely lower the barriers for users to incorporate voice functionalities in their applications, i.e. instantiate a call leg.rtc.telnyx.com acts as the translation layer where on the SDK facing side, it adheres to the WebRTC standard and on the SIP facing side, speaks SIP protocol.
To the core SIP platform, rtc.telnyx.com is merely another SIP UA. This is clearly illustrated by the fact that all methods of authenticating an SDK client are based on SIP connection.
This setup …
- avails WebRTC Voice SDKs the worldwide PSTN calling coverage and, more importantly,
- puts those calls under the umbrella of Programmable Voice API.
WebRTC Voice SDKs CANNOT be used on its own to orchestrate call flow
They merely allow some form of local control, e.g. un/hold, un/mute, sending DTMF digits. To orchestrate call flow or manipulate audio, TeXML or Call Control API must be used. Consider this example – a simple prepaid calling app where the user is told the remaining number of minutes before the call is placed. In the case of inadequate balance, they are told to top up before the call is hung up gracefully. The Voice SDKs are insufficient to achieve this simple call flow on their own. Instead, it is necessary to incorporate call control API —- The call leg instantiated by the SDK must be parked via a setting on the SIP connection.
- The user’s backend must
- respond to Telnyx webhooks,
- inject the necessary custom Text-To-Speach audio,
- place another outbound leg to the intended PSTN destination (or hangup due to insufficient balance), and finally,
- bridge the WebRTC call leg with the PSTN leg
WebRTC SDKs’ role in the Telnyx Voice Product Suite
To conclude, WebRTC SDKs’ role in the Telnyx voice product suite is one where- They bring the Telnyx voice infrastructure closer to the ultimate end users. Developers do not need to maintain their own voice infrastructure. Instead, they can focus on building user facing applications and business logic.
- They lower the barrier to access Telnyx’s worldwide PSTN coverage. Developers do not need to know SIP. Instead, they can work with the widely adopted WebRTC standardization and API.
- They unify all the crucial building blocks of a CPaaS platform under the Telnyx umbrella. Developers do not need to manage multiple integrations and vendors in their stack.
SDK Commonalities
Source: https://developers.telnyx.com/docs/voice/webrtc/sdk-commonalities.md
Classes, Methods, and Events
Broadly speaking, across all the SDKs — There are two main classes —- The Client class that represents the session. This session encapsulates the websocket connection which is used for signaling and the active call.
- The Call class that represents a webRTC media connection
- Instantiate an outbound call
- Un/Register callback handlers for events
- Control input and output devices
- Answer or hang up
- Emit DTMF digits
- On changes to the websocket, e.g. connected or disconnected
- On changes to the client, e.g. ready to make and receive calls
- On changes to the call, e.g. answered
Call States
Every SDK exposes a set of call states that describe where a call is in its lifecycle. The diagram below shows the common state machine shared across all WebRTC SDKs: Some platforms define additional states beyond the common set. iOS and Android add RECONNECTING and DROPPED (with an associated reason) for network-recovery scenarios. Flutter and Android add an ERROR state for unrecoverable failures.Authentication
A Client instance needs to be properly authenticated before a call can be made or received. The following means of authentications are offered Consult the linked guides on to the specific how-to guides.Dialing Registered Clients
Method of Authentication Dialing registered clients with Examples Basic credential based SIP connection SIP user name on the connection object john1234@sip.telnyx.com Basic credential based SIP connection Phone number on the connection (* See notes below.) +13128889999 Telephony credential SIP user name on the telephony credential object gencredXXXYYY@sip.telnyx.com JWT SIP user name on the parent telephony credential object gencredxXxYyY@sip.telnyx.com Dialing registered client using phone number on the connection requires “Destination Number Format” to be set as “SIP Username” on the “Inbound” setting of the same connection.Multi-client Registration Behavior
It’s recommended that the user sticks to one method of authentication and not mix and match unless there is a compelling use case for it. Here is an example to illustrate — Credential based SIP connection with SIP usernamejohn1234. Attached to this connections are:
- Telephony credential,
gencred1- JWT,
token1_1
- JWT,
- Telephony credential,
gencred2- JWT,
token2_1 - JWT,
token2_2
- JWT,
-
client_ais registered withjohn1234 -
client_bis registered withgencred1 -
client_cis registered withtoken1_1 -
client_dis registered withgencred2 -
client_eis registered withtoken2_1 -
client_fis registered withtoken2_2Dialing… Which client gets rung… john1234@sip.telnyx.com client_a gencred1@sip.telnyx.com Indeterminate; the last client to register between client_b and client_c. gencred2@sip.telnyx.com Indeterminate; the last client to register between client_d, client_e and client_f.
Common Usage Patterns
Two common primitive patterns are presented below. They can be augmented or used in combination with each other to achieve the user’s desired call flows.Pattern 1
This pattern is driven by the client-end application.- A client-end application (Web or Mobile App) initiates a call.
- The call is temporarily parked by Telnyx.
- Telnyx issues a webhook event to the user’s backend service.
- User’s backend service performs additional processing using Telnyx Voice API, TeXML or Conferencing API.
- Depending on user’s business logic,
- a second call leg may be initiated by the user’s backend and bridged to the initial call leg, or
- the initial call leg be put into a queue or conference until bridged to another call leg.
Pattern 2
This pattern is driven by a call from outside the Telnyx network.- Telnyx receives a call from outside the Telnyx network, e.g. PSTN.
- Telnyx processes the call via TeXML instruction or Voice API commands
- That call leg is placed into a queue or conference room
- User’s backend service initiates a second call leg toward a client-end application
- The two call legs are eventually joined via bridge command or conference join
Costs
WebRTC call legs are billed at $0.002/minute. Other voice legs and add on features are charged separately and independently according to the user’s price plan.Authentication
Credential Connections
Source: https://developers.telnyx.com/docs/voice/webrtc/auth/credential-connections.md
Prerequisites
- A valid V2 API key
Creating a Credential Based SIP Connection
The following API request will create a basic credential based SIP connection.Using This Connection with Telephony Credentials
For WebRTC SDK authentication, this connection is typically the parent resource for one or more telephony credentials. Best practices:- For multi-user applications, create a separate telephony credential per device
- If you create telephony credentials on demand, wait about 5 seconds before the first login. The same applies to a JWT minted from that credential
- If you use JWT authentication, mint the JWT from that device’s telephony credential
- Use the telephony credential’s
sip_username(gencred...) with the SIP Registration Status endpoint to check whether the SDK is currently registered
SDK Authentication
SDKs are authenticated withuser_namepassword
Limits
Sum of the following may not exceed 10,000 for an account.- Count of credential connection
- Count of IP connection
- Count of FQDN connection
- Count of external connection
- Count of TeXML application
- Count of Call Control Application
Additional Resources
Telephony Credentials
Source: https://developers.telnyx.com/docs/voice/webrtc/auth/telephony-credentials.md
Prerequisites
- An active credential based SIP connection
Create a Credential
The following API request will create a telephony credential.connection_idis requiredexpires_atis recommended for security especially when many are expected to be creatednameandtagare recommended for easy management
Propagation Time and Immediate Use
Telephony credential creation is not guaranteed to be immediately usable for SDK login or registration. In create-then-login flows, the first authentication attempt can fail transiently even though the API request succeeded. Best practices:- Prefer creating credentials ahead of time when possible
- If you create credentials on demand, wait about 5 seconds before the first login or registration attempt
- If you cannot wait, retry with short exponential backoff and treat early failures as transient
Updating a Credential
After a credential’s creation, it may be updated via the PATCH endpoint.expired credential since that state is terminal.
Revoking a Credential
A client-side application’s voice capabilities can be revoked by removing the corresponding credential.Managing Credentials
The following filters are useful when managing many credentials.filter[resource_id]e.g.filter[resource_id]=connection:1567510696929005999. Note thatconnection:must be prepended to the connection ID.filter[status]e.g.filter[status]=expiredfilter[status]e.g.filter[tag]=sandbox
How Telephony Credentials Should Be Used
A telephony credential is a SIP identity for one SDK device. Best practices:- Create a separate telephony credential for each device
- Do not share one telephony credential across concurrent devices
- JWTs minted from the same telephony credential still represent the same SIP identity
SDK Authentication
SDKs are authenticated withsip_usernamewhich starts withgencredsip_password
Check SIP Registration Status
After an SDK client logs in, you can verify whether the underlying telephony credential is currently registered.sip_username (gencred...) as username.
Limits
Currently, there exists- No limit on count of telephony credentials on a connection,
- Nor any limit on the aggregate count of telephony credentials on a single account.
Additional Resources
JWTs
Source: https://developers.telnyx.com/docs/voice/webrtc/auth/jwt.md
Prerequisites
- An active telephony credential
Create a Token
The following API request will generate a JWT.- 24 hours after its creation or
- the parent telephony credential is expired
What a JWT Represents
A JWT is an authentication token for one telephony credential. It does not create a new SIP identity. Best practices:- JWTs minted from the same telephony credential still represent the same
sip_username(gencred...) - Create a separate telephony credential per device, then mint JWTs from that credential
Immediate Login After Credential Creation
If you create a telephony credential and mint a JWT from it, wait about 5 seconds before using either thegencred or the JWT for login. Using them immediately after creation can fail transiently while the credential propagates.
SDK Authentication
SDKs are authenticated with the JWT.Check SIP Registration Status
If you need to confirm whether the SDK is currently registered, use the underlying telephony credential’ssip_username (gencred...) with the SIP Registration Status endpoint.
Limits
Currently, there exists- No limit on count of tokens on a telephony credential,
- Nor any limit on the aggregate count of tokens on a single account.
Additional Resources
Push Notifications
Overview
Source: https://developers.telnyx.com/docs/voice/webrtc/push-notifications.md
How push notifications work
When a client connects to the Telnyx WebRTC platform, it maintains a WebSocket connection that receives incoming call invitations in real time. If the app moves to the background or the device terminates it, that socket closes and calls can no longer reach the device. Push notifications bridge this gap. During login the SDK registers a platform-specific push token (FCM for Android, APNS for iOS) with Telnyx. When an incoming call targets that user, Telnyx sends a push notification through the appropriate service. The device wakes the app, which reconnects to the socket and receives the actual call invitation.Multidevice support
A single user can register up to 5 push tokens across iOS (APNS) and Android (FCM) devices. Each time a user logs in and provides a push token, Telnyx registers it. If a sixth token is added, the least-recently-used token is removed. This means up to five devices can receive push notifications for the same incoming call simultaneously.Platform setup
Push notification configuration has two parts:- Portal setup — Create a push credential in the Telnyx Portal and attach it to a SIP Connection.
- App setup — Integrate the push notification service into your application code and pass the token to the SDK on login.
API reference
You can also manage push credentials programmatically through the API:Android
Source: https://developers.telnyx.com/docs/voice/webrtc/push-notifications/android.md
Prerequisites
- A Telnyx account with a configured SIP Connection
- A Firebase project with Cloud Messaging enabled
- The Telnyx Android WebRTC SDK integrated into your application
Portal setup
1. Configure Firebase Cloud Messaging
- Go to the Firebase Console and open your project.
- Navigate to Project Overview → Project Settings → Service Accounts.
- Select Generate New Private Key to download a service account JSON file.
2. Create an Android push credential in the Telnyx Portal
- Go to portal.telnyx.com and log in.
- Navigate to API Keys in the left panel.
- Select the Credentials tab, then click Add → Android Credential.
- Enter a credential name and paste the contents of the service account JSON file into the Project Account JSON field.
- Click Add Push Credential to save.
3. Attach the credential to a SIP Connection
- Navigate to SIP Connections in the left panel.
- Open the SIP Connection you want to configure (or create a new one).
- Select the WebRTC tab.
- In the Android section, select the push credential you created.
- Save the SIP Connection.
App setup
Retrieve the FCM token
After integrating Firebase into your Android application (Firebase setup guide), retrieve the FCM registration token:Pass the token to the SDK
Provide the FCM token when connecting theTelnyxClient. The SDK registers it with Telnyx so push notifications can be routed to this device.
Handle incoming push notifications
Create aFirebaseMessagingService to process incoming FCM messages. Parse the metadata field from the notification payload and pass it to your notification UI:
Decline calls from push notifications
The SDK providesconnectWithDeclinePush() to decline incoming calls without fully reconnecting:
decline_push: true parameter, handles the decline, and disconnects automatically.
Android 14 permissions
Android 14 requires explicit notification permissions. Add these to yourAndroidManifest.xml:
POST_NOTIFICATIONS at runtime before showing notifications.
Troubleshooting
FCM token not passed to login
Verify that the FCM token is retrieved successfully and included in theCredentialConfig or TokenConfig passed to connect(). Check your logs for the token value.
Incorrect google-services.json
Confirm that thegoogle-services.json file is in your app module’s root directory and the package name matches your application.
Wrong push credential on the SIP Connection
In the Telnyx Portal, open your SIP Connection → WebRTC tab → Android section and verify the correct credential is selected.Invalid push credential
If the service account JSON is malformed or from the wrong Firebase project, push delivery fails silently. Generate a fresh key from the Firebase Console and update the credential in the Portal.Testing push delivery
The SDK repository includes a testing tool in thepush-notification-tool/ directory that sends test FCM notifications to verify your setup independently of the Telnyx call flow:
Next steps
- Push notifications overview — Multidevice support and architecture
- Android SDK reference — Full SDK documentation
- Mobile Push Credentials API — Manage credentials programmatically
iOS
Source: https://developers.telnyx.com/docs/voice/webrtc/push-notifications/ios.md
Prerequisites
- A Telnyx account with a configured SIP Connection
- An Apple Developer account
- The Telnyx iOS WebRTC SDK integrated into your application
Portal setup
1. Create a VoIP push certificate
For official Apple documentation, see Create VoIP Services Certificates. You will need:- An Apple Developer account
- Your app’s Bundle ID
- A Certificate Signing Request (CSR) from your Mac
- Go to developer.apple.com and sign in.
- Navigate to Certificates, Identifiers & Profiles.
- Click the + button to create a new certificate.
- Select VoIP Services Certificate and click Continue.
- Choose the Bundle ID for your application and click Continue.
- Upload a CSR file from your Mac.
- Open Keychain Access on your Mac.
- Go to Keychain Access → Certificate Assistant → Request a Certificate from a Certificate Authority.
- Enter your email address, select Save to disk, and click Continue.
voip_services.cer) and double-click it to install it in your Keychain.
A single VoIP Services Certificate works for both APNS sandbox and production environments. You need a separate certificate for each Bundle ID.
2. Export cert.pem and key.pem
- Open Keychain Access and search for “VoIP Services”.
- Verify the certificate is installed for your Bundle ID.
- Right-click the certificate and select Export. Save as a
.p12file (you’ll be prompted for a password). - Run the following commands to extract the PEM files:
3. Create an iOS push credential in the Telnyx Portal
- Go to portal.telnyx.com and log in.
- Navigate to API Keys in the left panel.
- Select the Credentials tab, then click Add → iOS Credential.
- Enter a credential name (using your Bundle ID makes it easy to identify).
- Paste the full contents of
cert.peminto the certificate field (include the-----BEGIN CERTIFICATE-----and-----END CERTIFICATE-----markers). - Paste the full contents of
key.peminto the key field (include the-----BEGIN RSA PRIVATE KEY-----and-----END RSA PRIVATE KEY-----markers). - Click Add Push Credential to save.
4. Attach the credential to a SIP Connection
- Navigate to SIP Connections in the left panel.
- Open the SIP Connection you want to configure (or create a new one).
- Select the WebRTC tab.
- In the iOS section, select the push credential you created.
- Save the SIP Connection.
App setup
Enable push notification capabilities
- Open your Xcode project.
- Select your app target in the Project Navigator.
- Go to Signing & Capabilities and click + Capability.
- Add Push Notifications.
- Add Background Modes and enable Voice over IP.
Configure PushKit
Import PushKit and register for VoIP push notifications:PKPushRegistryDelegate to capture the device token:
Pass the token to the SDK
Include the APNS device token when connecting theTelnyxClient:
Handle incoming VoIP push notifications
When a push notification arrives, reconnect the client and report the call to CallKit:Disable push notifications
To disable push notifications for the current user:Troubleshooting
VoIP certificate issues
- Verify your VoIP Services Certificate is not expired.
- Ensure the certificate matches the Bundle ID used in your app.
- For different Bundle IDs (e.g.,
com.myapp.devvscom.myapp), create separate certificates.
Push token not passed to login
Check that the APNS device token is captured inpushRegistry(_:didUpdate:for:) and included in TxConfig when calling connect().
Wrong credential on the SIP Connection
In the Telnyx Portal, open your SIP Connection → WebRTC tab → iOS section and verify the correct credential is selected.APNS environment mismatch
- Debug builds (Xcode): Use sandbox environment — set
pushEnvironmenttosandboxinTxConfig. - Release builds / TestFlight: Use production environment — set
pushEnvironmenttoproduction. - Ensure the APNS environment matches your build signing profile.
Testing push delivery
The SDK repository includes a testing tool in thepush-notification-tool/ directory:
cert.pem, key.pem, and the target APNS environment (sandbox or production).
Common error responses from the tool:
- BadDeviceToken: Token is invalid or expired
- BadCertificate: Certificate files are invalid or expired
- BadTopic: Bundle ID doesn’t match certificate
- TopicDisallowed: Certificate doesn’t have VoIP permissions
Next steps
- Push notifications overview — Multidevice support and architecture
- iOS SDK reference — Full SDK documentation
- Mobile Push Credentials API — Manage credentials programmatically
Flutter
Source: https://developers.telnyx.com/docs/voice/webrtc/push-notifications/flutter.md
Prerequisites
- A Telnyx account with a configured SIP Connection
- The Telnyx Flutter Voice SDK integrated into your application
- Android: A Firebase project with Cloud Messaging enabled
- iOS: An Apple Developer account with a VoIP push certificate
Portal setup
Flutter apps are cross-platform, so you need credentials for each platform you target:- Android: Follow the Android portal setup to create an Android push credential using your Firebase service account JSON.
- iOS: Follow the iOS portal setup to create an iOS push credential using your VoIP certificate PEM files.
App setup
Android — Firebase Cloud Messaging
1. Listen for background push notifications
Register a background message handler in yourmain method:
2. Handle the push notification
Process the incoming message and show a call notification using a plugin like FlutterCallkitIncoming:3. Create a high-importance notification channel (Android 8.0+)
For Android 8.0 and higher, create a dedicated notification channel so incoming call notifications display as heads-up alerts. Use the flutter_local_notifications package to configure the channel with maximum importance.iOS — Apple Push Notification Service
For iOS, the Flutter SDK uses APNS through the native PushKit integration. Configure your iOS project following the standard iOS app setup, which includes:- Enabling Push Notifications and Background Modes (VoIP) capabilities in Xcode.
- Configuring PushKit to register for VoIP pushes.
- Reporting incoming calls to CallKit (required on iOS 13+).
Troubleshooting
Android-specific issues
- FCM token not received: Ensure
Firebase.initializeApp()is called before requesting the token and thatgoogle-services.jsonis correctly placed. - Notifications not showing in background: Verify your background handler is annotated with
@pragma('vm:entry-point')and registered viaFirebaseMessaging.onBackgroundMessage. - Low-priority notifications: Create a notification channel with
Importance.maxfor incoming call alerts.
iOS-specific issues
- No push notifications: Confirm the VoIP push certificate matches your Bundle ID and is uploaded to the Telnyx Portal.
- App terminated on push: On iOS 13+, you must report every VoIP push to CallKit or the system kills your app.
- Environment mismatch: Use sandbox for debug builds and production for release/TestFlight builds.
General
- Push works but no call invitation: The push notification only signals that a call is incoming. Your app must reconnect to the TelnyxClient socket after receiving the push so the actual invitation can be delivered.
- Multidevice: A user can register up to 5 push tokens. If a 6th is added, the oldest is removed.
Next steps
- Push notifications overview — Multidevice support and architecture
- Flutter SDK reference — Full SDK documentation
- Mobile Push Credentials API — Manage credentials programmatically
React Native
Source: https://developers.telnyx.com/docs/voice/webrtc/push-notifications/react-native.md
Prerequisites
- A Telnyx account with a configured SIP Connection
- The
@telnyx/react-voice-commons-sdkintegrated into your application - Android: A Firebase project with Cloud Messaging enabled
- iOS: An Apple Developer account with a VoIP push certificate
Portal setup
React Native apps are cross-platform, so you need credentials for each platform you target:- Android: Follow the Android portal setup to create an Android push credential using your Firebase service account JSON.
- iOS: Follow the iOS portal setup to create an iOS push credential using your VoIP certificate PEM files.
App setup
Install dependencies
Android — Firebase Cloud Messaging
1. Add the Firebase configuration file
Downloadgoogle-services.json from your Firebase project console and place it in your project root (same level as package.json):
2. Configure the Android manifest
Add the Firebase messaging service and Telnyx notification receiver toandroid/app/src/main/AndroidManifest.xml:
3. Retrieve the FCM token
The SDK handles FCM token retrieval internally on Android. Pass the token to the SDK when connecting:iOS — Apple Push Notification Service
1. Configure PushKit
Use thereact-native-voip-push-notification package to register for VoIP pushes and capture the device token:
2. Enable capabilities in Xcode
- Open your iOS project in Xcode.
- Go to Signing & Capabilities.
- Add Push Notifications.
- Add Background Modes and enable Voice over IP.
Troubleshooting
Android-specific issues
- FCM token not received: Verify
google-services.jsonis in the correct location and the package name matches your app. - No notifications in background: Ensure the Firebase messaging service is declared in your Android manifest.
- Wrong credential on SIP Connection: Check the Telnyx Portal → SIP Connection → WebRTC → Android section.
iOS-specific issues
- No push notifications: Confirm the VoIP push certificate matches your Bundle ID and is uploaded to the Telnyx Portal.
- App terminated on push: Report every VoIP push to CallKit on iOS 13+.
- Environment mismatch: Use sandbox for debug builds and production for release/TestFlight.
General
- Push works but no call invitation: The push notification signals an incoming call. Your app must reconnect to the socket after receiving the push so the SDK can receive the actual invitation.
- Multidevice: A user can register up to 5 push tokens across iOS and Android devices.
Next steps
- Push notifications overview — Multidevice support and architecture
- React Native SDK reference — Full SDK documentation
- Mobile Push Credentials API — Manage credentials programmatically
Tutorials
JS SDK Demo App
Source: https://developers.telnyx.com/docs/voice/webrtc/js-sdk/demo-app.mdTo lower onboarding barrier, a JS SDK demo app was built and made accessible at webrtc.telnyx.com. To use it, complete the following procedure. Instead of portal.telnyx.com screenshots being displayed, only API requests are presented, as frequent UI improvements render this page out of date.
Pre-req 1: Account Balance
Sign up and top up the account with a small amount of credit, e.g. $5.Pre-req 2: Outbound Voice Profile (OVP)
Pre-req 3: Credential Based SIP Connection
outbound_voice_profile_id is the id returned in the previous API request.
Pre-req 4: Phone Number
For ease of activation, choose US or CA phone numbers as there exists no regulatory requirements for their immediate use.connection_id from the previous step.
pending in the immediate response. After a short wait, poll the order status.
status is success before proceeding.
Setting Up and Using the Demo App
Follow this instruction to create a telephony credential. The demo app should have the following configuration- “Authentication” → “Credential”
- “SIP Username” → from telephony credential
- “Password” → from telephony credential
- “Caller ID Name” → purchased phone number in +E164 format
- “Caller ID Number” → purchased phone number in +E164 format
registered in the log to the right.
Making Call
To make an outbound call, put the destination phone number in +E164 format. Ensure the destination country is in thewhitelisted_destinations of the configured OVP.
Receiving Call
Open another tab and successfully register another client. From that client, dial[xxx]@sip.telnyx.com where xxx is the sip_username of the telephony credential of the first client. It starts with gencred.

Additional Resources
- Anatomy of the JS SDK.
- OVP API Reference
- Credential Based Connection API Reference
- Number Searching API Reference
- Number Order API Reference
JS SDK Anatomy
Source: https://developers.telnyx.com/docs/voice/webrtc/js-sdk/anatomy.mdWhile some differences exist between the JS SDK and the mobile SDKs, they follow a similar client lifecycle and call flow. The JS SDK demo app is used here as it’s far easier to set up the application (just load up webrtc.telnyx.com) and perform debugging using browser tooling.
Overview
The SDK does two main things:- Establishes an active websocket connection to send and receive signaling messages to and from rtc.telnyx.com.
- Establishes a media session for a call
Client Instantiation & Authentication
- Go to webrtc.telnyx.com
- Right click; Inspect; Select Network tab and filter WS traffic
- Follow this page to successfully register the demo app.
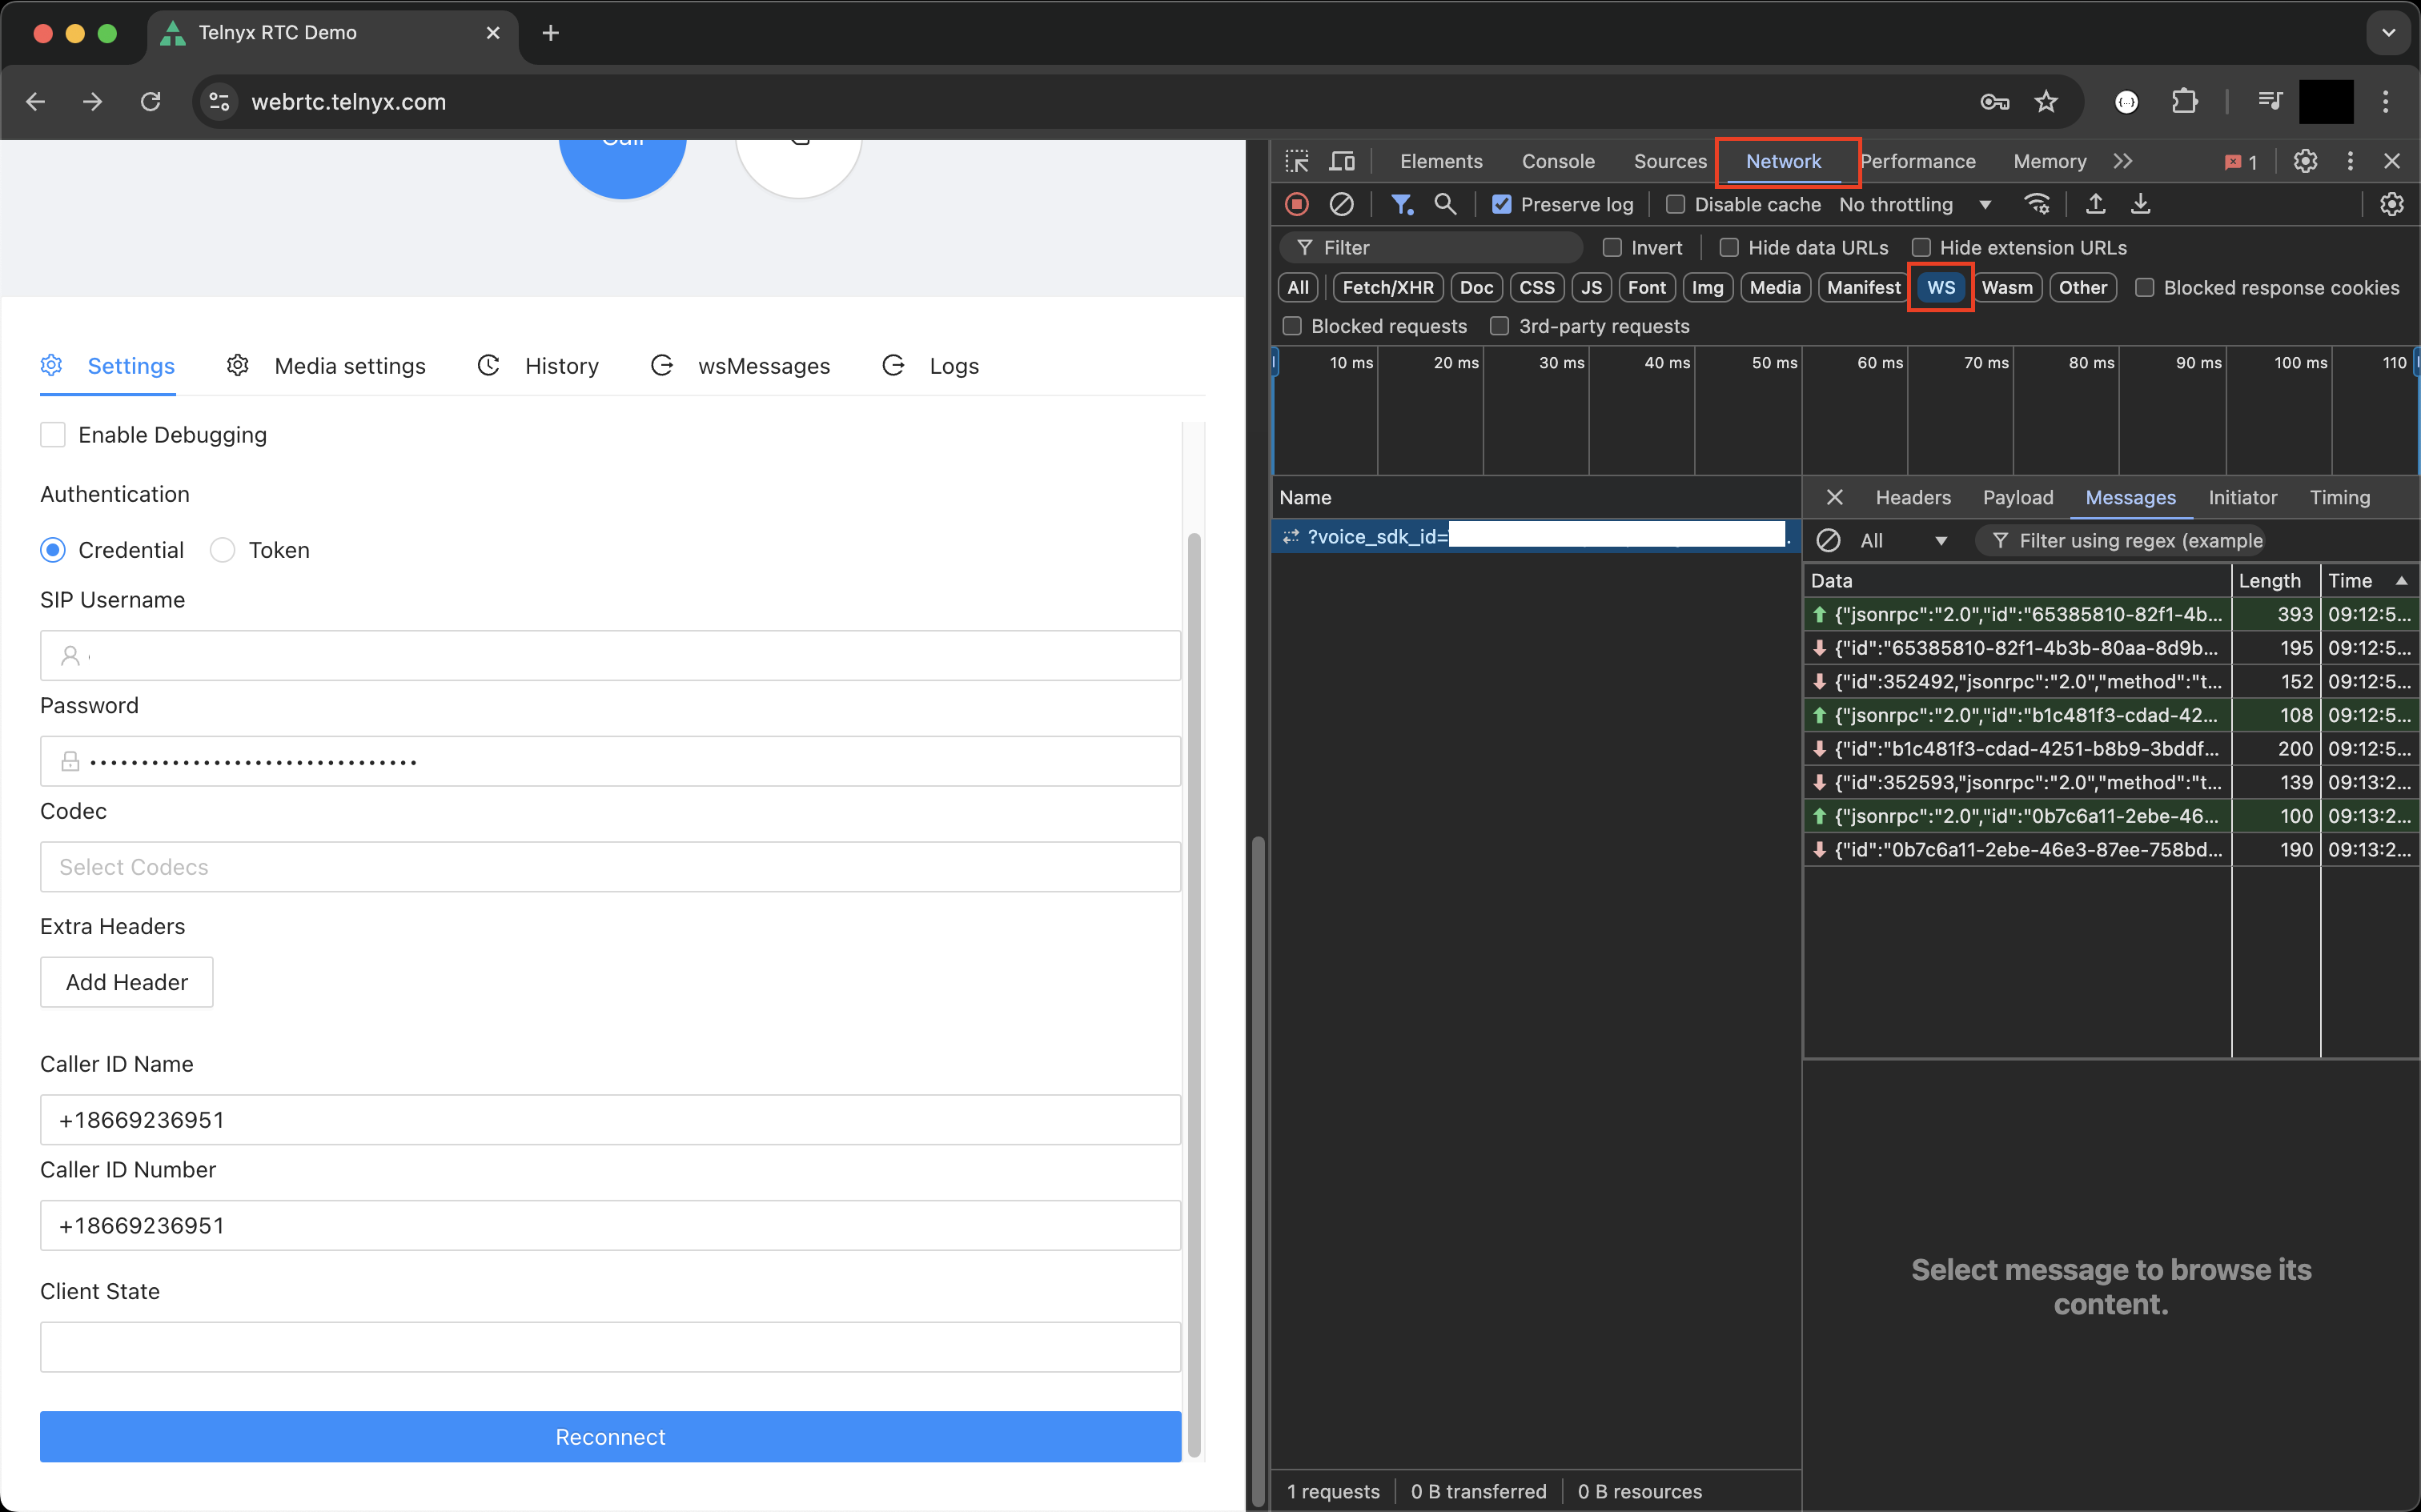
- creates a session object and
- registers handlers for all 4 socket events
connect method on the SDK client …
- Initiates a WebSocket connection to rtc.telnyx.com
- Once the socket is open, the login message is sent to rtc.telnyx.com.
- A
telnyx_rtc.clientReadyevent from rtc.telnyx.com triggers atelnyx_rtc.gateStatequery from the SDK client - A
REGEDevent from rtc.telnyx.com bubbles up astelnyx.ready.
Call Initiation
- In another tab, open chrome://webrtc-internals/
- Fill in “Call destination” with +18008648331 (United Airlines IVR)
- Click “Call”
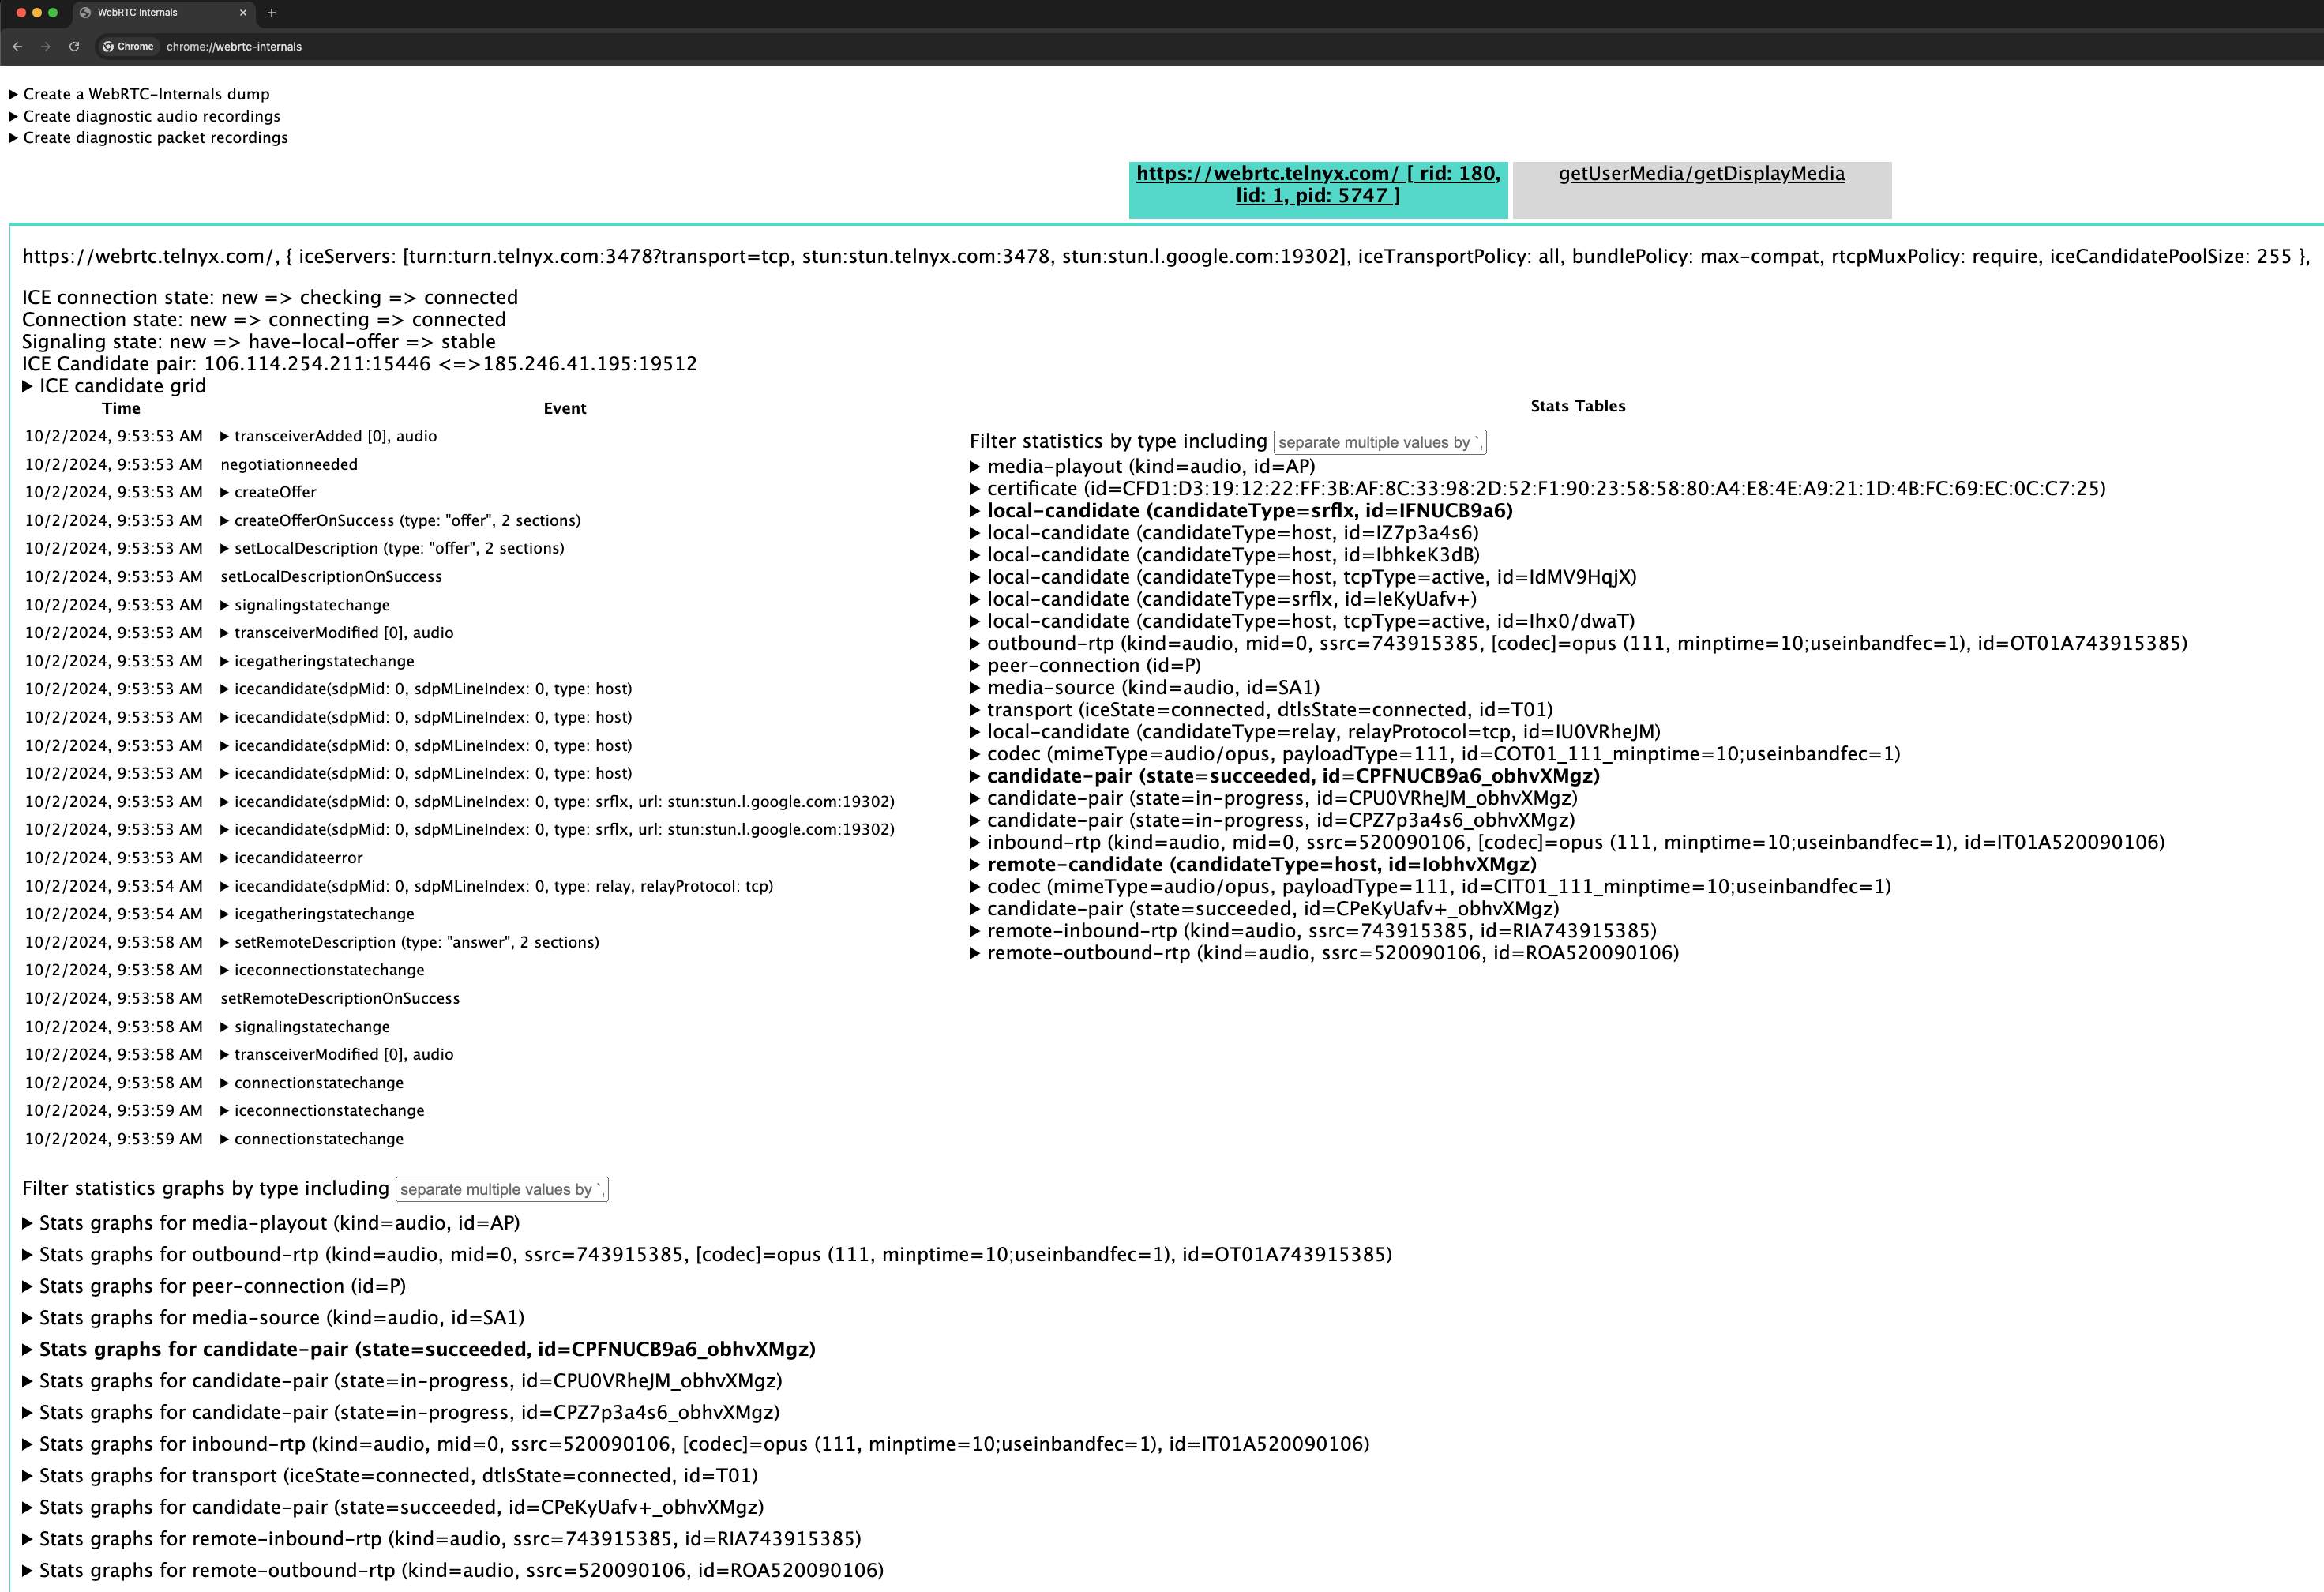
RTCPeerConnectionis instantiated.getUserMediais invoked to obtain user’s permission for audio and eventually theMediaStream
addTransceiveris invoked to add the local stream to the sender of theRTCPeerConnection.
- The previous step triggers the
negotiationneededevent.
- In the event handler, the SDK invokes
createOffer.
- This API call will eventually create a
RTCSessionDescriptionwith information on the local media stream.
- The SDK will then invoke the
setLocalDescriptionto set the SDP of the client peer.
- Concurrently,
createOfferalso kicks off the ICE candidate gathering.
- When all is done,
icecandidateevent triggers withcandidate = nullto indicate the process is completed. Subsequently, the existing local SDP parameters are augmented with the ICE candidates. - At this point, all necessary info are present to send the invite to rtc.telnyx.com.
- As a result, on the websocket, Message #1 through #4 are observed.
- At Message #5, rtc.telnyx.com sends over its SDP in the
telnyx_rtc.mediaevents. - Upon receipt of this message, the SDK invokes
setRemoteDescriptionto set the SDP of the remote peer.
- Finally, two peers of the
RTCPeerConnectionare fully identified. connectionState changes from connecting to connected.
- Media will flow over UDP.
Use Cases
Contact Center (CCaaS)
Source: https://developers.telnyx.com/docs/voice/webrtc/use-cases/contact-center.md
Overview
In building a Contact Center as a Service solution leveraging Telnyx WebRTC, enable SIP connection credentials with Park Outbound Calls and webhook events for enhanced functionality and seamless communication flows.Key features
Webhook events- Monitor SIP connection events in real-time.
- Receive notifications for call events: dialing, answering, bridging, hang-up, voicemail completion.
- Primary/failover URL configuration for reliability.
- Temporarily hold calls until further instructions via Voice API.
- Enable additional processing or decision-making before connecting.
- Provide customizable call handling experiences.
- Utilize Telnyx’s call control capabilities (Voice API documentation).
- Issue commands based on webhook events: answer, play audio, bridge, transfer.
- Handle sophisticated workflows for call routing.
Inbound call flow
- User calls main number, answered with text-to-speech greeting.
- IVR menu presents options to mark call attributes (language, skills, department).
- Call transferred to queue, parked while waiting for agent.
- Auto-transfer to most idle agent or manual cherry-picking.
- Call recording initiated when agent answers.
- Call forwarded to multiple agents simultaneously with recording enabled.
- Additional call control: mute, hold, transcription, text-to-speech announcements.
Frontend implementation
Authentication
Agent desktop applications should have an authentication process implemented. We recommend using authentication tokens generated from individual telephony credentials created for each agent. When an agent logs in, the frontend app requests an authentication token from the backend, which is then used for subsequent API requests in the WebRTC client. When a call is received, you can see which agents are logged in with the on-demand generated credentials. Your call center service would use our Call Control API to dial each of the generated credentials to connect the caller with one of the available agents. Once agents are logged in, make sure your WebRTC client informs your call center backend that the agents are registered. This ensures the backend has a list of agents it can dial each time an inbound call is received to the main number. See more details in the User authentication section in the Backend implementation for the Voice API methods to be used on the backend side.Agent desktop application
Agent desktop application should support the following options: Agent status management: The agent should be able to report their current status, such as Available or Unavailable, so the backend application can see the currently available agents and decide which agent should receive the next call. Here is an example softphone application (WebRTC client) with an option to choose a preferred audio device.


Audio device settings
Get a list of available audio devices:Call control toolbar
Toggle microphone:Backend implementation
The backend application handles call routing, IVR logic, and agent management through Telnyx Voice API webhooks.User authentication
For each user, generate on-demand telephony credentials which should be stored in a database and associated with the user login. Agent desktop application should request an authentication token to be created based on the telephony credentials. Generate on-demand telephony credentials On-Demand Credentials help you onboard new customers or team members under your SIP connection, allowing you to separate each user with their own security credentials. This solution is ideal for integrating WebRTC into your own platforms, enabling your backend system to create outbound calls to each on-demand generated credential. You can use the optional parameterexpires_at if you would like to set an expiration time for the credentials.
Call flow
In the backend application, we can fully control the call flow from the initiation of the call up to the call disconnect event. Based on the webhook notification, we can decide what kind of actions should be applied to the call. To monitor the call and proceed with the call flow, we should monitor call event types received on the webhook URL. Having an integration with the CRM application, we can retrieve caller data, for instance based on the caller number:call.initiated webhook, you should answer the call and provide an initial greeting with IVR options using the speak option:
Next steps
- Review WebRTC authentication options.
- Explore Call Control API documentation.
- Learn more about webhook fundamentals.
Outbound Dialer
Source: https://developers.telnyx.com/docs/voice/webrtc/use-cases/outbound-dialer.mdBuild an automated outbound dialer system that enables agents to make high-volume outbound calls efficiently using Telnyx WebRTC and Call Control API.
Overview
In building an outbound dialer solution leveraging Telnyx WebRTC, enable SIP connection credentials with Park Outbound Calls and webhook events to combine front-end WebRTC functionality with backend voice application.Key features
Park Outbound Calls- Combine front-end WebRTC application with backend voice application using Telnyx Voice APIs.
- Enable advanced call flow control and routing.
- Learn more about Park Outbound Calls.
- Monitor SIP connection events in real-time.
- Receive notifications for call events: dialing, answering, bridging, hang-up, voicemail completion.
- Primary/failover URL configuration for reliability.
Required components
- WebRTC Client.
- Backend Server Application.
- SIP Connection with Park Outbound Calls Enabled (select TeXML option when using the TeXML approach).
Frontend implementation
In a typical front-end WebRTC application, there are many components that should be supported. Agent status management: The outbound dialer application should be able to display the agent’s current status, such as, but not limited to, Available, Unavailable, Busy, and Offline. This type of management should not only act as an indicator for other agents but also limit agents’ ability to transfer calls to unavailable agents. This status should also be correlated with the WebRTC client state. This means that when an agent’s status is set to available, the WebRTC client should be fully registered and ready to place outbound calls. This should be handled at a global level, typically using state management frameworks such as Global Context APIs or Redux. Here is an example softphone application (WebRTC client) with an option to change its current state.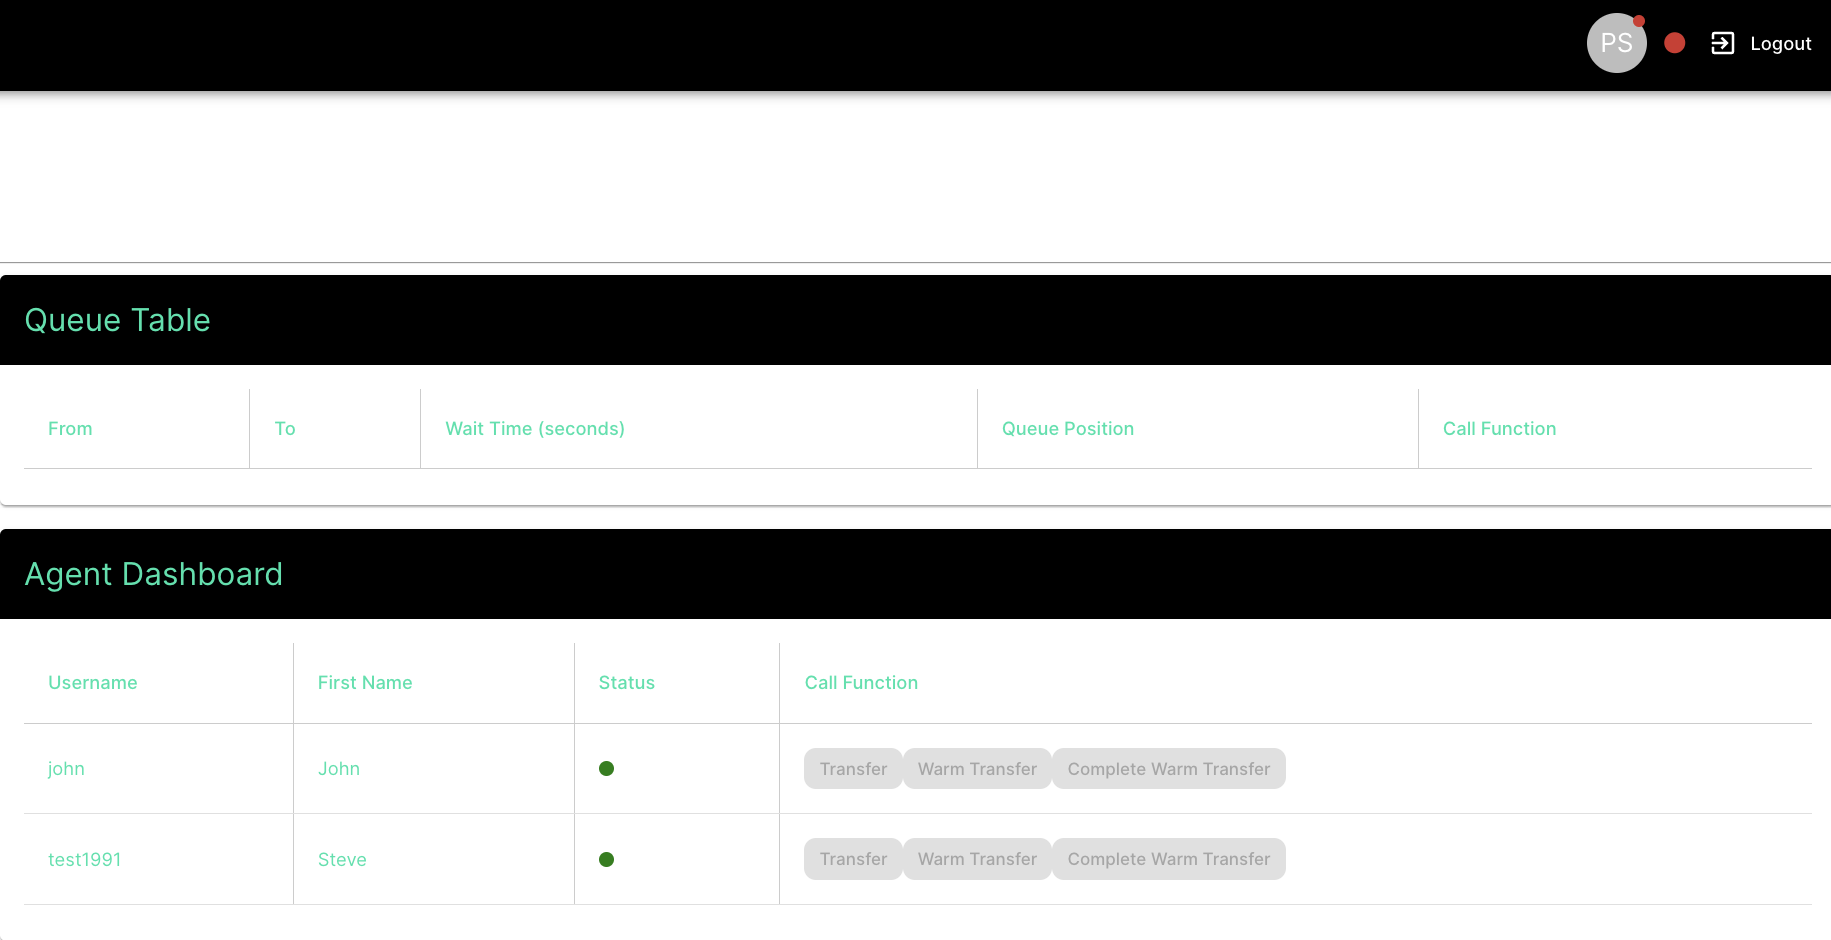
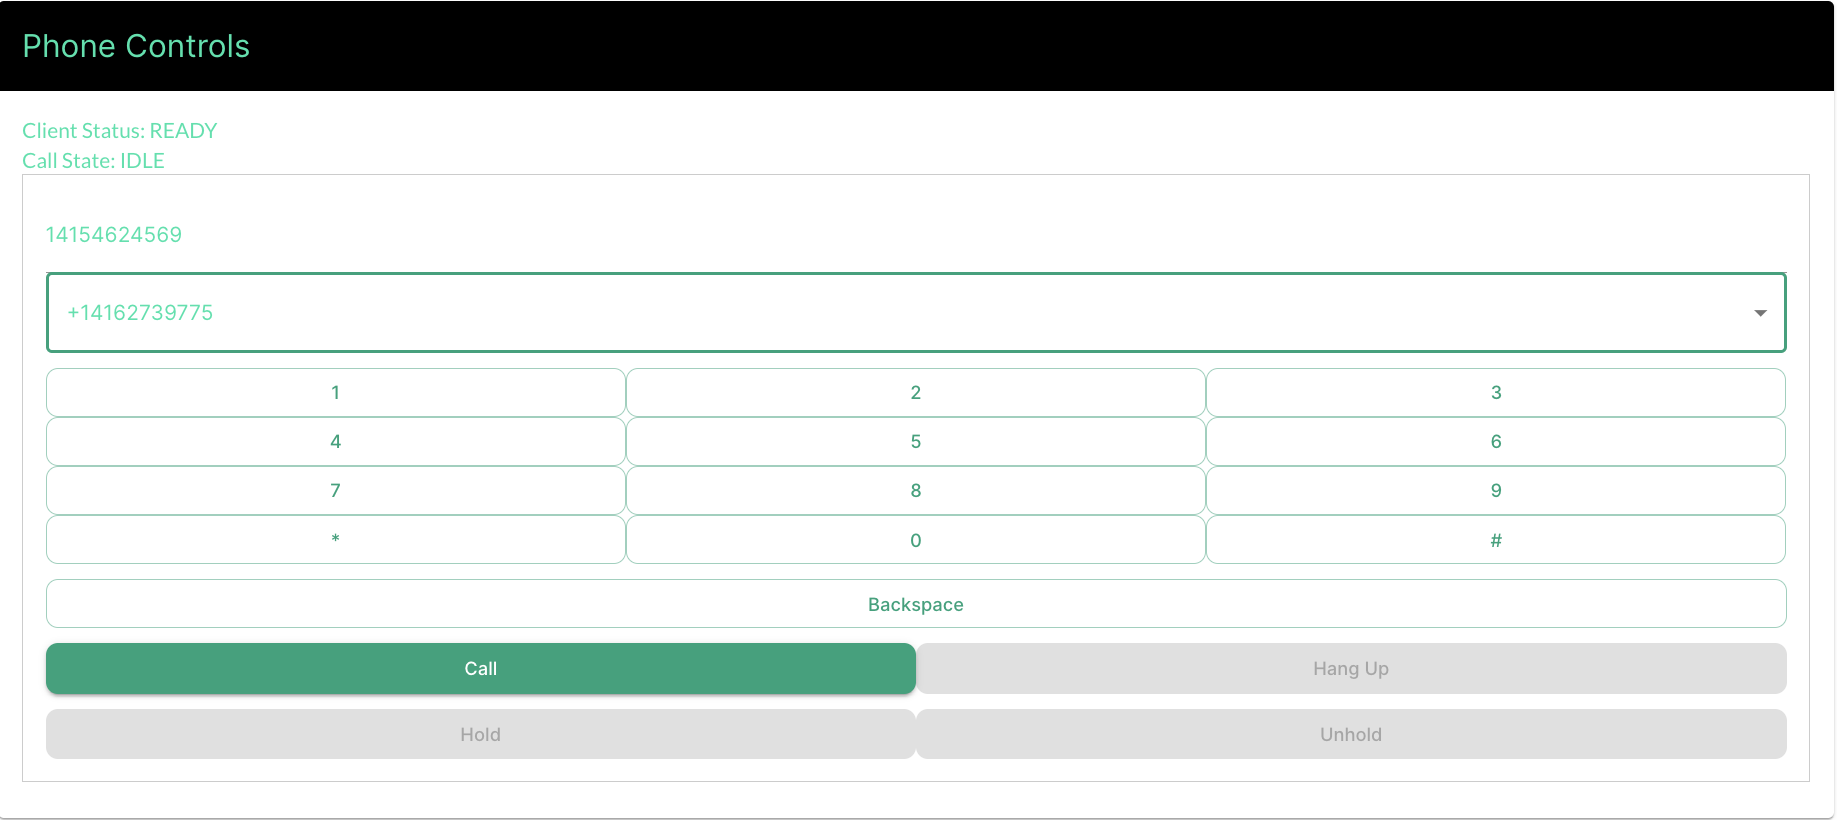
Backend implementation
The backend implementation is a crucial component of a successful call. The following sequence diagram covers a typical outbound call flow using Telnyx Voice API. Below the sequence diagram, I describe each step.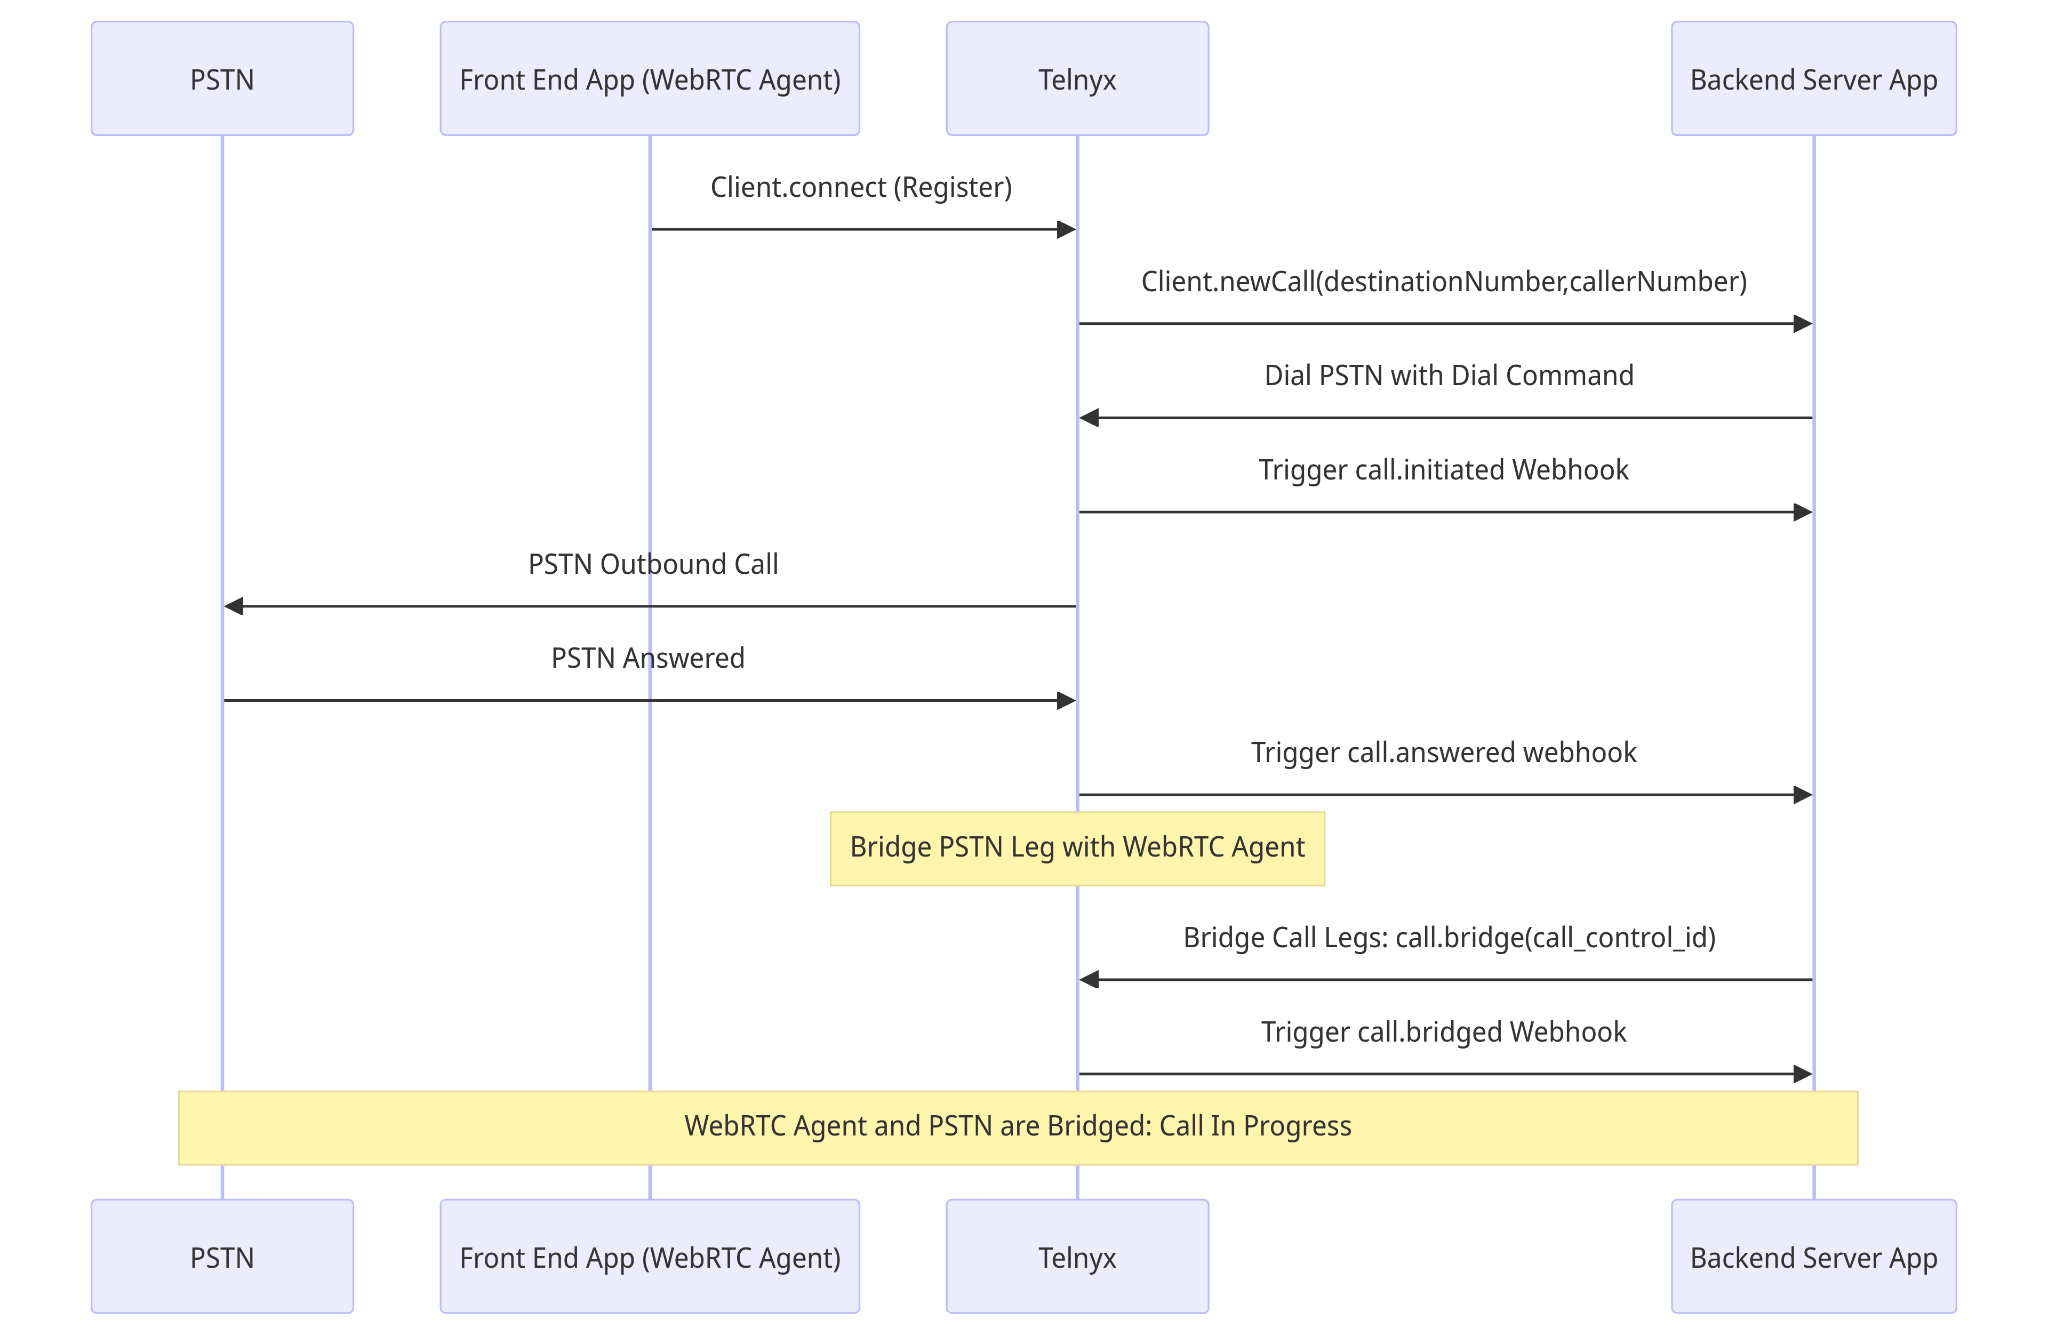
1. Client Registers with Telnyx
The process starts with the WebRTC client (the Front End App) connecting to Telnyx by sending aClient.connect (Register) request. This is essentially the WebRTC client registering with Telnyx to initiate communications.
2. Initiating a Call
Once the WebRTC client is connected, it requests to initiate a call by sending aClient.newCall(destinationNumber,callerNumber) method to Telnyx. The request requires the destination number and the caller number. This request is routed from the front-end WebRTC client application to the back-end server application, which acts as the intermediary between the client and Telnyx for controlling call logic.
3. Dialing PSTN (command)
The backend server then instructs Telnyx to dial the destination number in the PSTN using theDial PSTN with Dial Command. This command triggers Telnyx to initiate an outbound call to the PSTN.
4. Call Initiated (webhook)
Telnyx acknowledges the initiation of the call process by triggering acall.initiated webhook to the backend server. This webhook indicates that the call process has started but does not necessarily mean the call has been answered.
5. PSTN Outbound Call
Telnyx makes the outbound call to the destination number in the PSTN network.6. PSTN Answered (webhook)
When the PSTN destination answers the call, Telnyx sends a notification back to the backend server through acall.answered webhook, indicating that the call had been successfully answered on the PSTN side.
7. Bridging Call Legs (command)
After the call is answered, the next step is to bridge the call between the WebRTC client and the PSTN to enable two-way communication. The backend server sends a Bridge Call Legs:call.bridge(call_control_id) command to Telnyx, instructing it to connect the two call legs.
8. Call Bridged (webhook)
Once the call legs are successfully bridged, Telnyx triggers acall.bridged webhook to the backend server, indicating that the WebRTC agent and the PSTN call are now connected, and the call is in progress.
9. Call In Progress
With the bridge established, the WebRTC agent (the user on the front-end client) and the PSTN participant can now communicate. This state continues until either party terminates the call. If the call is ended, Telnyx triggers acall.hangup webhook. An example call.hangup event is provided below.
1. Client Registers with Telnyx
The process starts with the WebRTC client (the Front End App) connecting to Telnyx by sending aClient.connect (Register) request. This is essentially the WebRTC client registering with Telnyx to initiate communications.
2. Initiating a Call
Once the WebRTC client is connected, it requests to initiate a call by sending aClient.newCall(destinationNumber,callerNumber) method to Telnyx. The request requires the destination number and the caller number. This request is routed from the front-end WebRTC client application to the back-end server application, which acts as the intermediary between the client and Telnyx for controlling call logic.
3. Dialing PSTN (command)
The backend server then instructs Telnyx to dial the first destination number. This command triggers Telnyx to initiate an outbound call to the PSTN.4. TeXML Dial Verb
The Url parameter hits a server that then instructs Telnyx using XML to dial the second PSTN transfer B-leg. The verb triggers Telnyx to initiate an outbound call to the second PSTN leg.Next steps
- Review WebRTC authentication options.
- Explore Call Control API documentation.
- Learn more about webhook fundamentals.
Troubleshooting
Call Detail Records
Source: https://developers.telnyx.com/docs/voice/webrtc/troubleshooting/detail-records.md
Searching for Records
Every call between a voice SDK client and Telnyx produces awebrtc detail record. They can be searched via this API.
For example, the following query returns webrtc detail records of calls made
- to/from any clients registered with
myagent01username - within
today
Interpreting Records
While most of the fields in the records are self explanatory, the following parameters are given additional exposition.IDs in the WebRTC Domain
session_ididentifies a session, i.e. a successful registration, between an SDK client and Telnyx.call_id- identifies a call between an SDK client and Telnyx
- can be generated by the SDK client or Telnyx
- has a many-to-one relationship to a session, i.e. a session can have many calls.
call_id is essential to locate the debug log produced by an SDK client. This is further explained here.
IDs in the SIP Domain
The following IDs can be used to identify the SIP leg of a voice SDK call.telnyx_leg_idtelnyx_session_idfs_channel_id
IDs in the Programmable Voice Domain
If programmable voice (call control or TeXML) is used in the call flow, e.g. parking the outbound webRTC call, the following ID may also be returned in the detail record.telnyx_call_control_id
Debug Logs
Source: https://developers.telnyx.com/docs/voice/webrtc/troubleshooting/debug-logs.mdThis is a beta feature. The data schema and/or presentation may change without notice. Debug data is collected on the SDK client. It provides empirical data on the call leg between SDK client and Telnyx.
Availability
Enabling Debug
Initialize the SDK client with debug set totrue and output set to socket.
Locating the Debug Data
When properly enabled, the SDK client will ship debug data frames to Telnyx over the websocket. The data frames are assembled into a singlejson file and stored in a Telnyx Cloud Storage bucket located in us-central-1 belonging to the user.
The bucket is named voice-sdk-debug-reports-[USER-ID] where USER-ID is the user’s account ID.
The objects are named following this schema [call_id]/rtc_stats_reports/[segment_id] where call_id is the ID identifying the call leg between the SDK client and Telnyx. In most cases, there is only one data segment. When there is a reconnect between the SDK client and Telnyx, there may be more than one data segment.
To illustrate the above point more concretely, consider this example:
- A call is made from a JS SDK client to a phone number.
- The WebRTC call record is located using the detail record API.
- Noting the
call_id, locate the data using Telnyx Mission Control portal or a properly configured AWS CLI.
prefix is the call_id.
Visualizing the Data
The data can be uploaded and visualized via https://webrtc-debug.telnyx.com/.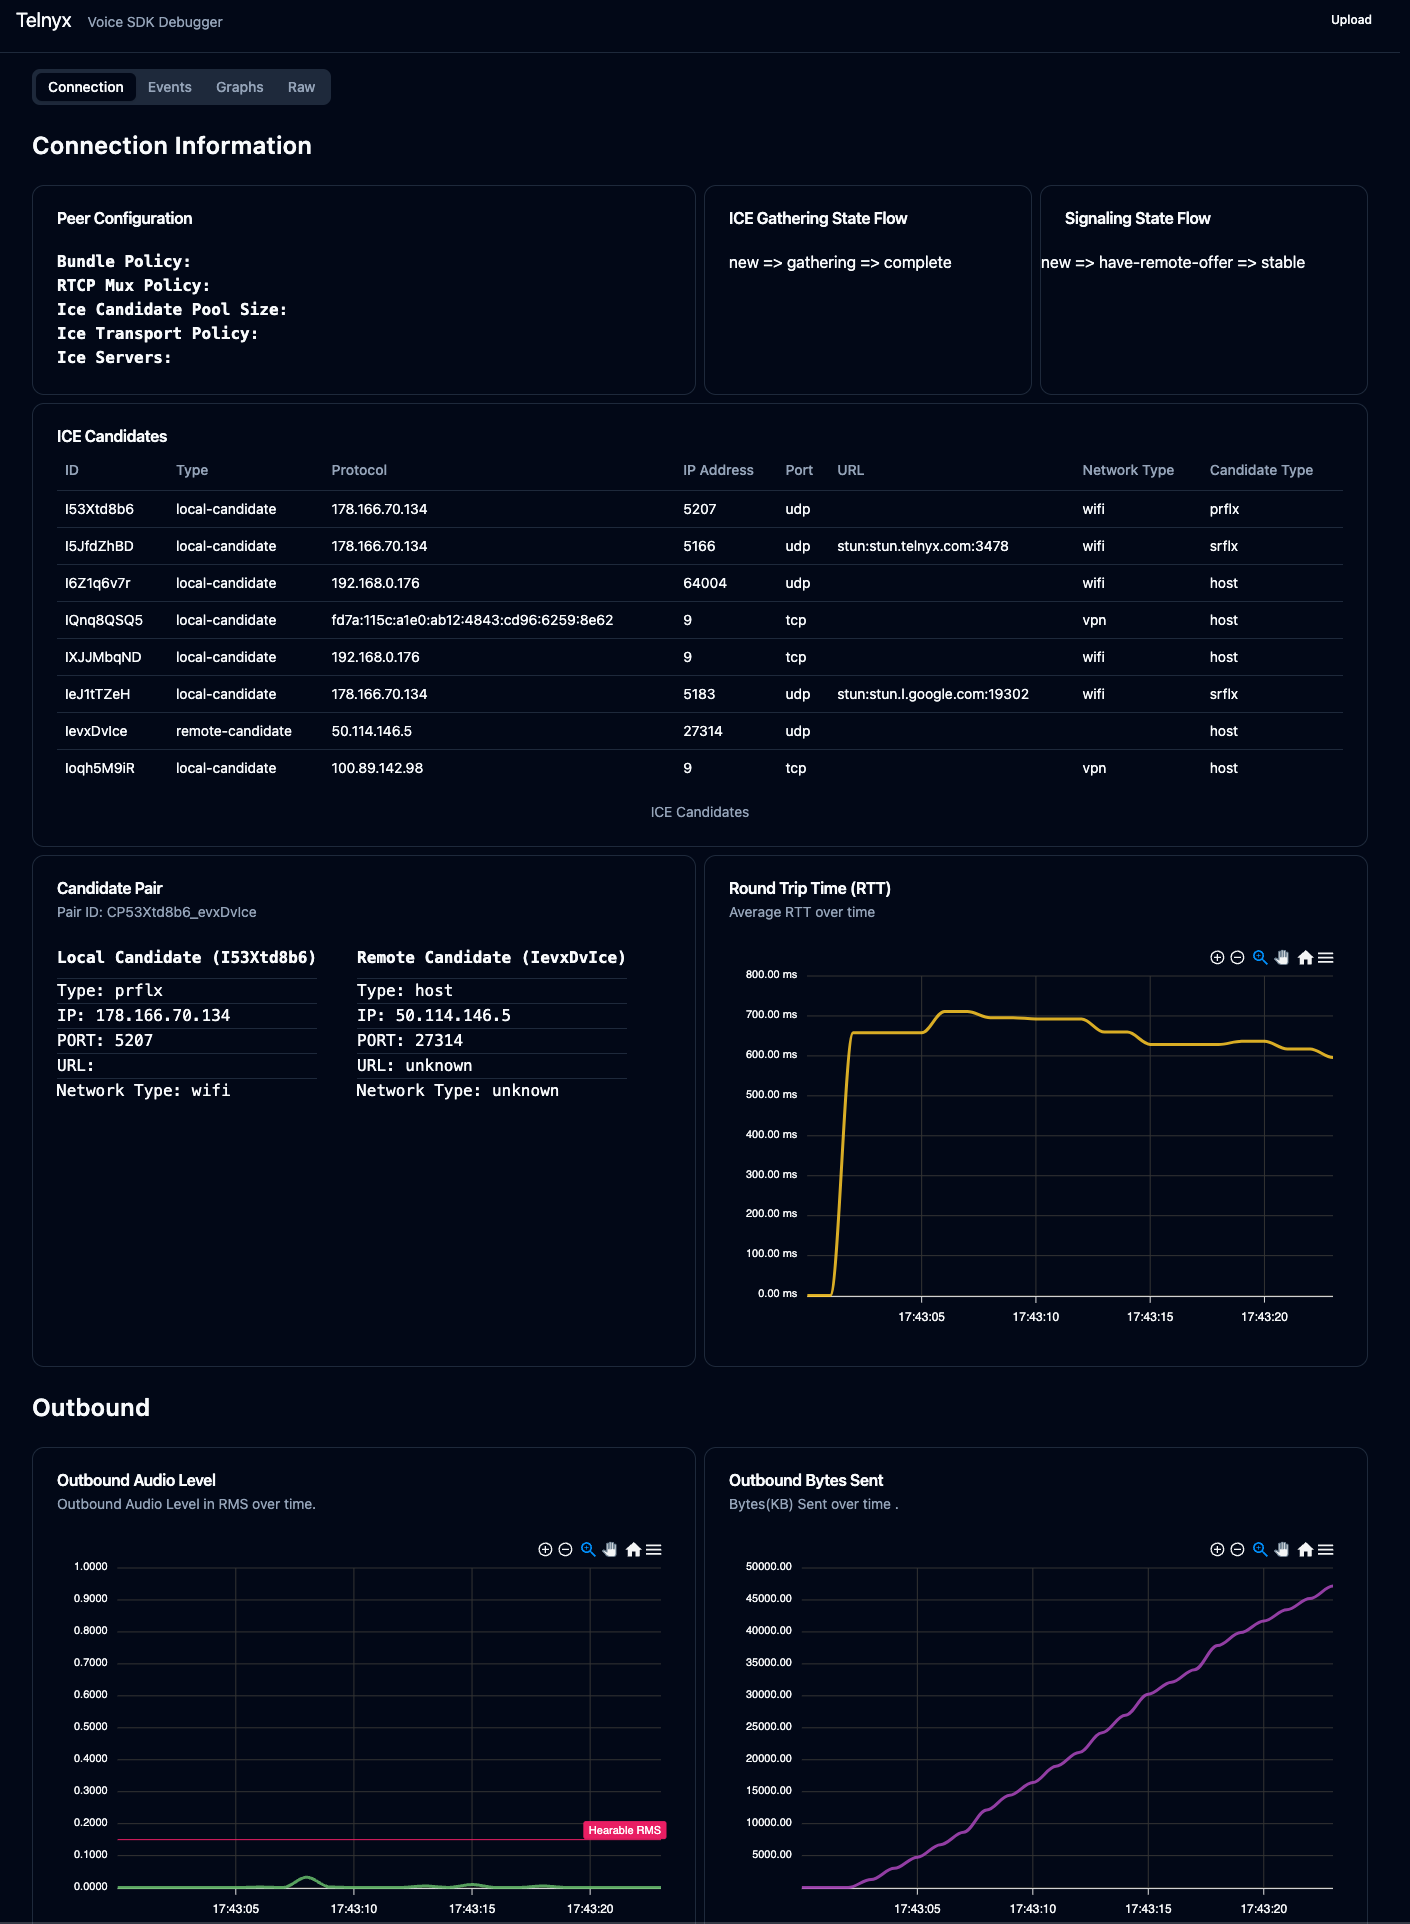
Interpreting the Data
The next section provides addition information on how to use the data to diagnose user issues.Interpreting Debug Data
Source: https://developers.telnyx.com/docs/voice/webrtc/troubleshooting/interpreting-debug-data.mdThis is a beta feature with limited availability by SDK type. Data schema and/or presentation may change without notification. To make full use of this guide, the reader is encouraged to complete the following steps in order to have a real world example to follow along.
- Initiates an outbound call from a properly configured
https://webrtc.telnyx.com/with debug enabled and data sent over socket. - Locate the debug data.
- Upload the data to
https://webrtc-debug.telnyx.com/.
Peer Configuration
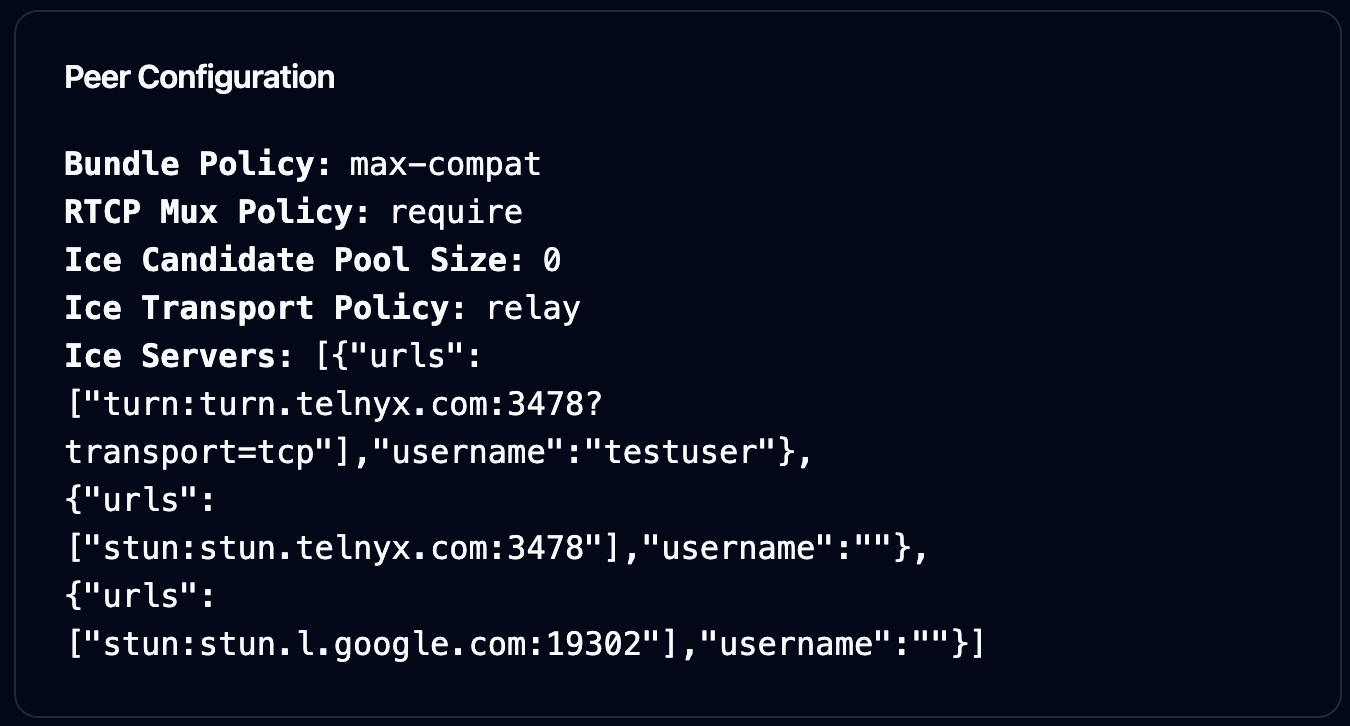
prefetchIceCandidates is disabled, the pool size is set to 0. Otherwise, it’s set to 255.
If forceRelayCandidate is enabled, then transport policy will be set to relay.
Lastly, by default, Telnyx SDKs use the following endpoints to gather ICE candidates.
stun.l.google.comstun.telnyx.comturn.telnyx.com
ICE Candidates & Candidate Pair
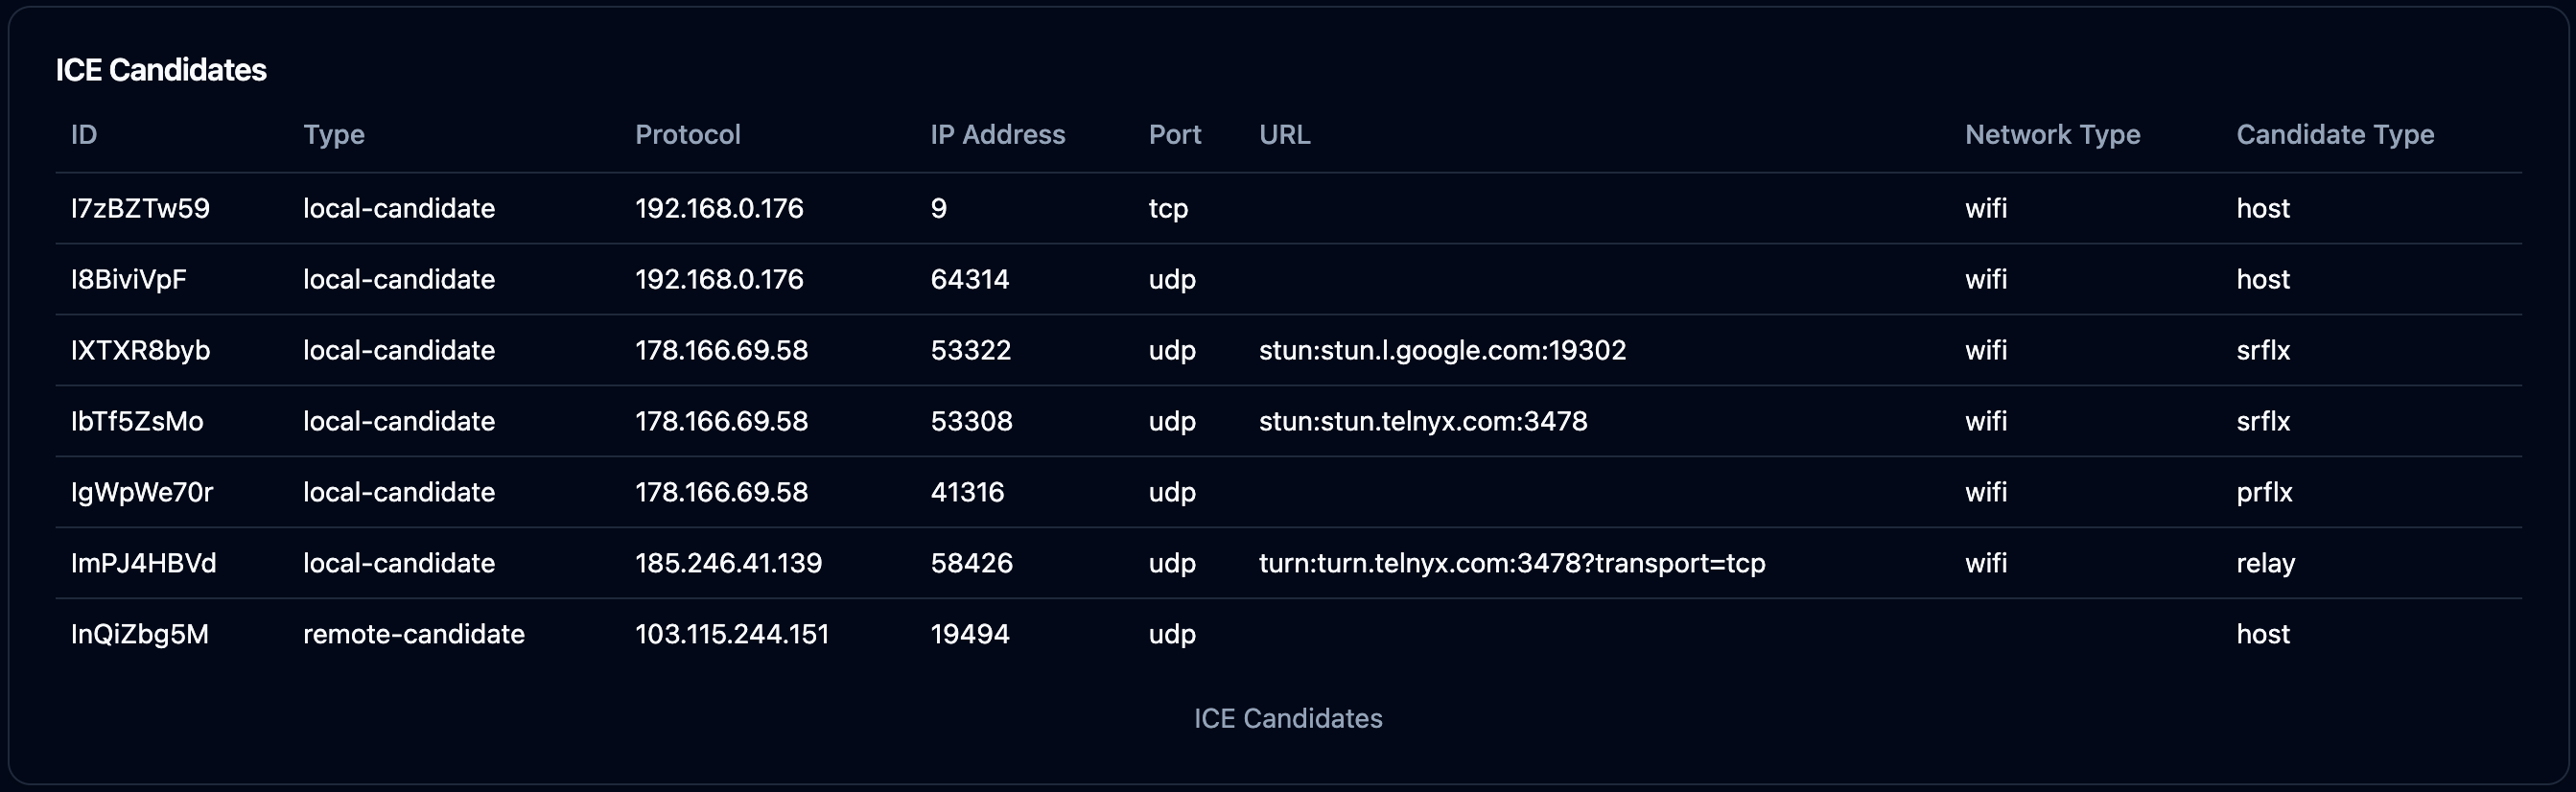
remote-candidate of host type offered. This represents the Telnyx’s end of the peer connection.
There will always be multiple local-candidate offered unless relay candidate was configured to be used.
For a call to be successfully established, at least one local-candidate of the following type must be present:
prflxsrflxrelay
host candidate type cannot be used to establish peer connection over the internet.
If no viable local-candidate are present, it’s highly likely that the SDK client is located on a very restrictive network where all UDP traffic is blocked and access to certain endpoints (turn.telnyx.com) are not allowed.
Barring that, there will be one pair of ICE candidates used for this call.
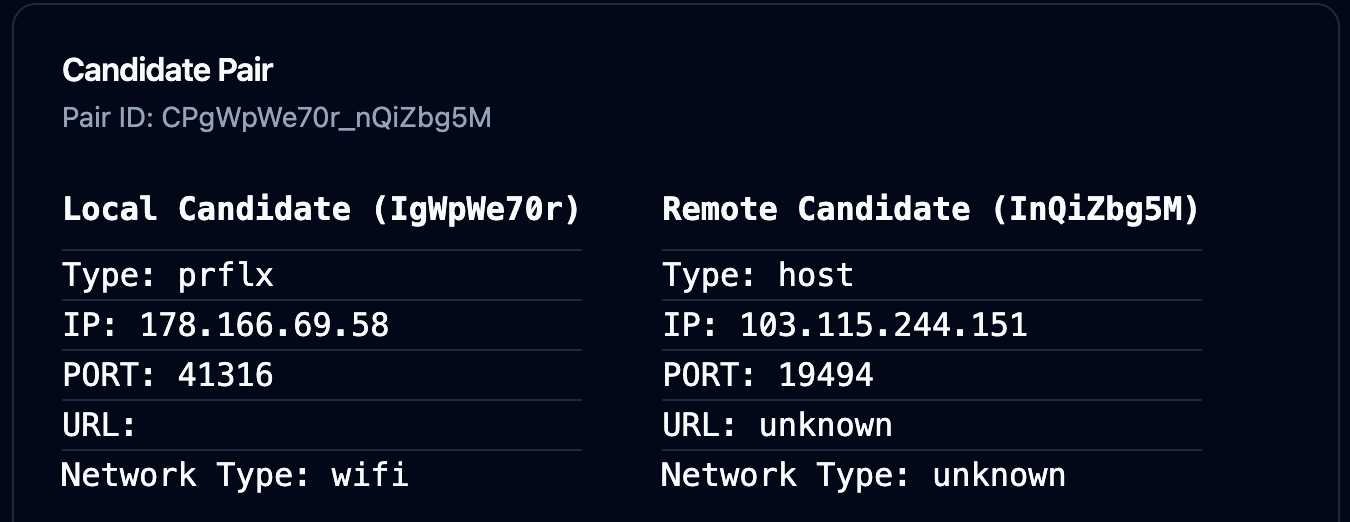
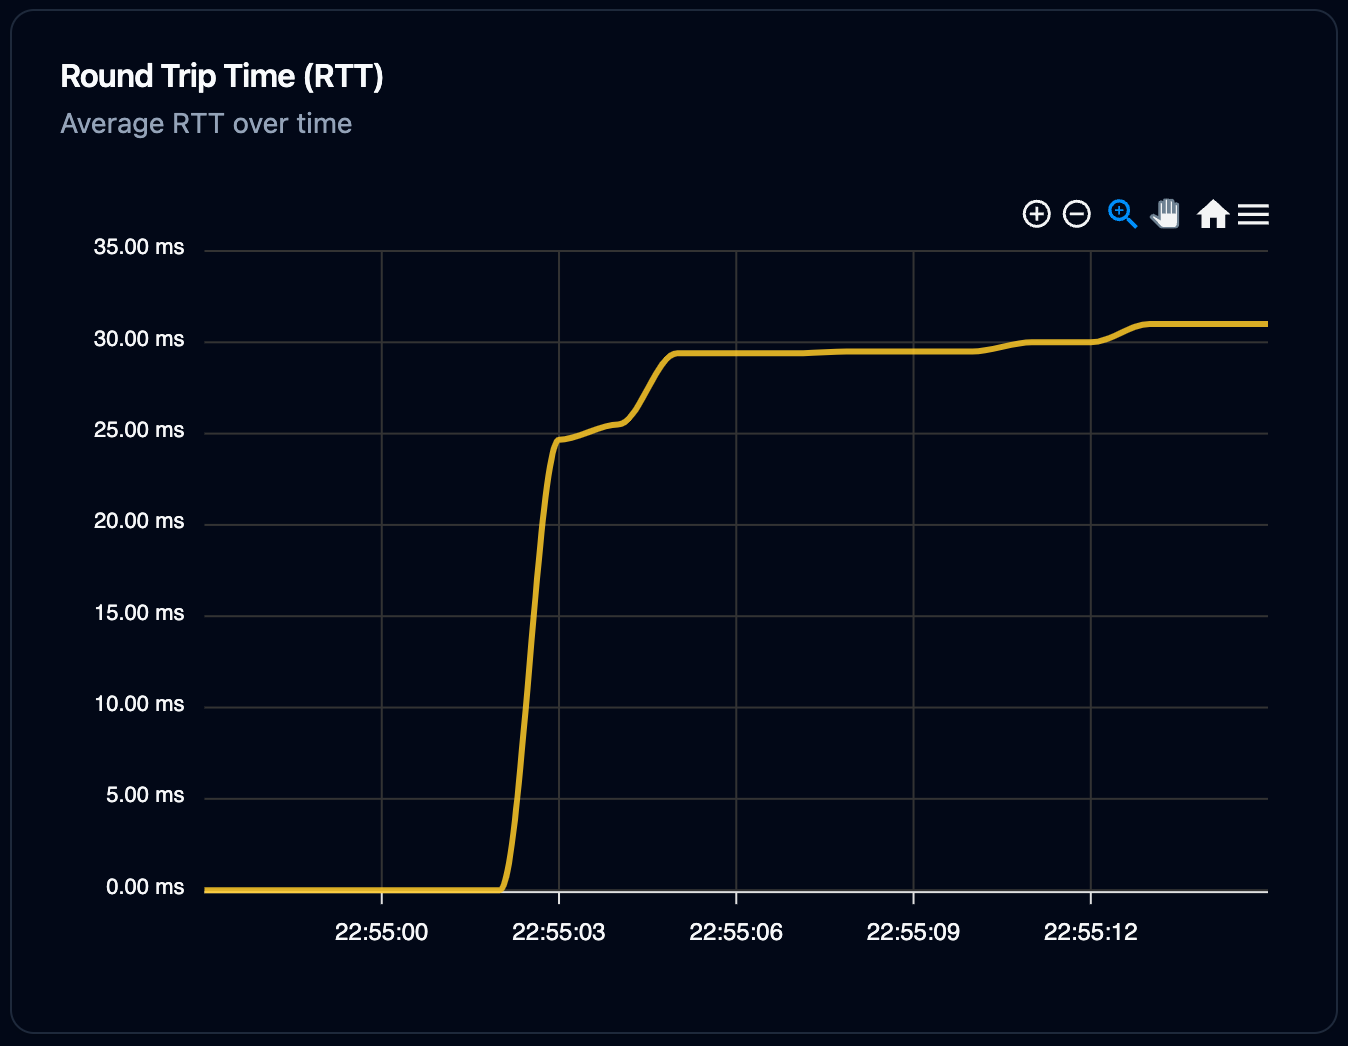
RTT
Packets Lost
A high packet lost value provides clues to skipped audio.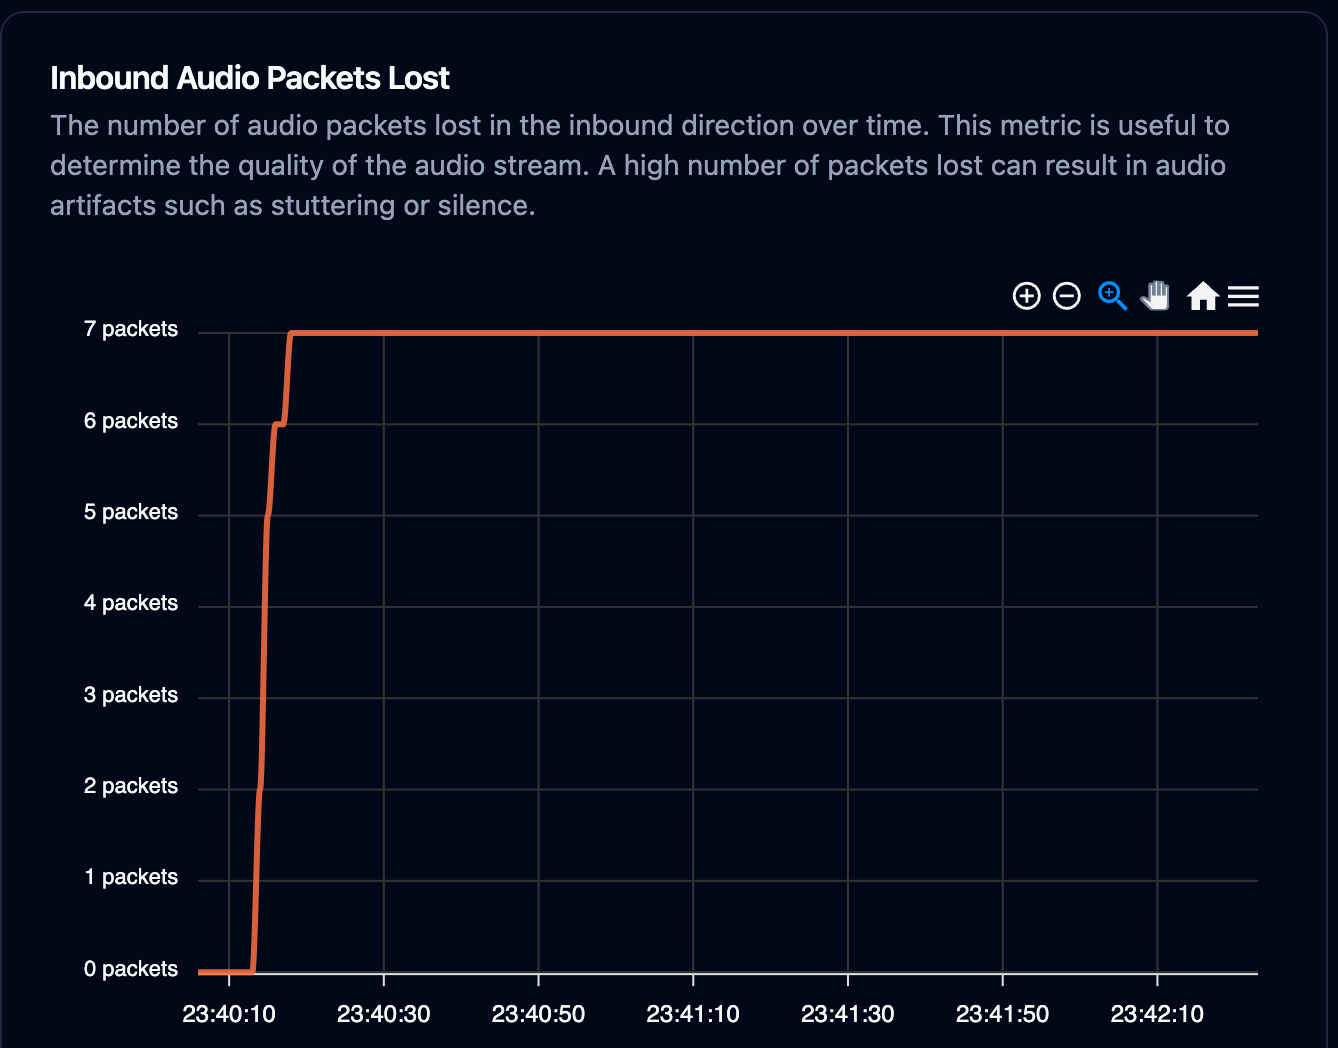
Jitter
A high jitter value provides clues to inconsistent audio quality throughout the call.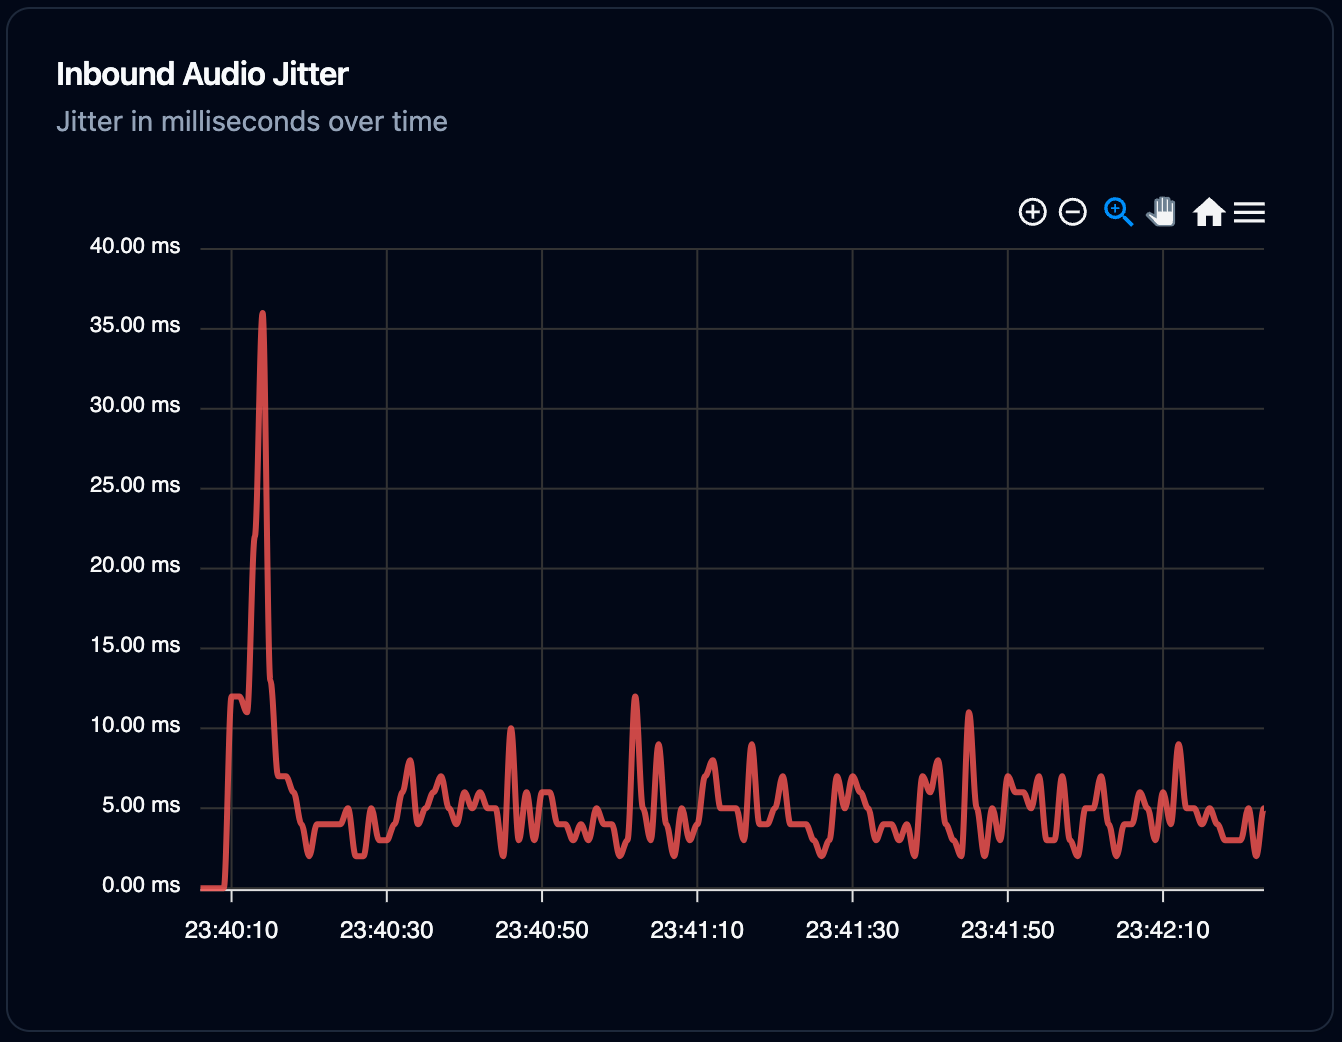
Other Useful Data
If the user is experiencing one way audio, it’s worth checking inbound and outbound audio level to corroborate the user’s claim.SDKs
WebRTC JS SDK quickstart
Source: https://developers.telnyx.com/development/webrtc/js-sdk/tutorials/make-your-first-call.md
Quickstart
Get the Telnyx WebRTC JS SDK running in your app — make your first call in under 5 minutes.Before You Begin
You’ll need:- A Telnyx account
- Node.js 16+ or a modern browser
Portal Setup
Set up everything you need in the Telnyx Portal — no API calls required. 1. Buy a number Go to Numbers → Buy Numbers in the Portal. Purchase a number in your desired country and area code. 2. Create a Credential Connection Go to Call Connections → Create → SIP Credential Connection. This defines how your WebRTC client authenticates with the SIP network. Give it a name and keep the defaults. 3. Create a Telephony Credential Go to Call Connections → [Your Connection] → Credentials → Create. Each user (or device) needs its own credential. Note the username and password — you’ll use these to generate a JWT. 4. Assign your number to the connection Go to Numbers → Your Numbers, select your number, and assign it to the Credential Connection you created. 5. Generate a JWT Still in the Credentials section, click Generate Token for the credential you created. Copy the JWT — this is what you’ll pass to the SDK aslogin_token.
For production, generate JWTs from your backend using the API. See Authenticating Your App for the full flow.
Install
Create a Client
The SDK connects to Telnyx via WebSocket and establishes WebRTC media sessions. Here’s the minimal setup:telnyx.ready before making calls. The client needs to establish a WebSocket connection and authenticate before it can place calls.
Authentication
The SDK supports three authentication methods:
JWT (Production):
Make an Outbound Call
Receive an Inbound Call
Play Audio
The SDK handles audio elements automatically, but you can provide your own:Handle Errors
Disconnect
Always disconnect when the user leaves or the app unloads:Next Steps
- Authentication — JWT generation, token refresh, security best practices
- Call State Machine — Understanding call lifecycle and state transitions
- Call Options — Custom headers, ICE config, media control
- Error Handling — Structured error codes and recovery
- Best Practices — Production checklist, performance, security
- Demo App — Full working reference application
Quick Reference
Build a Call Center Agent
Source: https://developers.telnyx.com/development/webrtc/js-sdk/tutorials/build-call-center-agent.md
Build a Call Center Agent
This tutorial walks you through building a fully functional call center agent interface. You’ll learn how to answer incoming calls, mute/unmute, and place calls on hold — the basics a real agent needs. Prerequisites:- Completed Make Your First Call
- A Telnyx account with a Credential Connection and JWT set up
- A phone number routed to your Credential Connection
- Receives incoming calls
- Shows caller ID
- Supports mute and hold
- Tracks call duration
-
Handles multiple calls with hold/resume
This SDK is client-side only. The WebRTC JS SDK handles real-time audio in the browser — it connects agents to calls, manages call state, and streams media. To route calls, create dial plans, or implement IVR logic, you need a backend application using:
- Programmable Voice (Call Control) — Build server-side call flows with the Telnyx API. Create calls, transfer, bridge, and play audio programmatically.
- TeXML — Telnyx’s markup language for voice applications. Define call flows in XML with verbs for dial, gather, play, say, and more.
Step 1: Set Up the HTML
Createagent.html:
Step 2: Connect and Authenticate
Add a<script> tag and connect:
Step 3: Handle Incoming Calls
Step 4: Answer and Reject
Step 5: Call Controls
Step 6: Render the Active Calls UI
Step 7: Call Timer
Step 8: Cleanup
What’s Next?
You now have a working call center agent interface. Here are ways to extend it: Client-side (this SDK):
Server-side (backend):
See Also
- Make Your First Call — Basic tutorial
- Programmable Voice — Server-side call management
- TeXML — XML-based voice applications
- Production Best Practices — Deployment guide
WebRTC JS SDK authentication
Source: https://developers.telnyx.com/development/webrtc/js-sdk/how-to/authenticating-your-app.md
Authentication
The Telnyx WebRTC SDK supports three authentication methods. Use JWT for all production applications.Overview
Use JWT (
login_token) for all production applications. Credentials (login + password) are long-lived with no automatic rotation. JWTs expire after 24 hours and can be refreshed via TOKEN_EXPIRING_SOON.
Method 1: JWT (Recommended)
JWT is the most secure authentication method. You generate a short-lived token on your backend and pass it to the SDK.How It Works
Step 1: Create a Credential Connection
Create a SIP Credential Connection in the Telnyx Portal or via API:Step 2: Create a Telephony Credential
Each user needs their own credential. Never share one credential across multiple users.Step 3: Generate a JWT
Generate the JWT on your backend — never on the client. This requires your API key.Step 4: Use JWT in the SDK
Token Refresh
JWTs expire after 24 hours. Handle theTOKEN_EXPIRING_SOON warning to refresh without dropping the connection:
TOKEN_EXPIRING_SOON warning fires ~1 hour before expiration.
Method 2: Credential (Development Only)
Uselogin + password for local development and testing only.
- Local development and testing
- Quick prototyping before setting up JWT infrastructure
- Production applications
- Multi-user scenarios where each user needs their own identity
- Any environment where you need automatic token rotation
login value is the sip_username from a Telephony Credential (e.g., gencrednb4ADiBVjsvgvxem0OwkeNfryiIwhaUSJMJXjiwY3Y). The password is set when creating the credential.
Method 3: Anonymous (AI Assistants)
Connect to an AI assistant without requiring a credential. Theanonymous_login option accepts an object specifying the target:
- Click-to-call widgets connecting users directly to an AI assistant
- Embedding voice AI in web apps without managing credentials
- Cannot receive inbound calls
- No SIP identity — calls are outbound to the specified AI assistant only
- Limited call control features
Continue a conversation
Pass aconversation_id to resume an existing conversation with the AI assistant:
Credential Hierarchy
Understanding how Telnyx auth resources relate to each other:- Credential Connection — SIP-level configuration (transport, codecs, webhook)
- Telephony Credential — Individual identity (one per user)
- JWT — Short-lived token generated from a credential
Common Mistakes
Server-Side Token Generation
Here’s a complete Node.js/Express endpoint for generating JWTs:See Also
- IClientOptions — Full client configuration
- Quickstart — Get started in 5 minutes
- Credential Connections API — Create connections via API
- Telephony Credentials API — Manage credentials via API
- Create Access Token API — Generate JWTs via API
- Best Practices — Security best practices
Network Connectivity Requirements
Source: https://developers.telnyx.com/development/webrtc/js-sdk/how-to/configure-network-firewall.md
Network Connectivity Requirements
For the Telnyx WebRTC JS SDK to function properly, the client must be able to reach Telnyx’s signaling and media infrastructure.Overview
The SDK requires connectivity to three types of endpoints:Signaling
The SDK uses a persistent WebSocket connection for call signaling (invite, answer, hangup, etc.).
Requirements:
- Outbound WebSocket connections must be allowed on port 443
- No HTTP long-polling fallback — WebSocket is required
- Connection must remain open for the duration of the session
env property, but this is not recommended for production.
STUN
STUN servers help the client discover its public IP address for ICE negotiation.
The SDK automatically uses these STUN servers. No configuration required.
TURN
TURN servers relay media when direct peer-to-peer connectivity is not possible (e.g., symmetric NAT, restrictive firewalls).
The SDK automatically provisions TURN credentials. No manual configuration required.
UDP vs TCP vs TURNS/443:
- UDP (preferred) — Lower latency, better for real-time audio
- TCP (fallback) — Higher latency, used when UDP is blocked
- TURNS over 443 (last resort) — TURN over TLS on port 443, used when both UDP and TCP/3478 are blocked by restrictive firewalls or proxies
turns:turn2.telnyx.com:443) in addition to the existing TURN UDP/3478 and TCP/3478 entries. This provides a last-resort relay fallback for networks that block both UDP/3478 and TCP/3478 but allow outbound TCP/443.
Firewall Configuration
Minimum required rules
Optional but recommended
Media ports
RTP media uses dynamic ports allocated by the browser. These are ephemeral and cannot be whitelisted by port number. Instead:- Ensure TURN is accessible — TURN handles media relay when direct connectivity fails
- Allow UDP outbound to Telnyx media servers (the
remote_media_ipseen in SDP) - Don’t restrict outbound UDP to specific ports — this will break WebRTC
Restrictive Network Scenarios
STUN fails (error 701)
Symptom: Client cannot discover its public IP. Nosrflx or prflx ICE candidates.
Fix:
- Check firewall allows UDP to
stun.telnyx.com:3478 - If STUN is blocked, TURN may still work — the SDK falls back automatically
- If both STUN and TURN are blocked, calls cannot connect
TURN fails
Symptom: Client is on a restrictive network (symmetric NAT), can’t getrelay candidates.
Fix:
- Check firewall allows UDP to
turn.telnyx.com:3478 - If UDP is blocked, check firewall allows TCP to
turn.telnyx.com:3478 - If both UDP/3478 and TCP/3478 are blocked, TURNS over TLS on port 443 to
turn2.telnyx.comwill work — this is included in the default ICE server list since SDK v2.27.4 - If all TURN paths are blocked, use
forceRelayCandidate: trueto skip direct connectivity attempts:
Custom ICE servers with TELNYX_ICE_SERVERS
Starting with SDK v2.27.4, the SDK exports a public TELNYX_ICE_SERVERS catalog of ready-to-use ICE server entries. Import it and compose any combination into the iceServers option to override the defaults:
When you omit
iceServers, the SDK uses its built-in defaults (DEFAULT_PROD_ICE_SERVERS) which include STUN + TURN UDP/3478 + TURN TCP/3478 + TURNS/443. Providing an explicit iceServers array replaces the defaults entirely.
Corporate VPN
Symptom: Calls fail or have poor quality through VPN. Fix:- Whitelist
rtc.telnyx.com,stun.telnyx.com,turn.telnyx.com, andturn2.telnyx.comin VPN split-tunneling config - Ensure VPN doesn’t block UDP traffic to TURN servers or TLS to
turn2.telnyx.com:443 - Consider split-tunneling so WebRTC traffic bypasses the VPN
Docker / Container environments
Symptom: STUN errors, no ICE candidates, one-way audio. Fix:- Docker’s default bridge network (
172.xor10.x) can interfere with ICE candidate gathering - Use
--network hostmode for the container - Or configure the Docker network to use the host’s network stack
Testing Connectivity
Quick test
Open your browser’s DevTools console and run:Debug tools
- SDK debug mode: Set
debug: trueanddebugOutput: 'socket'in IClientOptions - Debug visualizer: Upload debug data to
https://webrtc-debug.telnyx.com/ - Call reports: Enable
enableCallReports: truefor programmatic access to ICE stats
Bandwidth Requirements
Recommended minimum bandwidth per call:
- Audio only: 100 kbps (including overhead)
- With video: 500-2000 kbps depending on resolution
See Also
- IClientOptions — ICE and network configuration
- Debug Data & Call Quality Analysis — Interpreting ICE and quality data
- Best Practices — Production deployment guide
- Error Handling — ICE and WebSocket error codes
Device Management
Source: https://developers.telnyx.com/development/webrtc/js-sdk/how-to/switch-audio-devices.md
Device Management
The Telnyx WebRTC JS SDK uses the browser’sMediaDevices API for audio device management. This guide covers selecting devices, switching mid-call, and handling permission changes.
Enumerate Devices
List available audio input and output devices:label is an empty string and deviceId is a placeholder.
Request Permissions
Before you can select a specific device, the user must grant microphone access:Select a Specific Device
When placing a call
Via ICallOptions constraints
Switch Devices Mid-Call
Replace the audio track on an active PeerConnection:replaceTrack() doesn’t require renegotiation — the switch is seamless. The remote party won’t hear a gap.
Speaker Output
Set the audio output device (sink) on the audio element:setSinkId() is not supported in all browsers. Safari does not support it as of 2026. Check typeof audioElement.sinkId !== 'undefined' before using.
Device Change Detection
Listen for device changes (headphones plugged in, Bluetooth connected, etc.):- Headphones plugged in → switch output to headphones
- Bluetooth headset disconnected → fall back to built-in speaker
- USB microphone connected → update device list
Mute vs Device Off
Don’t confuse muting with device management:Common Issues
”Device not found” after permission grant
Cause: The device list was cached before permission was granted. Labels and real device IDs are only available aftergetUserMedia().
Fix: Re-enumerate devices after permission is granted:
Echo or feedback
Cause: Speaker output is being picked up by the microphone (especially with built-in speakers + mic on laptops). Fix:- Use echo cancellation (enabled by default in most browsers)
- Recommend headphones for long calls
- Use
call.muteAudio()when not speaking
Device disappears mid-call
Cause: Bluetooth disconnected, USB device unplugged. Fix:- Listen for
devicechangeevents - Fall back to the default device:
See Also
- Call Class —
muteAudio(),unmuteAudio() - ICallOptions —
localStreamfor custom device selection - Best Practices — Production deployment guide
Manage Multiple Calls
Source: https://developers.telnyx.com/development/webrtc/js-sdk/how-to/manage-multiple-calls.md
Manage Multiple Calls
The Telnyx WebRTC JS SDK supports multiple simultaneous calls within a singleTelnyxRTC client session. This guide covers concurrent call management, per-call media elements, call waiting, hold/transfer patterns, and the warnings the SDK emits when multiple calls are active.
The SDK does not recommend having multiple active calls simultaneously and cannot guarantee stable behavior in all scenarios. The supported pattern is accepting and holding an inbound call while finishing an active one — the SDK handles this well. Running two fully active calls at the same time (both with bidirectional audio) is not recommended and may produce unpredictable media or signaling behavior.
Overview
A singleTelnyxRTC instance connected to rtc.telnyx.com can have multiple active calls at the same time. Each call has its own:
- Call ID (
call.id) — unique per call leg - Direction (
call.direction) —inboundoroutbound - State (
call.state) —ringing,trying,active,held,hangup,destroyed - PeerConnection — independent
RTCPeerConnectionper call - Media element —
remoteElement/localElement(see Per-call media elements)
Per-call media elements
Starting with SDK v2.27.4, you can assign a distinctremoteElement (and localElement) per call. This is essential for concurrent calls — without it, all calls share the same audio element and the SDK emits a SHARED_REMOTE_ELEMENT_OVERWRITE warning when a second call overwrites the first call’s stream.
Why per-call elements matter
Outbound calls
PassremoteElement at call creation:
Inbound calls
PassremoteElement when answering:
Backward compatibility
Omitting the per-call params keeps the session-levelclient.remoteElement as the fallback default. This is backward compatible with existing single-call integrations — no changes are needed for apps that handle only one call at a time.
Call waiting
When a second inbound call arrives while a call is already active, the SDK emits aMULTIPLE_ACTIVE_CALLS_DETECTED warning (33010). This is diagnostic only — the SDK does not block the second call.
Accept the second call
Reject the second call
Hold and switch between calls
Usehold() and unhold() to switch between concurrent calls:
hold() sends a re-INVITE to the remote party to pause media. The call stays in the held state and can be resumed with unhold().
Warnings for multiple calls
See Error Handling for the full warning reference.
Transfer
Blind transfer and attended transfer work with multiple calls. To perform an attended transfer:Server-dialed consult leg (auto-answered second inbound call)
Some attended-transfer and consult flows are driven from the server: while the agent is on their customer call, Call Control dials the agent’s own credential as a second leg and the client auto-answers it. Because both legs are inbound calls on the same single registration, this depends on the SDK allowing a secondanswer() for a distinct call ID.
In v2.27.0–v2.27.3 this second answer() was silently ignored: the
duplicate-answer guard keyed on any other active inbound call, so the second
leg stayed ringing with only a DUPLICATE_INBOUND_ANSWER (33007) warning
and no error or state change (webrtc#726).
v2.27.4 fixes this — the guard is scoped per call ID, so answering a
genuinely distinct second inbound call proceeds normally. The previous
call.options.attach = true workaround is no longer needed.
Auto-answer the server-dialed leg when it rings (identify it however your
backend marks it — e.g. a custom SIP header):
DUPLICATE_INBOUND_ANSWER (33007) warning now fires only when the same
call ID is answered twice (for example a duplicate WebSocket registration of the
same leg); it is warning-only and never tears down established media.
Best practices for concurrent calls
- One active call at a time — the SDK does not recommend having two fully active calls simultaneously. Use hold to manage the active call and accept/hold an inbound call while finishing the active one.
-
Assign distinct
remoteElementper call — use separate<audio>or<video>elements for each call to avoidSHARED_REMOTE_ELEMENT_OVERWRITEwarnings and ensure independent playout lifecycles. -
Track calls by ID — use
call.idas the key in your application state. The call ID may change after reconnection (see recoveredCallId). -
Clean up on
destroyed— remove call references from your state whencall.state === 'destroyed'to prevent memory leaks. -
Use
hold()before answering — when accepting a second call, hold the first call first to avoid overlapping audio. -
One
TelnyxRTCinstance — keep a single client instance per tab/session. Multiple instances with the same credential causeDUPLICATE_INBOUND_ANSWERwarnings.
See Also
- Framework Integration — Per-call
remoteElementin React, Vue, Angular - Error Handling — Warning codes for multi-call scenarios
- Handle Reconnection — How calls survive reconnection
- IClientOptions — Client configuration
- ICallOptions — Call options including
remoteElement
Call Report Stats
Source: https://developers.telnyx.com/development/webrtc/js-sdk/how-to/monitor-call-quality.md
Call Report Stats
The Telnyx WebRTC JS SDK can automatically collect WebRTC statistics during and after calls. Use call reports to monitor quality, diagnose issues, and build real-time quality indicators.Enabling Call Reports
Real-Time Stats (telnyx.stats.frame)
Fires periodically during an active call (every callReportInterval ms):
StatsFrame Properties
Quality Thresholds
Building a quality indicator
Quality warning events
The SDK also emits structuredtelnyx.warning events when quality or connectivity thresholds are crossed. Use these warnings to drive user-facing indicators and collect diagnostics without parsing raw stats yourself:
LOW_LOCAL_AUDIO means RTP may still be flowing, but local microphone level is too low or silent. Ask the user to check microphone selection, mute state, and operating system input gain.
ICE_CANDIDATE_PAIR_CHANGED means the selected ICE path changed mid-call. The call may continue normally, but frequent changes are useful diagnostics for VPN changes, Wi-Fi handoffs, NAT rebinding, or relay fallback.
End-of-Call Report (telnyx.stats.report)
Fires when a call ends with a summary of the entire call:
Call Report Stats API
For SDK 2.25.20+, call reports are also available via HTTP API:API Response Structure
Key Fields for Diagnostics
Diagnosing Issues from Call Reports
DTLS stuck (“connecting”)
All relay candidates
forceRelayCandidate: true.
No candidates at all
stun.telnyx.com and turn.telnyx.com. See Network Requirements.
See Also
- IClientOptions —
enableCallReports,callReportInterval - Best Practices — Quality monitoring guidance
- Network Requirements — ICE/STUN/TURN configuration
- Debug Data & Call Quality Analysis — Interpreting debug output
Reconnection & Call Recovery
Source: https://developers.telnyx.com/development/webrtc/js-sdk/how-to/handle-reconnection.md
Reconnection & Call Recovery
Network interruptions happen — Wi-Fi drops, VPNs reconnect, laptops sleep. The Telnyx WebRTC JS SDK automatically handles reconnection so your users experience minimal disruption.How Reconnection Works
When the WebSocket connection tortc.telnyx.com drops:
- SDK detects the disconnect via WebSocket
closeorerrorevent, or via active-call signaling health checks when the socket is half-dead - SDK attempts reconnection after a randomized 2-6 second delay
- On successful reconnect, the SDK re-authenticates and re-attaches to existing calls
- If reconnection fails after
maxReconnectAttemptsattempts (default: 10), theRECONNECTION_EXHAUSTEDerror is emitted
When Calls Survive Reconnection
Calls can survive a brief WebSocket disconnect if:
Configuration:
keepConnectionAliveOnSocketClose is enabled:
- The PeerConnection (WebRTC media) stays alive even when the WebSocket (signaling) drops
- Audio continues flowing during the reconnection attempt
- On reconnect, the SDK re-attaches the existing call to the new WebSocket
- The call ID may change — use
recoveredCallIdto correlate
recoveredCallId
After a successful reconnection, the call may have a new ID. The previous ID is available as recoveredCallId:
When Calls Don’t Survive
When a call doesn’t survive reconnection, the SDK emits a
hangup state for that call.
Handling Reconnection in Your UI
Show reconnection status
Handle recovered calls
Handle signaling and media recovery warnings
During an active call, the SDK monitors WebSocket signaling liveness and media flow. If the browser reports the WebSocket as open but signaling stops flowing, the SDK emitstelnyx.warning and force-closes the socket to trigger reconnect + call reattach. If signaling is healthy but media is unhealthy, the SDK emits a media recovery warning and attempts ICE restart instead.
telnyx.ready, a recovered callUpdate, or a final hangup before cleaning up the call.
Inbound Calls After Reconnection
After a WebSocket reconnect, the browser may need to re-acquire microphone permissions to receive inbound calls. This is a browser security requirement, not an SDK limitation.mediaPermissionsRecovery
Handle microphone permission failures for inbound calls with a recoverable error pattern. When enabled and getUserMedia fails while answering, the SDK emits a recoverable telnyx.error event with resume() and reject() callbacks so your app can prompt the user to fix permissions before the call fails:
- An inbound call arrives and the user tries to answer
getUserMedia()fails (permission denied, device busy, etc.)- Instead of immediately failing the call, SDK emits a recoverable error with
resume()andreject()callbacks - Your app shows a UI prompting the user to grant permissions
- If the user fixes permissions and you call
resume(), the SDK retriesgetUserMedia() - If the user declines or
timeoutexpires, the call is terminated
mediaPermissionsRecovery only works for inbound calls. Recovery is attempted only when the initial getUserMedia call fails while answering.
Page Lifecycle and Call Report Flush
When the browser page is unloaded (close, reload, navigation), the SDK’s behavior depends on thehangupOnBeforeUnload option:
When
hangupOnBeforeUnload: false, active calls never hang up on unload, so a normal telnyx.stats.report (end-of-call report) would never fire for a call the user reloads or closes on. To prevent data loss, the SDK flushes an intermediate call report using navigator.sendBeacon / keepalive on visibilitychange → hidden — the last event reliably observable on both desktop and mobile before the page tears down.
visibilitychange → hidden flush is available since SDK v2.27.4. It mirrors the call report collector’s POST/retry/keepalive shape, ensuring the report reaches the stats endpoint even during page teardown.
Explicit Disconnect
When a user intentionally disconnects (e.g., signs out), you want to prevent automatic reconnection:clearReconnectToken() removes the session token that the SDK uses for automatic reconnection. After calling it, the SDK will not attempt to reconnect.
Common Issues
Rapid reconnection loops
Symptom: WebSocket connects and immediately disconnects, repeating rapidly. Cause: Usually an authentication issue — the JWT has expired or the credential has been revoked. Fix:- Check that the JWT is still valid
- Verify the credential still exists in the Telnyx Portal
- Check for
telnyx.errorevents withAUTH_FAILEDcode
RECONNECTION_EXHAUSTED
Symptom: SDK stops trying to reconnect after multiple failures.
Cause: Automatic reconnect reached maxReconnectAttempts (default: 10). The SDK uses a randomized 2-6 second delay between attempts; set maxReconnectAttempts: 0 only if your app should retry indefinitely.
Fix:
- Check network connectivity
- Verify
rtc.telnyx.comis reachable - Offer a manual “Reconnect” button in the UI:
Calls die after network change (Wi-Fi → Cellular)
Symptom: Call drops when switching networks, even withkeepConnectionAliveOnSocketClose.
Cause: The PeerConnection’s ICE candidates are tied to the old network. The new network has different candidates that weren’t part of the original negotiation.
Fix: This is a WebRTC limitation. The SDK attempts ICE restart, but it may not always succeed. The user will need to place a new call.
Configuration Summary
See Also
- TelnyxRTC Class — Client configuration and methods
- IClientOptions — Full configuration reference
- Error Handling — Error codes including reconnection errors
- Best Practices — Production reconnection guidance
Framework Integration
Source: https://developers.telnyx.com/development/webrtc/js-sdk/how-to/integrate-with-frameworks.md
Framework Integration
The Telnyx WebRTC JS SDK works with any JavaScript framework. This guide covers integration patterns for popular frameworks.React
Install
Using the React wrapper
The@telnyx/react-client package provides hooks and context providers:
Using the SDK directly
If you prefer to use the SDK without the React wrapper:Next.js
Next.js requires special handling because the SDK uses browser APIs (WebSocket, RTCPeerConnection) that don’t exist on the server.
Dynamic import
Client component (App Router)
Vue
Composable
Component
Angular
Service
General Patterns
Token fetching
All frameworks should fetch JWT tokens from a backend endpoint:Audio element management
The SDK auto-creates audio elements, but in some frameworks you may want to manage them yourself:Per-call media elements (concurrent calls)
Starting with SDK v2.27.4, you can assign a distinctremoteElement (and localElement) per call so concurrent calls in a single client session attach to independent <audio>/<video> elements with independent playout lifecycles. Hanging up one call never tears down another call’s element.
Outbound calls — pass remoteElement at call creation:
remoteElement when answering:
client.remoteElement as the fallback default — backward compatible with existing single-call integrations.
If two calls share the same remoteElement, the SDK emits a SHARED_REMOTE_ELEMENT_OVERWRITE warning (33011) when the second call overwrites the first call’s MediaStream. Assign distinct elements to avoid this.
See Manage Multiple Calls for the full concurrent-call guide.
Cleanup
Always clean up on unmount/unload:See Also
- Quickstart — Get started in 5 minutes
- Authentication — JWT setup for production
- IClientOptions — Client configuration
- Best Practices — Production deployment guide
- Demo App — Full React reference application
Debug Data & Call Quality Analysis
Source: https://developers.telnyx.com/development/webrtc/js-sdk/how-to/debug-call-issues.md
Debug Data & Call Quality Analysis
When calls have quality issues, the Telnyx WebRTC JS SDK provides multiple tools to diagnose the problem. This guide covers collecting debug data, interpreting results, and common troubleshooting patterns.Data Collection Methods
Method 1: Call Reports (Production)
Enable call reports for production quality monitoring:Method 2: Debug Reports (Deep Troubleshooting)
Enable debug output for detailed troubleshooting data. Usedebug: true with debugOutput to control where the data goes:
- Full ICE candidate list with timestamps
- DTLS handshake state
- SDP offer/answer with codec negotiation
- Packet-level stats (bytes, packets, loss per direction)
- Audio level measurements
Accessing debug data
Call report data is available via the Call Report Stats API after the call ends:Interpreting debug data
Key sections to check:Method 3: Console Debug (Development)
Enabledebug: true to get verbose SDK logging in the browser console:
debug: true enables console logging by default.
Method 4: Debug Visualizer
Send debug output to the Telnyx debug visualizer for graphical analysis:- Call timeline with state transitions
- ICE candidate gathering progress
- DTLS handshake status
- Audio quality graphs (RTT, jitter, packet loss)
- Media flow direction
Common Issues & Diagnosis
One-Way Audio
Check:- Is DTLS connected? →
ice_data.transport.dtls_state === "connected" - Is audio being sent? → Check
bytesSentin stats - Is audio being received? → Check
bytesReceivedin stats - Which candidate type? →
ice_data.selected_pairshows host/srflx/relay
- Asymmetric TURN relay (two nominated candidate pairs, one sending and one receiving)
- Firewall blocks media in one direction
- VPN interferes with ICE candidates
Call Doesn’t Connect
Check:- WebSocket state →
client.connection.connected - ICE state →
ice_data.transport.ice_state - STUN accessibility → Any
srflxcandidates?
- Firewall blocks
rtc.telnyx.com:443(signaling) - Firewall blocks
stun.telnyx.com:3478(STUN) - Firewall blocks
turn.telnyx.com:3478(TURN over UDP/TCP) - Firewall blocks
turn2.telnyx.com:443(TURNS — TURN over TLS, last-resort fallback) - No
relaycandidates and symmetric NAT
Choppy Audio
Check:- Jitter →
stats.jitter > 50msis poor - Packet loss →
stats.packetLoss > 3%is poor - RTT →
stats.rtt > 300msis poor
- WiFi congestion (high jitter)
- Network congestion (high packet loss)
- Long routing path (high RTT)
- VPN adding latency
Echo
Common causes:- Built-in speakers + mic without echo cancellation
- Two audio elements playing the same stream
- Headset echo cancellation not working
- Recommend headphones
- Ensure only one audio element is active per call
- Check browser echo cancellation settings
Quick Diagnostic Script
Run this in the browser console during a problematic call:See Also
- Call Report Stats — Full stats API reference
- Error Handling — Error and warning codes
- Network Requirements — Firewall and connectivity
- IClientOptions —
debug,debugOutput - Best Practices — Quality monitoring
WebRTC JS SDK error handling
Source: https://developers.telnyx.com/development/webrtc/js-sdk/how-to/error-handling.md
Error Handling
The SDK exposes error-related behavior through three main channels:
Use
telnyx.ready to know when the client is authenticated and the gateway is ready. Do not treat readiness as a notification case.
What your application should react to
For production integrations, handle these events explicitly:
Do not treat every warning as a failed call. Media/signaling recovery warnings are intentionally emitted before the SDK attempts recovery, so your application can show a short degraded/reconnecting state while the SDK handles the recovery path.
Version note: The structured error and warning system (TELNYX_ERROR_CODES,telnyx.warning,TelnyxError) was introduced after v2.25.25. Exponential-backoff reconnection and browseronline/offlinehints (see Reconnection Behavior) ship in the next release. If you are on v2.25.25, see Error handling in v2.25.25 below.
Structured Errors (telnyx.error)
telnyx.error is the primary error surface. Listen for it to handle authentication failures, media errors, and connection issues.
Imports
Error event payload structure
Everytelnyx.error event is one of two shapes. Always check isMediaRecoveryErrorEvent(event) first, because the media-recovery variant carries callable recovery helpers.
Standard error event (the common case):
mediaPermissionsRecovery.enabled is set and getUserMedia() fails while answering):
error object (TelnyxError / ITelnyxError) exposes:
fatalvsrecoverable— two distinct fields, two distinct purposes:Recommended listener order: (1) check
event.error.fatal(always present on every error): tells your app whether the SDK has a recovery path.true= the SDK will not recover — take action now.false= the SDK is handling it — wait or continue.event.recoverable(only on media-permission recovery events): signals the app can recover via theresume()/reject()helpers. Onlyevent.recoverable === trueis meaningful;recoverableis absent on standard errors — do not branch onevent.recoverable === false.isMediaRecoveryErrorEvent(event)first, (2) then checkevent.error.fatalto decide whether to take action or wait, (3) then branch onevent.error.codefor tailored UX.
Getting and filtering errors by code
Media permission recovery
WhenmediaPermissionsRecovery.enabled is configured and getUserMedia() fails while answering a call, the error event includes recoverable: true with resume() and reject() callbacks:
Fatal errors and recommended handling
Fatal errors are situations the SDK will not recover from. When a fatal error fires, the affected call or session is dead — the SDK will not retry, reconnect, or reattach on its own. Your application must take the action described below. Every error event includesevent.error.fatal — a boolean that tells your app whether the SDK has a recovery path. true means the situation is terminal and you must act; false means the SDK is handling it (wait or continue). The Fatal? column below mirrors this field.
Uncommon errors — when to investigate.Errors that are not fatal by default (the SDK handles or continues):SDP_CREATE_OFFER_FAILED(40001),SDP_CREATE_ANSWER_FAILED(40002),SDP_SET_LOCAL_DESCRIPTION_FAILED(40003),SDP_SET_REMOTE_DESCRIPTION_FAILED(40004),PEER_CLOSED_DURING_INIT(44005), andWEBSOCKET_CONNECTION_FAILED(45001) are not expected during normal operation. If any of these recurs a few times or more, share the call with Telnyx support for investigation — their occurrence is most likely not caused by user actions and may indicate a browser, network, or server-side issue.
HOLD_FAILED (44001), BYE_SEND_FAILED (44003), SUBSCRIBE_FAILED (44004), WEBSOCKET_ERROR (45002), GATEWAY_FAILED (45004), ICE_RESTART_FAILED (47001), NETWORK_OFFLINE (48001). Two exceptions to know:
AUTHENTICATION_REQUIRED(46003) is non-fatal by default but becomes fatal whenautoReconnect: false. Re-authenticate usingclient.login().- The three media errors (
42001–42003) become recoverable (non-fatal) whenmediaPermissionsRecovery.enabledis set.
Re-authenticate without recreating the instance. ForLOGIN_FAILED(46001),INVALID_CREDENTIALS(46002), andAUTHENTICATION_REQUIRED(46003), useclient.login()on the existing connection:
Errors and warnings you should handle explicitly
These are the high-impact errors and warnings we recommend handling explicitly in every production integration. They are also marked ⚠️ in the reference tables below. Important errors (handle ontelnyx.error):
Important warnings (handle on
telnyx.warning):
Error code reference
Each error below is classified as fatal or non-fatal and includes what the SDK does automatically versus what you should do.SDP errors
Media errors
Call-control errors
ICE restart errors
WebSocket and transport errors
autoReconnectis enabled by default. Unless you explicitly setautoReconnect: false, the SDK handles reconnection automatically forWEBSOCKET_ERROR,GATEWAY_FAILED, and signaling-health recovery. You only need to callclient.connect()manually if you disabledautoReconnector afterRECONNECTION_EXHAUSTED.
Authentication and session errors
Re-authenticate without recreating the instance. ForLOGIN_FAILED(46001),INVALID_CREDENTIALS(46002), andAUTHENTICATION_REQUIRED(46003), useclient.login()to re-authenticate on the existing connection:
Structured Warnings (telnyx.warning)
Warnings are never fatal. They describe degraded behavior, quality issues, or situations that may need user action before the session breaks. The SDK continues operating after emitting a warning.
Imports
Warning event payload structure
Every warning event includes a structuredwarning object and the SDK sessionId. When a warning is associated with a specific call, callId is included. Recovery-related warnings add reason (and source for signaling recovery) for diagnostics:
warning object (ITelnyxWarning) exposes:
Use
warning.code for application logic. Use warning.message, warning.causes, and warning.solutions for support tooling or user-facing troubleshooting copy.
Getting and filtering warnings by code
Warning code reference
Network quality warnings
Data-flow warnings
Call connection warnings
Authentication and session warnings
Signaling health and recovery warnings
Signaling health warnings are emitted when the SDK detects a half-dead WebSocket during an active call — the browser still reports the socket as
OPEN, but no signaling bytes are flowing after a network interface change, VPN change, NAT timeout, or proxy/load-balancer drop. The SDK decides one recovery path:
- If signaling is unhealthy, it reconnects the WebSocket and reattaches active calls (
SIGNALING_RECOVERY_REQUIRED). - If signaling is healthy but media is unhealthy, it attempts ICE restart (
MEDIA_RECOVERY_REQUIRED). - It does not run both recovery paths at the same time.
online/offline events are treated as low-confidence hints and may accelerate a signaling health probe, but they do not directly trigger recovery.
Your application should keep the current call visible, show a reconnecting/degraded state, and wait for the next callUpdate, telnyx.ready, warning, or final hangup before cleaning up the UI.
Call Termination Data
When a call reacheshangup, inspect these fields on the Call object:
Common causes:
Socket Events
telnyx.socket.close
Delivers the browser CloseEvent. During a forced safety cleanup, the SDK emits a synthetic abnormal close with code: 1006 and wasClean: false.
Useful close codes:
telnyx.socket.error
Delivers { error: ErrorEvent, sessionId: string }. Browsers expose very little information for WebSocket errors. The SDK also emits telnyx.error with code 45002 (WEBSOCKET_ERROR) when ws.onerror fires.
Connection State Helpers
The browser session exposes WebSocket state helpers onclient.connection:
Example:
Reconnection Behavior
Ontelnyx.socket.close or telnyx.socket.error, the SDK clears subscriptions and resets gateway readiness state. autoReconnect is enabled by default; unless you set autoReconnect: false, the SDK automatically schedules connect(). Automatic reconnect stops after maxReconnectAttempts attempts (default: 10), or runs indefinitely when maxReconnectAttempts: 0.
Reconnect backoff
Reconnect attempts use exponential backoff with jitter (not a fixed/random delay):- Base delay starts at ~1s and doubles per attempt (~1s → ~2s → ~4s → ~8s → ~16s), capped at 30s.
- ±25% jitter is applied to avoid thundering-herd reconnects.
- The backoff counter resets only on a confirmed healthy registration (
REGED), not merely on socket open.
Browser online/offline handling
Browseronline/offline events are treated as low-confidence hints, not direct recovery triggers:
offlineemits theNETWORK_OFFLINE(48001) error for backward compatibility/telemetry and may accelerate a signaling health probe. It does not force a reconnect.onlineclears the browser-reported offline state for diagnostics but does not trigger recovery.- Recovery starts only from SDK-owned health evidence: liveness probe timeout, critical request timeout, peer failure, or no-RTP.
Socket close/error dedupe
When a socket fails, browsers commonly emit bothSocketError and SocketClose for the same disconnect. The SDK dedupes these by socket generation so a duplicate event cannot clear an already-scheduled reconnect timer or schedule a redundant reconnect. Stale events from an older, already-replaced socket are ignored.
Gateway retry behavior
- UNREGED / NOREG: Up to 5 registration retries with exponential backoff. After that,
LOGIN_FAILED(46001). - FAILED / FAIL_WAIT / TIMEOUT:
GATEWAY_FAILED(45004) emitted on first detection. The SDK retries with exponential backoff untilRECONNECTION_EXHAUSTED(45003).
Keeping media alive
IfkeepConnectionAliveOnSocketClose is true, the SDK preserves active peer connections while signaling reconnects. Recovery can create a new Call object with recoveredCallId.
Clearing reconnect stickiness
By default, the SDK reconnects to the sameb2bua-rtc instance. To break this stickiness and route to a different instance:
Note:clearReconnectToken()andskipLastVoiceSdkIdare available in@telnyx/webrtc@2.26.4.
Error Handling in v2.25.25
Important: If you are using SDK version 2.25.25, the error handling architecture is fundamentally different from the current version. This section documents the v2.25.25 error surface.
What is different in v2.25.25
Error events in v2.25.25
In v2.25.25, errors are emitted throughtelnyx.error and telnyx.notification:
telnyx.error — Session-level errors with raw Error objects (no .code property):
telnyx.notification — Carries both call lifecycle updates and error information. This is the only recommended way to handle media, peer connection, and signaling errors in v2.25.25. Do not listen for telnyx.rtc.mediaError, telnyx.rtc.peerConnectionFailureError, or telnyx.rtc.peerConnectionSignalingStateClosed directly — those are internal events. Use telnyx.notification instead:
Authentication errors in v2.25.25
Login errors are emitted ontelnyx.error with a type field for invalid credentials. You can re-authenticate using client.login() without recreating the TelnyxRTC instance:
Reconnection in v2.25.25
Reconnection behavior differs from the current version:autoReconnectis enabled by default; the SDK automatically reconnects unless you setautoReconnect: false- Reconnect uses a fixed/random 2-6 second delay (current SDK uses exponential backoff with jitter, capped at 30s)
- Browser
online/offlineevents directly drive reconnect (current SDK treats them as low-confidence hints) - No
maxReconnectAttemptsoption (current SDK defaults to 10 attempts and supportsmaxReconnectAttempts: 0for unlimited attempts) - No
clearReconnectToken()method - No
skipLastVoiceSdkIdoption keepConnectionAliveOnSocketCloseis available
Migrating from v2.25.25 to the latest
If you are upgrading from v2.25.25 to the latest version:- Replace
telnyx.notificationerror handling — usetelnyx.errorfor fatal errors andtelnyx.warningfor non-fatal conditions. Keeptelnyx.notificationfor call lifecycle only. - Replace
notification.type === 'userMediaError'handling withtelnyx.errorlistener switching onevent.error.code(42001,42002,42003). - Replace
notification.type === 'peerConnectionFailureError'handling withtelnyx.warninglistener forPEER_CONNECTION_FAILED(33004). - Replace
notification.type === 'signalingStateClosed'handling withtelnyx.warninglistener for the appropriate warning code. - Replace
ERROR_TYPE.invalidCredentialsOptionschecks withevent.error.code === TELNYX_ERROR_CODES.INVALID_CREDENTIALS(46002). Useclient.login()to re-authenticate without recreating theTelnyxRTCinstance. - Import new symbols:
TelnyxError,TELNYX_ERROR_CODES,TELNYX_WARNING_CODES,isMediaRecoveryErrorEvent. - Note
SESSION_NOT_REATTACHEDis an error, not a warning: in v2.26.0+ it isTELNYX_ERROR_CODES.SESSION_NOT_REATTACHED(48501) ontelnyx.error(fatal), not a warning.UNKNOWN_REATTACHED_SESSION(35002) is the separate warning.
Production Best Practices
Source: https://developers.telnyx.com/development/webrtc/js-sdk/how-to/production-best-practices.md
Production Best Practices
Going from “it works on my machine” to “it works for all users, reliably” requires addressing security, reliability, performance, and monitoring. This guide covers the key areas.Authentication
Use JWT in production
Generate JWTs on your backend
Handle token refresh
One credential per user
Never share a Telephony Credential across multiple users. Each user must have their own JWT to ensure they receive their own incoming calls.Connection Management
One client instance per tab
Clean up on page unload
By default (hangupOnBeforeUnload: true), the SDK hangs up active calls and sends BYE on beforeunload:
hangupOnBeforeUnload: false to prevent the SDK from hanging up on unload. The SDK then flushes an intermediate call report on visibilitychange → hidden via keepalive so no call report data is lost:
hangupOnBeforeUnload: false, the SDK flushes a final call report on visibilitychange → hidden (the last reliably observable event on desktop and mobile) using keepalive so the report is not lost when the page tears down. Available since SDK v2.27.4.
Handle reconnection gracefully
Audio Quality
Request microphone with constraints
Monitor call quality
Enable call reports in production:Recommend headphones for agents
Built-in speakers + microphone create echo. For call center agents, recommend USB headsets or enforce echo cancellation.Network Configuration
Allowlist Telnyx domains
Ensure your firewall allows:Don’t force relay unless necessary
Error Handling
Always handle errors
Handle connection failures
Don’t show raw errors to users
Memory Management
Clean up call references
Remove event listeners
Monitoring & Observability
Enable call reports
Track key metrics
Log quality issues server-side
Deployment Checklist
See Also
- Authenticating Your App
- Configure Network & Firewall
- Handle Reconnection
- Monitor Call Quality
- Debug Call Issues
- Error Handling
TelnyxRTC Class
Source: https://developers.telnyx.com/development/webrtc/js-sdk/reference/telnyxrtc.md
TelnyxRTC
TheTelnyxRTC class is the main entry point for the Telnyx WebRTC JS SDK. It manages the WebSocket connection to Telnyx’s signaling server and provides methods to create calls, handle events, and control the client lifecycle.
Constructor
connect() to establish the WebSocket connection.
Parameters:
Example:
Methods
connect()
Opens a WebSocket connection to rtc.telnyx.com and authenticates using the configured credentials.
telnyx.ready on success or telnyx.error on failure.
disconnect()
Closes the WebSocket connection and cleans up all active calls.
disconnect() when the user leaves your app to avoid zombie WebSocket connections. See Best Practices → Connection Lifecycle.
newCall(options)
Creates and places a new outbound call.
Returns: Call
See ICallOptions for all available options including custom headers, ICE configuration, and media settings.
off(event, handler)
Removes an event listener.
removeAllListeners()
Removes all event listeners from the client.
Properties
connection
Provides helpers to check the current connection state.
calls
An array of all active Call objects.
Events
Register event listeners usingclient.on(eventName, handler):
Connection Events
Call Events
Stats Events
Typical Usage
Reconnection
The SDK automatically reconnects when the WebSocket drops. You don’t need to handle this manually in most cases. For advanced reconnection handling, see Reconnection & Recovery. Key configuration:See Also
- IClientOptions — Full configuration reference
- Call Class — Call control methods
- Error Handling — Error and warning codes
- Best Practices — Production deployment guide
- Authentication — JWT generation and token refresh
Call Class
Source: https://developers.telnyx.com/development/webrtc/js-sdk/reference/call.md
Call Class
TheCall object represents a voice call. It’s created by client.newCall() (outbound) or received via telnyx.notification (inbound).
Getting a Call Object
Outbound call
Inbound call
Properties
Call States
Methods
answer()
Answer an incoming call.
answer() when the call state is ringing. Calling answer() on an already-active call creates a duplicate PeerConnection, which causes one-way audio issues.
hangup()
End the call.
muteAudio() / unmuteAudio()
Toggle the microphone.
hold() / unhold()
Put the call on hold or resume it.
dtmf(digit)
Send a DTMF tone (0-9, *, #).
sendAIConversationMessage(item)
Send an outbound AI conversation item over the active VSP WebSocket session. Use this to return the result of a client-side tool execution back to the AI backend after receiving a function_call via the telnyx.ai.conversation event, or to subscribe to ACA pre-playout assistant audio.
For client-side tool results:
call_id must match the one from the inbound function_call. This is a fire-and-forget notification — the SDK does not wait for a response. Requires an active WebSocket connection (throws if disconnected).
sendDigits(digits)
Send a sequence of DTMF digits.
Events
Register event listeners usingcall.on(eventName, handler):
Call State Events
Advanced
Access the PeerConnection
For custom WebRTC monitoring or manipulation:close() or setRemoteDescription() directly may break the call.
Custom headers
Add SIP headers to the INVITE for server-side correlation:Common Patterns
Simple outbound call with state handling
Inbound call with accept/reject UI
Hold and resume
See Also
- ICallOptions — Call configuration options
- INotification — Notification types and payloads
- TelnyxRTC Class — Client methods and events
- SDK Commonalities — Call states across all SDK platforms
- Best Practices — Production call management guide
IClientOptions
Source: https://developers.telnyx.com/development/webrtc/js-sdk/reference/iclientoptions.md
IClientOptions
Options passed to theTelnyxRTC constructor to configure the client.
Quick Reference
Authentication
Choose one authentication method. See Authentication for the full guide.
Use
login_token (JWT) for production applications. Credentials (login + password) are long-lived with no automatic rotation. JWTs expire after 24 hours and support refresh. See Authenticating Your App.
JWT (production):
Anonymous Login
Connect to an AI assistant without requiring a credential. Theanonymous_login option accepts an object with the target configuration:
Example — Continue a conversation:
Connection
Control WebSocket, reconnection, and region behavior.
The SDK automatically reconnects when the WebSocket drops. There is no
reconnect option — reconnection is always automatic.
Select a region:
Supported regions
The SDK exports aRegion constant with the seven supported signaling regions. Pass one of these values to region, or omit the option to use automatic routing.
Region values ensures you target a valid signaling region.
ICE & Network
Configure STUN/TURN and ICE behavior.
The SDK automatically provisions STUN/TURN servers. You don’t need to configure
iceServers in most cases. See Network Requirements.
Force TURN for privacy:
Audio
Custom ringtone and ringback:
Call Reports
Enable post-call quality monitoring and real-time stats.
Call reports are enabled by default. You can customize the interval:
Debugging
Configure debug output for troubleshooting.
Enable console debug logging:
Media Permissions Recovery
Handle microphone permission failures for inbound calls with a recoverable error pattern.
When enabled and
getUserMedia fails while answering an inbound call, the SDK emits a recoverable telnyx.error event with resume() and reject() callbacks. Your app can prompt the user to fix permissions before the call fails:
Full Example
See Also
- TelnyxRTC Class — Client methods and events
- Authenticating Your App — JWT, credentials, and token refresh
- ICallOptions — Per-call configuration
- Handle Reconnection — Connection recovery
- Network Requirements — STUN/TURN/firewall
- Production Best Practices — Production configuration guide
ICallOptions
Source: https://developers.telnyx.com/development/webrtc/js-sdk/reference/icalloptions.md
ICallOptions
Options passed toclient.newCall(options) to configure call behavior.
Quick Reference
Required Properties
Call Identity
Customize how the call appears to the remote party.
Example — Custom caller ID:
ICE & Network
Control how the call establishes media connectivity.
Example — Force TURN for privacy:
iceServers if you have custom infrastructure. See Network Requirements.
Media Configuration
Control audio devices and streams.
Example — Custom audio elements:
Advanced
Common Patterns
Basic voice call
Call with SIP URI
Call with custom headers (for Call Control correlation)
Privacy-focused call (force TURN)
See Also
- Call Class — Call control methods (answer, hangup, mute, hold)
- IClientOptions — Client-level configuration
- Network Requirements — ICE/STUN/TURN configuration
- Best Practices — Call management best practices
INotification
Source: https://developers.telnyx.com/development/webrtc/js-sdk/reference/inotification.md
INotification
TheINotification object is emitted via the telnyx.notification event. It contains information about call state changes, media events, and SDK notifications.
Properties
Notification Types
Type: callUpdate
The most common notification type. Fired whenever a call’s state changes.
Call State Diagram
Type: userMediaError
Fired when the browser denies or fails to access media devices (microphone/camera).
- User clicked “Block” on the permission prompt
- No microphone/camera detected
- Another application is using the device
- System-level permission denied (OS settings)
Type: peerConnectionFailedError
Fired when the WebRTC PeerConnection fails to establish media. This usually means ICE negotiation or DTLS handshake failed.
- Firewall blocks UDP to TURN servers
- Symmetric NAT prevents direct connectivity
- VPN interfering with ICE
- Docker/container network issues
Type: signalingStateClosed
Fired when the PeerConnection’s signaling state becomes closed, indicating the SIP signaling channel has terminated.
callUpdate with state hangup.
Type: vertoClientReady
Fired when the client has successfully connected and authenticated with the Telnyx signaling server. This is equivalent to the telnyx.ready event but delivered as a notification.
Listening to Notifications
On the Client
On a Call
You can also listen on individual call objects:See Also
- Call Class — Call state and control methods
- TelnyxRTC Class — Client-level events
- Error Handling — Error and warning codes
- SDK Commonalities — Call states across all SDK platforms
Switch/Server Events
Source: https://developers.telnyx.com/development/webrtc/js-sdk/reference/sw-events.md
Switch/Server Events
The Telnyx signaling server sends events over the WebSocket connection during the call lifecycle. These are the raw server-side events — most applications should use the higher-leveltelnyx.notification event instead. See INotification for the recommended approach.
Most developers don’t need to handle these events directly. The SDK translates them into INotification objects. Use telnyx.notification unless you need low-level signaling details.
Event Reference
Client Lifecycle
Call Lifecycle
Media
Call Control
Presence & Registration
Event Flow: Outbound Call
Event Flow: Inbound Call
Listening to Server Events
For advanced use cases, you can listen to raw server events by enabling debug mode and parsing the WebSocket messages:telnyx.notification for stable event handling.
Server Events vs INotification
Use
telnyx.notification (INotification) for application code:
Gateway State Events
Thetelnyx.gateway.state event indicates when the WebSocket connection to the gateway goes up or down:
- Network interruption
- Server-side maintenance
- Credential revoked
- WebSocket timeout
See Also
- INotification — High-level notification types (recommended)
- Call Class — Call state and control methods
- TelnyxRTC Class — Client events
- Error Handling — Error and warning codes
- Architecture — How signaling and media flows work
How WebRTC Signaling Works
Source: https://developers.telnyx.com/development/webrtc/js-sdk/explanation/webrtc-signaling.md
How WebRTC Signaling Works
WebRTC itself has no signaling protocol — it only defines how to establish media. The signaling (how you say “call this number” or “I’m ringing”) is up to the application. Here’s how the Telnyx WebRTC SDK does it.The Signaling Path
Key components:
VSP handles signaling only. B2BUA-RTC handles media only. They are separate systems.
WebSocket Connection
The SDK opens a single persistent WebSocket tortc.telnyx.com:
What the DNS resolution does
rtc.telnyx.com resolves to the nearest VSP based on DNS-based geo-routing:
If the DNS routes to a suboptimal VSP (e.g., an Indian client hitting FR5 instead of CN1), call latency increases. See Configure Network & Firewall for troubleshooting.
Outbound Call Flow
When you callclient.newCall():
What the SDK does at each step:
newCall()— Creates a Call object, starts ICE gathering- SIP INVITE — SDK sends invite message over WebSocket, VSP translates to SIP
- SDP negotiation — Codec selection (OPUS, PCMU, PCMA), ICE candidates exchanged
- Ringing — Remote party’s phone is ringing.
call.state === 'ringing' - Answer (200 OK) — Remote party picked up.
call.state === 'active' - Media flows — Audio transmitted via WebRTC (separate from signaling)
Inbound Call Flow
When someone calls your WebRTC client: What the SDK does:- Incoming INVITE — VSP receives SIP INVITE, pushes to SDK over WebSocket
callUpdatenotification —notification.call.state === 'ringing'- Your app decides — Call
call.answer()orcall.hangup() - Answer — SDK sends 200 OK, establishes WebRTC media
- Media flows — Two-way audio established
Session Description Protocol (SDP)
During call setup, both sides exchange SDP (Session Description Protocol) to agree on:
The SDK handles SDP negotiation automatically. You don’t need to construct SDP manually.
Codec Priority
The SDK’s default codec priority:- OPUS — Best quality, handles packet loss well, variable bitrate
- PCMU — G.711μ-law, universal compatibility, 64kbps
- PCMA — G.711A-law, European PSTN standard, 64kbps
WebSocket Reconnection
If the WebSocket drops, the SDK automatically reconnects: See Handle Reconnection for the full reconnection behavior and how to handle it in your app.Custom Headers
You can pass custom SIP headers in both directions:Outbound (your app → carrier)
Inbound (carrier → your app)
Inbound custom headers are available in the notification:What Signals What
Mute is a local operation — it stops sending audio from your microphone but doesn’t send any SIP signal. The remote party doesn’t know you’re muted (unless you tell them via your app).
See Also
How ICE & TURN Work
Source: https://developers.telnyx.com/development/webrtc/js-sdk/explanation/ice-and-turn.md
How ICE & TURN Work
If you’ve ever wondered why some calls sound great and others don’t, the answer is often in ICE — the protocol that finds the best path for media between two endpoints. Understanding ICE helps you diagnose one-way audio, connection failures, and latency issues.The Problem ICE Solves
Two devices want to send audio to each other. But between them:- NAT (Network Address Translation) — Private IPs (192.168.x.x) aren’t reachable from the internet
- Firewalls — Block incoming connections
- Symmetric NAT — Even STUN can’t discover the public mapping
The Three Candidate Types
ICE discovers three types of candidates, in order of preference:1. Host Candidates (Local)
Your device’s local network interfaces (e.g.,192.168.1.105 on WiFi).
- Works when: Both devices are on the same LAN (rare for WebRTC calls)
- Quality: Best — zero extra latency
- Reality: Almost never used for WebRTC calls — both parties are rarely on the same network
2. Server-Reflexive Candidates (srflx) — via STUN
Your public IP, discovered by asking a STUN server (e.g.,203.0.113.5).
How STUN works:
- SDK sends a request to
stun.telnyx.com:3478 - STUN server sees the source IP (your public IP)
- STUN server sends it back: “Your public IP is 203.0.113.5”
- SDK creates a srflx candidate with that IP
- Works when: Your NAT allows inbound traffic to the mapped port (most home/office routers)
- Quality: Good — direct path, minimal extra latency
- Blockers: Symmetric NAT, strict firewalls
3. Relay Candidates — via TURN
An IP address allocated on a TURN server that relays your media (e.g.,64.16.248.1).
How TURN works:
- SDK authenticates with
turn.telnyx.com:3478over UDP or TCP (TURN/TLS on 443 is not currently supported) - TURN server allocates a relay address (e.g.,
64.16.248.1:50000) - All media is sent TO the TURN server, which forwards it to the remote party
- Remote party also sends TO the TURN server, which forwards to you
- Works when: Always — TURN is the fallback that never fails
- Quality: Adds latency (each packet goes through the TURN server) but guarantees connectivity
- Required when: Symmetric NAT, strict corporate firewalls, mobile carriers that block P2P
ICE Candidate Priority
The SDK tries candidates in this priority order:
In practice, most WebRTC calls use srflx (direct) or relay (TURN). Host candidates rarely work because both parties are on different networks.
A common misconception: “If my call uses TURN relay, something is wrong.”
False. TURN relay is normal and expected in many network conditions — mobile networks, corporate networks, some ISPs. The question isn’t “is TURN being used?” but “is the TURN server close to me?”
ICE Gathering Process
When a call starts, the SDK gathers candidates in this sequence:Trickle ICE
By default, the SDK uses Trickle ICE — it sends candidates as they’re discovered rather than waiting for all of them:ICE Connectivity Checks
Once both sides have candidates, ICE performs connectivity checks in this order:
If the STUN check fails (e.g., firewall blocks it), ICE tries the next candidate pair until it finds one that works — falling back to TURN relay if necessary.
DTLS — Encrypting Media
After ICE finds a working path, DTLS (Datagram Transport Layer Security) encrypts the media:
DTLS states:
If DTLS is stuck at
connecting, media won’t flow even if ICE connected. This is the #1 cause of one-way audio.
TURN Server Selection
Telnyx operates TURN servers in multiple regions:
The SDK automatically selects the nearest TURN server. You can override:
UDP vs TCP TURN
The SDK tries UDP first, falls back to TCP automatically. TURN/TLS on port
443 is not currently supported.
Troubleshooting ICE Issues
STUN fails (error 701)
Cause: Firewall blocksstun.telnyx.com:3478 (UDP)
Result: No srflx candidates — must use relay
Fix: Open UDP 3478 to STUN servers, or accept TURN relay
All ICE fails
Cause: Both STUN and TURN are blocked Result: Call cannot connect — no media path exists Fix: Open access to TURN servers on port3478 (UDP preferred, TCP fallback). TURN/TLS on port 443 is not currently supported.
Relay when srflx should work
Cause: Symmetric NAT — NAT mapping changes per destination Result: STUN-discovered port doesn’t accept inbound from B2BUA-RTC Fix: This is normal; TURN relay is the correct solutionHigh latency on relay
Cause: TURN server is geographically distant Result: 100ms+ added round-trip Fix: ConfigureiceServers to use a closer TURN server
See Also
- Configure Network & Firewall — Firewall rules and IP allowlists
- Debug Call Issues — How to diagnose ICE/TURN problems
- Monitor Call Quality — Check ICE stats in production
- Call State Lifecycle
- How WebRTC Signaling Works
Authentication Architecture
Source: https://developers.telnyx.com/development/webrtc/js-sdk/explanation/authentication-architecture.md
Authentication Architecture
Telnyx WebRTC has three authentication methods. They’re not interchangeable — they form a hierarchy, and using the wrong one is the most common cause of security issues and unexpected behavior.The Hierarchy
- One Credential Connection can have multiple Telephony Credentials
- Each Telephony Credential can generate multiple JWTs
The Three Methods
1. Credential Connection (login + password)
- Credentials are long-lived — they remain valid until manually deleted
- No per-user isolation — one credential = one SIP registration
- No automatic rotation or refresh
2. Telephony Credential (credential-based login)
3. JWT (login_token)
- Time-limited — tokens expire 24 hours after creation (or when the parent credential expires, whichever comes first)
- Per-device — each device should use its own credential → its own JWT, preventing registration conflicts
- Refresh-aware — the SDK emits a
TOKEN_EXPIRING_SOONwarning (code 34001) before expiry, so your app can request a fresh token from your backend - Multiple concurrent sessions — different users/devices can each have their own JWT without overwriting each other’s SIP registration
Comparison
The JWT Flow in Production
Initial connection
Token refresh
JWTs expire after 24 hours. The SDK warns you before expiry so you can refresh without disconnecting: Your backend must:- Have a Telnyx API key (
TELNYX_API_KEY) - Expose an endpoint that creates tokens for a given telephony credential
- Return the token to the browser
- Handle token refresh requests when
TOKEN_EXPIRING_SOON(34001) fires
Why “One Credential Per User” Matters
Wrong — shared credential
When two users share one credential, the second registration overwrites the first. User A never receives incoming calls.Correct — separate JWTs
With JWTs, each token maps to a unique session. Multiple users can register concurrently without conflicts.Common Mistakes
See Also
- Authenticating Your App — Full code examples for all three methods
- IClientOptions —
login_token,login,passwordfields
Call State Lifecycle
Source: https://developers.telnyx.com/development/webrtc/js-sdk/explanation/call-state-lifecycle.md
Call State Lifecycle
A call is a state machine. Understanding every state and transition is essential for building a reliable UI and handling edge cases like reconnection, transfer, and one-way audio.State Diagram
All States
Outbound Call States (Detailed)
new → ringing
- SDK creates a PeerConnection
- ICE gathering starts (host → srflx → relay candidates)
- SDP offer created with codec preferences
- INVITE sent over WebSocket to VSP
- VSP translates to SIP INVITE → carrier
ringing
- Remote phone is ringing (SIP 180 Ringing)
- You may hear ringback tone (generated locally by the SDK or played from network)
ringing → active
- SIP 200 OK received from carrier
- SDP answer processed — codecs and ICE candidates agreed
- DTLS handshake completes — media is encrypted
- SRTP audio starts flowing in both directions
- Audio element auto-created and attached to DOM
Inbound Call States (Detailed)
ringing (incoming)
- VSP receives SIP INVITE from carrier
- VSP pushes invite message to SDK over WebSocket
- SDK creates a Call object with
state: 'ringing' telnyx.notificationfires withcallUpdate
ringing → active (answer)
- SDK sends 200 OK over WebSocket
- getUserMedia() — browser requests microphone permission
- ICE gathering starts
- SDP answer sent
- DTLS handshake
- Media flows
call.answer() triggers getUserMedia(). If the user hasn’t granted microphone permission, the browser will show a permission dialog. The call won’t be fully active until permission is granted.
ringing → destroyed (reject)
Active Call States
active → held
- SDK sends re-INVITE with
sendonlymedia direction - Remote party’s audio continues (they hear hold music if configured)
- Your audio stops sending (microphone muted at SIP level)
- Remote party receives a
callUpdatewith their call state changing
held → active
- SDK sends re-INVITE with
sendrecvmedia direction - Two-way audio resumes
Reconnecting State
- ICE connectivity checks fail (network change)
- DTLS session breaks
- WebSocket still connected but media path lost
- ICE restart — re-gathers candidates
- Attempts to re-establish DTLS
- If successful →
call.state → 'active'(call resumes) - If fails after timeout →
call.state → 'destroyed'(call drops)
Destroyed State
All calls end up here. It’s terminal — no further transitions.
Your app: Clean up UI. Upload call report. Show call summary if applicable.
State Transition Matrix
Common Pitfalls
Double answer
Not handling destroyed
Missing reconnecting
See Also
- Call Class — Methods for each state
- INotification — All notification types
- Handle Reconnection — Reconnection flow
- Handle Multiple Calls — Hold/resume patterns
- How WebRTC Signaling Works — SIP message flow
WebRTC JS ChangeLog
Source: https://developers.telnyx.com/development/webrtc/js-sdk/changelog.md
React quickstart
Source: https://developers.telnyx.com/development/webrtc/react-sdk.mdThe React SDK can be added to your application by installing the npm packages:
Client initialization
In theTelnyxRTCProvider component, you can pass credentials and options objects with custom ringtones:
Phone component
In thePhone component, you would subscribe to the notifications from the WebRTC client, specify callbacks for Telnyx client event handlers, and define an Audio element.
First import the React client:
Phone function component where you will manage event handlers using callbacks and control audio stream in the <Audio /> element:
Sample React app
Check out our sample React application for a full implementation of the Telnyx Voice SDK with React components.Voice native iOS Client SDK
Source: https://developers.telnyx.com/development/webrtc/ios-sdk.md
WebRTC iOS Client
Source: https://developers.telnyx.com/development/webrtc/ios-sdk/classes/txclient.md
WebRTC iOS Call
Source: https://developers.telnyx.com/development/webrtc/ios-sdk/classes/call.md
WebRTC iOS Call
Source: https://developers.telnyx.com/development/webrtc/ios-sdk/classes/call-extensions.md
WebRTC iOS Client
Source: https://developers.telnyx.com/development/webrtc/ios-sdk/classes/txclient-extensions.md
WebRTC iOS Call State
Source: https://developers.telnyx.com/development/webrtc/ios-sdk/enums/call-state.md
WebRTC iOS TxClientDelegate
Source: https://developers.telnyx.com/development/webrtc/ios-sdk/protocols/tx-client-delegate.md
WebRTC iOS Call Info
Source: https://developers.telnyx.com/development/webrtc/ios-sdk/structs/tx-call-info.md
WebRTC iOS Client Configuration
Source: https://developers.telnyx.com/development/webrtc/ios-sdk/structs/tx-config.md
WebRTC iOS Client Push Notifications Configuration
Source: https://developers.telnyx.com/development/webrtc/ios-sdk/structs/tx-push-config.md
WebRTC iOS Client Push IP Notifications Configuration
Source: https://developers.telnyx.com/development/webrtc/ios-sdk/structs/tx-push-ip-config.md
iOS Portal Setup
Source: https://developers.telnyx.com/development/webrtc/ios-sdk/push-notification/portal-setup.md
iOS Push Notification Setup
Source: https://developers.telnyx.com/development/webrtc/ios-sdk/push-notification/app-setup.md
Troubleshooting
Source: https://developers.telnyx.com/development/webrtc/ios-sdk/push-notification/troubleshooting.md
WebRTC iOS SDK AI Voice Assistant Introduction
Source: https://developers.telnyx.com/development/webrtc/ios-sdk/ai-voice-assistant/introduction.md
WebRTC iOS SDK AI Voice Assistant Anonymous Login
Source: https://developers.telnyx.com/development/webrtc/ios-sdk/ai-voice-assistant/anonymous-login.md
WebRTC iOS SDK AI Voice Assistant Starting Conversations
Source: https://developers.telnyx.com/development/webrtc/ios-sdk/ai-voice-assistant/starting-conversations.md
WebRTC iOS SDK AI Voice Assistant Text Messaging
Source: https://developers.telnyx.com/development/webrtc/ios-sdk/ai-voice-assistant/text-messaging.md
WebRTC iOS SDK AI Voice Assistant Transcript Updates
Source: https://developers.telnyx.com/development/webrtc/ios-sdk/ai-voice-assistant/transcript-updates.md
WebRTC Stats
Source: https://developers.telnyx.com/development/webrtc/ios-sdk/stats.md
WebRTC iOS SDK Error Handling
Source: https://developers.telnyx.com/development/webrtc/ios-sdk/error-handling.md
WebRTC iOS ChangeLog
Source: https://developers.telnyx.com/development/webrtc/ios-sdk/changelog.md
WebRTC Android Quickstart
Source: https://developers.telnyx.com/development/webrtc/android-sdk/quickstart.md
Android Voice Client SDK
Source: https://developers.telnyx.com/development/webrtc/android-sdk.md
WebRTC Android Client
Source: https://developers.telnyx.com/development/webrtc/android-sdk/classes/txclient.md
WebRTC Android Call
Source: https://developers.telnyx.com/development/webrtc/android-sdk/classes/call.md
WebRTC Android Config
Source: https://developers.telnyx.com/development/webrtc/android-sdk/config/txconfig.md
WebRTC Android ReceivedMessageBody
Source: https://developers.telnyx.com/development/webrtc/android-sdk/socket/receivedmessagebody.md
WebRTC Android SocketResponse
Source: https://developers.telnyx.com/development/webrtc/android-sdk/socket/socketresponse.md
Android Portal Setup
Source: https://developers.telnyx.com/development/webrtc/android-sdk/push-notification/portal-setup.md
Notification Quickstart for Android
Source: https://developers.telnyx.com/development/webrtc/android-sdk/push-notification/quickstart.md
Android Push Notification Setup
Source: https://developers.telnyx.com/development/webrtc/android-sdk/push-notification/app-setup.md
Android Push Troubleshooting
Source: https://developers.telnyx.com/development/webrtc/android-sdk/push-notification/troubleshooting.md
WebRTC Android SDK AI Voice Assistant Introduction
Source: https://developers.telnyx.com/development/webrtc/android-sdk/ai-voice-assistant/introduction.md
WebRTC Android SDK AI Voice Assistant Anonymous Login
Source: https://developers.telnyx.com/development/webrtc/android-sdk/ai-voice-assistant/anonymous-login.md
WebRTC Android SDK AI Voice Assistant Starting Conversations
Source: https://developers.telnyx.com/development/webrtc/android-sdk/ai-voice-assistant/starting-conversations.md
WebRTC Android SDK AI Voice Assistant Text Messaging
Source: https://developers.telnyx.com/development/webrtc/android-sdk/ai-voice-assistant/text-messaging.md
WebRTC Android SDK AI Voice Assistant Transcript Updates
Source: https://developers.telnyx.com/development/webrtc/android-sdk/ai-voice-assistant/transcript-updates.md
WebRTC Stats
Source: https://developers.telnyx.com/development/webrtc/android-sdk/stats.md
WebRTC Call Reports
Source: https://developers.telnyx.com/development/webrtc/android-sdk/call-reports.md
WebRTC Call Reports
The Telnyx Android SDK automatically collects detailed call statistics during WebRTC calls and sends them to Telnyx for troubleshooting and monitoring purposes. This feature helps diagnose call quality issues, connection problems, and provides insights into call performance.Overview
When enabled, the SDK collects:- Call summary: Call identifiers, timestamps, duration, and device information
- Connection metrics: ICE states, DTLS states, signaling transitions
- Media statistics: Packet loss, jitter, round-trip time, audio levels
- Network information: Selected ICE candidates, transport details
Enabling Call Reports
Call reports are automatically enabled when you connect to the Telnyx WebRTC service. The SDK handles data collection and upload transparently. Call reports are sent automatically when a call ends. No additional configuration is required.Accessing Local Call Reports
For debugging purposes, you can access the call report JSON file that is saved locally after each call:<cache_dir>/call_stats/call_stats_<callId>.json
Call Report JSON Structure
The call report JSON contains the following sections:Top-Level Identifiers
Summary Section
Contains high-level call information:Stats Array
Contains interval-based statistics captured during the call. Each interval (typically 5 seconds) includes:Android Extra Section
Contains Android-specific debugging information:Metrics Reference
Audio Inbound Metrics
Audio Outbound Metrics
Connection Metrics
Troubleshooting with Call Reports
Call reports can help diagnose common issues:High Packet Loss
Look atpacketsLost in the audio inbound stats. Values above 1-2% may indicate network issues.
Audio Quality Issues
CheckjitterAvg and concealmentEvents. High jitter (>30ms) or frequent concealment events indicate audio quality degradation.
Connection Failures
Review theconnectionTimeline in android_extra. Look for:
ICE_FAILED- Network connectivity issuesDTLS_FAILED- TLS/security handshake failures- Long gaps between
ICE_CONNECTEDandDTLS_CONNECTED(>5 seconds)
One-Way Audio
Check if:packetsReceivedis 0 (not receiving audio)audioLevelAvgis 0 (microphone not capturing)- Review microphone permissions in
deviceInfo.permissions
Privacy & Data Handling
Call reports are sent securely to Telnyx and are used solely for:- Troubleshooting call quality issues
- Monitoring service health
- Improving SDK performance
See Also
- WebRTC Stats - Real-time call quality metrics
- Error Handling - SDK error codes and handling
- Troubleshooting Guide - Common issues and solutions
WebRTC Android SDK Error Handling
Source: https://developers.telnyx.com/development/webrtc/android-sdk/error-handling.md
WebRTC Android ChangeLog
Source: https://developers.telnyx.com/development/webrtc/android-sdk/changelog.md
React Native SDK
Source: https://developers.telnyx.com/development/webrtc/react-native-sdk.md
React Native SDK Quickstart
Source: https://developers.telnyx.com/development/webrtc/react-native-sdk/quickstart.md
Call
Source: https://developers.telnyx.com/development/webrtc/react-native-sdk/classes/call.md
TelnyxVoipClient
Source: https://developers.telnyx.com/development/webrtc/react-native-sdk/classes/telnyxvoipclient.md
CredentialConfig
Source: https://developers.telnyx.com/development/webrtc/react-native-sdk/interfaces/credentialconfig.md
TokenConfig
Source: https://developers.telnyx.com/development/webrtc/react-native-sdk/interfaces/tokenconfig.md
TelnyxVoipClientOptions
Source: https://developers.telnyx.com/development/webrtc/react-native-sdk/interfaces/telnyxvoipclientoptions.md
TelnyxVoiceAppOptions
Source: https://developers.telnyx.com/development/webrtc/react-native-sdk/interfaces/telnyxvoiceappoptions.md
Portal Setup
Source: https://developers.telnyx.com/development/webrtc/react-native-sdk/push-notification/portal-setup.md
App Setup
Source: https://developers.telnyx.com/development/webrtc/react-native-sdk/push-notification/app-setup.md
Error Handling
Source: https://developers.telnyx.com/development/webrtc/react-native-sdk/error-handling.md
Changelog
Source: https://developers.telnyx.com/development/webrtc/react-native-sdk/changelog.md
Flutter Voice Client SDK
Source: https://developers.telnyx.com/development/webrtc/flutter-sdk.md
WebRTC Flutter Client
Source: https://developers.telnyx.com/development/webrtc/flutter-sdk/classes/txclient.md
WebRTC Flutter Call
Source: https://developers.telnyx.com/development/webrtc/flutter-sdk/classes/call.md
Flutter WebRTC SDK Message
Source: https://developers.telnyx.com/development/webrtc/flutter-sdk/classes/messages/telnyx-message.md
Flutter WebRTC SDK Socket Error Message
Source: https://developers.telnyx.com/development/webrtc/flutter-sdk/classes/messages/telnyx-socket-error.md
WebRTC Flutter Call State
Source: https://developers.telnyx.com/development/webrtc/flutter-sdk/enums/call-state.md
Flutter WebRTC SDK Socket Message Handler
Source: https://developers.telnyx.com/development/webrtc/flutter-sdk/event-handlers/on-socket-message-received.md
Flutter WebRTC SDK Socket Error Handler
Source: https://developers.telnyx.com/development/webrtc/flutter-sdk/event-handlers/on-socket-error-received.md
WebRTC Flutter Client Configuration
Source: https://developers.telnyx.com/development/webrtc/flutter-sdk/method-objects/config.md
WebRTC Flutter Incoming Invite Object
Source: https://developers.telnyx.com/development/webrtc/flutter-sdk/method-objects/incoming-invite-params.md
WebRTC Flutter Client Push Notifications Configuration
Source: https://developers.telnyx.com/development/webrtc/flutter-sdk/method-objects/push-metadata.md
Flutter Push Notification Portal Setup
Source: https://developers.telnyx.com/development/webrtc/flutter-sdk/push-notification/portal-setup.md
Flutter Push Notification App Setup
Source: https://developers.telnyx.com/development/webrtc/flutter-sdk/push-notification/app-setup.md
Flutter Push Troubleshooting
Source: https://developers.telnyx.com/development/webrtc/flutter-sdk/push-notification/troubleshooting.md
WebRTC Flutter SDK AI Voice Assistant Introduction
Source: https://developers.telnyx.com/development/webrtc/flutter-sdk/ai-voice-assistant/introduction.md
WebRTC Flutter SDK AI Voice Assistant Anonymous Login
Source: https://developers.telnyx.com/development/webrtc/flutter-sdk/ai-voice-assistant/anonymous-login.md
WebRTC Flutter SDK AI Voice Assistant Starting Conversations
Source: https://developers.telnyx.com/development/webrtc/flutter-sdk/ai-voice-assistant/starting-conversations.md
WebRTC Flutter SDK AI Voice Assistant Text Messaging
Source: https://developers.telnyx.com/development/webrtc/flutter-sdk/ai-voice-assistant/text-messaging.md
WebRTC Flutter SDK AI Voice Assistant Transcript Updates
Source: https://developers.telnyx.com/development/webrtc/flutter-sdk/ai-voice-assistant/transcript-updates.md
WebRTC Stats
Source: https://developers.telnyx.com/development/webrtc/flutter-sdk/stats.md
WebRTC Flutter SDK Error Handling
Source: https://developers.telnyx.com/development/webrtc/flutter-sdk/error-handling.md
WebRTC Flutter ChangeLog
Source: https://developers.telnyx.com/development/webrtc/flutter-sdk/changelog.md
API Reference (WebRTC)
Credentials
- List all credentials: List all On-demand Credentials.
- Create a credential: Create a credential.
- Delete a credential: Delete an existing credential.
- Get a credential: Get the details of an existing On-demand Credential.
- Update a credential: Update an existing credential.
Access Tokens
- Create an Access Token.: Create an Access Token (JWT) for the credential.
Push Credentials
- List mobile push credentials: List mobile push credentials
- Creates a new mobile push credential: Creates a new mobile push credential
- Deletes a mobile push credential: Deletes a mobile push credential based on the given
push_credential_id - Retrieves a mobile push credential: Retrieves mobile push credential based on the given
push_credential_id
Voice SDK Stats
- List Voice SDK call reports: Returns paginated raw call report stats JSON payloads stored for the authenticated user. The user is derived from Telnyx authentication, not from request param…
- Retrieve Voice SDK call reports by call ID: Returns raw call report stats JSON payloads stored for the authenticated user and
call_id. The user is derived from Telnyx authentication, not from request p…