

Telnyx Calling: Voice API — Full Documentation
Complete page content for Voice API (Calling section) of the Telnyx developer docs (https://developers.telnyx.com). This file: https://developers.telnyx.com/development/llms/calling-voice-api-llms-full-txt.md · Root index: https://developers.telnyx.com/llms.txt
Voice API Fundamentals
Getting Started
Source: https://developers.telnyx.com/docs/voice/programmable-voice/voice-api-fundamentals.mdWelcome to the Telnyx Voice API! This guide will walk you through everything you need to start building voice applications with Telnyx, from creating your account to making your first API call.
What You’ll Build
In this guide, you’ll set up a complete voice application that can make outbound calls and be ready to explore advanced features like AI assistants, speech recognition, and media streaming.Prerequisites
Before you begin, make sure you have:- A computer with internet access.
- Basic understanding of REST APIs and webhooks.
- A development environment with your preferred programming language (we’ll provide examples in multiple languages).
- (Optional) A tool like ngrok for local webhook testing.
Create Your Telnyx Account
To get started with the Voice API, you’ll need a Telnyx account. Follow our account creation guide to set up your account and access the Mission Control Portal.Obtain Your API Key
To authenticate your Voice API requests, you’ll need an API key. Follow our API key creation guide to generate and securely store your API key.Set Up Your Webhook URL
To receive real-time events from the Voice API, you’ll need to set up webhooks. Follow our webhook fundamentals guide to configure your webhook URL and create a handler for Voice API events.Buy a Phone Number
To make calls with the Voice API, you’ll need a phone number. Follow our phone number purchase guide to buy a number that will be associated with your Voice API application.Create a Voice API Application
A Voice API Application defines how Telnyx handles calls to and from your numbers.Creating Your Application
- In the Mission Control Portal, navigate to Real-Time Communication > Voice > Programmable Voice.
- Click on the Create Voice App button in Voice API Applications tab.
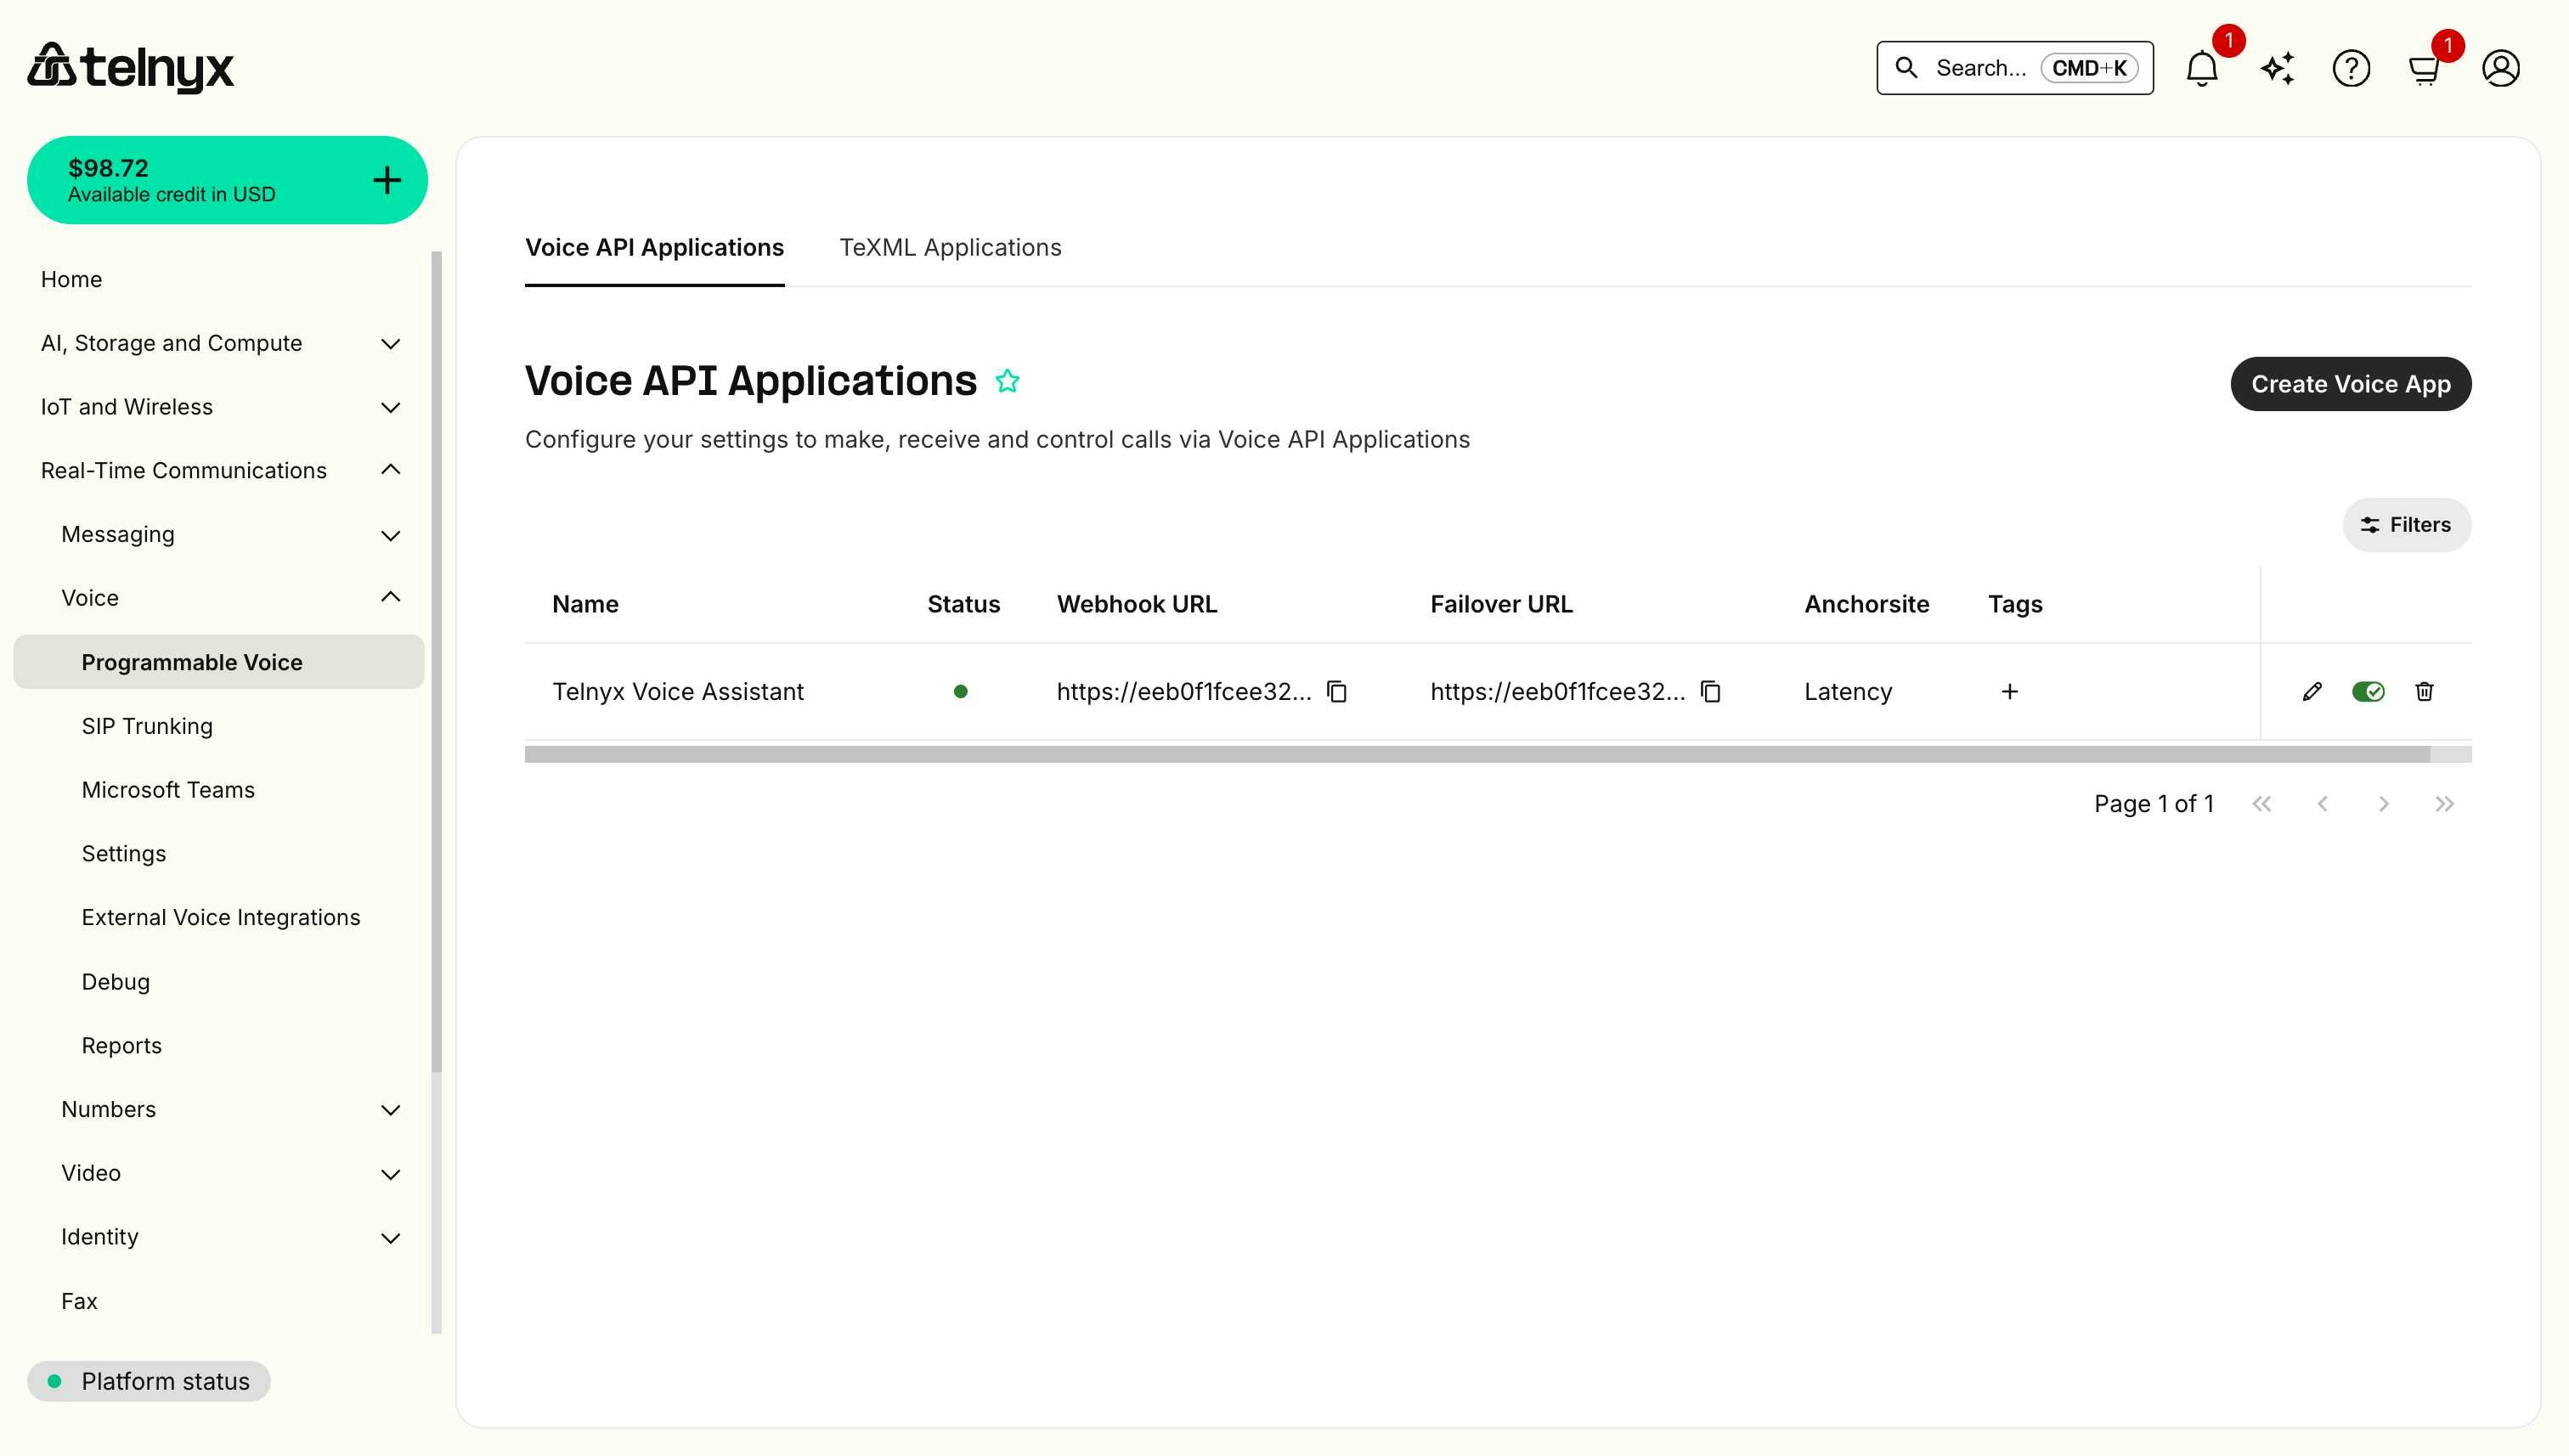
- Configure your application and click Create.
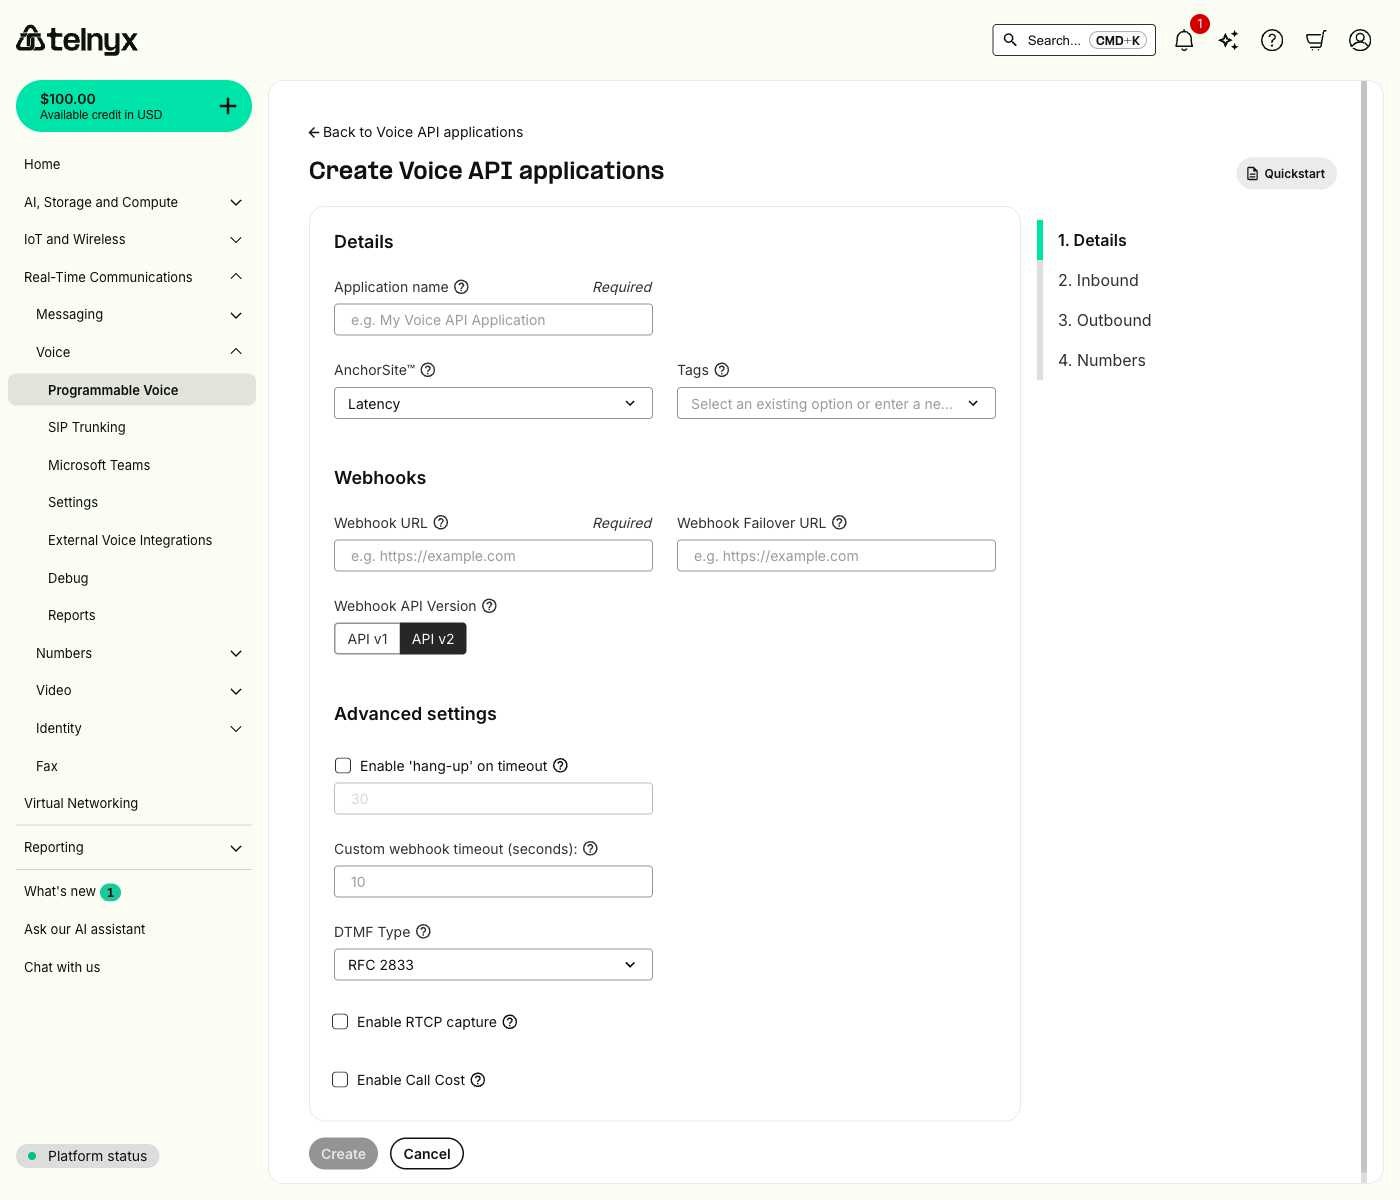
Application configuration options
- Application name: A user-assigned name to help manage the application.
- Webhook URL: Where Telnyx sends call events, must include a scheme such as ‘https’.
- Webhook failover URL: Backup URL used if primary webhook URL fails after two consecutive delivery attempts.
- Webhook API version: Determines which webhook format will be used, API v1 or v2 (v2 recommended).
- Anchor site: Routes media through the site with the lowest round-trip time to your connection.
- Tags: Create or remove tags associated to this application for organization.
- Enable hang-up on timeout: Hang up calls if no response to webhook within specified time.
- Custom webhook timeout: Time in seconds to wait for webhook response before timing out.
- DTMF type: Touch-tone digit handling method (RFC 2833 recommended).
- Enable call cost: Receive cost information webhooks for billing and reporting.
- Configure the Inbound settings.
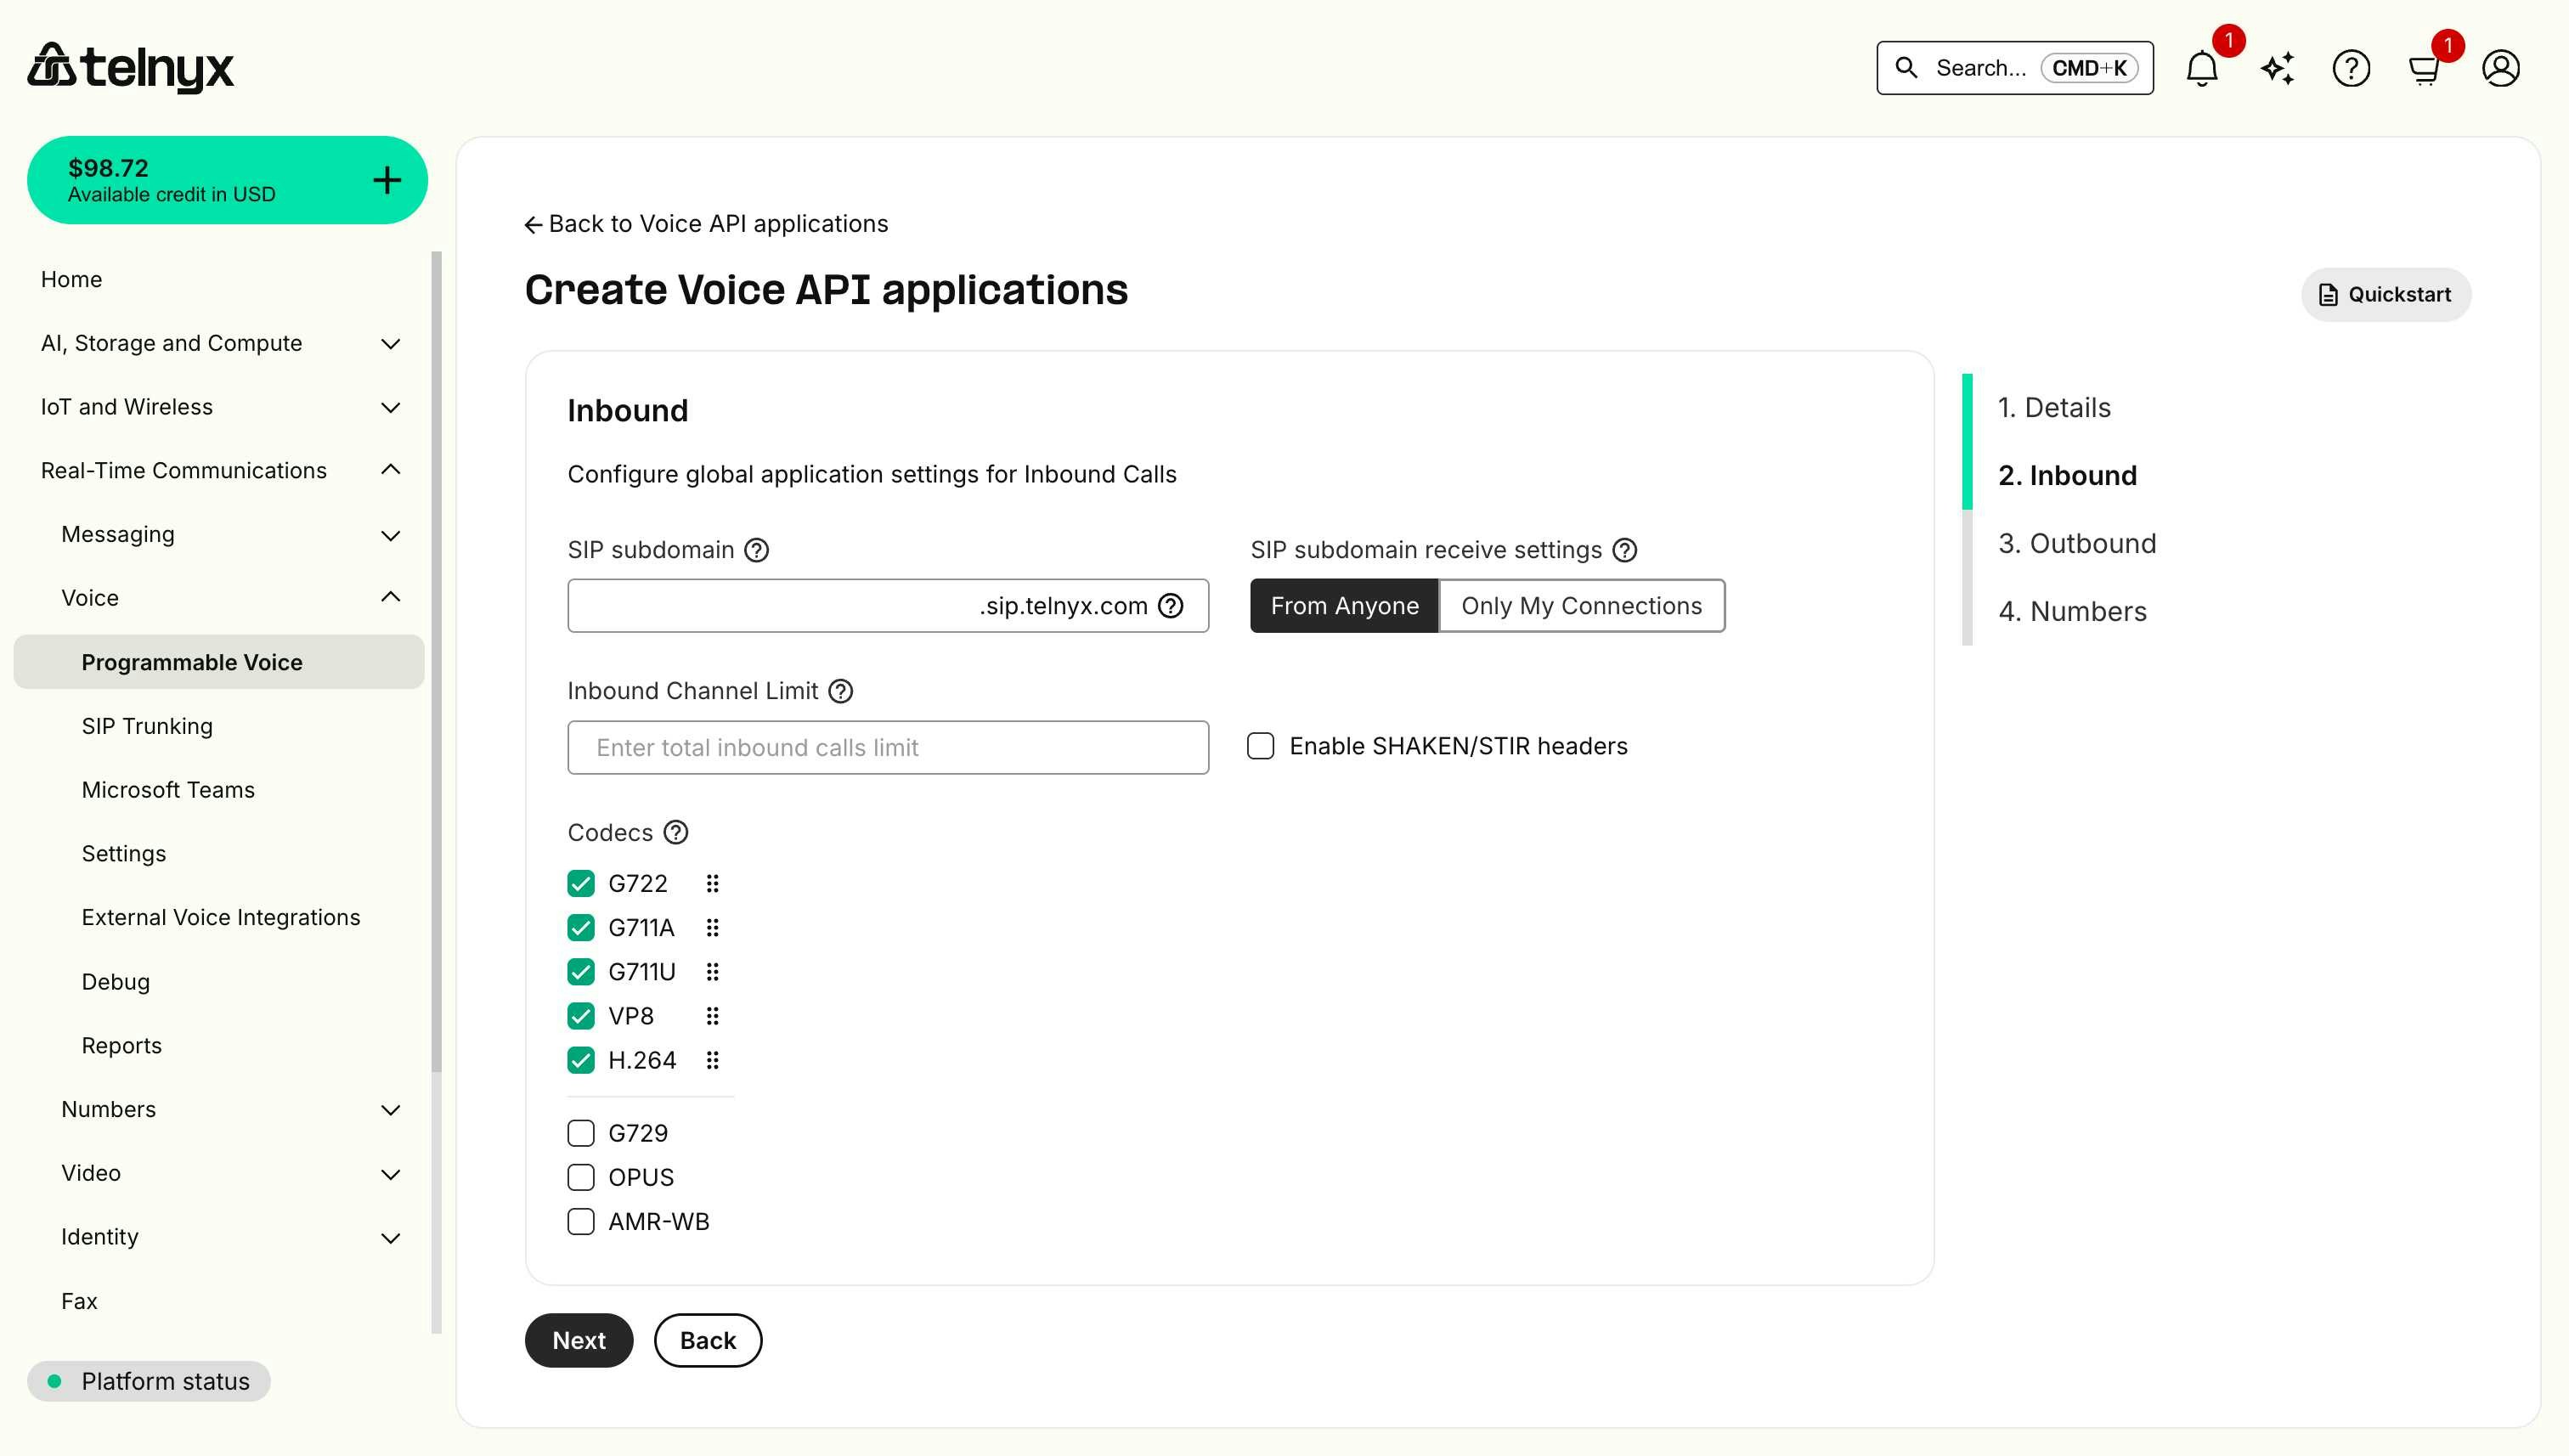
Inbound configuration options
- SIP subdomain: Create a custom SIP address (like
yourname.sip.telnyx.com) to receive calls from any SIP endpoint. - SIP subdomain receive settings: Choose who can call your SIP subdomain - anyone on the internet or only your connections.
- Inbound channel limit: Set the maximum number of simultaneous inbound calls allowed for this application.
- Enable SHAKEN/STIR headers: Add call authentication headers to help verify caller identity and reduce spoofing.
- Codecs: Select which audio and video formats your application will support for optimal call quality.
- Configure the Outbound settings.
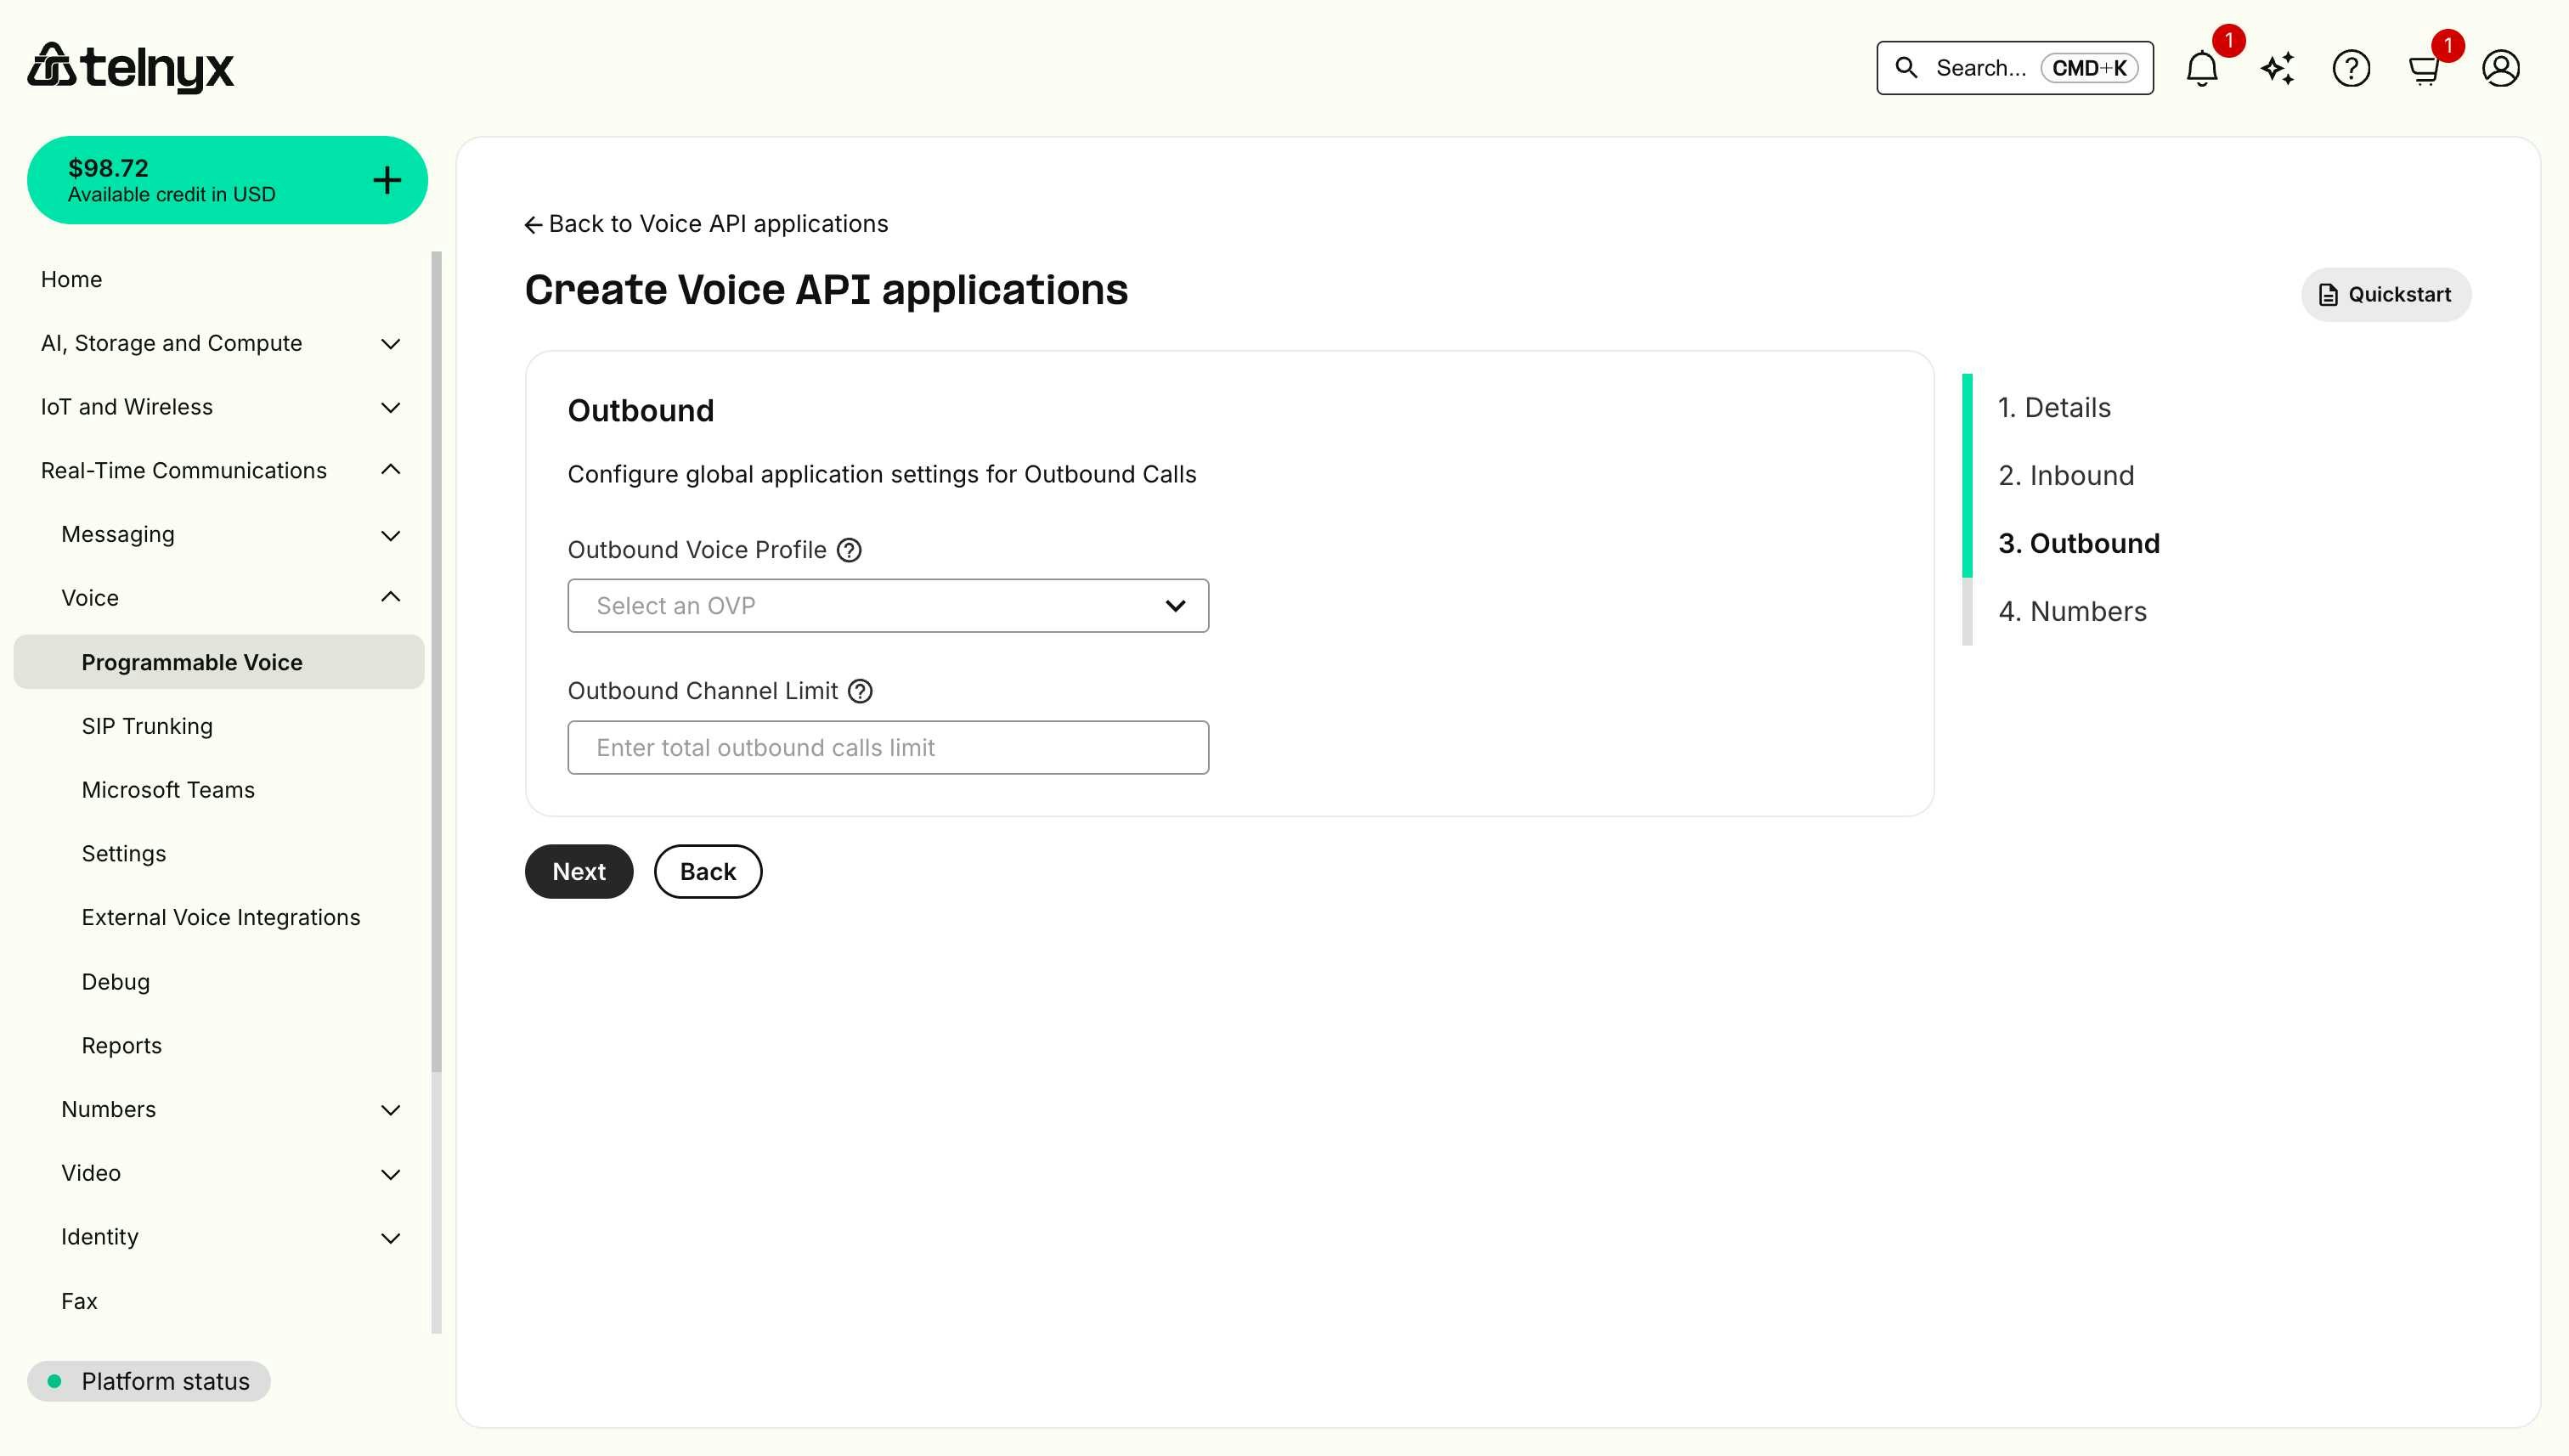
Outbound configuration options
- Outbound voice profile: Identifies the associated outbound voice profile for call routing and billing.
- Outbound channel limit: Sets the maximum number of simultaneous outbound calls allowed for this application.
- Configure the Numbers settings.
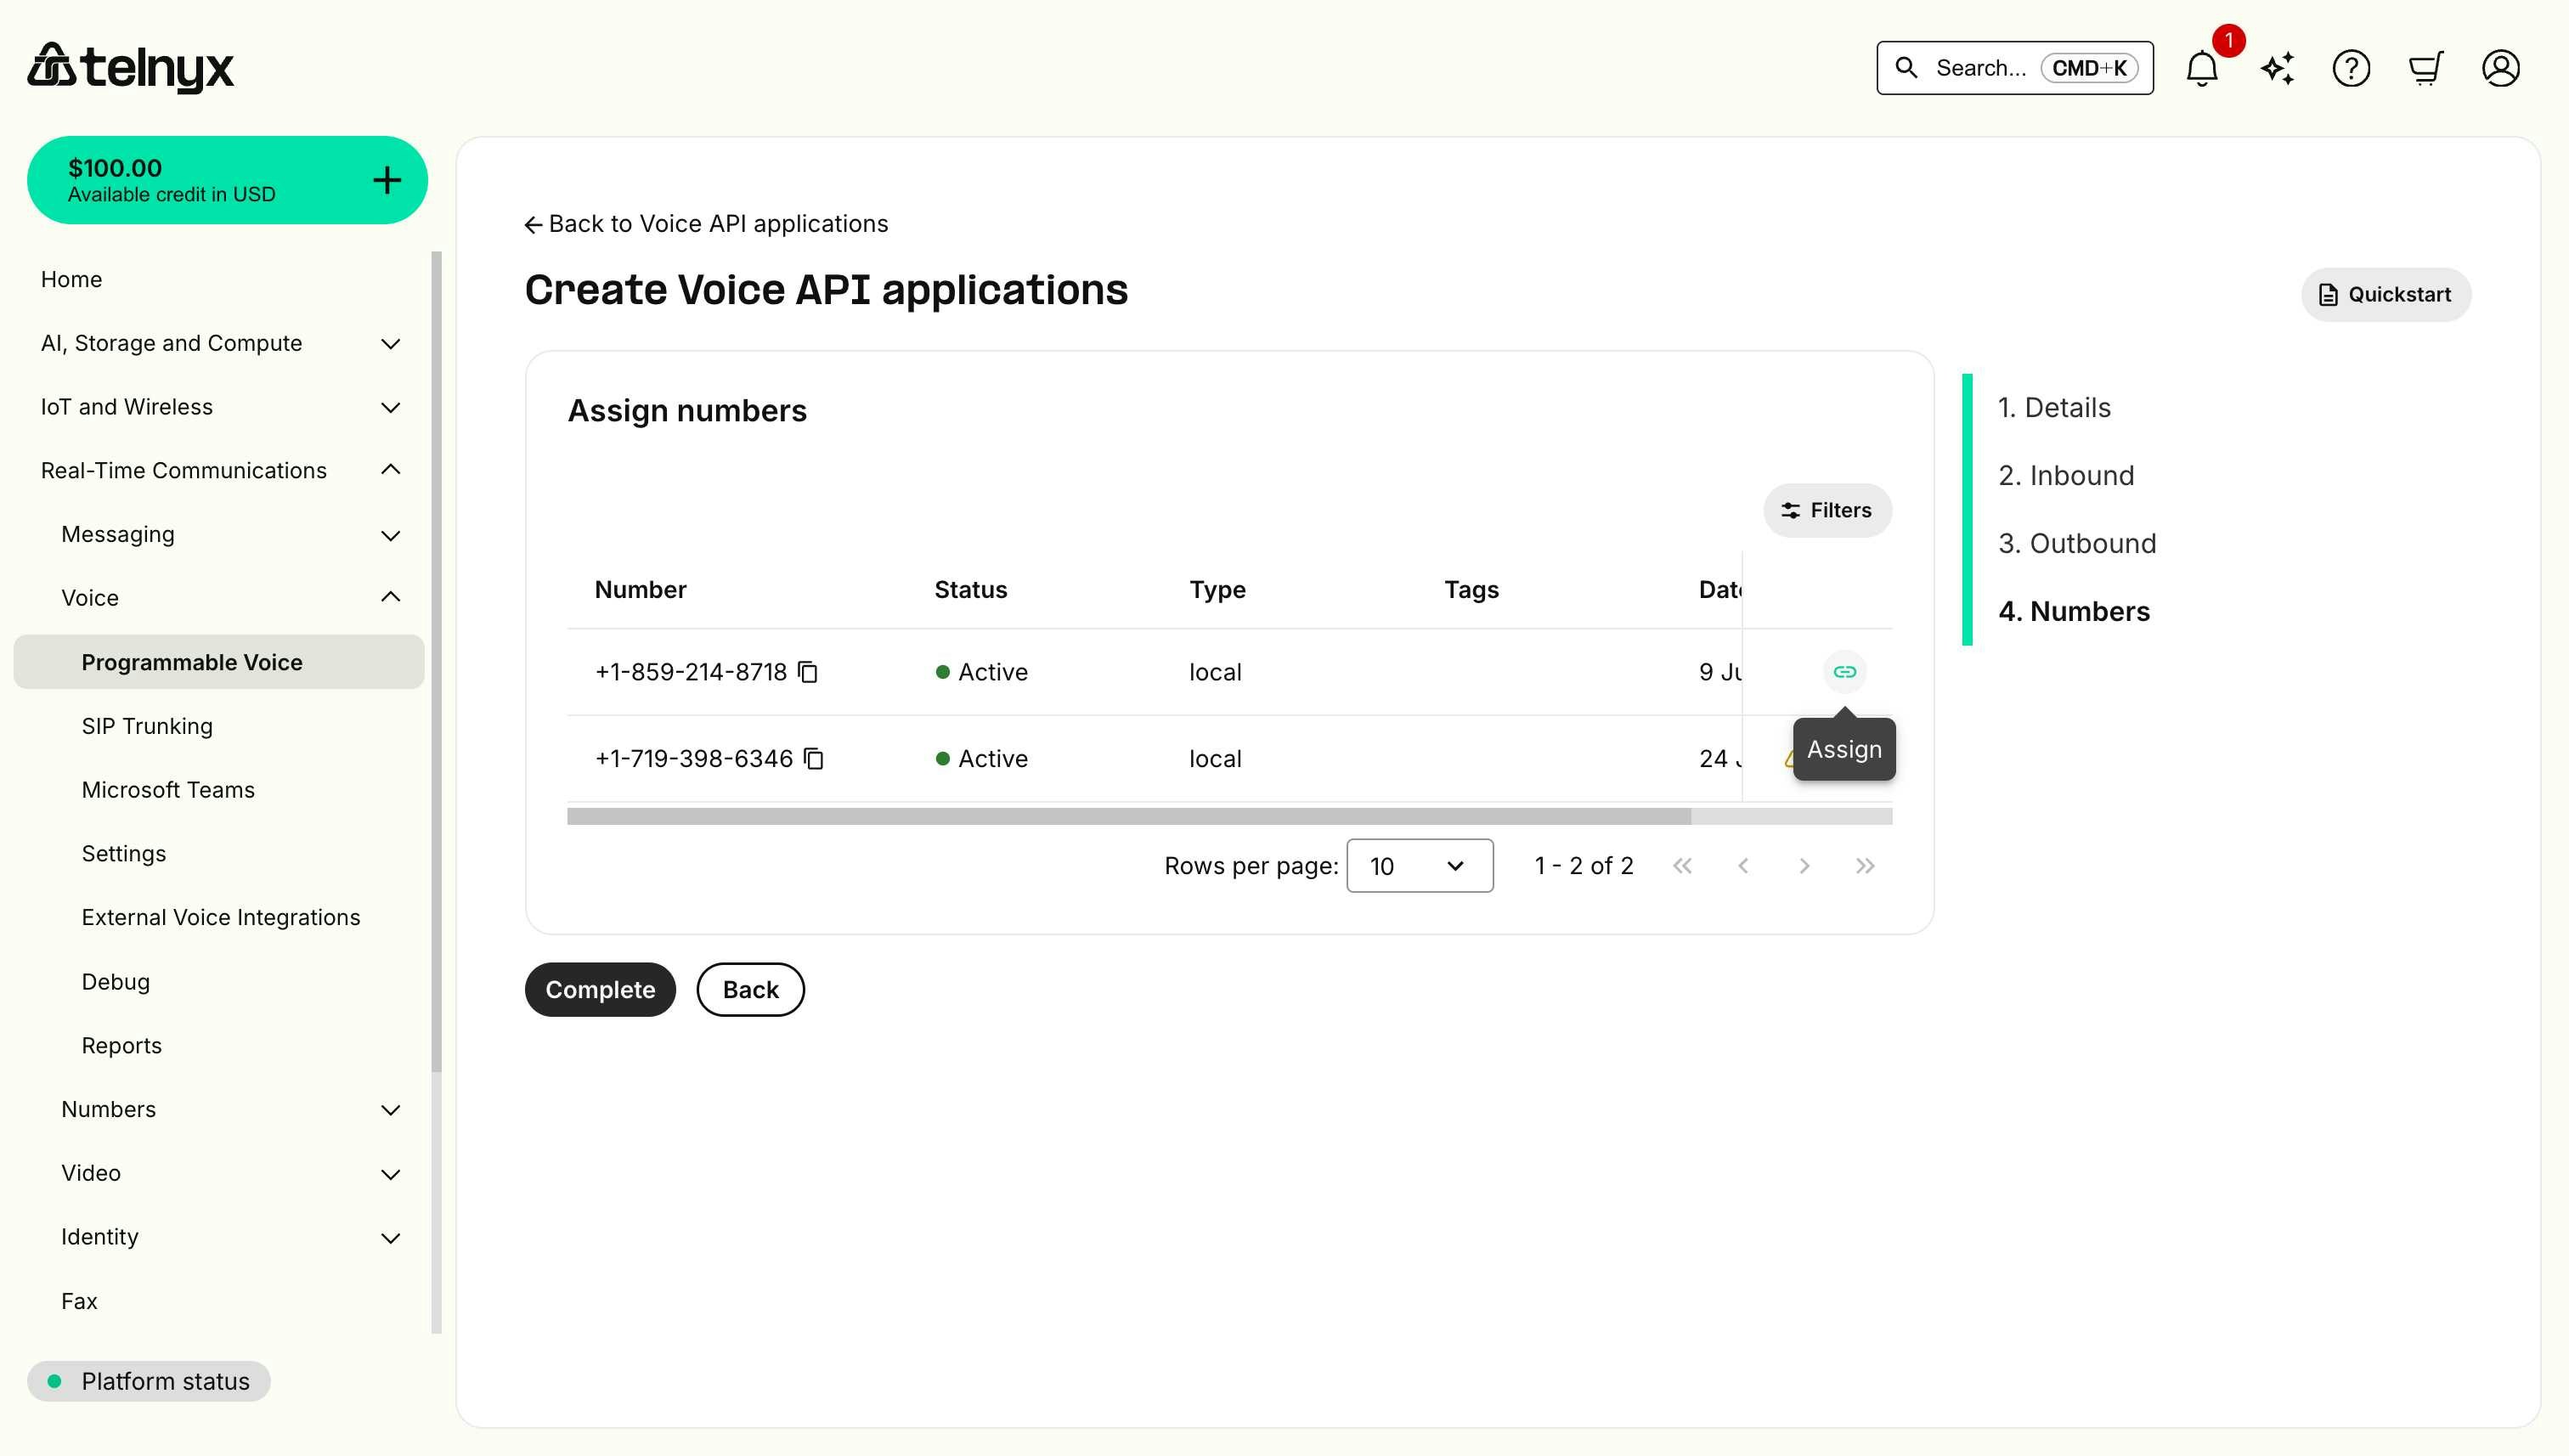
Numbers configuration
This section displays your purchased phone numbers that can be assigned to this Voice API application. You can view number details including status, type (local/toll-free), and purchase date, then select which numbers to associate with your application for handling inbound and outbound calls.- Click Complete, and congratulations! You just created a Voice API app. It will be listed under your Voice API Applications section.

Your First Voice API Call
Congratulations! 🎉 You’ve successfully set up everything needed for your Voice API application. Now comes the exciting part – let’s make your first outbound call and bring your application to life!Making an Outbound Call
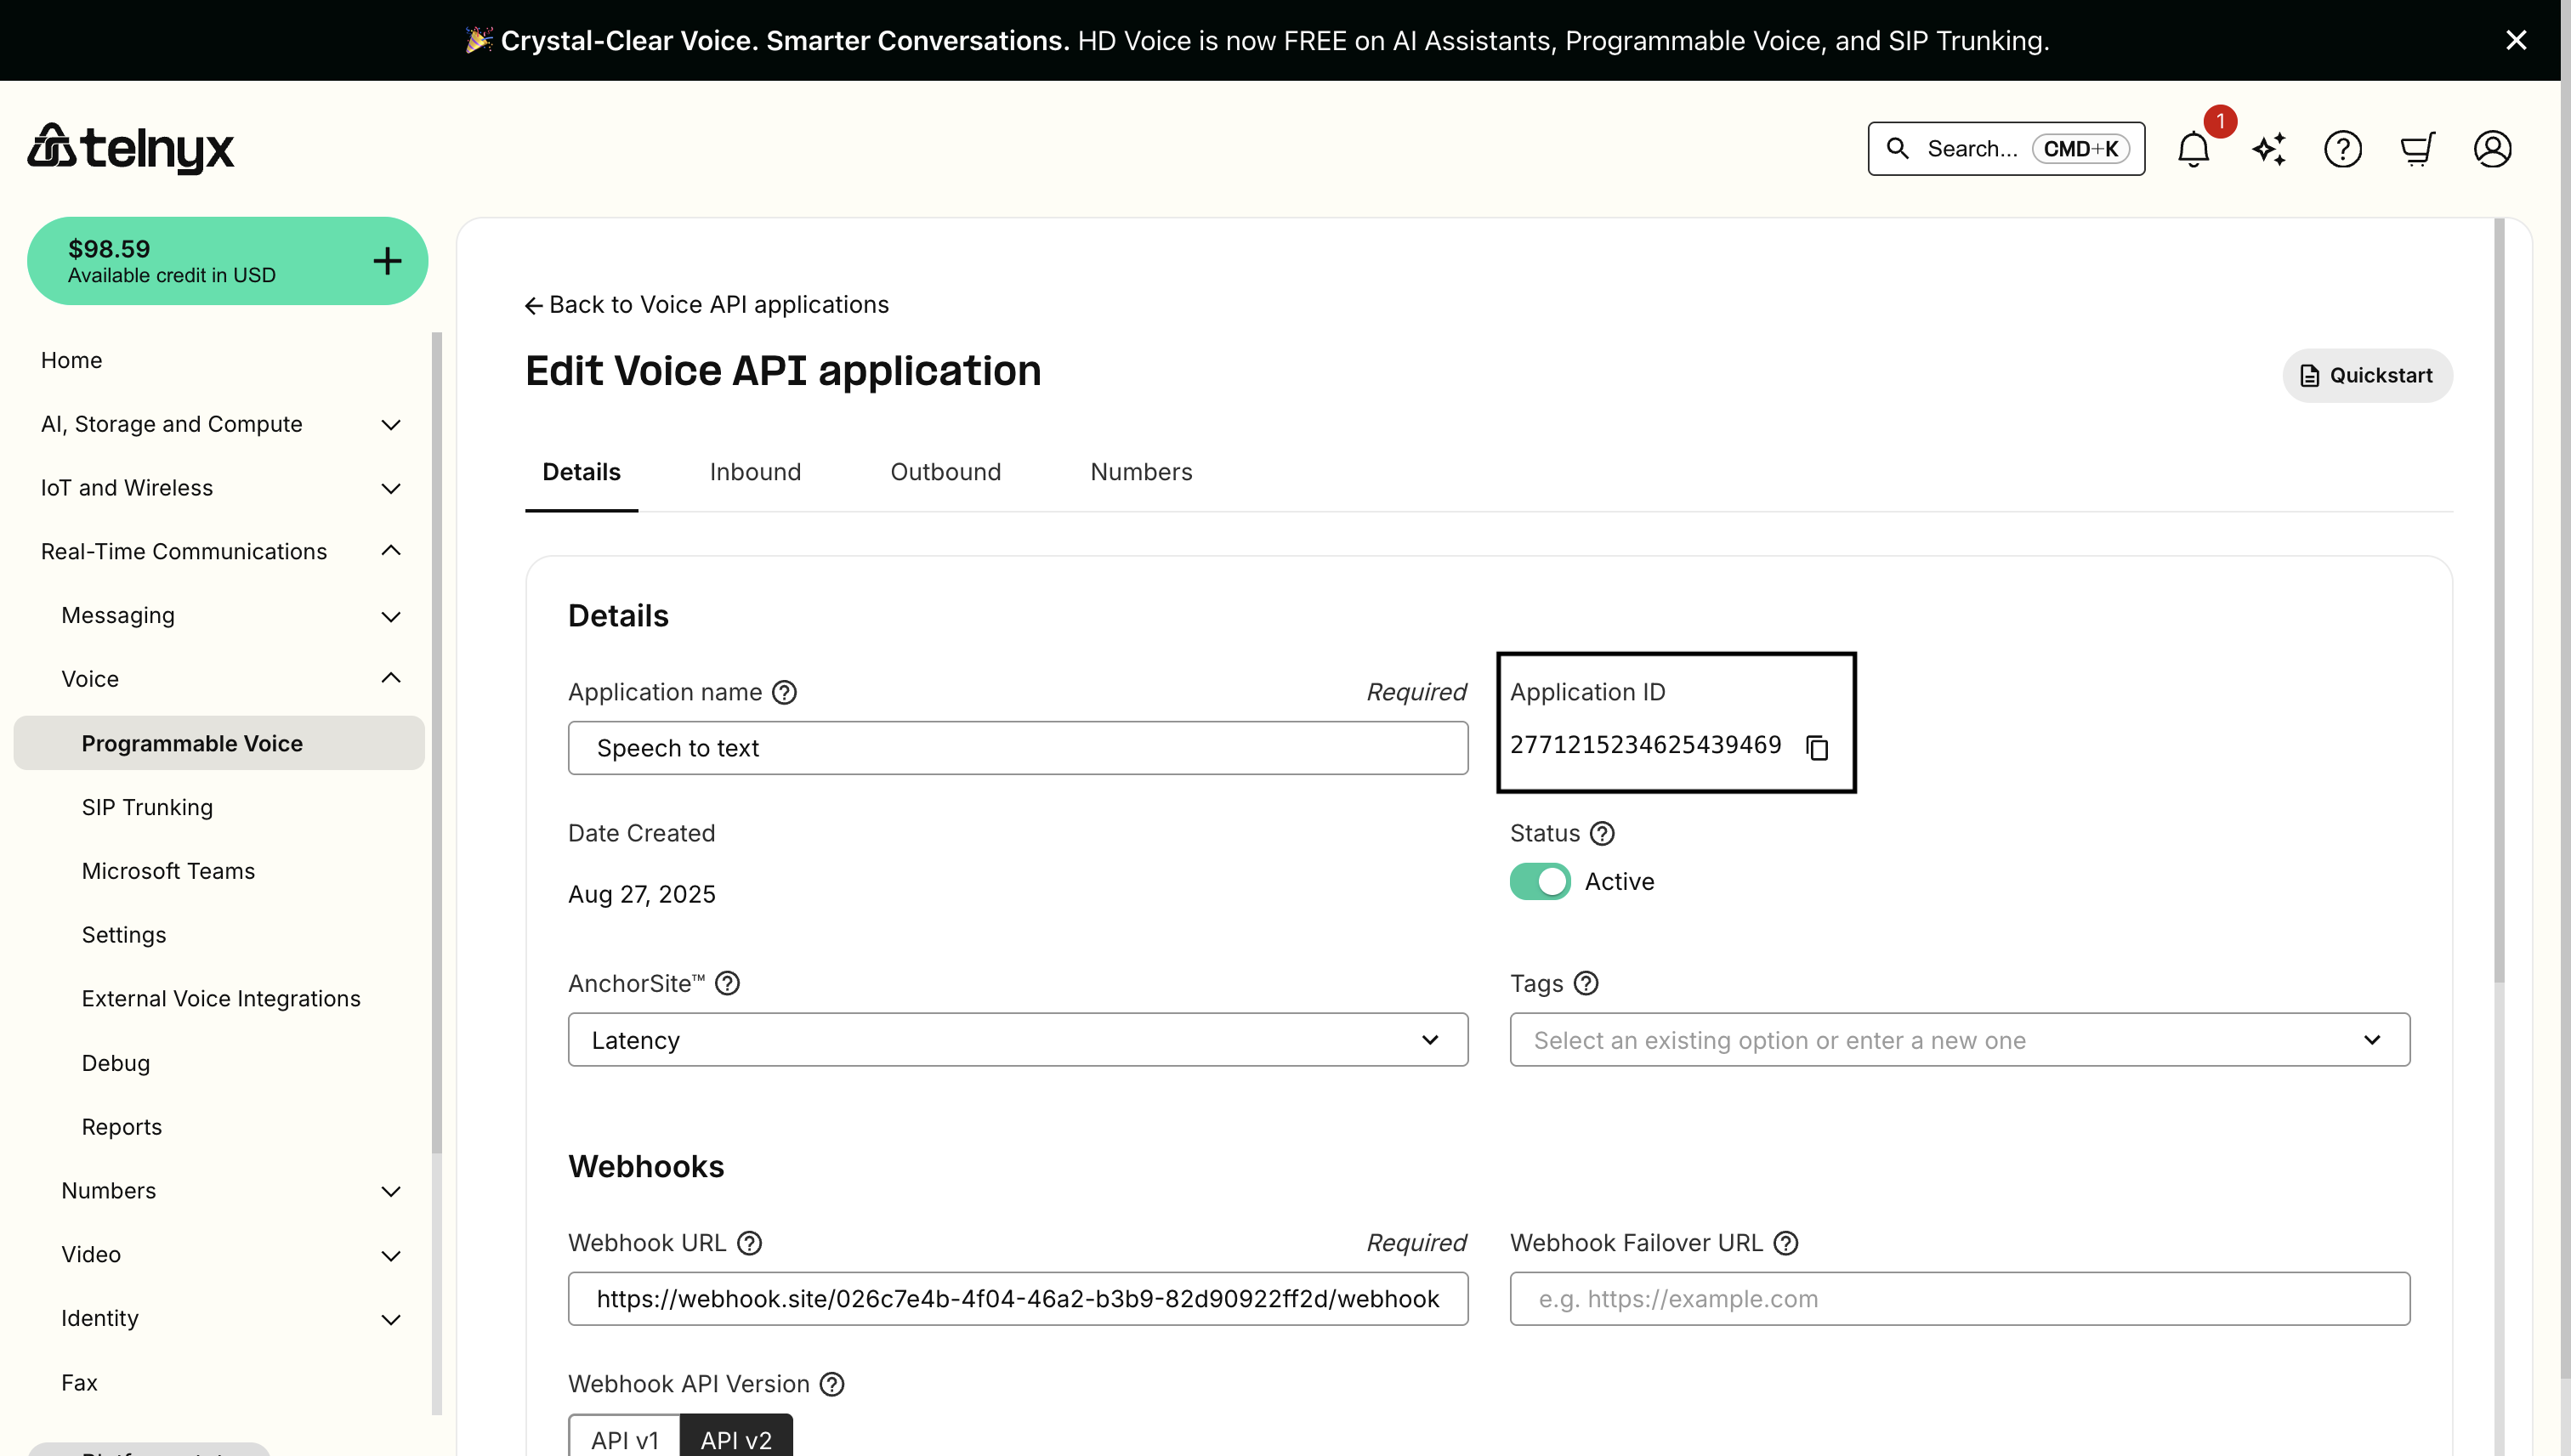
Replace the placeholders with your actual values:your_api_key: Your Telnyx API key from the API key section above.your_phone_number: The number you purchased above.destination_number: The number you want to call.connection_id: Your connection_id (which is the Application ID) from your Voice API Application details page.
cURL
Node.js
Python
Understanding the Call Flow
When you make a call, here’s what happens:- Call Initiated: Telnyx receives your API request and initiates the call.
- Webhook Sent: Telnyx sends a
call.initiatedwebhook to your URL. - Call Progress: Telnyx sends additional webhooks as the call progresses (
call.answered,call.hangup, etc.). - Your Response: When the call is answered, you can use Voice API commands to control it (e.g.,
speak, enabletranscription, startrecording). - Call End: Final webhook (
call.hangup) sent when the call completes.
Example Webhook Sequence
1. call.initiatedTesting Your Setup
Make a Test Call
- Ensure your webhook handler is running and accessible.
- Use the API to make an outbound call to your mobile phone.
Common Issues and Solutions
Record and Retrieve Call Recordings
Record Calls
You can enable call recording for Outbound Voice Profiles by configuring your Record Outbound Calls settings in the Mission Control Portal.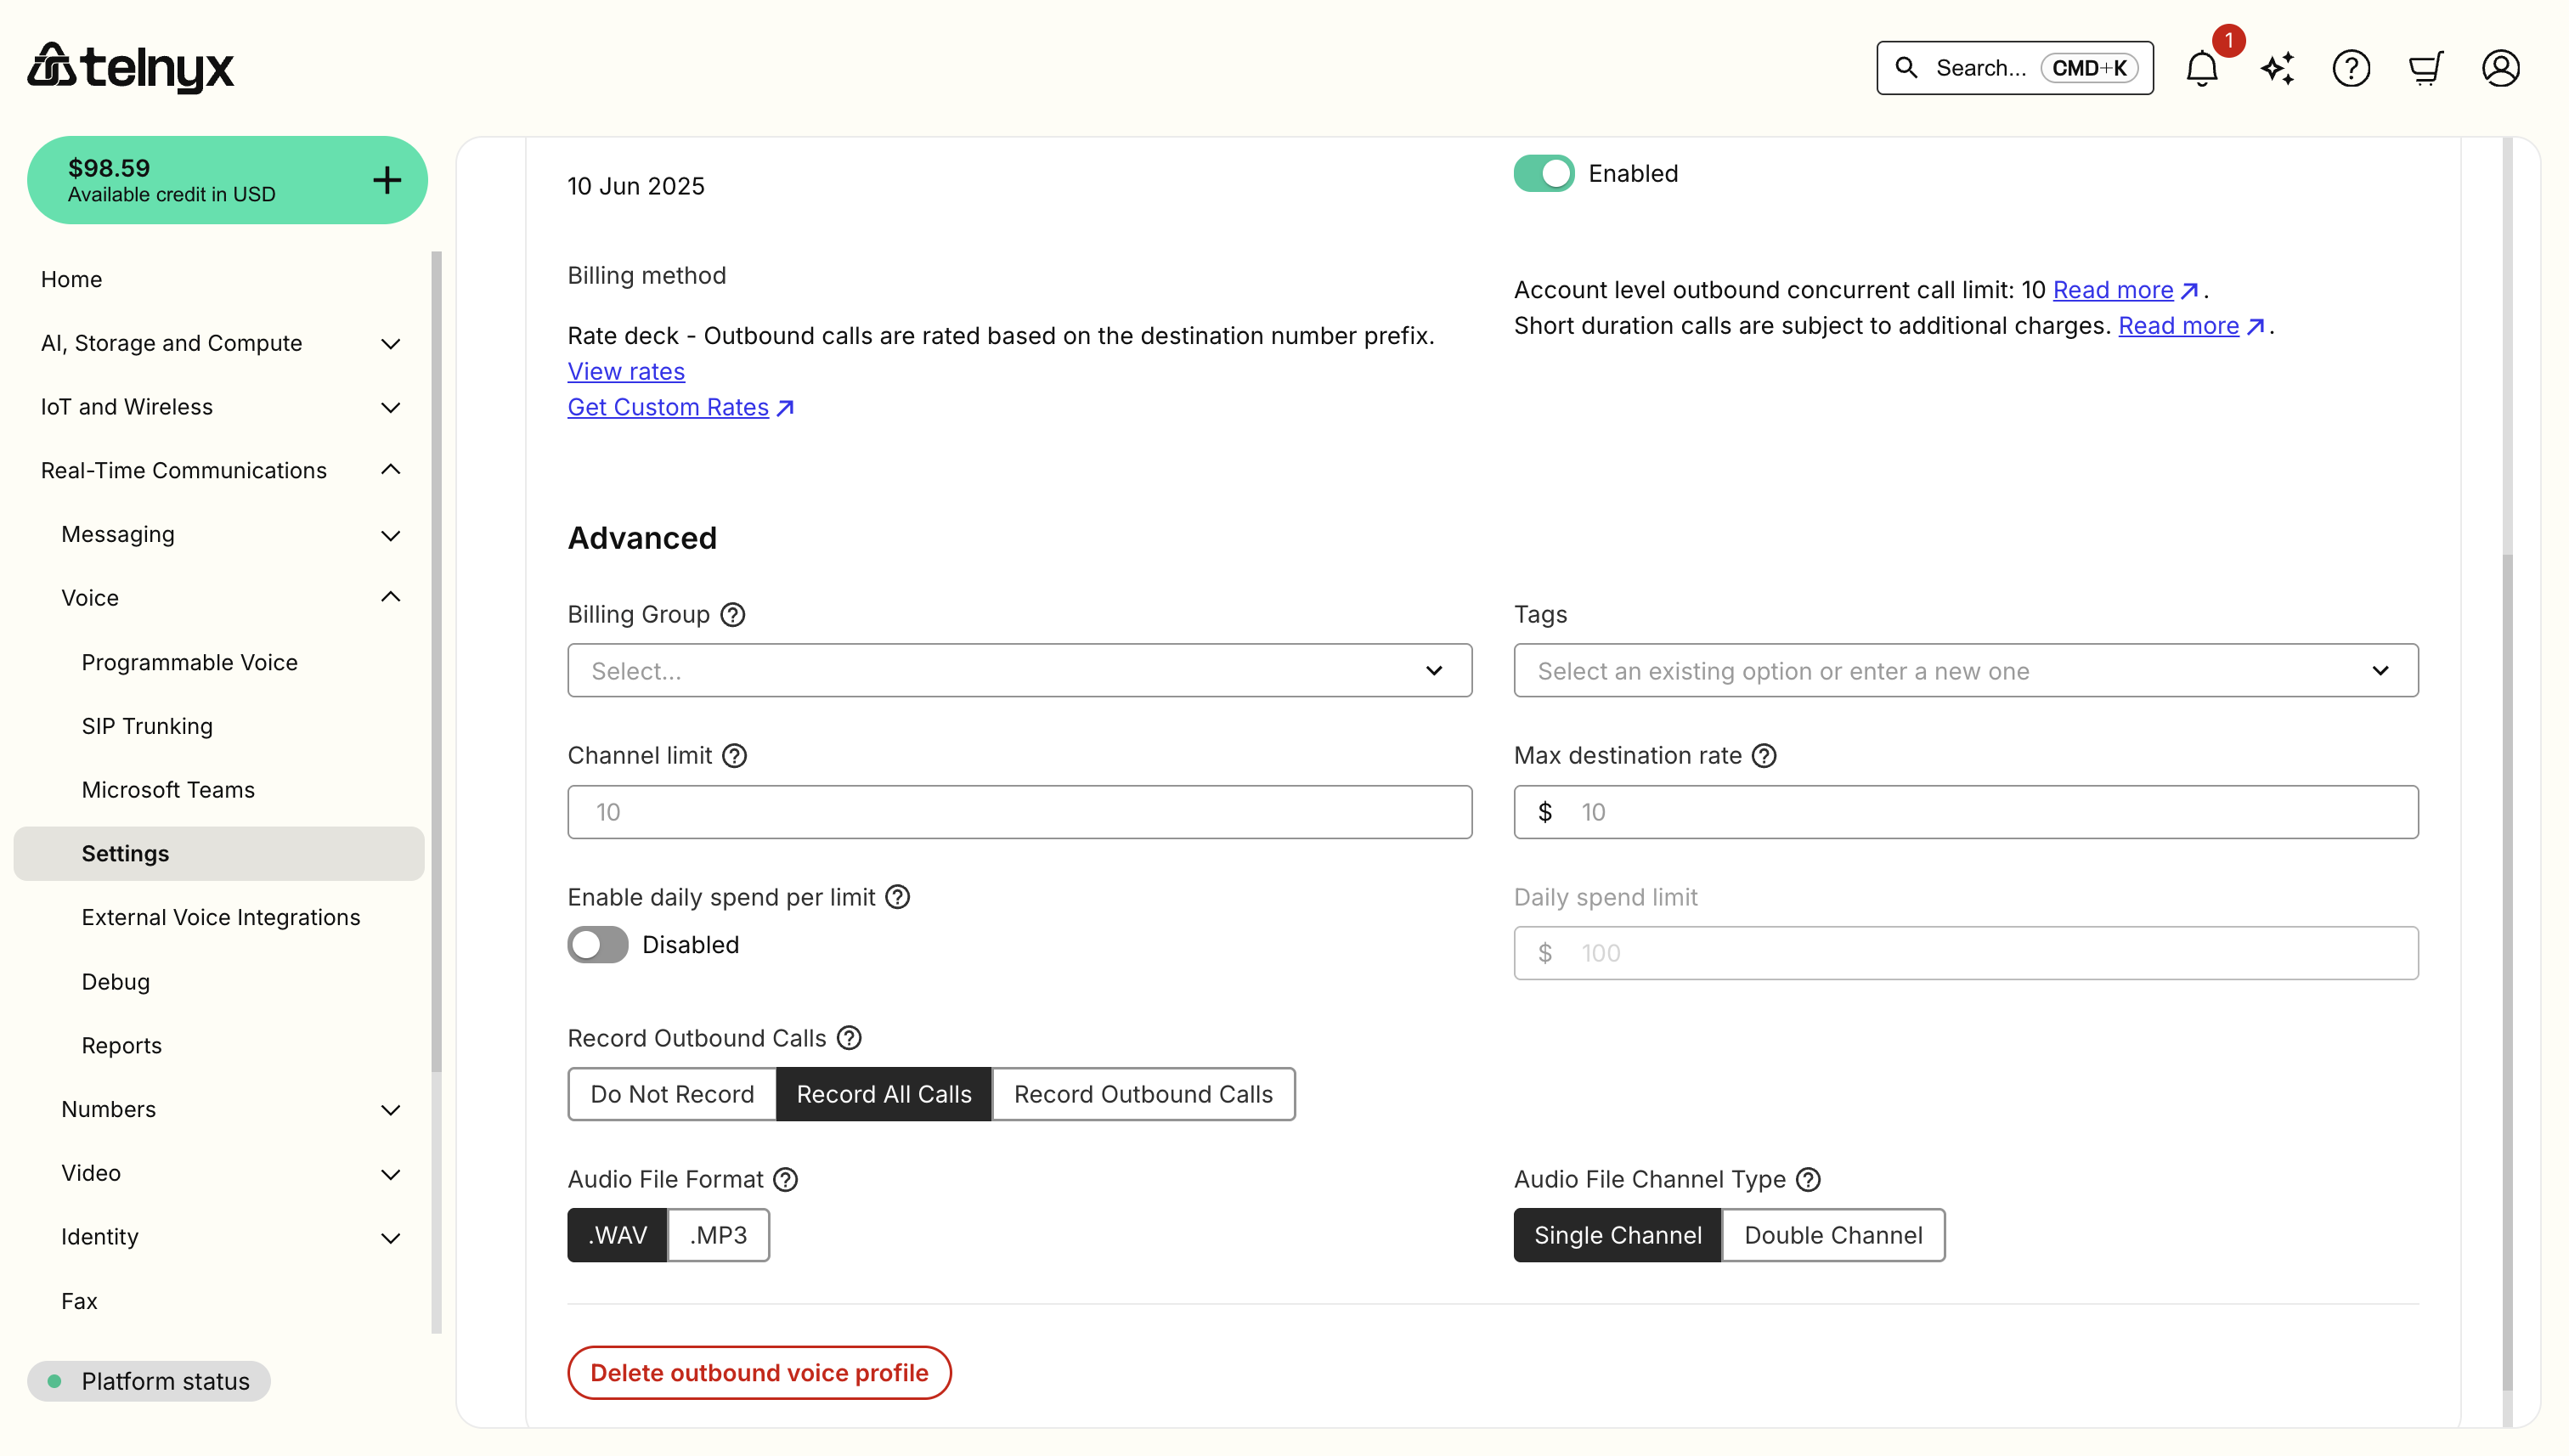
Retrieve Call Recordings
You can view and download your call recordings from the Call Recordings page in the Mission Control Portal.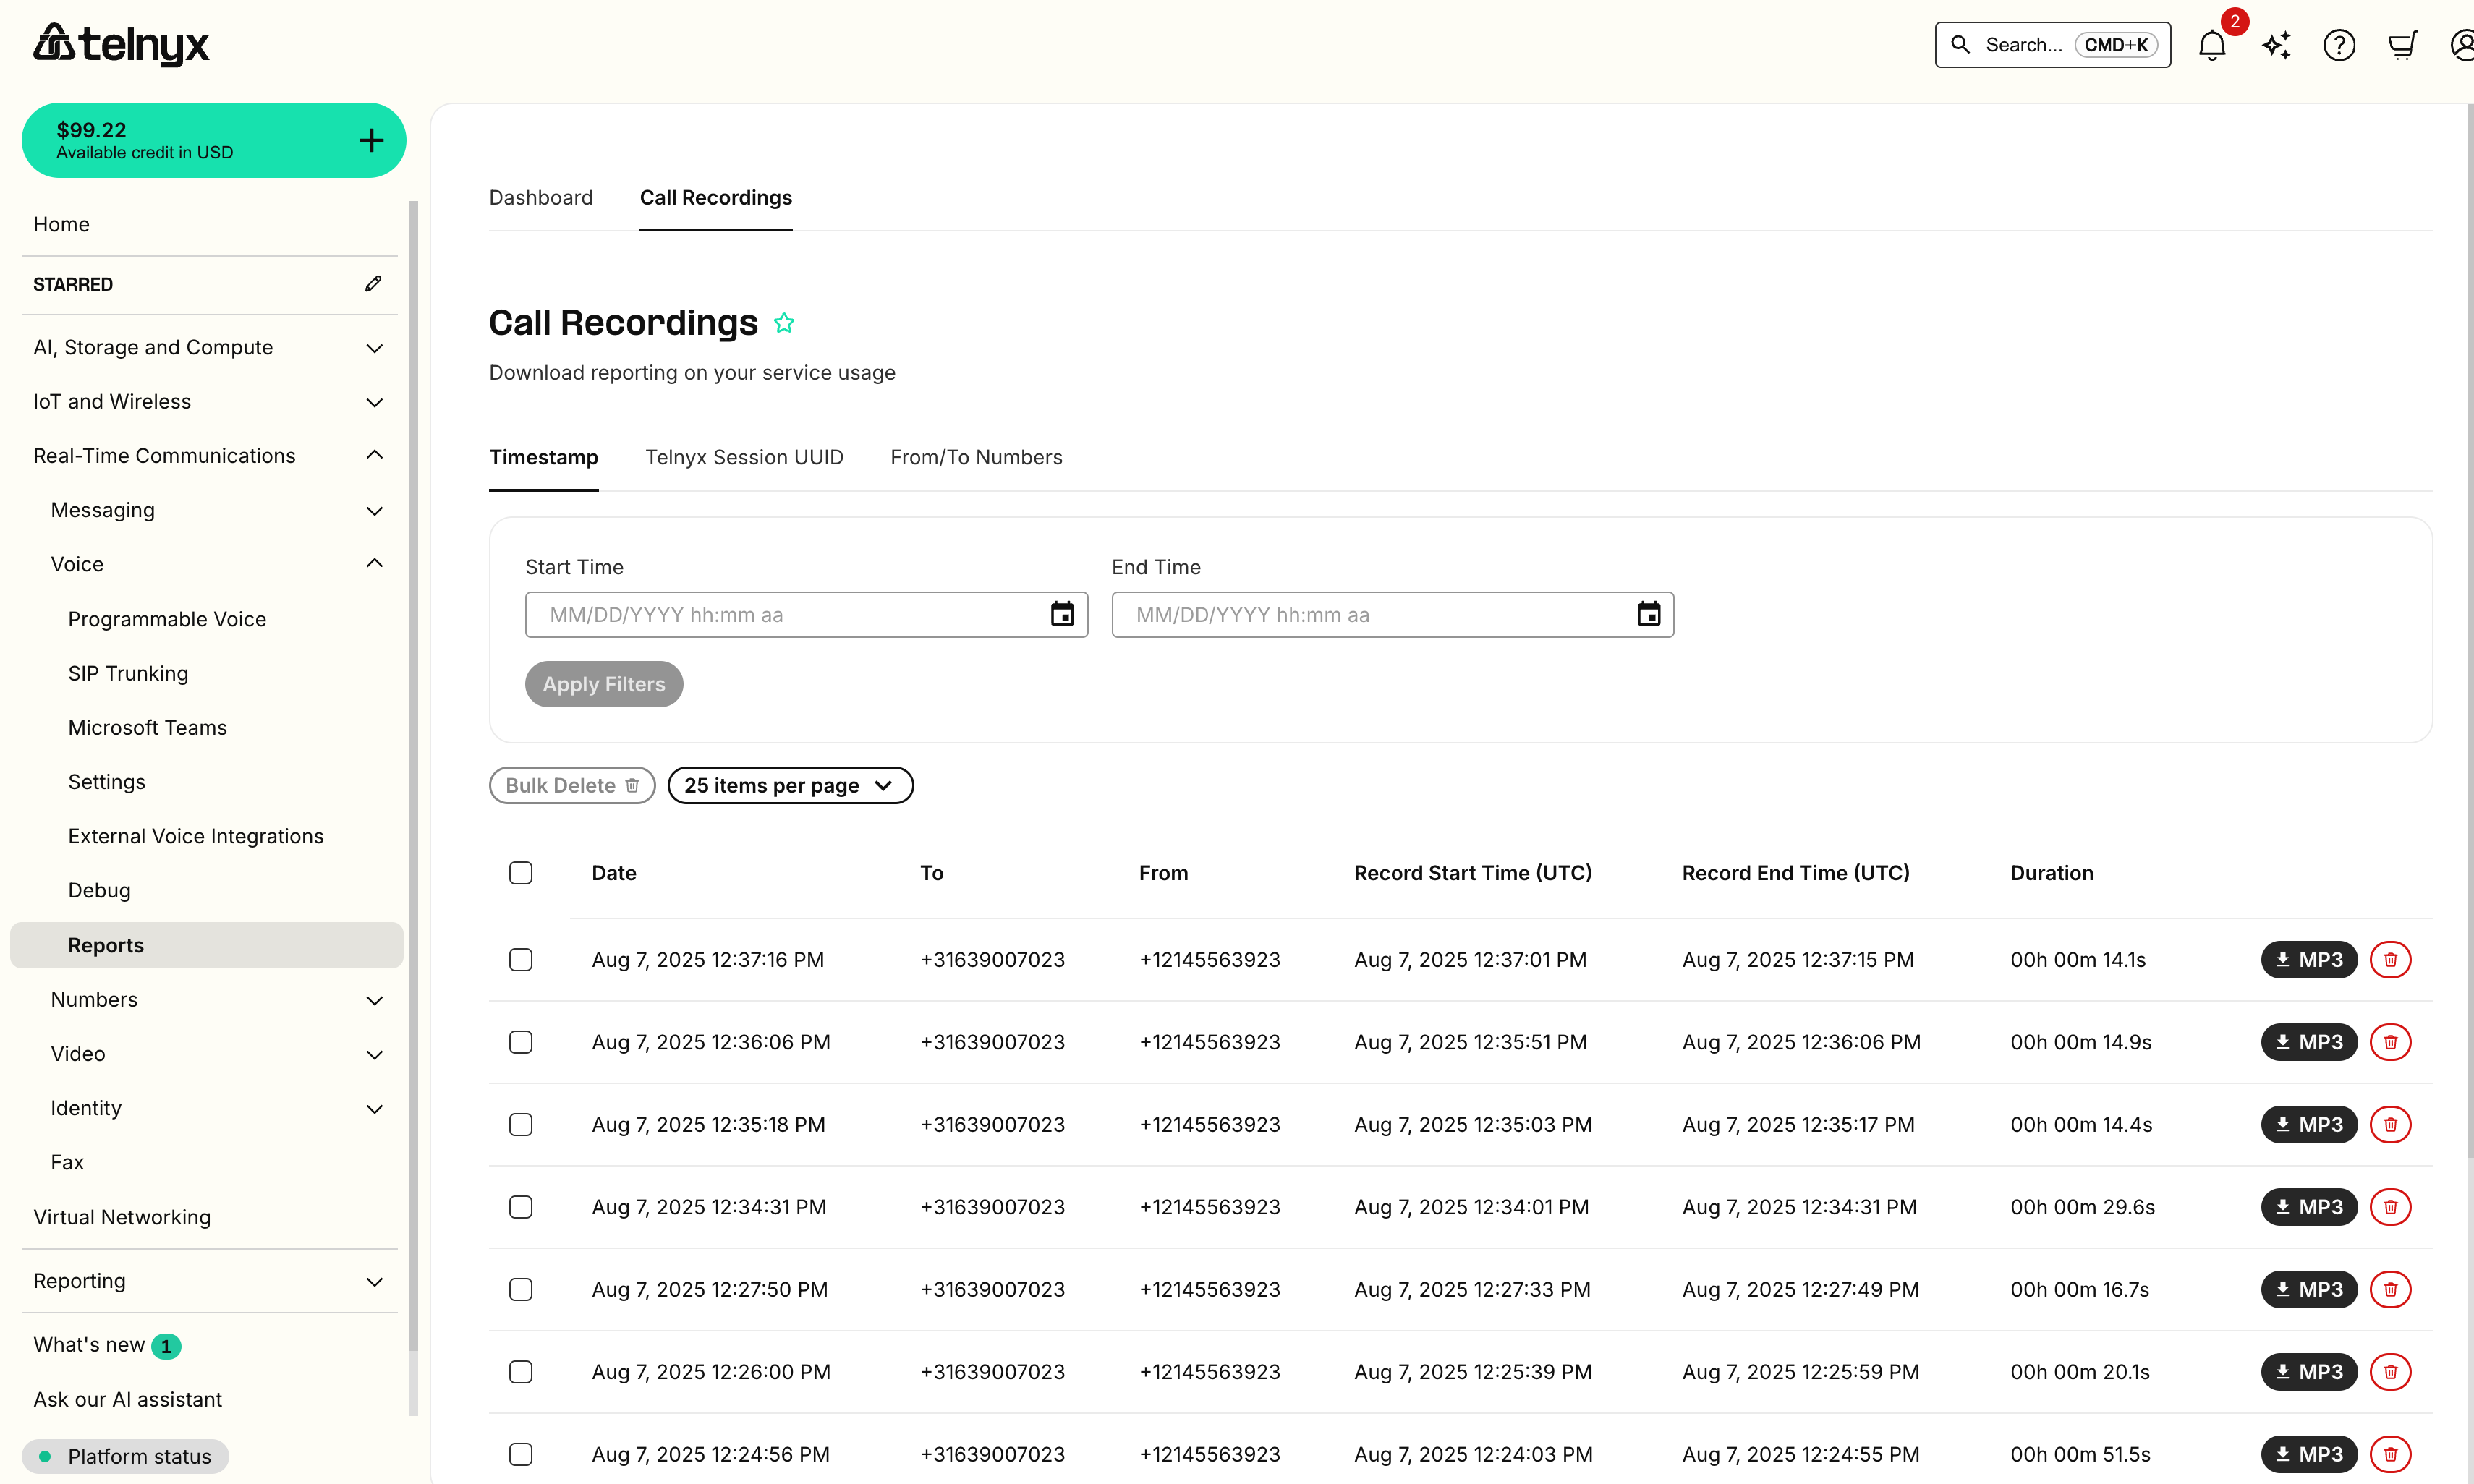
Next Steps
Congratulations! You’ve successfully set up your first Voice API application. Here are some next steps to enhance your application:Explore Advanced Features
- Voice API Commands & Resources: Learn about all available commands like transfer, conference, record, and more.
- Webhook Handling: Deep dive into webhook event handling and best practices.
- Text-to-Speech: Add natural-sounding voice synthesis to your applications.
- Speech-to-Text: Convert spoken audio into text for voice interactions.
- AI Assistants: Build intelligent voice assistants with natural conversations.
- Answering Machine Detection: Automatically detect and handle voicemail systems.
- Media Streaming: Stream real-time audio for advanced processing and analytics.
- TeXML: Use Telnyx TeXML to define complex call flows.
Try Our Tutorials
- IVR System: Build an interactive voice response system.
- Call Center: Create a call center application with queuing.
- Call Tracking: Implement call tracking for marketing campaigns.
Use Our SDKs
Speed up development with our official SDKs:Resources & Support
Documentation
- Voice API Reference: Complete API endpoint documentation.
- WebRTC SDK Documentation: Build browser-based calling.
- Migration Guides: Moving from other providers.
Getting Help
- Support Center: Knowledge base and ticket support.
- Slack Community: Connect with developers and Telnyx team.
- System Status: Check service availability.
- GitHub examples: For code samples.
Ready to build something amazing? You now have all the tools to create powerful voice applications with Telnyx Voice API!
Commands and Resources
Source: https://developers.telnyx.com/docs/voice/programmable-voice/voice-api-commands-and-resources.mdThe following endpoints can be used with the Voice API applications.
Call
Call events
Conference
Connection
Queue
Recording
Custom storage
Recording transcription
Webhooks
Source: https://developers.telnyx.com/docs/voice/programmable-voice/voice-api-webhooks.md
Overview
Voice API webhooks are HTTP callbacks that notify your application in real time when events occur during a call — a call is initiated, audio playback finishes, a recording is saved, and so on. Your application receives a JSON payload for each event and can respond with call control commands to drive the call flow.Webhook delivery
When an event occurs on a call, Telnyx delivers the webhook to your configured URL. If the primary URL fails, the webhook is sent to the failover URL (if configured). For details on retry logic, signature verification, and general webhook behavior, see Webhook Fundamentals.Configuration
Webhooks can be configured at three levels:- Connection webhook config — default webhook URL and settings tied to a Voice API connection in Mission Control.
- Custom webhook config — per-command overrides. Pass
webhook_urlandwebhook_url_methodin any call control command to route that command’s webhooks to a different endpoint. - Events webhook config — advanced configuration that routes specific event types to different URLs.
Configuration parameters
HTTP methods and headers
Methods
- Webhooks use the
POSTmethod by default. Passwebhook_url_methodasGETin a call control command to receive that command’s webhook payloads as URL query parameters instead of a JSON body.
Headers
Every webhook request includes:Webhook payload structure
All Voice API webhooks share a common envelope. Below is an examplecall.initiated payload:
Common fields
Event types
The following event types are fired by the Voice API. Each event type appears in theevent_type field of the webhook payload.
Call state
Audio playback
DTMF and gather
Recording
Answering machine detection (AMD)
Media forking
Queue
Transcription
Streaming
Response codes
Your webhook endpoint’s HTTP response determines whether delivery is considered successful:Debugging deliveries
Use the Webhook Deliveries API to inspect delivery history for your account. You can filter by status, event type, and time range — useful for diagnosing missed or failed webhooks.Best practices
- Return 2xx immediately — acknowledge receipt within a few seconds, then process asynchronously.
- Implement idempotency — webhooks may be delivered more than once. Use the event
idto deduplicate. - Verify signatures — validate the
Telnyx-Signature-Ed25519header to confirm webhook authenticity. See Webhook signing. - Use
command_id— include acommand_idin your call control commands to prevent duplicate command processing. Commands with duplicate IDs within 60 seconds are ignored. - Monitor failures — track failed webhook deliveries and configure a failover URL for critical applications.
Sending Commands
Source: https://developers.telnyx.com/docs/voice/programmable-voice/sending-commands.mdA Voice API command is sent with a
call_control_id. The call_control_id allows a user to communicate to Telnyx the call_leg the user wants to control. It also helps Telnyx route the call to the location where the call is being managed, resulting in the lowest possible latency for Call Control interactions.
Authenticating your Voice API command request
Like all other Telnyx API V2 requests, you must authenticate your Voice API command requests by sending the Authorization header with a value of an API Key. You can read more about API Keys here. Credential Type HTTP Header Format API Key Authorization: Bearer YOUR_API_KEYExample: Sending commands with a key + secret
To answer the call, send a POST request to the/actions/answer endpoint as shown in the example below.
Don’t forget to update YOUR_API_KEY here.
Available commands and their expected Webhooks
Telnyx offers a broad range of commands to enable granular control of your call flows. Below are a list of those commands, and the webhooks the Telnyx Voice API platform will always send in response. When multiple webhooks are listed, you can expect to often, though not always, receive webhooks in the order provided. Command Expected Webhooks Answer call call.answered Bridge call call.bridged for Leg A call.bridged for Leg B Dial call.initiated call.answered or call.hangup call.machine.detection.ended - if answering_machine_detection was requested call.machine.greeting.ended - if answering_machine_detection was requested to detect the end of machine greeting Forking start call.fork.started call.fork.stopped Forking stop call.fork.stopped Gather using audio call.playback.started call.playback.ended call.dtmf.received - you may receive many of these webhooks call.gather.ended Gather using speak call.dtmf.received - you may receive many of these webhooks call.gather.ended Hangup call.hangup call.recording.saved - if the call is being recorded Play audio url call.playback.started call.playback.ended Playback stop command call.playback.ended or call.speak.ended Recording start no webhooks Recording stop call.recording.saved Reject call call.hangup Send DTMF no webhooks Speak text call.speak.started call.speak.ended Transfer call call.initiated call.bridged to Leg B call.answered or call.hangupResponse when sending Voice API commands
When you send a Voice API Command, you will immediately receive an http response. Responses include, but are not limited to: HTTP Status Code Message Description 200 OK The request succeeded. 403 Forbidden The request was valid, however the user is not authorized to perform this action. 404 Not Found The requested resource could not be found. 422 Invalid Parameters The request has invalid parameters or the call is no longer active.Receiving Webhooks
Source: https://developers.telnyx.com/docs/voice/programmable-voice/receiving-webhooks.mdWhen you send a Voice API command and receive a successful response (i.e. 200 OK), you can expect to receive a webhook. The webhook will be delivered to the primary URL specified on the Voice API Application associated with the call. If that URL does not resolve, or your application returns a non 200 OK response, the webhook will be delivered to the failover URL, if one has been specified. In order to minimize webhook delivery time, Telnyx:
- does not enforce the order in which webhooks are delivered
- retries webhook delivery if your application does not respond within a certain time threshold.
- out-of-order webhooks
- simultaneous (or near simultaneous) webhooks
- duplicate webhooks
command_id parameter as part of your commands. Commands with duplicate command_ids within 60 seconds will be ignored.
Webhooks contain a variety of ID fields which describe them and correlate them with calls.
Example: Receiving a Webhook
When you place an incoming call to a number associated with your Voice API Application, you will receive a callback for the incoming call. It should look something like the JSON below:Command Retries
Source: https://developers.telnyx.com/docs/voice/programmable-voice/command-retries.mdUser Applications may encounter the following situations:
- 5XX Error: Telnyx actively monitors and alerts on the rate of 500, 501, 503, or 504 errors.
- Duplicate Webhooks: Identical webhooks may occasionally be delivered.
How to use command retries for better reliability
Telnyx carefully monitors the Voice API platform for 5XX errors, latency, and duplicate webhooks, and actively works to keep all of these to a minimum. For added reliability, there are several steps developers can take to handle 5XX errors, latency, and duplicate webhooks, and automatically retry commands when such issues are encountered:command_id: send a uniquecommand_idparameter as part of your commands. Thecommand_idmust be unique for each command. We suggest using UUIDv4.- Retry on 5XX Errors: If your application receives a 500 error, immediately retry the command.
- Retry on Latency >500ms: If your application fails to receive a HTTP response from Telnyx within 500ms, send an identical command.
Voice Features
Speech-to-Text
Source: https://developers.telnyx.com/docs/voice/programmable-voice/speech-to-text.md
Introduction
In this tutorial, we will cover how to get a speech-to-text transcription of your calls using Voice API and TeXML. Before starting, please ensure your Voice API or TeXML application is correctly configured.Video Tutorial
Learn how to implement real-time Speech-to-Text recognition in your voice applications: This video shows how to capture and process spoken input from callers using Telnyx’s Speech-to-Text API.Supported engines
Telnyx offers several speech-to-text engines that can be used to process the audio from the call into a transcription:- Google (default) - Google speech-to-text engine that offers additional features like interim results.
- Telnyx - In-house Telnyx speech-to-text engine with significantly better transcription accuracy and lower latency.
- Deepgram - Deepgram speech-to-text engine with 3 models (nova-2, nova-3 and flux) that can be set using
transcription_modelsetting. - Azure - Azure speech-to-text engine with a strong support for multiple languages and accents.
- xAI - xAI Grok STT engine with the
xai/grok-sttmodel. - AssemblyAI - AssemblyAI Universal-Streaming engine (backed by Universal-3.5 Pro Realtime) with the
assemblyai/universal-streamingmodel. - Speechmatics - Speechmatics real-time engine with the
speechmatics/standardmodel. High accuracy with multilingual and bilingual language packs. - Soniox - Soniox real-time engine with the
soniox/stt-rt-v4model. Automatic language detection with interim results and endpointing support. - Parakeet - Self-hosted NVIDIA Parakeet engine with the
nvidia/parakeet-v3model. Automatic multilingual language detection with final transcripts only. - Reson8 - Reson8 turn-based engine with the
reson8/turnsmodel. Automatic language detection across 10 European languages; transcripts are delivered per turn of speech.
Voice API
The transcription can be enabled for the Voice API calls using a dedicated endpoint in the following way: Don’t forget to updateYOUR_API_KEY here.
TeXML
You can enable transcription on your TeXML calls by including a<Transcription> verb in the TeXML instructions:
Text-to-Speech
Source: https://developers.telnyx.com/docs/voice/programmable-voice/tts.mdIn this tutorial, you will learn how to get a Text-To-Speech service on your calls using Voice API and TeXML. Before starting, please ensure your Voice API or TeXML application is correctly configured.
Video Tutorial
Watch this comprehensive video demonstration to see Text-to-Speech features in action: This video demonstrates how to use Telnyx’s Text-to-Speech capabilities to create dynamic voice interactions in your applications.Telnyx Ultra
Telnyx Ultra is a next-generation text-to-speech engine delivering ultra-quality voice synthesis with low latency and support for 44 languages. It produces highly natural and expressive speech, making it a great choice for premium voice experiences. You can request Telnyx Ultra voices for your calls using the Voice API:Telnyx internal Text-to-Speech engine
Telnyx provides a high-quality, low-latency Text-to-Speech (TTS) engine, offering a seamless experience for integrating speech synthesis into your calls. The Telnyx TTS engine ensures a clear and natural-sounding voice, making it an excellent choice for real-time voice applications. You can request Telnyx TTS for your calls using the Voice API. Below is an example of how to trigger speech synthesis with Telnyx TTS:Telnyx Natural
Telnyx Natural voices provide enhanced speech quality with improved naturalness and clarity. These voices offer a significant upgrade from basic text-to-speech options, delivering more human-like speech patterns and better pronunciation accuracy. You can request Telnyx Natural voices for your calls using the Voice API:Telnyx NaturalHD
Telnyx NaturalHD voices deliver premium-quality speech synthesis with exceptional clarity and richness. These high-definition voices are ideal for applications where audio quality is critical, such as customer service, media production, or premium user experiences. You can request Telnyx NaturalHD voices for your calls using the Voice API:AWS Polly
Telnyx offers both levels of quality for AWS Polly Text-To-Speech services: neural and standard. The list of voices can be found under the link. It can be requested on the call using the Voice API command similar to:Polly.*-Neural
Before you use it, please take a look at the price list under the link.
Azure AI Speech
Telnyx supports Azure AI Speech as a text-to-speech provider. You can find the list of supported voices and languages at the following link. To use Azure AI Speech, the process is the same as with AWS Polly. Voices should be specified using the following format: Azure.en-CA-ClaraNeural. Azure AI Speech supports two service levels via Telnyx:-
Neural
- These voices use deep neural networks to generate highly natural and expressive speech.
- Ideal for most general applications, they offer high-quality output with support for SSML to customize pronunciation, pitch, rate, and more.
- Example: Azure.en-CA-ClaraNeural
-
Neural HD (High Definition)
- HD voices deliver enhanced clarity and richness for scenarios where audio quality is critical—such as media production or premium customer engagement.
- These voices provide finer prosody control, improved phonetic detail, and natural pauses, yielding more lifelike speech.
- Example: en-US-Emma:DragonHDLatestNeural
ElevenLabs
Users get many voice options with ElevenLabs; however, response latency may exceed what you’d see from AWS Polly or Azure AI Speech. To use the integration, you must provide an API key to your ElevenLabs account. Telnyx offers to store it in a secure storage. The API key can be saved in the following way:speak command should look as follows for the Voice API application:
MiniMax
MiniMax offers high-quality text-to-speech with expressive voices across multiple languages and accents. Thespeak command should look as follows for the Voice API application:
ResembleAI
ResembleAI voices, built on the Chatterbox model, delivering AI voices that preserve emotion, style, and accent for natural sounding delivery. Thespeak command should look as follows for the Voice API application:
Inworld
Inworld offers expressive multilingual AI voices across three models: Mini, Max, and TTS2. Thespeak command should look as follows for the Voice API application:
Rime
Rime offers two TTS models through Telnyx:- Coda (recommended) — Rime’s flagship model (May 2026). LLM backbone with dedicated speech engine, sub-100ms latency, 184 voices, and top-rated quality in human evaluations. Supports English, Spanish, French, Portuguese, German, and Japanese. Voices use the
Rime.Coda.<VoiceId>format. - ArcanaV3 — Previous flagship with multilingual codeswitching across 10 languages: Arabic, English, French, German, Hebrew, Hindi, Japanese, Portuguese, Spanish, and Tamil. Voices use the
Rime.ArcanaV3.<VoiceId>format.
speak command should look as follows for the Voice API application:
Call Queueing
Source: https://developers.telnyx.com/docs/voice/programmable-voice/queueing-calls.md| cURL | Python |
cURL
In this tutorial you’ll learn how to use the Telnyx Call Queue API to create and manage call queues with just a few API requests. Call Queueing is fully integrated with the Telnyx Voice API, previously called Call Control. This tutorial assumes you’ve already set up your developer account and environment and you know how to send commands and receive webhooks using the Telnyx Voice API.Adding a call to a new or existing queue
A call can be placed into a queue using theenqueue command. Use the queue_name parameter to specify a queue into which the call should be placed.
- If the
queue_namerefers to a queue that already exists, the call will be placed at the end of the queue. - If the
queue_namehasn’t been used before, a new queue with this name will be created and the call will be placed into it.
YOUR_API_KEY here.
If the call for which the enqueue command was issued is bridged to another call leg (i.e. it is in an active conversation with someone) the call will be unbridged.
Bridging an existing call to a queue
Thebridge command can be used to bridge a call to another call waiting in a queue. The queue’s queue_name should be used as the bridge command’s queue parameter.
For example, a customer support agent can be bridged to the first call from a queue of waiting customer calls. If the customer support agent’s active call has a call_control_id 8899ad4a-de6f-11eb-a54c-02420a0d4168 and the support call queue has a name support, the command to bridge the call is as follows:
When a bridge command is issued, the call at the top of the specified queue will be dequeued and a bridge will be attempted.
Dequeuing calls
Calls can be removed from queues in four ways:- Ending the call by any means (e.g. a
hangupcommand, or the call being disconnected by calling parties). - Issuing any command that results in the call being bridged elsewhere (e.g.
bridge,transfer, conferencejoin,refer). - A call is automatically removed from queues if the
max_wait_time_secsparameter was used when adding the call to a queue and the specified maximum waiting time has elapsed. The automatically dequeued call will remain in a parked state and await further call commands. - Sending the
leave_queuecommand with a call’scall_control_idwill remove that call from any queue it is in, leaving it parked awaiting further call commands.
Inspecting queue state
There are a number of endpoints that let you inspect your queues and enqueued calls:- Retrieve a queue
- Retrieve a call from a queue
- List calls in a queue
Receiving webhooks for call queueing events
The Telnyx API will send you a webhook for every major queue event, i.e.- when a call is put in a queue,
- when a call leaves the queue for some reason.
enqueue command.
Next steps
Now that you’ve set up simple call queueing functionality with the Telnyx Voice API, why not use call queueing to build a contact center? If you’re interested in building something more complex or large-scale, our experts are standing by to help. Contact our team today.Python
In this guide you’ll learn how to use the Telnyx Call Queue API to create and manage call queues with just a few API requests. Call Queueing is fully integrated with the Telnyx Voice API, the Telnyx Voice API. This guide assumes you’ve already set up your developer account and environment and you know how to send commands and receive webhooks using the Telnyx Voice API.Adding a call to a new or existing queue
A call can be placed into a queue using theenqueue command. Use the queue_name parameter to specify a queue into which the call should be placed.
- If the
queue_namerefers to a queue that already exists, the call will be placed at the end of the queue. - If the
queue_namehasn’t been used before, a new queue with this name will be created and the call will be placed into it.
If the call for which the enqueue command was issued is bridged to another call leg (i.e. it is in an active conversation with someone) the call will be unbridged.
Bridging an existing call to a queue
Thebridge command can be used to bridge a call to another call waiting in a queue. The queue’s queue_name should be used as the bridge command’s queue parameter.
For example, a customer support agent can be bridged to the first call from a queue of waiting customer calls. If the customer support agent’s active call has a call_control_id 8899ad4a-de6f-11eb-a54c-02420a0d4168 and the support call queue has a name support, the command to bridge the call is as follows:
When a bridge command is issued, the call at the top of the specified queue will be dequeued and a bridge will be attempted.
Dequeuing calls
Calls can be removed from queues in four ways:- Ending the call by any means (e.g. a
hangupcommand, or the call being disconnected by calling parties). - Issuing any command that results in the call being bridged elsewhere (e.g.
bridge,transfer, conferencejoin,refer). - A call is automatically removed from queues if the
max_wait_time_secsparameter was used when adding the call to a queue and the specified maximum waiting time has elapsed. The automatically dequeued call will remain in a parked state and await further call commands. - Sending the
leave_queuecommand with a call’scall_control_idwill remove that call from any queue it is in, leaving it parked awaiting further call commands.
Inspecting queue state
There are a number of endpoints that let you inspect your queues and enqueued calls:- Retrieve a queue
- Retrieve a call from a queue
- List calls in a queue
Receiving webhooks for call queueing events
The Telnyx API will send you a webhook for every major queue event, i.e.- when a call is put in a queue,
- when a call leaves the queue for some reason.
enqueue command.
Next steps
Now that you’ve set up simple call queueing functionality with the Telnyx Voice API, why not use call queueing to build a contact center? If you’re interested in building something more complex or large-scale, our experts are standing by to help. Contact our team today.Answering Machine Detection
Source: https://developers.telnyx.com/docs/voice/programmable-voice/answering-machine-detection.mdOutbound calls placed with the Telnyx Voice API can be enabled with Answering Machine Detection (AMD, Voicemail Detection). When a call is answered, Telnyx runs real-time detection to determine if it was picked up by a human or a machine and sends webhooks with the analysis result.
AMD settings
Theanswering_machine_detection value when creating an outbound call or transferring an inbound call can be set to one of the following:
Setting
Description
Webhooks Sent
detect
Only detect if answering machine or human.
call.machine.detection.ended
detect_beep
Listens for a final “beep” sound after detecting a machine
call.machine.detection.ended and call.machine.greeting.ended only if a beep is detected
detect_words
After a machine is detected, a 30 second long beep detection will begin. Note the answering machine may still be playing it’s greeting while the 30 seconds is counting down.
call.machine.detection.ended and call.machine.greeting.ended when the beep is detected or at the end of 30 seconds.
greeting_end
Listens for extended periods of silence or a beep in the greeting to determine if a greeting has ended.
call.machine.detection.ended and call.machine.greeting.ended
premium
RECOMMENDED Premium AMD uses advanced speech recognition technology and machine learning to achieve exceptional accuracy in determining whether a call has been connected to a live person or a machine.
call.machine.premium.detection.ended with one of human_residence or human_business or machine or silence or fax_detected or not_sure. If a beep is detected a call.machine.premium.greeting.ended webhook with beep_detected is also sent. If a beep is detected before call.machine.premium.detection.ended, call.machine.premium.greeting.ended is sent. If a beep is detected after call.machine.premium.detection.ended, both webhooks will be sent.
premium_ios_call_screening_detection
Premium AMD with iOS Call Screening support. Use this when calls may be answered by Apple Call Screening and you need to detect the screening prompt before continuing AMD.
call.machine.premium.detection.ended, call.machine.premium.greeting.ended with result=prompt_ended when the screening prompt ends without a beep, and call.machine.premium.call_screening.detected with result=screening when an Apple Call Screening tone is detected.
Sample dial request
iOS Call Screening Detection
Setanswering_machine_detection to premium_ios_call_screening_detection to run Premium AMD with support for Apple Call Screening. In this mode, Telnyx uses Premium AMD first. If the initial Premium AMD result is machine, Telnyx listens for the iOS call-screening prompt to complete or for an Apple Call Screening tone.
When an Apple Call Screening tone is detected, Telnyx sends call.machine.premium.call_screening.detected with result=screening and then restarts Premium AMD on the screened call. If the screening prompt ends without a beep, Telnyx sends call.machine.premium.greeting.ended with result=prompt_ended. Use this webhook as the signal that your application can provide the response to the iOS screening prompt, such as who is calling and why.
Use answering_machine_detection_config.prompt_end_timeout_millis to control the maximum amount of time Telnyx waits for the iOS call-screening prompt to end after Premium AMD initially detects a machine. The default is 30000 milliseconds. The minimum value is 1000 milliseconds and the maximum value is 120000 milliseconds.
Sample dial request with iOS Call Screening Detection
iOS Call Screening Detection order of operations
- Create an outbound call or transfer an inbound call with
answering_machine_detectionset topremium_ios_call_screening_detection. - Receive
call.initiatedwebhook. - Receive
call.answeredwebhook when the call is answered. - Receive
call.machine.premium.detection.endedwith the initial Premium AMD result. - If the initial result is
machine, Telnyx waits for the call-screening prompt to end or for an Apple Call Screening tone. - If the prompt ends without a beep, receive
call.machine.premium.greeting.endedwithresult=prompt_ended. After receiving this webhook, your application can provide the response to the iOS screening prompt, such as who is calling and why. - If an Apple Call Screening tone is detected, receive
call.machine.premium.call_screening.detectedwithresult=screening. - After the screening tone is detected, Telnyx restarts Premium AMD on the screened call. Expect another
call.machine.premium.detection.endedwebhook with the post-screening classification. - If the restarted Premium AMD detects a machine and later detects a beep, expect
call.machine.premium.greeting.endedwithresult=beep_detected.
General order of operations
- Create outbound call.
- Receive
call.initiatedwebhook. - Receive
call.answeredwebhook when the call is answered either by human or machine. - Receive
call.machine.detection.endedwebhook with human/machine status. - Receive
call.machine.greeting.endedwebhook when beep detected or 30 second timeout.
call.hangup webhook.
Webhooks
call.machine.detection.ended
Thecall.machine.detection.ended is sent when Telnyx can make a determination on human or machine.
The data.payload.result will contain the information about the answering machine:
Result
Description
human
Human answered call
machine
Machine answered call
not_sure
Recommended to treat as if human answered.
Sample Webhook
call.machine.greeting.ended
If theanswering_machine_detection was set to detect_beep, detect_words, greeting_end you could receive a final webhook when the prompt (or beep detection) has finished.
The data.payload.result will contain the information about the answering machine:
Result
Description
AMD Setting
ended
Greeting is over.
ONLY sent when setting is greeting_end
beep_detected
Beep has been detected
detect_beep and detect_words
not_sure
30 second beep detection timeout fired after detecting a machine
detect_beep and detect_words
Sample Webhook
AMD premium Webhooks
call.machine.premium.detection.ended
Thecall.machine.premium.detection.ended webhook is sent when the AMD process can determine whether the call was answered by a human or a machine. It is possible to specify the number of milliseconds that Telnyx should attempt to perform the detection via the total_analysis_time_millis setting. By default, the timeout is set to 30 seconds. If the timeout is reached before the detection is finished, the result in the webhook will be not_sure.
The data.payload.result will contain the information about the answering machine:
Result
Description
human_residence
A human answered the call
human_business
A human answered call
machine
A machine answered the call
silence
No sound was detected
fax_detected
A Fax machine answered the call
not_sure
Not identifiable, or the configured AMD timeout was reached before the result was available.
Sample Webhook
call.machine.premium.greeting.ended
If a machine answered the call, you may receive a final webhook when the beep detection has finished. This webhook is optional and will only be sent if one of two happens:- a beep is detected. In this case, the result is
beep_detected. - the optional AMD timeout is reached after the call was answered by a machine, but no beep was heard. For this case, the result is
no_beep_detected. - the iOS call-screening prompt ends without a beep when using
premium_ios_call_screening_detection. For this case, the result isprompt_ended. After receiving this result, your application can provide the response to the iOS screening prompt, such as who is calling and why.
data.payload.result will contain the information about the answering machine:
Result
Description
AMD Setting
beep_detected
Greeting is over.
ONLY sent when a machine answered the call, and a beep was heard.
no_beep_detected
ONLY sent when a machine answered the call, and the AMD timeout was reached before a beep was heard.
prompt_ended
The iOS call-screening prompt ended without a beep. After receiving this result, your application can provide the response to the iOS screening prompt, such as who is calling and why.
ONLY sent when using premium_ios_call_screening_detection.
Sample Webhook
call.machine.premium.call_screening.detected
Thecall.machine.premium.call_screening.detected webhook is sent when premium_ios_call_screening_detection detects an Apple Call Screening tone. The data.payload.result value is screening.
After this webhook is sent, Telnyx restarts Premium AMD on the screened call. This webhook is not terminal; expect another call.machine.premium.detection.ended webhook with the post-screening classification, and possibly call.machine.premium.greeting.ended if a beep is detected after the restart.
Sample Webhook
Call Recordings Storage
Source: https://developers.telnyx.com/docs/voice/programmable-voice/storing-call-recordings.md
Overview
This tutorial covers how to store your Telnyx call recordings in Amazon S3 or Google Cloud Storage. Call recordings are automatically stored in S3 buckets owned by Telnyx, but users can opt to store recordings in their own S3 or GCS buckets instead.Telnyx’s S3 storage
The recordings for the calls are stored in the S3 buckets owned by Telnyx. The link to them is shared in the webhook “call.recording.saved” when they are ready to download.Using custom GCS storage
As an alternative, the recordings can be stored in a GCS bucket owned by the customer. To set this up, the following requests with user credentials to the storage need to be sent for every particular application:Using custom S3 storage
It is possible to use AWS S3 storage owned by the customer. In that case, the storage configuration can be provided in the following way:Using custom Microsoft Azure Blob Storage storage
The Microsoft Azure Blob Storage can be used for storing recordings too. In that case, the storage configuration can be provided in the following way:Pay
Source: https://developers.telnyx.com/docs/voice/programmable-voice/pay.md
Overview
Telnyx’s Pay over Voice feature enables accepting payments securely over the phone. The feature guides callers through an automated IVR flow to collect payment details (credit card or ACH debit), sends them to the configured payment processor, and returns the result — keeping sensitive card data out of recordings, logs, and AI assistants.How it works
- Create a Payment Connector pointing to the payment processor’s endpoint.
- A Pay session is started on an active call (via Voice API, TeXML, or AI Assistant).
- The caller is guided through IVR prompts to enter payment details via DTMF.
- Telnyx collects, encrypts, and sends the details to the processor.
- The processor charges or tokenizes the payment and returns a result.
- Telnyx emits progress and completed events to the webhook and AI assistant.
Create a Payment Connector
A Payment Connector is the bridge between Telnyx and the payment processor. It stores the processor’s endpoint URL and authentication credentials (encrypted at rest with AES-256).Step 1 — Navigate to Payment Connectors
In the Telnyx Portal, go to Voice API → Applications → Payment Connectors. The portal displays a list of existing connectors: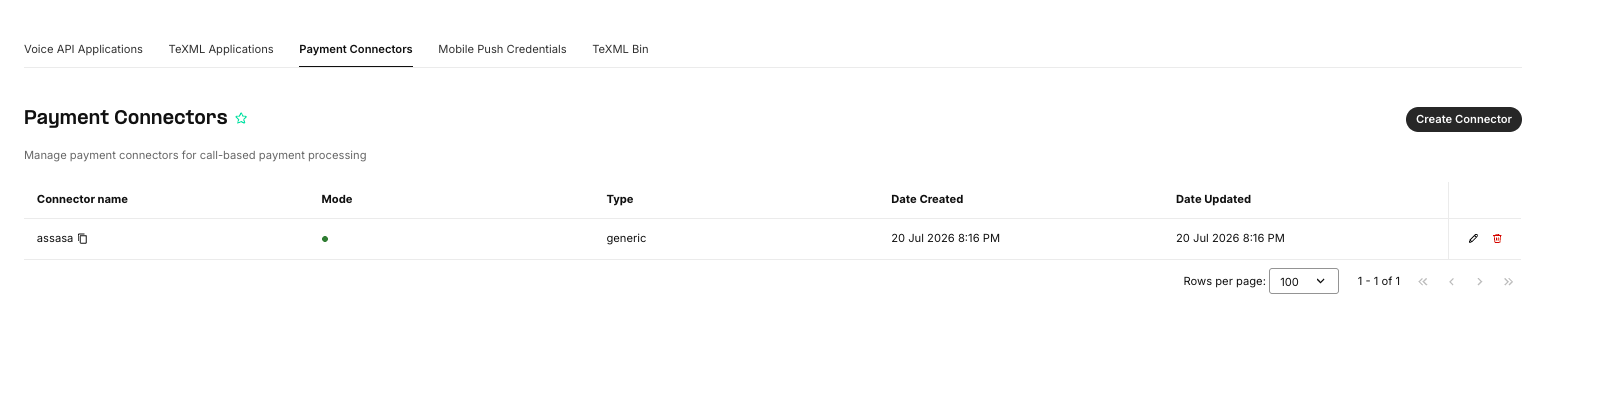
Step 2 — Create a new connector
Click Create Connector. Fill in the following fields: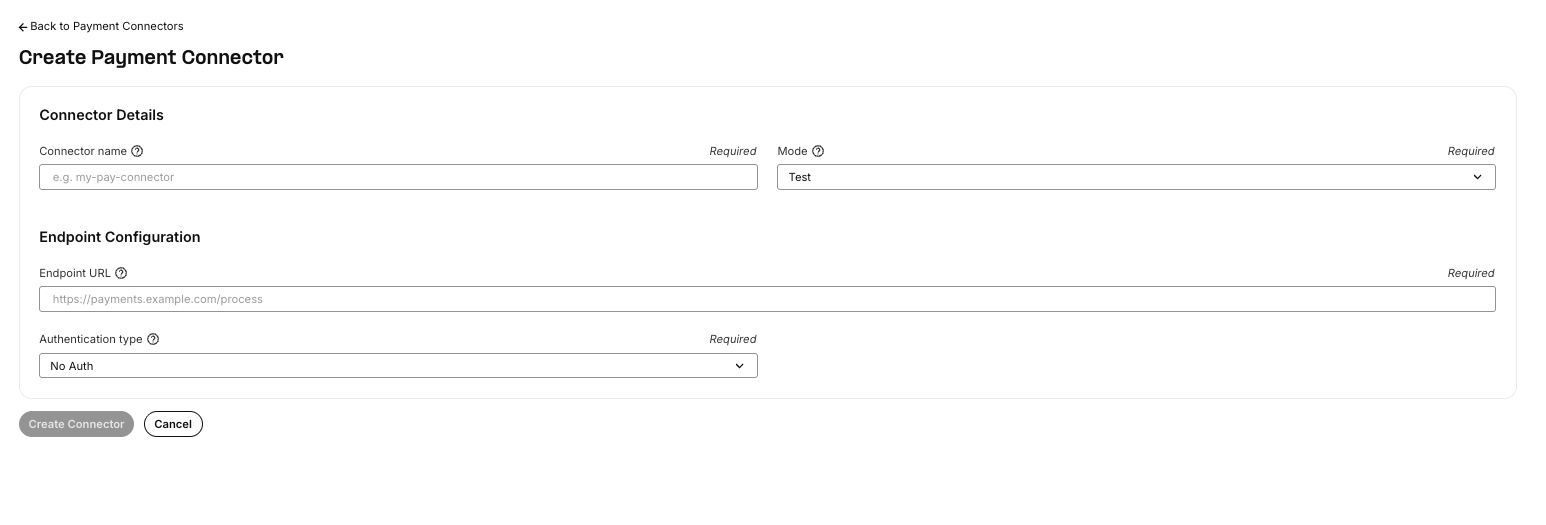
When Authentication type is set to
basic, Telnyx sends the credentials as HTTP Basic Auth headers with each request to the processor. The credentials are encrypted with AES-256-CTR before storage and are never exposed in logs or events.
Connectors can also be managed programmatically via the API:
Payment Modes: Test vs Live
Test mode (default)
New connectors are created in test mode. In test mode, the Pay session accepts only a predefined set of test card numbers. Any other card number is rejected with aninvalid-card-number error, and the caller is asked to re-enter the number (up to max_attempts times).
This allows testing the IVR flow, webhook handling, and processor integration end-to-end without processing real payments.
Valid test card numbers
For ACH-debit test mode, any valid-length routing and account numbers are accepted.
Live mode
When ready to accept real payments, switch the connector to live mode. Once a connector is in live mode:- It cannot be edited. The endpoint URL, authentication type, and credentials are locked. This prevents accidental changes to a production payment integration.
- All card numbers are accepted (no test card restriction).
- Real charges are processed through the payment processor.
The Payment Process
When a Pay session starts on a call, Telnyx takes over the call leg and guides the caller through a series of IVR steps. Each step plays a voice prompt, then collects the caller’s DTMF input.Security during payment
Before the first IVR prompt is played, Telnyx automatically disables all processes that could capture payment data:IVR steps
The IVR flow depends on the payment method selected:Credit card flow
ACH debit flow
Custom prompts
Prompts can be overridden by passing aprompts map. Each key is a step name, and the value is either a string or a list of prompt objects with conditional qualifiers:
attempt (1–3), error_type (e.g., invalid-card-number, timeout), card_type (e.g., visa, mastercard, amex, discover).
Error handling and retries
Each step allows up tomax_attempts (default 3) retries. If the caller enters too few digits, the wrong format, or times out, the step is repeated with an appropriate error prompt. If all attempts are exhausted, the session ends with too-many-failed-attempts.
Request sent to the payment processor
Once all digits are collected, Telnyx sends an HTTPS POST to the connector’s endpoint URL with the payment details.Credit card — charge
Credit card — tokenize
Whentransaction_type is tokenize (or amount is 0 or omitted), amount and currency_code are not sent:
ACH debit — charge
Response expected from the payment processor
The processor should return a JSON response: Charge — success:error_code is present and non-empty, the session ends with payment-connector-error.
Using Pay over Voice
Pay over Voice can be triggered from three interfaces: the Voice API, TeXML, and AI Assistant.Voice API
Start a Pay session by sending a POST request to the pay endpoint on an active call:Request parameters
TeXML
Use the<Pay> verb in a TeXML application. This is the simplest way to start a Pay session — include the verb in the TeXML response and Telnyx handles the rest:
call_payment_progress and call_payment_completed events. The application can use these to update external systems, confirm the payment, or continue the call flow.
AI Assistant
When using Telnyx’s AI Voice Assistant, a Pay tool can be added to the assistant so it can trigger a payment session during a conversation.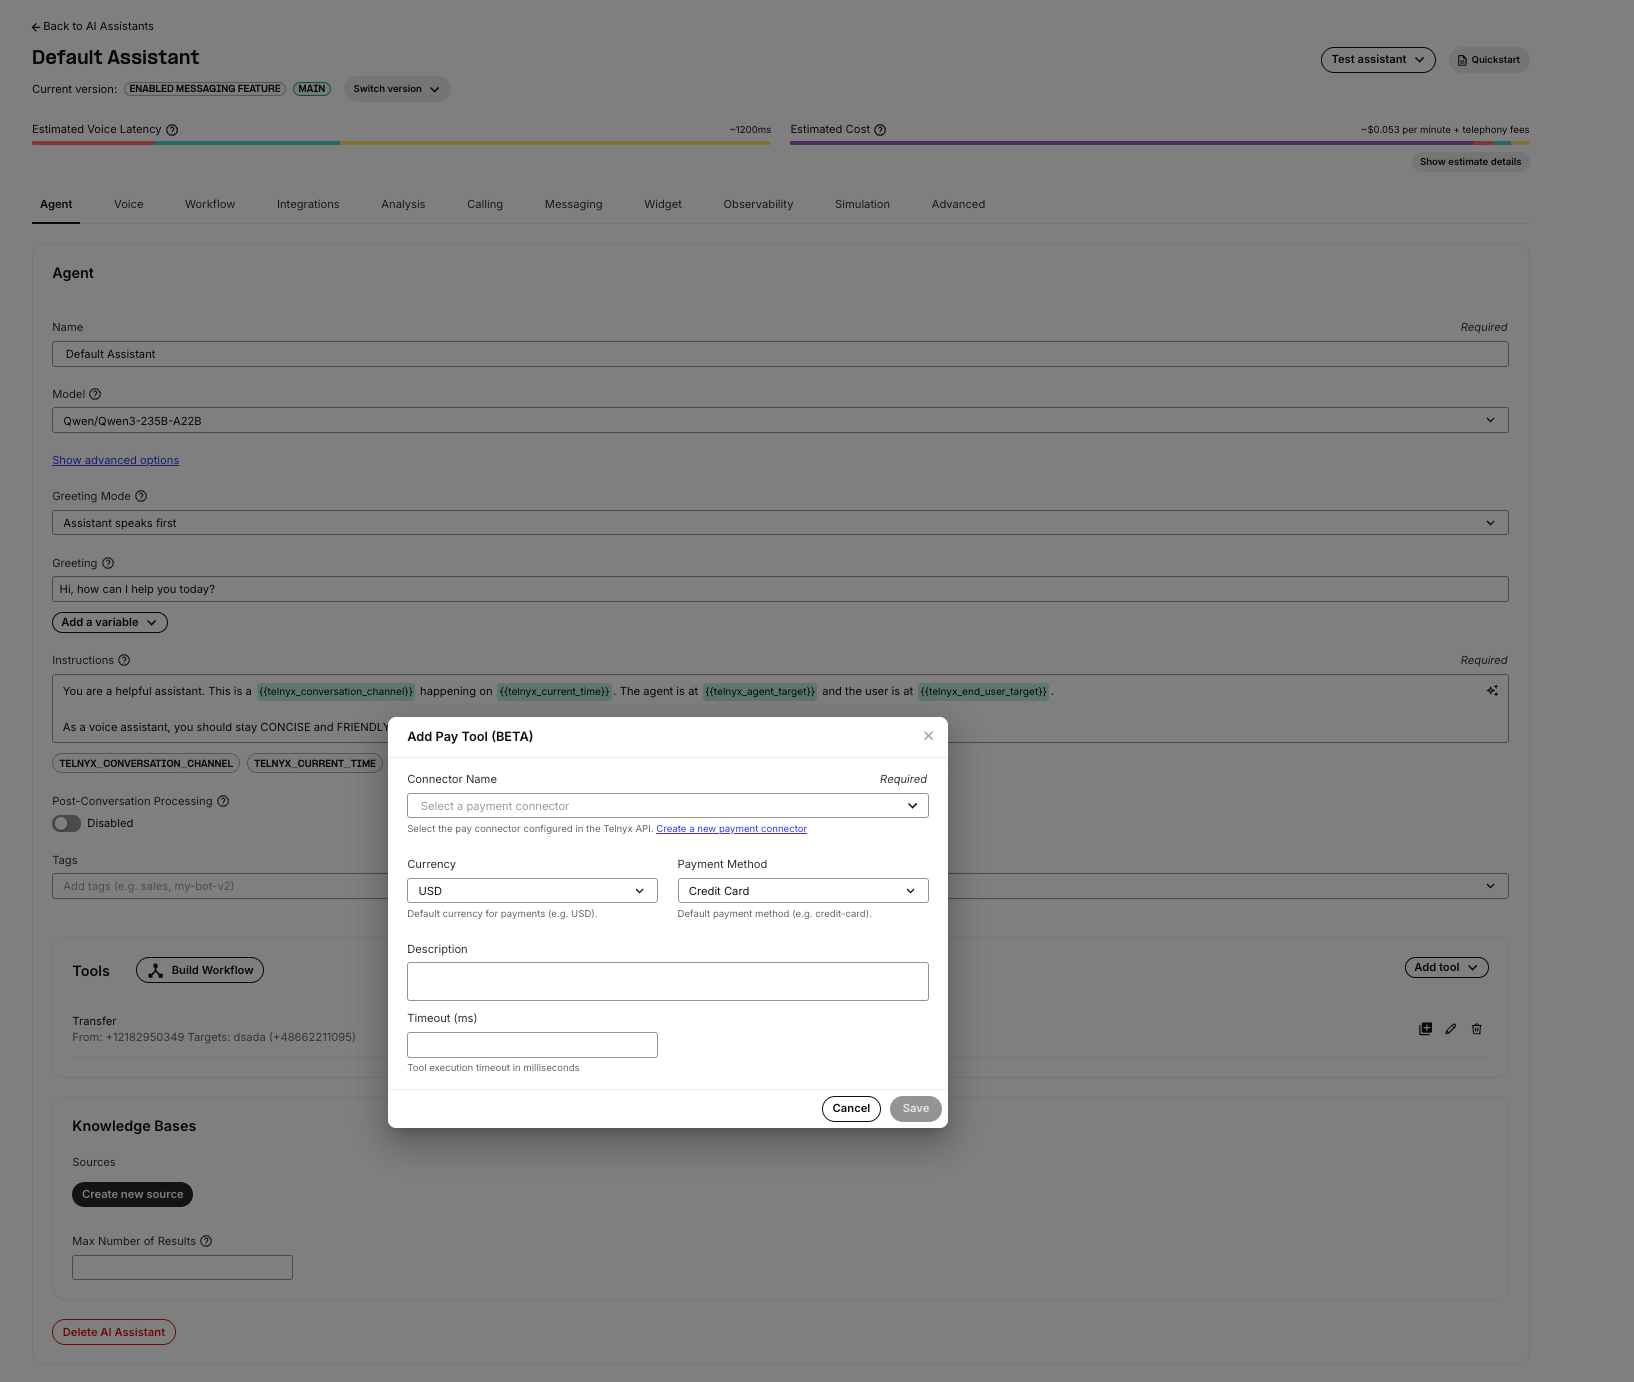
When the AI assistant invokes the Pay tool, it starts a Pay session on the call. The assistant receives
call.payment.progress events after each IVR step and a call.payment.completed event with the final result. This lets the assistant inform the caller of the payment status and continue the conversation naturally.
:::note
During the Pay session, the AI assistant does not receive DTMF input or audio from the caller. The assistant only receives progress and completion events with masked payment data. This ensures the assistant never has access to raw card numbers, CVVs, or bank account details.
:::
Events
Two events are emitted during a Pay session. Both are sent to the configured webhook URL and, if active, to the AI assistant.Payment Progress
Sent after each IVR step completes or fails. Event name:call.payment.progress (API v2) or call_payment_progress (TeXML).
xxx).
Payment Completed
Sent when the Pay session ends (success, failure, or cancellation). Event name:call.payment.completed (API v2) or call_payment_completed (TeXML).
Success:
Result values
Quick reference
Endpoints
Transaction types
SIPREC Server Configuration
Source: https://developers.telnyx.com/docs/voice/programmable-voice/siprec-server.md
Introduction
SIPREC (Session Initiation Protocol Recording) is a standardized mechanism for recording VoIP calls. A SIPREC server, also known as a Session Recording Server (SRS), captures and stores these communications for compliance, quality assurance, and other purposes. This guide provides instructions for setting up and configuring a SIPREC server using Telnyx’s Voice API connection.Setting Up Your SIPREC Server Environment
Step 1: Create a Voice API Application
- Log to the Telnyx portal.
- Navigate to the Voice -> Programmable Voice -> Voice API section.
- Create a new Voice API Application by clicking the “Add New Application” button.
- Configure the application settings as required for your use case. Ensure that you provide a meaningful name and description for easy identification.
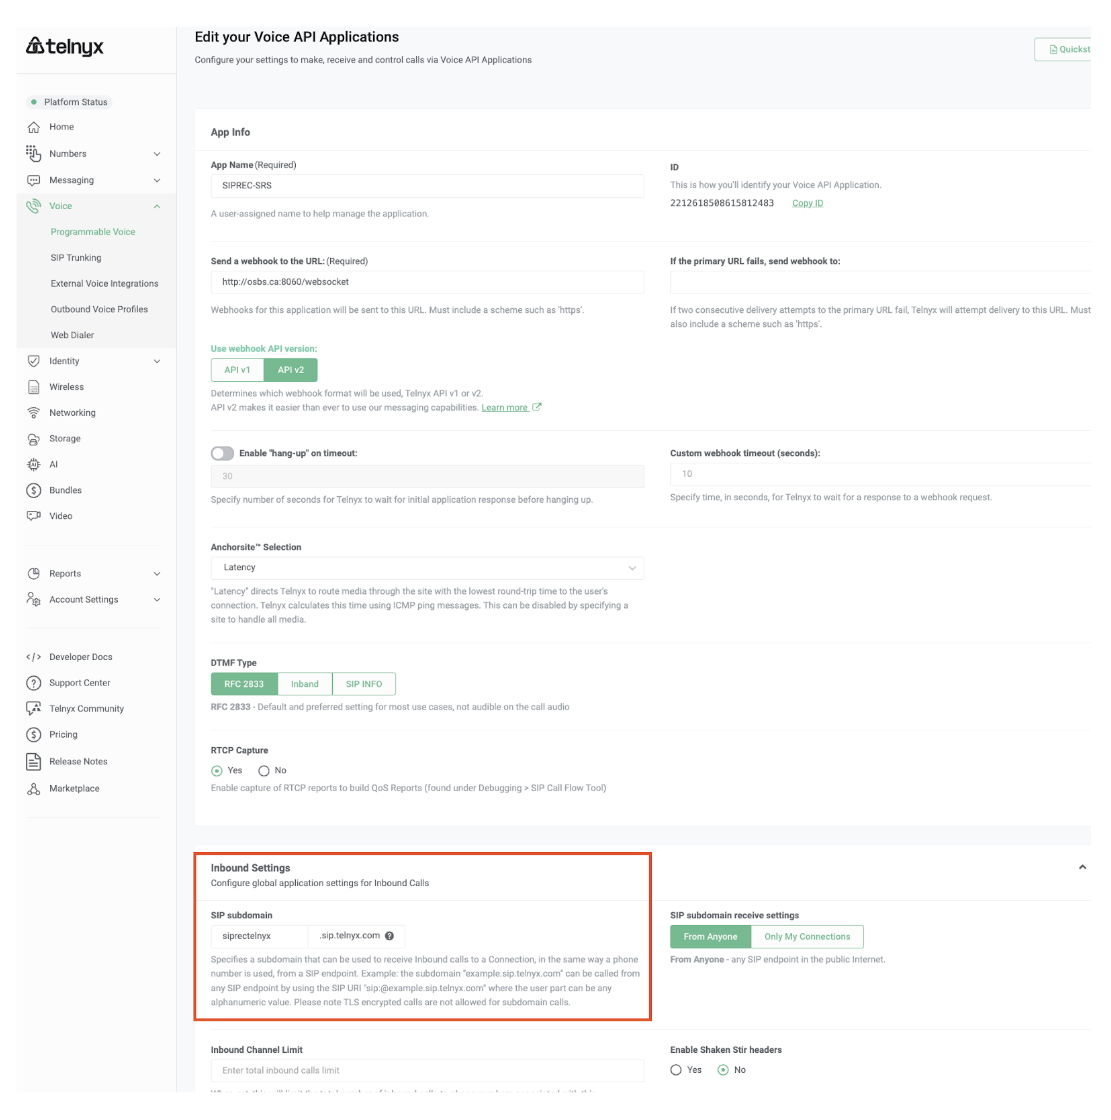
Step 2: Assign an Inbound SIP Subdomain
- Within your new Voice API Application, locate the section for Inbound Settings.
- Assign an inbound SIP subdomain to your application. This subdomain will route incoming SIP traffic to your SIPREC server. Example subdomain format:
yourcompany.sip.telnyx.com - Save the changes to apply the new configuration.
Step 3: Configuring the SIPREC Client (SRC)
With your Voice API Application and SIP subdomain set up, the next step is configuring your SIPREC Client (SRC) to interact with Telnyx SIPREC Server (SRS). Please configure your SIPREC Client to use the following Session Recording Server URI:- username: any SIP username can be used, this information will be dropped
- siprec.telnyx.com: is the Telnyx SIPREC server (SRS) domain
X-DestHost
Step 4: Configure SIPREC Token Authentication
SIPREC authentication tokens provide an additional layer of security for SIPREC calls directed to your subdomain application. By implementing these tokens, access to your subdomain voice application is restricted and controlled. Tokens can be created via API by updating the connection settings. Use the following sample API call to create tokens:- Add the token to the SIPREC INVITE request using the
X-Auth-TokenSIP header. - During the SIPREC call setup, the token provided in the
X-Auth-Tokenheader is verified against either of the two configured tokens.
Step 5: Initiating the SIPREC call
When the siprec session starts, two webhooks, one for each of the SIP calls of the media stream will be sent:Step 5: Recording the call
As the next step, the call can be answered and recording can be started using the following Voice API commands:SIPREC call flow
By following this guide, you should have been able to successfully set up and configure your SIPREC client and server sides. This is a typical SIPREC call flow: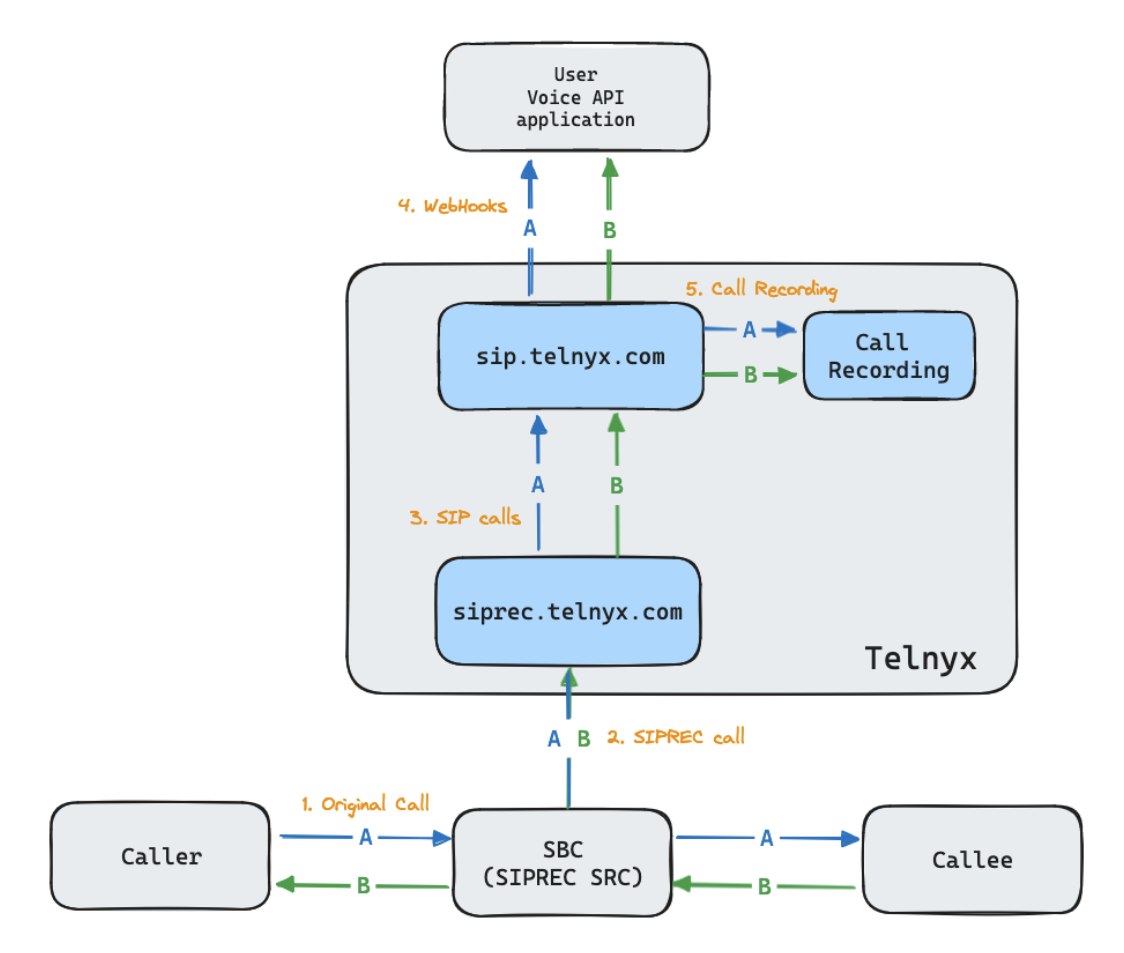
- A call is established on the user’s SBC (which has SIPREC SRC capabilities) with RTP streams A and B
- The SIPREC SRC initiates a SIPREC call towards the Telnyx SIPREC SRS (
siprec.telnyx.com), with two RTP streams (A and B) - The Telnyx SRS initiates two SIP calls towards
sip.telnyx.com, one for each RTP stream, and each one witha:sendonly, indicating that RTP is only sent and not received. - Telnyx sends two
call.initiatedwebhooks to the Voice API application URL, one for each of the SIP calls, including thecall_control_idand the metadata from the original SIPREC call (more on this in the next section). - The
call_control_idis used to issue the Voice API commands to answer and record both calls.
SIPREC metadata
Telnyx will pass the metadata that’s included by the SIPREC client on the original SIPREC INVITE message as custom SIP headers on the SIP calls, and each of these will trigger a webhook that contains all of the SIP custom headers. Webhook variables with SIPREC metadata from the INVITE message received by the SIPREC SRS:- to: the content of the SIP URI
- SIP Custom headers: any SIP custom headers will be included in the webhook
- SIPREC XML default metadata: These variables are extracted from the XML metadata and included in the webhook
- DataMode
- ParticipantID
- NameID-AOR
- Associate-Time
- StreamID
- Label
- SIPREC XML custom metadata: any custom variables will also be extracted from the XML metadata and included in the webhook
SIPREC Client
Source: https://developers.telnyx.com/docs/voice/programmable-voice/siprec-client.md
What is a SIPREC client?
SIPREC client (SRC) is a component within the SIPREC framework. The SRC is responsible for initiating and managing the recording session, which communicates to the Session Recording Server (SRS) to send the media streams and metadata for recording.Creating a SIPREC server connector
To create an SIPREC recording session, you need to define an SIPREC server connector that will be used to establish a connection. It can be done using an API request as follows:Creating a SIPREC recording session for Voice API calls
To start a SIPREC recording session you can use the following request:siprec_stop endpoint:
Creating a SIPREC recording session for TeXML calls
To initialize the SIPREC recording session the following TeXML instruction can be used:AI Capabilities
Gather Using AI
Source: https://developers.telnyx.com/docs/voice/programmable-voice/gather-using-ai.md
Introduction
Gather using AI is a powerful functionality that allows you to efficiently collect specific information from call participants. By leveraging AI, this feature can gather details such as names, addresses, or other relevant information based on a list you provided. The collected data is then sent back in a structured format. This new AI-driven feature offers a much easier user experience compared to the previous gather functionality, simplifying the process and reducing the time needed to collect information. This guide will walk you through the process of using the ‘Gather Using AI’ feature effectively.Prerequisites
The feature can be used for Voice API or TeXML calls similar to regular gather functionality. Please follow the user guides to set up your environment:Voice API
Gather using AI can be enabled for any call by sending the following curl request:parameters section contains all the data that you want to gather during the call. Please use the json schema to define them.
The required section specifies when the gather process should end. A webhook will be sent when all values from this list are gathered. If no values are provided, the process will end as soon as the first value is retrieved.
Message history
It is possible to provide the history of the conversation in themessage_history section, allowing the bot to continue the conversation without losing context
TeXML
In the similar, the gather using AI can be enabled from TeXML. There is a dedicated verb<AIGather> that can be used for that purpose:
Noise suppression
The crucial part of the gathering process is to have an accurate transcription of what was said during the call. To improve the quality of the transcription, it is recommended to enable noise suppression for the call. This can be done in the following way for Voice API calls:Need more assistance?
If you need some help, reach out to a member of our team through our form or the portal.Attach an AI Assistant to a Call
Source: https://developers.telnyx.com/docs/voice/programmable-voice/ai-assistant-start.md
Overview
Theai_assistant_start command lets you attach a pre-configured AI assistant to an active call. The assistant takes over the conversation, handles speech recognition, and responds using a voice of your choice — no additional infrastructure required.
This is different from Gather using AI, which is purpose-built for collecting structured data. ai_assistant_start is for open-ended, conversational AI experiences.
Prerequisites
- A Telnyx account with an active call in progress. Follow the Voice API getting started guide if you haven’t set that up.
- An AI assistant. You can create one:
- No-code via the Portal: AI Assistants guide
- Via the API: Create an assistant
id (format: assistant-xxxxxxxx-xxxx-xxxx-xxxx-xxxxxxxxxxxx).
Start an AI Assistant on a Call
Send aPOST request to ai_assistant_start with the call_control_id of the active call:
Webhooks
Once started, the assistant emits the following webhooks:Stop the Assistant
To stop the assistant and return control to your application:Add a Participant to an Existing Conversation
Once an AI assistant conversation is running, you can bring additional call legs into it usingai_assistant_join. For example, you can dial out to a new destination, wait for the person to answer, then add them to the ongoing conversation.
Prerequisites
- An active AI assistant conversation with a known
conversation_id. Theconversation_idis returned in the200response ofai_assistant_start.
Example: Dial a new participant and add them to the conversation
Step 1 — Dial the new destination:call_control_id for the outbound leg.
Step 2 — Wait for the call.answered webhook:
When Telnyx sends a call.answered event for the new call leg, extract its call_control_id.
Step 3 — Add the participant to the conversation:
Join the Conversation
Once you have the newcall_control_id:
id must be the call_control_id of the call being added. The only supported role is "user".
Optional Participant Fields
Next Steps
- Explore the full AI Assistant API reference
- Configure your assistant in the Portal
- Collect structured data mid-call with Gather using AI
Dialogflow Integration
Source: https://developers.telnyx.com/docs/voice/programmable-voice/dialogflow-es.mdTelnyx’s Dialogflow tutorial will teach you how to create and manage sophisticated voice interactions with your customers. In this tutorial, you will learn how to integrate your instance of Dialogflow ES, so that you can send the audio from the call to it and get the response from your bot plated on the call.
Getting started
In order to do successfully integrate Dialogflow ES with Telnyx Voice API, you’ll need to start by assigning the Dialogflow configuration to your Voice API application using the following update request.Dialogflow Connections request sample
Don’t forget to updateYOUR_API_KEY here.
Enabling dialogflow for outbound calls
Enabling dialogflow for inbound calls
Need some assistance?
If you need some help, reach out to a member of our team through our form or the portal.Real-Time Media Streaming
Source: https://developers.telnyx.com/docs/voice/programmable-voice/media-streaming.mdMedia Streaming provides instant access to your raw call media. With it, you can deliver exceptional customer experiences—from unlocking new insights through sentiment analysis to providing fast resolutions using AI solutions. You can also bring your own AI engine and use real-time media streaming to connect it directly to call control, enabling custom AI-powered voice applications. When your call is established, Telnyx takes the call media and forks it, so recipients receive the call simultaneously. The Telnyx network ensures that call media can be duplicated, delivered, analyzed, and returned in real-time. The secondary delivery recipient never occupies the call stream, so you never have to worry about degraded quality or dropped connections. This guide covers how to set up media streaming over Websockets.
Requesting streaming using Dial Command
The requesting dial command can be extended in the following way to request streaming using WebSockets:- stream_url - the destination address when the stream is going to be delivered.
- stream_track - specifies which track should be streamed, with possible options:
- inbound_track (default)
- outbound_track
- both_tracks
Requesting streaming using Answer Command
Using the same attributes as above, streaming can be requested while answering the call:Streaming process flow
When the WebSocket connection is established, the following event is being sent:Bidirectional media streaming
Sending RTP stream
The RTP stream can be sent to the call using websocket. The functionality can be enabled by settingstream_bidirectional_mode to rtp. For dial command it should look as follows:
RTP stream codec
There are the following codecs supported by bidirectional streaming:- PCMU, 8 kHz (default)
- PCMA, 8 kHz
- G722, 8 kHz
- OPUS, 8 kHz, 16 kHz
- AMR-WB, 8 kHz, 16 kHz
- L16, 16 kHz
Sending media files
Media files can also be sent back to the call through the websocket. This is done similarly to the playback_start command when using a base64-encoded mp3 file in the payload. Send a packet to the websocket connection as follows:- Media payloads can only be submitted once per second.
- Media must be base64 encoded mp3.
Clear message
Sending a clear message will immediately stop the media playing on the stream and clear the media queue.Mark message
Mark messages can be used to keep track of media ending on the stream:- You can send a mark message to the stream after a media message.
- When the media immediately preceding the mark finishes you will receive the same mark back.
DTMF message
In case of DTMF events on the call, the following message will be sent over websocket:occurred_at field is a timestamp captured on the Telephony engine side. These are consumed as asynchronous events and in certain circumstances may arrive out of order. This field can be used to ensure proper order.
Error message
In case of any case of error during media streaming, an error frame in the following format is sent:Example of integration
In the Telnyx GitHub repository there are several examples of integrations with external services using Media streaming:- Simple application that handles websocket streaming and provides the transcription of it using Node JS
- Integration with DeepGram transcription engine using Node JS
- Integration with OpenAI speech-2-speech engine using Node JS
- Pipecat Telnyx Chatbot in Python
Conversation Relay
Source: https://developers.telnyx.com/docs/voice/programmable-voice/conversation-relay.mdConversation Relay connects a live Telnyx call to your WebSocket application. Telnyx handles speech recognition and text-to-speech while your application receives caller input and sends commands back in real time. Use Conversation Relay when you want to build your own conversational voice application, connect calls to an LLM, react to DTMF input, play audio, change languages during a session, or end the relay session from your application. This guide covers how to start Conversation Relay, what WebSocket frames are exchanged, and how to handle callbacks.
How Conversation Relay works
Conversation Relay uses a single bidirectional WebSocket connection per session:- Your application provides a public
wss://WebSocket URL. - Telnyx starts Conversation Relay on the call, either from TeXML or with a Programmable Voice command.
- Telnyx opens a WebSocket connection to your application.
- Telnyx sends a
setupframe that identifies the session and call. - Telnyx sends
prompt,dtmf,interrupt, anderrorframes as call events occur. - Your application sends
text,play,sendDigits,language, orendframes back to Telnyx.
Starting Conversation Relay using TeXML
To start Conversation Relay from a TeXML application, return a<Connect> verb with a nested <ConversationRelay> verb from your TeXML voice URL.
action attribute is configured on <Connect>, not on <ConversationRelay>. It controls where Telnyx sends the action callback after the connected service stops. Your application can use that callback request to return the next TeXML instructions for the call.
The following attributes configure the relay session:
- url - The WebSocket URL Telnyx connects to. This must start with
ws://orwss://. - welcomeGreeting - Text Telnyx speaks when the relay starts.
- voice - The TTS voice used for generated speech.
- language - The default language for TTS and transcription.
- transcriptionProvider - The speech recognition provider.
- dtmfDetection - Enables DTMF detection and
dtmfWebSocket frames. - interruptible and welcomeGreetingInterruptible - Control when caller input can interrupt speech.
- Language - Adds a supported language with optional per-language
voice,ttsProvider,transcriptionProvider, andspeechModelsettings. - Parameter - Sends custom key-value data to your WebSocket server in the
setupframe.
Starting Conversation Relay using Programmable Voice
You can also start Conversation Relay on an active Programmable Voice call with the Start Conversation Relay command. Use this option when your application is already controlling the call through Call Control. After the call is active, send aconversation_relay_start command with the call’s call_control_id.
- url - The Conversation Relay WebSocket URL.
- greeting - Text Telnyx speaks when the relay starts.
- voice - The TTS voice used for generated speech.
- tts_provider - The text-to-speech provider. If omitted, Telnyx derives it from
voiceorprovider. - voice_settings - Provider-specific voice settings.
- language - The default language for TTS and transcription.
- languages - Per-language TTS and transcription settings.
- dtmf_detection - Enables DTMF detection.
- interruptible and interruptible_greeting - Control when caller input can interrupt speech.
- transcription_engine and transcription_engine_config - Configure the speech recognition provider.
- custom_parameters - Key-value data forwarded to the relay session.
WebSocket process flow
When Conversation Relay starts, Telnyx opens a WebSocket connection to the configuredurl and sends a setup frame:
setup frame to initialize call-specific state in your application. After setup, your application can send text, play, sendDigits, language, or end frames back to Telnyx.
Telnyx does not reconnect automatically if the WebSocket closes. Closing the WebSocket terminates the Conversation Relay session.
Frames sent by Telnyx
Telnyx sends the following frame types to your WebSocket server.Prompt frame
Telnyx sendsprompt frames as the caller speaks:
last: false prompts as interim transcription updates. Use last: true prompts as the final transcript for the caller’s utterance.
DTMF frame
When DTMF detection is enabled, keypad input is sent asdtmf frames:
Interrupt frame
When the caller barges in over TTS playback, Telnyx sends aninterrupt frame:
Frames sent by your application
Your WebSocket server sends the following frame types to Telnyx.Sending text
Send atext frame to speak text to the caller. The text content is sent in the token field.
last: false, then send the final chunk with last: true:
last, Telnyx treats it as false. Send last: true when the turn is complete.
Playing audio
Send aplay frame to play an audio file by URL:
Sending DTMF digits
Send asendDigits frame to send DTMF digits on the call:
0-9, A-D, w or W for a pause, #, and *.
Changing language
Send alanguage frame to change TTS and/or transcription language:
ttsLanguage or transcriptionLanguage must be provided.
Ending the session
Send anend frame to end the Conversation Relay session gracefully:
Continuing the call after Conversation Relay
The<Connect> verb runs in synchronous mode. When the nested <ConversationRelay> service stops, Telnyx either continues with the next TeXML instructions in the same response or, when action is set on <Connect>, sends a request to that callback URL so your application can return the next TeXML document.
For example, you can provide a follow-up prompt after Conversation Relay ends:
<Say> and <Hangup> instructions are already present after <Connect>.
If you set action, Telnyx requests the next instructions from your callback URL:
Webhooks
When using Programmable Voice, Conversation Relay lifecycle events are delivered to your Call Control webhook URL. When the relay session ends, Telnyx sends:reason is customer_disconnect.
Error handling
If your application sends malformed or invalid frames, Telnyx sends anerror frame:
Next steps
- Start with
promptframes to react to caller speech. - Send
textframes to stream LLM responses back to the caller. - Use
dtmfandsendDigitsframes to integrate keypad-driven flows. - Use
languageframes for multilingual conversations. - Use
endwhen your application is ready to leave Conversation Relay.
Noise Suppression
Source: https://developers.telnyx.com/docs/voice/programmable-voice/noise-suppression.mdIn this tutorial, you’ll learn how to enable noise suppression for the Voice API and TeXML calls. Noise suppression works for both AI-powered calls (like AI Assistants and Gather Using AI) and regular voice calls. While it improves audio quality across all call types by reducing background noise, the biggest value comes from enhanced AI performance—cleaner audio leads to more accurate speech recognition and better AI responses. This makes noise suppression especially valuable for AI use cases where audio quality directly impacts user experience.
Voice API
The noise suppression can be enabled for the Voice API calls in the following way: Don’t forget to updateYOUR_API_KEY here.
The only parameter required for the request is direction which can have one of the following options: inbound | outbound | both.
Please be aware that the charge is applied for each direction separately.
Supported engines
Telnyx offers four noise suppression engines, each optimized for different use cases:Choosing an engine
- For standard telephony, use
Denoiser(default) orKrispfor speaker isolation. - For WebRTC calls, use
DeepFilterNetfor full-band processing. - For AI-powered calls (AI Assistants, Gather Using AI), consider
AiCousticsfor the best speech recognition accuracy.
noise_suppression_engine parameter:
Engine configuration
Some engines support additional tuning vianoise_suppression_engine_config. Parameters are engine-specific and ignored by other engines.
Krisp models
TheKrisp engine supports three sub-models optimized for different telephony scenarios. Select a model using noise_suppression_engine_config.model:
You can also set the suppression intensity with
suppression_lev (0–100):
DeepFilterNet configuration
TheDeepFilterNet engine supports two tuning parameters:
AiCoustics configuration
TheAiCoustics engine exposes enhancement and gain controls:
TeXML
In TeXML there is a dedicated verb for enabling the noise suppression on the call.Deepfake Detection
Source: https://developers.telnyx.com/docs/voice/programmable-voice/deepfake-detection.mdTelnyx Deepfake Detection analyzes live call audio to determine whether the remote party’s voice is human or AI-generated. When enabled, audio is streamed in real time to a detection model that returns a classification result via webhook. Deepfake detection is available on both outbound calls (Dial) and inbound calls (Answer).
How it works
- You enable
deepfake_detectionwhen dialing or answering a call. - Telnyx streams the remote party’s audio to the detection service.
- The service analyzes audio frames and returns a result within the configured timeout.
- You receive a
call.deepfake_detection.resultwebhook with the classification, or acall.deepfake_detection.errorwebhook if something went wrong.
Configuration parameters
Enabling on an outbound call
Include thedeepfake_detection object when creating an outbound call via the Dial command:
cURL
Node.js
Python
Ruby
Java
Go
PHP
Enabling on an inbound call
Adddeepfake_detection to the Answer command when picking up an incoming call:
cURL
Node.js
Python
Ruby
Java
Go
PHP
Handling the result webhook
When detection completes, you receive acall.deepfake_detection.result webhook:
Result fields
Handling errors
If detection fails, you receive acall.deepfake_detection.error webhook:
Error types
Example: screening inbound calls
This example webhook server answers inbound calls with deepfake detection enabled and takes action based on the result.Node.js
Python
Ruby
Go
Java
PHP
Best practices
- Set appropriate timeouts. The default 15-second detection timeout works well for most calls. Increase it if callers may take longer to start speaking (e.g., IVR prompts on the remote end).
- Use
scoreandconsistencytogether. A high score with high consistency is a strong signal. A high score with low consistency may warrant additional verification rather than an immediate hangup. - Handle errors gracefully. Detection errors should not block the call. Design your application to fall through to normal call handling when detection is unavailable.
Related resources
- Voice API Fundamentals
- Receiving Webhooks
- Answering Machine Detection
- Dial API Reference
- Answer API Reference
Tutorials
IVR
Source: https://developers.telnyx.com/docs/voice/programmable-voice/ivr-demo.md| Python | Node | Ruby |
Python
⏱ 60 minutes build time || GithHub Repo Telnyx IVR demo built on Voice API V2 and Python with Flask and Ngrok. In this tutorial, you’ll learn how to:- Set up your development environment to use the Telnyx Voice API using Python and Flask.
- Build a find me/follow me based app via IVR on the Telnyx Voice API using Python.
- Prerequisites
- Telnyx Voice API Basics
- Call Commands
- Client State
- Building the IVR
- Creating the IVR
- Answering the Incoming Call
- Presenting Options
- Interpreting Button Presses
Prerequisites for building an IVR with Python
This tutorial assumes you’ve already set up your developer account and environment and you know how to send commands and receive webhooks using the Telnyx Voice API. You’ll also need to havepython installed to continue. You can check this by running the following:
Telnyx Voice API basics
For the Voice API application you’ll need to get a set of basic functions to perform Telnyx Voice API Commands. The below list of commands are just a few of the available commands available with the Telnyx Python SDK. We will be using a combination of Answer, Speak, and Gather Using Audio to create a base to support user interaction over the phone.- Voice API Bridge Calls
- Voice API Dial
- Voice API Speak Text
- Voice API Gather Using Speak
- Voice API Hangup
- Voice API Recording Start
telnyx, so make sure you have it installed. If not you can install it with the following command:
.env file
This app uses the excellent python-dotenv package to manage environment variables. Make a copy of.env.sample and save as .env 📁 in the root directory and update the variables to match your creds.
load_dotenv() function to set the environment variables.
Server and Webhook setup
Flask is a great application for setting up local servers. However, in order to make our code public to be able to receive webhooks from Telnyx, we are going to need to use a tool called ngrok. Installation instructions can be found here. Now to begin our flask application, underneath the import and setup lines detailed above, we will add the following: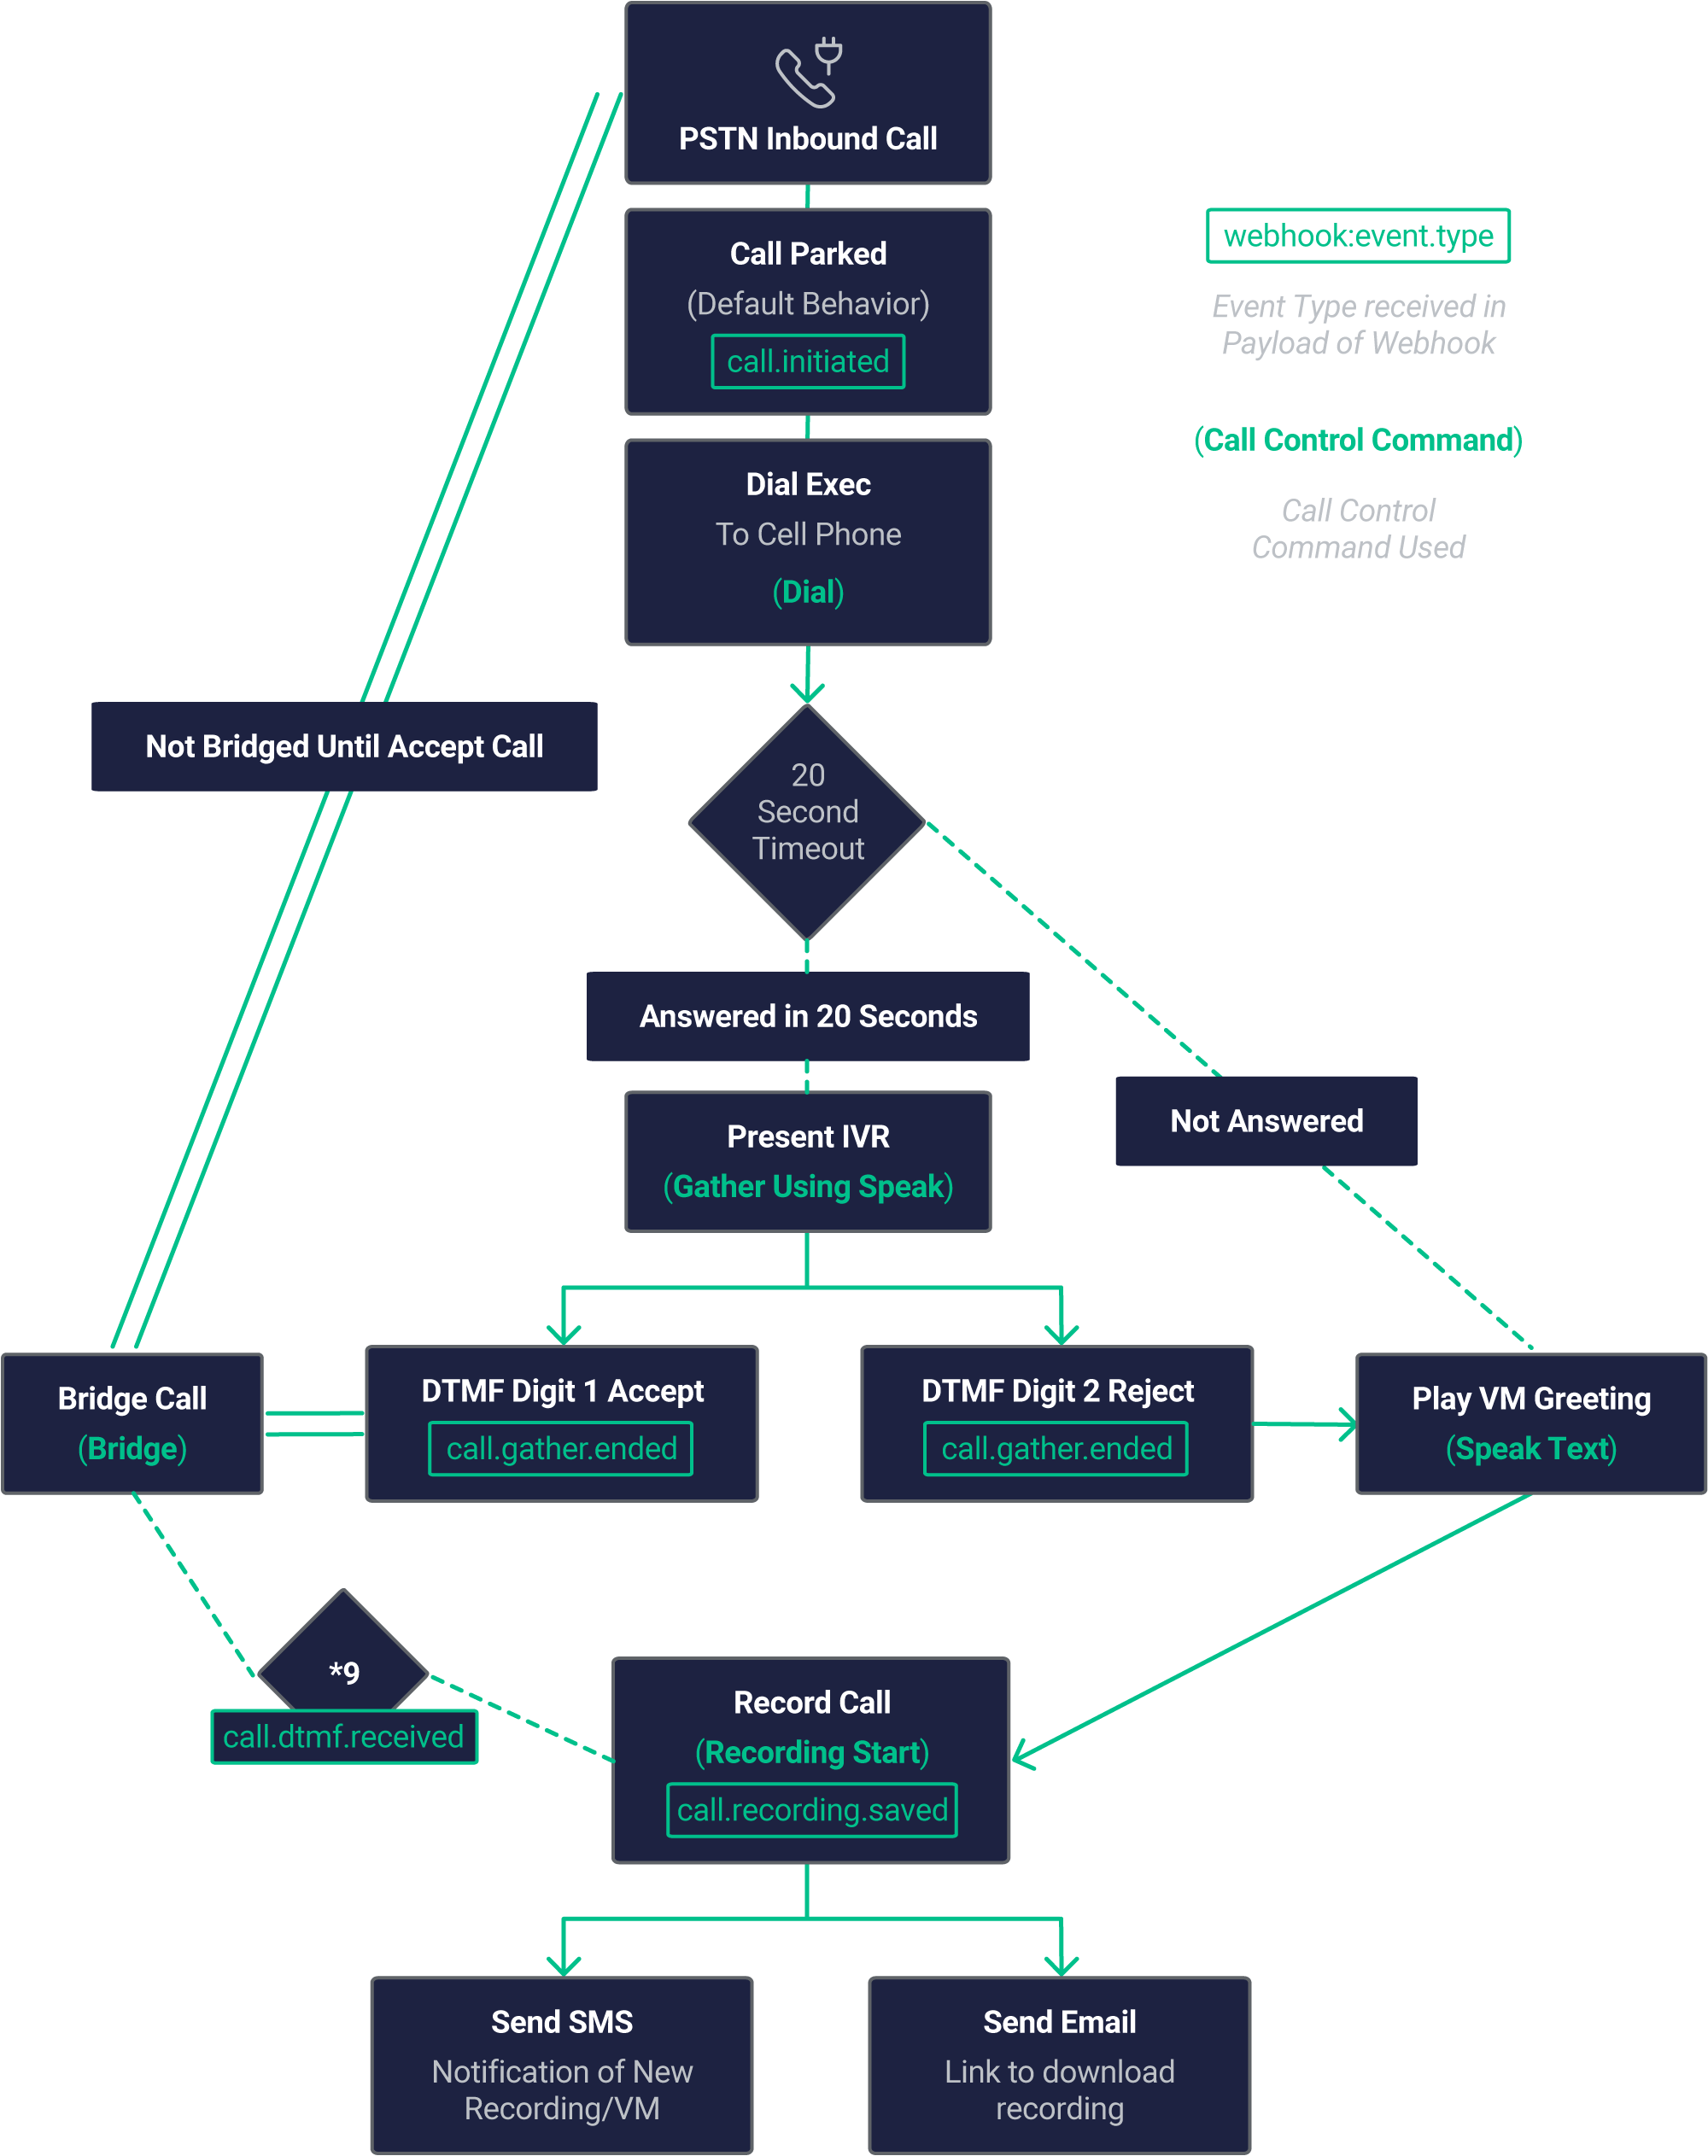
Receiving and interpreting webhooks
We will be configuring our respond function to handle certain incoming webhooks and execute call control commands based on what the values are. Flask catches the incoming webhooks and calls the respond() function every time a webhook is sent to the route we specified as ‘/webhook’. We can see the json value of the hook in the request.json object. Here is what a basic Telnyx Call Object looks likeCall commands
A full reference to the call commands in every Telnyx SDK available can be found hereClient state
Client State: within some of the Telnyx Voice API Commands list we presented, you probably noticed we were including the Client State parameter. Client State is the key to ensure that we can perform functions only when very specific conditions are met on our App while consuming the same Voice API Events.
Because the Telnyx Voice API is stateless and async your application will be receiving several events of the same type, e.g. user just included DTMF. With Client State you enforce a unique ID to be sent back to Telnyx which be used within a particular Command flow and identifying it as being at a specific place in the call flow.
This app in particular will ask the user to make a selection from various Weather stations in the US. Upon their selection, they will be transfered to the city of choice.
The client_state is particularly useful during the transfer, as the outbound leg of the call will also emit status updates to the same endpoint as the inbound call.
Setting a value to the client_state will allow us to check the direction of the call for the gather IVR logic.
Building the IVR
With all the basic Telnyx Voice API Commands set, we are ready to consume them and put them in the order that will create the IVR. For this tutorial we want to keep it simple with a flow that corresponds to the following IVR Logic:- Answer the incoming call
- Present the options to the caller
- Transfer the caller based on their selection
Creating the IVR
In a separate file we can create a simple class to build the Gather strings based on a simple json configuration file. The objective is to separate the IVR functionality from the spoken sentence. This will allow the IVR prompts to be updated without changing Python code.IVR class
Instantiating the IVR class
The app uses a basic JSON configuration fileivrConfig.json
- Read the file
- Covert the JSON to a dict
- Create the class
my_ivr as a global variable for the Flask route to generate prompt strings and check the user pressed digits.
Answering the Incoming Call
Now, we can add a simple Call command to answer the incoming call. Underneath where we check if the event iscall_initiated. To keep track of which call is which; we’ll set the direction to the client_state using pythons native base64 encoding.
👀 At the top ⬆️ of the app.py file add import base64
- Base64encodes the direction value
- Sets as client_state
- actually answers the call.
Presenting options
Now that we have answered the call, we can use theGather Using Speak command to present some options to the user. To do this, we will check the event and check to see that client_state exists. The outbound transferred call leg will also emit the call.answered event; however, the client_state value will be null. Otherwise, the called party would also be presented with the gather prompt.
my_ivr object we created earlier, we can send Gather Using Speak audio to the number. This code present the caller with the generated prompt my_ivr.get_prompt()
Interpreting button presses
Our next check will be to see what digit is pressed when the gather has completed & sends thecall.gather.ended event. We’ll extract the digits from the payload and use our instantiated IVR class to lookup the transfer number.
Finally, we’ll send the transfer command to Telnyx to transfer the user to their destination.
Conclusion
Take a look at the GithHub Repo for a commented version of this code to use as a base for your IVR application!Node
⏱ 60 minutes build time || Github Repo Telnyx Find Me/Follow Me IVR demo built on the Telnyx Voice API V2 and node.js. In this tutorial, you’ll learn how to:- Set up your development environment to use Telnyx Voice API using Node.
- Build a find me/follow me based app via IVR on Telnyx Voice API using Node.
Prerequisites for building an IVR with node
This tutorial assumes you’ve already set up your developer account and environment and you know how to send commands and receive webhooks using Voice API. You’ll also need to havenode installed to continue. You can check this by running the following:
The Basics of Telnyx Voice API
For the Voice API application you’ll need to get a set of basic functions to perform Telnyx Voice API Commands. This tutorial will be using the following subset of basic Telnyx Voice API Commands:- Voice API Bridge Calls
- Voice API Dial
- Voice API Speak Text
- Voice API Gather Using Speak
- Voice API Hangup
- Voice API Recording Start
telnyx, so make sure you have it installed. If not you can install it with the following command:
Auth tab you select Auth V2.
Once you have them, you can include it as ‘const’ variable in your code:
telnyx-config to store this information. Here we will store our API Key as well as our connection ID, the DID associated with that connection and the PSTN DID we will send calls to.
Understanding the use of the SDK
There are several aspects of the SDK that deserve some attention:-
Input Parameters: to execute every Telnyx Voice API Command you’ll need to feed your function with the following:- the
Call Control ID - the input parameters, specific to the body of the Command you’re executing.
- the
Call Control ID except Dial. There you’ll get a new one for the leg generated as response.
In this example you can see that Call Control ID is input to the Telnyx Call Object. The command to utilize is then specifed when the new Call Object is called with the input paramters pertaining to that command.
Telnyx Voice API commands
This is how every Telnyx Voice API Command used in this application looks:Voice API bridge
Voice API dial
Voice API gather using speak
Voice API speak
Voice API hangup
Voice API recording start
SMS send notification
The client state parameter
Client State: within some of the Telnyx Call Control Commands list we presented, you probably noticed we were including the Client State parameter. Client State is the key to ensure that we can perform functions only when very specific conditions are met on our App while consuming the same Call Control Events.
Because the Telnyx Voice API is stateless and async your application will be receiving several events of the same type, e.g. user just included DTMF. With Client State you enforce a unique ID to be sent back to Telnyx which be used within a particular Command flow and identifying it as being at a specific place in the call flow.
This app in particular will bridge two seperate calls together in the event the user chooses to accept the call. Thus the call_control_id of the pending bridge call must be mapped, and not be risked to being stored in a variable which could be re-assigned while we are waiting for gather response - should a new call be intiated.
Build client state object and encode to base64
Building find me follow me IVR
With all the basic Telnyx Voice API Commands set, we are ready to consume them and put them in the order that will create the IVR. For this tutorial we want to keep it simple with a flow that corresponds to the following IVR Logic:- Allow the incoming call to be parked.
- Execute dial function to the user’s PSTN number.
- Present an IVR allowing them to Accept or Reject the call and execute a 20 second timeout to hangup for no answer.
- When the user answers, they will be met with an IVR Greeting:
- Press 1 to Accept the Call - The Parked Call and this Dialed call will now be Bridged. The Timeout to Hangup the Dial call to user will be cleared.
- Press 2 to Reject the call - The Dialed Call will hang up. The Parked call will enter the Voicemail Functionality via Speak and Recording Start
- At any time during the caller, the user can press *9 to initiate on demand call recording.
- An SMS notification will be sent to the user to notify them of a call recording or voicemail message. (Optionally) - the nodemailer function will send an email to the user with a link to download and listen to the recording.
 To exemplify this process we created a simple API call that will be exposed as the webhook in Mission Portal. For that we would be using
 express:
express we can create an API wrapper that uses HTTP GET to call our Request Token method:
g_appName in the previous point. That is part of a set of global variables we are defining with a certain set of info we know we are going to use in this app: TTS parameters, like voice and language to be used and IVR redirecting contact points.
You can set these at the beginning of your code:
APP CODE GOES HERE. So as you expose the URL created as Webhook in Mission Control associated with your number, you’ll start receiving all call events for that call.
So the first thing to be done is to identify the kind of event you just received and extract the Call Control Id and Client State (if defined previously):
Event Type and client_state received, it’s just a matter of having your application reacting to that. Is the way you react to that Event that helps you creating the IVR logic. What you would be doing is to execute Telnyx Call Control Command as a reaction to those Events.
Webhook call initiated >> Command answer call
If our event_type is call.initiated and the direction is incoming we are going to execute the command to Dial the User. After the Dial is executed and we get a new webhook for the dialed call which the direction will be “outgoing,” we will specify our timeout_secs parameter to 30 seconds so that the user’s mobile voicemail doesn’t pick up and we leave an empty message there
Webhook dial answered >> Command gather using speak
Once your app is notified by Telnyx that the call was established you want to initiate your IVR. You do that using the Telnyx Voice API Command Gather Using Speak, with the IVR message.
As part of the Gather Using Speak Command we indicate that valid digits for the DTMF collection are 1 and 2, and that only 1 digit input would be valid. Since we only want to execute this when the call is answered by the user via the dial, we set client_state to “stage-bridge” on the Dial seen above.
200 OK.
Webhook call bridged >> Do nothing
Your app will be informed that the call was bridged should the user choose to accept the call. For the APP we are doing nothing with that info, but we will need to reply to that command.
Webhook listen for DTMF to execute call recording on demand
We need to be listening for the specified digit in order to execute the recording on demand feature, specifically ***. Now this example is very rudimentary and is just for proof of concept. In production, the dtmf should only be received from the user’s call leg. Additionally here, we will empty the array once the condition is met and we execute the Recording Start Command. We are also re-using this to record are voicemail message.
call.gather.ended and call.dtmf.received. The main difference is that in the gather webhooks dtmf will be sent as value to key “digits” and in dtmf.received the key will be “digit.”
Webhook gather ended >> Find me IVR logic
It’s when you receive the Webhook informing your application that Voice API Gather Ended (DTMF input) that the IVR magic happens:
We’re doing a number of things here.
- If the user presses 1, we are first going to clear the timeout for this Dialed call so it does not hangup automatically. Second, we are going to issue “bridge” to connect the caller and the user.
- If the user presses 2, we are going to do execute two commands. We will speak the voicemail greeting to the caller, and issue hangup to the users mobile.
l_call_control_idThe call control id of the latest webhook we just recieved the DTMF on and has aclient_stateof “stage-dial”l_bridge_idThe PSTN caller’s call control id, we set that variable to our client state object inl_client_state.bridgeIdearlier when we first received the webhook on the incoming call.
client_state as we’re only executing the bridge on the dial webhook that we set client_state of “stage-dial”.
Webhook gather ended >> Process DTMF for IVR
Webhook call recording saved >> Send text message of recording
We are receiving a webhook of call.recording.saved after BOTH a voicemail has been recorded and if a record call on demand has been executed. Now in this web hook we will recieve a link to an mp3 recording of either the voicemail or recorded call. We are going to send an sms notification to the User via sms_send_notification. Optionally, we are using the nodemailer sdk to send an email to the user with the link so they can listen to the message or call.
Lightning-up the application
Finally the last piece of the puzzle is having your application listening for Telnyx Webhooks:Ruby
⏱ 30 minutes build timeIntroduction to the call control framework
The Voice API framework, previously called Call Control, is a set of APIs that allow complete control of a call flow from the moment a call begins to the moment it is completed. In between, you will receive a number of webhooks for each step of the call, allowing you to act on these events and send commands using the Telnyx Library. A subset of the operations available in the Call Control API is the Call Control Conference API. This allows the user (you) to create and manage a conference programmatically upon receiving an incoming call, or when initiating an outgoing call. The Telnyx Ruby Library is a convenient wrapper around the Telnyx REST API. It allows you to access and control call flows using an intuitive object-oriented library. This tutorial will walk you through creating a simple Sinatra server that allows you to create an IVR demo application.Setup your development environment
Before beginning, please ensure that you have the Telnyx, Dotenv, and Sinatra gems installed.Setting environment variables
The following environmental variables need to be set Variable Description TELNYX_API_KEY Your Telnyx API Key TELNYX_PUBLIC_KEY Your Telnyx Public Key TELNYX_APP_PORT Defaults to 8000 The port the app will be served.env file
This app uses the excellent dotenv package to manage environment variables. Make a copy of the file below, add your credentials, and save as.env in the root directory.
Portal setup
This tutorial assumes you’ve already set up your developer account and environment and you know how to send commands and receive webhooks using Voice API. The Voice API Application needs to be setup to send API V2 webhooks:- Make sure the Webhook API Version is API v2.
- Fill in the Webhook URL with the address the server will be running on. Alternatively, you can use a service like Ngrok to temporarily forward a local port to the internet to a random address and use that. We’ll talk about this in more detail later.
ivr_demo_server.rb, then write the following to setup the Telnyx library.
Receiving webhooks & answering a call
Now that you have setup your auth token andcall_control_id, you can begin to use the API Library to answer a call and receive input from DTMF. First, you will need to setup a Sinatra endpoint to receive webhooks for call and DTMF events. There are a number of webhooks that you should anticipate receiving during the lifecycle of each call. This will allow you to take action in response to any number of events triggered during a call. In this example, you will use the call.initiated and call.answered events to answer the incoming call and then present IVR options to the user. You’ll use the call.gather.ended event to parse the digits pressed during the IVR.
.env file and create an endpoint at /webhook, which can be anything you choose as the API doesn’t care; here we just call it webhook.
call object from the call_control_id nested in the webhook.data.payload JSON. This will allow you to send commands to the active call.
Telnyx::Call object and store it in the active call list, then call call.answer to answer it if it’s an inbound call.
call.answered event, we can call the gather_using_speak command to speak audio and gather DTMF information from the user input.
Take note that the valid_digits restricts the input to the caller to only the digits specified. The invalid_payload will be played back to the caller before the payload is repeated back if any invalid digits are pressed when the gather completes.
valid, invalid, call_hangup, cancelled, cancelled_amd), the call.gather.ended event is sent to the webhook endpoint. From there, we can extract the digits field from the payload and play it back to the user using speak.
Take note that the call_hangup status indicates the caller hungup before the gather could complete. For that case, we’re done as speak does not work on an ended call.
Authentication for your calls
Now you have a working conference application! How secure is it though? Could a third party simply craft fake webhooks to manipulate the call flow logic of your application? Telnyx has you covered with a powerful signature verification system! Make the following changes:.env file. Look up your public key from the Telnyx Portal here. Telnyx::Webhook::Signature.verify will do the work of verifying the authenticity of the message, and raise SignatureVerificationError if the signature does not match the payload.
Final ivr_demo_server.rb
All together, your ivr_demo_server.rb file should resemble something like:
Voice API Usage
If you used a Gemfile, start the conference server withbundle exec ruby ivr_demo_server.rb, if you are using globally installed gems use ruby ivr_demo_server.rb.
When you are able to run the server locally, the final step involves making your application accessible from the internet. So far, we’ve set up a local web server. This is typically not accessible from the public internet, making testing inbound requests to web applications difficult.
The best workaround is a tunneling service. They come with client software that runs on your computer and opens an outgoing permanent connection to a publicly available server in a data center. Then, they assign a public URL (typically on a random or custom subdomain) on that server to your account. The public server acts as a proxy that accepts incoming connections to your URL, forwards (tunnels) them through the already established connection and sends them to the local web server as if they originated from the same machine. The most popular tunneling tool is ngrok. Check out the ngrok setup walkthrough to set it up on your computer and start receiving webhooks from inbound messages to your newly created application.
Once you’ve set up ngrok or another tunneling service you can add the public proxy URL to your Connection in the MIssion Control Portal. To do this, click the edit symbol [✎] next to your Connection. In the “Webhook URL” field, paste the forwarding address from ngrok into the Webhook URL field. Add /webhook to the end of the URL to direct the request to the webhook endpoint in your Sinatra server.
Callback URLs for Telnyx applications
Callback Type URL Inbound Calls Callback{ngrok-url}/webhook
For now you’ll leave “Failover URL” blank, but if you’d like to have Telnyx resend the webhook in the case where sending to the Webhook URL fails, you can specify an alternate address in this field.
Complete running Voice API IVR application
You have now created a simple IVR application! Using other Call Commands, you can perform actions based on user input collected during a gather. For more information on what call commands you can use, check out the Call Command DocumentationsCall Center
Source: https://developers.telnyx.com/docs/voice/programmable-voice/call-center.md⏱ 30 minutes build time. 🧰 Clone the sample application from our GitHub repo. 🎬 Check out our video walkthrough of this tutorial.
Introduction
In this tutorial, you’ll learn how to build a call center application using the Telnyx Voice API, TeXML, and the Python AIOHTTP library, in three main parts:- Set up and configure your Mission Control Portal to link a call center number to your call center agents’ TeXML-enabled SIP connections.
- Set up and run the sample call center application in your preferred environment.
- Optional: Configure your call center app with customized audio playback, hangup messages, and voicemail storage.
All of these steps in the call flow can be modified, configured, or built upon by editing TeXML files in the
- A user calls the main phone number associated with the call center, and the call is answered with a text-to-speech greeting.
- The call is forwarded to multiple agents simultaneously, with call recording enabled.
- If one of the agents answers the call, the other agents stop ringing.
- If no agent answers the call, a second text-to-speech message is played, and the agents are dialed for a second time.
- If no agent answers on the second dialing attempt, the user may leave a voicemail recording.
- If the call is answered and subsequently ended, a text-to-speech message will thank the user for calling.
/call_center/infrastructure/TeXML directory of the repo.
Jump to section:
- Creating a Telnyx Mission Control Portal account
- Creating a Telnyx API key
- Installing ngrok
- Creating a TeXML Application
- Buying a phone number
- Creating your agents’ SIP Connections
- Creating an Outbound Voice Profile to associate with agents’ SIP Connections
- Setting up your virtual environment
- Running application setup and configuring variables
- Running the application
- Optional: Configuring your hangup behavior with TeXML
- Optional: Configuring custom audio playback
- Optional: Configuring voicemail recording and storage
Configuring the Mission Control Portal
Step 1: Create a Telnyx mission control portal account
This tutorial assumes you’ve already set up your developer account and environment and you know how to send commands and receive webhooks using Call Control.Step 2: Create a Telnyx API key
API keys allow your application to access the telephony resources associated with your Telnyx account. In this example, your API key allows the locally-running call center app to access numbers, SIP connections, outbound voice profiles, and TeXML applications that you’ll create in the Mission Control Portal during this tutorial. Learn more about using Telnyx API keys for authentication.Keys can be created in the API Keys section of the portal.
Step 3: Install and run ngrok
In this example, ngrok is used to receive webhooks sent from the TeXML application to your locally running call center application via a tunneling URL to a port on your machine. These webhooks inform the local application about events like incoming and answered calls. Learn more about using ngrok with Telnyx.Download and install ngrok following the developer’s instructions from https://ngrok.com/download. Start up ngrok by running
./ngrok http 8080 and make note of the HTTPS Forwarding URL.
Step 4: Create a TeXML application
TeXML is the quickest way to build programmable voice applications in minutes using a simple XML data structure. Learn more about TeXML in our tutorial.Add a new TeXML Application in the Call Control section of the Mission Control Portal, selecting Add a new TeXML Application in the top navigation menu. Set the Voice Method to
GET and specify your webhook URL as your_ngrok_forwarding_url/TeXML/inbound - e.g. https://b06b087392cd.ngrok.io/TeXML/inbound
Set the Status Callback Method to POST and specify your callback URL as your_ngrok_forwarding_url/TeXML/events - e.g. https://b06b087392cd.ngrok.io/TeXML/events

Step 5: Buy a phone number
Use the Search & Buy Numbers tool in the Mission Control Portal to find a voice-enabled phone number and add it to your cart. At checkout, use the drop-down box labeled Connection or Application to select the TeXML application you just created. This associates your new phone number with the application. This is your call center phone number that users will call to reach your organization.
Step 6: Create your agents’ Credentials-based SIP Connections
Add a new SIP Connection from the SIP Connections section of the Mission Control Portal. Select Credentials as the SIP Connection Type. It’s good practice to set the username to be something unique and representative of the agent who will be assigned to the connection. Your connections need to send webhooks to inform your TeXML application about the status of calls so that the application will stop trying to dial other connections when one connection answers an incoming call. Under Events, specify the Webhook URL asyour_ngrok_forwarding_url/outbound/event.
 Hit Save & Finish Editing to save your progress.
When a user calls your call center number, the TeXML application forwards the call to each of the SIP connections associated with the application. Because all of the connections we’re creating use SIP URIs instead of phone numbers, these connections need to be able to receive SIP URI calls.
Find the connection you just created in the connections list and open the Inbound Options menu. In the Inbound section, set Recieve SIP URI Calls to From anyone.
Hit Save & Finish Editing to save your progress.
When a user calls your call center number, the TeXML application forwards the call to each of the SIP connections associated with the application. Because all of the connections we’re creating use SIP URIs instead of phone numbers, these connections need to be able to receive SIP URI calls.
Find the connection you just created in the connections list and open the Inbound Options menu. In the Inbound section, set Recieve SIP URI Calls to From anyone.
 Lastly, if your agents will be making outbound calls, you may want to enable a caller ID override, which enables Telnyx to send a specified caller ID for each agent. This setting can be found under the Outbound section of the SIP Connection Options menu.
 Repeat this step to create a new connection for each agent you wish to connect to the call center.
Telnyx is fully compatible with every major free softphone platform, with in-depth configuration guides for each one.
Repeat this step to create a new connection for each agent you wish to connect to the call center.
Telnyx is fully compatible with every major free softphone platform, with in-depth configuration guides for each one.
Don’t have a SIP desk phone or softphone to use with this demo? Why not try WebRTC? Load up our free WebRTC development demo tool and enter your SIP connection credentials to start making and receiving calls directly from your browser.
Step 7: Create an Outbound Voice Profile and associate all the SIP Connections
Outbound calls must be enabled for the TeXML Application to forward incoming calls to your agents’ SIP Connections. Outbound calls are configured with an Outbound Voice Profile, which is in turn associated with each SIP Connection to enable calls to be forwarded to that connection. Add a new profile from the Outbound Voice Profiles section of the portal, then hit Add connections/apps to profile and select each of the connections you created in the previous step. Outbound Voice Profiles allow outbound calls to be placed within the United States and Canada by default. You can enable outbound calling to international destinations in the International Allowed Destinations menu when configuring an Outbound Voice Profile.Configuring your environment and running the application
Step 8: Set up virtual your virtual environment
The sample application requires Python version 3.6 or higher and leverages theaiohttp, apscheduler, and python-dotenv packages. You can install these packages manually using pip, or use a packaging tool like pipenv to install them automatically inside a virtual environment.
To install pipenv, run:
pipenv to install the required packages, navigate to the /call-center-texml directory, and run:
Step 9: Set up and configure variables
The sample application interfaces with the Telnyx resources set up via the Mission Control portal by passing a set of environment variables, including your API key and other unique identifiers, into the app. Setting up the app involves running a setup script that creates a .env file, into which you can populate these environment variables. In the/call-center-texml directory, run:
.env file within the /call-center-texml/call-center directory. Open this .env file and fill in the required variables:
API_KEY: This is your Telnyx API Key, created in Step 2.PROD: Defaults to True. You can set this to either True or False. If set to True, scheduled jobs for updating connections and sending account balance notifications will run at automated time intervals.SLACK_URL: If you wish to integrate your call center with Slack to receive live notifications for incoming calls, this URL will be configured for incoming webhooks in the Slack app. More on setting up Slack API integrations can be found in Slack’s documentation.- Note: The
SLACK_URLcan be left blank if Slack is not being used.
- Note: The
NGROK_URL: This is the Forwarding URL from Step 3.OUTBOUND_PROFILE_ID: This is the ID of the Outbound Voice Profile from Step 7. The ID can be found and copied by opening the configuration settings of the profile.
Step 10: Running The Application
From the/call-center-texml directory, run the following command to start the application:
Optional: Customizing your call center app
Configure your hangup behavior
When a call is answered and subsequently ended by an agent, the customer hears a text-to-speech message thanking them for calling. Like any other behavior in the call flow, this behavior can be configured by modifying the relevant TeXML files. This particular behavior is specified in the answered.xml file, located in the/call_center/infrastructure/TeXML/ directory. The default behavior uses a <Say> verb in this file to speak a text string. If you have an IVR, you may instead wish to use a <Dial> or <Redirect> verb, which could send the caller to another line or back to the IVR, should they wish to have a conversation with another department.
Play custom audio files
The TeXML files are configured to use text-to-speech by default, using<Say> verbs to communicate information to the user.
However, the application is also capable of delivering audio files for initial greetings and hold messages, using the <Play> verb.
All you need to do is record the audio and place the resultant files in a new subdirectory under /call_center/infrastructure/audio, named:
support_greeting.mp3support_busy.mp3
<Play> verbs that are in the busy_template.xml and inbound_template.xml files, and remove or comment-out the <Say> verbs to prevent the file from reading text-to-speech directly after playing your audio file:
There’s no need to change the {ngrok_url} placeholder in the above example - this is populated at runtime from the environment variables you set up in Step 9.
Configure voicemail recording and storage
You can also specify a recording status callback URL in thevoicemail.xml file. When a call ends after being sent to voicemail, the TeXML application sends a POST request with the URL of the recording file to the status callback URL you specified.
Where to Next?
Now that you’ve set up a fully-functioning, deeply customizable call center application using TeXML, the possibilities are endless:- Read the story of how we built a bespoke call center for our 24/7 technical support team using TeXML, in our two-part blog series.
- Check out the full TeXML documentation for a list of commands that can be used in your XML files.
- Check out a video walkthrough of this tutorial.
- Learn more about Telnyx for Contact Centers .
Call Tracking
Source: https://developers.telnyx.com/docs/voice/programmable-voice/call-tracking.md| Python | Node |
Python
⏱ 60 minutes build time. 🧰 Clone the sample application from our GitHub repo In this tutorial, you’ll learn how to build a Call Tracking application using the Telnyx API, and our Python SDK. Call Control (the Telnyx Voice API), combined with our Numbers API, provides everything you need to build a robust number ordering and call tracking application:- The Numbers API enables you to search the Telnyx phone number inventory in real time; filtering by Area Code, City/State, and more to find the perfect local number for your use-case.
- Call Control enables you to quickly setup dynamic forwarding numbers, toggle dual-channel recording, join/leave dynamic conferences, and pull post-call analytics.
- Search and order phone numbers by a city and state combination.
- Receive inbound calls to the Telnyx phone number.
- Transfer calls using Call Control to your designated Forwarding Number.
- Store all required information in a database of your choice.
- Make a front-end that shows what’s going on.
Create a Telnyx mission control portal account
To get started, you’ll need to create an account. Verify your email address and you can log into the Mission Control Portal to get started.Set up your local machine to receive webhooks from Telnyx
Next, you’ll need a means of receiving webhooks sent by Telnyx to notify your application of call events. One of the easiest ways to accomplish this is to use a tool like ngrok to generate a tunnelling URL, which connects to a locally running application via a port on your machine. In this example, port8000 is used. After downloading and installing ngrok, run ./ngrok http 8000 and make note of the resultant HTTPS Forwarding URL.
Create a Telnyx call control application
From the Portal, create a new Call Control Application , and paste the HTTPS Forwarding URL from the previous steps to send webhooks from this application to your local machine via ngrok. Ensure API v2 is selected, and save your application. We don’t need to worry about any other application settings for now. Select your application again to edit it, and make a note of the ID. This is how you’ll identify your Call Control Application in your code.Create an Outbound Voice profile
From the Portal, create a new Outbound Voice Profile. Click Add connections/apps to profile and select the Call Control Application you created in the previous step. In the International Allowed Destinations section, ensure you have selected the region(s) in which you want your application to work.Initialize and install packages via pip
Initialize your call tracking application with the defaults presented to you and create a virtual environment.Set up environment variables
The following environment variables need to be set for your call tracking application to work: Variable Description TELNYX_API_KEY Your Telnyx API Key, which can be created in the portal. TELNYX_PUBLIC_KEY Your Telnyx Public Key, which is accessible via the portal. TELNYX_CONNECTION_ID The ID from your Call Control Application MESSAGING_PROFILE_ID The ID from your Messaging Profile DATABASE_HOST Connection of the host (ie. localhost or your local ip address) DATABASE_USER Your database user name DATABASE_PASSWORD Your database password DATABASE_NAME Your database name DATABASE_PORT Your database port This app uses the excellent dotenv package to manage environment variables. Make a copy of the file below, add your credentials, and save as.env in the root directory.
Create some folders and Python files to build our call tracking application
We’ll use a few.py files to build the call tracking application.
app.pyas our entry point to the applicationdatabase.pyfor our databasedatabase_queries.pyfor our database controllertelnyx_commands.pyto manage most of our telnyx related functions
modelto host our databse related quieriesstaticfor our css and jstemplatesas our entry point to everything html and frontend that we would want
Setup basic Telnyx commands
Here we will setup some basic commands to get ourselves going for the call tracking app. We will want the ability to procure some numbers via the API, have the capability to delete them, and look up some basic CNAM paramaters if we can. As such, we will be creating some basic functions:-
telnyx_number_acquire(locality, administrative_area): This will handle the number search and ordering portion of our app when given the specific arameters
- We will be specifying locality and rate_center which corresponds with City and State.
- We will also go ahead and search for numbers that are SMS capable so we can future proof just in case we would want to be adding on an SMS component to this.
- Setting limit as 1 to fetch and procure the first result
- Making sure quickship is set as True, so we get numbers that are actively ready to go out of the box and will not have to wait for procurement.
- We will want to return the
number_to_orderandcity_state_comboto pass which number and from where exactly we procured this from
- telnyx_number_delete(number_to_delete): This will handle deleting phone numbers in our portal
-
telnyx_cnam_lookup(calling_number): This will handle using Telnyx Lookup service to see if we can get information on the number that’s calling us
- We will be returning the variable
cnam_infowith the result to use later on
- We will be returning the variable
-
difference(start_time, end_time): This handles conversion of the webhook start/end times to get call durations
- Webhook times are in full time format, so we will use the included datetime function to convert the time into seconds before doing the math to get the difference for the duration
- We will be returning both
durationanddate
Database and database queries setup
We will need to now setup our database and store some of this data that we will be getting. You can setup a basic database in-memory, but obviously this results with the drawback of it being killed every time the app is restarted. As such, I’ve personally chosen to use Oracle SQL. I believe a relational database makes the most sense in this case to use, as we are relating tracking inbound numbers that are calling us with forwarded phone numbers. ie. all the data that would be presented is tied to the same call/number combination. So for this we will be creating two files:-
database.py: to setup and create our basic database -
database_queries.py: to provide all the functions we would need related to our database
in database.py
- We will be using peewee to connect to our database
- We will then define our table classes and add a function to create them at the end
database.py (if you were to pass the correct dot.env variables related to database login), you should successfully be able to create the tables in your desired database.
For MySQL, do make sure your database schema is created first and matches your DATABASE_NAME parameter, for example in MySQL Workbench
Setup Flask Server for Number Ordering and Call Tracking
Theapp.py file sets up 5 routes:
/: Our base route, where we will have our interface once we construct our index.html/number: To manage our number ordering and patching that we will be setting up/call: This path will relate to our call logging service that we will show. We will need to hit this if we would like to delete certain calls/call-control/inbound: This points to our main call-control processing/call-control/outbound: To manage our number ordering and patching that we will be setting up
/call-control/inbound route.
Here we are performing the function of parsing through the incoming webhooks that we will be getting into our application, specifically:
- Receiving inbound call webhooks
- Answering the inbound call
- Transferring the call to the destination number saved in the database
- Saving the hangup event to the database
Building the front-end
The front-end was built with Boostrap and Nunjucks. I won’t go into much detail about building it out in this article, but if you want to attach your methods from above simply import the resources located in the static and templates folders located on our GitHub page.Running the call tracking application
We should now be able to run the application!Launch ngrok and update your call control application
We need to be able to receive webhooks from Telnyx, sent over the public Internet. We’ll use ngrok for this tutorial. Launch ngrok on thePORT specified in your .env file. If you’re using port 8000 (the default for this app), you can simply run ./ngrok http 8000
/call-control/inbound to the end of the URL to direct the request to the webhook endpoint in your server.
If we were using the example URL from the code sample above, the URL would be http://ead8b6b4.ngrok.io/call-control/inbound.
Run the APP.PY Call tracking application
Start the server by runningpython app.py.
Once everything is setup, you should now be able to:
- Search and purchase a number based on your parameters
- Allocate the purchased number to your desired forwarding number
- Track your acquired forwarded phone numbers in your database
- Record and store call information relating to those numbers in your database
- Present all of this information in your UI
Call tracking follow-ons
Now that you’ve successfully constructed this application, you have the freedom to expand it as you wish! You can start saving even more information from the webhooks such as IDs in your database by adding more tables, you can add more routes to handle inbound messaging functions, you can add recording/auto answer functions… it’s all up to you! Our developer Slack community is full of Python developers like you - be sure to join to see what your fellow developers are building!Node
⏱ 60 minutes build time. 🧰 Clone the sample application from ourGitHub repo In this tutorial, you’ll learn how to build a Call Tracking application using the Telnyx API, and our Node SDK. Programmable Voice, combined with our Numbers API, provides everything you need to build a robust call tracking application:- The Numbers API enables you to search the Telnyx phone number inventory in real time; filtering by Area Code, City/State, and more to find the perfect local number for your use-case.
- Call Control enables you to quickly setup dynamic forwarding numbers, toggle dual-channel recording, join/leave dynamic conferences, and pull post-call analytics.
- Search and order a phone number by area code.
- Store a ‘binding’ of Telnyx phone numbers to a forwarding number (to which incoming calls to the Telnyx phone numbers will be forwarded).
- Receive inbound calls to the Telnyx phone number.
- Transfer calls using Call Control.
- Store webhook events associated with calls to a datastore.
Create a Telnyx mission control portal account
This tutorial assumes you’ve already set up your developer account and environment and you know how to send commands and receive webhooks using Call Control.Set up your local machine to receive webhooks from Telnyx
One of the easiest ways to accomplish this is to use at tool like ngrok to generate a tunnelling URL, which connects to a locally running application via a port on your machine. In this example, port8000 is used. After downloading and installing ngrok, run ./ngrok http 8000 and make note of the resultant HTTPS Forwarding URL.
Create a Telnyx call control application
From the Portal, create a new Call Control Application , and paste the HTTPS Forwarding URL from the previous steps to send webhooks from this application to your local machine via ngrok. Ensure API v2 is selected, and save your application. We don’t need to worry about any other appliction settings for now. Select your application again to edit it, and make a note of the ID. This is how you’ll identify your Call Control Application in your code.Create an outbound voice profile
From the Portal, create a new Outbound Voice Profile. Click Add connections/apps to profile and select the Call Control Application you created in the previous step. In the International Allowed Destinations section, ensure you have selected the region(s) in which you want your application to work.Initialize and Install packages via npm
Initialize your call tracking application with the defaults presented to you.package.json file with the packages needed to run the application.
Set up environment variables
The following environment variables need to be set for your call tracking application to work: Variable Description TELNYX_API_KEY Your Telnyx API Key, which can be created in the portal. TELNYX_PUBLIC_KEY Your Telnyx Public Key, which is accessible via the portal. TELNYX_CONNECTION_ID The ID from your Call Control Application PORT The port through which the app will be served. This variable defaults to 8000 This app uses the excellent dotenv package to manage environment variables. Make a copy of the file below, add your credentials, and save as.env in the root directory.
Create JavaScript files to build a Call Tracking Application
We’ll use a few.js files to build the call tracking application.
index.jsas our entry point to the applicationdb.jsfor our database controller (in-memory DB for sample)callControl.jsto manage call-control webhooksbindings.jsto manage call-tracking bindings and post-call metadata
Setup Express Server for Call Tracking
Theindex.js file sets up 2 express routes:
/call-control: To handle call-control webhooks/bindings: To manage phone number bindings and call information
Setup database for Call Tracking information
Thedb.js file contains the in-memory database to manage our phone numbers and call information. It exports 1 array and 3 functions:
bindings = []: Our in-memory databaseaddPhoneNumberBinding: accepts a Telnyx phone number and a destination number to save to the database.- Called when ordering / creating a new call-tracking number
getDestinationPhoneNumber: accepts a Telnyx phone number and searches the database for a match, then returns the destination phone number.- Called when receiving an inbound call to look up transfer destination.
saveCall: accepts a Telnyx event and saves the call to the database based on the payload.- Called when the
call.hangupevent is received to save post-call information
- Called when the
getBinding: accepts a Telnyx phone number and returns the matching binding information from the database.- Called when
GETbindings has a telnyxPhoneNumber query parameter
- Called when
Managing phone number bindings for Call Tracking
Thebindings.js file contains all the logic for:
- Searching Phone Numbers by area code (also known as
national_destination_code) - Ordering Phone Numbers and setting the
connection_idas part of the order - Saving the binding to the database
- Routes for fetching binding information
Managing call flows for call tracking
ThecallControl.js file contains the routes and functions for:
- Receiving inbound call webhooks
- Answering the inbound call
- Transferring the call to the destination number saved in the database
- Saving the hangup event to the database
Running the Call Tracking application
Now that you’ve saved all the examples and built your routes, it’s time to run the application.Launch ngrok and update your Call Control Application
We need to be able to receive webhooks from Telnyx, sent over the public Internet. We’ll use ngrok for this tutorial. Launch ngrok on thePORT specified in your .env file. If you’re using port 8000 (the default for this app), you can simply run ./ngrok http 8000
/call-control/inbound to the end of the URL to direct the request to the webhook endpoint in your server.
If we were using the example URL from the code sample above, the URL would be http://ead8b6b4.ngrok.io/call-control/inbound.
Run the Node.JS call tracking application
Start the server by runningnode index.js.
Once everything is setup, you should now be able to:
- Allocate a new call tracking number and bind it to a forwarding number
- Call the allocated number and get connected to the destination.
Create a binding for call tracking
The bindings interface is managed through a RESTful API. To create a new binding create aPOST request to your ngrok URL (in this example: http://ead8b6b4.ngrok.io/bindings)
The POST request accepts a JSON object with the following fields:
areaCode: Desired area code for the new call tracking phone numberdestinationPhoneNumber: Number which we’ll forward all incoming calls to the call-tracking phone number
areaCode passed, and will order the first result returned from the API. It then creates a binding so that any inbound call to the Telnyx phone number is forwarded to the destination phone number.
List call tracking bindings and call information
The bindings endpoint supports aGET request to pull call information and existing bindings.
The bindings object returns a calls array with the hangup webhooks saved. The length of the array equals the number of calls the call tracking number received. The duration for each call can be calculated as the difference between the start_time and end_time values.
Call tracking follow-Ons
Now that you’ve successfully built a call tracking application, you can explore more features and discover ideas to build new applications. Our developer Slack community is full of Node developers like you - be sure to join to see what your fellow developers are building!Conferencing
Source: https://developers.telnyx.com/docs/voice/programmable-voice/conferencing-demo.md| Python | PHP | Node | Ruby |
Python
⏱ 60 minutes build time || Github RepoIntroduction
The Voice API framework, previously called Call Control, is a set of APIs that allow complete control of a call flow from the moment a call begins to the moment it is completed. In between, you will receive a number of webhooks for each step of the call, allowing you to act on these events and send commands using the Telnyx Library. A subset of the operations available in the Voice API is the Conference API. This allows the user (you) to create and manage a conference programmatically upon receiving an incoming call, or when initiating an outgoing call. The Telnyx Python Library is a convenient wrapper around the Telnyx REST API. It allows you to access and control call flows using an intuitive object-oriented library. This tutorial will walk you through creating a simple Flask and Ngrok server application that allows you to create and manage a conference.Setup
This tutorial assumes you’ve already set up your developer account and environment and you know how to send commands and receive webhooks using the Telnyx Voice API.- make sure the Webhook API Version is API v2
python installed to continue. You can check this by running the following:
telnyx, so make sure you have it installed. If not you can install it with the following command:
Server and Webhook setup
Flask is a great application for setting up local servers. However, in order to make our code public to be able to receive webhooks from Telnyx, we are going to need to use a tool called ngrok. Installation instructions can be found here. Now to begin our flask application, underneath the import and setup lines detailed above, we will add the following: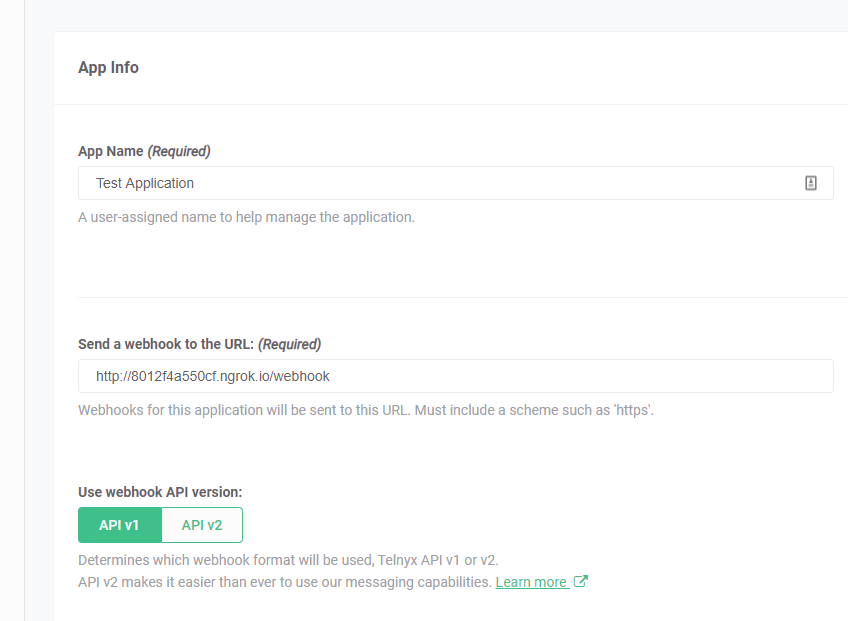
Receiving and interpreting Webhooks
We will be configuring our respond function to handle certain incoming webhooks and execute Voice API commands based on what the values are. Flask catches the incoming webhooks and calls the respond() function every time a webhook is sent to the route we specified as ‘/webhook’. We can see the json value of the hook in the request.json object. Here is what a basic Telnyx Call Object looks likeReceiving Webhooks & creating a conference
Below is the logic that will go inside our respond() function. When we receive a webhook, we extract the data fromrequest.json.get('data') and we look at the event_type inside that object to determine a course of action.
record_type is event. Then, we extract the event_type itself and use logic to determine the action taken based on the event.
call_control_id and call_leg_id from the incoming data. We then use telnyx.Call.answer(new_call) to answer the call. This will trigger a webhook event call.answered which we will handle below.
call.answered event, retrieve the stored call created during the call.initiated event. Then, either create a new conference if this is the first call and there isn’t a conference running yet, or add the call to an existing conference. Note that a call_control_id is required to start a conference, so there must aready be an existing call before you can create a conference, which is why we create the conference here.
Conclusion
The full tutorial with comments can be found on Github.PHP
⏱ 60 minutes build time || Github RepoIntroduction
The Voice API framework, previously called Call Control, is a set of APIs that allow complete control of a call flow from the moment a call begins to the moment it is completed. In between, you will receive a number of webhooks for each step of the call, allowing you to act on these events and send commands using the Telnyx Library. A subset of the operations available in the Telnyx Voice API is the Conference API. This allows the user (you) to create and manage a conference programmatically upon receiving an incoming call, or when initiating an outgoing call. The Telnyx PHP Library is a convenient wrapper around the Telnyx REST API. It allows you to access and control call flows using an intuitive object-oriented library. This tutorial will walk you through creating a simple Slim server that allows you to create and manage a conference.What can you do
At the end of this tutorial you’ll have an application that:- Verifies inbound webhooks are indeed from Telnyx
- Creates a conference for the first caller
- Adds additional callers to the existing conference
- Tears down the conference when the last call leaves
- Will create a new conference when the next caller dials in
Setup
Before beginning, please setup ensure that you have composer installed.Install packages
composer.json file with the packages needed to run the application.
This tutorial assumes you’ve already set up your developer account and environment and you know how to send commands and receive webhooks using the Telnyx Voice API.
The Voice API Application
needs to be setup to work with the conference control api:
- make sure the Webhook API Version is API v2
- Fill in the Webhook URL with the address the server will be running on. Alternatively, you can use a service like ngrok to temporarily forward a local port to the internet to a random address and use that. We’ll talk about this in more detail later.
Setting environment variables
This tutorial uses the excellent phpenv package to manage environment variables. Create a.env file in your root directory to contain your API & Public key. BE CAREFUL TO NOT SHARE YOUR KEYS WITH ANYONE Recommended to add .env to your .gitignore file.
Your .env file should look something like:
Code-along
Now create a folderpublic and a file in the public folderindex.php, then write the following to setup the telnyx library.
Setup slim server and instantiate Telnyx
$CONFERENCE_FILE_NAME = '../conference_id.txt'; will be used to track conference state.
Receiving Webhooks & creating a conference
Now that you have setup your auth token, phone number, and connection, you can begin to use the API Library to make and control conferences. First, you will need to setup a Slim endpoint to receive webhooks for call and conference events. There are a number of webhooks that you should anticipate receiving during the lifecycle of each call and conference. This will allow you to take action in response to any number of events triggered during a call. In this example, you will use thecall.initiated, call.answered, and conference.ended events to add calls to a conference and tear it down. Because you will need to wait until there is a running call before you can create a conference, plan to use call events to create the conference after a call is initiated.
Basic routing & functions
The basic overview of the application is as follows:- Verify webhook & create TelnyxEvent
- Check event-type and route to the event handler
call.initiatedevents are answeredcall.answeredevents check if there is a conference, if so; join, if not, create new conferenceconference.endedwill tear down the existing conference making way for a new one.
Webhook validation middleware
Telnyx signs each webhook that can be validated by checking the signature with your public key. This example adds the verification step as middleware to be included on all Telnyx endpoints.Conference management
For each call, we need to check if there is already a conference. In a more sophisticated application this would typically be solved by a connection to any given data store. For this demo, we’re managing the state in a file on disc$CONFERENCE_FILE_NAME.
Event Handlers and switch
For each event (besidescall.initiated we need to check the current state of the conference before making next steps)
Usage
Start the serverphp -S localhost:8000 -t public
When you are able to run the server locally, the final step involves making your application accessible from the internet. So far, we’ve set up a local web server. This is typically not accessible from the public internet, making testing inbound requests to web applications difficult.
The best workaround is a tunneling service. They come with client software that runs on your computer and opens an outgoing permanent connection to a publicly available server in a data center. Then, they assign a public URL (typically on a random or custom subdomain) on that server to your account. The public server acts as a proxy that accepts incoming connections to your URL, forwards (tunnels) them through the already established connection and sends them to the local web server as if they originated from the same machine. The most popular tunneling tool is ngrok. Check out the ngrok setup walkthrough to set it up on your computer and start receiving webhooks from inbound messages to your newly created application.
Once you’ve set up ngrok or another tunneling service you can add the public proxy URL to your Connection in the Mission Control Portal. To do this, click the edit symbol [✎] next to your Connection. In the “Webhook URL” field, paste the forwarding address from ngrok into the Webhook URL field. Add /Callbacks/Voice/Inbound to the end of the URL to direct the request to the webhook endpoint in your slim-php server.
For now you’ll leave “Failover URL” blank, but if you’d like to have Telnyx resend the webhook in the case where sending to the Webhook URL fails, you can specify an alternate address in this field.
Complete Running Voice API Conference Application
The Github Repo contains an extended version of the tutorial code above ready to run.Node
⏱ 60 minutes build time || Github Repo Telnyx Conference System demo built on Voice API V2 and node.js. In this tutorial, you’ll learn how to:- Set up your development environment to use Telnyx Voice API using Node.
- Build a simple Telnyx Voice API Conference System using Node.
- Prerequisites
- Telnyx Voice API Basics
- Building a Conference System
- Interacting with the Conference Room
- Lightning-Up the Application
Prerequisites
This tutorial assumes you’ve already set up your developer account and environment and you know how to send commands and receive webhooks using the Telnyx Voice API. You’ll also need to havenode installed to continue. You can check this by running the following:
Get started with Telnyx Voice API
For the Voice API application you’ll need to get a set of basic functions to perform Telnyx Voice API Commands plus Telnyx Voice API Conference specifics. This tutorial will be using the following subset of basic Telnyx Voice API Commands: Plus all the Telnyx Voice API Conference Commands:- Voice API Join Conference
- Voice API Mute Conference Participant
- Voice API Unmute Conference Participant
- Voice API Hold Conference Participant
- Voice API Unhold Conference Participant
HTTP POST Request to back to Telnyx server. To execute this API we are using superagent, so make sure you have it installed. If not you can install it with the following command:
Auth tab you select Auth V2. There you’ll find credentials for Auth v2 API Keys. Click on Create API Key and save the key that is shown to you. Please store it as you wont be able to fetch it later.
Once you have it, you can include it on the telnyx-account-v2.json file.
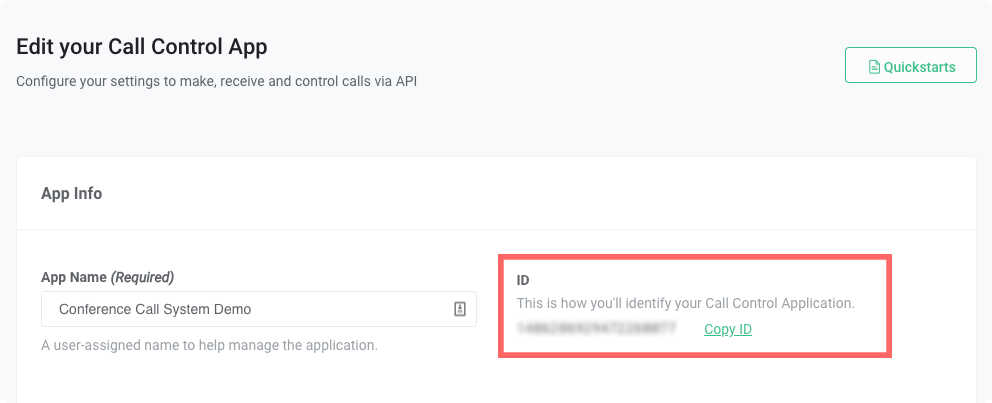 Once all dependencies are set, we can create a function for each Telnyx Voice API Command. All Commands will follow the same syntax:
Understanding the Command Syntax
There are several aspects of this function that deserve some attention:-
Function Input Parameters: to execute every Telnyx Voice API Command you’ll need to feed your function with the following:- the
Call Control ID - the input parameters, specific to the body of the Command you’re executing.
- the
Call Control ID except Dial. There you’ll get a new one for the leg generated as response.
Name of the Call Control Command: as detailed here, the Command name is part of the API URL. In our code we call that theactionname, and will feed the POST Request URL later:
Building the Telnyx Call Control Command: once you have the Command name defined, you should have all the necessary info to build the complete Telnyx Voice API Command:
Calling the Telnyx Call Control Command: Having the requestheadersandoptions/bodyset, the only thing left is to execute thePOST Requestto run the command. For that we are making use of node’srequestmodule:
Telnyx Voice API basic set
This is how every Telnyx Voice API Command used in this application looks:Voice API answer
Voice API hangup
Voice API dial
Voice API speak
Voice API recording start
Voice API recording stop
Telnyx Voice API Conference Commands
This is what every Telnyx Voice API Conference Commands look like:Conference: create conference
Conference: Join conference
Conference: Mute participant
Conference: Unmute participant
Conference: Hold participant
Conference: Unhold participant
Client State: within some of the Telnyx Voice API Commands list we presented, you probably noticed we were including the Client State parameter. Client State is the key to ensure that we can have several levels on our IVR while consuming the same Voice API Events.
Because Voice API is stateless and async, your application will be receiving several events of the same type, e.g. user just included DTMF. With Client State you enforce a unique ID to be sent back to Telnyx which can be used within a particular Command flow, identifying it as being at Level 2 of a certain IVR for example.
Building a conference system
With all the basic and conference related Telnyx Voice API Commands set, we are ready to put them in the order that will create a simple Conference System. For that all we are going to do is to:- handle incoming calls and place participants in the conference
- push for outgoing calls and place participants in the conference
- maintain a participant list
- greet the new participants before place them on the conference room
- put the first participant automatically on hold
- put a participant on-hold every-time he’s the only participant on the conference room
- un-hold the unique participant on the conference room when the second arrives
- allow remote commands to list participants, force hold/unhold, force mute/unmute, force participant push
express:
express we can create an API wrapper that uses HTTP POST to call our Request Token method:
g_appName in the previous point. That is part of a set of global variables we are defining with a certain set of info we know we are going to use in this app: TTS parameters, like voice and language to be used, etc…
For the purpose of maintaining the Conference list and state of the Conference room we also define a set of global variables.
You can set these at the beginning of your code:
If you would like to run the application on your local machine you will have to expose the app to the public internet. To do this you can useWith that set, we can fill in that space that we named asngrok. You can follow the setup guide forngrokhere.
APP CODE GOES HERE. When your webhook URL is ready you can add the webhook URL to your Mission Control Portal Connection associated with your number. Here’s an example of what a Voice API setup looks like:
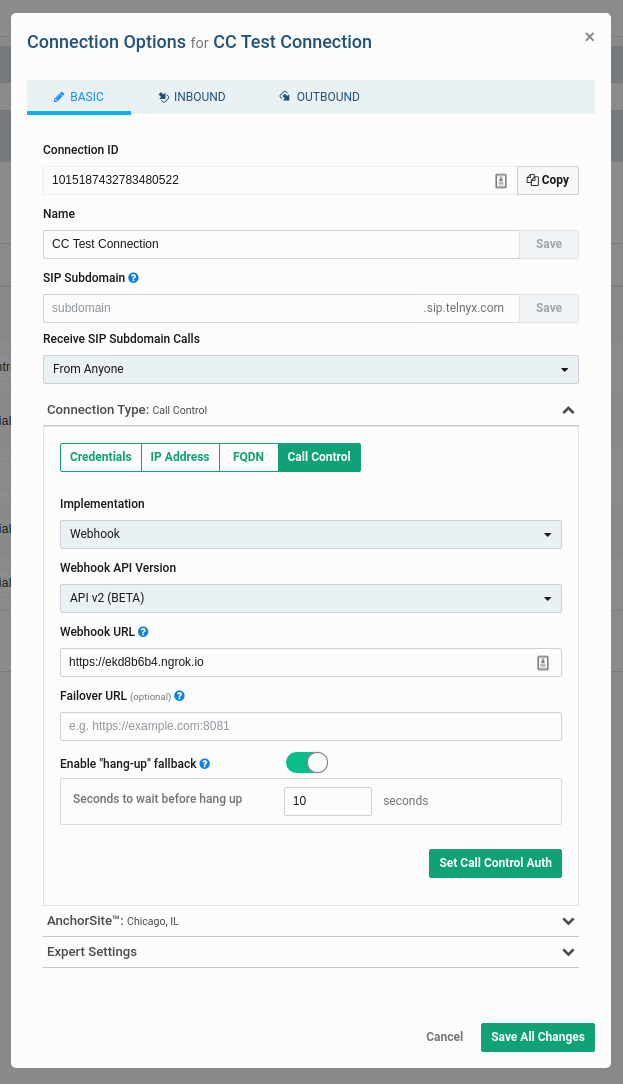
Call Control Id and Client State:
Event Type received, it’s just a matter of having your application reacting to that. Is the way you react to that Event that helps you creating the IVR logic. What you would be doing is to execute Telnyx Voice API Command as a reaction to those Events.
For consistency, the Telnyx Voice API engine requires every single Webhook to be replied to by the Webhook end-point, otherwise we will keep trying to send it. For that reason, we have to be ready to consume every Webhook we expect to receive and reply with 200 OK.
Webhook call initiated >> Command answer call
Webhook call answered >> Start conference
Once your app is notified by Telnyx that the call was established you want to either start the conference room or put the participant in an already existing room.
Conference created >> Just log
Your app will be informed that the Conference was created.
Conference join >> Hold/Unhold participant
Your app will be informed that a participant just joined the room.
Conference Leave >> Remove Participant / Cleanup Vars
Your app will be informed that a participant just left the room, we need to cleanup some things.
Anything Else >> Just Ack/200ok
Interacting with the conference room
As part of the process of building a Conference Room, there is also the possibility of interacting with the application to list participants and engage with direct participants. We do that by creating a couple ofHTTP GET commands that can be then called by a browser, cURL or Postman.
Listing participants
https://<webhook_domain>:8081/telnyx-conf-v2/list
Mute participant
https://<webhook_domain>:8081/telnyx-conf-v2/mute?participant=x
Unmute participant
https://<webhook_domain>:8081/telnyx-conf-v2/unmute?participant=x
Hold participant
https://<webhook_domain>:8081/telnyx-conf-v2/hold?participant=x
Unhold participant
https://<webhook_domain>:8081/telnyx-conf-v2/unhold?participant=x
Pull participant
https://<webhook_domain>:8081/telnyx-conf-v2/pull?number=x
Please note that a URL encoded number format is expected by the webhook, so for international +E164 numbers we should replace + per %2B.
Example:
https://<webhook_domain>:8081/telnyx-conf-v2/pull?number=%2B35193309090
Start recording call leg
https://<webhook_domain>:8081/telnyx-conf-v2/record-start?participant=x
Stop recording call leg
https://<webhook_domain>:8081/telnyx-conf-v2/record-stop?participant=x
Lightning-up the application
Finally the last piece of the puzzle is having your application listening for Telnyx Webhooks:Ruby
⏱ 60 minutes build time || Github RepoIntroduction to conferencing
The Voice API framework, previously called Call Control, is a set of APIs that allow complete control of a call flow from the moment a call begins to the moment it is completed. In between, you will receive a number of webhooks for each step of the call, allowing you to act on these events and send commands using the Telnyx Library. A subset of the operations available in the Voice API is the Conference API. This allows the user (you) to create and manage a conference programmatically upon receiving an incoming call, or when initiating an outgoing call. The Telnyx Ruby Library is a convenient wrapper around the Telnyx REST API. It allows you to access and control call flows using an intuitive object-oriented library. This tutorial will walk you through creating a simple Sinatra server that allows you to create and manage a conference.Setting up your environment
Before beginning, please ensure that you have the Telnyx and Sinatra gems installed.- make sure the Webhook API Version is API v2
- Fill in the Webhook URL with the address the server will be running on. Alternatively, you can use a service like Ngrok to temporarily forward a local port to the internet to a random address and use that. We’ll talk about this in more detail later.
conference_demo_server.rb, then write the following to setup the telnyx library.
Receiving webhooks & creating a conference
Now that you have setup your auth token, phone number, and connection, you can begin to use the API Library to make and control conferences. First, you will need to setup a Sinatra endpoint to receive webhooks for call and conference events. There are a number of webhooks that you should anticipate receiving during the lifecycle of each call and conference. This will allow you to take action in response to any number of events triggered during a call. In this example, you will use thecall.initiated and call.answered events to add call to a conference. Because you will need to wait until there is a running call before you can create a conference, plan to use call events to create the conference after a call is initiated.
/webhook, which can be anything you choose as the API doesn’t care; here we just call it webhook.
Telnyx::Call object and store it in the active call list, then call call.answer to answer it if it’s an inbound call.
call.answered event, retrieve the stored call created during the call.initiated event. Then, either create a new conference if this is the first call and there isn’t a conference running yet, or add the call to an existing conference. Note that a call_control_id is required to start a conference, so there must aready be an existing call before you can create a conference, which is why we create the conference here.
Authentication for your conferencing application
Now you have a working conference application! How secure is it though? Could a 3rd party simply craft fake webhooks to manipulate the call flow logic of your application? Telnyx has you covered with a powerful signature verification system! Simply make the following changes:Telnyx::Webhook::Signature.verify will do the work of verifying the authenticity of the message, and raise SignatureVerificationError if the signature does not match the payload.
Conferencing usage
If you used a Gemfile, start the conference server withbundle exec ruby conference_demo_server.rb, if you are using globally installed gems use ruby conference_demo_server.rb.
When you are able to run the server locally, the final step involves making your application accessible from the internet. So far, we’ve set up a local web server. This is typically not accessible from the public internet, making testing inbound requests to web applications difficult.
The best workaround is a tunneling service. They come with client software that runs on your computer and opens an outgoing permanent connection to a publicly available server in a data center. Then, they assign a public URL (typically on a random or custom subdomain) on that server to your account. The public server acts as a proxy that accepts incoming connections to your URL, forwards (tunnels) them through the already established connection and sends them to the local web server as if they originated from the same machine. The most popular tunneling tool is ngrok. Check out the ngrok setup walkthrough to set it up on your computer and start receiving webhooks from inbound messages to your newly created application.
Once you’ve set up ngrok or another tunneling service you can add the public proxy URL to your Connection in the Mission Control Portal. To do this, click the edit symbol [✎] next to your Connection. In the “Webhook URL” field, paste the forwarding address from ngrok into the Webhook URL field. Add /webhooks to the end of the URL to direct the request to the webhook endpoint in your Sinatra server.
For now you’ll leave “Failover URL” blank, but if you’d like to have Telnyx resend the webhook in the case where sending to the Webhook URL fails, you can specify an alternate address in this field.
Complete running Voice API conference application
The api-v2 directory contains an extended version of the tutorial code above, with the added ability to control the conference from the console! See the comments in the code for details on invoking the commands.Regional & Restrictions
Voice API Services in Europe
Source: https://developers.telnyx.com/docs/voice/programmable-voice/voice-api-services-in-europe.md
Overview
Telnyx now has a dedicated endpoint - https://api.telnyx.eu, that can be used to help reduce the latency on calls held in Europe. Don’t forget to updateYOUR_API_KEY here.
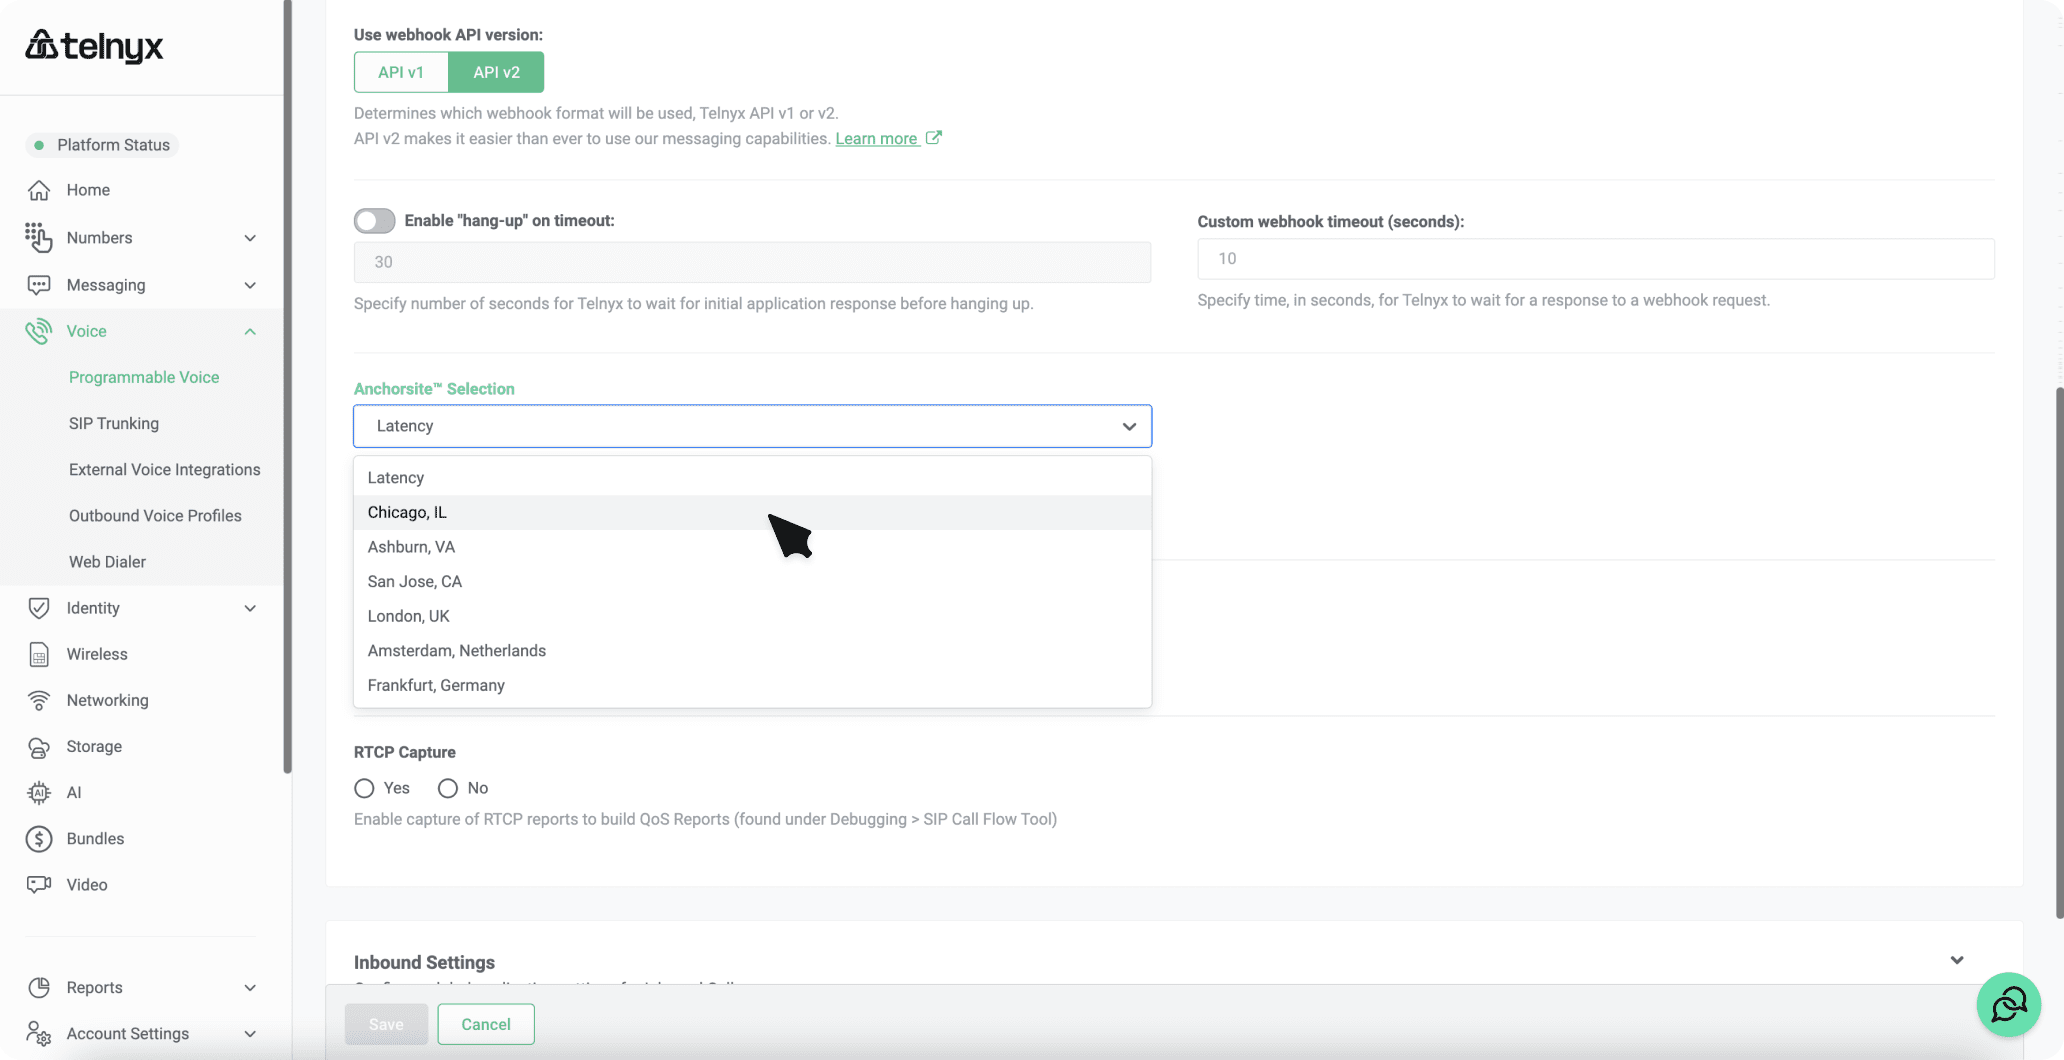
Please note that all the participants of the conferences and the calls to add to the queue must be in the same region.
L1 Account Restrictions
Source: https://developers.telnyx.com/docs/voice/programmable-voice/l1-accounts-restirctions.mdThe accounts with the L1 verification are restricted in the following way:
-
All machine-generated speak commands are pre-pended with “This is an automated call generated on the Telnyx platform, please report any abuse to fraud@telnyx.com”. This currently includes:
- /v2/calls
- /v2/calls/:call_control_id/actions/transfer
- /v2/calls/:call_control_id/actions/gather_using_audio
- /v2/calls/:call_control_id/actions/gather_using_speak
- /v2/calls/:call_control_id/actions/playback_start
- /v2/calls/:call_control_id/actions/speak
- /v2/calls/:call_control_id/actions/gather_using_ai
- /v2/calls/:call_control_id/actions/ai_assistant_start
- and the TeXML verbs:
- Play
- Say
- AIGather
- Limited to a maximum of 100 outbound calls a day.
- Limited to 10 outbound calls per hour.
API Reference (Voice API)
Call Control Applications
- List call control applications: Return a list of call control applications.
- Create a call control application: Create a call control application.
- Delete a call control application: Deletes a call control application.
- Retrieve a call control application: Retrieves the details of an existing call control application.
- Update a call control application: Updates settings of an existing call control application.
Call Information
- List all active calls for given connection: Lists all active calls for given connection. Acceptable connections are either SIP connections with webhook_url or xml_request_url, call control or texml. Retu…
- Retrieve a call status: Returns the status of a call (data is available 10 minutes after call ended).
Debugging
- List call events: Filters call events by given filter parameters. Events are ordered by
occurred_at. If filter forleg_idorapplication_session_idis not present, it only…
Call Commands
- Dial: Dial a number or SIP URI from a given connection. A successful response will include a
call_leg_idwhich can be used to correlate the command with subsequent… - Answer call: Answer an incoming call. You must issue this command before executing subsequent commands on an incoming call.
- Bridge calls: Bridge two call control calls.
- Start AI Assistant: Start an AI assistant on the call.
- Join AI Assistant Conversation: Add a participant to an existing AI assistant conversation. Use this command to bring an additional call leg into a running AI conversation.
- Stop AI Assistant: Stop an AI assistant on the call.
- Add messages to AI Assistant: Add messages to the conversation started by an AI assistant on the call.
- Start Conversation Relay: Start a Conversation Relay session on an active call. Conversation Relay connects the call audio to your WebSocket so your application can exchange realtime me…
- Stop Conversation Relay: Stop the active Conversation Relay session on a call.
- Update client state: Updates client state
- Enqueue call: Put the call in a queue.
- Forking start: Call forking allows you to stream the media from a call to a specific target in realtime.
- Forking stop: Stop forking a call.
- Gather: Gather DTMF signals to build interactive menus.
- Gather stop: Stop current gather.
- Gather using AI: Gather parameters defined in the request payload using a voice assistant.
- Gather using audio: Play an audio file on the call until the required DTMF signals are gathered to build interactive menus.
- Gather using speak: Convert text to speech and play it on the call until the required DTMF signals are gathered to build interactive menus.
- Hangup call: Hang up the call.
- Reject a call: Reject an incoming call.
- Remove call from a queue: Removes the call from a queue.
- Process a payment: Collect payment details from the caller using DTMF and either charge or tokenize the payment method through a configured Pay connector. Pay pauses active call…
- Play audio URL: Play an audio file on the call. If multiple play audio commands are issued consecutively,
- Stop audio playback: Stop audio being played on the call.
- Recording start: Start recording the call. Recording will stop on call hang-up, or can be initiated via the Stop Recording command.
- Recording stop: Stop recording the call.
- Record resume: Resume recording the call.
- Record pause: Pause recording the call. Recording can be resumed via Resume recording command.
- Send DTMF: Sends DTMF tones from this leg. DTMF tones will be heard by the other end of the call.
- SIP Refer a call: Initiate a SIP Refer on a Call Control call. You can initiate a SIP Refer at any point in the duration of a call.
- SIPREC start: Start siprec session to configured in SIPREC connector SRS.
- SIPREC stop: Stop SIPREC session.
- Speak text: Convert text to speech and play it back on the call. If multiple speak text commands are issued consecutively, the audio files will be placed in a queue awaiti…
- Streaming start: Start streaming the media from a call to a specific WebSocket address or Dialogflow connection in near-realtime. Audio will be delivered as base64-encoded RTP…
- Streaming stop: Stop streaming a call to a WebSocket.
- Noise Suppression Start (BETA): Start noise suppression on an active call to reduce background noise. This feature is currently in beta.
- Noise Suppression Stop (BETA): Stop noise suppression previously started on an active call. This feature is currently in beta.
- Switch supervisor role: Switch the supervisor role for a bridged call. This allows switching between different supervisor modes during an active call
- Transcription start: Start real-time transcription. Transcription will stop on call hang-up, or can be initiated via the Transcription stop command.
- Transcription stop: Stop real-time transcription.
- Transfer call: Transfer a call to a new destination. If the transfer is unsuccessful, a
call.hangupwebhook for the other call (Leg B) will be sent indicating that the tran…
Callbacks
- Call Answered
- Call Cost
- Call Deepfake Detection Error
- Call Deepfake Detection Result
- Call Hold
- Call Initiated
- Call Streaming Failed
- Call Streaming Started
- Call Streaming Stopped
- Call Unhold
- Call Bridged
- Call Conversation Ended
- Call Conversation Insights Generated
- Call Enqueued
- Call Left Queue
- Call Fork Started
- Call Fork Stopped
- Call Dtmf Received
- Call Gather Ended
- Call AI Gather Ended
- Call AI Gather Message History Updated
- Call AI Gather Partial Results
- Call Playback Ended
- Call Playback Started
- Call Hangup
- Call Recording Saved
- Call Payment Completed
- Call Payment Progress
- Call Speak Ended
- Call Recording Error
- Call Recording Transcription Saved
- Call Refer Completed
- Call Refer Failed
- Call Refer Started
- Call Siprec Failed
- Call Siprec Started
- Call Siprec Stopped
- Call Speak Started
- Transcription
- Call Machine Detection Ended
- Call Machine Greeting Ended
- Call Machine Premium Detection Ended
- Call Machine Premium Greeting Ended
- Conference Created
- Conference Ended
- Conference Floor Changed
- Conference Participant Joined
- Conference Participant Left
- Conference Participant Playback Ended
- Conference Participant Playback Started
- Conference Participant Speak Ended
- Conference Participant Speak Started
- Conference Playback Ended
- Conference Playback Started
- Conference Recording Saved
- Conference Speak Ended
- Conference Speak Started
Conference Commands
- List conferences: Lists conferences. Conferences are created on demand, and will expire after all participants have left the conference or after 4 hours regardless of the number…
- Create conference: Create a conference from an existing call leg using a
call_control_idand a conference name. Upon creating the conference, the call will be automatically bri… - Retrieve a conference: Retrieve an existing conference
- Hold conference participants: Hold a list of participants in a conference call
- Join a conference: Join an existing call leg to a conference. Issue the Join Conference command with the conference ID in the path and the
call_control_idof the leg you wish t… - Leave a conference: Removes a call leg from a conference and moves it back to parked state.
- Mute conference participants: Mute a list of participants in a conference call
- Play audio to conference participants: Play audio to all or some participants on a conference call.
- Conference recording pause: Pause conference recording.
- Conference recording resume: Resume conference recording.
- Conference recording start: Start recording the conference. Recording will stop on conference end, or via the Stop Recording command.
- Conference recording stop: Stop recording the conference.
- Speak text to conference participants: Convert text to speech and play it to all or some participants.
- Stop audio being played on the conference: Stop audio being played to all or some participants on a conference call.
- Unhold conference participants: Unhold a list of participants in a conference call
- Unmute conference participants: Unmute a list of participants in a conference call
- Update conference participant: Update conference participant supervisor_role
- End a conference: End a conference and terminate all active participants.
- Gather DTMF using audio prompt in a conference: Play an audio file to a specific conference participant and gather DTMF input.
- Send DTMF to conference participants: Send DTMF tones to one or more conference participants.
- List conference participants: Lists conference participants
- Retrieve a conference participant: Retrieve details of a specific conference participant by their ID or label.
- Update a conference participant: Update properties of a conference participant.
SIPREC Connectors
- Create a SIPREC connector: Creates a new SIPREC connector configuration.
- Retrieve a SIPREC connector: Returns details of a stored SIPREC connector.
- Update a SIPREC connector: Updates a stored SIPREC connector configuration.
- Delete a SIPREC connector: Deletes a stored SIPREC connector.