

Python
⏱ 60 minutes build time || Github RepoIntroduction
The Voice API framework, previously called Call Control, is a set of APIs that allow complete control of a call flow from the moment a call begins to the moment it is completed. In between, you will receive a number of webhooks for each step of the call, allowing you to act on these events and send commands using the Telnyx Library. A subset of the operations available in the Voice API is the Conference API. This allows the user (you) to create and manage a conference programmatically upon receiving an incoming call, or when initiating an outgoing call. The Telnyx Python Library is a convenient wrapper around the Telnyx REST API. It allows you to access and control call flows using an intuitive object-oriented library. This tutorial will walk you through creating a simple Flask and Ngrok server application that allows you to create and manage a conference.Setup
This tutorial assumes you’ve already set up your developer account and environment and you know how to send commands and receive webhooks using the Telnyx Voice API.- make sure the Webhook API Version is API v2
python installed to continue. You can check this by running the following:
After pasting the above content, Kindly check and remove any new line added
After pasting the above content, Kindly check and remove any new line added
telnyx, so make sure you have it installed. If not you can install it with the following command:
After pasting the above content, Kindly check and remove any new line added
After pasting the above content, Kindly check and remove any new line added
After pasting the above content, Kindly check and remove any new line added
After pasting the above content, Kindly check and remove any new line added
Server and Webhook setup
Flask is a great application for setting up local servers. However, in order to make our code public to be able to receive webhooks from Telnyx, we are going to need to use a tool called ngrok. Installation instructions can be found here. Now to begin our flask application, underneath the import and setup lines detailed above, we will add the following:After pasting the above content, Kindly check and remove any new line added
After pasting the above content, Kindly check and remove any new line added
After pasting the above content, Kindly check and remove any new line added
After pasting the above content, Kindly check and remove any new line added
After pasting the above content, Kindly check and remove any new line added
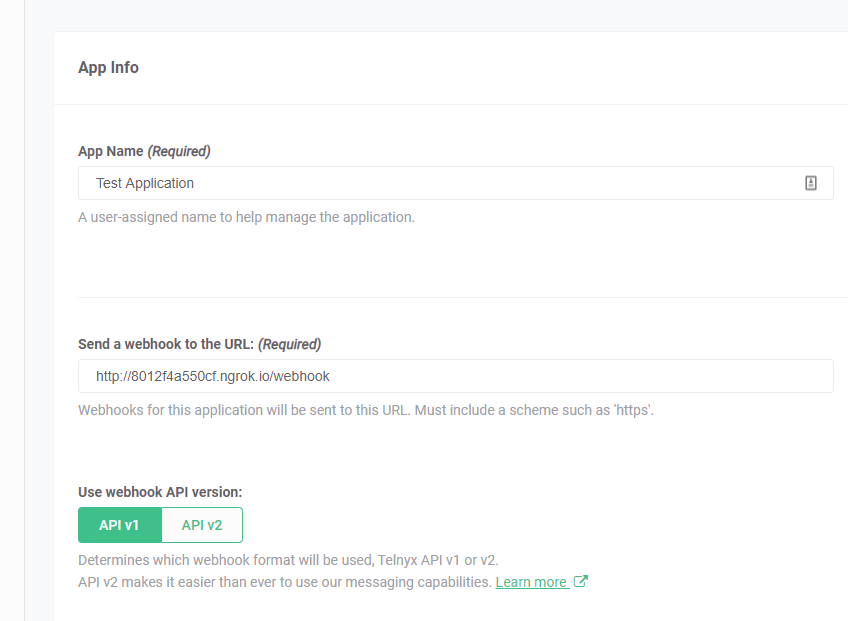
Receiving and interpreting Webhooks
We will be configuring our respond function to handle certain incoming webhooks and execute Voice API commands based on what the values are. Flask catches the incoming webhooks and calls the respond() function every time a webhook is sent to the route we specified as ‘/webhook’. We can see the json value of the hook in the request.json object. Here is what a basic Telnyx Call Object looks likeAfter pasting the above content, Kindly check and remove any new line added
After pasting the above content, Kindly check and remove any new line added
After pasting the above content, Kindly check and remove any new line added
Receiving Webhooks & creating a conference
Below is the logic that will go inside our respond() function. When we receive a webhook, we extract the data fromrequest.json.get('data') and we look at the event_type inside that object to determine a course of action.
After pasting the above content, Kindly check and remove any new line added
After pasting the above content, Kindly check and remove any new line added
record_type is event. Then, we extract the event_type itself and use logic to determine the action taken based on the event.
After pasting the above content, Kindly check and remove any new line added
call_control_id and call_leg_id from the incoming data. We then use telnyx.Call.answer(new_call) to answer the call. This will trigger a webhook event call.answered which we will handle below.
After pasting the above content, Kindly check and remove any new line added
call.answered event, retrieve the stored call created during the call.initiated event. Then, either create a new conference if this is the first call and there isn’t a conference running yet, or add the call to an existing conference. Note that a call_control_id is required to start a conference, so there must aready be an existing call before you can create a conference, which is why we create the conference here.
After pasting the above content, Kindly check and remove any new line added
After pasting the above content, Kindly check and remove any new line added
Conclusion
The full tutorial with comments can be found on Github.PHP
⏱ 60 minutes build time || Github RepoIntroduction
The Voice API framework, previously called Call Control, is a set of APIs that allow complete control of a call flow from the moment a call begins to the moment it is completed. In between, you will receive a number of webhooks for each step of the call, allowing you to act on these events and send commands using the Telnyx Library. A subset of the operations available in the Telnyx Voice API is the Conference API. This allows the user (you) to create and manage a conference programmatically upon receiving an incoming call, or when initiating an outgoing call. The Telnyx PHP Library is a convenient wrapper around the Telnyx REST API. It allows you to access and control call flows using an intuitive object-oriented library. This tutorial will walk you through creating a simple Slim server that allows you to create and manage a conference.What can you do
At the end of this tutorial you’ll have an application that:- Verifies inbound webhooks are indeed from Telnyx
- Creates a conference for the first caller
- Adds additional callers to the existing conference
- Tears down the conference when the last call leaves
- Will create a new conference when the next caller dials in
Setup
Before beginning, please setup ensure that you have composer installed.Install packages
After pasting the above content, Kindly check and remove any new line added
composer.json file with the packages needed to run the application.
This tutorial assumes you’ve already set up your developer account and environment and you know how to send commands and receive webhooks using the Telnyx Voice API.
The Voice API Application
needs to be setup to work with the conference control api:
- make sure the Webhook API Version is API v2
- Fill in the Webhook URL with the address the server will be running on. Alternatively, you can use a service like ngrok to temporarily forward a local port to the internet to a random address and use that. We’ll talk about this in more detail later.
Setting environment variables
This tutorial uses the excellent phpenv package to manage environment variables. Create a.env file in your root directory to contain your API & Public key. BE CAREFUL TO NOT SHARE YOUR KEYS WITH ANYONE Recommended to add .env to your .gitignore file.
Your .env file should look something like:
After pasting the above content, Kindly check and remove any new line added
Code-along
Now create a folderpublic and a file in the public folderindex.php, then write the following to setup the telnyx library.
After pasting the above content, Kindly check and remove any new line added
Setup slim server and instantiate Telnyx
After pasting the above content, Kindly check and remove any new line added
$CONFERENCE_FILE_NAME = '../conference_id.txt'; will be used to track conference state.
Receiving Webhooks & creating a conference
Now that you have setup your auth token, phone number, and connection, you can begin to use the API Library to make and control conferences. First, you will need to setup a Slim endpoint to receive webhooks for call and conference events. There are a number of webhooks that you should anticipate receiving during the lifecycle of each call and conference. This will allow you to take action in response to any number of events triggered during a call. In this example, you will use thecall.initiated, call.answered, and conference.ended events to add calls to a conference and tear it down. Because you will need to wait until there is a running call before you can create a conference, plan to use call events to create the conference after a call is initiated.
Basic routing & functions
The basic overview of the application is as follows:- Verify webhook & create TelnyxEvent
- Check event-type and route to the event handler
call.initiatedevents are answeredcall.answeredevents check if there is a conference, if so; join, if not, create new conferenceconference.endedwill tear down the existing conference making way for a new one.
Webhook validation middleware
Telnyx signs each webhook that can be validated by checking the signature with your public key. This example adds the verification step as middleware to be included on all Telnyx endpoints.After pasting the above content, Kindly check and remove any new line added
Conference management
For each call, we need to check if there is already a conference. In a more sophisticated application this would typically be solved by a connection to any given data store. For this demo, we’re managing the state in a file on disc$CONFERENCE_FILE_NAME.
After pasting the above content, Kindly check and remove any new line added
Event Handlers and switch
For each event (besidescall.initiated we need to check the current state of the conference before making next steps)
After pasting the above content, Kindly check and remove any new line added
Usage
Start the serverphp -S localhost:8000 -t public
When you are able to run the server locally, the final step involves making your application accessible from the internet. So far, we’ve set up a local web server. This is typically not accessible from the public internet, making testing inbound requests to web applications difficult.
The best workaround is a tunneling service. They come with client software that runs on your computer and opens an outgoing permanent connection to a publicly available server in a data center. Then, they assign a public URL (typically on a random or custom subdomain) on that server to your account. The public server acts as a proxy that accepts incoming connections to your URL, forwards (tunnels) them through the already established connection and sends them to the local web server as if they originated from the same machine. The most popular tunneling tool is ngrok. Check out the ngrok setup walkthrough to set it up on your computer and start receiving webhooks from inbound messages to your newly created application.
Once you’ve set up ngrok or another tunneling service you can add the public proxy URL to your Connection in the Mission Control Portal. To do this, click the edit symbol [✎] next to your Connection. In the “Webhook URL” field, paste the forwarding address from ngrok into the Webhook URL field. Add /Callbacks/Voice/Inbound to the end of the URL to direct the request to the webhook endpoint in your slim-php server.
For now you’ll leave “Failover URL” blank, but if you’d like to have Telnyx resend the webhook in the case where sending to the Webhook URL fails, you can specify an alternate address in this field.
Complete Running Voice API Conference Application
The Github Repo contains an extended version of the tutorial code above ready to run.Node
⏱ 60 minutes build time || Github Repo Telnyx Conference System demo built on Voice API V2 and node.js. In this tutorial, you’ll learn how to:- Set up your development environment to use Telnyx Voice API using Node.
- Build a simple Telnyx Voice API Conference System using Node.
- Prerequisites
- Telnyx Voice API Basics
- Building a Conference System
- Interacting with the Conference Room
- Lightning-Up the Application
Prerequisites
This tutorial assumes you’ve already set up your developer account and environment and you know how to send commands and receive webhooks using the Telnyx Voice API. You’ll also need to havenode installed to continue. You can check this by running the following:
After pasting the above content, Kindly check and remove any new line added
After pasting the above content, Kindly check and remove any new line added
Get started with Telnyx Voice API
For the Voice API application you’ll need to get a set of basic functions to perform Telnyx Voice API Commands plus Telnyx Voice API Conference specifics. This tutorial will be using the following subset of basic Telnyx Voice API Commands: Plus all the Telnyx Voice API Conference Commands:- Voice API Join Conference
- Voice API Mute Conference Participant
- Voice API Unmute Conference Participant
- Voice API Hold Conference Participant
- Voice API Unhold Conference Participant
HTTP POST Request to back to Telnyx server. To execute this API we are using superagent, so make sure you have it installed. If not you can install it with the following command:
After pasting the above content, Kindly check and remove any new line added
After pasting the above content, Kindly check and remove any new line added
Auth tab you select Auth V2. There you’ll find credentials for Auth v2 API Keys. Click on Create API Key and save the key that is shown to you. Please store it as you wont be able to fetch it later.
Once you have it, you can include it on the telnyx-account-v2.json file.
After pasting the above content, Kindly check and remove any new line added
After pasting the above content, Kindly check and remove any new line added
After pasting the above content, Kindly check and remove any new line added
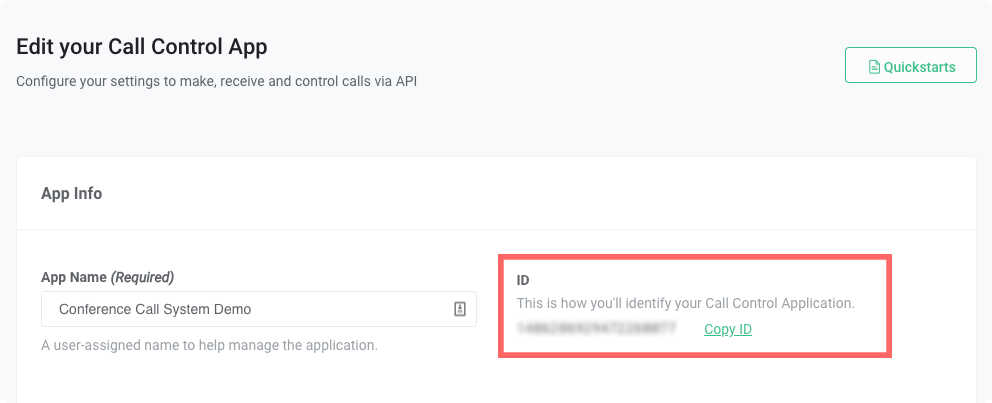 Once all dependencies are set, we can create a function for each Telnyx Voice API Command. All Commands will follow the same syntax:
After pasting the above content, Kindly check and remove any new line added
Understanding the Command Syntax
There are several aspects of this function that deserve some attention:-
Function Input Parameters: to execute every Telnyx Voice API Command you’ll need to feed your function with the following:- the
Call Control ID - the input parameters, specific to the body of the Command you’re executing.
- the
After pasting the above content, Kindly check and remove any new line added
Call Control ID except Dial. There you’ll get a new one for the leg generated as response.
Name of the Call Control Command: as detailed here, the Command name is part of the API URL. In our code we call that theactionname, and will feed the POST Request URL later:
After pasting the above content, Kindly check and remove any new line added
Building the Telnyx Call Control Command: once you have the Command name defined, you should have all the necessary info to build the complete Telnyx Voice API Command:
After pasting the above content, Kindly check and remove any new line added
Calling the Telnyx Call Control Command: Having the requestheadersandoptions/bodyset, the only thing left is to execute thePOST Requestto run the command. For that we are making use of node’srequestmodule:
After pasting the above content, Kindly check and remove any new line added
Telnyx Voice API basic set
This is how every Telnyx Voice API Command used in this application looks:Voice API answer
After pasting the above content, Kindly check and remove any new line added
Voice API hangup
After pasting the above content, Kindly check and remove any new line added
Voice API dial
After pasting the above content, Kindly check and remove any new line added
Voice API speak
After pasting the above content, Kindly check and remove any new line added
Voice API recording start
After pasting the above content, Kindly check and remove any new line added
Voice API recording stop
After pasting the above content, Kindly check and remove any new line added
Telnyx Voice API Conference Commands
This is what every Telnyx Voice API Conference Commands look like:Conference: create conference
After pasting the above content, Kindly check and remove any new line added
Conference: Join conference
After pasting the above content, Kindly check and remove any new line added
Conference: Mute participant
After pasting the above content, Kindly check and remove any new line added
Conference: Unmute participant
After pasting the above content, Kindly check and remove any new line added
Conference: Hold participant
After pasting the above content, Kindly check and remove any new line added
Conference: Unhold participant
After pasting the above content, Kindly check and remove any new line added
Client State: within some of the Telnyx Voice API Commands list we presented, you probably noticed we were including the Client State parameter. Client State is the key to ensure that we can have several levels on our IVR while consuming the same Voice API Events.
Because Voice API is stateless and async, your application will be receiving several events of the same type, e.g. user just included DTMF. With Client State you enforce a unique ID to be sent back to Telnyx which can be used within a particular Command flow, identifying it as being at Level 2 of a certain IVR for example.
Building a conference system
With all the basic and conference related Telnyx Voice API Commands set, we are ready to put them in the order that will create a simple Conference System. For that all we are going to do is to:- handle incoming calls and place participants in the conference
- push for outgoing calls and place participants in the conference
- maintain a participant list
- greet the new participants before place them on the conference room
- put the first participant automatically on hold
- put a participant on-hold every-time he’s the only participant on the conference room
- un-hold the unique participant on the conference room when the second arrives
- allow remote commands to list participants, force hold/unhold, force mute/unmute, force participant push
express:
After pasting the above content, Kindly check and remove any new line added
express we can create an API wrapper that uses HTTP POST to call our Request Token method:
After pasting the above content, Kindly check and remove any new line added
g_appName in the previous point. That is part of a set of global variables we are defining with a certain set of info we know we are going to use in this app: TTS parameters, like voice and language to be used, etc…
For the purpose of maintaining the Conference list and state of the Conference room we also define a set of global variables.
You can set these at the beginning of your code:
After pasting the above content, Kindly check and remove any new line added
If you would like to run the application on your local machine you will have to expose the app to the public internet. To do this you can useWith that set, we can fill in that space that we named asngrok. You can follow the setup guide forngrokhere.
APP CODE GOES HERE. When your webhook URL is ready you can add the webhook URL to your Mission Control Portal Connection associated with your number. Here’s an example of what a Voice API setup looks like:
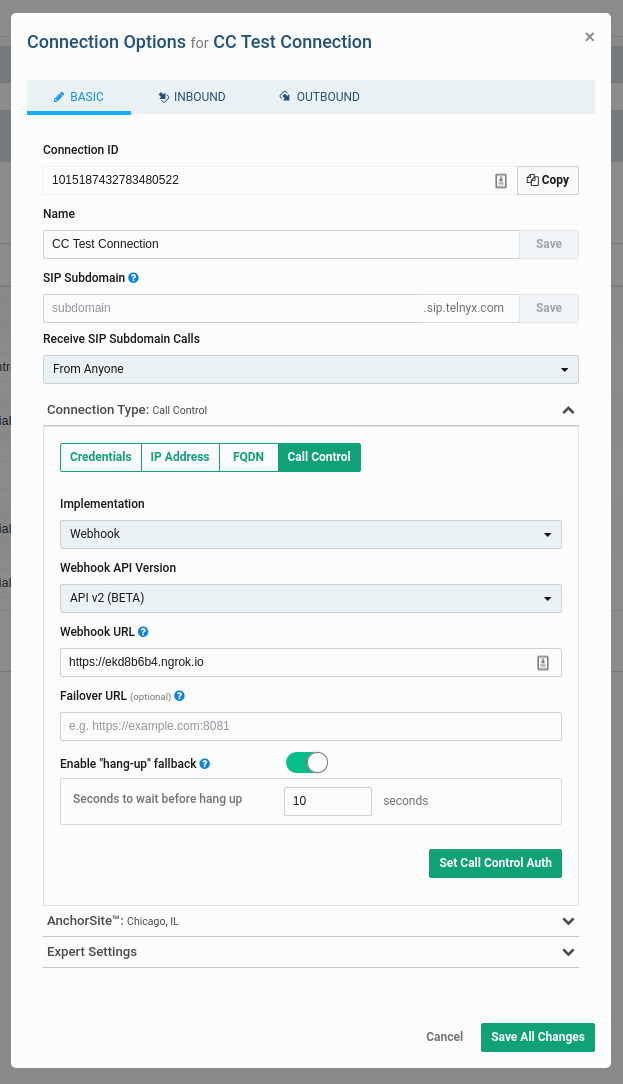
Call Control Id and Client State:
After pasting the above content, Kindly check and remove any new line added
Event Type received, it’s just a matter of having your application reacting to that. Is the way you react to that Event that helps you creating the IVR logic. What you would be doing is to execute Telnyx Voice API Command as a reaction to those Events.
For consistency, the Telnyx Voice API engine requires every single Webhook to be replied to by the Webhook end-point, otherwise we will keep trying to send it. For that reason, we have to be ready to consume every Webhook we expect to receive and reply with 200 OK.
Webhook call initiated >> Command answer call
After pasting the above content, Kindly check and remove any new line added
Webhook call answered >> Start conference
Once your app is notified by Telnyx that the call was established you want to either start the conference room or put the participant in an already existing room.
After pasting the above content, Kindly check and remove any new line added
Conference created >> Just log
Your app will be informed that the Conference was created.
After pasting the above content, Kindly check and remove any new line added
Conference join >> Hold/Unhold participant
Your app will be informed that a participant just joined the room.
After pasting the above content, Kindly check and remove any new line added
Conference Leave >> Remove Participant / Cleanup Vars
Your app will be informed that a participant just left the room, we need to cleanup some things.
After pasting the above content, Kindly check and remove any new line added
Anything Else >> Just Ack/200ok
After pasting the above content, Kindly check and remove any new line added
Interacting with the conference room
As part of the process of building a Conference Room, there is also the possibility of interacting with the application to list participants and engage with direct participants. We do that by creating a couple ofHTTP GET commands that can be then called by a browser, cURL or Postman.
Listing participants
https://<webhook_domain>:8081/telnyx-conf-v2/list
After pasting the above content, Kindly check and remove any new line added
Mute participant
https://<webhook_domain>:8081/telnyx-conf-v2/mute?participant=x
After pasting the above content, Kindly check and remove any new line added
Unmute participant
https://<webhook_domain>:8081/telnyx-conf-v2/unmute?participant=x
After pasting the above content, Kindly check and remove any new line added
Hold participant
https://<webhook_domain>:8081/telnyx-conf-v2/hold?participant=x
After pasting the above content, Kindly check and remove any new line added
Unhold participant
https://<webhook_domain>:8081/telnyx-conf-v2/unhold?participant=x
After pasting the above content, Kindly check and remove any new line added
Pull participant
https://<webhook_domain>:8081/telnyx-conf-v2/pull?number=x
Please note that a URL encoded number format is expected by the webhook, so for international +E164 numbers we should replace + per %2B.
Example:
https://<webhook_domain>:8081/telnyx-conf-v2/pull?number=%2B35193309090
After pasting the above content, Kindly check and remove any new line added
Start recording call leg
https://<webhook_domain>:8081/telnyx-conf-v2/record-start?participant=x
After pasting the above content, Kindly check and remove any new line added
Stop recording call leg
https://<webhook_domain>:8081/telnyx-conf-v2/record-stop?participant=x
After pasting the above content, Kindly check and remove any new line added
Lightning-up the application
Finally the last piece of the puzzle is having your application listening for Telnyx Webhooks:After pasting the above content, Kindly check and remove any new line added
Ruby
⏱ 60 minutes build time || Github RepoIntroduction to conferencing
The Voice API framework, previously called Call Control, is a set of APIs that allow complete control of a call flow from the moment a call begins to the moment it is completed. In between, you will receive a number of webhooks for each step of the call, allowing you to act on these events and send commands using the Telnyx Library. A subset of the operations available in the Voice API is the Conference API. This allows the user (you) to create and manage a conference programmatically upon receiving an incoming call, or when initiating an outgoing call. The Telnyx Ruby Library is a convenient wrapper around the Telnyx REST API. It allows you to access and control call flows using an intuitive object-oriented library. This tutorial will walk you through creating a simple Sinatra server that allows you to create and manage a conference.Setting up your environment
Before beginning, please ensure that you have the Telnyx and Sinatra gems installed.After pasting the above content, Kindly check and remove any new line added
After pasting the above content, Kindly check and remove any new line added
- make sure the Webhook API Version is API v2
- Fill in the Webhook URL with the address the server will be running on. Alternatively, you can use a service like Ngrok to temporarily forward a local port to the internet to a random address and use that. We’ll talk about this in more detail later.
conference_demo_server.rb, then write the following to setup the telnyx library.
After pasting the above content, Kindly check and remove any new line added
Receiving webhooks & creating a conference
Now that you have setup your auth token, phone number, and connection, you can begin to use the API Library to make and control conferences. First, you will need to setup a Sinatra endpoint to receive webhooks for call and conference events. There are a number of webhooks that you should anticipate receiving during the lifecycle of each call and conference. This will allow you to take action in response to any number of events triggered during a call. In this example, you will use thecall.initiated and call.answered events to add call to a conference. Because you will need to wait until there is a running call before you can create a conference, plan to use call events to create the conference after a call is initiated.
After pasting the above content, Kindly check and remove any new line added
/webhook, which can be anything you choose as the API doesn’t care; here we just call it webhook.
After pasting the above content, Kindly check and remove any new line added
After pasting the above content, Kindly check and remove any new line added
Telnyx::Call object and store it in the active call list, then call call.answer to answer it if it’s an inbound call.
After pasting the above content, Kindly check and remove any new line added
call.answered event, retrieve the stored call created during the call.initiated event. Then, either create a new conference if this is the first call and there isn’t a conference running yet, or add the call to an existing conference. Note that a call_control_id is required to start a conference, so there must aready be an existing call before you can create a conference, which is why we create the conference here.
After pasting the above content, Kindly check and remove any new line added
After pasting the above content, Kindly check and remove any new line added
Authentication for your conferencing application
Now you have a working conference application! How secure is it though? Could a 3rd party simply craft fake webhooks to manipulate the call flow logic of your application? Telnyx has you covered with a powerful signature verification system! Simply make the following changes:After pasting the above content, Kindly check and remove any new line added
Telnyx::Webhook::Signature.verify will do the work of verifying the authenticity of the message, and raise SignatureVerificationError if the signature does not match the payload.
Conferencing usage
If you used a Gemfile, start the conference server withbundle exec ruby conference_demo_server.rb, if you are using globally installed gems use ruby conference_demo_server.rb.
When you are able to run the server locally, the final step involves making your application accessible from the internet. So far, we’ve set up a local web server. This is typically not accessible from the public internet, making testing inbound requests to web applications difficult.
The best workaround is a tunneling service. They come with client software that runs on your computer and opens an outgoing permanent connection to a publicly available server in a data center. Then, they assign a public URL (typically on a random or custom subdomain) on that server to your account. The public server acts as a proxy that accepts incoming connections to your URL, forwards (tunnels) them through the already established connection and sends them to the local web server as if they originated from the same machine. The most popular tunneling tool is ngrok. Check out the ngrok setup walkthrough to set it up on your computer and start receiving webhooks from inbound messages to your newly created application.
Once you’ve set up ngrok or another tunneling service you can add the public proxy URL to your Connection in the Mission Control Portal. To do this, click the edit symbol [✎] next to your Connection. In the “Webhook URL” field, paste the forwarding address from ngrok into the Webhook URL field. Add /webhooks to the end of the URL to direct the request to the webhook endpoint in your Sinatra server.
For now you’ll leave “Failover URL” blank, but if you’d like to have Telnyx resend the webhook in the case where sending to the Webhook URL fails, you can specify an alternate address in this field.