

Telnyx Development — Full Documentation
Account setup, authentication, API fundamentals, SDKs, CLI, MCP servers, and integration guides. Complete page content for the Development section of the Telnyx developer docs (https://developers.telnyx.com). Root index: https://developers.telnyx.com/llms.txt · Lightweight index for this section: https://developers.telnyx.com/development/llms-txt.md
Account setup
Create Account
Source: https://developers.telnyx.com/docs/account-setup/create-account.mdBefore you can start using any Telnyx services, you’ll need to create an account to access our APIs and Mission Control Portal.
Account creation steps
Navigate to telnyx.com/sign-up to start the signup process. Enter your contact information, company details, and a secure password. This ensures Telnyx can verify who you are. Look for the confirmation email and click the verification link so we know you’re the owner of the address you used. Access the Mission Control Portal with your new credentials to finish onboarding and explore your dashboard. New accounts come with free testing credits so you can explore the platform before adding payment methods.Need help?
If you encounter any issues during account creation:- Review the Account Setup FAQ
- Contact our support team through the Mission Control Portal
- Join the Telnyx Slack community for developer support
Account Signup
Source: https://developers.telnyx.com/docs/account-setup/signup.mdEvery signup attempt is subjected to a battery of trust and safety checks. Among them, in no particular order, are the following:
- Domain age
- Domain reputation
- Host reputation
- IP reputation
- Signup origin
- reCAPTCHA verification
- Successfully validating a legitimate mobile number
- Successfully passing Know Your Customer (KYC) documentation verification
Account Levels Overview
Source: https://developers.telnyx.com/docs/account-setup/levels-and-capabilities.mdA successful signup may be placed in one of the following frameworks (but never both):
- Level 1 / Level 2 account framework
- Pretrial-Trial-Paid-Verified-Enterprise (PTPVE) framework
- V2 APIs
- S3 Compatible Storage APIs
Pretrial Account
Source: https://developers.telnyx.com/docs/account-setup/levels-and-capabilities/pretrial.md
Testing credit
USD $25 in AI credits is provided.Access
- Full access to AI Suite (AI Assistant, Inference, Cloud Storage) except otherwise specified below.
- Telnyx reserves the right to modify limitations without notification.
Numbers
Number searching
- Full number display limited to USA local numbers only.
- All other numbers will be shown redacted (e.g., +49351xxxxxxx).
- No access to other APIs or features in this category.
Number reservation
- No access to APIs or features in this category.
Number ordering
- Limited to 1 USA local number per pretrial account lifetime.
- No access to global numbers.
- No port out is allowed on this number.
- This number will be reclaimed within 30 days of purchase if the account has not upgraded.
- No access to other APIs or features in this category.
Number porting
- No access to APIs or features in this category.
Bundles
- No access to APIs or features in this category.
Messaging
- Limited to 1 messaging profile at any one time.
- Outbound: Limited to long code sending, destination limited to verified number, and capped at 10 messages a day.
- Inbound: Limited to receiving from the verified number.
- No access to other APIs or features in this category.
Verify
- No access to APIs or features in this category.
Voice
General limits
- Limited to 1 TeXML Application at any one time.
- Limited to 1 outbound voice profile at any one time.
- Outbound limited to dialing only the verified phone number.
- Inbound limited to receiving from the verified phone number.
- Limited to 2 concurrent outbound calls.
- Limited to a maximum of 10 minutes per call.
Programmable Voice
- All machine-generated voices are prepended with: “This is an automated call generated on the Telnyx platform, please report any abuse to fraud@telnyx.com”.
- This applies to:
/v2/calls/v2/calls/:call_control_id/actions/transfer/v2/calls/:call_control_id/actions/gather_using_audio/v2/calls/:call_control_id/actions/gather_using_speak/v2/calls/:call_control_id/actions/playback_start/v2/calls/:call_control_id/actions/speak/v2/calls/:call_control_id/actions/gather_using_ai/v2/calls/:call_control_id/actions/ai_assistant_start- TeXML verb
Play - TeXML verb
Say - TeXML verb
AIGather
- Limited to a maximum of 10 outbound calls a day.
Call Control Applications
- No access to APIs or features in this category.
Microsoft Operator Connect
- No access to APIs or features in this category.
Microsoft Direct Routing
- No access to APIs or features in this category.
Zoom Phone Provider Exchange
- No access to APIs or features in this category.
LRN / Number Lookup
- No access to APIs or features in this category.
Cloud Storage
- Limited to non-public policy or ACL on buckets or objects.
- Limited to 5 minutes of TTL on pre-signed URLs.
- Limited to the documented free tier of used capacity across all buckets and regions.
Wireless
- No access to APIs or features in this category.
Account features
Organizations and sub-users
- No access to APIs or features in this category.
ManagED Accounts
- No access to APIs or features in this category.
Payment methods
- No access to APIs or features in this category. Credit is not required — AI credits are provided.
Billing groups
- No access to APIs or features in this category.
API keys
- Limited to 1 API key at any one time.
- No access to other APIs or features in this category.
DDoS mitigation
- No access to APIs or features in this category.
Trial Account
Source: https://developers.telnyx.com/docs/account-setup/levels-and-capabilities/trial.md
Testing credit
USD $5 in testing credit is provided.Access
- Full access except otherwise specified below.
- Telnyx reserves the right to modify limitations without notification.
Numbers
Verified numbers
- Limited to 1 verified number at any one time.
- Limited to 10 changes per trial account lifetime.
- Limited to 15 delivery attempts regardless of conversion outcome per trial account lifetime.
Number searching
- Full number display limited to local numbers of the account’s country of origin.
- All other numbers will be shown redacted (e.g., +49351xxxxxxx).
- No access to other APIs or features in this category.
Number reservation
- No access to APIs or features in this category.
Number ordering
- Limited to 1 local number of the account’s country of origin per trial account lifetime.
- Successful number activation is subject to inventory availability, sufficient account balance, and local jurisdiction documentation rules.
- This number will be reclaimed within 30 days of purchase if the account has not upgraded.
- No port out is allowed on this number.
- No access to other APIs or features in this category.
Number porting
- Limited to 50 portability check attempts per trial account lifetime.
- No access to other APIs or features in this category.
- Users do not have proprietary rights to their trial telephone number, and Telnyx reserves the right to make reasonable changes to them with reasonable notice. Users cannot port out their trial number.
Bundles
- No access to APIs or features in this category.
Messaging
- Limited to 1 messaging profile at any one time.
- Outbound: Limited to long code sending, destination limited to verified number, and capped at 100 messages a day.
- Inbound: Limited to receiving from the verified number.
- No access to other APIs or features in this category.
Verify
- Limited to 1 verified profile at any one time.
- Only SMS is allowed.
- Destination limited to verified number.
- Limited to a max of 50 verifications a day.
- No access to other APIs or features in this category.
Voice
General limits
- Limited to 1 instance per connection type at any one time.
- Limited to 1 outbound voice profile at any one time.
- Outbound limited to dialing only the verified phone number.
- Inbound limited to receiving from the verified phone number.
- Limited to 2 concurrent outbound calls across all connection instances.
- Limited to a maximum of 10 minutes per call.
Programmable Voice
- All machine-generated voices are prepended with: “This is an automated call generated on the Telnyx platform, please report any abuse to fraud@telnyx.com”.
- This applies to:
/v2/calls/v2/calls/:call_control_id/actions/transfer/v2/calls/:call_control_id/actions/gather_using_audio/v2/calls/:call_control_id/actions/gather_using_speak/v2/calls/:call_control_id/actions/playback_start/v2/calls/:call_control_id/actions/speak/v2/calls/:call_control_id/actions/gather_using_ai/v2/calls/:call_control_id/actions/ai_assistant_start- TeXML verb
Play - TeXML verb
Say - TeXML verb
AIGather
- Limited to a maximum of 100 outbound calls a day.
- Limited to 10 outbound calls per hour.
Microsoft Operator Connect
- No access to APIs or features in this category.
Microsoft Direct Routing
- No access to APIs or features in this category.
Zoom Phone Provider Exchange
- No access to APIs or features in this category.
LRN / Number Lookup
- No access to APIs or features in this category.
Cloud Storage
- Limited to non-public policy or ACL on buckets or objects.
- Limited to 5 minutes of TTL on pre-signed URLs.
- Limited to the documented free tier of used capacity across all buckets and regions.
Wireless
- No access to physical SIM registration.
- No access to eSIM purchase.
Account features
Organizations and sub-users
- No access to APIs or features in this category.
ManagED Accounts
- No access to APIs or features in this category.
Payment methods
- Limited to credit cards.
Billing groups
- No access to APIs or features in this category.
API keys
- Limited to 1 API key at any one time.
- No access to other APIs or features in this category.
DDoS mitigation
- No access to APIs or features in this category.
Using Your Trial Account
Source: https://developers.telnyx.com/docs/account-setup/using-trial-account.mdFollow this process to make the most of your trial credit and stay within trial limitations. A verified number is essential to test Voice and Messaging. Use a mobile phone number that you control. Keep in mind that trial accounts have limits on delivery attempts and the number of changes allowed. Once the allowance is depleted, upgrade your account. Search results show only local (to the signup origin) numbers in full +E164; other results appear partially redacted. A successful purchase depends on inventory availability, sufficient account balance, and local jurisdiction documentation rules. Only one phone number order is allowed during the trial, regardless of the outcome. Use one of the following tutorials to place calls: Regardless of how the call is created, the destination is limited to the verified phone number from Step 1, and inbound calls must also originate from that number. Check trial voice limits. Use the Send Message tutorial to send SMS. Outbound messages must target the verified phone number you configured, and inbound messages must also originate from that number. Check trial messaging limits.
Paid Account
Source: https://developers.telnyx.com/docs/account-setup/levels-and-capabilities/paid.md
Access
- Full access except otherwise specified below.
- Telnyx reserves the right to modify limitations without notification.
Numbers
Number searching
- No access to number blocks.
Number ordering
- Limited to local numbers whose country code matches the account’s country of origin.
Number porting
- No access to LRN migration.
Messaging
- No access to 10DLC.
- No access to Toll-Free verification.
- No access to hosted messaging.
Voice
General limits
- Limited set of outbound destination country codes.
- Limited to 5 concurrent outbound calls across all connection types.
Programmable Voice
- All machine-generated voices are prepended with: “This is an automated call generated on the Telnyx platform, please report any abuse to fraud@telnyx.com”.
- This applies to:
/v2/calls/v2/calls/:call_control_id/actions/transfer/v2/calls/:call_control_id/actions/gather_using_audio/v2/calls/:call_control_id/actions/gather_using_speak/v2/calls/:call_control_id/actions/playback_start/v2/calls/:call_control_id/actions/speak/v2/calls/:call_control_id/actions/gather_using_ai/v2/calls/:call_control_id/actions/ai_assistant_start- TeXML verb
Play - TeXML verb
Say - TeXML verb
AIGather
- Limited to a maximum of 100 outbound calls a day.
- Limited to 10 outbound calls per hour.
Cloud Storage
- Limited to non-public policy or ACL on buckets or objects.
- Limited to 5 minutes of TTL on pre-signed URLs.
Account features
ManagED Accounts
- No access to APIs or features in this category.
Payment methods
- Credit card
- PayPal
DDoS mitigation
- No access to APIs or features in this category.
Verified Account
Source: https://developers.telnyx.com/docs/account-setup/levels-and-capabilities/verified.md
Access
- Full access except otherwise specified below.
- Telnyx reserves the right to modify limitations without notification.
Numbers
Number searching
- No access to number blocks.
Number ordering
- No access to number blocks.
Number porting
- No access to LRN migration.
Account features
ManagED Accounts
- No access to APIs or features in this category.
Payment methods
- Credit card
- PayPal
- BTC
DDoS mitigation
- No access to APIs or features in this category.
Account Upgrade
Source: https://developers.telnyx.com/docs/account-setup/account-upgrade.md
Identify the desired account level and complete all required actions. For enterprise upgrades, qualification by the Telnyx sales team is required. Contact Telnyx to begin the process.
Data Locality
Source: https://developers.telnyx.com/docs/account-setup/data-locality.mdData Locality lets you choose the geographic region where your Telnyx data is stored at rest.
Available regions
Covered data types
Data locality applies to the following data stored at rest:- Call Detail Records (CDRs)
- Message Detail Records (MDRs)
- Conference records
- Forking CDRs
- Media Storage (recordings)
- Premium AMD
- Speech-to-Text
- Verify
- Video
- Wireless
Selecting a region
- Log in to the Mission Control Portal.
- Go to Account settings > Profile.
- Scroll to Data Storage Location and select a country from the dropdown.
- Click Save Location.
APIs fundamentals
Create API Keys
Source: https://developers.telnyx.com/development/api-fundamentals/create-api-keys.mdAPI keys are essential for authenticating your requests to any Telnyx API. This guide shows you how to create and manage your API keys through the Mission Control Portal.
Creating Your API Key
- In the Mission Control Portal, click on your name in the upper right corner, and click API Keys.
- Click the Create API Key button.
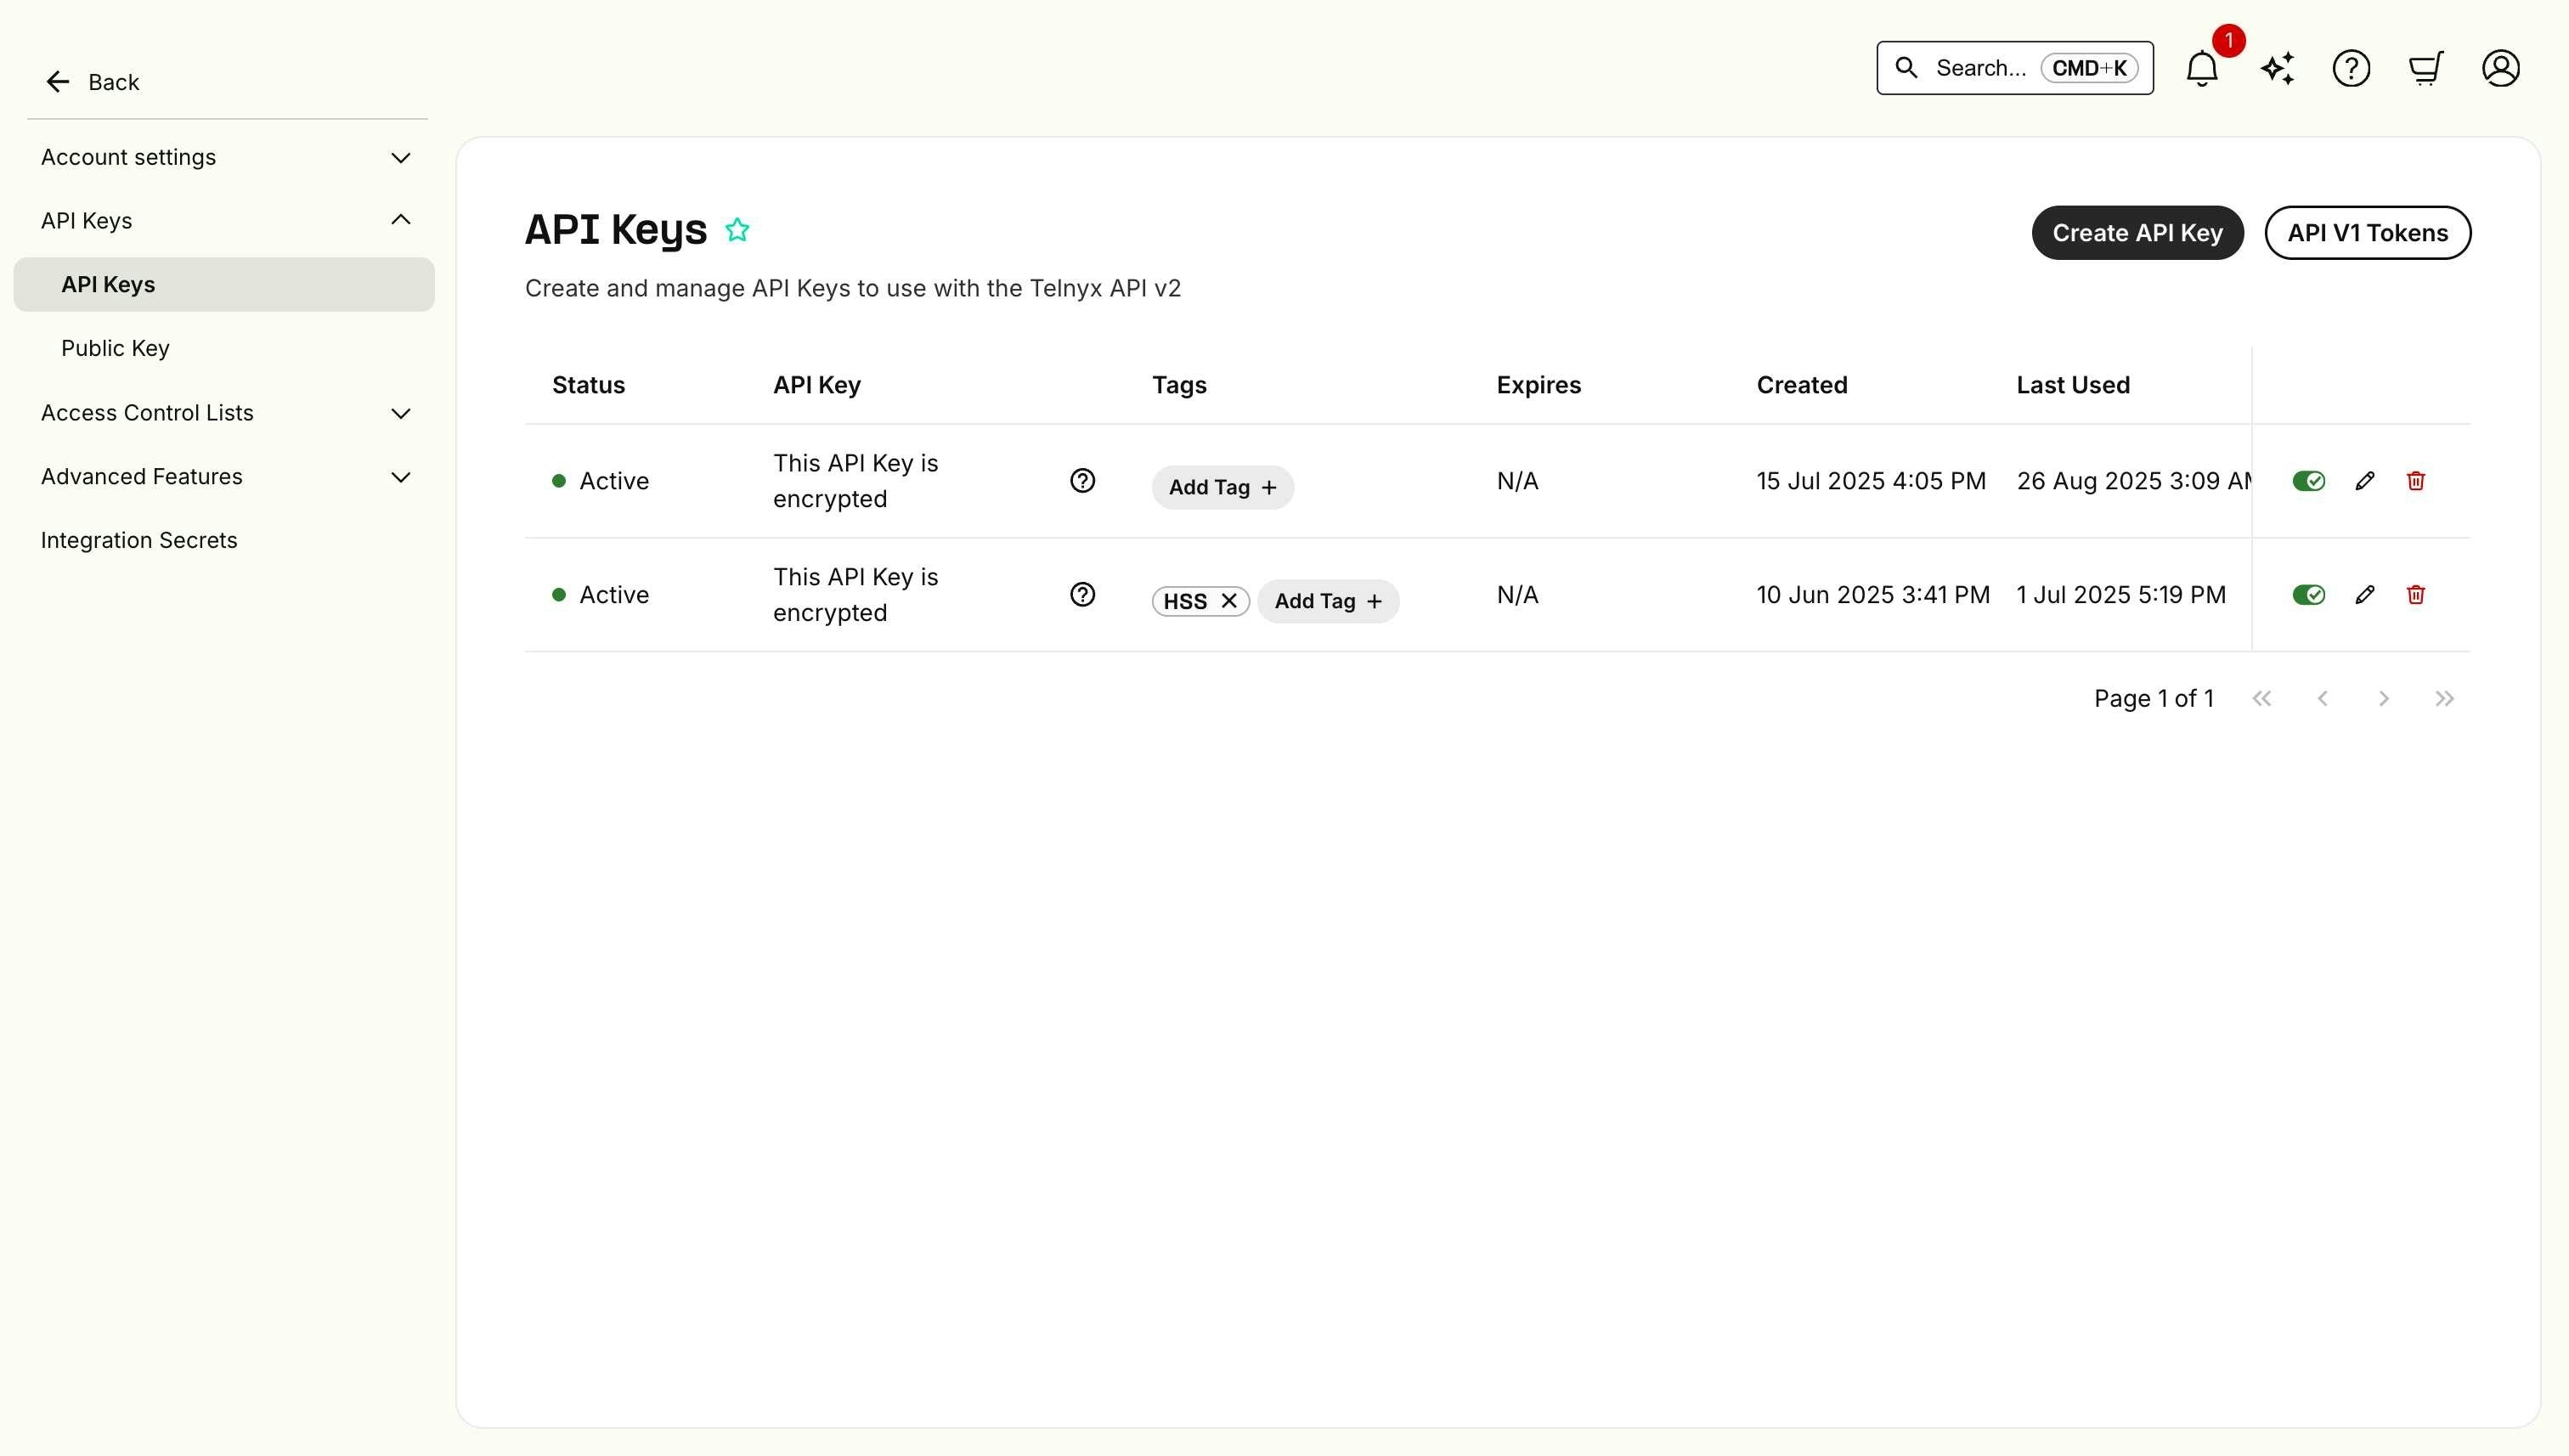
- In the Create API Key dialog, add a descriptive tag (e.g., “Voice API Development”, “SMS Production”, etc.) and choose your expiration settings.

- Click Create.
Important: Save Your API Key Securely
We’ll show the full API key value only once at creation. If you lose the key, you’ll need to generate a new one. We recommend using a secure password manager or secrets vault once you’ve created it. We’re doing this to reduce the risk of accidental key leaks and help keep your account secure. This approach aligns with our best-in-class security standards and helps prevent accidental key exposures.Storing Your API Key
Best Practices:- Never commit API keys to version control (Git, SVN, etc.).
- Use environment variables in your applications.
- Rotate keys regularly for production applications.
- Use separate keys for development and production.
Using Your API Key
Once created, you can use your API key with any Telnyx service:REST API
SDKs
API Authentication
Source: https://developers.telnyx.com/development/api-fundamentals/authentication.mdAll Telnyx APIs use consistent authentication mechanisms to ensure secure access to your resources. This guide covers the universal authentication patterns used across Voice, Messaging, Cloud Storage, IoT, and all other Telnyx services.
API Keys
Overview
Telnyx uses API Keys as the primary authentication method across all services. Your API Keys carry significant privileges and provide access to all Telnyx resources associated with your account.Security Best Practices
- Keep API Keys secure: Never share API Keys in publicly accessible areas such as GitHub, client-side code, or logs
- Use environment variables: Store API Keys in environment variables or secure configuration files
- Rotate keys regularly: Periodically generate new API Keys and deactivate old ones
- Use least privilege: If available, use API Keys with minimal required permissions
Managing API Keys
You can view and manage your API Keys in the Auth section of your Mission Control portal.Authentication Methods
Bearer Token Authentication
Most Telnyx APIs use Bearer token authentication in the Authorization header:SDK Authentication
When using Telnyx SDKs, authentication is typically configured once during initialization:Common Authentication Patterns
RESTful APIs
- Voice API: Bearer token in Authorization header
- Messaging API: Bearer token in Authorization header
- Cloud Storage: AWS Signature Version 4 or Bearer token
- IoT APIs: Bearer token in Authorization header
Real-time Connections
- WebRTC: JWT tokens for client authentication
- WebSocket connections: Bearer token during connection establishment
Error Handling
Authentication Errors
Common authentication-related HTTP status codes:- 401 Unauthorized: Invalid or missing API Key
- 403 Forbidden: Valid API Key but insufficient permissions
- 429 Too Many Requests: Rate limit exceeded
Debugging Authentication Issues
- Verify API Key format: Ensure the key is correctly formatted and complete
- Check headers: Confirm the Authorization header is properly set
- Validate permissions: Ensure your API Key has the required permissions for the resource
- Test with curl: Use curl to isolate authentication issues from SDK problems
Environment-Specific Considerations
Development vs Production
- Use separate API Keys for development and production environments
- Never use production API Keys in development or testing
- Consider using restricted API Keys for development
Regional Considerations
Some Telnyx services may have regional API endpoints. Always check the specific service documentation for the correct base URL.Account Management
Account Levels and Access
Account levels determine which APIs and features are available to you. For detailed information about account types, capabilities, and verification requirements, see Account Levels and Capabilities.Next Steps
- API Reliability & Retries - Handle authentication failures gracefully
- Webhook Security - Secure your webhook endpoints
- SDKs & Tools - Language-specific authentication setup
HTTP Patterns
Source: https://developers.telnyx.com/development/api-fundamentals/request-response.mdUnderstanding common request and response patterns will help you build robust integrations across all Telnyx services. This guide covers the universal HTTP concepts that apply to Voice, Messaging, Cloud Storage, IoT, and all other Telnyx APIs.
HTTP Methods
Telnyx APIs follow RESTful conventions using standard HTTP methods:GET - Retrieve Resources
Used to fetch information without making changes:POST - Create Resources
Used to create new resources or trigger actions:PATCH - Update Resources
Used to modify existing resources:DELETE - Remove Resources
Used to delete resources:Request Format
Content-Type Headers
Most Telnyx APIs expect JSON payloads:Request Structure
Response Format
Standard Response Structure
Most Telnyx APIs return JSON responses with consistent structure:Success Responses
- 200 OK: Request successful, data returned
- 201 Created: Resource successfully created
- 202 Accepted: Request accepted, processing asynchronously
- 204 No Content: Request successful, no data to return
Error Responses
Error responses include details to help troubleshoot issues:Telnyx API Error Codes
For a comprehensive list of all Telnyx-specific error codes and their meanings, see the API Error Codes reference. This resource provides detailed explanations for each error code to help you troubleshoot and handle API errors effectively. Common error patterns include:- 10xxx codes: Parameter validation errors
- 20xxx codes: Authentication and authorization errors
- 30xxx codes: Resource not found or unavailable errors
- 40xxx codes: Rate limiting and quota errors
- 50xxx codes: Server-side errors
HTTP Status Codes
Client Errors (4xx)
- 400 Bad Request: Invalid request format or parameters
- 401 Unauthorized: Authentication failed
- 403 Forbidden: Authentication succeeded but access denied
- 404 Not Found: Resource doesn’t exist
- 422 Unprocessable Entity: Valid request format but logical errors
- 429 Too Many Requests: Rate limit exceeded
Server Errors (5xx)
- 500 Internal Server Error: Unexpected server error
- 502 Bad Gateway: Upstream service error
- 503 Service Unavailable: Service temporarily unavailable
- 504 Gateway Timeout: Request timeout
Common Headers
Request Headers
Response Headers
Pagination
For endpoints that return lists, Telnyx uses consistent pagination:Request Parameters
Response Metadata
Filtering and Sorting
Common Filter Patterns
Best Practices
Request Optimization
- Use appropriate HTTP methods: Don’t use POST for retrieving data
- Include relevant headers: Specify Content-Type and Accept headers
- Validate input: Check parameters before sending requests
- Handle timeouts: Set appropriate timeout values
Response Handling
- Check status codes: Don’t assume all responses are successful
- Parse error messages: Use error details for troubleshooting
- Handle edge cases: Account for empty results and partial failures
- Log appropriately: Log errors but avoid logging sensitive data
Next Steps
- API Reliability & Retries - Handle failed requests
- Webhook Fundamentals - Receive asynchronous notifications
- API Glossary - Reference for API terminology
API error codes
Source: https://developers.telnyx.com/development/api-fundamentals/api-errors.mdWhen working with the Telnyx API, you may encounter various error codes. This page provides a complete reference of all error codes returned by the Telnyx API.
Rate Limiting
Source: https://developers.telnyx.com/development/api-fundamentals/reliability/rate-limiting.mdIn order to protect our services, we employ the use of rate limits on the majority of
api.telnyx.com endpoints. These limits are typically static, but are subject to change based on usage and may be adjusted to align with changes in capacity.
For this reason, we include headers in our API responses that should be parsed and respected by your application. These headers aim to help you understand your current consumption rate and self-diagnose or prevent potential throttling issues.
Rate Limit Headers
When the rate limit is exceeded, responses with status code 429 will be returned,
indicating that you have exhausted the number of requests allowed in the current
window.
Rate Limit Response
HTTP Status Code
The status code of rate limit responses is 429.Response Body
Handling Rate Limits
Best Practices
- Monitor Headers: Always check the rate limit headers in API responses
- Implement Backoff: Use exponential backoff when receiving 429 responses
- Cache Results: Cache API responses when possible to reduce request frequency
- Distribute Load: Spread requests across multiple time windows
Over Your Rate Limit?
Contact support@telnyx.com if you find you are exceeding the rate limit.Product-Specific Rate Limits
Different Telnyx services may have different rate limiting strategies:- Messaging: See Rate Limiting and Message Encoding for messaging-specific limits
- 10DLC: See 10DLC rate limits for campaign-specific limits
- Voice API: Standard API rate limits apply to call control endpoints
- Cloud Storage: Rate limits apply to S3-compatible operations
API Reliability & Retries
Source: https://developers.telnyx.com/development/api-fundamentals/reliability/command-retries.mdWhen building applications with Telnyx APIs, you may encounter various reliability challenges that require robust error handling and retry strategies. These patterns apply across all Telnyx services including Voice, Messaging, Cloud Storage, and more.
Common Reliability Challenges
Applications may encounter the following situations across any Telnyx API:- 5XX Errors: Server errors (500, 501, 503, 504) that indicate temporary service issues
- Network Timeouts: Requests that don’t complete within expected timeframes
- Duplicate Responses: Identical responses that may occasionally be delivered
Best Practices for API Reliability
Telnyx carefully monitors all API platforms for 5XX errors, latency, and duplicate responses, and actively works to keep all of these to a minimum across all services. For added reliability, there are several steps developers can take to handle errors, latency, and duplicate responses across any Telnyx API:Retry Strategies
- Retry on 5XX Errors: If your application receives a 500-level error, implement exponential backoff and retry
- Timeout Handling: If your application fails to receive an HTTP response within a reasonable timeframe (typically 500ms-5s depending on the operation), retry the request
- Maximum Retry Attempts: Implement a maximum retry limit (typically 3-5 attempts) to avoid infinite loops
Error Handling Patterns
- Exponential Backoff: Increase wait time between retries (e.g., 1s, 2s, 4s, 8s)
- Circuit Breaker: Temporarily stop making requests if error rates exceed thresholds
- Graceful Degradation: Design your application to continue functioning even when some API calls fail
Webhook Fundamentals
Source: https://developers.telnyx.com/development/api-fundamentals/webhooks/receiving-webhooks.mdOne application can provide another application with real-time updates via a webhook (also referred to as a web callback or HTTP push API). A webhook delivers data to other applications as it happens, meaning you get data immediately. In the past, APIs would typically need to poll for data very frequently to get it promptly. This makes webhooks much more efficient for both providers and consumers. The only drawback to webhooks is the difficulty of initially setting them up - this tutorial walks through how to consume webhooks. Webhooks are sometimes referred to as “Reverse APIs,” as they give you what amounts to an API spec, and you must design an API for the webhook to use. The webhook will make an HTTP request to your app (typically a POST), and you will then be charged with interpreting it. Telnyx can send webhook events that notify your application any time an event happens on your account. This is especially useful for events like receiving an SMS or MMS message and getting feedback on Voice API events. The messaging webhooks section goes into a bit more detail on how SMS and MMS webhooks work.
Universal Webhook Behavior
Across all Telnyx services, webhooks follow consistent patterns:- Primary/Failover URLs: Webhooks are delivered to the primary URL specified in your application configuration. If that URL doesn’t respond successfully, the webhook is sent to the failover URL (if configured)
- Response Requirements: Your endpoint must return a 2xx HTTP status code to indicate successful receipt
- Retry Logic: Failed webhook deliveries are automatically retried with exponential backoff
Webhook Setup Options
Choose one of the following options based on your development stage:Option A: Local Development with ngrok (Recommended for Testing)
- Install ngrok following our ngrok setup guide.
- Start your local webhook server (see example below).
- Create a tunnel:
ngrok http 3000. - Use the provided HTTPS URL (e.g.,
https://abc123.ngrok.io/webhooks).
Option B: Quick Testing with webhook.site
- Visit webhook.site.
- Copy your unique URL.
- Use this for initial testing (note: this won’t allow you to respond to webhooks).
Option C: Production Deployment
Deploy your webhook handler to a cloud service like:- AWS Lambda with API Gateway.
- Google Cloud Functions.
- Heroku.
- DigitalOcean App Platform.
Webhook Delivery Characteristics
To minimize webhook delivery time across all services, Telnyx:- Does not guarantee delivery order: Webhooks may arrive out of sequence
- Implements automatic retries: Failed deliveries are retried with exponential backoff
- Delivers concurrently: Multiple webhooks may arrive simultaneously
- Out-of-order webhooks: Events may not arrive in chronological order
- Simultaneous webhooks: Multiple events may be delivered at the same time
- Duplicate webhooks: The same event may be delivered more than once
Handling Duplicate Events
Duplicate webhooks can cause your application to process the same event multiple times. To prevent this:- Use idempotency keys: Include unique identifiers in your API requests (such as
command_id,idempotency_key, etc.) - Implement deduplication: Track processed webhook IDs to avoid duplicate processing
- Design idempotent operations: Ensure that processing the same event multiple times has no adverse effects
Webhook Payload Structure
All Telnyx webhooks contain common identification fields:- Event ID: Unique identifier for the webhook event
- Timestamp: When the event occurred
- Resource IDs: Identifiers that correlate the webhook with your resources (calls, messages, etc.)
- Event Type: Describes what action triggered the webhook
Security & Protocols
HTTP and HTTPS
- Unsecure (HTTP) URLs are allowed for webhooks.
- If HTTPS (TLS) is used, the certificate will be validated.
Event type naming
Where possible, events map to the C(R)UD operations, but this is certainly not always be applicable.- resource.created
- resource.updated
- resource.deleted
- message.created
- message.deleted
- message.delivered
- message.received
- porting_sub_request.ported
- porting_sub_request.closed
Webhook Structure
The top-level structure of the webhook will vary by product, but not by type of event received. For example, Voice API webhooks have a different top-level structure than Messaging webhooks however, the webhook structure across all Voice API commands is consistent. Thepayload of the webhook contains the most valuable information for your application.
Voice API top-level structure
Messaging top-level structure
Example: Receiving a Webhook
When you place an incoming call to a number associated with your Voice API Application, you will receive a callback for the incoming call. It should look something like the JSON below:Note: After pasting the above content, Kindly check and remove any new line addedField Value record_type Description of the record. event_type The type of event detected by the Telnyx system id unique id for the webhook occurred_at ISO-8601 datetime of when event occured call_control_id call id used to issue commands via Voice API connection_id Voice API App ID (formerly Telnyx connection ID) used in the call. call_leg_id ID that is unique to the call and can be used to correlate webhook events call_session_id ID that is unique to the call session and can be used to correlate webhook events. Call session is a group of related call legs that logically belong to the same phone call, e.g. an inbound and outbound leg of a transferred call. client_state State received from a command from Number or SIP URI placing the call to Destination number or SIP URI of the call direction Whether the call is ‘incoming’ or ‘outgoing’ state Whether the call is in ‘bridging’ or ‘parked’ state
Full Voice API example
Responding to a webhook
To acknowledge receipt of a webhook, your endpoint should return a2xx HTTP status code. Any other information returned in the request headers or request body is ignored. All response codes outside this range, including 3xx codes, will indicate to Telnyx that you did not receive the webhook. URL redirection or a “Not Modified” response will be treated as a failure.
Retries
Webhooks will be retried to each of the supplied URLs if your application does not respond in 2000 milliseconds.Best practices
If your webhook script performs complex logic or makes network calls, it’s possible the script would timeout before Telnyx sees its complete execution. For that reason, you may want to have your webhook endpoint immediately acknowledge receipt by returning a2xx HTTP status code, and then perform the rest of its duties.
Webhook endpoints may occasionally receive the same event more than once. We advise you to guard against duplicated event receipts by making your event processing idempotent. One way of doing this is logging the events you’ve processed, and then not processing already-logged events. Additionally, we recommend verifying webhook signatures to confirm that received events are being sent from Telnyx.
Webhook signing
Telnyx signs the webhook events it sends to clients so that the authenticity of the request can be verified. Webhook signing in API V2 uses public key encryption. Telnyx stores a public-private key pair and uses the private key to sign the payload. The public key is available to you so that you can verify the request. The public key can be viewed in the Mission Control Portal. The signature for the payload is calculated by building a string that is the combination of the timestamp of when the request was initiated, the pipe| character and the JSON payload. The signature is then Base64 encoded.
Base64 encoded) and the timestamp (in Unix format) are assigned to the request headers telnyx-signature-ed25519 and telnyx-timestamp respectively.
You can then use cryptographic libraries in your language of choice to verify the signature using the public key. Refer to the Telnyx SDKs for implementation examples in your preferred language.
Parameters & Field Names
Source: https://developers.telnyx.com/development/api-fundamentals/data-standards/parameters-fields.mdThe Parameter & Field names section provides an overview of patterns for API request and response parameters and field names.
Data Types
Booleans
Boolean values are presented astrue and false values. They will not be 1 or 0 nor will they be strings such as “true” and “false”.
Date-times
All date-times are represented in UTC with precisely the following format:YYYY-MM-DDThh:mm:ss.fffZ where fff is the first three decimals of the fractional seconds (i.e., millisecond precision).
API V2 accepts date-times in at least the following 12 formats:
YYYY-MM-DDThh:mm:ss.fffZYYYY-MM-DDThh:mm:ssZYYYY-MM-DDThh:mmZ- The above with
-00,-0000, or-00:00instead of theZtimezone identifier.
Times (no date portion)
All times are represented in UTC with precisely the following format:hh:mm:ss.fffZ where fff is the first three decimals of the fractional seconds (i.e., millisecond precision).
Durations
If a parameter represents a unit of time, then the unit name should be part of the field name so that the consumer knows what the value represents. For example, a retry timeout value would be namedretry_timeout_secs or retry_timeout_millis.
Valid field suffixes are:
- millis
- secs
- hours
- days
- weeks
- months
- years
P4Y, PT0,42M or P3Y6M4DT12H30M5.423S).
Time zones
Time zone field names are always spelled astimezone and the value is always the Time Zone Database area name spelled out as Europe/Berlin, America/Chicago for example.
Date Literals
User-friendly date ranges use this naming convention.HTTP Headers
Date-times in HTTP headers follow RFC-7231 §7.1.1.1’s recommended “IMF-fixdate” format. An example of the preferred format is Sun, 06 Nov 1994 08:49:37 GMT ; IMF-fixdateNaming Conventions
Enums and string literals
Enum and string literal parameters use snake case. If there is an acronym involved, there will not be an underscore between every letter. For example,by_ani instead ofByANI, byAni, or by_a_n_i.
Country codes
The field namecountry_code is always used to represent a country. It will be in ISO 3166-1 alpha-2 format in capital letters to represent the country. For example DE for Germany.
Phone numbers
Phone numbers are always specified in e164 format. For example,+18005550199.
If the country calling code needs to be represented in the API, the field name will always be country_calling_code. If representing the actual country via its alpha 2 representation, country_code will be used.
Ex: {"country_calling_code": "1", "country_code": "US"}
City names
City names are always calledlocality and represented in title case. For example, New York City instead of NEW YORK CITY.
Address Format
Addresses are represented like this:U.S. addresses
US states are always represented in their two-digit form in capital letters. For example,NY for New York.
Pagination
The parameter which contains pagination ispage. This parameter is a map of pagination attributes.
Example
GET /phone_numbers?page[number]=3&page[size]=1 HTTP/1.1
The default number of items per page is 20; however, sometimes, this may not be appropriate.
Page numbering is 1-based and omitting the page, or the page[number] parameter will return the first page.
Generally speaking, the maximum allowable results will not be more than 250, although there may be some exceptions to this rule.
The total number of results is provided in the total_pages field so that clients will know how many page options to display.
Example Response
Sorting
An endpoint may support requests to sort the primary data with asort query parameter.
Example
created_at DESC
An endpoint may also support multiple sort fields using the array syntax. Sort fields will be applied in the order specified.
Multiple Sort Fields
Filtering
Filtering of a resource collection based upon associations do so by allowing query parameters that combine the filter with the association name. For example, the following is a request for all phone_numbers associated with a particular tag:null to filter on resources that don’t have a particular value set:
Filtering on values of nested or related objects
To denote that a filter applies to an attribute of a nested object, use the dot notation. For example, the phone numbers endpoint returns data in this format:name was a top-level key as in the below example:
Complex filters
When filtering, you may need to specify more complex filters thanequal to.
Options are:
eqnegtgteltltestarts_withends_withcontains
eq then:
starts_with, ends_with or contains:
Server-side SDKs
Node.js
Source: https://developers.telnyx.com/development/sdk/node.md
Python
Source: https://developers.telnyx.com/development/sdk/python.md
PHP
Source: https://developers.telnyx.com/development/sdk/php.md
Java
Source: https://developers.telnyx.com/development/sdk/java.md
Add Dependency
Create S3 Bucket
Upload an Object
List Objects
Download Object
Generate Presigned URLs for Upload and Download
In order for this part to work, we will need to add json decoding library and http client. Any libraries will do, but for this example we picked: gson and okhttp3.Ruby
Source: https://developers.telnyx.com/development/sdk/ruby.md
Go
Source: https://developers.telnyx.com/development/sdk/golang.md
Telnyx CLI
Overview
Source: https://developers.telnyx.com/development/cli.mdThe Telnyx CLI is the official command-line interface for managing Telnyx resources directly from your terminal. Send messages, manage phone numbers, control calls, and more — all without leaving the command line.
When to Use the CLI vs the API
The CLI is ideal for operators, developers exploring the API, and simple automation. For production applications, use the Telnyx SDKs or call the REST API directly.
Features
Access all Telnyx APIs — messaging, voice, numbers, 10DLC, AI, verification, storage, and more JSON, YAML, pretty-print, and raw output for scripting and human readability Always in sync with the latest Telnyx API endpoints Inspect HTTP requests and responses for troubleshootingQuick Example
Installation
Install via Go:$GOPATH/bin is in your PATH.
Detailed installation instructions and troubleshooting
Documentation
Get up and running in 5 minutes Configure your API key Output formats, filtering, and scripting Full list of all CLI commandsResources
View source, report issues, and contribute Release notes and version history Full API documentation (CLI wraps these endpoints)Install
Source: https://developers.telnyx.com/development/cli/getting-started/install.mdThe Telnyx CLI is supported on macOS, Windows, and Linux. The Telnyx CLI requires Go 1.22 or later. If you don’t have Go installed, follow the official installation guide.
Installation
Install the CLI using Go:telnyx binary to your Go bin directory.
Add to PATH
After installation, ensure the Go bin directory is in your PATH:Verify Installation
Update
To update to the latest version, run the install command again:Alternative: Run Without Installing
You can run the CLI directly without installing:Troubleshooting
”command not found: telnyx”
If the command isn’t found after installation:-
Verify Go’s bin directory:
-
Add Go bin to your PATH:
-
Reload your shell config:
“command not found: go”
Install Go first:- macOS:
brew install go - Linux: Use your package manager or download from go.dev
- Windows: Download the installer from go.dev
Build errors
If you encounter build errors:-
Ensure you have Go 1.22+:
-
Clear Go’s module cache and retry:
Next Steps
Configure authentication and run your first commands Full list of all CLI commandsQuickstart
Source: https://developers.telnyx.com/development/cli/getting-started/quickstart.mdThis quickstart guide will help you install the Telnyx CLI, configure authentication, and run your first commands.
Prerequisites
- Go 1.22+ installed
- A Telnyx account
- A Telnyx API key
Step 1: Install the CLI
Step 2: Configure Authentication
Set your API key as an environment variable. You can get your API key from the Telnyx Portal.~/.bashrc, ~/.zshrc, etc.) to persist it across sessions.
Verify Authentication
Test that your credentials are working:Step 3: Run Your First Commands
Check Your Balance
List Your Phone Numbers
Search for Available Numbers
Send a Test Message
You’ll need a messaging-enabled phone number and a configured messaging profile.Step 4: Explore Commands
Get Help
Common Commands
Output Formats
The CLI supports multiple output formats:Debug Mode
To see full HTTP request/response details:Next Steps
Learn about authentication options Output formats, scripting, and CI/CD integrationAuthentication
Source: https://developers.telnyx.com/development/cli/getting-started/authentication.mdThe Telnyx CLI authenticates using an API key set via environment variable.
Setting Your API Key
Set theTELNYX_API_KEY environment variable:
~/.bashrc, ~/.zshrc, etc.) to persist it across terminal sessions.
Verify Authentication
Test that your credentials are working by running any command:Getting Your API Key
- Log in to the Telnyx Portal
- Navigate to API Keys
- Click Create API Key
- Copy the key (it won’t be shown again)
KEY_. If you’re using a v1 API key (starting with a different prefix), you’ll need to create a new v2 key.
Multiple Accounts
If you work with multiple Telnyx accounts (e.g., production and staging), you have several options:Option 1: Shell Aliases
Create aliases for different accounts:Option 2: Separate Terminal Sessions
Set different API keys in different terminal windows:Option 3: Inline Override
Override the API key for a single command:CI/CD Integration
GitHub Actions
GitLab CI
Shell Scripts
Security Best Practices
Use environment variables or secrets management. Add.env files to .gitignore.
Create different API keys for production, staging, and development. This limits blast radius if a key is compromised.
Regenerate API keys periodically and update your configurations.
Store API keys in GitHub Secrets, GitLab CI Variables, AWS Secrets Manager, HashiCorp Vault, etc.
Troubleshooting
”Unauthorized” Error
- Verify your API key is set:
echo $TELNYX_API_KEY - Check if the key starts with
KEY_ - Verify the key hasn’t been revoked in the Portal
- Ensure there are no extra spaces or characters in the key
”No API key” Error
Solutions:- Set the environment variable:
export TELNYX_API_KEY=KEY_xxx - Check for typos in the variable name
- Ensure the variable is exported (not just set)
Next Steps
Run your first CLI commands Output formats, scripting, and CI/CDScripting & Automation
Source: https://developers.telnyx.com/development/cli/general-usage.mdThis guide covers common patterns for automating workflows with the Telnyx CLI — output formats, filtering, and integration with scripts and CI/CD pipelines.
Output Formats
The CLI supports multiple output formats via the--format flag.
Auto Format (Default)
Interactive exploration mode, best for browsing data:JSON Format
Machine-readable output for scripting and automation:YAML Format
Human-readable structured output:Pretty Format
Indented, colorized JSON:Raw Format
Unformatted API response:All Format Options
Transforming Output with GJSON
Use--transform to extract specific fields using GJSON syntax:
Filtering JSON with jq
Combine with jq for powerful filtering:Pagination
List commands support pagination via filter parameters:Filtering
Most list commands support filtering via individual--filter.* flags:
--filter.country-code, not --filter.country_code).
Global Flags
These flags work with all commands:Environment Variables
Scripting Examples
Bash: Bulk SMS Send
Bash: Export Numbers to CSV
Bash: Monitor Account Balance
GitHub Actions: Deploy Notification
Debug Mode
To inspect the full HTTP request and response:- Troubleshooting authentication issues
- Understanding the exact API calls being made
- Debugging unexpected responses
Next Steps
Full list of all commands Common issues and solutionsCommand Reference
Source: https://developers.telnyx.com/development/cli/reference.mdThis page provides a comprehensive reference for all available CLI commands. Use
telnyx <command> --help for detailed options.
The CLI is auto-generated from the Telnyx REST API. For full request/response schemas, see the corresponding API reference for each resource.
Global Options
These flags work with all commands:Phone Numbers
See Phone Numbers API for full response schemas.List & Manage Numbers
Search Available Numbers
Purchase Numbers
Number Reservations
Messaging
See Messaging API for full payload options.Send Messages
Retrieve Messages
Messaging Profiles
Optouts
10DLC (US A2P Messaging)
See 10DLC documentation for registration requirements.Brands
Campaigns
Use Cases
Phone Number Campaigns
Voice / Call Control
See Call Control API for advanced call flow options.Make Calls
Call Status
Call Actions
Call Control Applications
Conferences
Recordings
AI
Chat Completions
AI Assistants
Audio (Speech-to-Text / Text-to-Speech)
Embeddings
Conversations
Verify (2FA)
Profiles
Send Verification
Verify Code
Fax
Number Lookup
Billing
SIM Cards (IoT)
Porting
Storage
Video Rooms
Networking
WireGuard
Global IPs
Getting Help
10DLC Registration
Source: https://developers.telnyx.com/development/cli/workflows/10dlc.mdThis guide shows you how to complete 10DLC (10-Digit Long Code) registration using the Telnyx CLI, from brand creation through campaign approval.
Why 10DLC?
US carriers require 10DLC registration for Application-to-Person (A2P) messaging from local phone numbers. Without it, your messages may be blocked or throttled. Registration establishes your business identity with carriers and unlocks higher throughput based on your trust score. For a deeper explanation of 10DLC, trust scores, and carrier requirements, see Understanding 10DLC.Prerequisites
- Telnyx account with verified status
- Telnyx CLI installed
TELNYX_API_KEYenvironment variable set- Business information ready (EIN, address, website)
- At least one US phone number
Registration Steps
Step 1: Create a Brand
A brand represents your business identity for 10DLC registration.Standard Business
Sole Proprietor
For sole proprietors, additional SMS OTP verification is required:PRIVATE_PROFIT- Private companyPUBLIC_PROFIT- Publicly traded companyNON_PROFIT- Non-profit organizationGOVERNMENT- Government entitySOLE_PROPRIETOR- Individual / sole proprietor
Step 2: Check Brand Status
Step 3: Create a Campaign
Once your brand is approved, create a campaign to define your messaging use case:Step 4: Manage Campaigns
Step 5: Phone Number Assignment
Check phone number campaign assignments:Step 6: Verify Setup
Campaign Approval
After submission, campaigns go through carrier approval:
Campaign approval can take 1-7 business days. Do not send A2P messages until approved.
Appeal Rejected Campaigns
If your campaign was rejected, you can submit an appeal:Deactivate a Campaign
Best Practices
Sample Messages
Your sample messages should:- Represent actual messages you’ll send
- Include opt-out language (“Reply STOP to unsubscribe”)
- Match your stated use case
- Not contain placeholder text
Throughput
10DLC throughput depends on your trust score:
Higher trust scores come from:
- Verified business information
- Good messaging practices
- Low spam/complaint rates
Troubleshooting
”Brand verification failed”
- Double-check EIN matches IRS records exactly
- Verify business address is current
- Ensure phone number is associated with business
“Campaign rejected”
Common reasons:- Sample messages don’t match use case
- Missing opt-out language
- Vague or generic description
Revet a Brand
If your brand information has changed or was rejected, you can revet (resubmit):Complete Script Example
Next Steps
Start sending SMS after approval Deep dive on trust scores and carrier requirements Throughput tiers and trust scores Common errors and solutionsTroubleshooting
Source: https://developers.telnyx.com/development/cli/troubleshooting.mdThis reference covers common issues you may encounter when using the Telnyx CLI and how to resolve them. Most CLI errors map directly to API error codes. For a complete list, see API Error Codes.
Authentication Errors
”Unauthorized” (401)
- Invalid or expired API key
- API key not set
- API key has extra whitespace or characters
-
Verify your API key is set:
-
Check the key format (should start with
KEY_): - Verify the key in the Telnyx Portal
-
Test with a simple command:
“No API key” Error
Causes:- Environment variable not set
- Environment variable not exported
-
Set the environment variable:
-
Verify it’s exported (not just set):
-
Add to your shell profile for persistence:
Permission Errors
”Forbidden” (403)
- API key doesn’t have permission for this action
- Resource belongs to a different account
- Account verification required
- Check API key permissions in the Portal
- Verify you’re using the correct API key for the account
- Some features require account verification (verify here)
Resource Errors
”Not Found” (404)
- Resource ID is incorrect
- Resource was deleted
- Resource belongs to a different account
-
Verify the resource exists:
- Check for typos in the resource ID
- Ensure you’re using the correct API key if you have multiple accounts
”Phone number not found”
Solution: List your numbers to see what’s available:Rate Limiting
”Too Many Requests” (429)
- Exceeded API rate limits
- Too many requests in short period
-
Add delays between requests in scripts:
- Use bulk endpoints when available
- Check rate limits documentation
Messaging Errors
”Number not enabled for messaging”
- Enable messaging on the number via the Portal or API
-
Or purchase a messaging-enabled number:
“10DLC campaign required”
”Invalid ‘to’ number”
-
Use E.164 format (include country code):
-
Verify the number is valid:
Installation Issues
”command not found: telnyx”
Causes:- CLI not installed
- Go bin directory not in PATH
- Shell not reloaded after install
-
Verify Go’s bin directory contains telnyx:
-
Add Go bin to PATH:
-
Reinstall if needed:
-
Reload your shell config:
“command not found: go”
Causes:- Go not installed
Go version error
Build/compile errors
Solutions:-
Ensure you have Go 1.22+:
-
Clear module cache and retry:
Connection Issues
Network error / Connection refused
Causes:- No internet connection
- Firewall blocking requests
- Proxy misconfiguration
- Check internet connectivity
- Verify you can reach the API:
- Check proxy settings if applicable
Timeout errors
Solutions:- Check your internet connection
- Try again (may be temporary)
- For large operations, the API may need more time
Getting More Help
Enable Debug Mode
For detailed HTTP request/response logging:Check CLI Version
Ensure you’re on the latest version:Get Support
- GitHub Issues: Report bugs
- Telnyx Support: Contact support
- Community: Slack
- API Status: status.telnyx.com
Overview
Source: https://developers.telnyx.com/development/cli/legacy.mdThis CLI is deprecated. The
@telnyx/api-cli package is no longer actively maintained.
For new projects, use the Telnyx CLI (Go) which offers better performance, simpler authentication, and full API coverage.
About the Legacy CLI
The@telnyx/api-cli is a Node.js-based command-line interface for interacting with the Telnyx API. It provides commands for managing phone numbers, sending messages, making calls, and more.
Features
- Interactive Setup — Guided authentication with
telnyx auth setup - Profile Management — Multiple API key profiles for different environments
- 10DLC Wizard — Step-by-step 10DLC brand and campaign registration
- Shell Autocomplete — Tab completion for commands and options
- Dry Run Mode — Preview destructive operations before executing
Legacy Documentation
npm installation instructions API keys, profiles, and config files Full command referenceResources
- npm Package — Version history
- GitHub Repository — Source code
Installation
Source: https://developers.telnyx.com/development/cli/legacy/install.mdThis CLI is deprecated. For new projects, use the current Telnyx CLI instead.
Requirements
The legacy CLI requires Node.js 20 or later.Installation
Install globally via npm:telnyx command available from any directory.
Verify Installation
Update
To update to the latest version:Troubleshooting
”command not found: telnyx”
If the command isn’t found after installation:-
Verify it installed:
-
Check npm’s global bin is in your PATH:
-
Restart your terminal or reload your shell config:
Permission errors
If you getEACCES permission errors:
- Follow npm’s guide to fix permissions
- Or use a Node version manager (nvm, fnm) which doesn’t require sudo
Next Steps
Configure API keys and profilesAuthentication
Source: https://developers.telnyx.com/development/cli/legacy/authentication.mdThis CLI is deprecated. The new Telnyx CLI uses environment variables only (
TELNYX_API_KEY). Profile management is not available in the new CLI.
Authentication Methods
The legacy CLI supports three authentication methods, checked in order: flag → environment variable → config file.1. Interactive Setup (Recommended)
~/.config/telnyx/config.json.
2. Environment Variable
3. Command-Line Flag
Verify Authentication
Multiple Profiles
Use named profiles to manage multiple Telnyx accounts or environments.Create a Profile
List Profiles
Use a Profile
Set Default Profile
Delete a Profile
Configuration File
The CLI stores configuration in~/.config/telnyx/config.json:
Environment Variables
Getting Your API Key
- Log in to the Telnyx Portal
- Navigate to API Keys
- Click Create API Key
- Copy the key (it won’t be shown again)
KEY_. If you’re using a v1 API key, you’ll need to create a new v2 key.
Next Steps
Full command reference for the legacy CLICommand Reference
Source: https://developers.telnyx.com/development/cli/legacy/reference.mdThis CLI is deprecated. For the current CLI commands, see Command Reference.
Authentication & Profiles
Phone Numbers
Search & Purchase
Manage Numbers
Messaging
Send Messages
List & Retrieve
Messaging Profiles
Voice
Make Calls
Call Control
Voice Profiles & Connections
10DLC
Interactive Setup
Brand Management
Campaign Management
Billing
Verification
Shell Autocomplete
Global Options
Migration to New CLI
See the Legacy CLI Overview for a command mapping to the new Go-based CLI.Development Tools
Postman Setup
Source: https://developers.telnyx.com/development/development-tools/postman-setup.mdPostman is an API platform available as a web or desktop application. A great way to understand an API is to make requests and review the responses. Postman exactly does that by providing a UI for testing and experimenting with API calls without the need to write code. Hence, we recommend using Postman to get started quickly and get the taste of Telnyx APIs. You can easily accomplish this by utilizing our Postman collections. Steps to use these collections:
- Configure your local environment
- Import a collection.
- Send a test request and inspect the responses.
Configure environment
An environment is a set of variables you can use in your Postman requests. You can use environments to group related sets of values together. By the end of this tutorial, you would have imported and configured environment to use with Telnyx collections.- Create an API Key following the below steps.
- Sign up for a free Telnyx account
- Navigate to the API Keys section and create an API Key by clicking Create API Key.
- Sign up at Postman or download and install the Postman application.
- Once signed in to Postman, select an existing workspace or create a new workspace for your Telnyx collections. If you are new to Postman, learn more about creating a workspace here.
-
Once you are in your desired workspace, click Import in the top left corner, select Link from the options and paste this link in the Enter a URL text box:
https://tlyx.co/telnyx-postman-environment
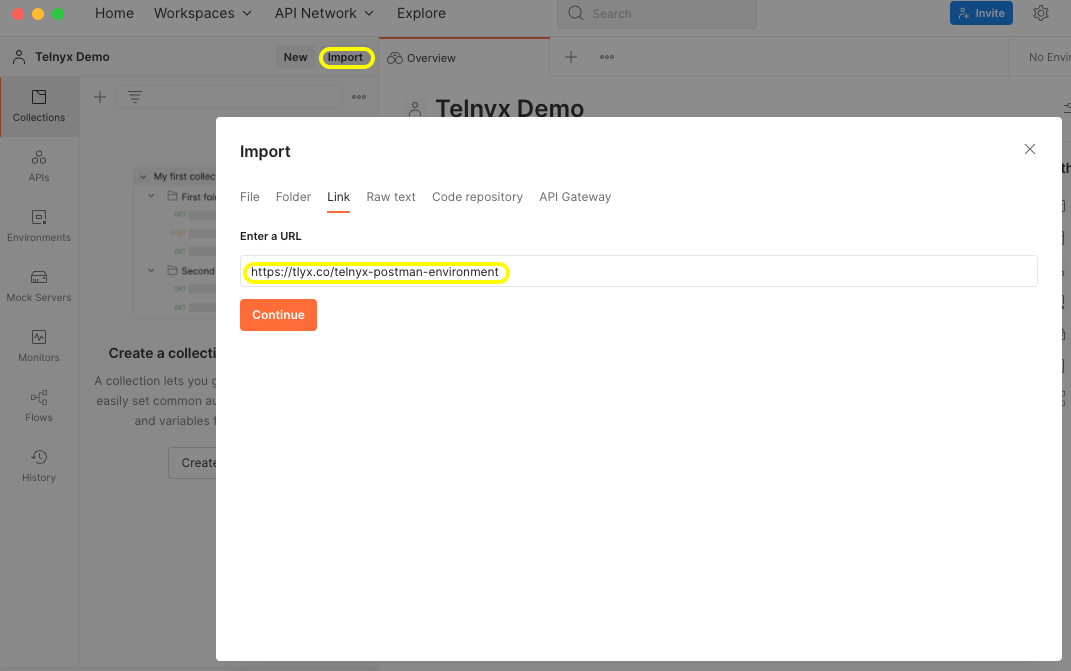
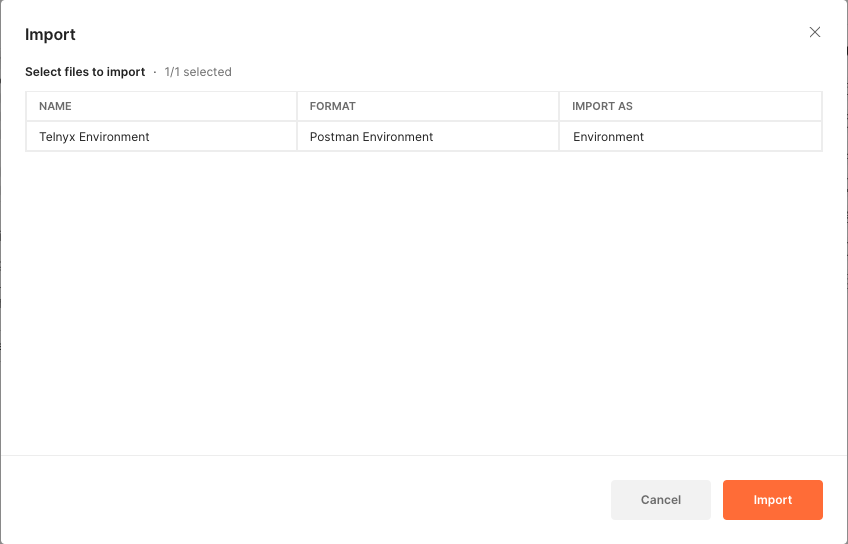
- Go to Environments tab on the left and select
Telnyx Environment
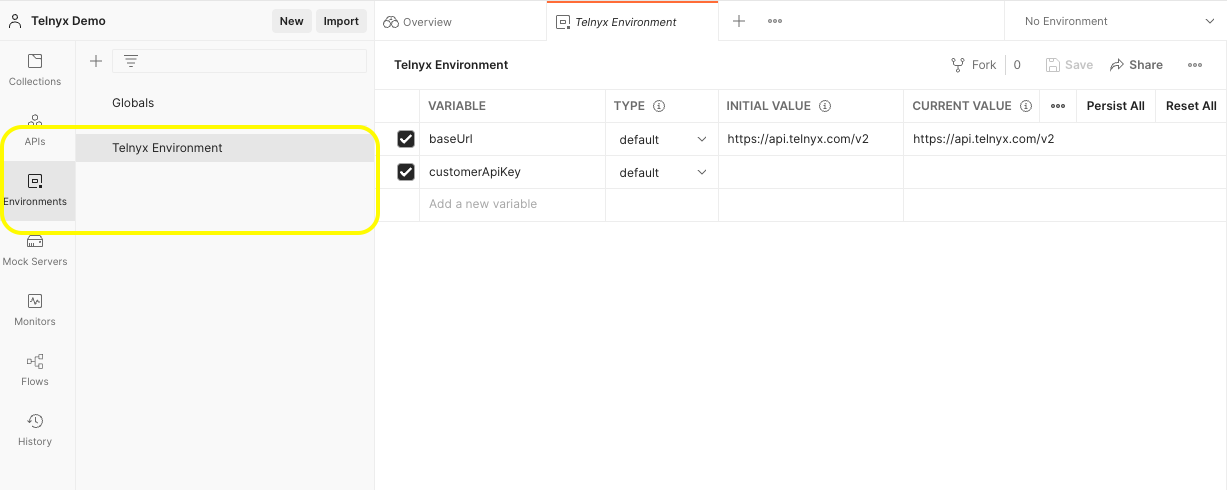
- For the
customerApiKeyvariable, in the Initial Value and Current Value columns, enter your API key that you created earlier in Step 1. - Click Save at the top right to save the value to the environment.
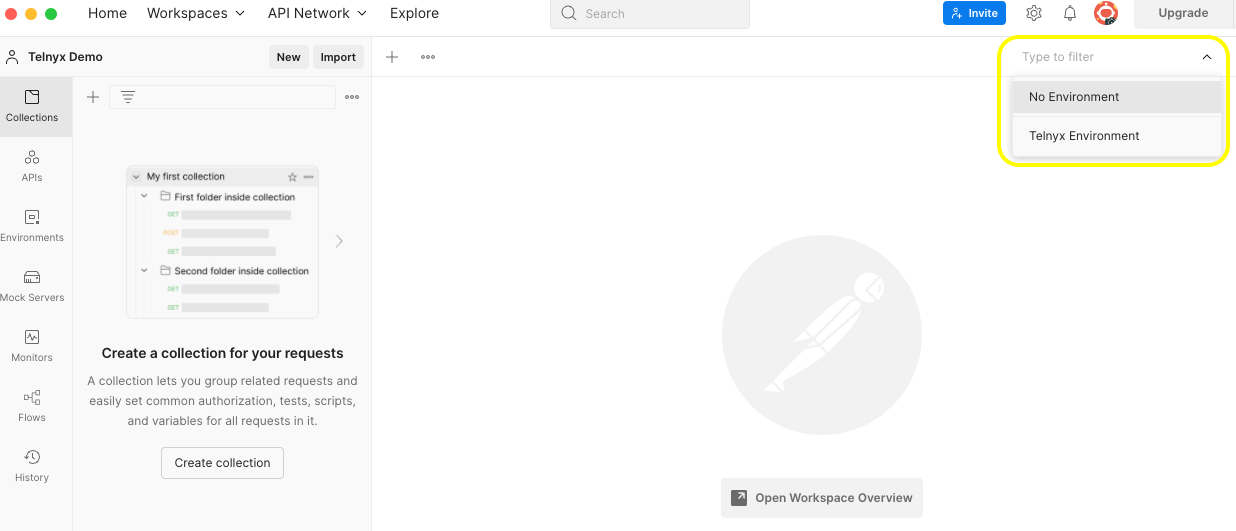
- Click the box in the top right corner that has list of environments and select
Telnyx Environmentfrom the list. Initially it shows up asNo Environment.
Telnyx Environment moving forward.
Import collections
Postman Collections are a group of saved requests. We made it easy to import postman collections by adding aRun in Postman button in all the API reference pages that allows you to fork the collections, test API requests, and see the results immediately without writing any code.
For example, Use the Run in Postman button below to import the Phone Numbers API collection:
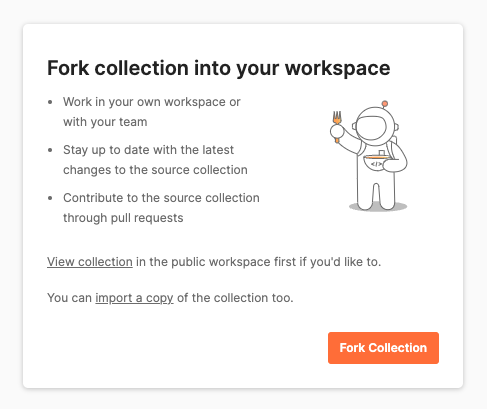
 Then, it should show a dialog box with some information on benefits of forking and links to view/import the collection instead of forking. Click
 Fork Collection
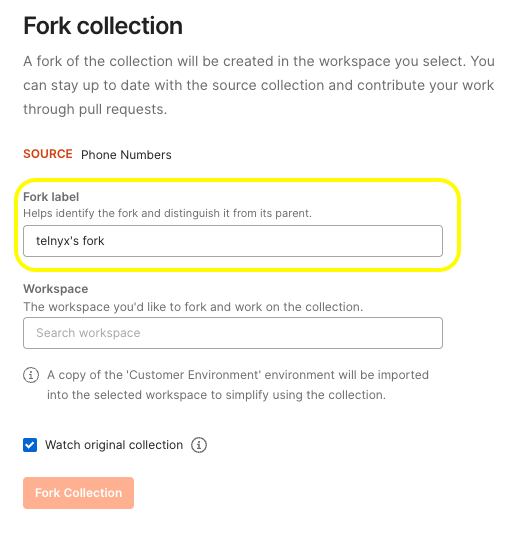
- Fork label: Make sure you provide a relevant label for you to easily identify it.
Eg:
telnyx's fork - Workspace: Choose which workspace you would like this collection to be part of.
- Watch original collection: Checking this box will notify you when updates are made to the collection so you can pull the latest changes made to the collection.
Send request
As you’ve added yourAPI KEY to the environment and imported a collection from the previous steps, you’re now ready to send a request.
Note: Make sure you have selected Telnyx Environment at the top right from the list of environments
As we have imported Phone Numbers API collection from previous steps, let us send a request to list the phone numbers in your account:
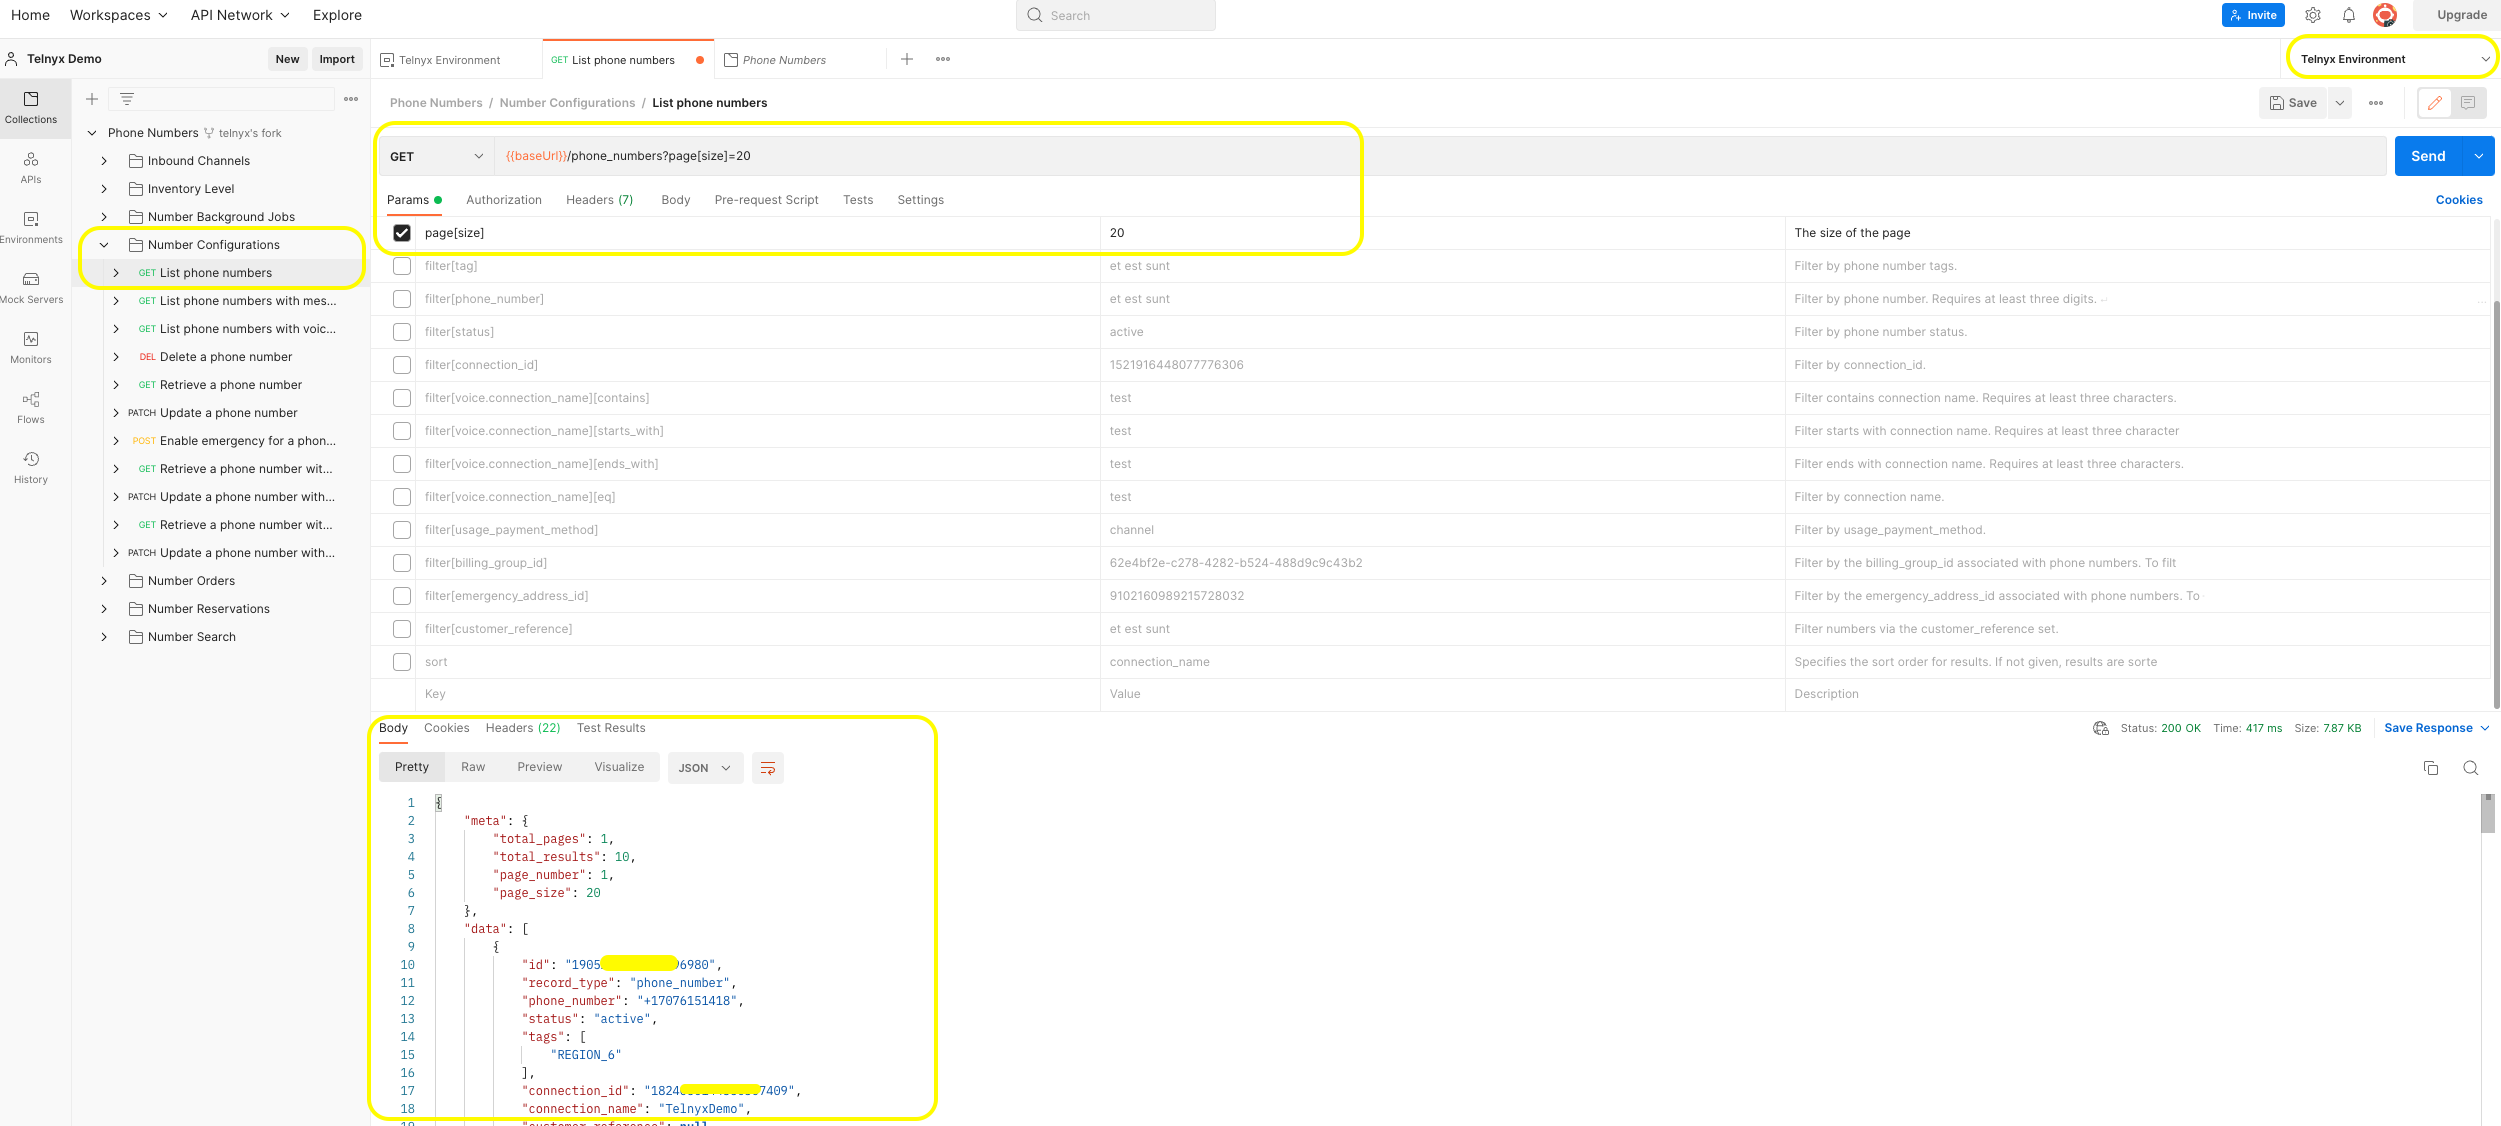
- Once you are in your desired workspace where you imported this collection, Select the Collections tab in Postman on the left and expand the Phone Numbers collection.
- Expand the Number Configurations folder and select List phone numbers. This loads the List phone numbers request into Postman, ready to send.
- Click Send. The result pane automatically displays the results of your request.
-
In case you would like to use any filters, just select the checkbox for any filter you would like from the Params tab, set the value and click Send.
-
You can play with the API and if you want to save the request with the modified parameters or any other data, just click save and it should save your changes in the collection. This change would be local to you and would not effect the original collection you forked from.
If you would like to get the latest changes made to the original collection into your local collection, click on the Phone Numbers collection folder and then click on the three dots beside Save button which gives you a list of options. Select
Pull Changesand it will fetch you the latest updates in that collection.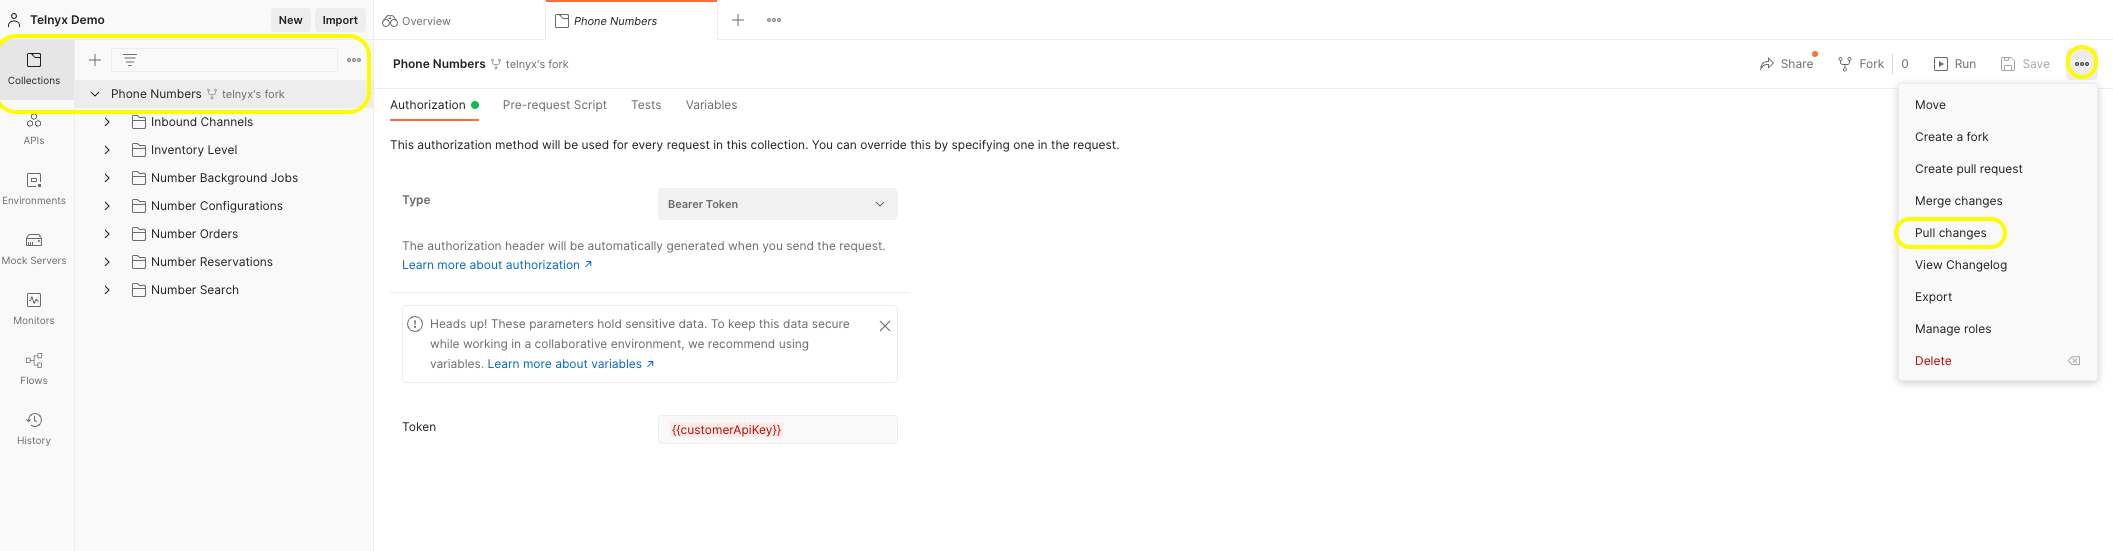
ngrok Setup
Source: https://developers.telnyx.com/development/development-tools/ngrok-setup.mdThis guide walks through how to get ngrok up and running on your machine. To test it out with Telnyx webhooks, you’ll need to sign up. If you’d like to test out your ngrok instance by receiving a webhook associated with an API-enabled phone call, jump to our Receiving Webhooks in Voice API after you complete these steps! ngrok is a popular tunneling tool used to expose a locally running application to the internet. You can download it for free with all of the functionality you need here. This is useful for receiving webhooks to your local applications for testing. For the sake of this tutorial, we’ll assume that your local application is running locally on port
5000. Now you’ll need the ability to send a request to that port from Telnyx. You can easily do this using ngrok when developing your application.
Sign up for ngrok and follow the setup and installation steps to get up and running. The final step in the process is to start an HTTP tunnel to your application. The instructions specify $ ./ngrok http 80, which will tunnel traffic to port 80 on your machine. As our application is running on port 5000, you should use that instead: $ ./ngrok http 5000.
When you run this command, you should see output similar to the following:
ngrok forwarding address
The forwarding addresses will be different for you, but they should still point tolocalhost:5000. Copy the https forwarding address, as you’ll need it to configure your Mission Control Portal.
Messaging With ngrok
For messaging, webhooks set the webhook URL on your messaging profile from the Telnyx Portal Messaging dashboard. Edit your Messaging Profile by clicking the “Basic Options” button [✎]. Select the “Inbound” section and paste the forwarding address from ngrok into the Webhook URL field. Append/webhooks to the end of the URL to direct the request to the webhook endpoint in your local application.
Resending webhooks
For now, you’ll leave “Failover URL” blank, but if you wanted to have Telnyx resend the webhook — if sending to the Webhook URL fails — you can specify an alternate address in this field.Next steps
We hope this guide helped you understand how to use ngrok. Next, why not dive into our API and start sending text messages and making API-enabled phone calls? Create an account and enjoy Telnyx APIs!Node-RED
Source: https://developers.telnyx.com/development/development-tools/node-red.md(aka
@telnyx/node-red-telnyx)

Overview
Node-RED is an open-source flow-based programming tool that provides a visual development environment for building applications by wiring together nodes. It was originally developed by IBM Emerging Technology Services and is now part of the JS Foundation. Node-RED allows users to create applications and services by connecting pre-built nodes together in a flowchart-like manner. Each node represents a specific task or function, such as reading data from a sensor, processing data, making decisions, or interacting with external systems. Users can drag and drop nodes onto a canvas, connect them together, and configure their properties. The flows created in Node-RED are executed by a runtime engine, which runs on a server or device where Node-RED is installed. The runtime executes the flow in a sequential manner, passing data between nodes as it progresses through the flow. The flows can be easily modified and deployed, making it a flexible tool for building and prototyping Internet of Things (IoT) applications, automation workflows, and data integration processes.Start the journey
node-red-telnyx is the Telnyx powerful integration that allows you to combine the capabilities of Node-RED, a flow-based programming tool, with Telnyx, a cloud-based communications platform. With node-red-telnyx, you can create complex workflows and automate various telecommunications tasks. node-red-telnyx can be integrated with other services and platforms through Node-RED’s extensive library of nodes. You can connect Telnyx’s communications capabilities with databases, APIs, messaging platforms, and IoT devices to build end-to-end automation solutions. e.g., you can use node-red-telnyx to send SMS messages programmatically. This can be useful for notifications, alerts, or two-factor authentication (2FA) purposes. You can configure the flow to trigger SMS messages based on specific events or conditions. To get started, sign up for a Portal account, then follow the steps in our quickstart guide to buy an SMS-enabled number.Usage
The package needs to be configured with your MCP account’s API key and some other details you can find in the Telnyx Mission Control Portal.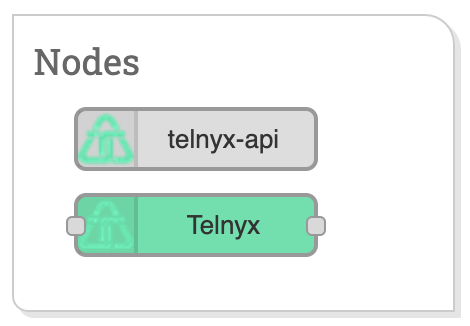
- Alphanumeric: Alphanumeric Sender ID allows you to set your company name or brand as the Sender ID when sending one-way SMS messages to international destinations. Find more information here.
- Two-way: You’ll need an SMS-capable phone number purchased from, or ported into, the Telnyx platform. If purchasing a new number, select the SMS number feature when searching. In general, numbers that are ported in will be messaging-capable. Learn more.
Resources
- Node-RED pages
- Example flows using node-red-telnyx
- Getting Started Video (Coming Soon)
Support
Our team provides open source support in a best effort fashion, ensuring that we offer assistance and guidance to the community based on our expertise and resources. For support, install the@telnyx/node-red-telnyx package from npm and reach out via the Telnyx support center with questions or issues.
For AI Agents
Local MCP Server
Source: https://developers.telnyx.com/development/mcp/local-mcp.mdOfficial Telnyx Local Model Context Protocol (MCP) Server that enables interaction with powerful telephony, messaging, and AI assistant APIs. This server allows MCP clients like Claude Desktop, Cursor, Windsurf, OpenAI Agents and others to manage phone numbers, send messages, make calls, and create AI assistants.
Quickstart with Claude Desktop
- Get your API key from the Telnyx Portal.
- Install
uvx(Python package manager), install withcurl -LsSf https://astral.sh/uv/install.sh | sh,brew install uvor see theuvrepo for additional install methods. - Go to Claude > Settings > Developer > Edit Config > claude_desktop_config.json to include the following:
Running After Download
- Get your API key from the Telnyx Portal.
- Install
uvx(Python package manager), install withcurl -LsSf https://astral.sh/uv/install.sh | sh,brew install uvor see theuvrepo for additional install methods. - Clone the Git Repository
Use Git to download the Telnyx MCP Server locally:
- Configure and Run with uvx
In your Claude config, you can reference the local folder by using the
--fromargument. For example: - This instructs Claude to run the server from the folder you cloned. Replace “/path/to/telnyx-mcp-server” with the actual location of the repository.
Available Tools
Assistant Tools
- Create AI assistants with custom instructions and configurations
- List existing assistants
- Get assistant details
- Update assistant properties
- Delete assistants
- Get assistant TEXML configurations
Call Control Tools
- Make outbound phone calls
- Hang up active calls
- Transfer calls to new destinations
- Play audio files during calls
- Stop audio playback
- Send DTMF tones
- Speak text using text-to-speech
Messaging Tools
- Send SMS and MMS messages
- Get message details
WhatsApp Tools
- Send WhatsApp messages (template or free-form text)
- List WhatsApp Business Accounts (WABAs)
- List and create message templates
- Get template details and approval status
- List WhatsApp-enabled phone numbers
- Get and update business profiles
Phone Number Tools
- List your phone numbers
- Buy new phone numbers
- Update phone number configurations
- List available phone numbers
Connection Tools
- List voice connections
- Get connection details
- Update connection configurations
Cloud Storage Tools
- Create buckets compatible with Telnyx Cloud Storage
- List buckets across all regions
- Upload files
- Download files
- List objects in a bucket
- Delete objects
- Get bucket location information
Embeddings Tools
- List existing embedded buckets
- Scrape and embed a website URL
- Create embeddings for your own files
Secrets Manager Tools
- List integration secrets
- Create new bearer or basic secrets
- Delete integration secrets
Example Usage
Try asking Claude:- “Create an AI agent that can handle customer service for an e-commerce business”
- “Send a text message to +5555551234 saying ‘Your appointment is confirmed for tomorrow at 3pm’”
- “Make a call to my customer at +5555551234 and transfer them to my support team”
- “Find me a phone number in Chicago with area code 312”
- “Send a WhatsApp template message to +18005551234 using the order_confirmation template”
- “List my WhatsApp message templates and show which ones are approved”
- “Create an auto-attendant system using Telnyx AI assistants and voice features”
- “Upload /Volumes/Drive/contract.pdf to the ‘legal-docs’ bucket in Telnyx Cloud Storage”
- “Embed the knowledge base at https://example.com/docs so the assistant can answer user questions”
- “Create a integration secret named openai-token with my openai key XYZ”
Contributing
See github.com/team-telnyx/telnyx-mcp-server for more information.Remote MCP
Source: https://developers.telnyx.com/development/mcp/remote-mcp.md
Remote endpoint
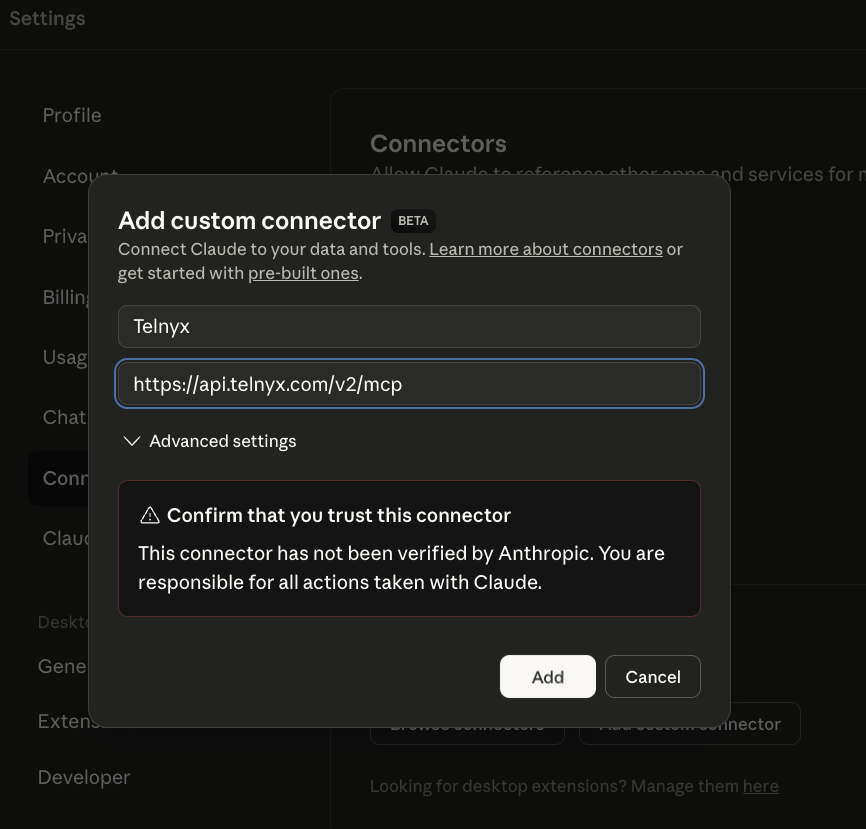
The canonical Telnyx API MCP endpoint ishttps://api.telnyx.com/v2/mcp.
Use this endpoint for MCP clients or scanners that need Telnyx API actions. It uses streamable HTTP and Bearer authentication with Authorization: Bearer <TELNYX_API_KEY>.
For focused, app-specific MCP surfaces, discover available MCP Apps from https://api.telnyx.com/v2/mcp/apps and connect to app endpoints at https://api.telnyx.com/v2/mcp/apps/{slug}/mcp.
The canonical MCP server card is published at https://telnyx.com/.well-known/mcp/server-card.json. The developers.telnyx.com server card is a secondary discovery mirror for the documentation site and points back to that canonical card.
https://developers.telnyx.com/mcp and other developers.telnyx.com MCP discovery paths may expose documentation/search MCP capabilities. Do not treat those docs endpoints as the API action MCP; API actions should connect to https://api.telnyx.com/v2/mcp.
Quickstart with Claude Desktop
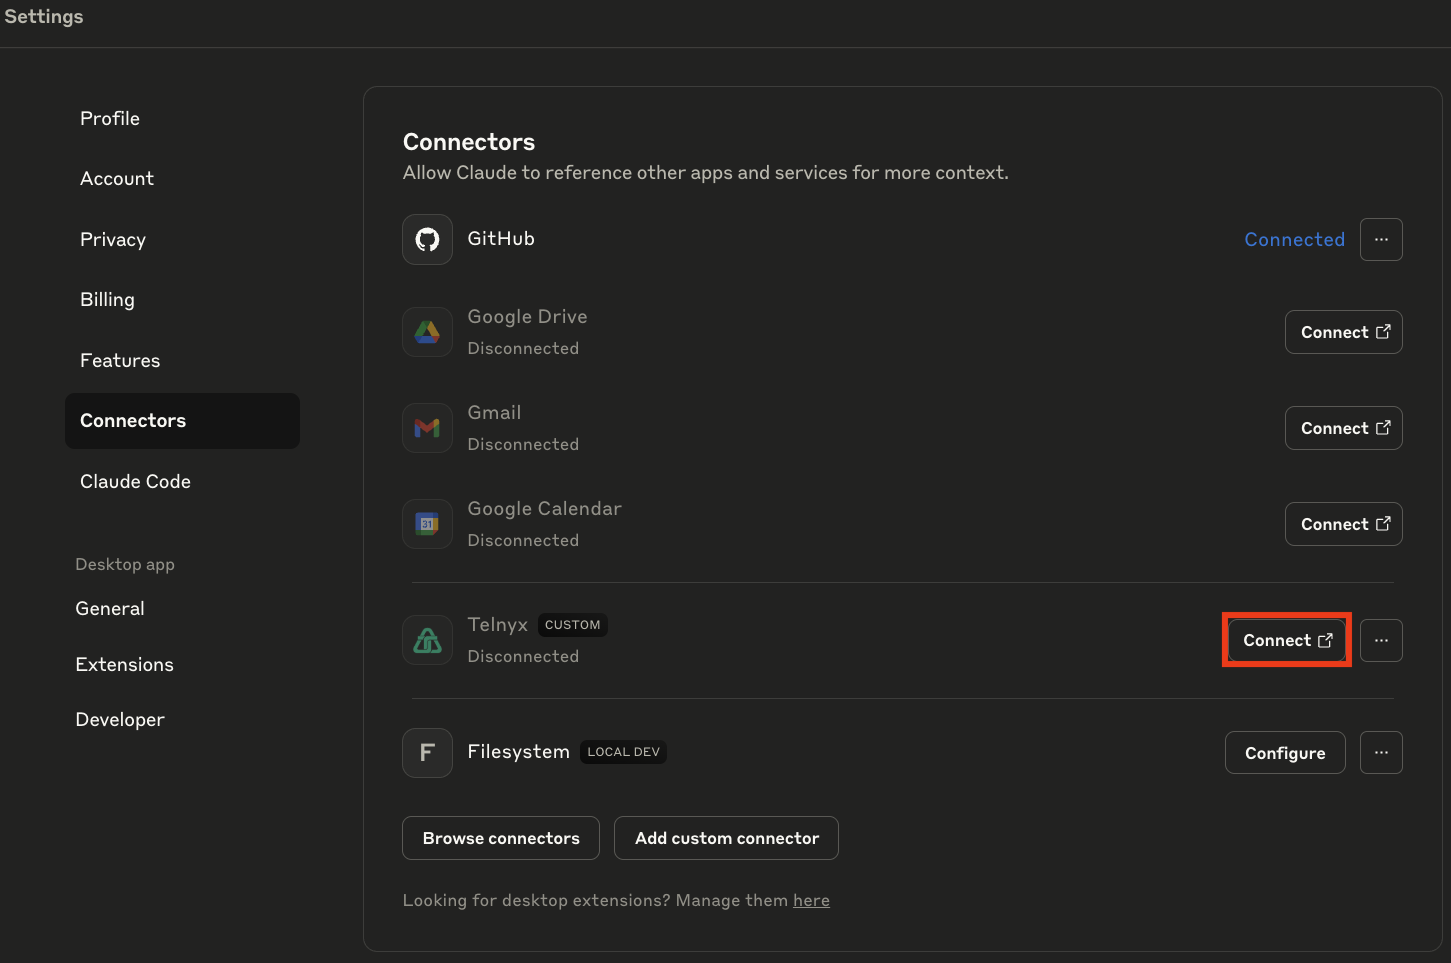
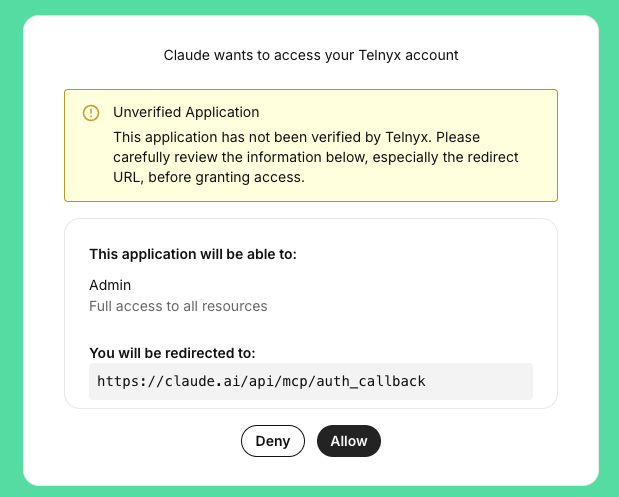
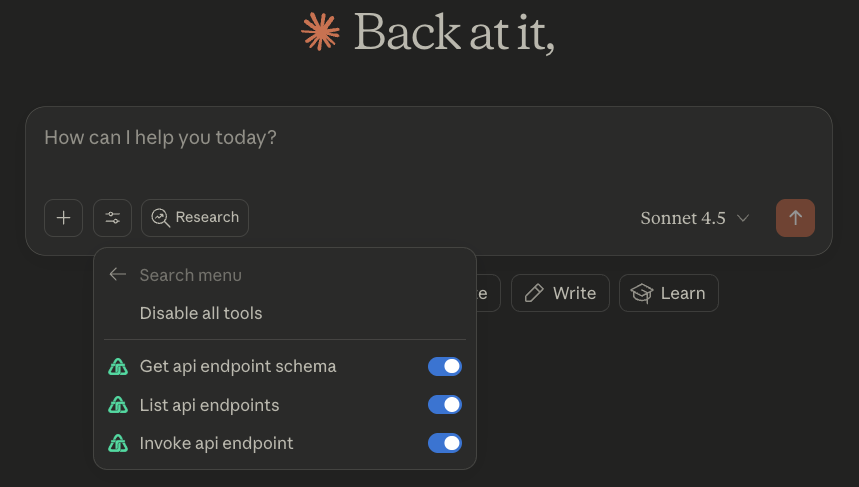
Connect via Portal
Requires a Claude or Claude Desktop plan with access to Custom Connectors. Go to Claude > Settings > Connectors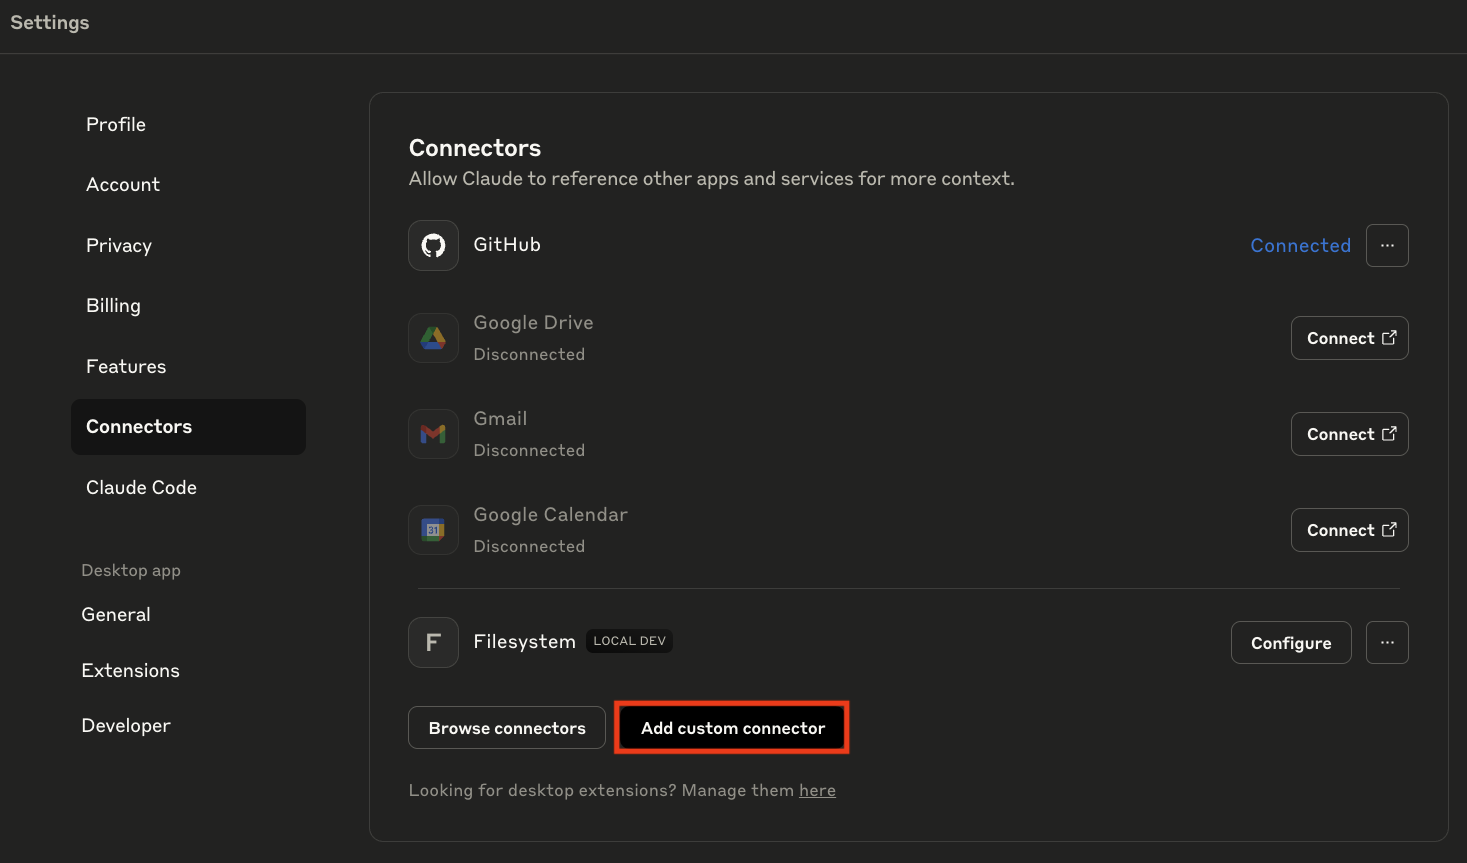
Agent Skills
Source: https://developers.telnyx.com/development/agent-skills.md
Installation Quickstart
Choose your setup method: The Skills CLI works with Codex, Cursor, OpenClaw, Gemini CLI, GitHub Copilot, and more.Agent-specific commands
Examples:
- Open Settings > Rules > Project Rules.
- Create a rule file (e.g.,
.cursor/rules/telnyx.mdc). - Paste the contents of the relevant
SKILL.mdfrom the skills repository.
- Create a
.windsurfrulesfile in your project root. - Paste the contents of the relevant
SKILL.md.
telnyx-python and telnyx-messaging-python with your desired language and product.
You’ll need a Telnyx API key when you’re ready to make API calls.
Available Skills
Skills are organized by product and language. Each product skill is available in curl, JavaScript, Python, Go, Java, and Ruby. Replace* with your language suffix (e.g., telnyx-voice-python, telnyx-messaging-go).
Messaging
Voice & Communications
Numbers
AI
IoT & Networking
Other Products
Account Management
WebRTC Client SDKs
The skills above cover server-side Telnyx APIs. For building calling apps where users make/receive VoIP calls, you need client-side WebRTC SDKs:
Each covers authentication, making/receiving calls, call controls, push notifications, and AI Agent integration.
Building a calling app typically requires two skills: a server-side plugin (e.g.
telnyx-voice-python) for credentials/tokens, and a client-side WebRTC skill for the UI.
Twilio Migration
A comprehensive 6-phase orchestrated workflow for migrating from Twilio to Telnyx.
Includes automated scripts for pre-flight checks, usage scanning, linting, validation, and smoke tests.
Example Prompts
Once installed, try asking your agent:How It Works
- Describe what you want to build in natural language.
- The agent reads Telnyx SDK documentation through the installed skill.
- The agent writes production-ready code with proper auth, error handling, and best practices.
- Review and iterate until complete.
- Complete SDK reference documentation
- Code examples and patterns
- Error handling best practices
- Authentication setup guides
- Webhook configuration examples