

As of December 17th, Twilio will go forward with sunsetting support for their Programmable Fax offering. As such, we have outlined a step-by-step guide to make the transition to Telnyx’s Programmable Fax system as painless as possible. This guide will inform and detail the process from start to finish to get you started using Fax with Telnyx! Transitioning is quite simple, as the general configuration of the app mirrors Twilio’s implementation. In most cases, the only change you will have to make in the code itself is the authentication parameters and the send function.
cURL
Part 1: Account configuration
To get started using Programmable Fax with Telnyx, you will be required to make an account and attain the following items. A guide on how to set this up can be found at our Quickstart You will ultimately need the following configured:- A valid Telnyx Portal Account
- A Telnyx Outbound Voice Profile (If you are intending to send Faxes Outbound)
- A Telnyx Fax Application
- A Telnyx Phone Number that’s enabled with a Telnyx Fax Application
- Your API V2 Key
- Your App ID of the Telnyx Fax Application
- Your Phone Number that you procured from the previous step.
Part 2: Sending faxes
Sending outbound faxes requires:- A To number (Destination)
- A From number (Generally the number you have procured from above)
- A public facing URL which points to the document you are intending to send, in PDF format.
Don’t forget to update
YOUR_API_KEY in the examples.Part 3: Receiving faxes
In order to receive faxes, you will need to setup a webhook mentioned earlier. In order for the webhooks in this tutorial to work, Telnyx must be able to send your web application an HTTP request over the Internet. That means your application needs to have a URL or IP address that Telnyx can reach. Telnyx sends webhooks to the URL or IP address to notify your application of incoming faxes. For the purpose of this tutorial, we’re using ngrok, a popular tunneling tool used to expose a locally running application to the internet. ngrok gives you a public URL for a local port on your development machine, which you can use to configure your Telnyx webhooks as described above. Download and install ngrok, then use it at the command line to create a tunnel to whatever port your web application is running on. For example, this command will create a public URL for a web application listening on port 3000.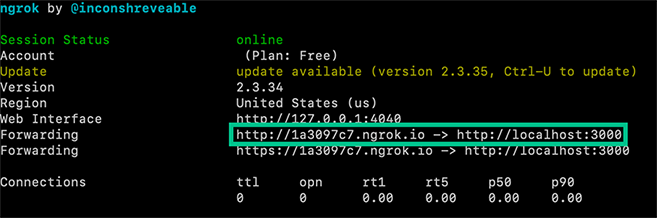
Example Webhooks
If you have set everything up correctly, any time an inbound fax is received you can expect to receive the following webhooks:Fax has begun transmitting to Telnyx
Fax transmission is complete and Telnyx is converting to PDF
PDF has been generated and is ready for download
Themedia_url field contains a signed AWS link to a PDF of the received fax. This URL is valid for 10 minutes before the file is no longer accessible so be sure to download the file if you wish to keep it!
Uh oh, something has gone wrong and the fax failed
Inbound faxes can fail for a variety of reasons. Some of the most common reasons are that the sending party hung up before the fax was finished transmitting or didn’t send anything at all.Python
Part 1: Account configuration
To get started using Programmable Fax with Telnyx, you will be required to make an account and attain the following items. A guide on how to set this up can be found at our Quickstart You will ultimately need the following configured:- A valid Telnyx Portal Account
- A Telnyx Outbound Voice Profile (If you are intending to send Faxes Outbound)
- A Telnyx Fax Application
- A Telnyx Phone Number that’s enabled with a Telnyx Fax Appliction
- Your API V2 Key
- Your App ID of the Telnyx Fax Application
- Your Phone Number that you procured from the previous step.
Part 2: Sending Faxes
Sending outbound faxes requires:- A To number (Destination)
- A From number (Generally the number you have procured from above)
- A public facing URL which points to the document you are intending to send, in PDF format.
Part 3: Receiving faxes
In order to receive faxes, you will need to setup a webhook mentioned earlier. In order for the webhooks in this tutorial to work, Telnyx must be able to send your web application an HTTP request over the Internet. That means your application needs to have a URL or IP address that Telnyx can reach. Telnyx sends webhooks to the URL or IP address to notify your application of incoming faxes. For the purpose of this tutorial, we’re using ngrok, a popular tunneling tool used to expose a locally running application to the internet. ngrok gives you a public URL for a local port on your development machine, which you can use to configure your Telnyx webhooks as described above. Download and install ngrok, then use it at the command line to create a tunnel to whatever port your web application is running on. For example, this command will create a public URL for a web application listening on port 3000.Example Webhooks
If you have set everything up correctly, any time an inbound fax is received you can expect to receive the following webhooks:Fax has begun transmitting to Telnyx
Fax transmission is complete and Telnyx is converting to PDF
PDF has been generated and is ready for download
Themedia_url field contains a signed AWS link to a PDF of the received fax. This URL is valid for 10 minutes before the file is no longer accessible so be sure to download the file if you wish to keep it!
Uh oh, something has gone wrong and the fax failed
Inbound faxes can fail for a variety of reasons. Some of the most common reasons are that the sending party hung up before the fax was finished transmitting or didn’t send anything at all.PHP
Part 1: Account configuration
To get started using Programmable Fax with Telnyx, you will be required to make an account and attain the following items. A guide on how to set this up can be found at our Quickstart You will ultimately need the following configured:- A valid Telnyx Portal Account
- A Telnyx Outbound Voice Profile (If you are intending to send Faxes Outbound)
- A Telnyx Fax Application
- A Telnyx Phone Number that’s enabled with a Telnyx Fax Appliction
- Your API V2 Key
- Your App ID of the Telnyx Fax Application
- Your Phone Number that you procured from the previous step.
Part 2: Sending Faxes
Sending outbound faxes requires:- A To number (Destination)
- A From number (Generally the number you have procured from above)
- A public facing URL which points to the document you are intending to send, in PDF format.
Part 3: Receiving faxes
In order to receive faxes, you will need to setup a webhook mentioned earlier. In order for the webhooks in this tutorial to work, Telnyx must be able to send your web application an HTTP request over the Internet. That means your application needs to have a URL or IP address that Telnyx can reach. Telnyx sends webhooks to the URL or IP address to notify your application of incoming faxes. For the purpose of this tutorial, we’re using ngrok, a popular tunneling tool used to expose a locally running application to the internet. ngrok gives you a public URL for a local port on your development machine, which you can use to configure your Telnyx webhooks as described above. Download and install ngrok, then use it at the command line to create a tunnel to whatever port your web application is running on. For example, this command will create a public URL for a web application listening on port 3000.Example Webhooks
If you have set everything up correctly, any time an inbound fax is received you can expect to receive the following webhooks:Fax has begun transmitting to Telnyx
Fax transmission is complete and Telnyx is converting to PDF
PDF has been generated and is ready for download
Themedia_url field contains a signed AWS link to a PDF of the received fax. This URL is valid for 10 minutes before the file is no longer accessible so be sure to download the file if you wish to keep it!
Uh oh, something has gone wrong and the fax failed
Inbound faxes can fail for a variety of reasons. Some of the most common reasons are that the sending party hung up before the fax was finished transmitting or didn’t send anything at all.Node
Part 1: Account Configuration
To get started using Programmable Fax with Telnyx, you will be required to make an account and attain the following items. A guide on how to set this up can be found at our Quickstart You will ultimately need the following configured:- A valid Telnyx Portal Account
- A Telnyx Outbound Voice Profile (If you are intending to send Faxes Outbound)
- A Telnyx Fax Application
- A Telnyx Phone Number that’s enabled with a Telnyx Fax Appliction
- Your API V2 Key
- Your App ID of the Telnyx Fax Application
- Your Phone Number that you procured from the previous step.
Part 2: Sending Faxes
Sending outbound faxes requires:- A To number (Destination)
- A From number (Generally the number you have procured from above)
- A public facing URL which points to the document you are intending to send, in PDF format.
Part 3: Receiving Faxes
In order to receive faxes, you will need to setup a webhook mentioned earlier. In order for the webhooks in this tutorial to work, Telnyx must be able to send your web application an HTTP request over the Internet. That means your application needs to have a URL or IP address that Telnyx can reach. Telnyx sends webhooks to the URL or IP address to notify your application of incoming faxes. For the purpose of this tutorial, we’re using ngrok, a popular tunneling tool used to expose a locally running application to the internet. ngrok gives you a public URL for a local port on your development machine, which you can use to configure your Telnyx webhooks as described above. Download and install ngrok, then use it at the command line to create a tunnel to whatever port your web application is running on. For example, this command will create a public URL for a web application listening on port 3000.Example Webhooks
If you have set everything up correctly, any time an inbound fax is received you can expect to receive the following webhooks:Fax has begun transmitting to Telnyx
Fax transmission is complete and Telnyx is converting to PDF
PDF has been generated and is ready for download
Themedia_url field contains a signed AWS link to a PDF of the received fax. This URL is valid for 10 minutes before the file is no longer accessible so be sure to download the file if you wish to keep it!
Uh oh, something has gone wrong and the fax failed
Inbound faxes can fail for a variety of reasons. Some of the most common reasons are that the sending party hung up before the fax was finished transmitting or didn’t send anything at all.Java
Part 1: Account Configuration
To get started using Programmable Fax with Telnyx, you will be required to make an account and attain the following items. A guide on how to set this up can be found at our Quickstart You will ultimately need the following configured:- A valid Telnyx Portal Account
- A Telnyx Outbound Voice Profile (If you are intending to send Faxes Outbound)
- A Telnyx Fax Application
- A Telnyx Phone Number that’s enabled with a Telnyx Fax Appliction
- Your API V2 Key
- Your App ID of the Telnyx Fax Application
- Your Phone Number that you procured from the previous step.
Part 2: Sending faxes
Sending outbound faxes requires:- A To number (Destination)
- A From number (Generally the number you have procured from above)
- A public facing URL which points to the document you are intending to send, in PDF format.
Part 3: Receiving faxes
In order to receive faxes, you will need to setup a webhook mentioned earlier. In order for the webhooks in this tutorial to work, Telnyx must be able to send your web application an HTTP request over the Internet. That means your application needs to have a URL or IP address that Telnyx can reach. Telnyx sends webhooks to the URL or IP address to notify your application of incoming faxes. For the purpose of this tutorial, we’re using ngrok, a popular tunneling tool used to expose a locally running application to the internet. ngrok gives you a public URL for a local port on your development machine, which you can use to configure your Telnyx webhooks as described above. Download and install ngrok, then use it at the command line to create a tunnel to whatever port your web application is running on. For example, this command will create a public URL for a web application listening on port 3000.Example Webhooks
If you have set everything up correctly, any time an inbound fax is received you can expect to receive the following webhooks:Fax has begun transmitting to Telnyx
Fax transmission is complete and Telnyx is converting to PDF
PDF has been generated and is ready for download
Themedia_url field contains a signed AWS link to a PDF of the received fax. This URL is valid for 10 minutes before the file is no longer accessible so be sure to download the file if you wish to keep it!
Uh oh, something has gone wrong and the fax failed
Inbound faxes can fail for a variety of reasons. Some of the most common reasons are that the sending party hung up before the fax was finished transmitting or didn’t send anything at all..NET
Part 1: Account configuration
To get started using Programmable Fax with Telnyx, you will be required to make an account and attain the following items. A guide on how to set this up can be found at our Quickstart You will ultimately need the following configured:- A valid Telnyx Portal Account
- A Telnyx Outbound Voice Profile (If you are intending to send Faxes Outbound)
- A Telnyx Fax Application
- A Telnyx Phone Number that’s enabled with a Telnyx Fax Appliction
- Your API V2 Key
- Your App ID of the Telnyx Fax Application
- Your Phone Number that you procured from the previous step.
Part 2: Sending faxes
Sending outbound faxes requires:- A To number (Destination)
- A From number (Generally the number you have procured from above)
- A public facing URL which points to the document you are intending to send, in PDF format.
- Using the dotnet CLI create a new console application and change directories to the newly created folder. Then add the Telnyx.net package.
- Open the ‘Program.cs’ file created for you in the directory. It should look something like the code below:
- Tell the application to use Telnyx.net by adding:
using Telnyx;before thenamespace - In order to use the Asynchronous methods, we need to modify our Main method to return a Task and make it async.
4.1
static void Main(string[] args)should bestatic async Task Main(string[] args) 4.2 Addusing System.Threading.Tasks;before thenamespace`
Part 3: Recieving faxes
In order to receive faxes, you will need to setup a webhook mentioned earlier. In order for the webhooks in this tutorial to work, Telnyx must be able to send your web application an HTTP request over the Internet. That means your application needs to have a URL or IP address that Telnyx can reach. Telnyx sends webhooks to the URL or IP address to notify your application of incoming faxes. For the purpose of this tutorial, we’re using ngrok, a popular tunneling tool used to expose a locally running application to the internet. ngrok gives you a public URL for a local port on your development machine, which you can use to configure your Telnyx webhooks as described above. Download and install ngrok, then use it at the command line to create a tunnel to whatever port your web application is running on. For example, this command will create a public URL for a web application listening on port 3000.Example Webhooks
If you have set everything up correctly, any time an inbound fax is received you can expect to receive the following webhooks:Fax has begun transmitting to Telnyx
Fax transmission is complete and Telnyx is converting to PDF
PDF has been generated and is ready for download
Themedia_url field contains a signed AWS link to a PDF of the received fax. This URL is valid for 10 minutes before the file is no longer accessible so be sure to download the file if you wish to keep it!
Uh oh, something has gone wrong and the fax failed
Inbound faxes can fail for a variety of reasons. Some of the most common reasons are that the sending party hung up before the fax was finished transmitting or didn’t send anything at all.Ruby
Part 1: Account configuration
To get started using Programmable Fax with Telnyx, you will be required to make an account and attain the following items. A guide on how to set this up can be found at our Quickstart You will ultimately need the following configured:- A valid Telnyx Portal Account
- A Telnyx Outbound Voice Profile (If you are intending to send Faxes Outbound)
- A Telnyx Fax Application
- A Telnyx Phone Number that’s enabled with a Telnyx Fax Appliction
- Your API V2 Key
- Your App ID of the Telnyx Fax Application
- Your Phone Number that you procured from the previous step.
Part 2: Sending faxes
Sending outbound faxes requires:- A To number (Destination)
- A From number (Generally the number you have procured from above)
- A public facing URL which points to the document you are intending to send, in PDF format.
Part 3: Receiving faxes
In order to receive faxes, you will need to setup a webhook mentioned earlier. In order for the webhooks in this tutorial to work, Telnyx must be able to send your web application an HTTP request over the Internet. That means your application needs to have a URL or IP address that Telnyx can reach. Telnyx sends webhooks to the URL or IP address to notify your application of incoming faxes. For the purpose of this tutorial, we’re using ngrok, a popular tunneling tool used to expose a locally running application to the internet. ngrok gives you a public URL for a local port on your development machine, which you can use to configure your Telnyx webhooks as described above. Download and install ngrok, then use it at the command line to create a tunnel to whatever port your web application is running on. For example, this command will create a public URL for a web application listening on port 3000.Example Webhooks
If you have set everything up correctly, any time an inbound fax is received you can expect to receive the following webhooks:Fax has begun transmitting to Telnyx
Fax transmission is complete and Telnyx is converting to PDF
PDF has been generated and is ready for download
Themedia_url field contains a signed AWS link to a PDF of the received fax. This URL is valid for 10 minutes before the file is no longer accessible so be sure to download the file if you wish to keep it!