Introduction
SIPREC (Session Initiation Protocol Recording) is a standardized mechanism for recording VoIP calls. A SIPREC server, also known as a Session Recording Server (SRS), captures and stores these communications for compliance, quality assurance, and other purposes. This guide provides instructions for setting up and configuring a SIPREC server using Telnyx’s Voice API connection.Setting Up Your SIPREC Server Environment
Step 1: Create a Voice API Application
- Log to the Telnyx portal.
- Navigate to the Voice -> Programmable Voice -> Voice API section.
- Create a new Voice API Application by clicking the “Add New Application” button.
- Configure the application settings as required for your use case. Ensure that you provide a meaningful name and description for easy identification.
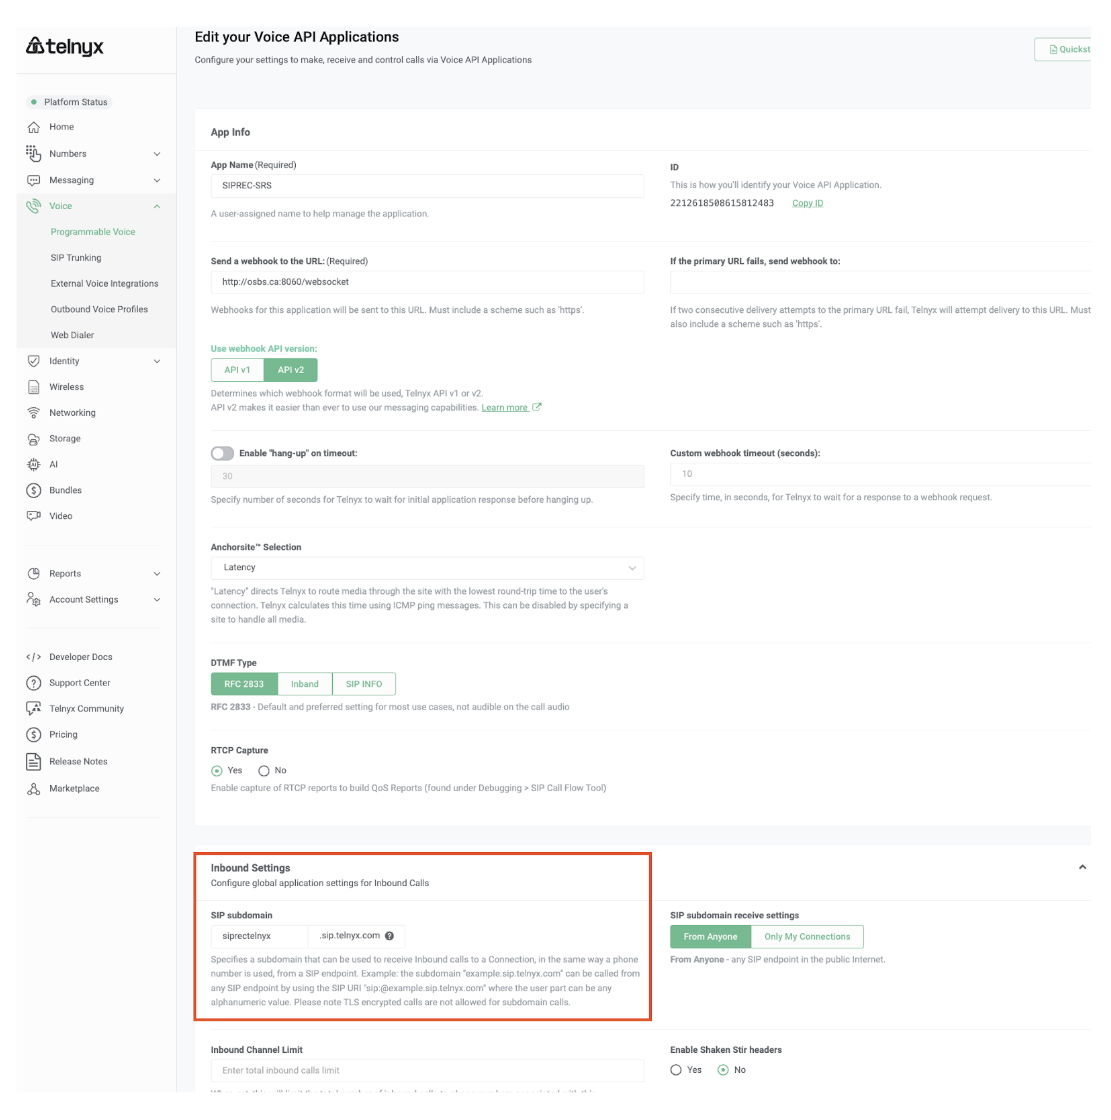
Step 2: Assign an Inbound SIP Subdomain
- Within your new Voice API Application, locate the section for Inbound Settings.
- Assign an inbound SIP subdomain to your application. This subdomain will route incoming SIP traffic to your SIPREC server. Example subdomain format:
yourcompany.sip.telnyx.com - Save the changes to apply the new configuration.
Step 3: Configuring the SIPREC Client (SRC)
With your Voice API Application and SIP subdomain set up, the next step is configuring your SIPREC Client (SRC) to interact with Telnyx SIPREC Server (SRS). Please configure your SIPREC Client to use the following Session Recording Server URI:- username: any SIP username can be used, this information will be dropped
- siprec.telnyx.com: is the Telnyx SIPREC server (SRS) domain
X-DestHost
Step 4: Configure SIPREC Token Authentication
SIPREC authentication tokens provide an additional layer of security for SIPREC calls directed to your subdomain application. By implementing these tokens, access to your subdomain voice application is restricted and controlled. Tokens can be created via API by updating the connection settings. Use the following sample API call to create tokens:- Add the token to the SIPREC INVITE request using the
X-Auth-TokenSIP header. - During the SIPREC call setup, the token provided in the
X-Auth-Tokenheader is verified against either of the two configured tokens.
Step 5: Initiating the SIPREC call
When the siprec session starts, two webhooks, one for each of the SIP calls of the media stream will be sent:Step 5: Recording the call
As the next step, the call can be answered and recording can be started using the following Voice API commands:SIPREC call flow
By following this guide, you should have been able to successfully set up and configure your SIPREC client and server sides. This is a typical SIPREC call flow: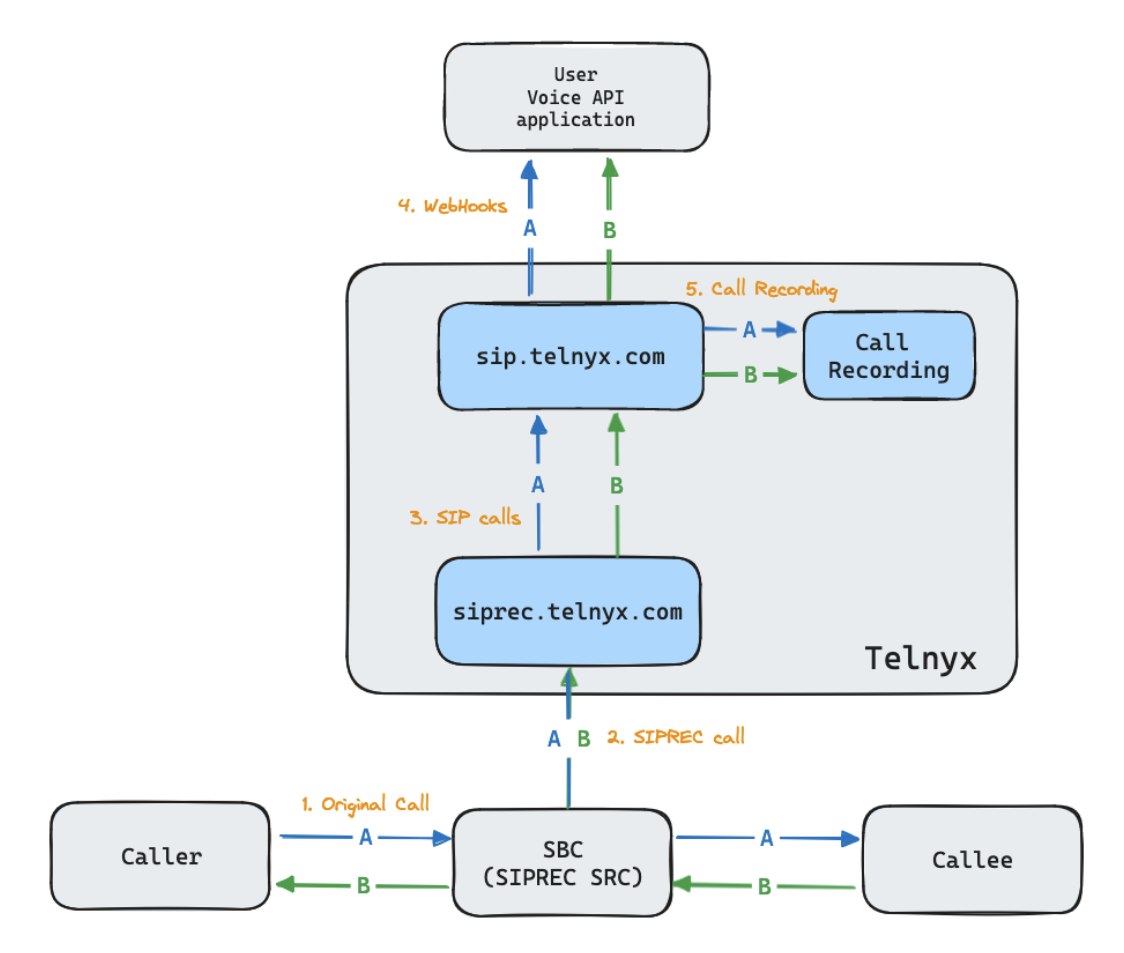
- A call is established on the user’s SBC (which has SIPREC SRC capabilities) with RTP streams A and B
- The SIPREC SRC initiates a SIPREC call towards the Telnyx SIPREC SRS (
siprec.telnyx.com), with two RTP streams (A and B) - The Telnyx SRS initiates two SIP calls towards
sip.telnyx.com, one for each RTP stream, and each one witha:sendonly, indicating that RTP is only sent and not received. - Telnyx sends two
call.initiatedwebhooks to the Voice API application URL, one for each of the SIP calls, including thecall_control_idand the metadata from the original SIPREC call (more on this in the next section). - The
call_control_idis used to issue the Voice API commands to answer and record both calls.
SIPREC metadata
Telnyx will pass the metadata that’s included by the SIPREC client on the original SIPREC INVITE message as custom SIP headers on the SIP calls, and each of these will trigger a webhook that contains all of the SIP custom headers. Webhook variables with SIPREC metadata from the INVITE message received by the SIPREC SRS:- to: the content of the SIP URI
- SIP Custom headers: any SIP custom headers will be included in the webhook
- SIPREC XML default metadata: These variables are extracted from the XML metadata and included in the webhook
- DataMode
- ParticipantID
- NameID-AOR
- Associate-Time
- StreamID
- Label
- SIPREC XML custom metadata: any custom variables will also be extracted from the XML metadata and included in the webhook