Purpose of this document
This configuration guide is designed to help you establish and optimize a SIP Trunk between Telnyx, a global leader in VoIP communications, and LiveKit, a robust platform for building real-time audio and video applications. The primary objective of this document is to provide a comprehensive, step-by-step approach for configuring your SIP Trunk setup. This guide caters to both beginners and experienced professionals, ensuring that all readers can effectively integrate these two powerful services. By the end of this guide, you will be able to: **1. Set Up Telnyx: ** Configure your Telnyx account and SIP Trunk settings to prepare for integration. 2. Configure LiveKit: Adjust your LiveKit settings to accept and manage Telnyx SIP Trunk communications. 3. Add Custom X-Headers: In your app setX-Telnyx-Username: <username> to ensure your calls are properly routed. username has to be same value as your authentication username.
4. Debug and Optimize: Troubleshoot common issues and fine-tune your configuration for optimal performance.
Configuration in Telnyx Mission Control Portal
Follow the steps below to create a SIP connection to your LiveKit account. Your checklist:-
- Have an account created on Telnyx portal
-
- Complete L2 verification process
-
- Purchase a number to be used for the voice calls
1. SIP Connection
- In the Telnyx Mission Control Portal choose a “Real-Time Communications” -> “Voice” -> “SIP Trunking” menu on the left sidebar
- Click “Add SIP Connection” button
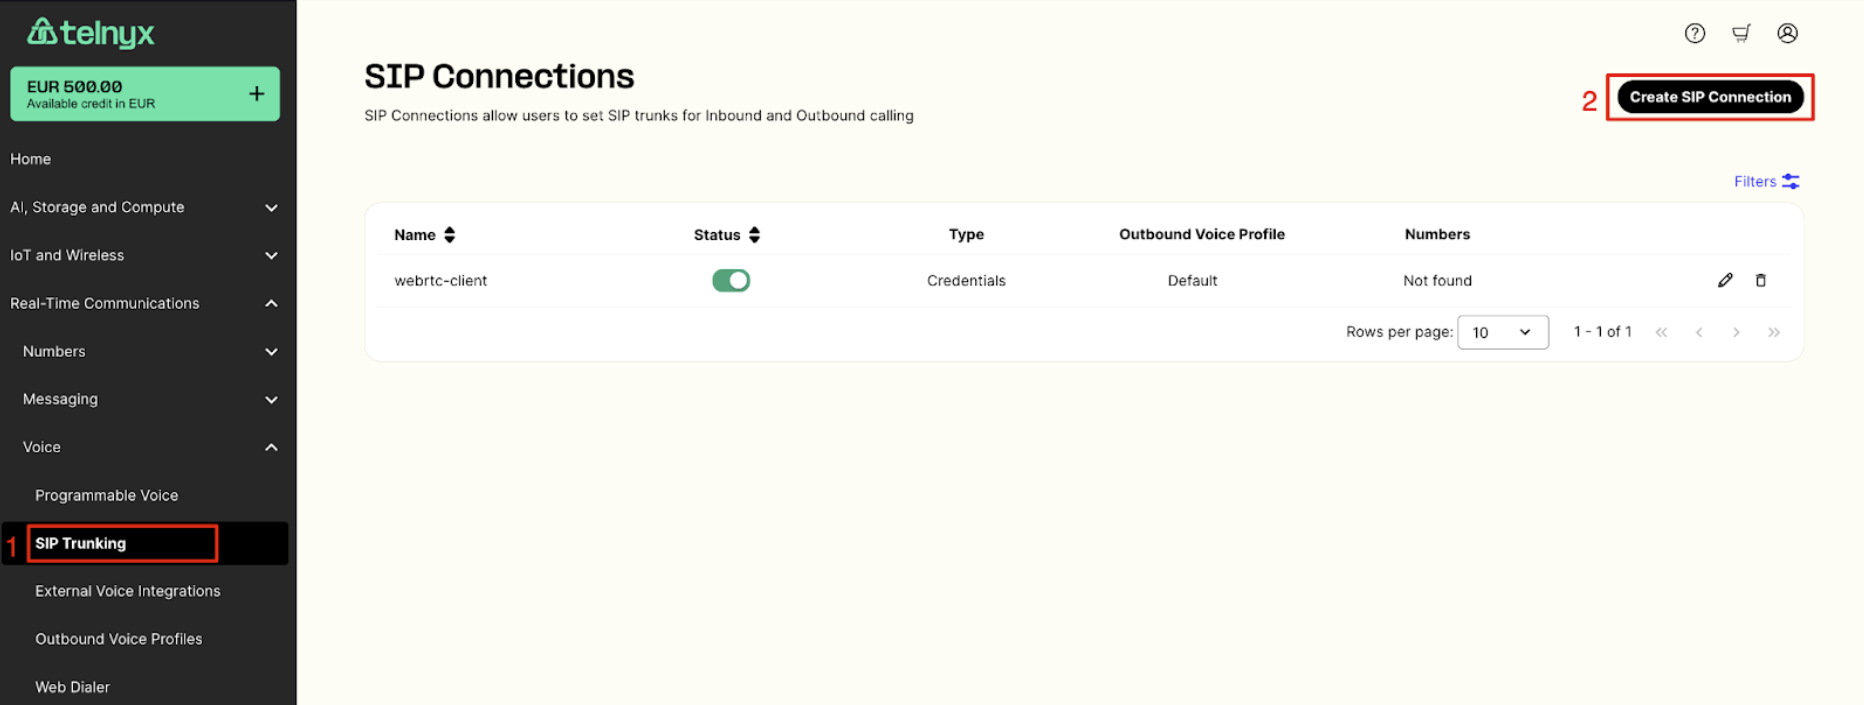
- Provide a name for your new SIP Connection
- Select FQDN as a type of connection
- Create a sip connection
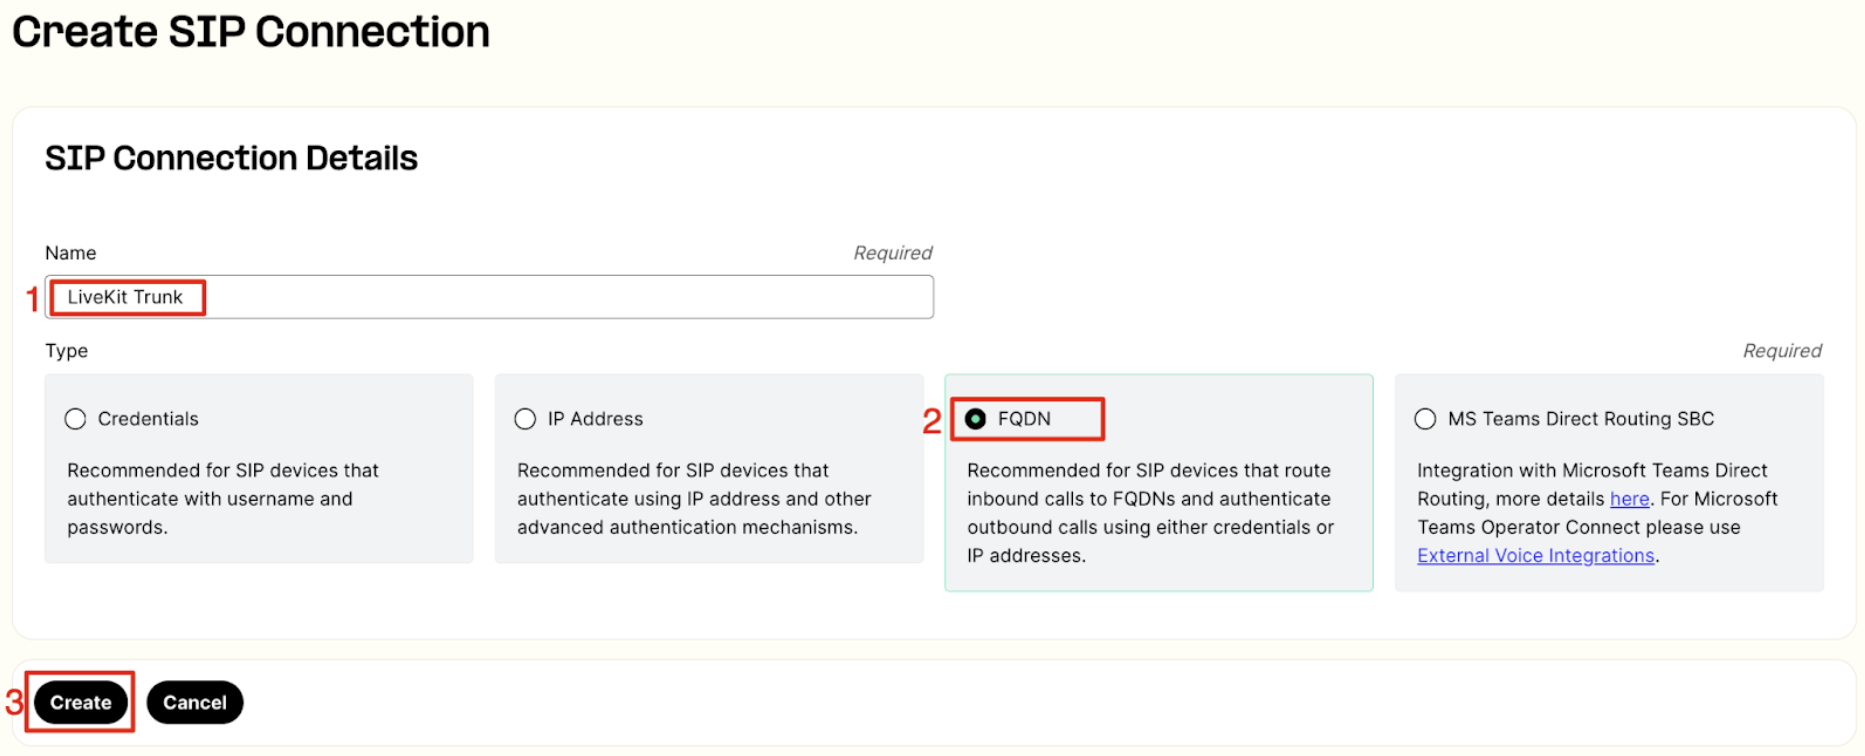
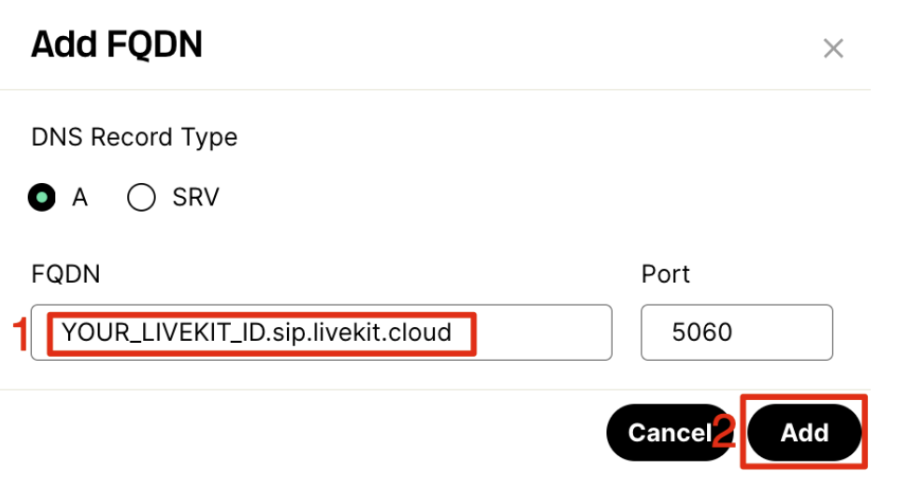
- Choose “FQDN” as a connection type
- Provide SIP URI obtained from your LiveKit account. You can find it in your project settings page.
- Save FQDN settings with “Add” button
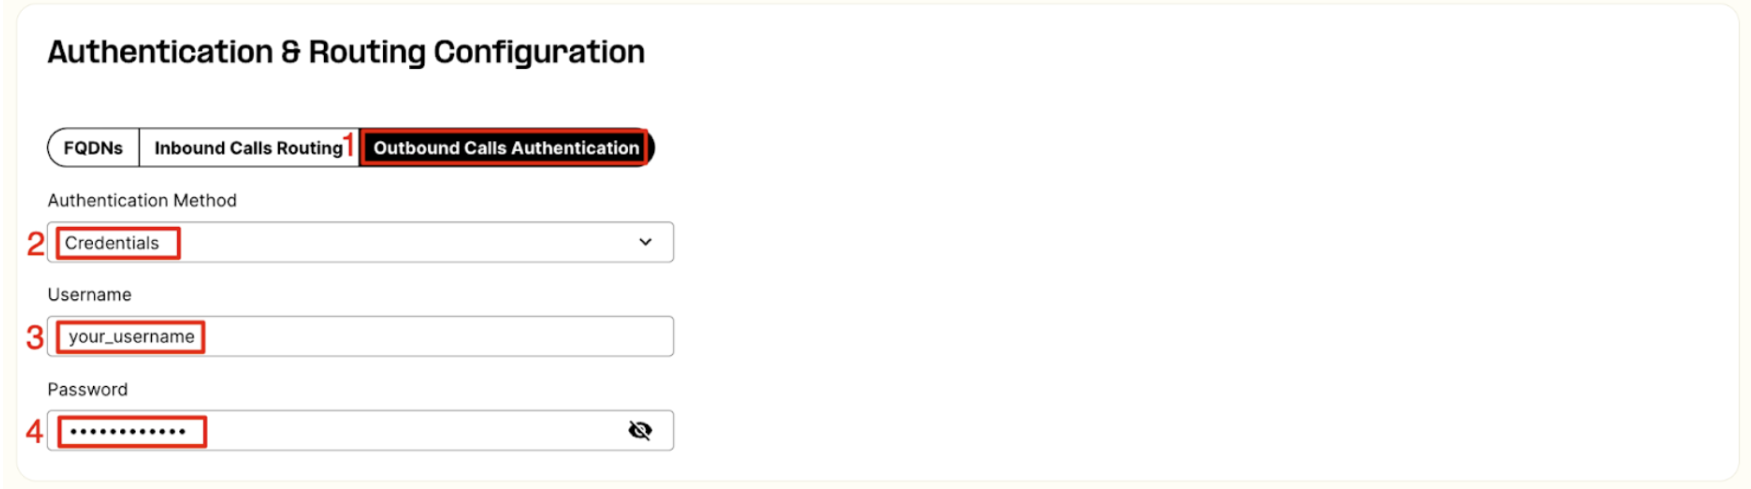
- Switch to the “Outbound Calls Authentication” tab in the Authentication & Routing Configuration section
- Choose “Credentials” for the Authentication Method
- Provide your user name and password which will be used later for the LiveKit outbound trunk configuration
- On top of SIP Connection page switch to the Outbound tab
- Select an existing Outbound Voice Profile from a dropdown list.
- If no profile is available you can create a one with a “Create New Outbound Voice Profile” link
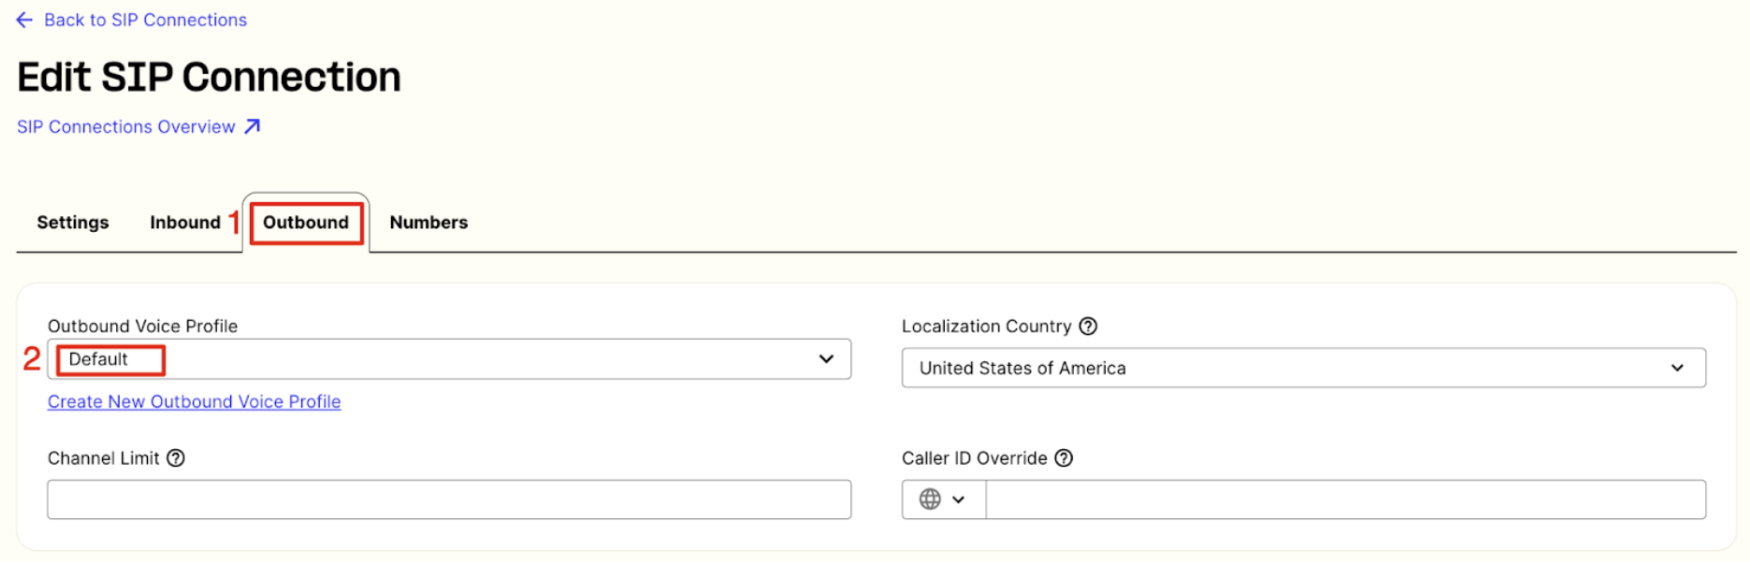
- Finally save your sip connection with a “Save” button at the bottom of the page

2. Programmable Voice Applications
Integration over SIP trunk with LiveKit allows also to redirect voice calls originated from LiveKit to Telnyx Voice AP applicationsI. With that option you can implement advanced voice applications with the features like listed below:- Call recording
- IVR (Interactive Voice Response)
- TTS (Text-To-Speech)
- STT (Speech-To-Text / Call transcription)
- Conversational AI (Voice bots with different AI models)
- and many more
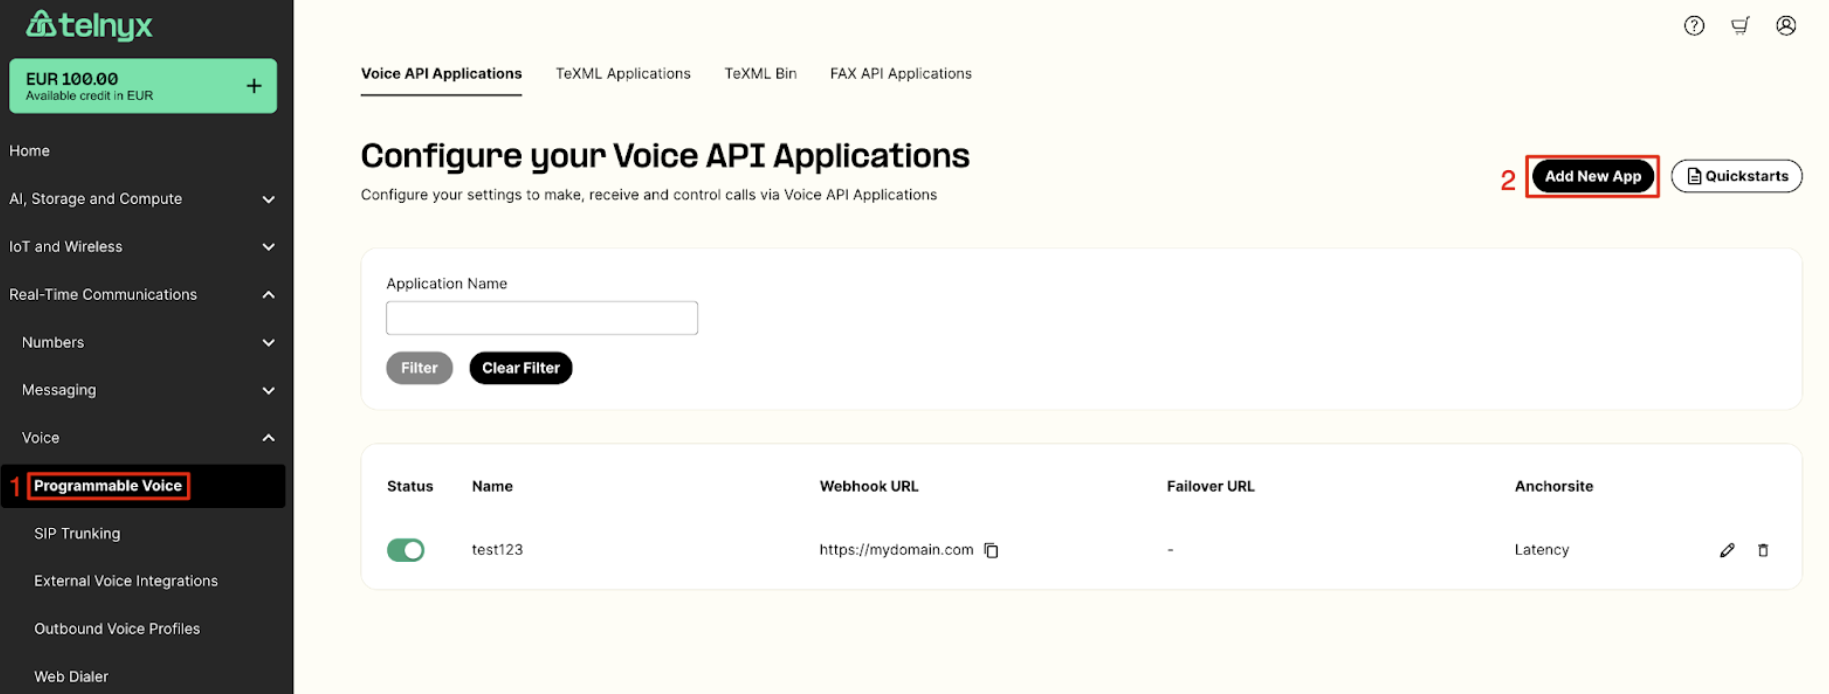
- Switch to a “Real-Time Communications” -> “Voice” -> “Programmable Voice” menu on the left sidebar
- Create a new application with an “Add New App” button
- Provide a name for your application
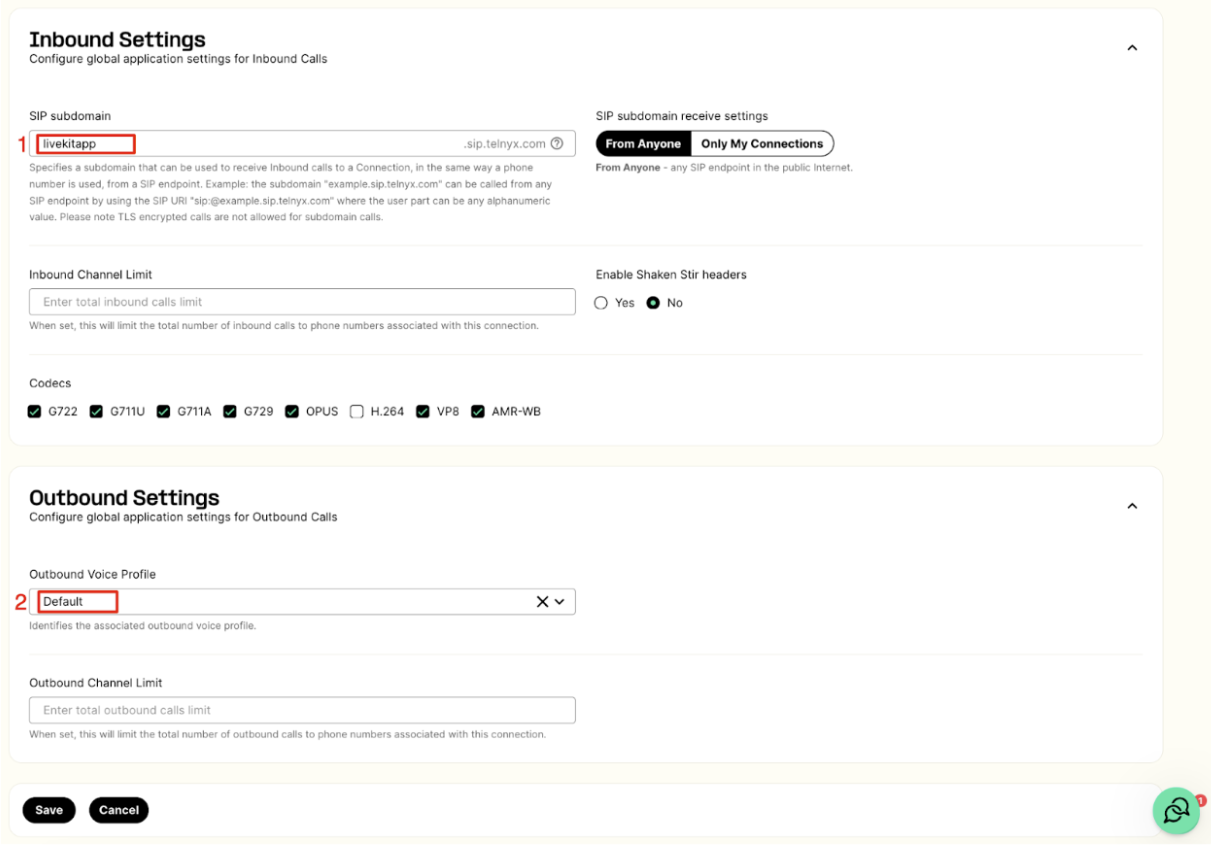
- Configure webhooks URL to receive webhooks about call status changes
- In the Inbound section provide a subdomain name (later you need to use it in a LiveKit outbound trunk setup)
- In the Outbound section select an outbound voice profile
- Save the voice app configuration
3. Outbound Voice Profile
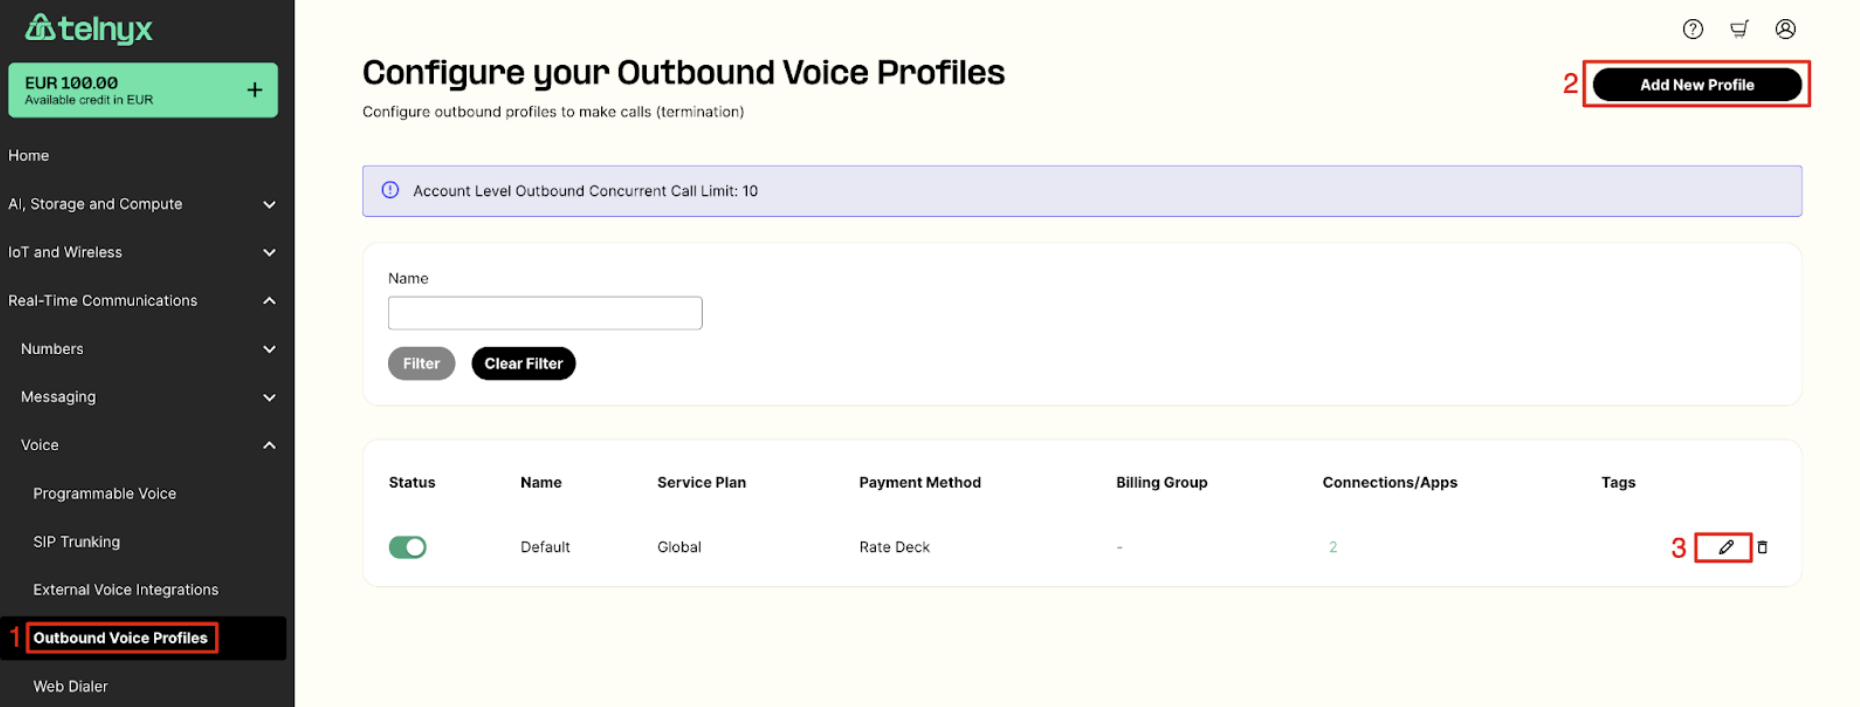
- Switch to a “Real-Time Communications” -> “Voice” -> “Outbound Voice Profile” menu on the left sidebar
- Add a new Profile and provide a name for it
- Or you can adjust the existing profile with clicking on the edit icon
- Select the destinations which should be allowed to make outbound calls to
- Click “Save” button to confirm your configuration

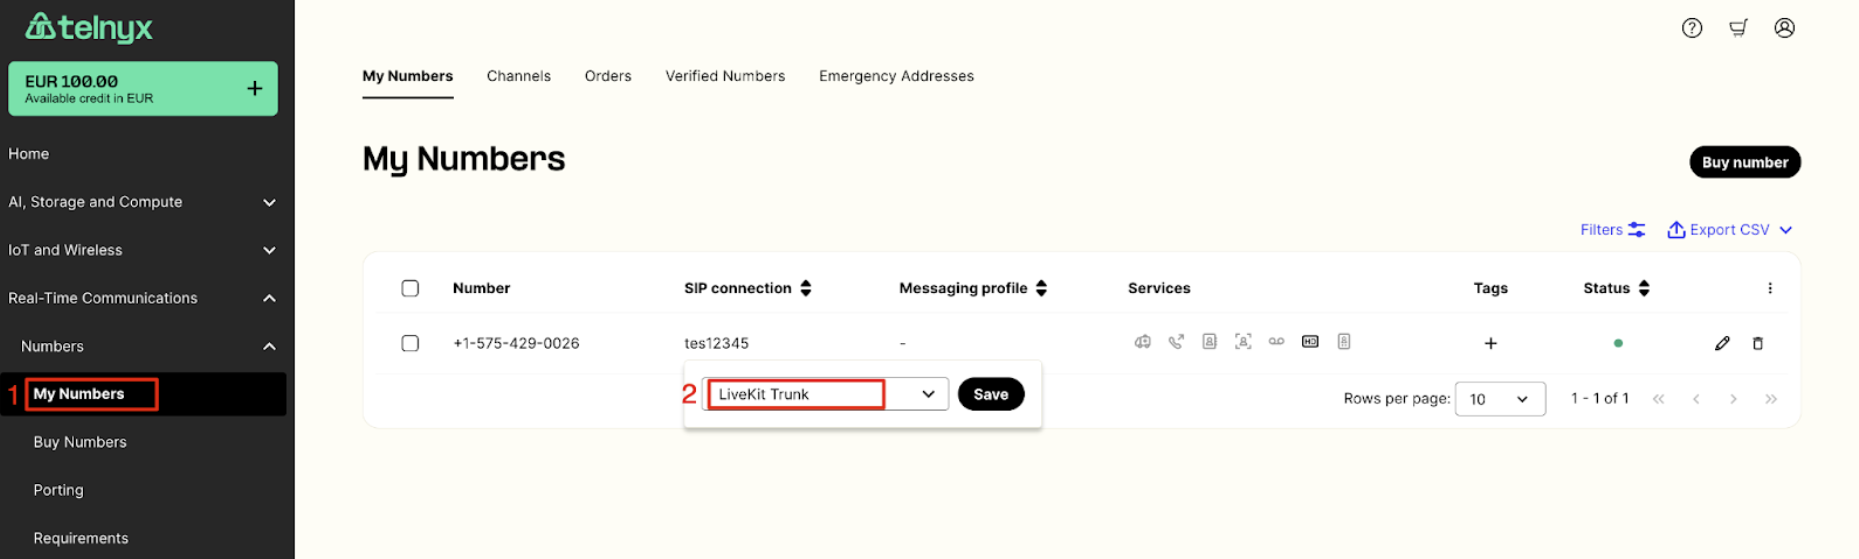
4. Number configuration
- Switch to a “Real-Time Communications” -> “Voice” -> “My Numbers” menu on the left sidebar
- For the number(s) you would like to use for the LiveKit voice participants, select your LiveKit sip connection from a dropdown list presented in the “SIP connections” column
- Update your configuration with a “Save” button
- You can purchase additional numbers in a “Buy Numbers” menu
- The same SIP connection may be assigned to multiple numbers
Configuration in LiveKit
Follow the steps below to configure a SIP trunk for your LiveKit account. Your checklist:-
- SIP URI is available in your project settings
-
- LiveKit CLI is installed on your computer
-
- ENV variables have been configured
1. Create Inbound SIP Trunk
- Create a json file (inboundTrunk.json) with the configuration of your inbound sip trunk
- Provide a name for your trunk and a number to be used (or an array of the comma delimited numbers)
- Run LiveKit CLI command to create an inbound trunk
- In the response you will receive a trunk ID
2. Create Inbound Dispatch Rule
- Create a json file (dispatchRule.json)
- Provide a name for your rule, a trunk ID from the previous step and room name to which incoming calls should be connected
- Run LiveKit CLI command to create a dispatch rule
3. Create Outbound SIP Trunk
- Create a json file (outboundTrunk.json) with the configuration of your outbound sip trunk
- Provide a name for your trunk
- In the address parameter provide “sip.telnyx.com” if you configured a SIP connection on Telnyx side
- If you want to make calls to the configured Voice App, for the address parameter provide a subdomain configured in the Inbound section of your voice application
- Provide username and password you set in your sip trunk configuration for the Outbound Calls Authentication.
- Credentials should be left blank when connecting to the subdomain of your Voice App.
- Run LiveKit CLI command to create an outbound trunk
- In the response you will receive a trunk ID
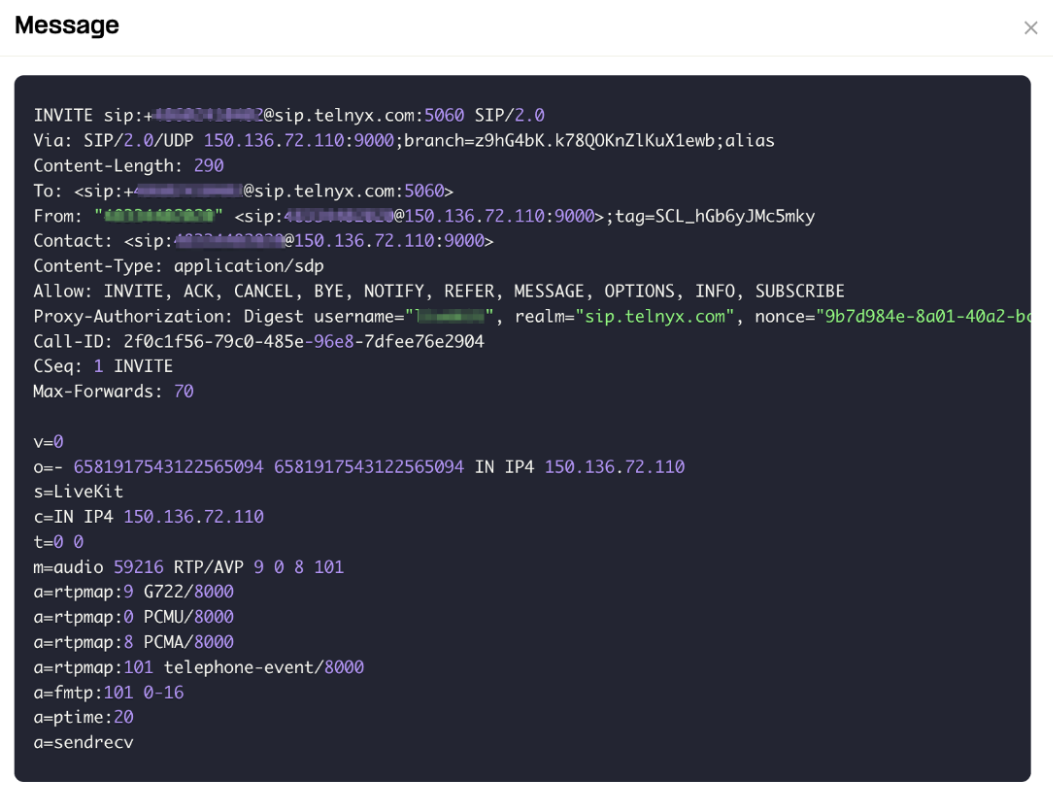
4. Set custom headers when sending SIP INVITEs
To make sure every outbound call is authenticated against your Telnyx SIP trunk and account, you should send your Telnyx SIP username in a custom SIP header on the very firstINVITE.
Why this is importantTelnyx supports two ways to authenticate SIP calls:
- Credential (SIP digest) authentication
- Using a username and password.
- IP-based authentication
- Matching calls by their source IP address.
INVITE without a username. In that case, Telnyx will:
- Try to match the call to any existing SIP IP connection whose IP matches the source IP.
- Only send a
407 Proxy Authentication Requiredchallenge if no matching IP connection is found.
- It won’t send the 407 challenge.
- It will treat the call as authenticated as that other connection, not your FQDN trunk.
- This can lead to calls being billed or routed under the wrong trunk/account.
- LiveKit sends an
INVITEto Telnyx with your username in a custom header. - Telnyx sees the username and responds with
407 Proxy Authentication Required. - LiveKit sends a second
INVITEwith the username + encrypted password. - Telnyx validates the credentials and authenticates the call against your FQDN connection.
Important: The header value must exactly match the username you configured for credential authentication on your Telnyx FQDN connection (for example, the one you set in the Telnyx Portal or via the API).Example configuration (LiveKit trunk JSON)
authUsernameis your unique Telnyx SIP usernameX-Telnyx-Usernameis the custom SIP header Telnyx will read- The
headers_to_attributesmapping tells LiveKit to populateX-Telnyx-Usernamewith the same value asauthUsername
5. Testing Outbound Calls
- To test an outbound call you can initiate a call with a CLI command
- Create a json file (sipParticipant.json) providing outbound trunk ID obtained in the previous step
- Provide a number to be called in a sip_call_to parameter
- Provide a room name, participant identity and name
- Run LiveKit CLI command to make an outbound call
Troubleshooting
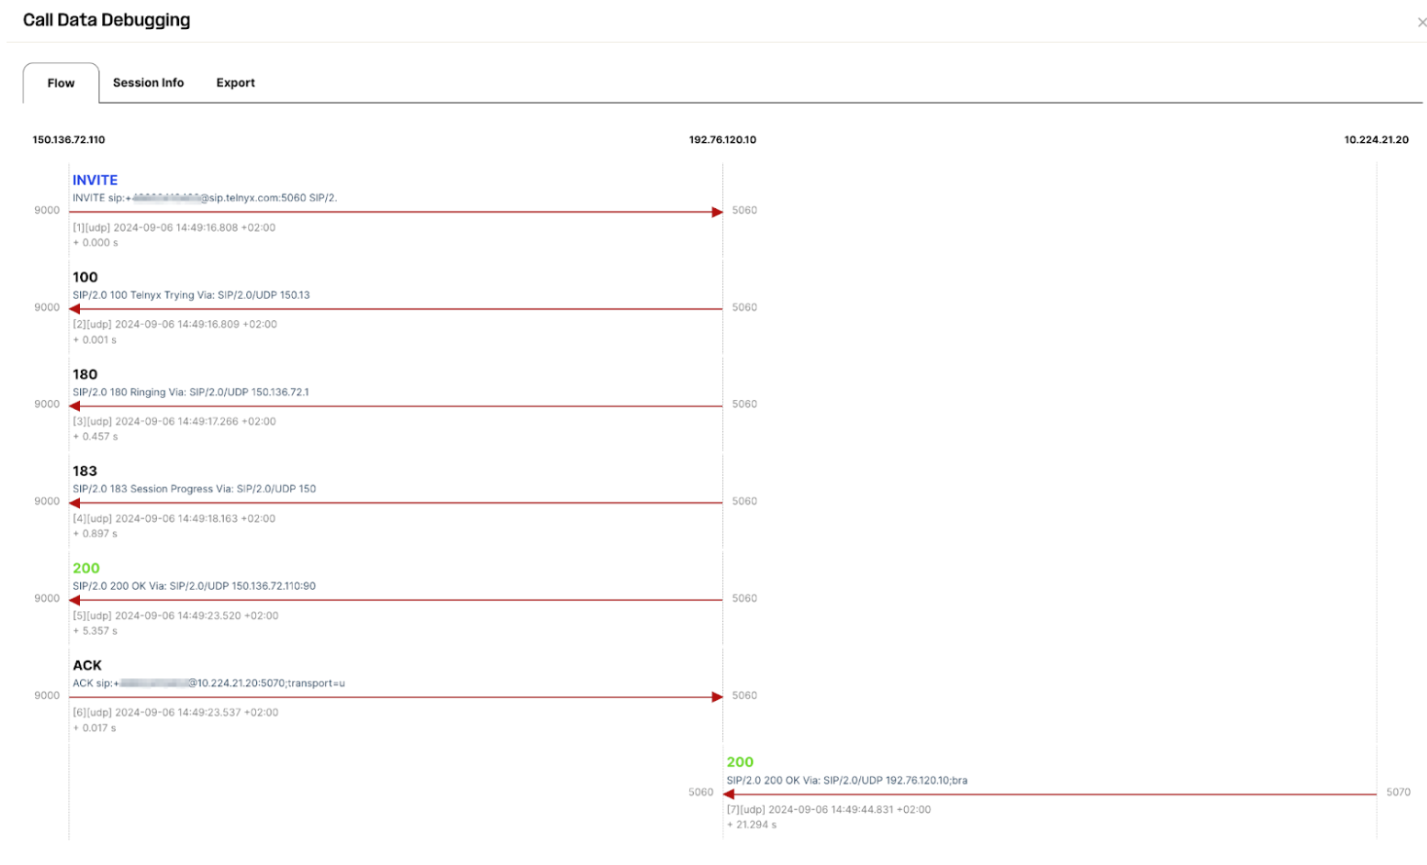
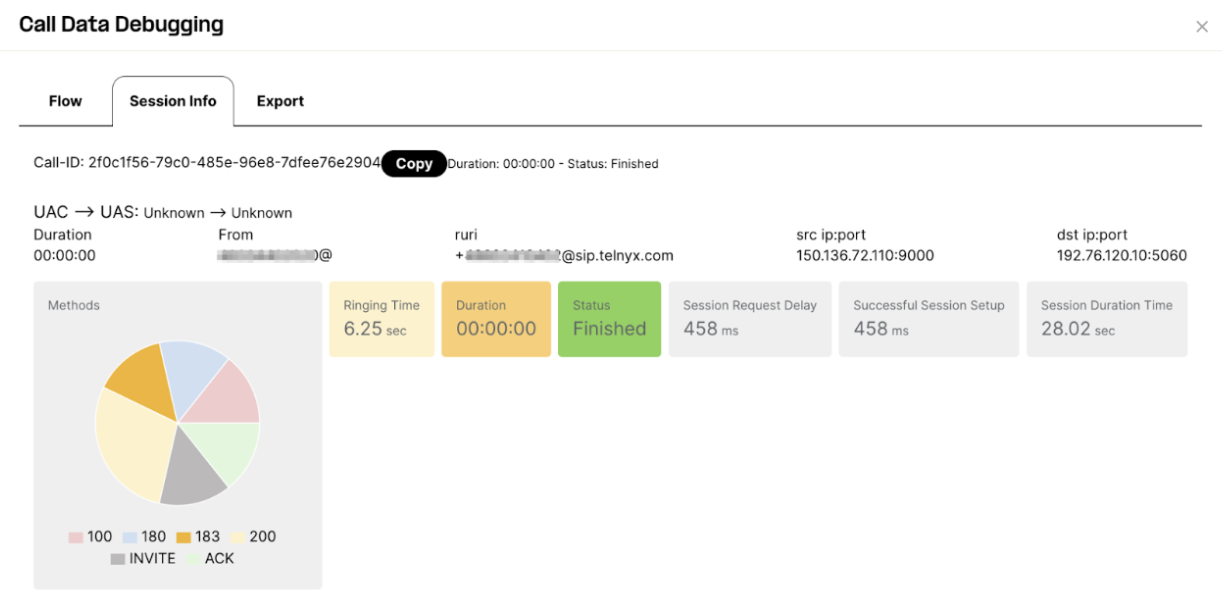
In Telnyx Mission Control Portal we are providing debugging tools where you can troubleshoot any issues with your SIP trunk communication checking SIP call flows, QoS stats and communication to a defined webhooks.1. Debugging tool
- Go to the “Debugging” menu under “Reporting” in the left menu
- Select “SIP Call Flow Tool” on the top bar
- Specify your search criteria and press “Search CDRs” button
- From the list of listed calls select a one with “Call Data Debugging” button

References
-
- Telnyx SIP trunk configuration data - https://sip.telnyx.com
-
- Telnyx SIP trunk setup - https://developers.telnyx.com/docs/voice/sip-trunking/get-started
-
- LiveKit SIP configuration - https://docs.livekit.io/sip/