Receiving SMS and MMS
Inbound texts are delivered via a webhook to your server. The webhook will be an HTTP POST request that includes a payload with information about the inbound SMS or MMS. To receive the message, you’ll need to create a minimal web application that will accept the webhook request.
Python
Prerequisites
Check out the API prerequisites to setup your Python development environment for this guide.
Receive an SMS or MMS with Telnyx
- First, you’ll need to install Flask, a minimal web framework written in Python.
pip install flask
NoteAfter pasting the above content, Kindly check and remove any new line added
- Create a Flask application to accept webhooks. Create a new file called receive.py and copy the code below into the file:
import os
from flask import Flask, request

app = Flask(__name__)

@app.route('/webhooks', methods=['POST'])
def webhooks():
    body = request.json

    print(body)

    return '', 200

if __name__ == "__main__":
    app.run(port=5000)
NoteAfter pasting the above content, Kindly check and remove any new line added
This file does a few things, so we'll step through each line one by one.
import os
from flask import Flask, request
NoteAfter pasting the above content, Kindly check and remove any new line added
Make the code from the Flask library available in the receive.py file.
app = Flask(__name__)
NoteAfter pasting the above content, Kindly check and remove any new line added
Create a new instance of the Flask class, passing in the module attribute __name__ as the name of the Flask application.
@app.route('/webhooks', methods=['POST'])
NoteAfter pasting the above content, Kindly check and remove any new line added
Next, you’ll define a route using a decorator function. We define the path as /webhooks and specify that the path will respond to the HTTP POST method. This route will accept webhooks from Telnyx when your Telnyx number receives an SMS or MMS.
def webhooks():
NoteAfter pasting the above content, Kindly check and remove any new line added
Finally, the print function will print the body of the request so you can see it in your terminal. For the purposes of this demo, you'll print the body of the message to the terminal to see the contents of the message. But in a real application, you'd most likely take some action based on the type of event that was received.
print(body)
NoteAfter pasting the above content, Kindly check and remove any new line added
The last lines in the file check to see if the name of the module is __main__, and if it is, starts the application on the port 5000.
if __name__ == "__main__":
    app.run(port=5000)
NoteAfter pasting the above content, Kindly check and remove any new line added
- Now that you’ve set up your application, make sure it's ready to receive requests. From your terminal, run the below:
python receive.py
NoteAfter pasting the above content, Kindly check and remove any new line added
You should see something like the following:
* Serving Flask app "receive" (lazy loading)
* Environment: production
  WARNING: Do not use the development server in a production environment.
  Use a production WSGI server instead.
* Debug mode: off
* Running on http://127.0.0.1:5000/ (Press CTRL+C to quit)
NoteAfter pasting the above content, Kindly check and remove any new line added
This means our server is listening on port 5000. You're almost ready to receive an SMS or MMS.
- The final step involves making your application accessible from the internet. So far, we've set up a local web server. This is typically not accessible from the public internet, making testing inbound requests to web applications difficult.
The best workaround is a tunneling service. They come with client software that runs on your computer and opens an outgoing permanent connection to a publicly available server in a data center. Then, they assign a public URL (typically on a random or custom subdomain) on that server to your account. The public server acts as a proxy that accepts incoming connections to your URL, forwards (tunnels) them through the already established connection and sends them to the local web server as if they originated from the same machine. The most popular tunneling tool is
ngrok. Check out the ngrok setup walkthrough to set it up on your computer and start receiving webhooks from inbound messages to your newly created application.
- Once you've set up
ngrokor another tunneling service you can add the public proxy URL to your Messaging Profile. To do this, click the edit symbol [✎] next to your Messaging Profile. Under “Inbound”, paste the forwarding address from ngrok into the Webhook URL field. Add/webhooksto the end of the URL to direct the request to the webhook endpoint in your Flask app.
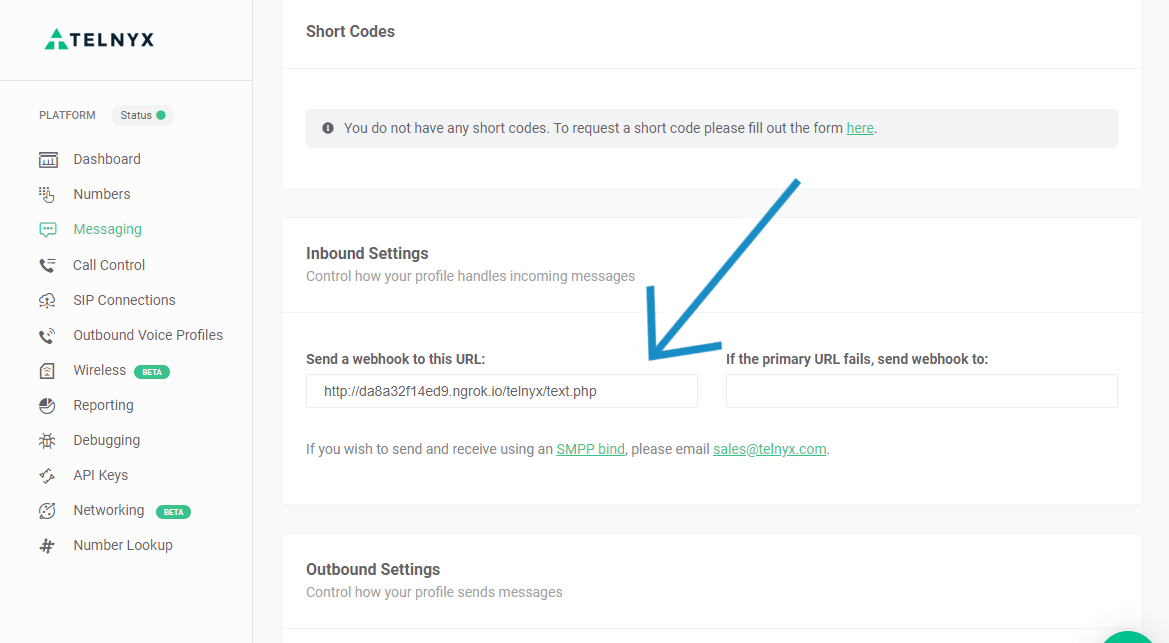
For now you'll leave “Failover URL” blank, but if you'd like to have Telnyx resend the webhook in the case where sending to the Webhook URL fails, you can specify an alternate address in this field.
-
Now that your Messaging Profile is configured, you're ready to receive an SMS or MMS.
Send a message from your phone to your Telnyx number. Soon after you’ll see an event printed in your terminal when the inbound SMS or MMS request is received by your Flask application.
Congrats, you’ve learned how to recieve messages with Telnyx.
Node
Install dependencies
We will use the express framework to setup a webserver that will receive webhooks. Create a new npm project and install express and body-parser. This will allow you to receive incoming HTTP requests
npm init
npm install express body-parser --save
NoteAfter pasting the above content, Kindly check and remove any new line added
Create an express application to accept webhooks
Now create a new file, receive.js, and import the dependencies.
import express from 'express';
import bodyParser from 'body-parser';
NoteAfter pasting the above content, Kindly check and remove any new line added
Next, setup the Node app to parse requests as JSON.
const app = express();
app.use(bodyParser.json());
NoteAfter pasting the above content, Kindly check and remove any new line added
Handling the request
Then create a POST handler, this should be the same endpoint that you have configured Telnyx to send requests to.
app.post('/webhook', (req, res) => {
    console.log(`New message from ${req.body.from}: ${req.body.body}`);
});
NoteAfter pasting the above content, Kindly check and remove any new line added
Start the server.
const port = 8080;
app.listen(port, () => console.log(`App running on port ${port}`));
NoteAfter pasting the above content, Kindly check and remove any new line added
From your terminal run this command to start the server.
node receive.js
NoteAfter pasting the above content, Kindly check and remove any new line added
A sample webhook from Telnyx would look like this:
{
    "sms_id": "8d7b47fc-be08-4820-8ce3-58fd4fe42a76",
    "direction": "inbound",
    "from": "+15555555",
    "to": "+16666666",
    "body": "Hello world"
}
NoteAfter pasting the above content, Kindly check and remove any new line added
The final step involves making your application accessible from the internet. So far, we've set up a local web server. This is typically not accessible from the public internet, making testing inbound requests to web applications difficult.
The best workaround is a tunneling service. They come with client software that runs on your computer and opens an outgoing permanent connection to a publicly available server in a data center. Then, they assign a public URL (typically on a random or custom subdomain) on that server to your account. The public server acts as a proxy that accepts incoming connections to your URL, forwards (tunnels) them through the already established connection and sends them to the local web server as if they originated from the same machine. The most popular tunneling tool is ngrok. Check out the ngrok setup walkthrough to set it up on your computer and start receiving webhooks from inbound messages to your newly created application.
Once you've set up ngrok or another tunneling service you can add the public proxy URL to your Messaging Profile. To do this, click the edit symbol [✎] next to your Messaging Profile. Under “Inbound”, paste the forwarding address from ngrok into the Webhook URL field. Add /webhooks to the end of the URL to direct the request to the webhook endpoint in your Flask app.
For now you'll leave “Failover URL” blank, but if you'd like to have Telnyx resend the webhook in the case where sending to the Webhook URL fails, you can specify an alternate address in this field.
Now that your Messaging Profile is configured, you're ready to receive an SMS or MMS.
Send a message from your phone to your Telnyx number. Soon after you’ll see an event printed in your terminal when the inbound SMS or MMS request is received by your Flask application.
Congrats, you’ve learned how to recieve messages with Telnyx.
Inbound texts are delivered via a webhook to your server. The webhook will be an HTTP POST request that includes a payload with information about the inbound SMS or MMS. To receive the message, you’ll need to create a minimal web application that will accept the webhook request.
Ruby
Install dependencies
First you'll need to install Sinatra, a minimal HTTP server for Ruby.
gem install sinatra
NoteAfter pasting the above content, Kindly check and remove any new line added
Create an express application to accept webhooks
Create a Sinatra application to accept webhooks by pasting the following code into a file called receive.rb:
require 'sinatra'
require 'json'

post '/webhooks' do
    payload = JSON.parse(request.body.read)
    puts payload.inspect
end
NoteAfter pasting the above content, Kindly check and remove any new line added
Let's step through this code one line at a time. At the top we make the Sinatra and JSON libraries available to the application.
require 'sinatra'
require 'json'
NoteAfter pasting the above content, Kindly check and remove any new line added
Next we create the route /webhooks. This tells sinatra what URL path to handle requests on and the post function specifies POST as the request type.
post '/webhooks' do
    # ...
end
NoteAfter pasting the above content, Kindly check and remove any new line added
Once inside the request handler, first parse the JSON body into a structured object.
payload = JSON.parse(request.body.read)
NoteAfter pasting the above content, Kindly check and remove any new line added
Finally, print out a summary of the payload object
puts payload.inspect
NoteAfter pasting the above content, Kindly check and remove any new line added