

Telnyx Other APIs: Fax — Full Documentation
Complete page content for Fax (Other APIs section) of the Telnyx developer docs (https://developers.telnyx.com). Root index: https://developers.telnyx.com/llms.txt · Lightweight index for this subsection: https://developers.telnyx.com/development/llms/other-apis-fax-llms-txt.md
Getting Started
Source: https://developers.telnyx.com/docs/programmable-fax/get-started.md
Introduction
Welcome to Telnyx Programmable Fax, a powerful tool that allows you to send and receive faxes seamlessly through HTTP endpoints. This guide will introduce you to the basics of setting up and using the Programmable Fax API.Prerequisites
Before you begin, you’ll need to:- Set up a Telnyx account. Sign up here if you haven’t already.
- Obtain a phone number and create a Programmable Fax Application following our Quickstart guide.
- Generate a Telnyx V2 API Authentication key via the Telnyx Mission Control Portal.
Core Concepts
- Programmable Fax Application: Configure inbound traffic and authentication for your phone numbers.
- Outbound Voice Profile: Manage outbound traffic, billing, and allowed destinations.
- Webhooks: HTTP callbacks that notify your server about fax events.
Hello World Example
Send Your First Fax Using cURL:- Authenticate Your Request: Include your API key in the header for authentication.
- Specify Fax Details: Provide the media URL, connection ID (use your application id), and the ‘to’ and ‘from’ fax numbers in E.164 format.
- Send the Fax:
- Verify the Response: Check for an HTTP 202 response indicating successful fax initiation
Next Steps
- Explore advanced features like receiving faxes and detailed webhook management.
- Check out our detailed tutorials for comprehensive guidance.
Additional Resources
- Visit our API documentation for in-depth understanding.
- Join our community forums for support and discussion
Feedback
We value your feedback. If you have questions or need help troubleshooting, our support team is ready to assist. Contact us here.Glossary
- Programmable Fax Application: A configuration within the Telnyx platform used to manage inbound and outbound fax traffic. It includes settings for authentication and handling of fax transmissions.
- Outbound Voice Profile: A setting in Telnyx that allows users to initiate outbound traffic, including faxes. It includes configurations for billing, traffic management, and permitted destinations.
- Fax_id: A unique identifier assigned to each fax transmission. It is used to track and manage specific fax communications within the Telnyx system.
- Media_url: The URL pointing to the document you wish to fax, typically in PDF format. This URL is included in the fax command to specify the fax content.
- Connection_id: An identifier for your specific application or connection within Telnyx, used to route the fax correctly and associate it with your account.
- E.164 Format: An internationally-recognized format for phone numbers, used in specifying the ‘to’ and ‘from’ fields in fax commands.
- Failure_reason: A field in the webhook payload that provides the reason for a fax’s failure, helping in troubleshooting and understanding delivery issues.
- Ngrok: A tunneling tool used to expose a local server to the internet, often used for testing webhook endpoints in development environments.
- cURL: A command-line tool used for sending requests to URLs, commonly used for interacting with APIs like Telnyx’s Programmable Fax API.
Quickstart
Source: https://developers.telnyx.com/docs/programmable-fax/quickstart.mdIn this guide, you’ll learn how to get started with Telnyx Programmable Fax within the Telnyx Portal. Just follow these simple steps:
- Sign up for a Telnyx Account.
- Create a Programmable Fax Application to configure how you connect your calls.
- Buy or port a Phone Number.
- Assign your number to the Programmable Fax Application.
- Create an Outbound Voice Profile to configure your outbound call settings and assign it to your Programmable Fax Application.
Step 1: Sign Up for a Telnyx Mission Control Portal account
Head to telnyx.com/sign-up to sign up for your free Telnyx account. It’ll give you access to our Mission Control Portal where you can buy phone numbers, set up and manage Programmable Fax Applications, and more.Step 2: Create a programmable fax application in the Telnyx portal
- Select “Programmable Fax” in the left-hand navigation menu.
- Click “Add New App”.
- For testing purposes, you can set the webhook URL using an endpoint you create at https://hookbin.com .
Step 3: Buy a phone number
You can search for, buy, and provision new numbers, or port existing numbers - all within the Numbers section of the Telnyx Portal . Simply click on “Numbers”, then either “Search & Buy Numbers” or “Port Numbers” and follow the prompts.You can also do this programmatically via our RESTful API. Check out our documentation for number searching and ordering.
Step 4: Assign your phone number to the programmable fax application
Once your number has been purchased or ported, assign it to the Programmable Fax Application that you created in step 2. You can do this via the My Numbers section of the Portal.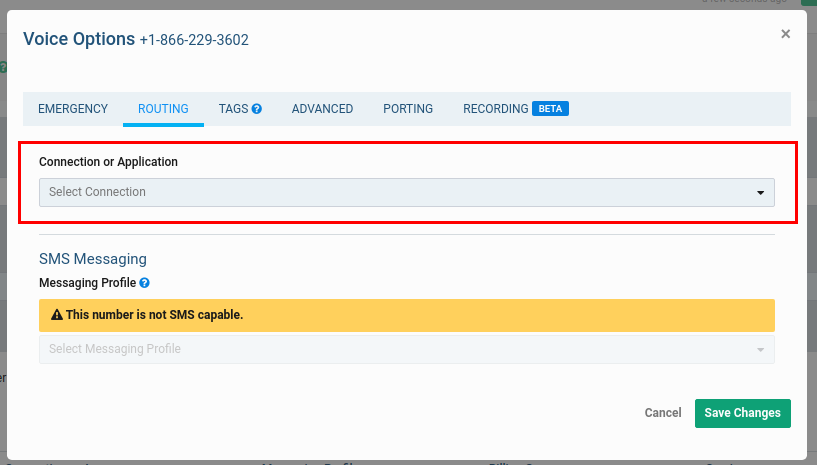
Step 5: Create an outbound voice profile (not required for Inbound)
To initiate an outbound fax, you must create an Outbound Voice Profile and assign your Programmable Fax Application to it. Select “Outbound Voice Profiles” on the left-hand navigation menu, click “+Add New Profile” and set up your profile name. Add the Programmable Fax Application you just created above, the traffic type, the service plan, and your desired billing method.You can also do this programmatically via our RESTful API. Check out our documentation for Outbound Voice Profiles.That’s it. You’re all set to start integrating Telnyx with your applications.
Where to next?
Head over to our tutorials to learn how to send a fax and receive a fax via API. After you setup your development environment you can also dive deeper into sending commands and receiving webhooks.Receiving Webhooks
Source: https://developers.telnyx.com/docs/programmable-fax/receiving-webhooks.mdWhen you send a Programmable Fax command and receive a successful response (i.e. 200 OK), you can expect to receive a webhook. The webhook will be delivered to the primary URL specified on the Application associated with the call. If that URL does not resolve, or your application returns a non 200 OK response, the webhook will be delivered to the failover URL, if one has been specified. In order to minimize webhook delivery time, Telnyx:
- does not enforce the order in which webhooks are delivered
- retries webhook delivery if your application does not respond within a certain time threshold.
- out-of-order webhooks
- simultaneous (or near simultaneous) webhooks
- duplicate webhooks
command_ids within 60 seconds will be ignored.
Example: Receiving a webhook from an outbound fax
When you place an outbound fax, you will receive a number of webhooks indicating the current status of the fax. The first webhook you will receive will have A queued status indicating that Telnyx successfully received the request to send the fax.Example: Receiving a webhook on successful fax delivery
Example: Receiving a webhook on failed fax delivery
Possible failure reasons
Inspect thefailure_reason field in webhook’s payload to debug failed deliveries of your faxes. The possible failure reasons are:
account_disabledconnection_channel_limit_exceededdestination_invaliddestination_not_in_countries_whitelistdestination_not_in_service_plandestination_unreachablefax_initial_communication_timeoutfax_signaling_errorinvalid_ecm_response_from_receiverno_outbound_profileoutbound_profile_channel_limit_exceededoutbound_profile_daily_spend_limit_exceededreceiver_call_droppedreceiver_communication_errorreceiver_declinereceiver_incompatible_destinationreceiver_invalid_number_formatreceiver_no_answerreceiver_no_responsereceiver_recovery_on_timer_expirereceiver_unallocated_numberservice_unavailableunverified_destination_not_allowedunverified_origination_numberuser_busyuser_channel_limit_exceeded
Sending Commands
Source: https://developers.telnyx.com/docs/programmable-fax/sending-commands.mdA Programmable Fax API command is sent with a fax_id. The fax_id allows a user to communicate to Telnyx the fax the user wants to take an action on. The Telnys Programmable Fax API supports PDF files. To initiate sending the fax, we need to send the request to the Telnyx Programmable Fax API endpoint https://api.telnyx.com/v2/faxes.
Authentication
With the request we need to send additional parameters containing authentication information so Telnyx knows which account to send the fax from and information about the destination and file being sent. HEADER DESCRIPTION media_url Authorization: Bearer YOUR_API_KEY connection_id Authorization: Bearer YOUR_API_KEY to Authorization: Bearer YOUR_API_KEY from Authorization: Bearer YOUR_API_KEY Authorization: Bearer The prefix to your API V2 key created in Step 2.Available commands and their expected Webhooks
Telnyx sends webhooks to update on the status of Programmable Fax. Webhooks will also be sent in response to requests to list and delete faxes. COMMAND ASSOCIATED WEBHOOKS Send a fax fax.queued fax.media.processed fax.sending.started fax.delivered fax.failedResponse when sending command
When you send a Programmable Fax API Command, you will immediately receive an http response. Responses include, but are not limited to: HTTP STATUS CODE MESSAGE DESCRIPTION 202 OK The request succeeded. 403 Forbidden The request was valid, however the user is not authorized to perform this action. 404 Not Found The requested resource could not be found. 422 Invalid Parameters The request has invalid parameters.Example: Sending commands
To send a fax, send a POST request to the https://api.telnyx.com/v2/faxes endpoint as shown in the example below.WITH A API V2 KEY
Send a fax via API
Source: https://developers.telnyx.com/docs/programmable-fax/send-a-fax-api.mdThe Telnyx Programmable Fax API lets you send, receive, and manage faxes through a set of easy-to-use HTTP endpoints. In this guide, you’ll learn how to send a fax using the Programmable Fax API in four simple steps.
Step 1: Setting up with Telnyx
Setup a Telnyx account, phone number, and programmable fax application
First, follow our Quickstart guide to create a Telnyx account, phone number, and Fax Application.Step 2: API authentication
If you already have a Telnyx V2 API Authentication key, skip to Step 3.
- In the Telnyx Mission Control Portal , in the left menu bar navigate to ” API Keys ”.
- Ensure, API V2 is selected in the horizontal menu bar.
- Click “Create API key”
- Copy the API key and save it somewhere safe.
Step 3: Send a PDF with the programmable fax API using curl
The Telnyx Programmable Fax API supports PDF files. To initiate sending a fax, we need to send the request to the Telnyx Programmable Fax API endpointhttps://api.telnyx.com/v2/faxes.
We need to send additional parameters containing authentication information with the request, so Telnyx knows which account to send the fax from and information about the destination and file being sent.
Header
Description
media_url
The URL of the PDF used for the fax’s media.
connection_id
The app ID or connection ID to send the fax with.
to
The fax enabled phone number (in E.164 format), or SIP URI, the fax will be sent to.
from
The phone number, in E.164 format, the fax will be sent from.
Authorizaton: Bearer
The prefix to your API V2 key created in Step 2.
Now that we know what we need to include in our request, we can use a number of different methods to structure and send it. In this example, we are going to use curl straight from the command line. You can also use a client such as
Postman
to structure your request.
Step 4: Verify HTTP response and receive webhooks
If you have successfully structured your command and the fax has begun sending, the Programmable Fax API will respond with HTTP 202. If you do not receive a HTTP 202 response, double-check your request and try again. Explanations of other response codes can be found in our API reference. Once the request to send the fax has been successfullly received by Telnyx, you should begin receiving a series of webhooks to the URL that you specified in your Fax Application. The webhooks you should receive are:fax.queuedfax.media.processedfax.sending.startedfax.deliveredfax.failed
fax.delivered webhook, your fax has been delivered to its destinaion.
Webhook examples
On successful delivery
On failed delivery
Possible failure reasons
Inspect thefailure_reason field in webhook’s payload to debug failed deliveries of your faxes. The possible failure reasons are:
account_disabledconnection_channel_limit_exceededdestination_invaliddestination_not_in_countries_whitelistdestination_not_in_service_plandestination_unreachablefax_initial_communication_timeoutfax_signaling_errorinvalid_ecm_response_from_receiverno_outbound_profileoutbound_profile_channel_limit_exceededoutbound_profile_daily_spend_limit_exceededreceiver_call_droppedreceiver_communication_errorreceiver_declinereceiver_incompatible_destinationreceiver_invalid_number_formatreceiver_no_answerreceiver_no_responsereceiver_recovery_on_timer_expirereceiver_unallocated_numberservice_unavailableuser_busyuser_channel_limit_exceeded
Where to next?
Continue to our next tutorial to learn how to receive inbound faxes via API.Receive a fax via API
Source: https://developers.telnyx.com/docs/programmable-fax/receive-a-fax-api.mdThe Telnyx Programmable Fax API lets you send, receive and manage faxes through a set of easy-to-use HTTP endpoints. In this guide, you’ll learn how to handle receiving a fax using the Programmable Fax API.
Step 1: Setup with Telnyx
Setup a Telnyx account, phone number, and programmable fax application
First, follow our Quickstart guide to create a Telnyx account, phone number, and Fax Application. The phone number that you select and associate with the Programmable Fax Application will receive incoming fax calls. You can also port an existing number to Telnyx and use it for Programmable Fax.Step 2: Receiving Webhooks
In order for the webhooks in this tutorial to work, Telnyx must be able to send your web application an HTTP request over the Internet. That means your application needs to have a URL or IP address that Telnyx can reach. Telnyx sends webhooks to the URL or IP address to notify your application of incoming faxes. For the purpose of this tutorial, we’re using ngrok , a popular tunneling tool used to expose a locally running application to the internet. ngrok gives you a public URL for a local port on your development machine, which you can use to configure your Telnyx webhooks as described above. Download and install ngrok, then use it at the command line to create a tunnel to whatever port your web application is running on. For example, this command will create a public URL for a web application listening on port 3000.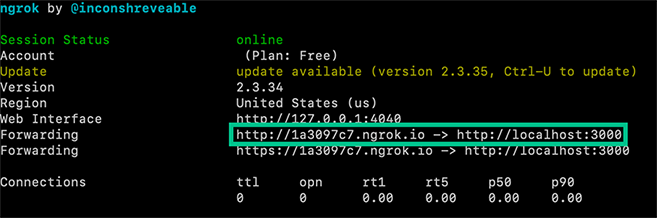
Example Webhooks
If you have set everything up correctly, any time an inbound fax is received you can expect to receive the following webhooks: Webhook Name Description fax.receiving.started The fax has begun transmitting to Telnyx successfully. fax.media.processing.started Telnyx has received the fax and is generating the digital PDF file. fax.received The PDF has been generated and the file is ready to be downloaded. fax.failed Transmission of the fax failed. Check the <code>failure_reason</code> for more details.Fax has begun transmitting to Telnyx
Fax transmission is complete and Telnyx is converting to PDF
PDF has been generated and is ready for download
The media_url field contains a signed AWS link to a PDF of the received fax. This URL is valid for 10 minutes before the file is no longer accessible so be sure to download the file if you wish to keep it!Uh oh, something has gone wrong and the fax failed
Inbound faxes can fail for a variety of reasons. Some of the most common reasons are that the sending party hung up before the fax was finished transmitting or didn’t send anything at all.Where to next?
Go back to our previous tutorial to learn how to send outbound faxes via API.Email to fax
Source: https://developers.telnyx.com/docs/programmable-fax/email-to-fax.md⏱ 60 minutes build time. __🧰 Clone the sample application from our GitHub repo __ In this tutorial, you’ll learn how to use the Telnyx Fax API to receieve faxes to your email in Python. Our Programmable Fax API, combined with our Numbers API, provides everything you need to build a robust call tracking application: The Numbers API enables you to search the Telnyx phone number inventory in real time; filtering by Area Code, City/State, and more to find the perfect local number for your use-case. Call Control enables you to quickly setup dynamic forwarding numbers, toggle dual-channel recording, join/leave dynamic conferences, and pull post-call analytics. By following this tutorial, you’ll be able to:
- Configure a Telnyx portal account.
- Set up a Telnyx Fax profile and an outbound voice profile.
- How to send a fax to your email using Telnyx.
- How to send a fax using your email and to Telnyx Fax profile.
What you’ll need to get started with email to fax
- A Telnyx account- take a minute to sign up to our self-service portal.
- A Telnyx phone number that’s enabled with a Telnyx Fax Appliction and a Telnyx Outbound Voice profile .
- Ability to receive webhooks (with something like ngrok)
- Python and PIP installed
- An AWS Account setup with proper profiles and groups with IAM for S3. Check out the Quickstart for more information.
- Finally you’ll need a Mailgun account . If you’re planning on using this guide to build an email to fax application you’ll need an account with the ability to setup inbound routes .
Create a Telnyx Mission Control Portal account
To get started, you’ll need to create an account . Verify your email address and you can log into the Mission Control Portal to get started.Usage
The following environmental variables need to be set: Variable Description TELNYX_API_KEY Your Telnyx API Key TELNYX_PUBLIC_KEY Telnyx Public Key TELNYX_S3_BUCKET The name of the bucket to upload the media attachments TELNYX_FAX_CONNECTION_ID The connection ID for your Fax Applications MAILGUN_API_KEY Your Mailgun API Key MAILGUN_DOMAIN Your Mailgun Domain. PORT Defaults to 8000 The port the app will be served.env file
This app uses the excellent python-dotenv package to manage environment variables. Make a copy of .env.sample and save as .env and update the variables to match your creds. TELNYX_PUBLIC_KEY=“+kWXUag92mcUMFQopVlff7ctD/m2S/IoXv+AlI1/5a0=” TELNYX_API_KEY=“KEYI” TELNYX_S3_BUCKET=telnyx-mms-demo TELNYX_FAX_CONNECTION_ID=36092346987 MAILGUN_API_KEY=“123-432-123” MAILGUN_DOMAIN=“sandbox367c5ec1512d458e95f5e5c60f5fe97a.mailgun.org” PORT=8000Callback URLs for Telnyx application
Callback Type URL Fax Callbacks{ngrok-url}/faxes
Email Callbacks
{ngrok-url}/email/inbound
Install
Run the following commands to get started: $ git clone https://github.com/team-telnyx/demo-python-telnyx.gitNgrok
This application is served on the port defined in the runtime environment (or in the .env file). Be sure to launch ngrok for that port: ./ngrok http 8000 ngrok by @inconshreveable (Ctrl+C to quit) Session Status online Account Little Bobby Tables (Plan: Free) Version 2.3.35 Region United States (us) Web Interface http://127.0.0.1:4040 Forwarding http://your-url.ngrok.io -> http://localhost:8000 Forwarding https://your-url.ngrok.io -> http://localhost:8000 Connections ttl opn rt1 rt5 p50 p90 0 0 0.00 0.00 0.00 0.00 At this point you can point your application to generated ngrok URL + path: (Example:http://{your-url}.ngrok.io/faxes).
Run
High level code overview
Receiving fax, sending email
- Receive the webhook from Telnyx indicating fax is incoming
- We only only care about the fax.received webhook for inbound faxes
- Extract the to/from and other information about the fax
- Download the attachment and save locally
- Lookup the association between phone_number and email
- Create and send an email via Mailgun with downloaded media as an attachment
Sending fax
- Receive webhook from mailgun for incoming email
- Extract the prefix of the email (19198675309@MAILGUN_DOMAIN.com, we want 19198675309) and prepend the +
- Lookup the association between email and phone_number to determine the from phone number.
- Save the first attachment locally
- Upload the attachment to S3
- Create and send a fax to the phone number extracted above
Update “DB”
The app as provided uses a dumb-hard-coded database to minimize dependencies for the sake of examples. There is an in memory database defined at the top that associates an email to a Telnyx number.- phone_number is a Telnyx phone number
- email is the email to associate with that phone number
Receiving faxes
Sending faxes
Launch the app and update callbacks
Start the server python app.py When you are able to run the server locally, the final step involves making your application accessible from the Internet. So far, we’ve set up a local web server. This is typically not accessible from the public internet, making testing inbound requests to web applications difficult. The best workaround is a tunneling service. They come with client software that runs on your computer and opens an outgoing permanent connection to a publicly available server in a data center. Then, they assign a public URL (typically on a random or custom subdomain) on that server to your account. The public server acts as a proxy that accepts incoming connections to your URL, forwards (tunnels) them through the already established connection and sends them to the local web server as if they originated from the same machine. The most popular tunneling tool is ngrok. Check out the ngrok setup walkthrough to set it up on your computer and start receiving webhooks from inbound faxes to your newly created application. Once you’ve set up ngrok or another tunneling service you can add the public proxy URL to your Inbound Settings in the Mission Control Portal. To do this, click the edit symbol [✎] next to your Fax Profile. In the “Inbound Settings” > “Webhook URL” field, paste the forwarding address from ngrok into the Webhook URL field. Add faxes to the end of the URL to direct the request to the webhook endpoint in your server. For now you’ll leave “Failover URL” blank, but if you’d like to have Telnyx resend the webhook in the case where sending to the Webhook URL fails, you can specify an alternate address in this field. Once everything is setup, you should now be able to:- Fax your phone number and receive an email
- Email
{19198675309}@domain.coman attachment to send a fax to{19198675309}
Fax follow-Ons
Now that you’ve successfully sent a fax to your email and phone number, you can explore more fax features and discover ideas to build new applications. Our developer Slack community is full of Python developers like you - be sure to join to see what your fellow developers are building!API Reference (Fax)
Programmable Fax Applications
- List all Fax Applications: This endpoint returns a list of your Fax Applications inside the ‘data’ attribute of the response. You can adjust which applications are listed by using filter…
- Creates a Fax Application: Creates a new Fax Application based on the parameters sent in the request. The application name and webhook URL are required. Once created, you can assign phon…
- Retrieve a Fax Application: Return the details of an existing Fax Application inside the ‘data’ attribute of the response.
- Update a Fax Application: Updates settings of an existing Fax Application based on the parameters of the request.
- Deletes a Fax Application: Permanently deletes a Fax Application. Deletion may be prevented if the application is in use by phone numbers.
Programmable Fax Commands
- View a list of faxes
- Send a fax: Send a fax. Files have size limits and page count limit validations. If a file is bigger than 50MB or has more than 350 pages it will fail with `file_size_limi…
- View a fax
- Delete a fax
- Cancel a fax: Cancel the outbound fax that is in one of the following states:
queued,media.processed,originatedorsending - Refresh a fax: Refreshes the inbound fax’s media_url when it has expired