

Telnyx Calling: SIP Trunking — Full Documentation
Complete page content for SIP Trunking (Calling section) of the Telnyx developer docs (https://developers.telnyx.com). This file: https://developers.telnyx.com/development/llms/calling-sip-trunking-llms-full-txt.md · Root index: https://developers.telnyx.com/llms.txt
Getting Started
Overview
Source: https://developers.telnyx.com/docs/voice/sip-trunking/get-started.mdTelnyx SIP trunking uses SIP Connections for inbound traffic and authentication, and Outbound Voice Profiles for outbound call routing.
SIP Connections
SIP connections authenticate traffic with Telnyx SIP proxies and configure inbound call handling.
See Authentication Methods for configuration details.
Outbound Voice Profiles
Outbound voice profiles control outbound call routing, destinations, and spending limits.Network configuration
For SIP signaling addresses, media IP ranges, and port requirements, see sip.telnyx.com.Related pages
Authentication
Overview
Source: https://developers.telnyx.com/docs/voice/sip-trunking/authentication/credential-types.mdTelnyx SIP connections support multiple authentication methods based on network topology and security requirements.
Methods
Credential-based authentication
Username and password for SIP registration. POST /v2/credential_connectionsP-Charge-Info authentication
SIP header containing a phone number associated with the connection.FQDN authentication
Hostname-based inbound routing combined with credentials or IP authentication for outbound.Comparison
IP Authentication Token
Source: https://developers.telnyx.com/docs/voice/sip-trunking/authentication/ip-authentication-token.mdThe
X-Telnyx-Token header distinguishes multiple SIP connections sharing the same IP address.
Token requirements
SIP header format
Configuration
PATCH /v2/ip_connections/{id}Authentication behavior
Both the source IP and
X-Telnyx-Token value must match the connection configuration.
Tech Prefix
Source: https://developers.telnyx.com/docs/voice/sip-trunking/authentication/tech-prefix.mdA 4-digit identifier prepended to outbound calls to differentiate multiple SIP connections sharing the same IP address.
Dial string format
1234 + destination +18005678912 = 123418005678912
Use cases
- Multiple SIP connections from the same IP address
- Granular call routing and billing per connection
- Traffic stream separation
Configuration
PATCH /v2/ip_connections/{id}Phone system setup
The PBX or SIP client must prepend the tech prefix to all outbound calls on the trunk.Authentication behavior
Alternative authentication methods
For connections sharing an IP address:Configuration
Caller ID Policy
Source: https://developers.telnyx.com/docs/voice/sip-trunking/configuration/caller-id-policy.mdTelnyx enforces strict caller ID validation to prevent spoofing and ensure compliance with telecommunications regulations. Invalid caller ID numbers are rejected with a
403 Caller Origination Number is Invalid D35 SIP response.
Number format requirements
The accepted caller ID format depends on the connection’s localization setting and call destination.USA localization
Accepted formats:International localization
For non-USA localization (e.g., Ireland):Cross-border calls
When calling outside the localization country, only E.164 format is accepted:+13129457420.
Caller ID override
Connections with Caller ID Override enabled can send any format for outbound calls, bypassing standard validation rules.SIP header priority
Telnyx checks the following SIP headers in order to determine the caller ID:P-Preferred-Identity(User part)P-Asserted-Identity(User part)Remote-Party-Id(User part)FROM(User part)
Caller ID anonymization
To anonymize the caller ID, include thePrivacy: id header in the SIP request:
- A valid origination number must still be provided
- Invalid numbers with this header trigger the D35 error
- Toll-free and emergency number calls cannot be anonymized
- Emergency services (911, etc.)
- Toll-free numbers
International spoofing restrictions
Outbound calls to international destinations with spoofed caller IDs are rejected with a503 error response. This allows implementing fallback routing logic on the client side.
Validation behavior
If no localization is configured and a number appears invalid, Telnyx defaults to USA validation rules. Failed validation returns a404 Invalid Destination response.
Configuration
Set the connection localization in the Mission Control Portal under Connection Outbound Settings, or via the API:Troubleshooting
Concurrent Call Limits
Source: https://developers.telnyx.com/docs/voice/sip-trunking/configuration/concurrent-limits.mdConcurrent call limits control the maximum number of simultaneous outbound calls allowed on an account. This limit applies globally across all outbound voice profiles.
Default limits
New accounts start with a default concurrent call limit that increases based on account verification:Error handling
When the application attempts to establish a call that exceeds the configured limit, Telnyx returns a SIP 403 error:Implementing retry logic
Implement exponential backoff when handling limit errors:Monitoring
Track concurrent call usage to prevent limit errors:Via API
Use GET /v2/calls and filter forstatus: active to get the current concurrent call count.
Webhook monitoring
Track call lifecycle events using Voice API webhooks:call.initiated- Increment countercall.hangup- Decrement counter
Best practices
- Set alerts - Configure monitoring to alert when usage reaches 80% of the limit
- Implement queueing - Queue calls when approaching limits rather than failing immediately
- Monitor trends - Track peak usage patterns to anticipate when limit increases are needed
- Test error handling - Verify the application handles 403 limit errors gracefully
Requesting limit increases
For concurrent call limits exceeding 10 channels, contact support@telnyx.com. Include the following information in the request:- Current concurrent call requirement
- Expected growth trajectory
- Use case description (required for limits exceeding 100 channels)
P-Charge-Info
Source: https://developers.telnyx.com/docs/voice/sip-trunking/configuration/p-charge-info-header.mdA SIP header that identifies the billing number (DID) for outbound calls, enabling accurate call attribution and routing through Telnyx SIP trunks.
Header format
- A valid DID associated with the Telnyx SIP connection
- In E.164 format (e.g.,
+15551234567) - Wrapped in SIP URI format
Use cases
- Multiple DIDs on a single SIP connection
- Call detail record (CDR) attribution per DID
- Billing and usage tracking per number
- Carrier-side call routing based on originating number
Requirements
- Telnyx SIP connection configured for outbound calling
- Valid DID ownership and assignment to the connection
- PBX access to modify dialplan or trunk configuration
Troubleshooting
Alternative identification methods
For connections sharing authentication credentials:Outbound Voice Profiles for SIP trunking
Source: https://developers.telnyx.com/docs/voice/sip-trunking/configuration/outbound-voice-profiles.mdOutbound voice profiles control routing, billing, and rate limits for outbound SIP calls. Each profile generates a unique Profile ID used in API calls and CDR reports.
Profile components
Destinations
Telnyx supports 255 destinations across 10 regions. Enable destinations by region or individual country. Many destinations require Level 2 verification before activation.Channel limits
Channels represent concurrent call capacity. Each active call consumes one channel. Set channel limits per profile to control concurrency and prevent service degradation.Billing configuration
Rate deck
Calls are rated based on destination number prefix. Download current rate decks or request custom rates through an account representative.Max destination rate
Set a maximum per-minute rate threshold. Calls to destinations exceeding this rate are rejected automatically.Daily spend limit
Define maximum spend per day per connection. Limits reset at 00:00:00 UTC. Prevents unexpected overages from misconfigured systems or traffic anomalies.Call recording
Enable recording for all outbound calls or specific ANI numbers.Routing
Round Robin Routing
Source: https://developers.telnyx.com/docs/voice/sip-trunking/routing/round-robin-routing.mdRound robin routing distributes inbound calls sequentially across all configured IP addresses in a SIP connection. Each IP receives equal call volume regardless of active call load.
How it works
Calls route to IPs in sequential order:Failover behavior
If the target IP fails, the system attempts remaining IPs in sequence. All IPs function as backups for each other. Example: If IP 2 is selected first and fails, the system tries IP 3, then IP 1.Configuration
PATCH /v2/ip_connections/{id}Limitations
- Only counts inbound call distribution, not active call load
- An IP handling 100 active calls receives the same incoming call rate as an IP handling 10 active calls
Use cases
- Distributing load across multiple PBX instances
- High-availability setups without dedicated failover systems
- Deployments where simple call distribution is sufficient
AnchorSite
Source: https://developers.telnyx.com/docs/voice/sip-trunking/routing/anchorsite-configuration.mdAnchorSite determines which Telnyx Point of Presence (PoP) handles media routing for SIP calls.
Configuration modes
Latency mode
Automatically selects the optimal PoP based on ICMP ping latency measurements to the SIP endpoint. Requirements:- IP/FQDN authentication: Whitelist Telnyx media IP addresses for ICMP.
- Credential authentication: Include username in
Contactheader orX-Telnyx-Usernameheader:
- TeXML: PoP selected based on latency to webhook URL IP.
Manual mode
Explicitly select a PoP for predictable routing behavior. Available PoPs:Configuration
You can configure AnchorSite in the Telnyx Portal by editing an IP Connection: PATCH /v2/ip_connections/{id}:Failover
If the selected PoP is unavailable (maintenance, outage, health check failure), calls automatically reroute through the next available PoP.Failover & Retries
Source: https://developers.telnyx.com/docs/voice/sip-trunking/routing/failover-and-retries.mdTelnyx SIP connections automatically retry failed call attempts through different routes and IP addresses.
Signaling IP addresses
Telnyx uses two geographically redundant signaling IPs per region:Failover behavior
Single route
- SIP INVITE sent from IP1
- On failure, retry from IP2
Multiple routes
- Attempt all routes via IP1 in configured order
- On failure, retry all routes via IP2
Credential authentication
Calls route through the registered KSS instance with three levels of internal failover.Call forward on failure
When enabled, calls that fail on all SIP routes forward to PSTN (up to 10 termination carriers).Response codes
Triggers failover:
Does NOT trigger failover (call considered connected):
DNS configuration
SRV records (recommended):sip.telnyx.com (US), sip-eu.telnyx.com (EU)
SRV records automatically resolve to both IP1 and IP2.
A records (alternative):
Configure separate A records for each signaling IP and add both as routes.
Configuration
PATCH /v2/ip_connections/{id}:Network Configuration
IP Whitelisting
Source: https://developers.telnyx.com/docs/voice/sip-trunking/network-configuration/ip-whitelisting.mdFirewall and ACL configuration for Telnyx SIP signaling, media transport, webhook delivery, and AI services.
SIP signaling and media
For current SIP signaling addresses, media IP ranges, supported codecs, and regional FQDNs, see sip.telnyx.com.Port requirements
Webhook IP addresses
Whitelist these CIDR blocks to receive webhook notifications.North America
Europe
Asia-Pacific
These ranges also apply to WebSocket stream connections.
AI Services IP addresses
Whitelist these CIDR blocks if you use Telnyx AI-powered voice services (AI Assistants, TeXML, Conversation Relay, or Call Control API). These are the source IPs from which Telnyx AI services emit webhook tool calls and HTTP callbacks. SIP signaling for AI workloads uses the same edge IPs as the rest of the platform (see sip.telnyx.com).SRV Records
Source: https://developers.telnyx.com/docs/voice/sip-trunking/network-configuration/srv-records.mdDNS SRV (Service) records enable automatic failover and load distribution for SIP connections by resolving to multiple Telnyx signaling IPs with priority and weight parameters.
SRV record format
Telnyx SRV records follow RFC 2782 DNS SRV specification:Parameters
Regional FQDNs
Configure SRV records to point to the Telnyx region closest to the user’s infrastructure:
For the most current IP addresses and additional regions, see sip.telnyx.com.
Configuration examples
Basic configuration
Single SRV record pointing to US region:TLS transport
For encrypted SIP signaling on port 5061:Multi-region redundancy
Route to US as primary, EU as secondary:10 (US) is preferred over priority 20 (EU).
Benefits over A records
Verification
Verify the user’s SRV record configuration:DNS provider configuration
Most DNS providers support SRV records through their control panel or API. Common DNS providers:- Route 53 (AWS): Record type “SRV”, value format
10 10 5060 sip.telnyx.com - Cloudflare: Record type “SRV”, configure service, protocol, priority, weight, port, target separately
- Google Cloud DNS: Use
gcloud dns record-sets createwith--type=SRV
Failover behavior
SRV records work with Telnyx automatic failover:- DNS query resolves
sip.telnyx.comto both IP1 and IP2 - SIP INVITE sent to IP1 (primary)
- On timeout or error, retry to IP2 (secondary)
- If all IPs fail, attempt next priority SRV target (if configured)
Troubleshooting
SRV record not resolving:- Verify trailing dot on target FQDN (
sip.telnyx.com.) - Check TTL has expired if you recently updated
- Confirm DNS propagation:
dig @8.8.8.8 _sip._udp.example.com SRV
- Some PBX systems require explicit SRV lookup enablement
- Configure PBX to use domain (
example.com) not IP address - Check PBX logs for DNS query behavior
- Verify equal weight values for balanced distribution
- Some SIP stacks cache first resolved IP
- Consider implementing client-side round-robin
STUN/TURN
Source: https://developers.telnyx.com/docs/voice/sip-trunking/network-configuration/stun-turn-servers.mdSTUN (Session Traversal Utilities for NAT) and TURN (Traversal Using Relays around NAT) servers enable NAT traversal for SIP clients behind firewalls and private networks.
When to use STUN/TURN
Use STUN/TURN servers when the SIP client is:- Behind a firewall or NAT gateway
- On a private network without public IP addresses
- Unable to receive inbound connections directly
- Experiencing one-way audio issues
Telnyx STUN/TURN endpoints
Telnyx provides the following public endpoints for NAT traversal:Configuration
Standard STUN configuration
Configure the SIP client to use Telnyx STUN servers for NAT traversal:TURN with authentication
TURN requires credentials. Contact Telnyx support to obtain TURN server credentials for the account.Alternative STUN servers
While Telnyx provides its own STUN infrastructure, third-party STUN servers may also be used:Network requirements
Ensure the firewall allows outbound traffic:ICE candidate types
When using STUN/TURN, the client will gather different types of ICE candidates:- host: Local network addresses (cannot traverse NAT)
- srflx: Server reflexive addresses (via STUN)
- relay: Relayed addresses (via TURN)
- prflx: Peer reflexive addresses (discovered during connectivity checks)
srflx(server reflexive via STUN)relay(relayed via TURN)prflx(peer reflexive)
Troubleshooting
One-way audio
If one-way audio occurs:- Verify STUN server is reachable:
stun.telnyx.com:3478 - Check that UDP port 3478 is allowed outbound
- Ensure RTP media ports (16384-32768) are open bidirectionally
Connection failures
If calls fail to connect:- Verify firewall rules allow outbound UDP to port 3478
- Check that the SIP client supports STUN/TURN
- Confirm TURN credentials are correct (if using TURN)
- Review ICE candidate gathering logs in the client
Restrictive networks
In highly restrictive networks that block UDP traffic:- Use TURN over TCP:
turn.telnyx.com:3478(TCP) - Consider using TLS for SIP signaling: port 5061
- Contact support for additional configuration options
See also
- IP Whitelisting - Firewall configuration for SIP signaling
- WebRTC Troubleshooting - ICE candidate debugging
Features
Noise Suppression
Source: https://developers.telnyx.com/docs/voice/sip-trunking/features/noise-suppression.mdNoise suppression enhances call quality by removing background noise from audio streams. Configure this feature at the connection level or individual phone number level to reduce unwanted ambient sounds during calls.
Configuration scope
Noise suppression can be configured at two levels:- Connection level: Applied to all phone numbers associated with the SIP connection. This setting overrides individual number configurations.
- Number level: Applied to specific phone numbers for granular control.
Configuration via API
Configure at connection level
PATCH /v2/ip_connections/{id} with thenoise_suppression object:
Configure at number level
PATCH /v2/phone_numbers/{id}/voice with thenoise_suppression object:
Supported engines
Use thenoise_suppression_engine parameter to select an engine. If omitted, Denoiser is used.
For SIP trunking, Denoiser and Krisp Viva Tel Lite are the most common choices. Use
Krisp Viva Tel Lite when you need to isolate the primary speaker from background voices.
Direction options
Thedirection parameter controls which audio streams are processed:
Codec compatibility
Noise suppression works with standard SIP trunking codecs including:- G.711 (μ-law and A-law)
- G.722
- Opus
Performance considerations
- Each direction (inbound/outbound) is processed and billed independently
- Processing adds minimal latency (typically < 20ms)
- Noise suppression is applied in real-time during the call
- Connection-level configuration provides consistent behavior across all numbers
Best practices
- Use connection-level configuration for consistent audio quality across all phone numbers
- Enable bidirectional suppression (
both) for optimal results in noisy environments - Test with your specific use case to balance noise reduction with audio naturalness
- Monitor call quality metrics to validate the impact on your application
Jitter Buffer
Source: https://developers.telnyx.com/docs/voice/sip-trunking/features/jitter-buffer.mdJitter buffering smooths out packet arrival variation on SIP connections to reduce audio artifacts such as choppy or distorted speech. Enable this feature at the connection level to improve call quality on networks with inconsistent latency.
How it works
An adaptive jitter buffer temporarily holds incoming voice packets before playing them out, compensating for uneven packet arrival times (jitter). The buffer dynamically adjusts its size between configurable minimum and maximum values based on observed network conditions — expanding when jitter increases and shrinking when the network stabilizes.Configuration settings
jitterbuffer_msec_min cannot exceed jitterbuffer_msec_max. The API will reject requests where the minimum is greater than the maximum.
Configuration via API
Credential connections
PATCH /v2/credential_connections/{id}FQDN connections
PATCH /v2/fqdn_connections/{id}IP connections
PATCH /v2/ip_connections/{id}Tuning guidance
- Higher values increase latency tolerance and work better for high-jitter networks (e.g., international routes or mobile carriers).
- Lower values reduce latency and are suited for stable, low-jitter networks (e.g., dedicated fiber or local connections).
- Default values (
60–200ms) work well for most deployments and are a good starting point.
Best practices
- Start with defaults before tuning — the default range of 60–200 ms handles most network conditions
- Monitor call quality metrics after enabling to validate the impact on your specific traffic
- Increase the maximum for routes with known high jitter rather than raising the minimum, which adds baseline latency to all calls
- Enable on specific connections rather than globally if only certain routes experience jitter issues
- Test during peak hours when network congestion and jitter are most likely to occur
External Transfers
Source: https://developers.telnyx.com/docs/voice/sip-trunking/features/external-transfers.mdExternal transfers move an inbound PSTN call to an external destination while preserving the original caller’s identity.
Call flow
- Caller A dials Telnyx number B
- Telnyx routes the call to the SIP endpoint (A → B)
- The endpoint initiates a transfer to external number C
- Telnyx places a new outbound call (A → C)
Validation requirements
Telnyx validates external transfers to prevent unauthorized call spoofing:- Active call verification: An active inbound call must exist from the original caller to the Telnyx number
- Diversion header: The outbound call leg must include a SIP
Diversionheader containing the Telnyx number
Transfer types
Blind transfer
Immediate transfer without announcement:Attended transfer
- Place the original call on hold
- Dial the transfer destination
- Announce the transfer
- Complete with SIP REFER
Programmable Voice implementation
Transfer command
POST /v2/calls/{call_control_id}/actions/transfer:Dial with bridge
POST /v2/calls withlink_to and bridge_intent:
TeXML Dial
\ verb:Troubleshooting
If transfers fail, verify:- An active inbound call exists on the Telnyx number
- The Diversion header includes the correct Telnyx number
- The outbound voice profile allows calls to the destination
- The destination number is in E.164 format
SIP URI Calling
Source: https://developers.telnyx.com/docs/voice/sip-trunking/features/sip-uri-calling.mdSIP URI calling enables inbound calls to a SIP username, eliminating the need for a traditional phone number. This feature allows direct communication using SIP addresses in the format
username@sip.telnyx.com.
Prerequisites
- Active SIP connection with credential authentication
- SIP device or softphone registered with connection credentials
- Feature enabled on the connection’s inbound settings
SIP URI format
Calls are placed to the SIP username using the standard SIP URI format:- Must begin with a non-numeric character
- This restriction prevents number spoofing and unauthorized dialing
support@sip.telnyx.compbx-main@sip.telnyx.comalice123@sip.telnyx.com
123456@sip.telnyx.com(starts with numeric character)
Configuration
Access control options
Configure SIP URI calling access using one of three modes:Configure via API
PATCH /v2/ip_connections/{id} with thesip_uri_calling_preference parameter:
disabled, unrestricted, or internal based on security requirements.
Making SIP URI calls
From Telnyx SIP connections
Dial directly to the SIP URI from any registered SIP endpoint:From external systems
When configured asunrestricted, external SIP systems can place calls:
Receiving SIP URI calls
Configure the SIP endpoint to accept incoming calls:- Register the SIP device using the connection credentials
- Enable SIP URI calling with the appropriate access control
- Configure the dial plan or routing rules to handle incoming calls
Billing
Identifiable sources
Calls from Telnyx SIP connections use standard rate deck pricing based on the originating connection’s pricing plan.Unidentifiable sources
When SIP URI calling is set tounrestricted, calls from external or unidentifiable sources are billed at $0.002/minute to the connection owner.
Monitor usage when enabling unrestricted access to prevent unexpected charges from public internet traffic.
Security considerations
- Username validation: Non-numeric username requirements prevent unauthorized number spoofing
- Access control: Use
internalmode for private communications within the organization - Rate monitoring: Track call volumes and sources when using
unrestrictedmode - Authentication: Credential-based connections provide secure endpoint registration
Troubleshooting
If SIP URI calls fail, verify:- SIP URI calling is enabled on the connection
- Username begins with a non-numeric character
- Access control mode permits the calling source
- SIP endpoint is properly registered with valid credentials
- Firewall rules allow SIP traffic to/from Telnyx infrastructure
STIR/SHAKEN
Attestation Behavior
Source: https://developers.telnyx.com/docs/voice/stir-shaken/attestation-behavior.mdAttestation levels assigned by Telnyx for outbound calls.
Outbound calls
Certificate selection
Call forwarding
When call forwarding is enabled on a Telnyx number:- Original STIR/SHAKEN passport preserved or passed through
- DIV (diversion) passport added for forwarded leg with Attestation A
Call transfers
*A if from number is owned, B otherwise.
Hosted Certificate
Source: https://developers.telnyx.com/docs/voice/stir-shaken/hosted-cert.mdUse a self-hosted STIR/SHAKEN certificate to sign outbound calls.
Requirements
- STIR/SHAKEN certificate from an authorized STI-CA
- Certificate hosted at a public HTTPS URL (
x5u) - Unencrypted PEM-format private key (EC-P256 or RSA-2048)
- Outbound voice profile
- US phone number (for validation)
Upload certificate
POST /v2/stir_shaken_certs
Associate with outbound voice profile
PATCH /v2/outbound_voice_profiles/{id}Verify signing
To verify the certificate is signing calls:- Create an IP connection with “Receive SHAKEN/STIR Identity SIP header” enabled
- Assign a US phone number to this connection
- Place a call from a connection using the configured outbound voice profile
- Check the inbound INVITE for the
Identityheader:
Cost
$100 per certificate per month.SIP Header Parameters
Source: https://developers.telnyx.com/docs/voice/stir-shaken/sip-header-parameters.mdTelnyx provides call attestation information through the
verstat parameter in the P-Asserted-Identity SIP header.
Verstat parameter
Call scope
Theverstat parameter is included for:
- Inbound calls from the PSTN
- On-net calls between Telnyx customers
Emergency Calling
Dynamic E911
Source: https://developers.telnyx.com/docs/voice/sip-trunking/emergency-calling-dynamic-e911.mdDynamic E911 delivers location information to PSAPs during emergency calls. Two methods available:
API-based addresses
Pre-provision addresses and endpoints, then reference IDs in SIP headers during calls. Dynamically provisioning emergency endpoints may result in a delay before the associated address is fully available for routing. Telnyx recommends pre-provisioning a persistent emergency address rather than relying on just-in-time provisioning. In circumstances where an emergency call (e.g., 911) is initiated before a dynamically provisioned endpoint is fully activated, the call will be routed to a national emergency call center (PSAP) .Create emergency address
POST /v2/dynamic_emergency_addressesid- Address UUID for endpoint associationsip_geolocation_id- Include inGeolocationheaderstatus-pendingduring validation,activatedwhen ready
Create emergency endpoint
POST /v2/dynamic_emergency_endpointssip_from_id- Include inFromorP-Asserted-Identityheader
SIP INVITE format
Include both IDs in emergency call INVITE:P-Asserted-Identity:
GPS coordinates (PIDF-LO)
Pass real-time coordinates in PIDF-LO format for mobile devices, wearables, and IoT.Coordinate format
SIP INVITE Format for PIDF-LO with GPS Coordinates
SIP INVITE Format for PIDF-LO with MiMe
PIDF-LO requirements
Testing
Use test number933 to simulate emergency calls without dispatching services.
Address field limits
*Common terms auto-abbreviated: APARTMENT→APT, FLOOR→FL, SUITE→STE, BUILDING→BLDG, ROOM→RM
Troubleshooting
Response Codes
Source: https://developers.telnyx.com/docs/voice/sip-trunking/troubleshooting/response-codes.mdTelnyx-specific SIP response codes for diagnosing call failures.
D-Series Codes (4XX Responses)
Client-side errors related to account configuration, limits, and permissions.D1X: Account & Connection Issues
D2X: Profile & Channel Limits
D3X: Connection & URI Issues
D4X: Routing & Destination Issues
D5X: Channel Billing & Verification
D6X: Account Tier Restrictions
D7X, D8X, D9X: Additional Restrictions
P-Series Codes (Protocol Issues)
SIP protocol violations or proxy-level issues.P0X: Protocol Violations
R-Series Codes (Registration & Authentication)
SIP registration and authentication issues.Routing & Media Codes
PE-Series: Routing Failures
T-Series: Termination Issues
B-Series: Media Issues
488 Not Acceptable Media
Media negotiation failures:SIP Integrations Guides
Configuration Overview
Source: https://developers.telnyx.com/docs/voice/sip-trunking/configuration-guides.mdThe following Configuration Guides are intended to help you connect your SIP Infrastructure (IP-PBX, SBC, etc) to a Telnyx Elastic SIP Trunk. Be aware, due to the large number of versions, variations, add-ons, and options for many of these systems, the settings you see may differ from those shown in our Configuration Guides. As such, these documents are intended as general guidelines, rather than configuration templates. There is an assumption of familiarity with your network and SIP infrastructure, and how they work.
Guide Listing
Telnyx cannot provide direct support for third-party products; you should contact the manufacturer for your PBX/SBC for assistance in configuring such products. Vendor Version Type Qualified for Secure Trunking 3CX V18 with IP trunk IP-PBX Yes 3CX V18 with credentials trunk IP-PBX Yes 3CX V16 with IP trunk IP-PBX Yes 3CX V16 with credentials trunk IP-PBX Yes 3CX V15 with IP trunk IP-PBX Yes 3CX V15 with credentials trunk IP-PBX Yes 3CX V14 with IP trunk IP-PBX Yes 3CX V14 with credentials trunk IP-PBX Yes Oracle Acme Packet E-SBC Yes Acrobits Groundwire, Softphone Softphone Yes Alcatel SD601 SIP door phone Yes Algo 8xxx Series IP phone Yes Amazon AWS n/a VXC Yes Asterisk n/a: Credentials trunk PBX Yes Asterisk n/a: IP trunk PBX Yes Audiocodes 400HD IP phone Yes Audiocodes E-SBC Yes Auth0 SAML identity proivder SaaS solution n/a Avaya PBX Yes Bicom PBXware PBX Yes BuddyTalk BT110/120 Smart speaker/speakerphone Yes Cisco 68xx/88xx IP phone Yes Cisco CME with IP trunk Softphone Yes Cisco CME with credentials trunk Softphone Yes Cisco CUBE/CUCM with IP trunk SBC Yes Cisco CUBE/CUCM with credentials trunk SBC Yes Cisco SPA112/122 IP phone Yes CounterPath Bria Teams Softphone Yes CounterPath Bria Solo Softphone Yes Dinstar C60 IP phone Yes Elastix by 3CX Elastix 5 with credentials trunk PBX Yes Elastix by 3CX Elastix 5 with IP trunk PBX Yes Elastix by 3CX Elastix 4 with credentials trunk PBX Yes Elastix by 3CX Elastix 4 with IP trunk PBX Yes Epygi QX series PBX Yes Fanvil H5 Hotel IP phone Yes Fanvil X4G IP phone Yes Fanvil X2CP/X2C/X2P Call center IP phone Yes Fanvil X1/X1P IP phone Yes Fanvil V-Series IP phone Yes Fanvil H3 Hotel IP phone Yes Fanvil XU Series IP phone Yes Fanvil H2U IP phone Yes Fanvil X Series IP phone Yes Fanvil X7 Series IP phone Yes Fanvil H3W/H5W WiFi IP phone Yes Fanvil A32i IP phone Yes Flyingvoice All IP phone Yes Fortinet FortiFone FON-375/175/H25 IP phone Yes Fortinet FortiFone FON-570 IP phone Yes FreePBX v15 with credentials trunk: PJSIP PBX Yes FreePBX v15 with IP trunk: PJSIP PBX Yes FreePBX v15 with credentials trunk: ChanSIP PBX Yes FreePBX v14 with IP trunk: ChanSIP PBX Yes FreePBX v14 with credentials trunk: ChanSIP PBX Yes FreePBX v13 with IP trunk: ChanSIP PBX Yes FreePBX v13 with credentials trunk: ChanSIP PBX Yes FreePBX v13 with credentials trunk: PJSIP PBX Yes FreeSWITCH Credentials trunk Device Yes FreeSWITCH IP trunk Device Yes FusionPBX n/a: Credentials trunk PBX Yes Gigaset A510 IP phone Yes Gigaset DX800a IP phone Yes Gigaset A690/AS690 IP phone Yes GOautodial n/a: Credentials trunk PBX Yes GOautodial n/a: IP trunk PBX Yes Google VPC n/a VXC Yes Grandstream GDS3710 Video door system Yes Grandstream Wave Lite Softphone Yes Grandstream GXV3370 IP phone Yes Grandstream GXP1700 Series IP phone Yes Grandstream GXP21XX Series IP phone Yes Grandstream GDS3710 Series Video door system Yes Grandstream GRP2612/GRP2612P/GRP2612W Series IP phone Yes Grandstream GXP IP phone Yes Grandstream GRP260x Series IP phone Yes Grandstream DP752 IP phone Yes Grandstream UMC6202 with IP trunk IP-PBX appliance Yes Grandstream UMC6202 with credentials trunk IP-PBX appliance Yes Grandstream GXP16XX Series IP phone Yes Grandstream UCM6xxx Series IP phone Yes Grandstream HT802 ATA Yes GSuite by Google GSuite SAML Identity Provider SAML identity provider n/a Konftel 300IPx Conference IP phone Yes Konftel 300Wx Conference IP phone (wireless) Yes LastPass n/a SAML identity provider n/a Linphone n/a Softphone Yes Mediatrix C7/4100 Analog adapter/media gateway Yes Megaport n/a Cloud netoworking solution Yes MicroSIP n/a Softphone Yes Microsoft Azure AD SAML Identity Provider SAML identity provider n/a Microsoft Azure n/a VXC Yes Microsoft Teams Call2Teams Office 365 add-on Yes Microsoft Microsoft Teams E-SBC Yes Mitel 5320E/5330E/5340E SIP phone Yes Mitel 6800/6900 SIP phone Yes NCH Software ExpressTalk Softphone Yes Okta Okta SAML Identity Provider SAML identity provider n/a OneLogin OneLogin SAML Identity Provider SAML identity provider n/a OSDial n/a Predictive dialer Yes Panasonic KX-HDV IP phone Yes Panasonic TGP 550 IP phone Yes PBXes n/a PBX Yes PhoneSuite Voiceware, Voiceware Express/Express +, Voiceware Series 2 PBX Yes Plantronics/Polycom Poly OBi300 VoIP adapter Yes Plantronics/Polycom VVX 300-series IP phone Yes Positron IP304/IP304C, IP408/IP408C, IP410C/IP410G SIP phone Yes Positron G-Series PBX device Yes Ribbon EdgeMarc 6000 E-SBC Yes Sansay VSXi E-SBC Yes ScopServ ScopTEL PBX Yes SIPfoundry sipXecs PBX Yes Skype Skype for Business (Office 365) E-SBC Yes SNOM M100 KLE IP phone base station Yes SNOM Professinoal D7xx Series Desk phone Yes SNOM C520 Conference phone Yes Synway UC-200 PBX Yes Thirdlane n/a PBX Yes Ubiquiti Unifi Talk with credentials trunk PBX Yes Ubiquiti Unifi Talk with IP trunk PBX Yes Vicidial n/a: IP trunk Contact center suite Yes Vicidial n/a: Credentials trunk Contact center suite Yes VitalPBX n/a PBX Yes Vodia n/a PBX Yes Voice Elements by Microsoft .NET n/a Development environment Yes Vtech VCS754 ErisStation Conference phone Yes Wildix n/a PBX Yes Xorcom Complete PBX PBX Yes Yealink n/a IP phone Yes Yealink Yeastar S-Series PBX Yes Zoiper Zoiper Communicator Softphone Yes Zoiper 5 Pro Softphone Yes Zoiper 3 with Linux Softphone Yes Zoiper 3 with MacOS Softphone YesLiveKit
Source: https://developers.telnyx.com/docs/voice/sip-trunking/livekit-configuration-guide.md
Purpose of this document
This configuration guide is designed to help you establish and optimize a SIP Trunk between Telnyx, a global leader in VoIP communications, and LiveKit, a robust platform for building real-time audio and video applications. The primary objective of this document is to provide a comprehensive, step-by-step approach for configuring your SIP Trunk setup. This guide caters to both beginners and experienced professionals, ensuring that all readers can effectively integrate these two powerful services. By the end of this guide, you will be able to: **1. Set Up Telnyx: ** Configure your Telnyx account and SIP Trunk settings to prepare for integration. 2. Configure LiveKit: Adjust your LiveKit settings to accept and manage Telnyx SIP Trunk communications. 3. Add Custom X-Headers: In your app setX-Telnyx-Username: <username> to ensure your calls are properly routed. username has to be same value as your authentication username.
4. Debug and Optimize: Troubleshoot common issues and fine-tune your configuration for optimal performance.
Configuration in Telnyx Mission Control Portal
Follow the steps below to create a SIP connection to your LiveKit account. Your checklist:-
- Have an account created on Telnyx portal
-
- Complete L2 verification process
-
- Purchase a number to be used for the voice calls
1. SIP Connection
- In the Telnyx Mission Control Portal choose a “Real-Time Communications” -> “Voice” -> “SIP Trunking” menu on the left sidebar
- Click “Add SIP Connection” button
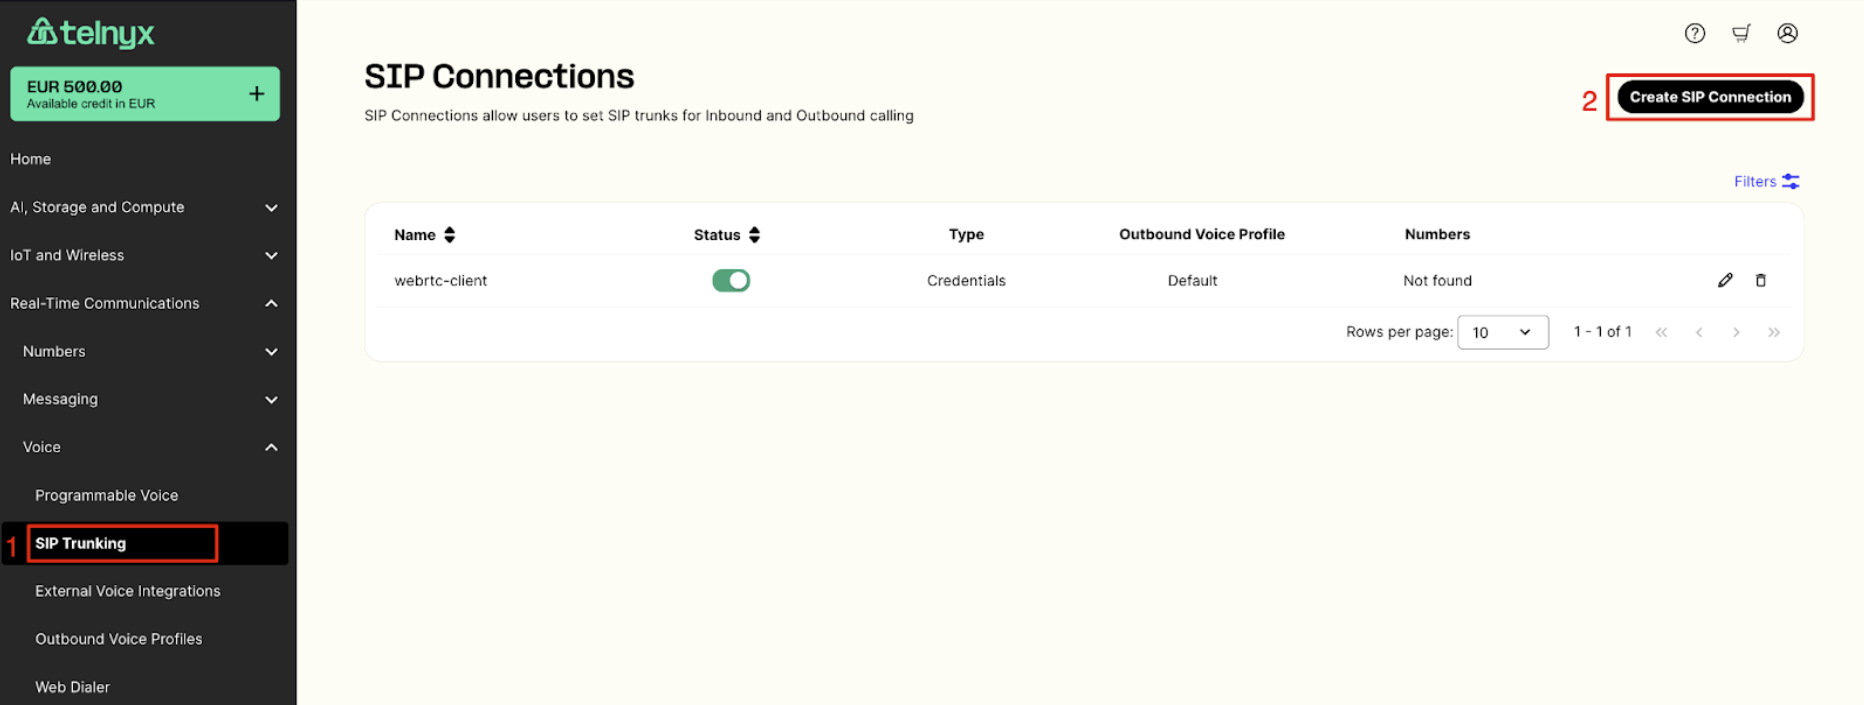
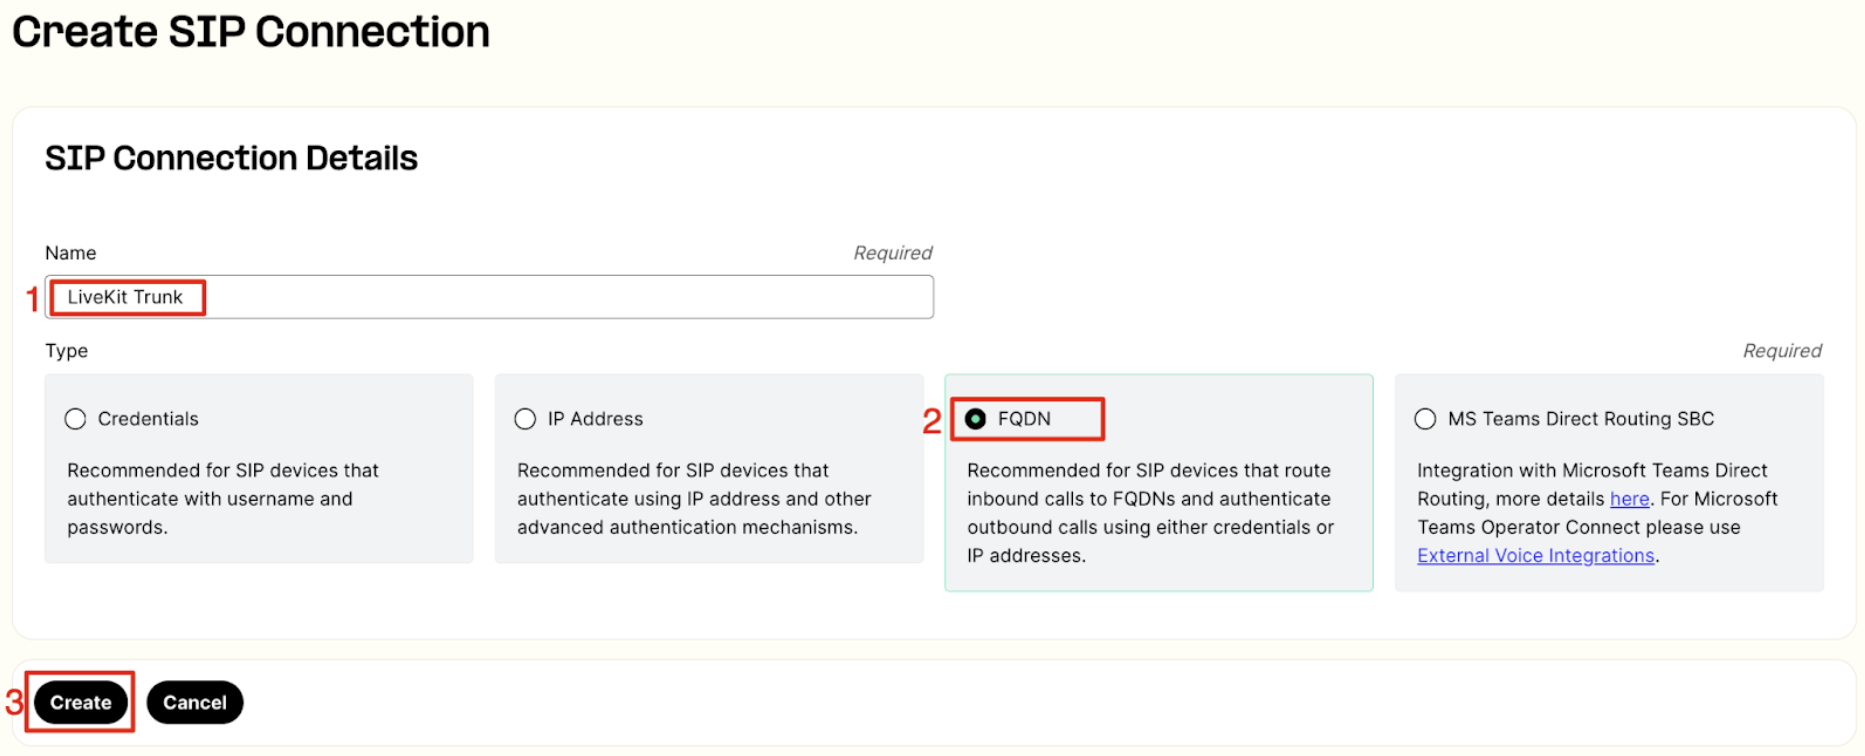
- Provide a name for your new SIP Connection
- Select FQDN as a type of connection
- Create a sip connection
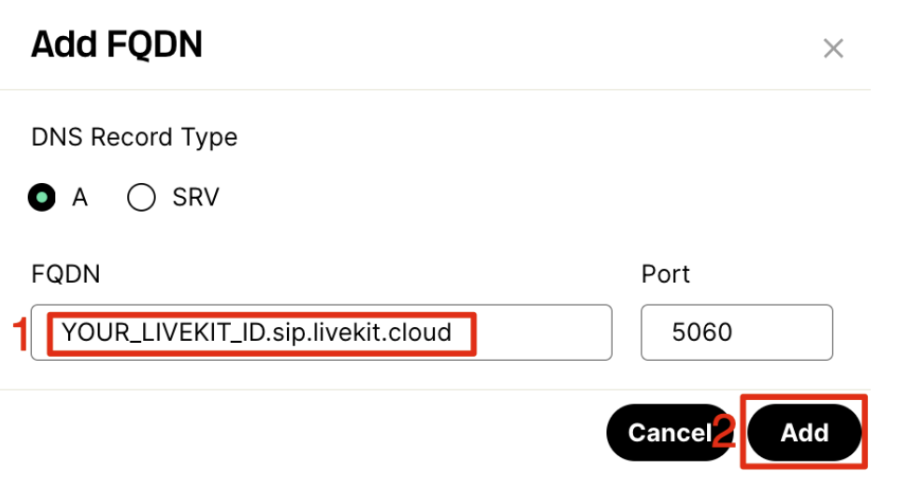
- Choose “FQDN” as a connection type
- Provide SIP URI obtained from your LiveKit account. You can find it in your project settings page.
- Save FQDN settings with “Add” button
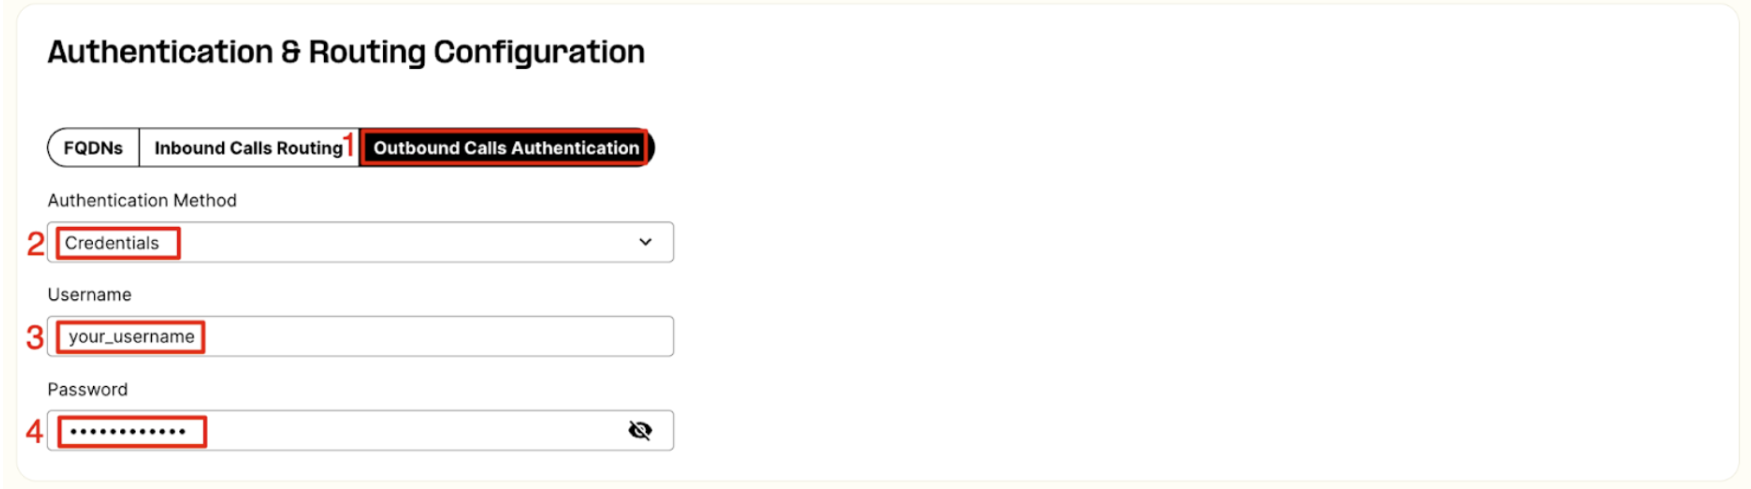
- Switch to the “Outbound Calls Authentication” tab in the Authentication & Routing Configuration section
- Choose “Credentials” for the Authentication Method
- Provide your user name and password which will be used later for the LiveKit outbound trunk configuration
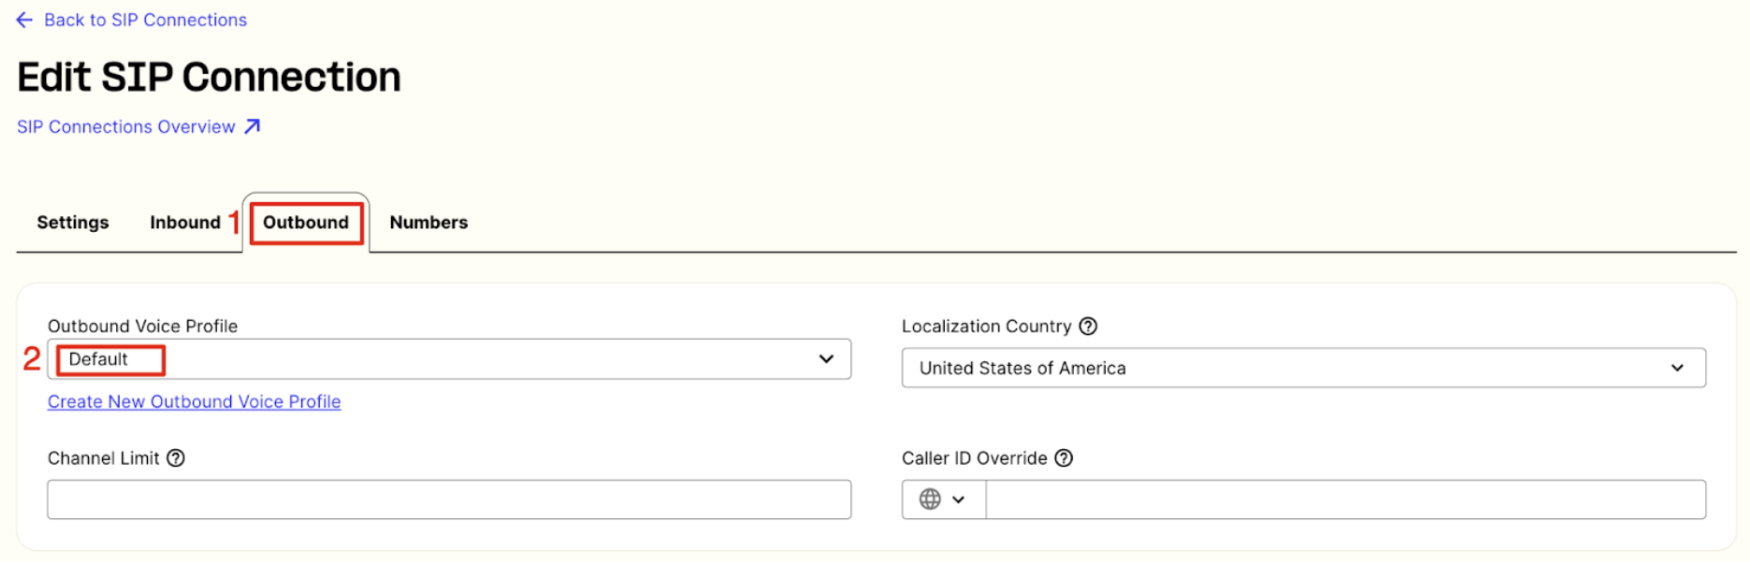
- On top of SIP Connection page switch to the Outbound tab
- Select an existing Outbound Voice Profile from a dropdown list.
- If no profile is available you can create a one with a “Create New Outbound Voice Profile” link
- Finally save your sip connection with a “Save” button at the bottom of the page

2. Programmable Voice Applications
Integration over SIP trunk with LiveKit allows also to redirect voice calls originated from LiveKit to Telnyx Voice AP applicationsI. With that option you can implement advanced voice applications with the features like listed below:- Call recording
- IVR (Interactive Voice Response)
- TTS (Text-To-Speech)
- STT (Speech-To-Text / Call transcription)
- Conversational AI (Voice bots with different AI models)
- and many more
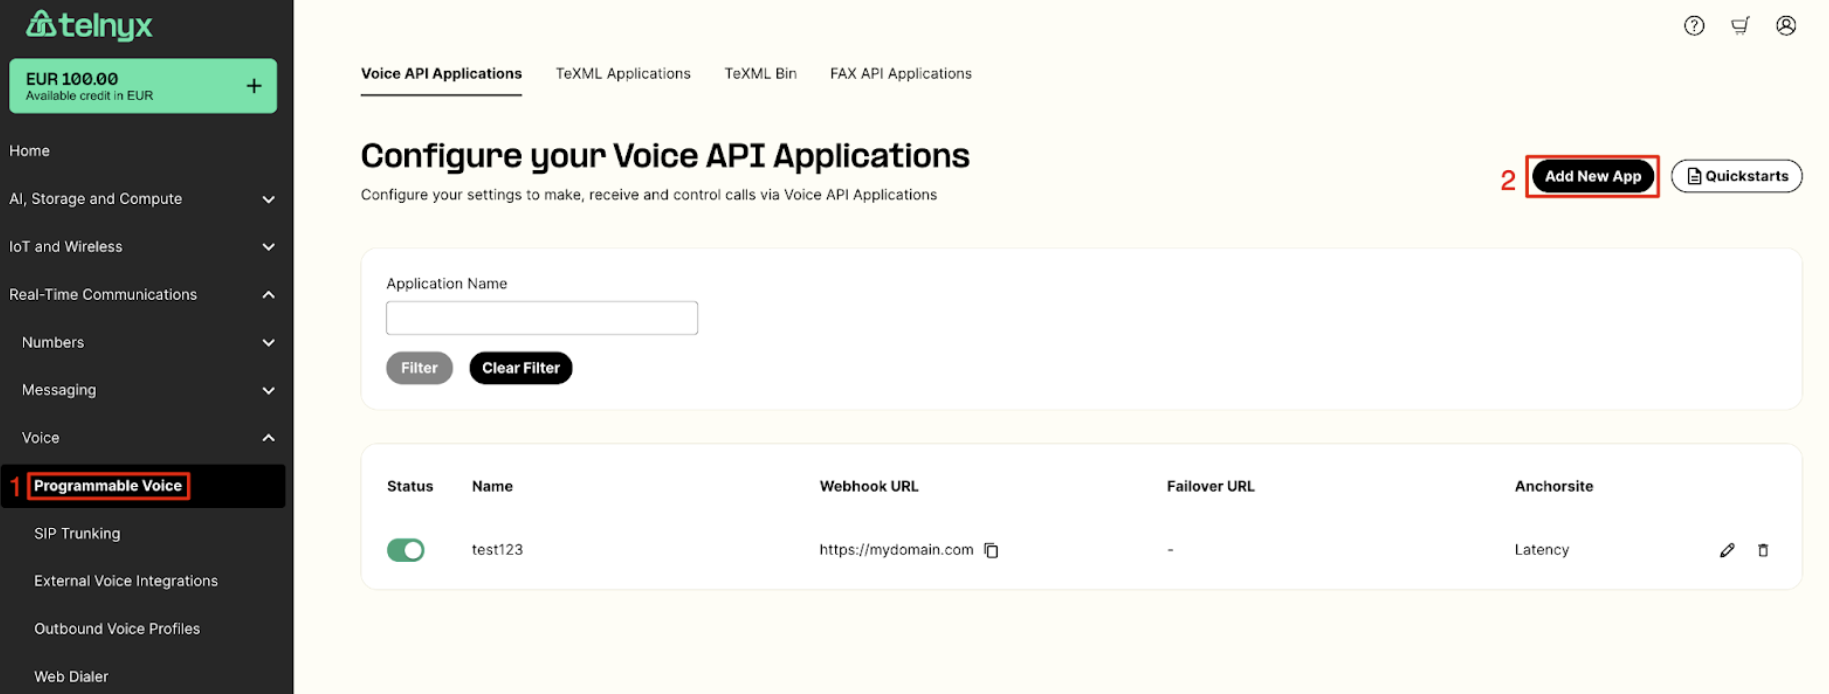
- Switch to a “Real-Time Communications” -> “Voice” -> “Programmable Voice” menu on the left sidebar
- Create a new application with an “Add New App” button
- Provide a name for your application
- Configure webhooks URL to receive webhooks about call status changes
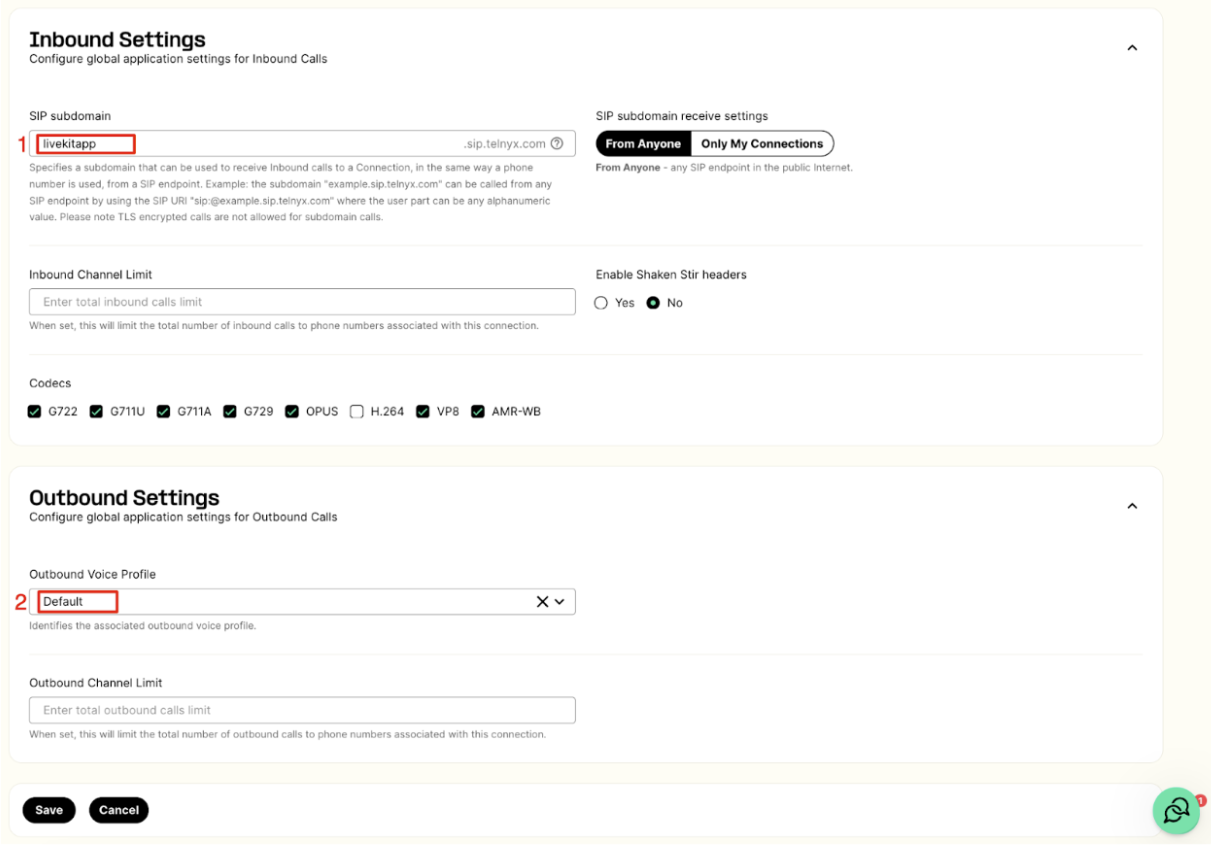
- In the Inbound section provide a subdomain name (later you need to use it in a LiveKit outbound trunk setup)
- In the Outbound section select an outbound voice profile
- Save the voice app configuration
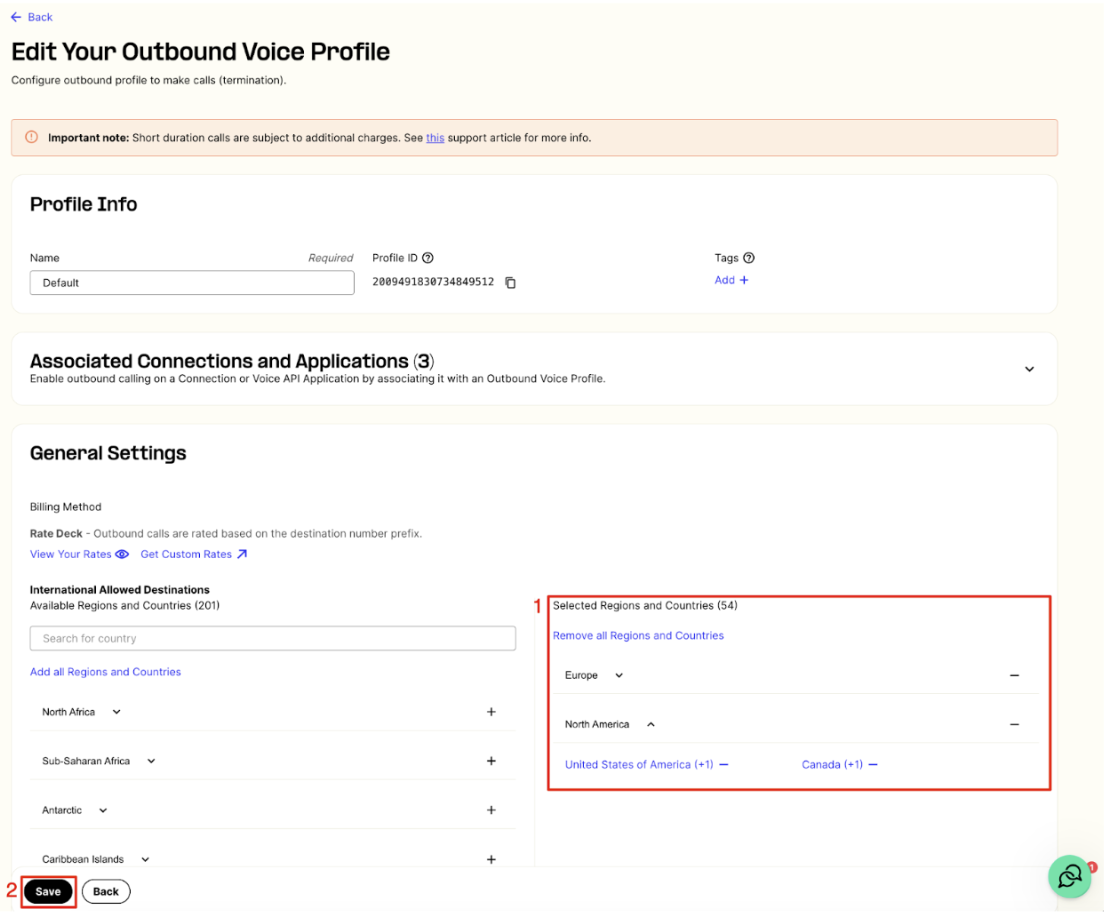
3. Outbound Voice Profile
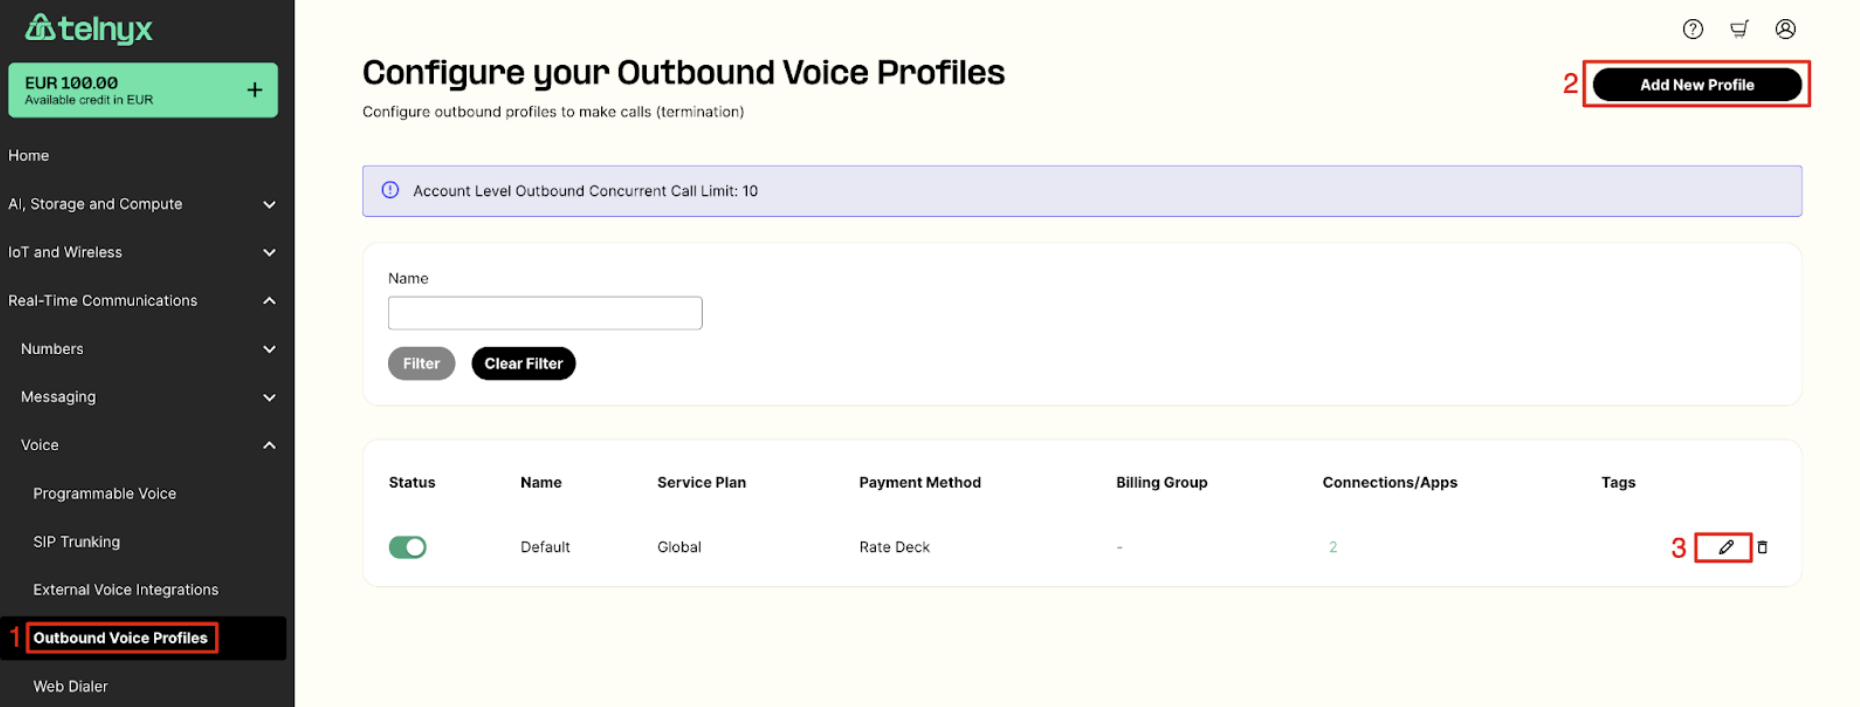
- Switch to a “Real-Time Communications” -> “Voice” -> “Outbound Voice Profile” menu on the left sidebar
- Add a new Profile and provide a name for it
- Or you can adjust the existing profile with clicking on the edit icon
- Select the destinations which should be allowed to make outbound calls to
- Click “Save” button to confirm your configuration
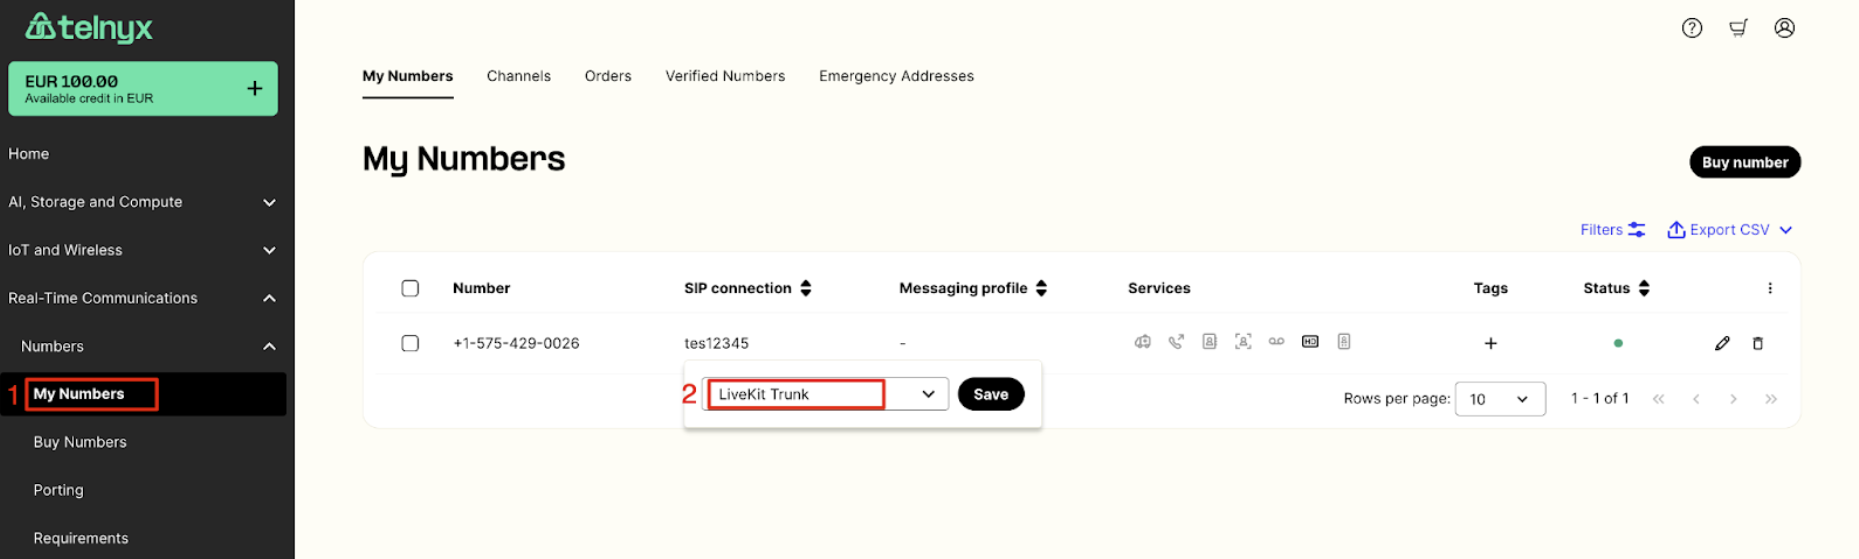
4. Number configuration
- Switch to a “Real-Time Communications” -> “Voice” -> “My Numbers” menu on the left sidebar
- For the number(s) you would like to use for the LiveKit voice participants, select your LiveKit sip connection from a dropdown list presented in the “SIP connections” column
- Update your configuration with a “Save” button
- You can purchase additional numbers in a “Buy Numbers” menu
- The same SIP connection may be assigned to multiple numbers
Configuration in LiveKit
Follow the steps below to configure a SIP trunk for your LiveKit account. Your checklist:-
- SIP URI is available in your project settings
-
- LiveKit CLI is installed on your computer
-
- ENV variables have been configured
1. Create Inbound SIP Trunk
- Create a json file (inboundTrunk.json) with the configuration of your inbound sip trunk
- Provide a name for your trunk and a number to be used (or an array of the comma delimited numbers)
- Run LiveKit CLI command to create an inbound trunk
- In the response you will receive a trunk ID
2. Create Inbound Dispatch Rule
- Create a json file (dispatchRule.json)
- Provide a name for your rule, a trunk ID from the previous step and room name to which incoming calls should be connected
- Run LiveKit CLI command to create a dispatch rule
3. Create Outbound SIP Trunk
- Create a json file (outboundTrunk.json) with the configuration of your outbound sip trunk
- Provide a name for your trunk
- In the address parameter provide “sip.telnyx.com” if you configured a SIP connection on Telnyx side
- If you want to make calls to the configured Voice App, for the address parameter provide a subdomain configured in the Inbound section of your voice application
- Provide username and password you set in your sip trunk configuration for the Outbound Calls Authentication.
- Credentials should be left blank when connecting to the subdomain of your Voice App.
- Run LiveKit CLI command to create an outbound trunk
- In the response you will receive a trunk ID
4. Set custom headers when sending SIP INVITEs
To make sure every outbound call is authenticated against your Telnyx SIP trunk and account, you should send your Telnyx SIP username in a custom SIP header on the very firstINVITE.
Why this is importantTelnyx supports two ways to authenticate SIP calls:
- Credential (SIP digest) authentication
- Using a username and password.
- IP-based authentication
- Matching calls by their source IP address.
INVITE without a username. In that case, Telnyx will:
- Try to match the call to any existing SIP IP connection whose IP matches the source IP.
- Only send a
407 Proxy Authentication Requiredchallenge if no matching IP connection is found.
- It won’t send the 407 challenge.
- It will treat the call as authenticated as that other connection, not your FQDN trunk.
- This can lead to calls being billed or routed under the wrong trunk/account.
- LiveKit sends an
INVITEto Telnyx with your username in a custom header. - Telnyx sees the username and responds with
407 Proxy Authentication Required. - LiveKit sends a second
INVITEwith the username + encrypted password. - Telnyx validates the credentials and authenticates the call against your FQDN connection.
Important: The header value must exactly match the username you configured for credential authentication on your Telnyx FQDN connection (for example, the one you set in the Telnyx Portal or via the API).Example configuration (LiveKit trunk JSON)
authUsernameis your unique Telnyx SIP usernameX-Telnyx-Usernameis the custom SIP header Telnyx will read- The
headers_to_attributesmapping tells LiveKit to populateX-Telnyx-Usernamewith the same value asauthUsername
5. Testing Outbound Calls
- To test an outbound call you can initiate a call with a CLI command
- Create a json file (sipParticipant.json) providing outbound trunk ID obtained in the previous step
- Provide a number to be called in a sip_call_to parameter
- Provide a room name, participant identity and name
- Run LiveKit CLI command to make an outbound call
Troubleshooting
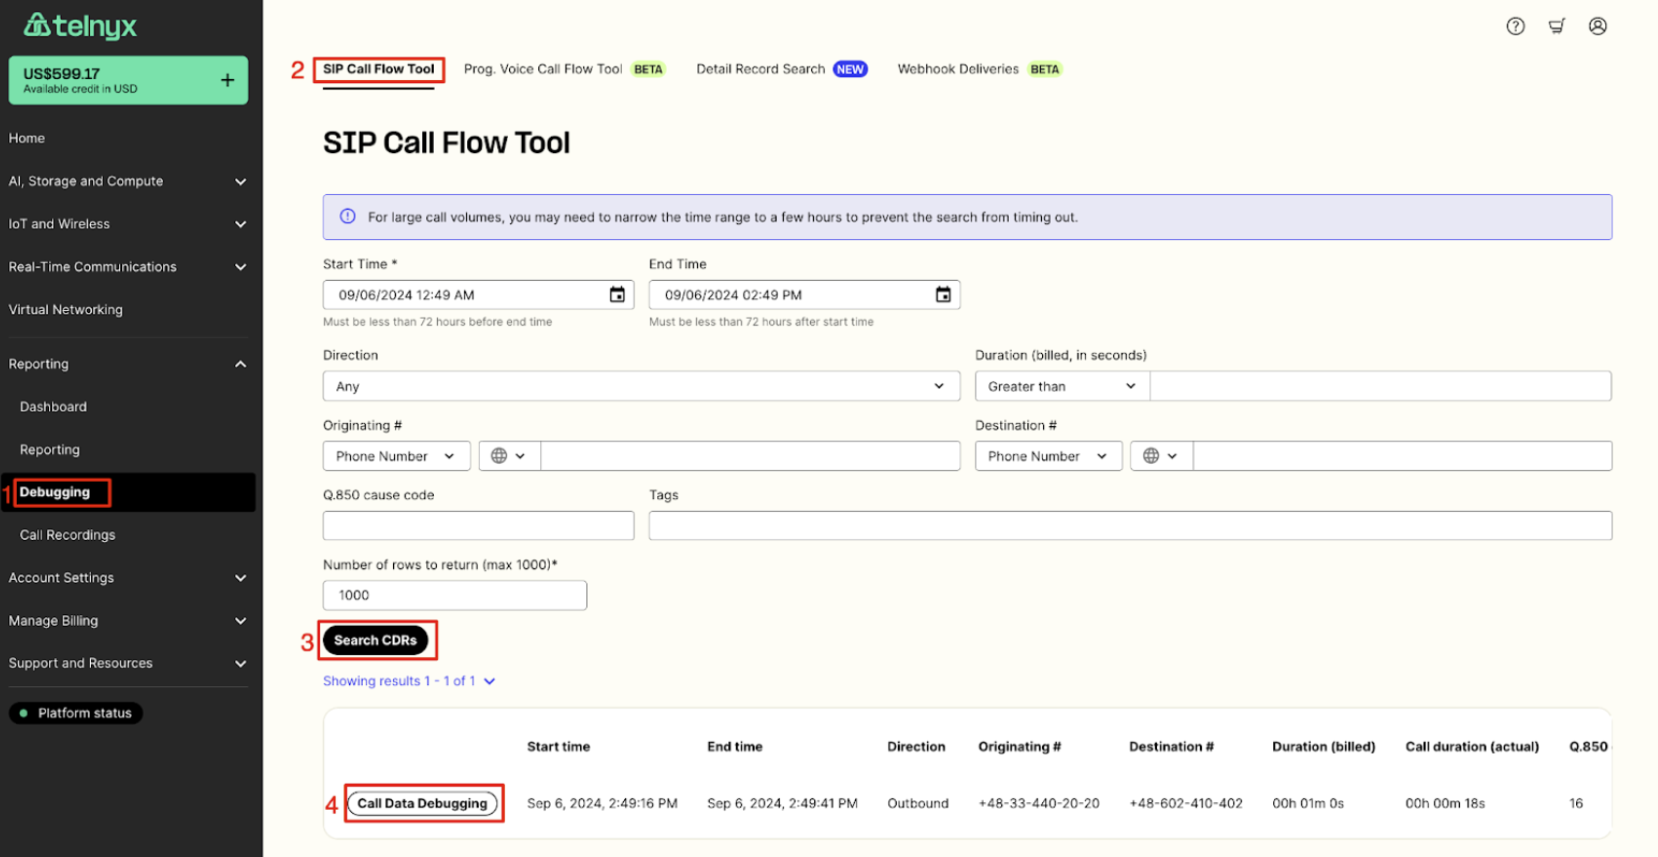
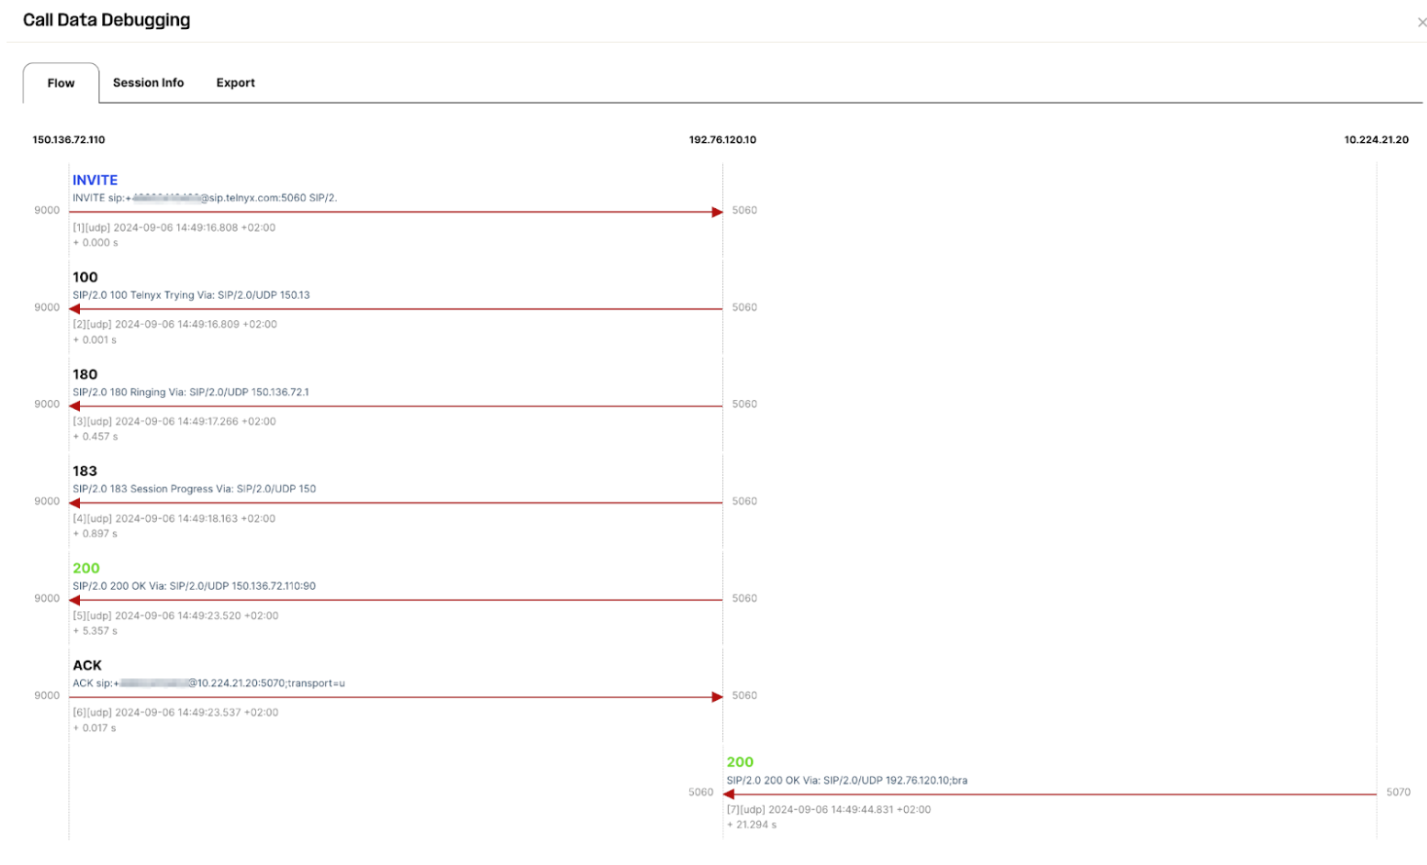
In Telnyx Mission Control Portal we are providing debugging tools where you can troubleshoot any issues with your SIP trunk communication checking SIP call flows, QoS stats and communication to a defined webhooks.1. Debugging tool
- Go to the “Debugging” menu under “Reporting” in the left menu
- Select “SIP Call Flow Tool” on the top bar
- Specify your search criteria and press “Search CDRs” button
- From the list of listed calls select a one with “Call Data Debugging” button
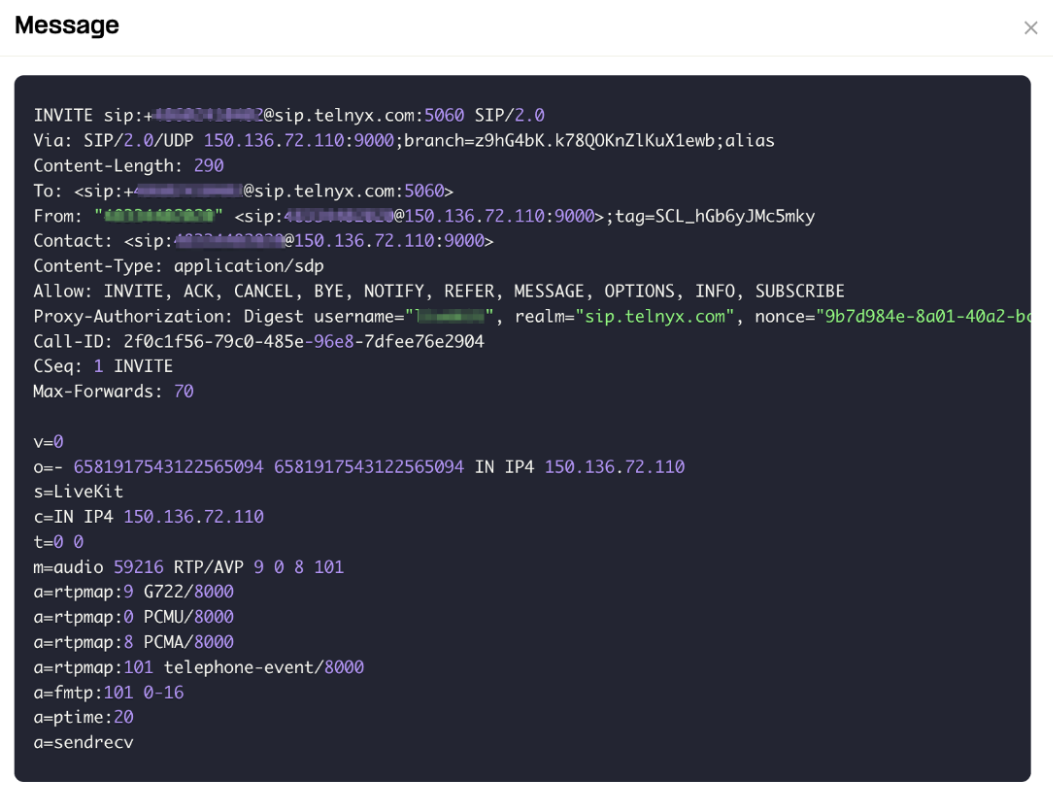
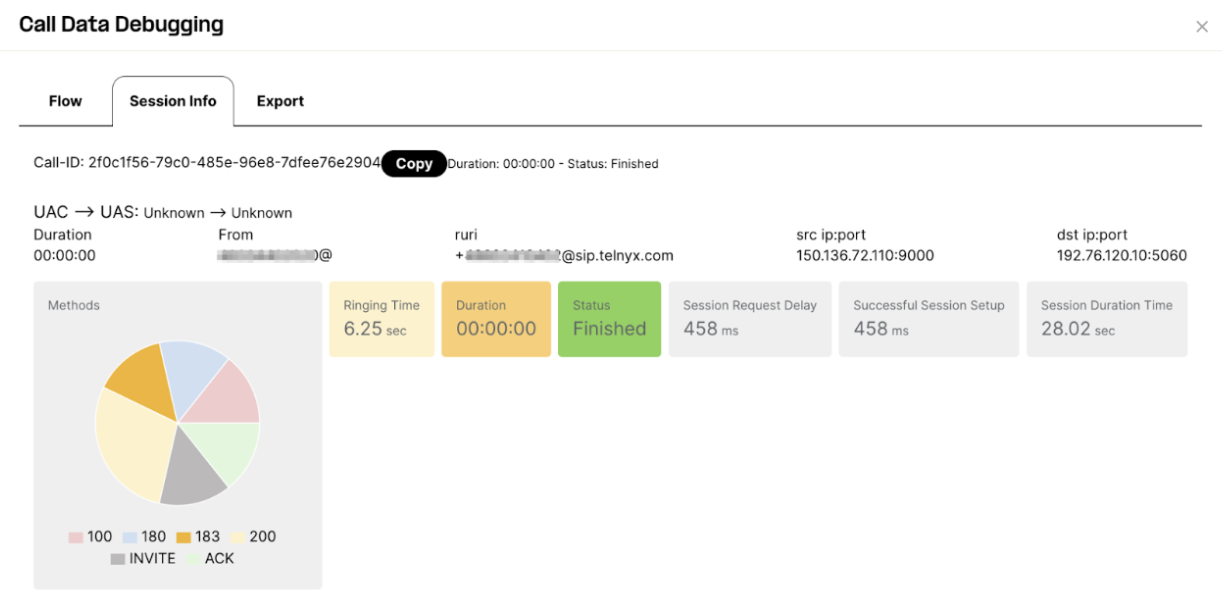
References
-
- Telnyx SIP trunk configuration data - https://sip.telnyx.com
-
- Telnyx SIP trunk setup - https://support.telnyx.com/en/articles/8096455-how-to-configure-a-sip-trunk
-
- LiveKit SIP configuration - https://docs.livekit.io/sip/
API Reference (SIP Trunking)
Connections
- List connections: Returns a list of your connections irrespective of type.
- Retrieve a connection: Retrieves the high-level details of an existing connection. To retrieve specific authentication information, use the endpoint for the specific connection type.
Credential Connections
- List credential connections: Returns a list of your credential connections.
- Create a credential connection: Creates a credential connection.
- Delete a credential connection: Deletes an existing credential connection.
- Retrieve a credential connection: Retrieves the details of an existing credential connection.
- Update a credential connection: Updates settings of an existing credential connection.
- Check a Credential Connection Registration Status: Checks the registration_status for a credential connection, (
registration_status) as well as the timestamp for the last SIP registration event (`registration…
IPs
- List Ips: Get all IPs belonging to the user that match the given filters.
- Create an Ip: Create a new IP object.
- Delete an Ip: Delete an IP.
- Retrieve an Ip: Return the details regarding a specific IP.
- Update an Ip: Update the details of a specific IP.
IP Connections
- List Ip connections: Returns a list of your IP connections.
- Create an Ip connection: Creates an IP connection.
- Delete an Ip connection: Deletes an existing IP connection.
- Retrieve an Ip connection: Retrieves the details of an existing ip connection.
- Update an Ip connection: Updates settings of an existing IP connection.
FQDNs
- List FQDNs: Get all FQDNs belonging to the user that match the given filters.
- Create an FQDN: Create a new FQDN object.
- Delete an FQDN: Delete an FQDN.
- Retrieve an FQDN: Return the details regarding a specific FQDN.
- Update an FQDN: Update the details of a specific FQDN.
FQDN Connections
- List FQDN connections: Returns a list of your FQDN connections.
- Create an FQDN connection: Creates a FQDN connection.
- Delete an FQDN connection: Deletes an FQDN connection.
- Retrieve an FQDN connection: Retrieves the details of an existing FQDN connection.
- Update an FQDN connection: Updates settings of an existing FQDN connection.
- Retrieve an FQDN authentication: Retrieves the details of an existing FQDN authentication strategy for a specific FQDN connection.
- Update an FQDN authentication: Updates the FQDN authentication strategy for a specific FQDN connection.
UAC Connections
- List UAC connections: Returns a list of your UAC connections. A UAC (User Agent Client) Connection registers Telnyx to your PBX — the opposite of a standard SIP trunk, where the PBX…
- Create a UAC connection: Creates a UAC connection. A UAC (User Agent Client) Connection registers Telnyx to your PBX — the opposite of a standard SIP trunk, where the PBX registers to…
- Delete a UAC connection: Deletes an existing UAC connection.
- Retrieve a UAC connection: Retrieves the details of an existing UAC connection.
- Update a UAC connection: Updates settings of an existing UAC connection.
- SIP Registration Status: Returns the live SIP registration status for a Telnyx endpoint: whether it is currently registered, when the current registration expires, and the last respons…
Outbound Voice Profiles
- Get all outbound voice profiles: Get all outbound voice profiles belonging to the user that match the given filters.
- Create an outbound voice profile: Create an outbound voice profile.
- Delete an outbound voice profile: Deletes an existing outbound voice profile.
- Retrieve an outbound voice profile: Retrieves the details of an existing outbound voice profile.
- Updates an existing outbound voice profile.: Updates an existing outbound voice profile.
Dialogflow Integration
- Delete stored Dialogflow Connection: Deletes a stored Dialogflow Connection.
- Retrieve stored Dialogflow Connection: Return details of the Dialogflow connection associated with the given CallControl connection.
- Create a Dialogflow Connection: Save Dialogflow Credentiails to Telnyx, so it can be used with other Telnyx services.
- Update stored Dialogflow Connection: Updates a stored Dialogflow Connection.
External Connections
- List all External Connections: This endpoint returns a list of your External Connections inside the ‘data’ attribute of the response. External Connections are used by Telnyx customers to sea…
- Creates an External Connection: Creates a new External Connection based on the parameters sent in the request. The external_sip_connection and outbound voice profile id are required. Once cre…
- Deletes an External Connection: Permanently deletes an External Connection. Deletion may be prevented if the application is in use by phone numbers, is active, or if it is an Operator Connect…
- Retrieve an External Connection: Return the details of an existing External Connection inside the ‘data’ attribute of the response.
- Update an External Connection: Updates settings of an existing External Connection based on the parameters of the request.
- List all civic addresses and locations: Returns the civic addresses and locations from Microsoft Teams.
- Retrieve a Civic Address: Return the details of an existing Civic Address with its Locations inside the ‘data’ attribute of the response.
- Update a location’s static emergency address: Update the static emergency address assigned to a specific location of an external connection.
- List all phone numbers: Returns a list of all active phone numbers associated with the given external connection.
- Retrieve a phone number: Return the details of a phone number associated with the given external connection.
- Update a phone number: Asynchronously update settings of the phone number associated with the given external connection.
- List all Releases: Returns a list of your Releases for the given external connection. These are automatically created when you change the
connection_idof a phone number that i… - Retrieve a Release request: Return the details of a Release request and its phone numbers.
- List all Upload requests: Returns a list of your Upload requests for the given external connection.
- Creates an Upload request: Creates a new Upload request to Microsoft teams with the included phone numbers. Only one of civic_address_id or location_id must be provided, not both. The ma…
- Refresh the status of all Upload requests: Forces a recheck of the status of all pending Upload requests for the given external connection in the background.
- Get the count of pending upload requests: Returns the count of all pending upload requests for the given external connection.
- Retrieve an Upload request: Return the details of an Upload request and its phone numbers.
- Retry an Upload request: If there were any errors during the upload process, this endpoint will retry the upload request. In some cases this will reattempt the existing upload request,…
- List all log messages: Retrieve a list of log messages for all external connections associated with your account.
- Dismiss a log message: Dismiss a log message for an external connection associated with your account.
- Retrieve a log message: Retrieve a log message for an external connection associated with your account.
- Refresh Operator Connect integration: This endpoint will make an asynchronous request to refresh the Operator Connect integration with Microsoft Teams for the current user. This will create new ext…
Call Recordings
- List all call recordings: Returns a list of your call recordings.
- Delete a call recording: Permanently deletes a call recording.
- Retrieve a call recording: Retrieves the details of an existing call recording.
- Delete a list of call recordings: Permanently deletes a list of call recordings.
- List all recording transcriptions: Returns a list of your recording transcriptions.
- Delete a recording transcription: Permanently deletes a recording transcription.
- Retrieve a recording transcription: Retrieves the details of an existing recording transcription.
- Delete a stored credential: Deletes a stored custom credentials configuration.
- Retrieve a stored credential: Returns the information about custom storage credentials.
- Create a custom storage credential: Creates a custom storage credentials configuration.
- Update a stored credential: Updates a stored custom credentials configuration.
Media Storage API
- List uploaded media: Returns a list of stored media files.
- Upload media: Upload media file to Telnyx so it can be used with other Telnyx services
- Deletes stored media: Deletes a stored media file.
- Retrieve stored media: Returns the information about a stored media file.
- Update stored media: Updates a stored media file.
- Download stored media: Downloads a stored media file.