Bring Your Own Carrier: Telnyx & FreePBX

The Telnyx network offers unparalleled security, reliability and call quality. That’s because we’re a true carrier. And, unlike many CPaaS providers, we don’t rely on middlemen to provide core communications functionality and routing.

We built our SIP services so that you can easily integrate Telnyx with any platform to get your business communications set up quickly. Whether you’re looking to integrate with hardware or cloud-based solutions, we empower you to make and receive calls globally with the network built for reliable, enterprise-grade voice services.

This guide shows you how to connect your Telnyx numbers to FreePBX. FreePBX is a web-based, open source GUI (graphical user interface) that controls Asterisk (PBX) open source communication servers. FreePBX can be customized to manage communications for any business, from home offices to global corporations and call centers. Configure this PBX for making and receiving calls over the internet through a next-generation carrier like Telnyx!

What you’ll need to get started with FreePBX:

  1. A Telnyx account - Sign up with your email address, or register with your Google, Facebook or GitHub account - it only takes a few seconds.

A download of FreePBX v14.

How it works

FreePBX

A Telnyx Elastic SIP Trunk is used to connect your IP-based communications infrastructure to the PSTN, so you can make and receive calls globally with our private IP network. We handle all the complexity in routing calls and delivering crystal clear conversations. To connect your Telnyx numbers to your FreePBX platform we need to establish a SIP interface which is completed in these steps:

  1. Set up your Telnyx SIP Trunk Connection.
  2. Authenticate your SIP Trunk with FreePBX.
  3. Configure your FreePBX profile for Inbound and Outbound calling.

Getting Started with Your Telnyx Mission Control Portal

There are four steps needed to set up your Telnyx Mission Control Portal account so that it’s ready to be configured to your PBX phone system, softphone client or softswitch of your choice.

Level 1 Verification:

To complete the below steps, you'll need to be Level 1 verified. Most users will already be Level 1 verified following email confirmation on signup. To check, visit the ‘My Account’ section of your portal account, and navigate to ‘Verifications’. More information on account verification can be found here.

Connection Setup

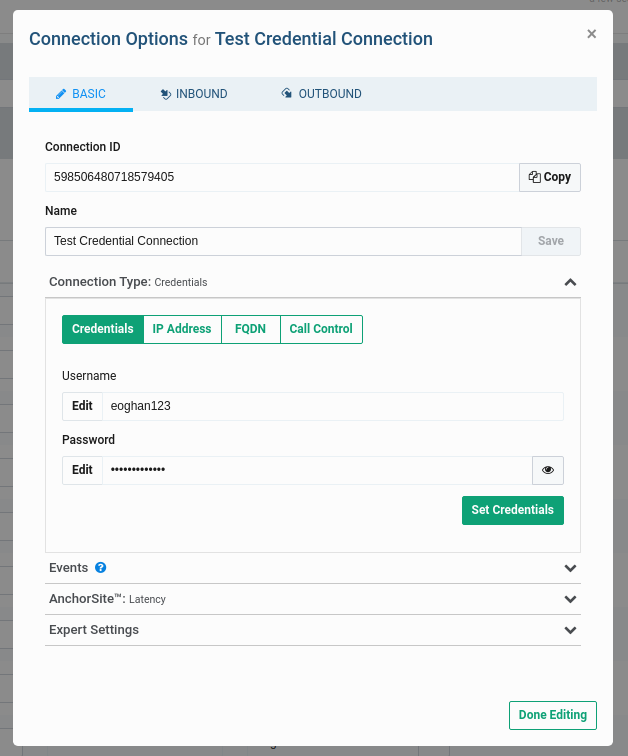
Next, you need to set up a connection to authenticate your client (FreePBX) with our sip proxy ( sip.telnyx.com).

These steps will walk through the setup of a credentials based connection. For information on IP and FQDN, check out the instructions here.

  1. Go to ‘Connections’ from the side navigation.
  2. Click the "+ Add Connection" button near the top right corner of the page.
  3. Enter the name you wish to have for your connection.
  4. Select "Credentials" as the "Connection Type". Click here for IP or FQDN setup.
  5. A username and password will automatically be generated but you change the credentials by clicking the "edit" button to the left. Please make sure you use strong credentials.
  6. Click "Set Credentials".
  7. Click "Done"

Note: Once your credential-based Connection is created, you can display the username and password by clicking the eye icon under the "Auth Detail" column.

DIDs

A DID is required in order to receive inbound calls to your client. After you purchase a DID on your account, you'll have to assign the connection you wish to receive inbound calls to. Information on assigning DIDs to a connection and DID features can be found here. More details on our number search feature can be found here.

Outbound Profile

An outbound profile is required in order to make outbound calls. More information on creating an outbound profile and its features are explained here.

Need additional support to get started?

Check out our support guide. Supplementary information for configuring your client, such as the signaling and media IP’s to our SIP proxy can be found at sip.telnyx.com.

Setup FreePBX for Your Telnyx Connection

Your Mission Control Portal is now setup. You’re ready to configure your Telnyx trunk within your FreePBX V14 system.

FreePBX Installation

Installing FreePBX is fairly straightforward. You’ll just need internet access, and a username and password for your FreePBX account. We’ll point out the important steps to perform a full install using Asterisk 13.

  1. When you load the ISO onto your server or virtual machine, the first screen will ask you to select your installation type.

FreePBX install

  1. Select your preferred video method for the installation. The installer will start once you finish this step.

FreePBX install

  1. Once the installer starts, click on the root password box to set your root password. Type in your root password and confirm it. A root password is required to complete the installation.

FreePBX install 2

  1. The FreePBX installation will start. Installation can take 15 minutes or more to complete, depending on your internet speed.
  2. Once the installation is complete, click on “reboot”.
  3. After the system reboot finishes, you’ll be presented with a Linux command prompt login. Use the username “root” (without quotes) and the root password you set earlier to login.

FreePBX install 3

  1. After you log in, the IP address of your PBX will be displayed under “IP addresses” in the table. Write this IP address down or remember it. You need it for the next step.
  2. Open your web browser and enter the IP address into the URL bar. The first time you do this, you'll be asked to create an admin username, admin password and enter an administrator email address. This username and password will be used to access the FreePBX configuration screen.

FreePBX install 4

Note: These passwords do not change the root password. They are only used for access to the FreePBX web interface.

Basic FreePBX Configuration

After you complete your FreePBX installation, you’ll need to do a few things to complete your basic FreePBX setup. All of these steps are accessed by clicking the “FreePBX Administration” option from the base dashboard, and logging in with the administrator username and password you created. Navigate the interface using the tabs at the top of the screen.

FreePBX config 1

  1. The first time you login, you’ll be guided through a series of steps to activate your FreePBX, including selecting your default language and timezone, and selecting options for your firewall. You’ll return to the dashboard when you’re finished. Now you must confirm your network settings and configure your SIP trunks and extensions.

  2. Click the “Settings” tab, then click “Asterisk SIP Settings”.

FreePBX config 2

  1. Navigate to the “General SIP Settings” tab, and ensure the external and local network addresses are populated. You may need to click “Detect Network Settings” to get the addresses to populate.
  2. Click “Submit”. Then click “Apply Config”.

Extensions Configuration

  1. Click on the “Applications” tab.
  2. Click “Extensions”, then click “Add Extension.”
  3. Click “Add new Chan SIP Extension” to open the SIP extension configuration screen.
  4. Enter the number you purchased in the Telnyx Mission Control Portal in the Outbound CID field.

extension configuration

You may see a warning that says, “This device uses CHAN_SIP technology listening on Port 5160 (UDP - this is a NON STANDARD port)”. This is normal.

  1. You can add an extension password in the “Secret” field. Occasionally, the “Secret” field is located under the “Other” tab.
  2. Click “Submit”, and then click “Apply Config”.

SIP Trunks Configuration

  1. Click the “Connectivity” tab.
  2. Click “Trunks”, then click “Add Trunk”.
  3. Click “Add New Chan SIP Trunk”. This will take you to the “General” tab of the trunk configuration screen.

SIP Trunks configuration

  1. Enter a trunk name.
  2. Enter the outbound CID you added in the extension configuration for the “Outbound CallerID”, and the maximum channels you'd like for this trunk.
  3. Click the “Dialed Number Manipulation Rules” tab.
  4. Depending on your use case, we've provided a simple dial pattern US numbers below.

For US numbers, use these simple dial patterns:

  • prepend: 1; match pattern: NXXNXXXXXX
  • prepend: blank; match pattern: 1NXXNXXXXXX

Use these dialing patterns for international numbers:

  • prepend: Country Dialing prefix; match pattern: NXXNXXXXXX
  • prepend: blank; match pattern: (Country Dialing prefix) NXXNXXXXXX

The configuration should look like this:

SIP Trunks configuration 2

  1. Click on the “SIP Settings” tab.
  2. Click on the “Outgoing” tab. Copy and paste these settings into the “PEER Details” box:
    • type=friend
    • qualify=yes
    • insecure=port,invite
    • host=sip.telnyx.com
    • fromdomain=sip.telnyx.com
    • disallow=all
    • allow=ulaw

SIP Trunks configuration 3

  1. Click on the “Incoming” tab. Copy and paste these settings into the “USER Details” box:
    • type=friend
    • insecure=port,invite
    • host=sip.telnyx.com
    • dtmfmode=rfc2833
    • disallow=all
    • allow=ulaw

SIP Trunks configuration 4

Outbound Routes

  1. Click the “Connectivity” tab.
  2. Click “Outbound Routes”, then click “Add Outbound Route”.
  3. Enter the route name and route CID (the same number you purchased in the Telnyx Mission Control Portal).
  4. Specify the Telnyx_IP trunk in the “Trunk Sequence for Matched Routes”.
  5. Click “Submit”, then click “Apply Config”.

outbound routes

Inbound Routes

  1. Click the “Connectivity” tab.
  2. Click “Inbound Routes”, then click “Add Inbound Route”.
  3. Enter the route name and DID associated with this route.
  4. Specify the extension that should be associated when calls are received to the DID.
  5. Click “Submit”, then click “Apply Config”.

That's it, you've now completed the configuration of FreePBX V14 Credentials Trunk and can now make and receive calls by using Telnyx as your SIP provider!

A little disclaimer: This guide has been developed by our product team to help you get started on the Telnyx platform. It isn’t necessarily supported or verified by the other platform and may vary based on platform version but we are confident in its accuracy.

Support and Additional Resources:

  • Check out FreePBX's help section for extra support!

  • Looking for additional help? Click the Live Chat icon at your lower right-hand corner and start a chat.

On this page