> ## Documentation Index
> Fetch the complete documentation index at: https://developers.telnyx.com/llms.txt
> Use this file to discover all available pages before exploring further.
# Introduction to using Telnyx with Microsoft Teams
> Connect Telnyx phone numbers to Microsoft Teams over Direct Routing SIP trunking. Step-by-step setup for SBC, voice routing, and PSTN calling in Teams.
> You’ll need a Telnyx account to get Teams Direct Routing set up.
> Sign up
> today.
> Looking for more info?
> Find out why Direct Routing is the next big thing in business communications.
**Direct Routing** with Microsoft Teams allows businesses to connect external phone lines to Microsoft Teams and use Teams as an office phone system instead of a legacy PBX system. This means you can maintain your existing SIP trunks and PSTN connectivity -- retaining control over your numbers and realizing cost savings over the MS Teams Calling Plans.
In this user guide, we’ll show Telnyx customers how to use Telnyx as a PSTN provider for Microsoft Teams Direct Routing.
Once set up, Telnyx customers will be able to **buy Numbers** on the Telnyx Mission Control Portal, receive calls from the PSTN to their Teams account, and **send calls** to the PSTN from the same Teams account.
This integration is carried out via the **Telnyx MS Teams SBC**, which interconnects Microsoft Teams with the Telnyx telephony platform. Telnyx SBC uses the base domain **mstsbc.telnyx.tech**, and Telnyx customers will be able to interconnect using a subdomain of **mstsbc.telnyx.tech** and a **token** for authentication.
 > *This product is currently in Beta.
> Reach out to a member of our team for a list of currently supported features.*
This guide is broken down into 4 sections:
1. Telnyx Portal Setup
2. Microsoft 365 Admin Center: Telnyx Subdomain Setup
3. Microsoft Teams: Direct Routing Setup
4. Making Test Calls
## 1. Telnyx Portal Setup
In order to use Telnyx as a PSTN provider for Microsoft Teams Direct Routing you’ll need a Telnyx account, which you can create in our Mission Control Portal
To explore and buy numbers on the Mission Control Portal you can follow these four quick steps:
1. Navigate to the ‘Numbers’ tab on the menu and click ‘Search and Buy Numbers’.
2. Perform a Number Search based on region and features.
3. Enter your chosen criteria and click the ‘Search Numbers’ button. A list of all available numbers with your chosen features will appear.
4. Click the ‘Add to Cart’ button to purchase a number and navigate to the ‘Cart’ at the top right-hand corner of the screen to check out.
Next, you’ll need to set up an **Outbound Voice Profile** to make outbound calls to the PSTN. This can be created from the ‘Outbound Voice Profiles’ tab in the Mission Control Portal. Follow along with our ‘
Getting Started with SIP Trunking’ video on how to set your profile, billing, and anti-fraud preferences.
Once you have your Portal Account up and running you’ll need to set up a new MS Teams SIP Connection- let's get started!
### Create your Telnyx Portal Connection
When you have set up an account in the Mission Control Portal, the first thing you need to do is to set up a new Connection for the Telnyx SBC on the
SIP Connections Page
.
Click **Add SIP Connection** and name your connection. A pop-up window will appear. Give your new connections a name, in this case we'll call it 'MS Teams Trial Connection'. Click **Create SIP Connection**.
> *This product is currently in Beta.
> Reach out to a member of our team for a list of currently supported features.*
This guide is broken down into 4 sections:
1. Telnyx Portal Setup
2. Microsoft 365 Admin Center: Telnyx Subdomain Setup
3. Microsoft Teams: Direct Routing Setup
4. Making Test Calls
## 1. Telnyx Portal Setup
In order to use Telnyx as a PSTN provider for Microsoft Teams Direct Routing you’ll need a Telnyx account, which you can create in our Mission Control Portal
To explore and buy numbers on the Mission Control Portal you can follow these four quick steps:
1. Navigate to the ‘Numbers’ tab on the menu and click ‘Search and Buy Numbers’.
2. Perform a Number Search based on region and features.
3. Enter your chosen criteria and click the ‘Search Numbers’ button. A list of all available numbers with your chosen features will appear.
4. Click the ‘Add to Cart’ button to purchase a number and navigate to the ‘Cart’ at the top right-hand corner of the screen to check out.
Next, you’ll need to set up an **Outbound Voice Profile** to make outbound calls to the PSTN. This can be created from the ‘Outbound Voice Profiles’ tab in the Mission Control Portal. Follow along with our ‘
Getting Started with SIP Trunking’ video on how to set your profile, billing, and anti-fraud preferences.
Once you have your Portal Account up and running you’ll need to set up a new MS Teams SIP Connection- let's get started!
### Create your Telnyx Portal Connection
When you have set up an account in the Mission Control Portal, the first thing you need to do is to set up a new Connection for the Telnyx SBC on the
SIP Connections Page
.
Click **Add SIP Connection** and name your connection. A pop-up window will appear. Give your new connections a name, in this case we'll call it 'MS Teams Trial Connection'. Click **Create SIP Connection**.
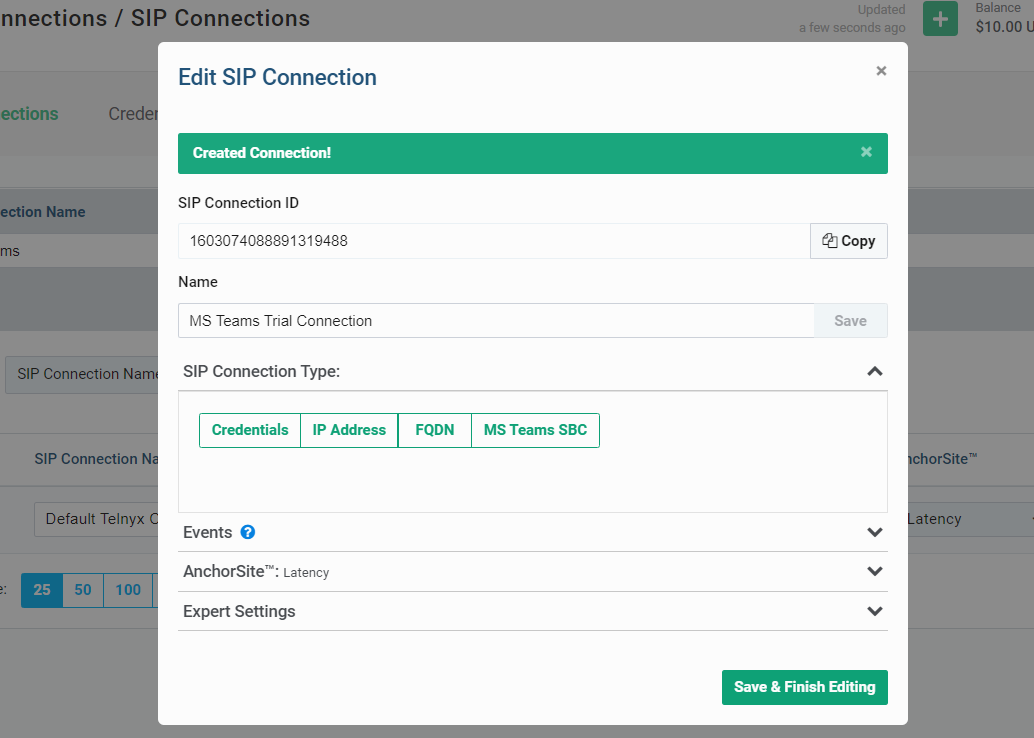 *Creating a new SIP Connection in Mission Control*
An 'Edit SIP Connection' window will appear. Under **SIP Connection Type** choose **MS Teams SBC**. Click **Save & Finish Editing**.
*Creating a new SIP Connection in Mission Control*
An 'Edit SIP Connection' window will appear. Under **SIP Connection Type** choose **MS Teams SBC**. Click **Save & Finish Editing**.
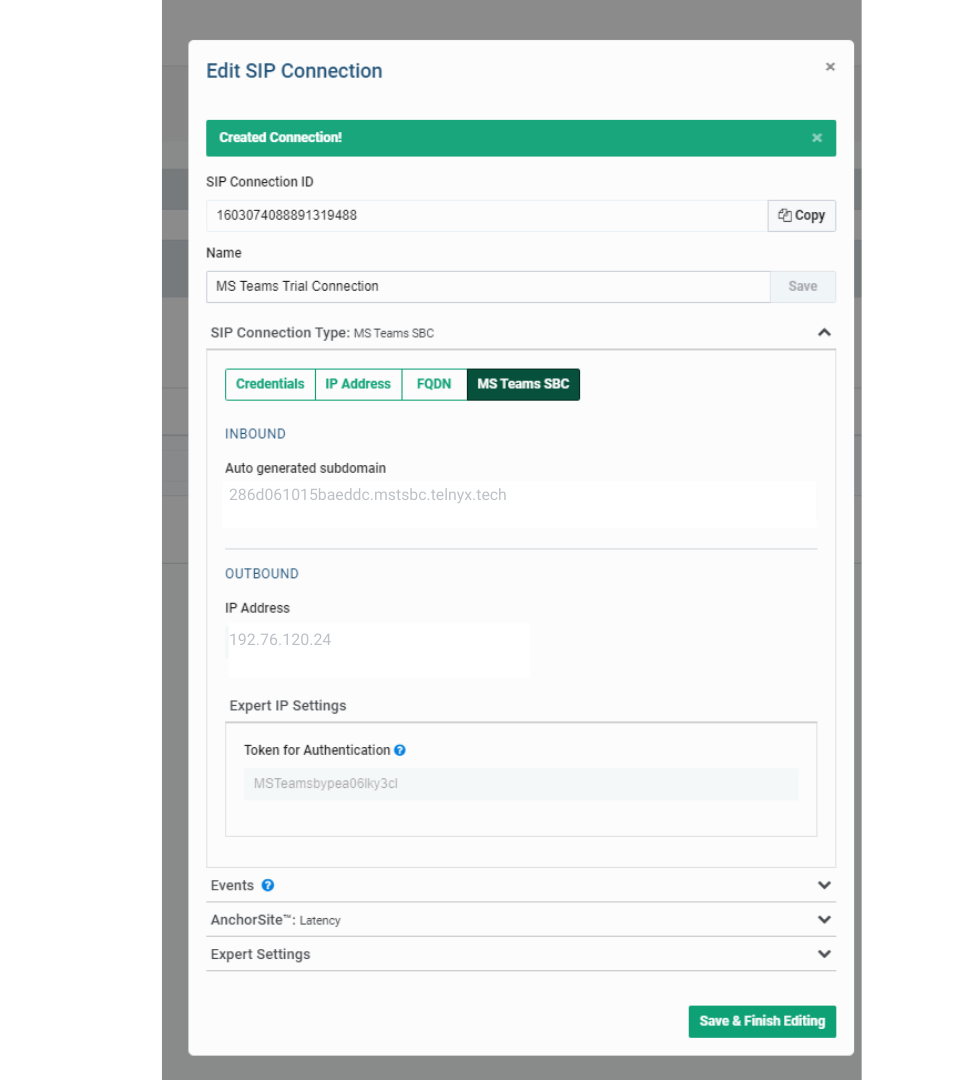 *Creating an MS Teams SBC SIP Connection in Mission Control.*
At this point you'll want to take note of the auto-generated subdomain as it will be needed at different stages during the set up.
### Assign a number to the Telnyx SBC Connection
Next you’ll need to assign a Number to the MS Teams SBC Connection.
In order to do this, you’ll first have to buy a number in the Mission Control Portal, as explained in the Introduction of this guide.
If you have an existing number, navigate to the ‘Numbers’ page and assign your Microsoft Teams connection to the desired DID as shown below.
*Creating an MS Teams SBC SIP Connection in Mission Control.*
At this point you'll want to take note of the auto-generated subdomain as it will be needed at different stages during the set up.
### Assign a number to the Telnyx SBC Connection
Next you’ll need to assign a Number to the MS Teams SBC Connection.
In order to do this, you’ll first have to buy a number in the Mission Control Portal, as explained in the Introduction of this guide.
If you have an existing number, navigate to the ‘Numbers’ page and assign your Microsoft Teams connection to the desired DID as shown below.
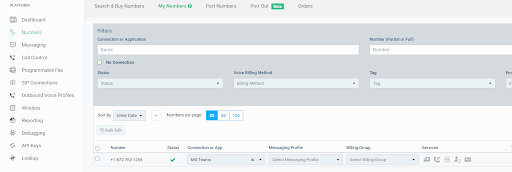 \*Assigning a Telnyx Number to a Microsoft Teams DID connection. \*
### Add your SIP Connection to your Outbound Voice Profile
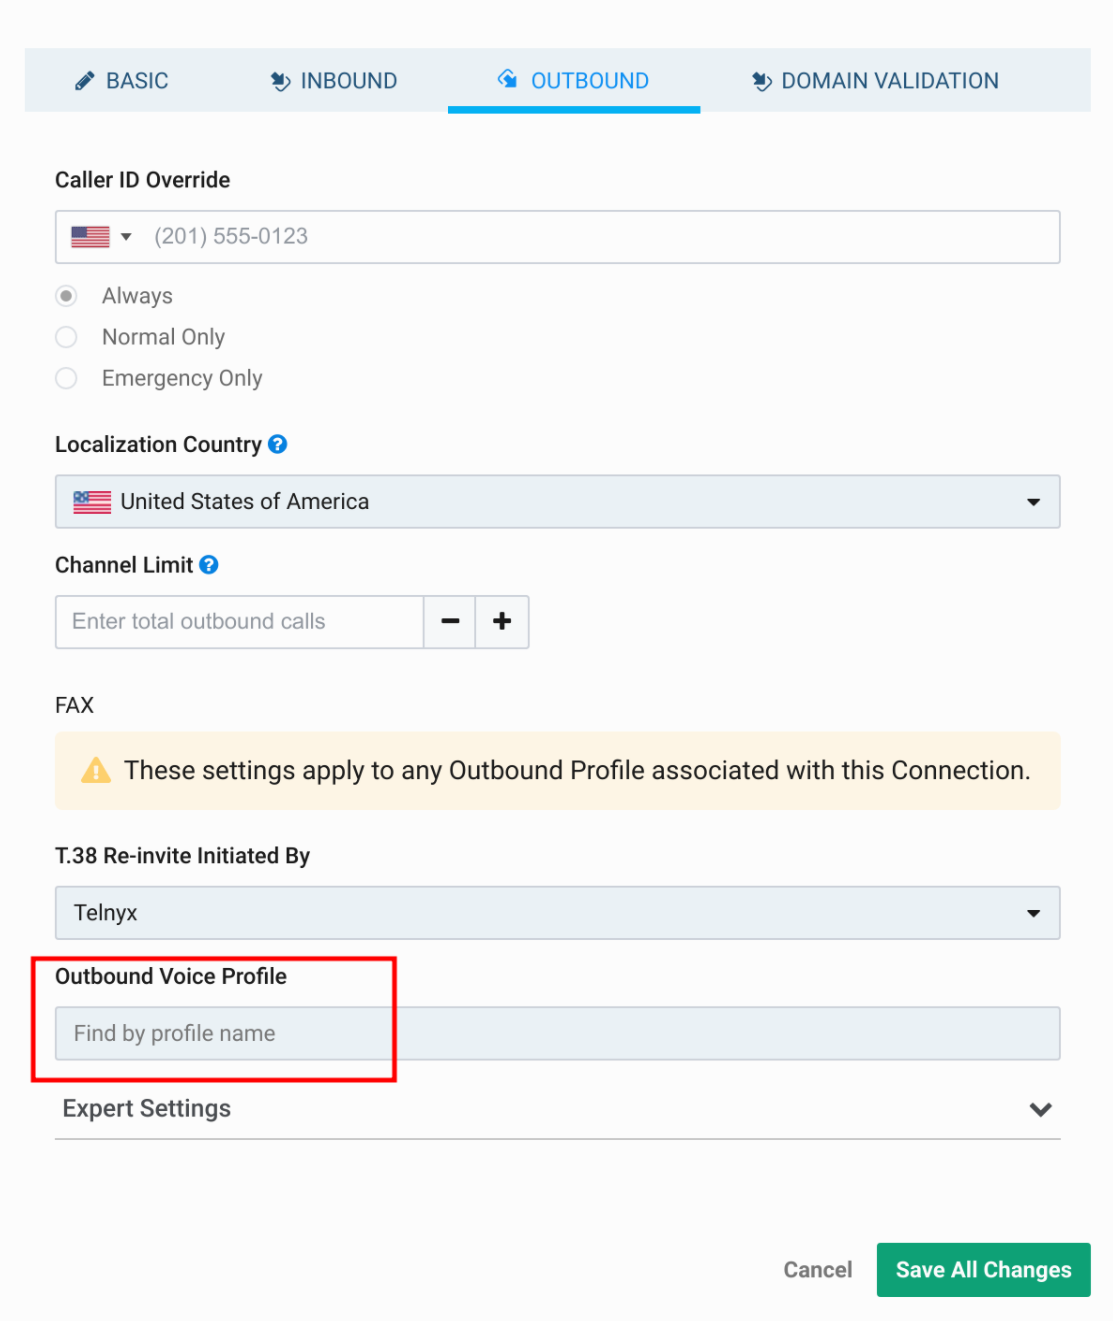
Lastly, you’ll also want to assign the SIP Connection to the Outbound Voice Profile created in the Introduction of this guide. If you don’t have an outbound profile yet you can create it in the tab “Outbound Voice Profiles. Choose the Traffic Types and Allowed Destinations according to your preferences and click **Save**.
You can assign an outbound profile to the MS Teams connection in SIP Connections -> Connection -> Outbound and selecting the “Outbound Voice Profile”. Once completed click on “Save All Changes”.
\*Assigning a Telnyx Number to a Microsoft Teams DID connection. \*
### Add your SIP Connection to your Outbound Voice Profile
Lastly, you’ll also want to assign the SIP Connection to the Outbound Voice Profile created in the Introduction of this guide. If you don’t have an outbound profile yet you can create it in the tab “Outbound Voice Profiles. Choose the Traffic Types and Allowed Destinations according to your preferences and click **Save**.
You can assign an outbound profile to the MS Teams connection in SIP Connections -> Connection -> Outbound and selecting the “Outbound Voice Profile”. Once completed click on “Save All Changes”.
 ## 2. Microsoft 365 Admin Center: Telnyx Subdomain Setup
Now that your Mission Control Portal is set up and ready to go, you’ll need to activate the subdomain in the Microsoft admin portal before setting up Direct Routing in Microsoft Teams.
### Microsoft Teams licensing requirements
Microsoft Teams Direct Routing does not require users to have Microsoft 365 E5 or Office 365 E5.
Each user who will make or receive PSTN calls through Direct Routing must have:
* A Microsoft Teams license, or a Microsoft 365 or Office 365 plan that includes Microsoft Teams.
* A Teams Phone license or Teams Phone entitlement. Teams Phone Standard is one common add-on when Teams Phone is not already included in the user's Microsoft bundle.
* Direct Routing configuration for the user, including a phone number assignment and the relevant voice routing policy.
E5 is a valid licensing path because it includes Teams Phone, but E5 is not mandatory. For example, users on eligible E1, E3, Business, Frontline, Education, or Government plans can use Direct Routing when they also have the required Teams Phone entitlement and Teams availability for that plan.
A Microsoft Calling Plan is not required when Telnyx provides PSTN connectivity through Direct Routing.
Sources:
* [Microsoft Direct Routing planning and licensing requirements](https://learn.microsoft.com/en-us/microsoftteams/direct-routing-plan#licensing-and-other-requirements)
* [Microsoft user enablement for Direct Routing](https://learn.microsoft.com/en-us/microsoftteams/direct-routing-enable-users)
* [Microsoft Teams add-on licensing](https://learn.microsoft.com/en-us/microsoftteams/teams-add-on-licensing/microsoft-teams-add-on-licensing)
Before you start, ensure you have the appropriate rights in the customer tenant. You can only add new domains if you signed in to the Microsoft 365 admin center as a Global Administrator. To validate the role you have, please sign in to the Microsoft 365 admin center (
[https://portal.office.com](https://portal.office.com)) and go to Users → Active Users and then verify that you have a **Global Administrator** role.
### Add a subdomain to the customer tenant
Navigate to Setup → Domains → Add Domain in the Microsoft 365 admin center. Add the subdomain that was automatically generated when the Telnyx Portal Connection was created in Section 1.
## 2. Microsoft 365 Admin Center: Telnyx Subdomain Setup
Now that your Mission Control Portal is set up and ready to go, you’ll need to activate the subdomain in the Microsoft admin portal before setting up Direct Routing in Microsoft Teams.
### Microsoft Teams licensing requirements
Microsoft Teams Direct Routing does not require users to have Microsoft 365 E5 or Office 365 E5.
Each user who will make or receive PSTN calls through Direct Routing must have:
* A Microsoft Teams license, or a Microsoft 365 or Office 365 plan that includes Microsoft Teams.
* A Teams Phone license or Teams Phone entitlement. Teams Phone Standard is one common add-on when Teams Phone is not already included in the user's Microsoft bundle.
* Direct Routing configuration for the user, including a phone number assignment and the relevant voice routing policy.
E5 is a valid licensing path because it includes Teams Phone, but E5 is not mandatory. For example, users on eligible E1, E3, Business, Frontline, Education, or Government plans can use Direct Routing when they also have the required Teams Phone entitlement and Teams availability for that plan.
A Microsoft Calling Plan is not required when Telnyx provides PSTN connectivity through Direct Routing.
Sources:
* [Microsoft Direct Routing planning and licensing requirements](https://learn.microsoft.com/en-us/microsoftteams/direct-routing-plan#licensing-and-other-requirements)
* [Microsoft user enablement for Direct Routing](https://learn.microsoft.com/en-us/microsoftteams/direct-routing-enable-users)
* [Microsoft Teams add-on licensing](https://learn.microsoft.com/en-us/microsoftteams/teams-add-on-licensing/microsoft-teams-add-on-licensing)
Before you start, ensure you have the appropriate rights in the customer tenant. You can only add new domains if you signed in to the Microsoft 365 admin center as a Global Administrator. To validate the role you have, please sign in to the Microsoft 365 admin center (
[https://portal.office.com](https://portal.office.com)) and go to Users → Active Users and then verify that you have a **Global Administrator** role.
### Add a subdomain to the customer tenant
Navigate to Setup → Domains → Add Domain in the Microsoft 365 admin center. Add the subdomain that was automatically generated when the Telnyx Portal Connection was created in Section 1.
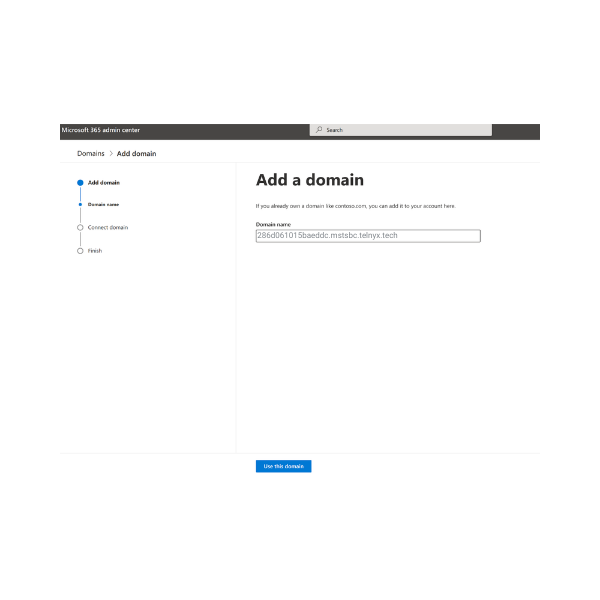 *Adding a subdomain in Microsoft 365 admin center*
### Verify the subdomain
Click on **Next** and verify the domain on the following page. Then select **Add a TXT record instead**.
*Adding a subdomain in Microsoft 365 admin center*
### Verify the subdomain
Click on **Next** and verify the domain on the following page. Then select **Add a TXT record instead**.
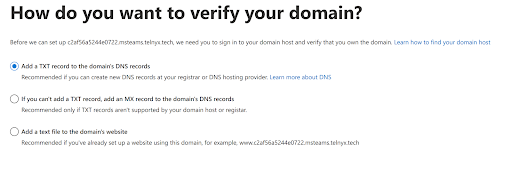 *Verifying the domain on Microsoft Teams*
Click **Next** and take note of the TXT value.
*Verifying the domain on Microsoft Teams*
Click **Next** and take note of the TXT value.
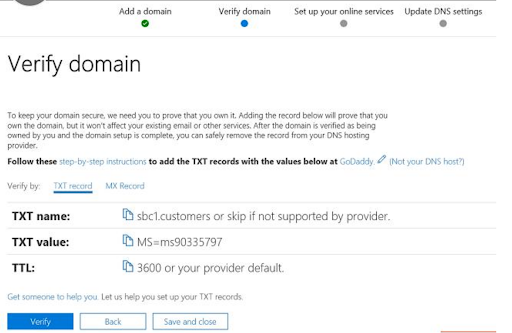 *Information required to verify the domain.*
### Share the TXT value with Telnyx
Go back to your Telnyx MS Teams SBC SIP Connection in the Mission Control Portal and click the **Edit** button on your new connection. Navigate to the ‘Domain Validation’ tab in this window and paste the TXT Value from the MS Teams portal into the ‘TXT Value’ field on your Telnyx SIP Connection. Click **Save All Changes**.
The TXT Name and TTL fields should match the fields shown in Microsoft 365 admin center, so they can’t be edited.
*Information required to verify the domain.*
### Share the TXT value with Telnyx
Go back to your Telnyx MS Teams SBC SIP Connection in the Mission Control Portal and click the **Edit** button on your new connection. Navigate to the ‘Domain Validation’ tab in this window and paste the TXT Value from the MS Teams portal into the ‘TXT Value’ field on your Telnyx SIP Connection. Click **Save All Changes**.
The TXT Name and TTL fields should match the fields shown in Microsoft 365 admin center, so they can’t be edited.
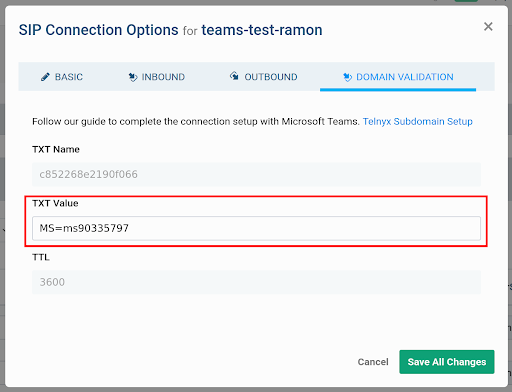 *Adding the TXT Value to the Telnyx SIP Connection in Mission Control*
Once changes are saved go back to Microsoft 365 admin center and click on the **Verify** button.
*Adding the TXT Value to the Telnyx SIP Connection in Mission Control*
Once changes are saved go back to Microsoft 365 admin center and click on the **Verify** button.
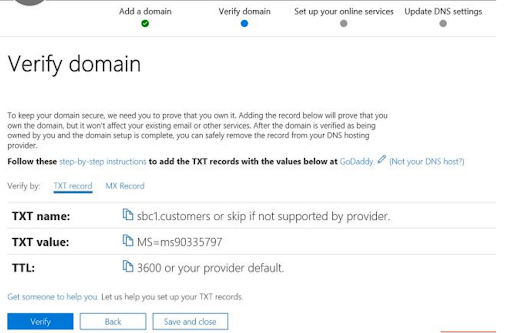 *Verifying the subdomain in MS Teams*
**Note:** It’s OK if the domain status shows “No services selected”. You don’t need to add SPF records. SPF records are a requirement for email but not for Direct Routing.
### Update DNS settings
On the next page, select **More Options** and the select **Skip and do this later** and click **Next**.
*Verifying the subdomain in MS Teams*
**Note:** It’s OK if the domain status shows “No services selected”. You don’t need to add SPF records. SPF records are a requirement for email but not for Direct Routing.
### Update DNS settings
On the next page, select **More Options** and the select **Skip and do this later** and click **Next**.
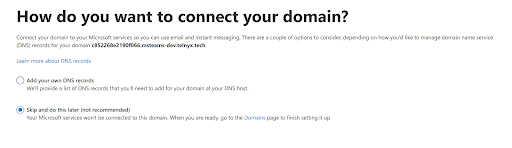 *Check the ‘Skip and do this later’.*
After this you'll see a screen menu indicating that the setup is complete.
*Check the ‘Skip and do this later’.*
After this you'll see a screen menu indicating that the setup is complete.
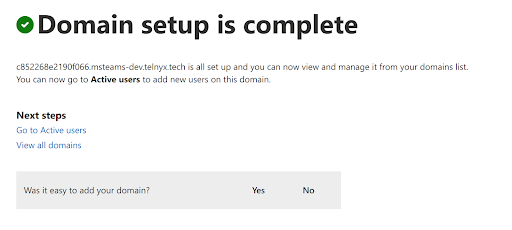 *Domain setup is complete*
### Activate the subdomain
After you have registered a domain name, you’ll need to activate it. You can do this by **adding at least one user** and **assigning a domain** that matches the subdomain that was automatically generated when the Telnyx Portal Connection was created in Section 1.
To do this, navigate to Users → Active users → Add a user in the Microsoft admin center.
*Domain setup is complete*
### Activate the subdomain
After you have registered a domain name, you’ll need to activate it. You can do this by **adding at least one user** and **assigning a domain** that matches the subdomain that was automatically generated when the Telnyx Portal Connection was created in Section 1.
To do this, navigate to Users → Active users → Add a user in the Microsoft admin center.
 *Adding users to activate the subdomain*
Next, fill in the **User details**, select the Telnyx subdomain (i.e yyyy.msteams.telnyx.com), assign a license that includes Microsoft Teams, and click **Add**. You can remove this temporary user or reassign its license once you're able to add this domain to Direct Routing.
*Adding users to activate the subdomain*
Next, fill in the **User details**, select the Telnyx subdomain (i.e yyyy.msteams.telnyx.com), assign a license that includes Microsoft Teams, and click **Add**. You can remove this temporary user or reassign its license once you're able to add this domain to Direct Routing.
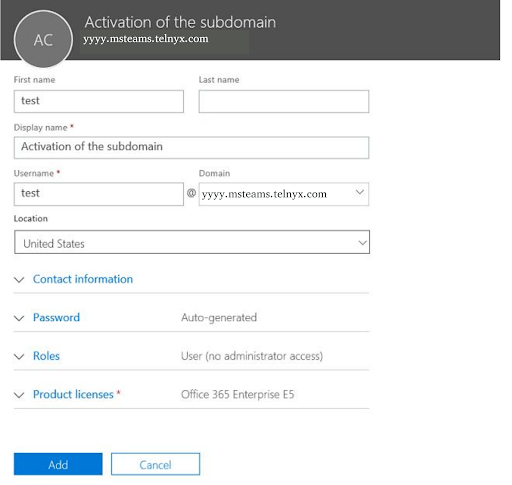 *Activating the subdomain*
## 3. Microsoft Teams: Direct Routing Setup
Here, we’ll take a look at how to set up the Telnyx SBC subdomain in the Microsoft Teams admin center. Before users make or receive PSTN calls through Direct Routing, make sure they have the required Teams and Teams Phone licensing described above, a phone number assignment, and the relevant voice routing policy. Keep in mind that the changes on the MS Teams admin portal may take up to 24 hours to take effect.
### Adding the Telnyx SBC in Direct Routing
In the left tab of the Microsoft Teams admin center, navigate to ‘Voice → Direct Routing’. Click the **SBCs** tab.
*Activating the subdomain*
## 3. Microsoft Teams: Direct Routing Setup
Here, we’ll take a look at how to set up the Telnyx SBC subdomain in the Microsoft Teams admin center. Before users make or receive PSTN calls through Direct Routing, make sure they have the required Teams and Teams Phone licensing described above, a phone number assignment, and the relevant voice routing policy. Keep in mind that the changes on the MS Teams admin portal may take up to 24 hours to take effect.
### Adding the Telnyx SBC in Direct Routing
In the left tab of the Microsoft Teams admin center, navigate to ‘Voice → Direct Routing’. Click the **SBCs** tab.
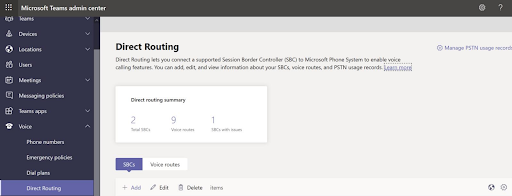 *Direct Routing in the Microsoft Teams admin center.*
### Enter the SBC settings
Click **Add** and enter the subdomain that was automatically generated when the Telnyx Portal Connection was created in Section 1. Set the SBC to use SIP signaling port 5061, check that **SIP options** and the connection are enabled. When you’re done click **Save**.
*Direct Routing in the Microsoft Teams admin center.*
### Enter the SBC settings
Click **Add** and enter the subdomain that was automatically generated when the Telnyx Portal Connection was created in Section 1. Set the SBC to use SIP signaling port 5061, check that **SIP options** and the connection are enabled. When you’re done click **Save**.
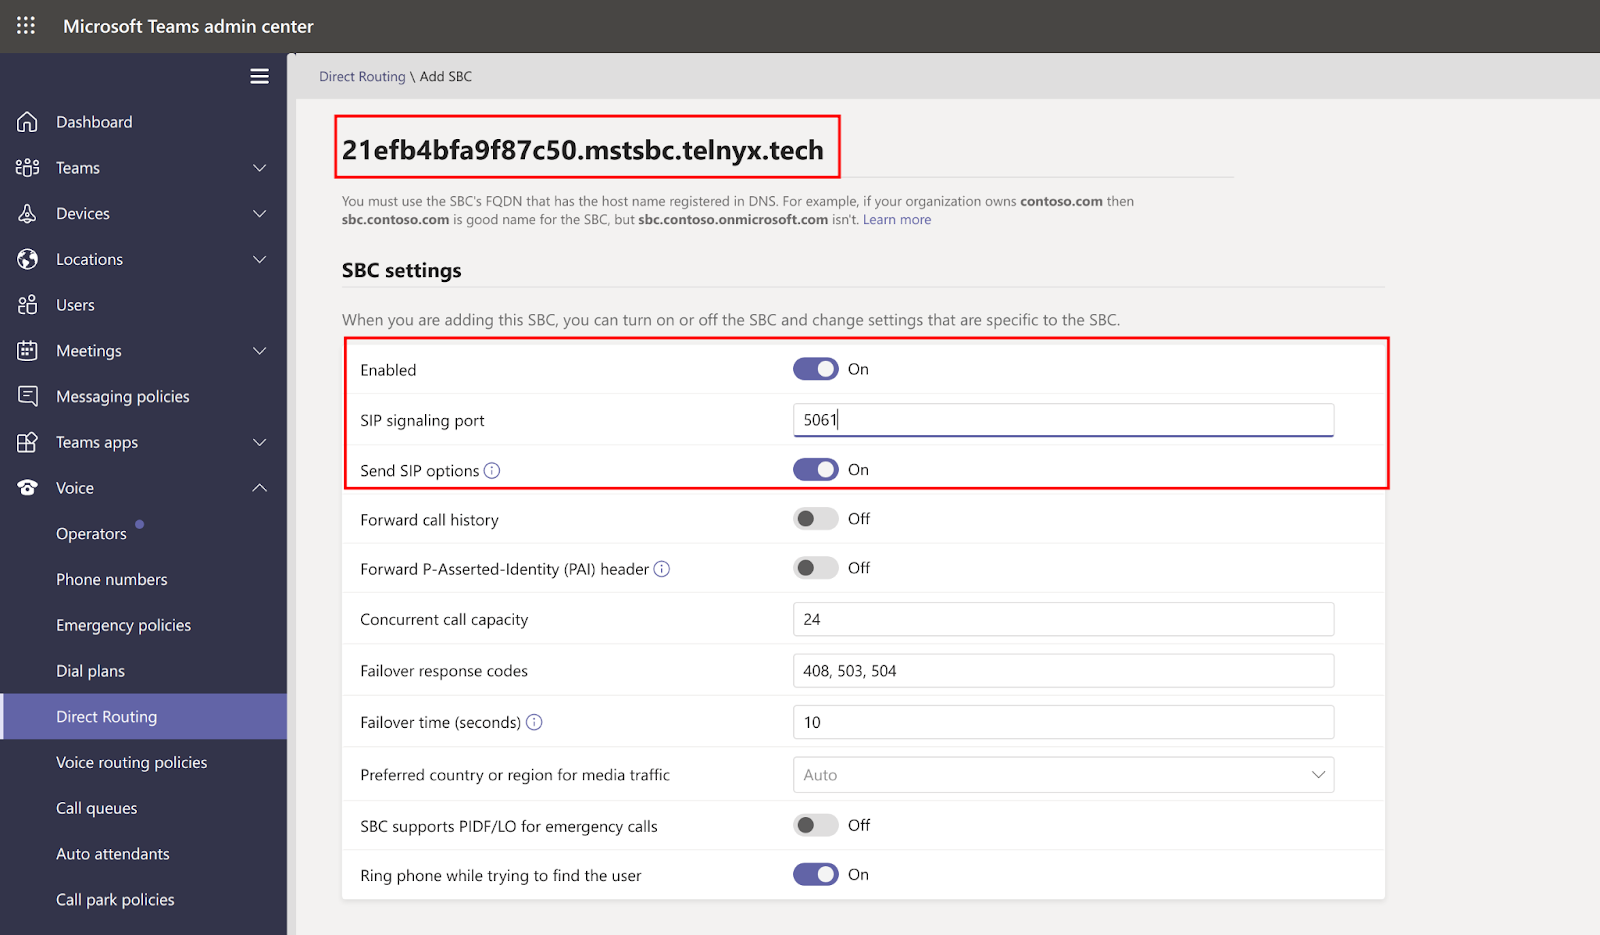 *Enter SBC settings in Microsoft Teams*
Once you save the changes, the connection should look like this:
*Enter SBC settings in Microsoft Teams*
Once you save the changes, the connection should look like this:
 *Example Connection in Microsoft Teams*
### Create PSTN usage records
This step enables PSTN usage for Direct Routing. In the left tab, navigate to Voice → Direct Routing. In the upper right-hand corner, select **Manage PSTN usage records**.
*Example Connection in Microsoft Teams*
### Create PSTN usage records
This step enables PSTN usage for Direct Routing. In the left tab, navigate to Voice → Direct Routing. In the upper right-hand corner, select **Manage PSTN usage records**.
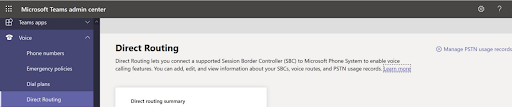 *Manage PSTN Usage Records*
Click **Add**, type **TELNYX**, and then click **Apply**.
*Manage PSTN Usage Records*
Click **Add**, type **TELNYX**, and then click **Apply**.
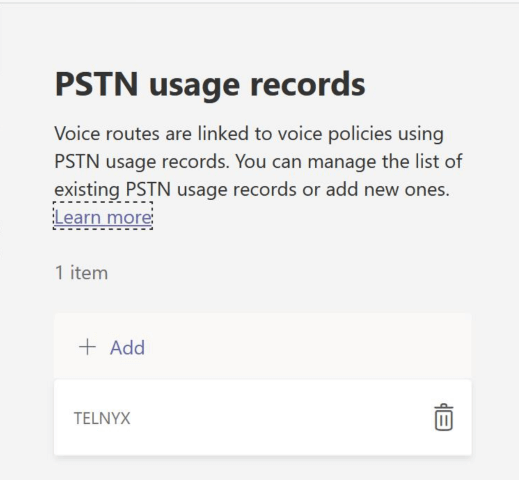 *Creating PSTN Usage Records*
### Creating Voice Routes
Now you’ll need to create a pass-through voice route. In the left-hand tab of the admin center, navigate to Voice → Direct Routing. When on the Directing Routing page, select the **Voice routes** tab.
Click **Add**, and then enter a name and description for the voice route.
Set the priority and specify the dialed number pattern as per your service provider’s numbering plan.
*Creating PSTN Usage Records*
### Creating Voice Routes
Now you’ll need to create a pass-through voice route. In the left-hand tab of the admin center, navigate to Voice → Direct Routing. When on the Directing Routing page, select the **Voice routes** tab.
Click **Add**, and then enter a name and description for the voice route.
Set the priority and specify the dialed number pattern as per your service provider’s numbering plan.
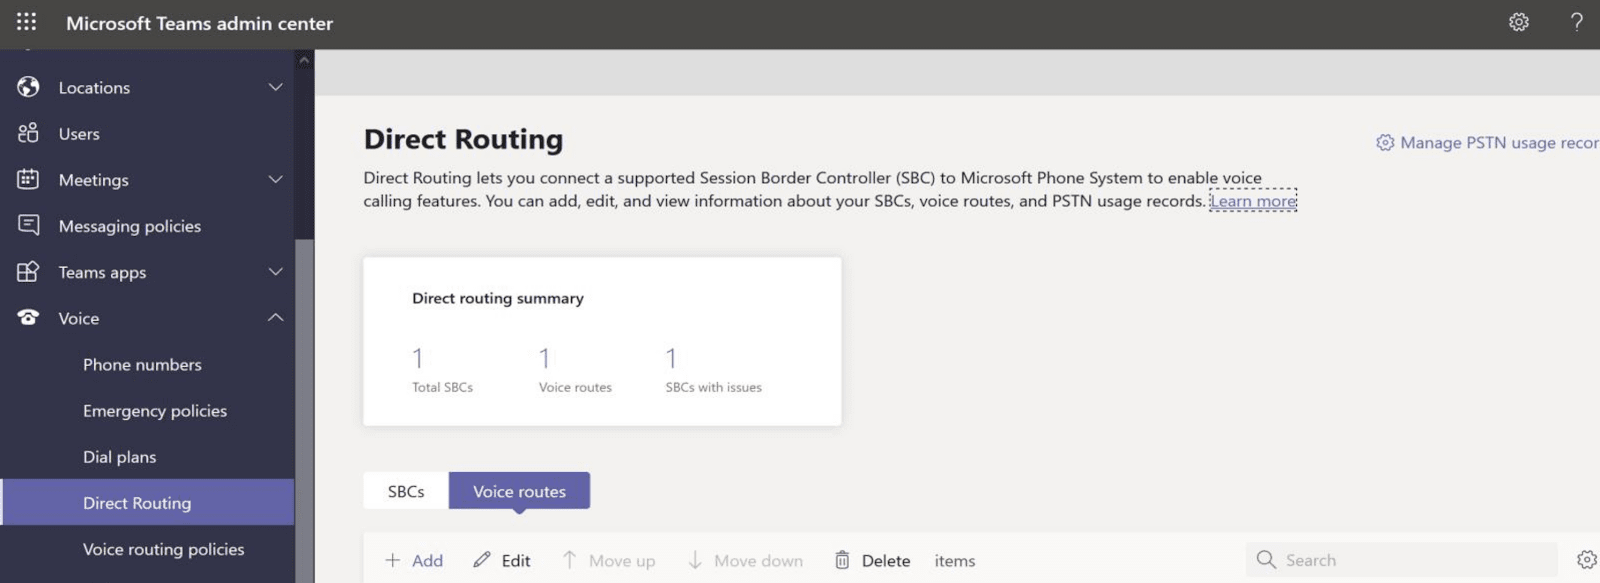 *Creating Voice Routes in Microsoft Teams*
### Enroll SBC
To **enroll SBC** with the voice route, navigate to SBCs enrolled on the **Direct Routing** page. Click ‘Add SBCs’, select the SBCs you want to enroll, and then click **Apply**.
To add **PSTN usage records**, navigate to the PSTN usage records section. Click **Add PSTN usage**, select the PSTN records you want to add, and then click **Apply**.
Note that for this example we included “^(.\*)\$”, which allows you to dial any destination. We recommend using a different pattern if you want to include restrictions.
*Creating Voice Routes in Microsoft Teams*
### Enroll SBC
To **enroll SBC** with the voice route, navigate to SBCs enrolled on the **Direct Routing** page. Click ‘Add SBCs’, select the SBCs you want to enroll, and then click **Apply**.
To add **PSTN usage records**, navigate to the PSTN usage records section. Click **Add PSTN usage**, select the PSTN records you want to add, and then click **Apply**.
Note that for this example we included “^(.\*)\$”, which allows you to dial any destination. We recommend using a different pattern if you want to include restrictions.
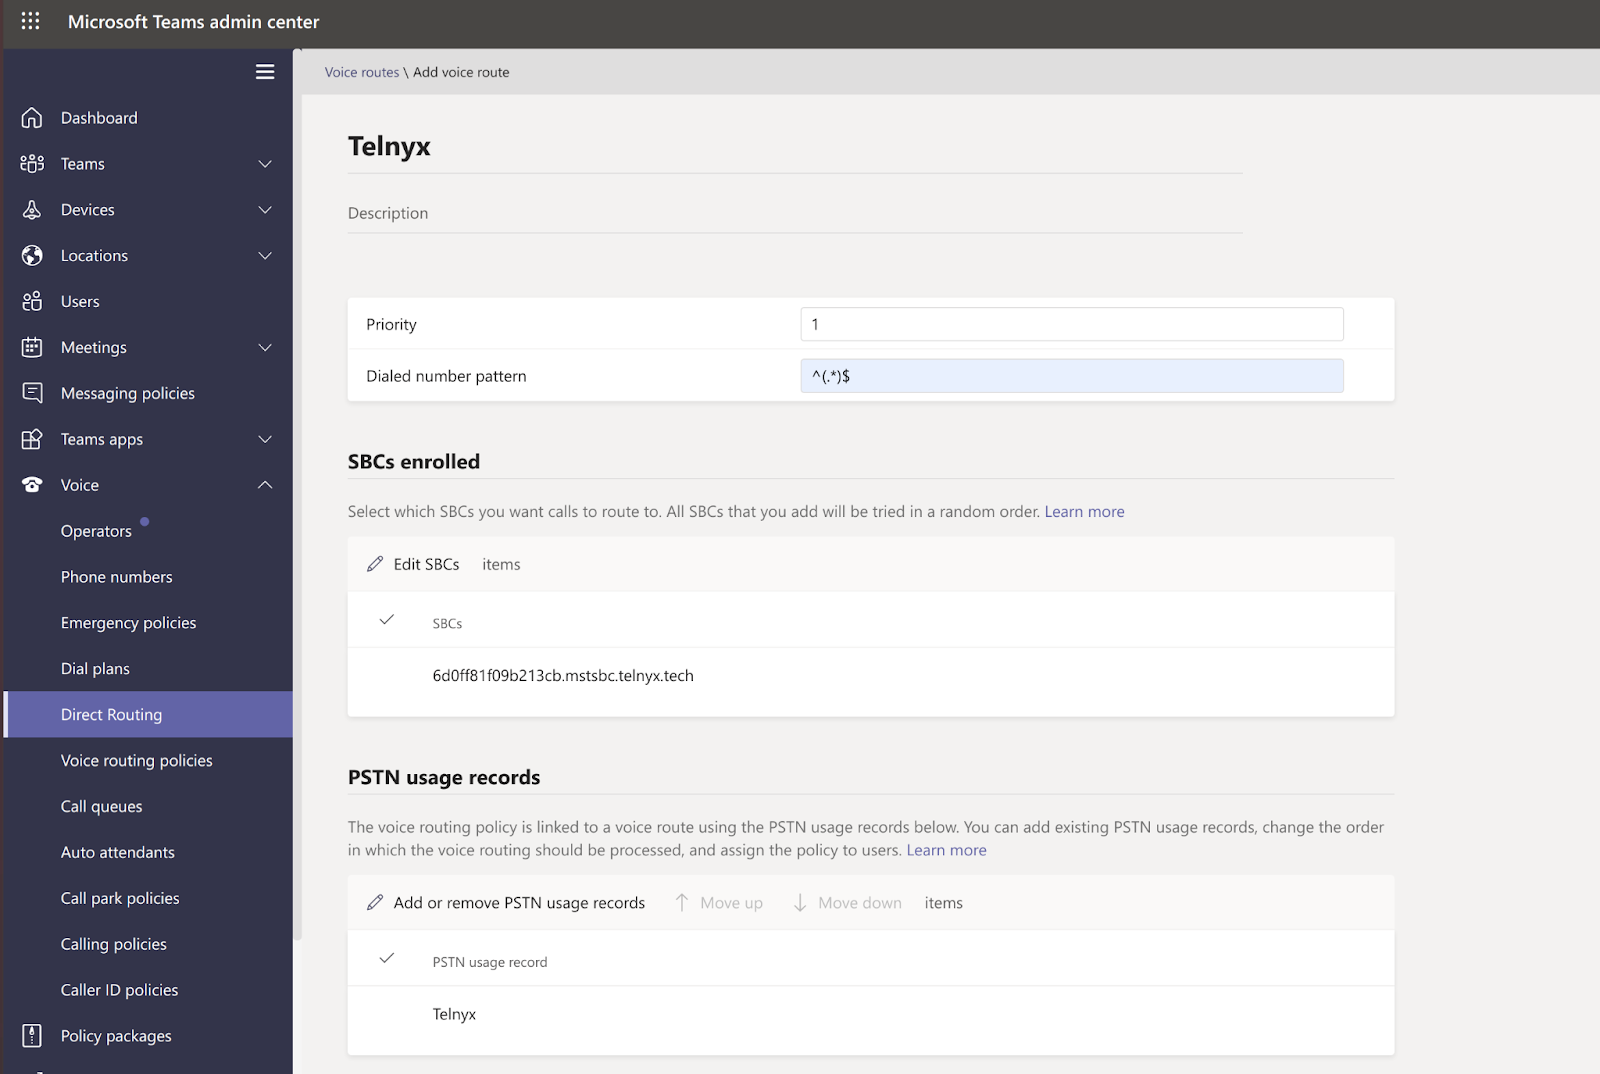 \*Enrolling SBC’s and adding PSTN usage records in Microsoft Teams. \*
### Voice Routing Policies
In the left tab of the Microsoft Teams admin center, navigate to Voice → Voice routing policies, and then click **Add**. Type **TELNYX** as the name and add a description.
\*Enrolling SBC’s and adding PSTN usage records in Microsoft Teams. \*
### Voice Routing Policies
In the left tab of the Microsoft Teams admin center, navigate to Voice → Voice routing policies, and then click **Add**. Type **TELNYX** as the name and add a description.
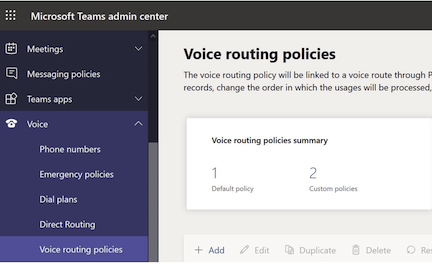 *Adding Voice Routing Policies in Microsoft Teams*
### PSTN usage records
Under PSTN usage records, click **Add PSTN usage**, select the "TELNYX" PSTN usage record, and then click **Apply**.
*Adding Voice Routing Policies in Microsoft Teams*
### PSTN usage records
Under PSTN usage records, click **Add PSTN usage**, select the "TELNYX" PSTN usage record, and then click **Apply**.
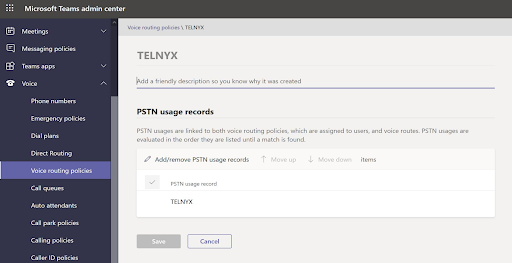 *Adding PSTN Usage Records*
### Assigning Dialplan and Voice routing policies
Under ‘Users’ in the tab on the left-hand side, click **Policies**. Select **Edit** and assign "TELNYX" Dial plan and Voice routing policy, and then click **Apply**.
*Adding PSTN Usage Records*
### Assigning Dialplan and Voice routing policies
Under ‘Users’ in the tab on the left-hand side, click **Policies**. Select **Edit** and assign "TELNYX" Dial plan and Voice routing policy, and then click **Apply**.
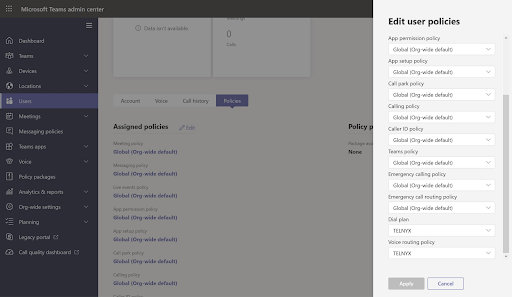 \*Assigning the Telnyx dial plan and voice routing policy in Microsoft Teams. \*
### Assigning Telnyx DID to On-premises PSTN Connectivity
#### Running Powershell Commands
To provision a user with an on-premises phone number using powershell run the following cmdlet:
```
Ps> Set-CsUser -Identity "" -OnPremLineURI tel:<+E164 phone number>
```
To activate a user with enterprise voice using powershell, run the following cmdlet:
```
Ps> Set-CsUser -Identity "" -EnterpriseVoiceEnabled $true
```
## 4. Making Test Calls with Microsoft Teams
Don’t worry, you’re nearly there!
The last step is to test inbound and outbound calls from Microsoft Teams to verify the service is working. To do this, follow these short steps:
1. Call a PSTN number from the Microsoft Teams client. You’ll want to confirm the call connects through Telnyx and that there is two-way audio.
2. Call a Telnyx DID assigned to both your new Microsoft Teams Portal Connection and one of your Microsoft Teams users in the Microsoft Admin Center from the PSTN (i.e. a cell phone). Confirm that the call is received in Microsoft Teams and there is two-way audio.
3. Check that both calls went through your Telnyx portal account by checking your CDRs present in the Reporting section of the Telnyx
Mission Control Portal. If there's any difficulty with making/receiving calls, then please send us an email to [support@telnyx.com](mailto:support@telnyx.com) (including a note of the number dialed and the date/time) and we'll do our best to help you out.
And that’s it. You’ve successfully set up Microsoft Teams Direct Routing using Telnyx.
## Emergency Dynamic Location Routing using PIDF-LO
Dynamic location routing (DLR) is now available for Telnyx Direct Routing customers. Users who wish to set up DLR for Direct Routing need to have:
1. Microsoft Teams Emergency Calling configured according to
Microsoft specifications
2. Associated any number they wish to activate DLR on with a Microsoft Teams Direct Routing SIP Connection.
Based on the user's location at the moment of the 911 call, Telnyx Microsoft Teams Direct Routing Dynamic Location Routing (DLR) offers routing and locating capabilities for emergency calls.
Even though Microsoft Teams handles most configurations and location management, user by user, Telnyx offers the essential enriched connection to the proper Public Safety Answering Point (PSAP) and the caller's location information is made accessible to the emergency operator.
\*Assigning the Telnyx dial plan and voice routing policy in Microsoft Teams. \*
### Assigning Telnyx DID to On-premises PSTN Connectivity
#### Running Powershell Commands
To provision a user with an on-premises phone number using powershell run the following cmdlet:
```
Ps> Set-CsUser -Identity "" -OnPremLineURI tel:<+E164 phone number>
```
To activate a user with enterprise voice using powershell, run the following cmdlet:
```
Ps> Set-CsUser -Identity "" -EnterpriseVoiceEnabled $true
```
## 4. Making Test Calls with Microsoft Teams
Don’t worry, you’re nearly there!
The last step is to test inbound and outbound calls from Microsoft Teams to verify the service is working. To do this, follow these short steps:
1. Call a PSTN number from the Microsoft Teams client. You’ll want to confirm the call connects through Telnyx and that there is two-way audio.
2. Call a Telnyx DID assigned to both your new Microsoft Teams Portal Connection and one of your Microsoft Teams users in the Microsoft Admin Center from the PSTN (i.e. a cell phone). Confirm that the call is received in Microsoft Teams and there is two-way audio.
3. Check that both calls went through your Telnyx portal account by checking your CDRs present in the Reporting section of the Telnyx
Mission Control Portal. If there's any difficulty with making/receiving calls, then please send us an email to [support@telnyx.com](mailto:support@telnyx.com) (including a note of the number dialed and the date/time) and we'll do our best to help you out.
And that’s it. You’ve successfully set up Microsoft Teams Direct Routing using Telnyx.
## Emergency Dynamic Location Routing using PIDF-LO
Dynamic location routing (DLR) is now available for Telnyx Direct Routing customers. Users who wish to set up DLR for Direct Routing need to have:
1. Microsoft Teams Emergency Calling configured according to
Microsoft specifications
2. Associated any number they wish to activate DLR on with a Microsoft Teams Direct Routing SIP Connection.
Based on the user's location at the moment of the 911 call, Telnyx Microsoft Teams Direct Routing Dynamic Location Routing (DLR) offers routing and locating capabilities for emergency calls.
Even though Microsoft Teams handles most configurations and location management, user by user, Telnyx offers the essential enriched connection to the proper Public Safety Answering Point (PSAP) and the caller's location information is made accessible to the emergency operator.
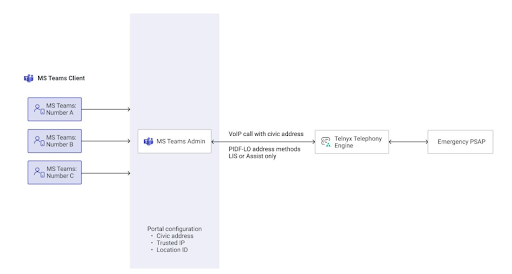 *Solution diagram*
## What is PIDF-LO
The PIDF-LO (Presence Information Data Format – Location Object) provides a flexible and versatile means to represent location information in a SIP header using an XML schema.
This XML schema has all the relevant information associated with the Microsoft Teams user location, according to the information configured on the Microsoft Teams account.
This information will be added to all 911 calls made through Microsoft Teams Director Routing, on the SIP INVITE, which will be made available to the 911 PSAP.
To get started
reach out to a member of our support team for assistance.
*Note that Telnyx only supports PIDF-LO LIS and ASSIST methods.*
*Solution diagram*
## What is PIDF-LO
The PIDF-LO (Presence Information Data Format – Location Object) provides a flexible and versatile means to represent location information in a SIP header using an XML schema.
This XML schema has all the relevant information associated with the Microsoft Teams user location, according to the information configured on the Microsoft Teams account.
This information will be added to all 911 calls made through Microsoft Teams Director Routing, on the SIP INVITE, which will be made available to the 911 PSAP.
To get started
reach out to a member of our support team for assistance.
*Note that Telnyx only supports PIDF-LO LIS and ASSIST methods.*
### Can’t find what you’re looking for?
If you’re looking for more information about Telnyx SIP Trunking, take a look at our
product page where you’ll find details about our features and pricing.
If you need some extra help, our support team is always on hand to answer any questions.- don’t hesitate to
get in touch.