> ## Documentation Index
> Fetch the complete documentation index at: https://developers.telnyx.com/llms.txt
> Use this file to discover all available pages before exploring further.
# Bring Your Own Carrier: Telnyx & Genesys Cloud
> Connect Telnyx phone numbers to Genesys Cloud over SIP trunking. Step-by-step setup for credentials, BYOC trunk, and inbound/outbound call routing.
This guide provides instructions and technical details for the configuration of SIP trunk connectivity between Genesys Cloud and Telnyx.
Before you get started you'll have to have the following set up:
1. Have created an account with Telnyx
2. Completed L2 verification
3. Purchased a number to be used for voice calls.
## Creating a SIP connection
In the Telnyx Mission Control Portal navigate to the "Voice” tab on the left side menu and select "SIP Trunking". Click on the “Add SIP Connection” button.
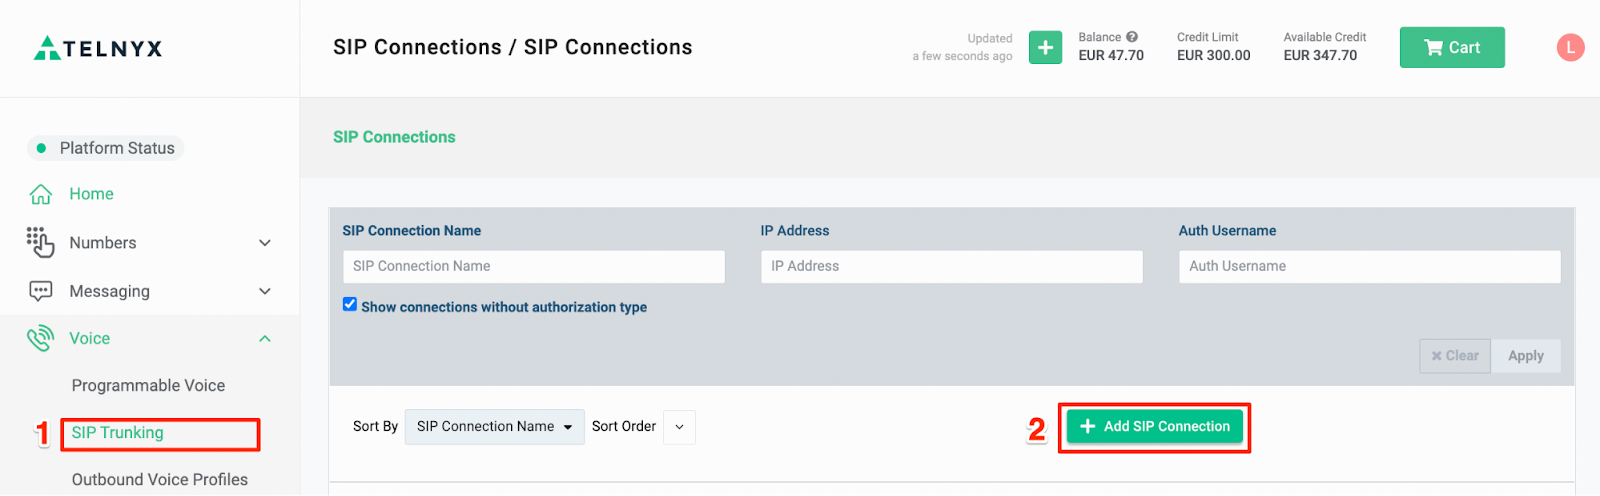 *Creating a SIP Trunk in Mission Control*
Name your SIP connection to make it easy to find.
*Creating a SIP Trunk in Mission Control*
Name your SIP connection to make it easy to find.
 *Naming your connection*
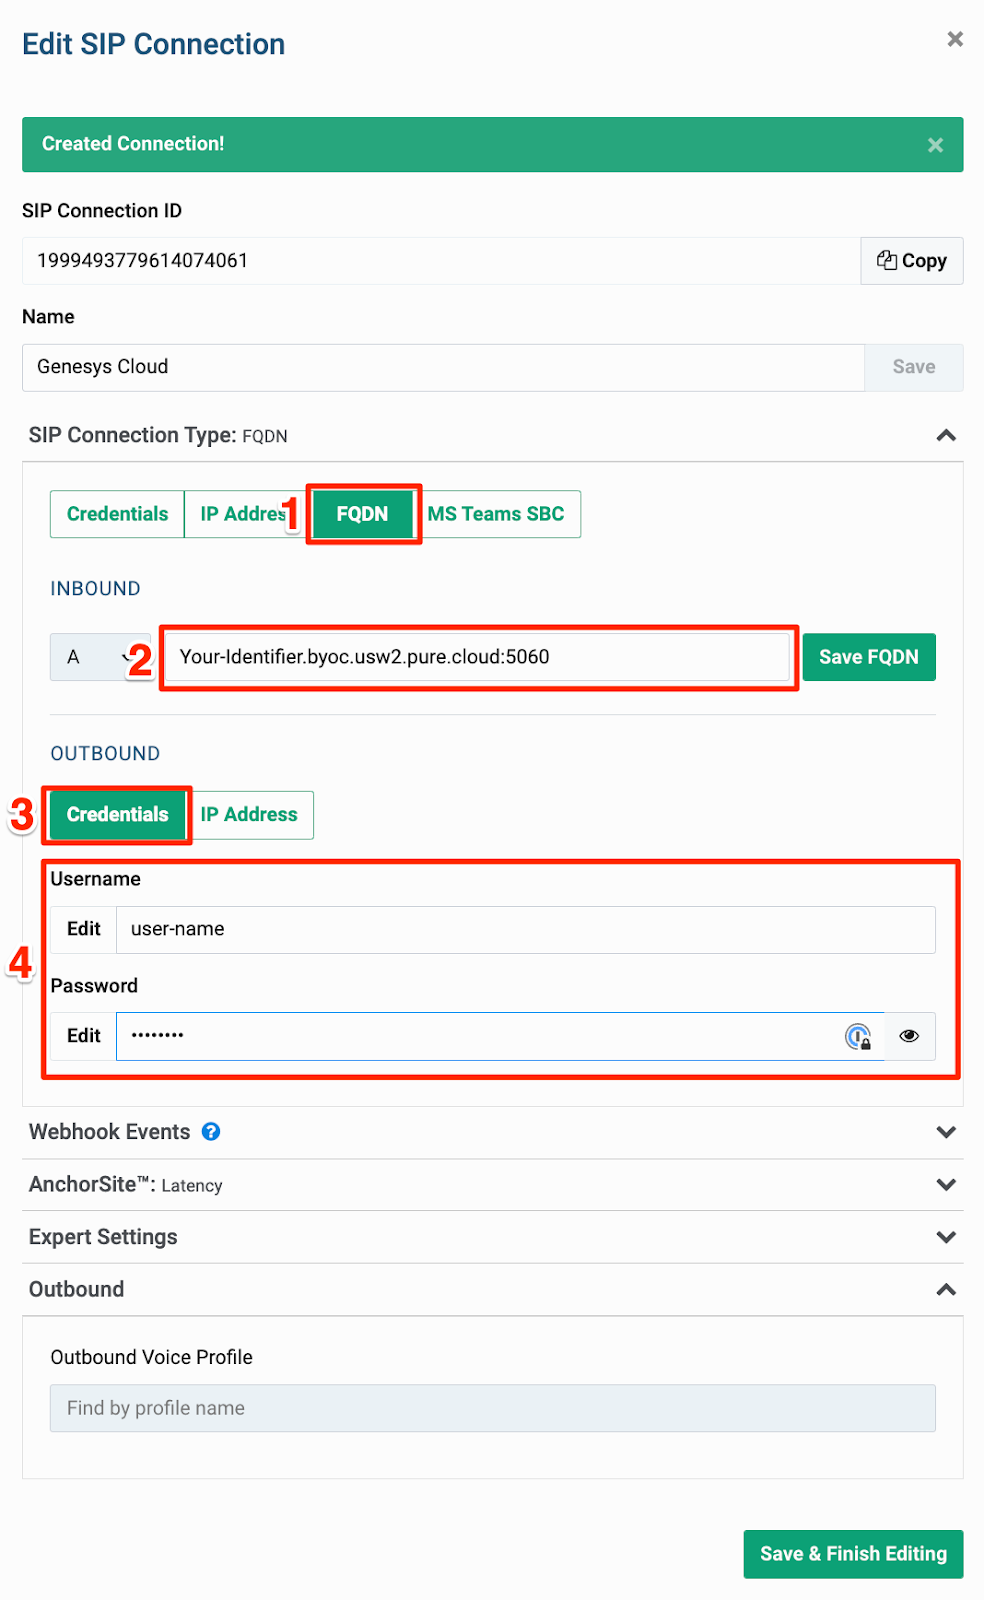
Choose “FQDN” as the SIP connection type and provide SIP URI to your Genesys Cloud organization. The domain should match the region of your Genesys Cloud deployment. Click the “have FQDN” button to update the FQDN setting.
In the “Outbound” section of the SIP connection settings, choose “Credentials” and provider user name and a password to be used for a digest authentication. Click “Save & Finish Editing” button to save your SIP Connection.
*Naming your connection*
Choose “FQDN” as the SIP connection type and provide SIP URI to your Genesys Cloud organization. The domain should match the region of your Genesys Cloud deployment. Click the “have FQDN” button to update the FQDN setting.
In the “Outbound” section of the SIP connection settings, choose “Credentials” and provider user name and a password to be used for a digest authentication. Click “Save & Finish Editing” button to save your SIP Connection.
 *Choosing a FQDN Connection type*
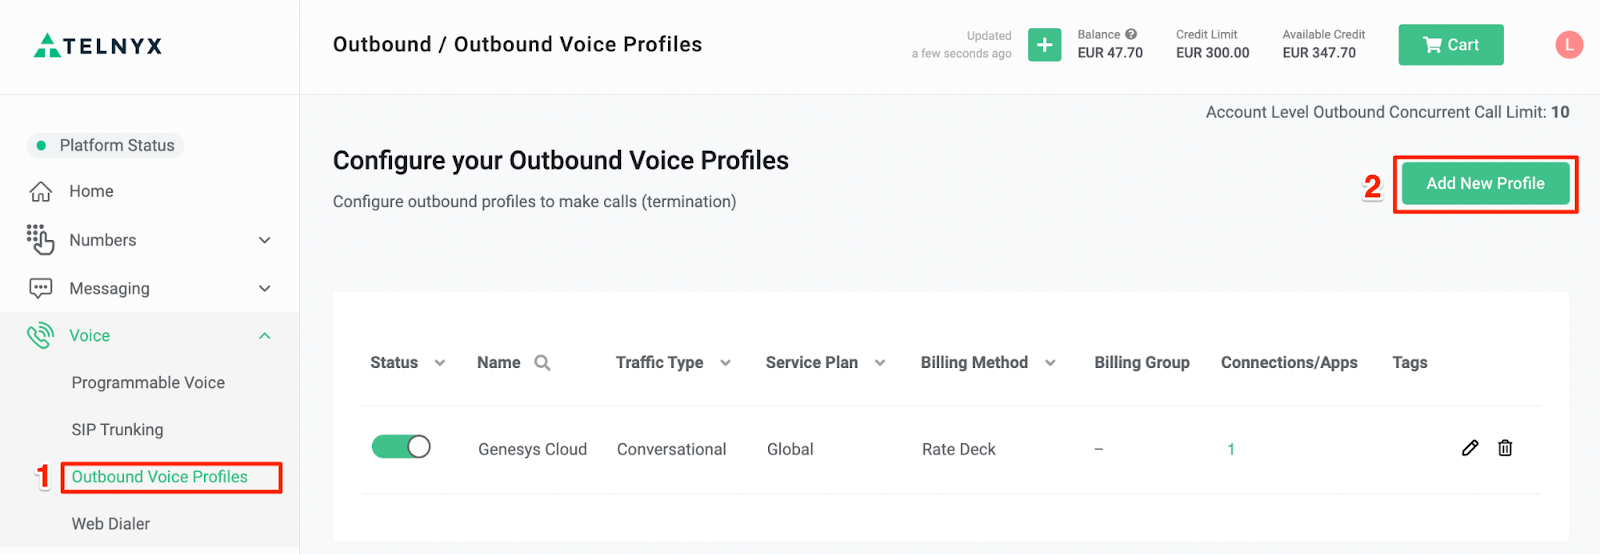
## Creating an Outbound Voice Profile
Navigate to the “Outbound Voice Profiles” tab in the "Voice" section. Click the “Add New Profile” button.
*Choosing a FQDN Connection type*
## Creating an Outbound Voice Profile
Navigate to the “Outbound Voice Profiles” tab in the "Voice" section. Click the “Add New Profile” button.
 *Setting up your outbound voice profile*
Provide a name for your new Outbound Voice Profile and click "Create".
*Setting up your outbound voice profile*
Provide a name for your new Outbound Voice Profile and click "Create".
 *Naming your Outbound Voice Profile*
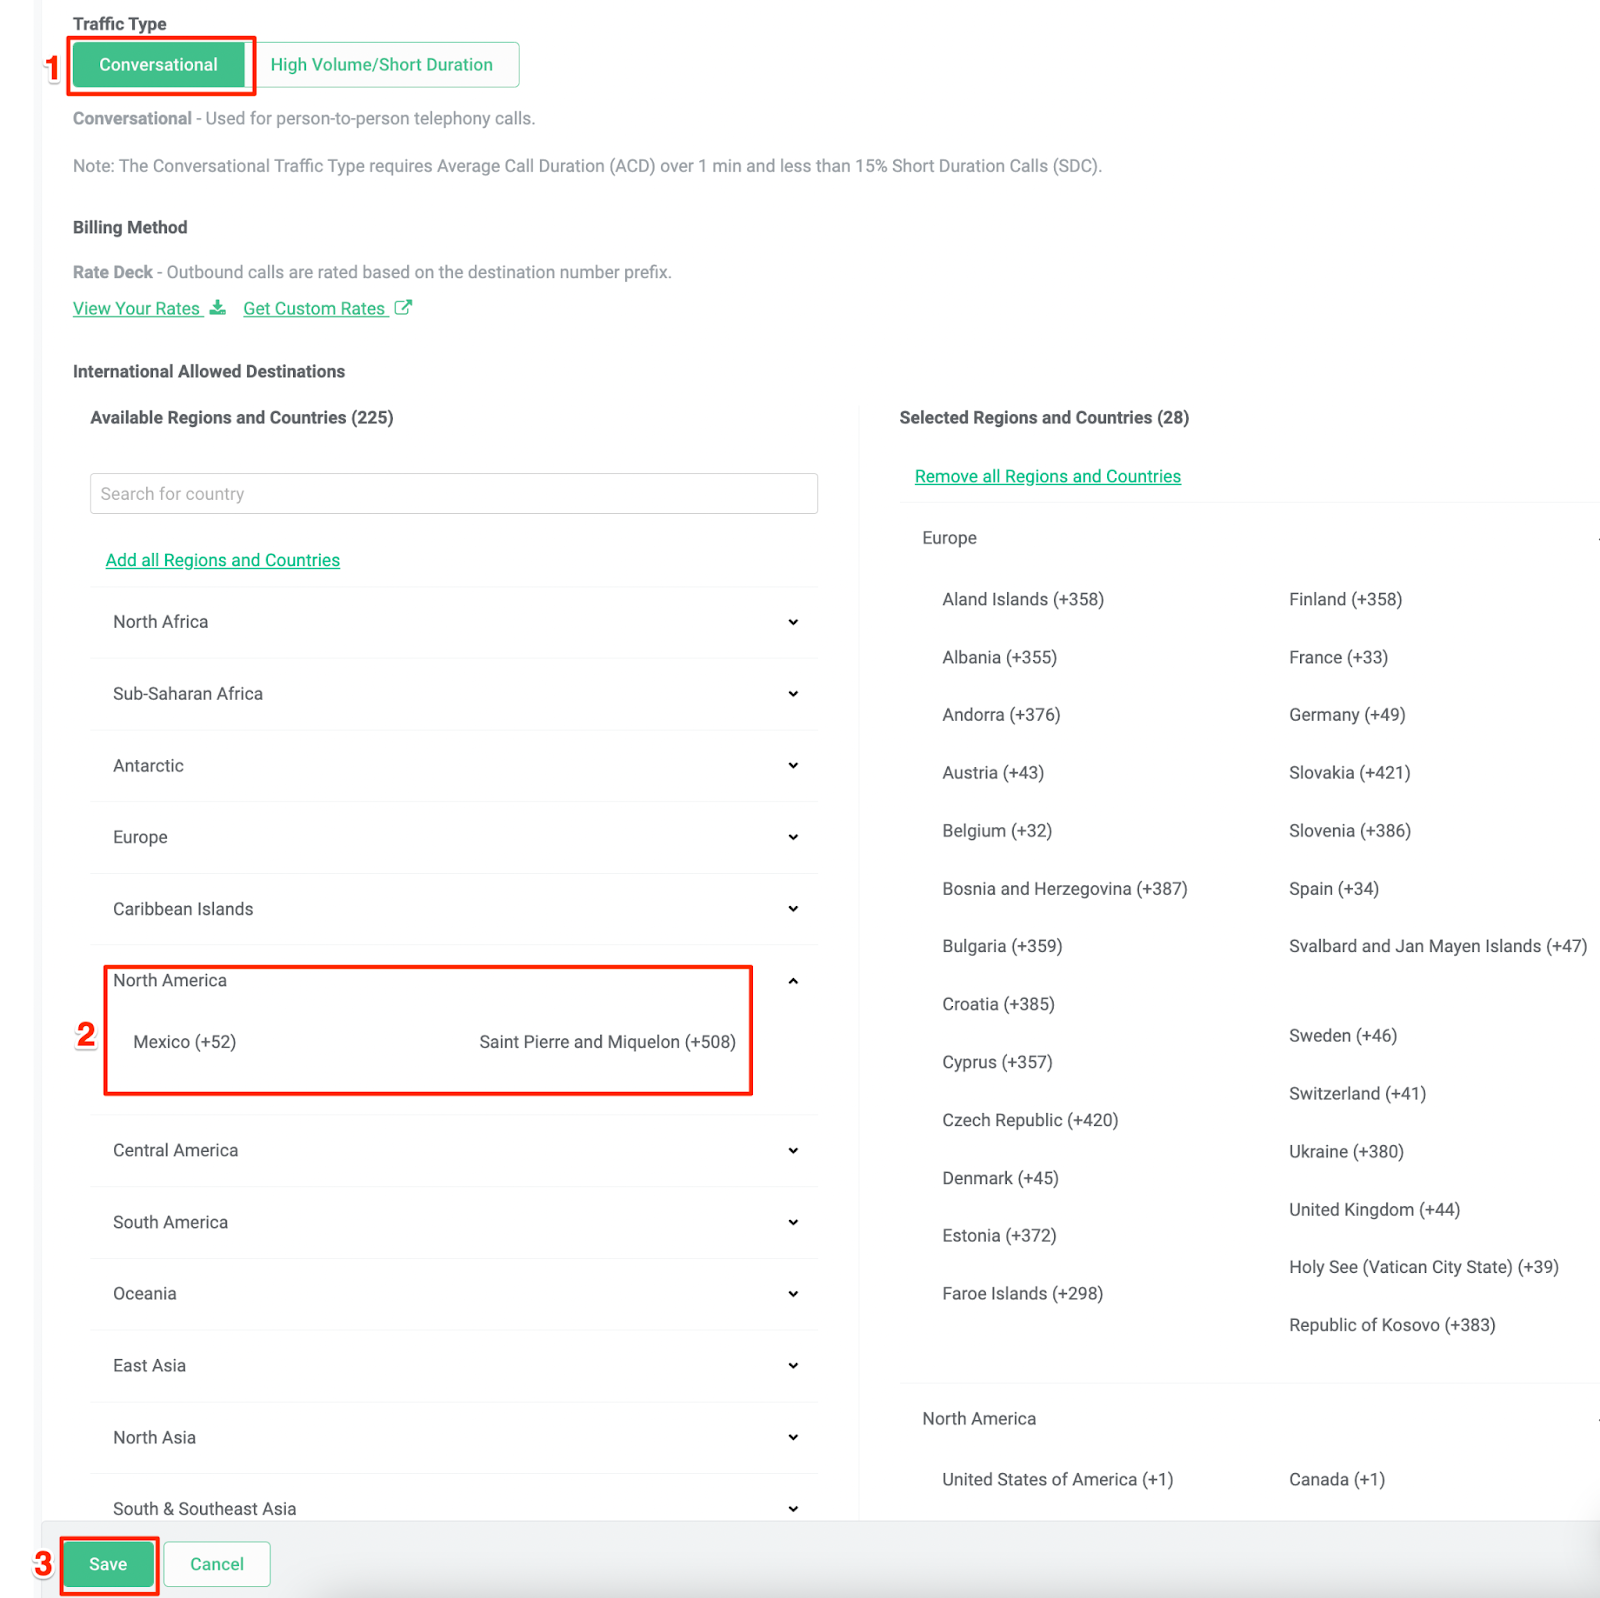
When selecting traffic type choose “Conversational”.
You can also select individual countries or regions to be allowed for the voice calls. Once you have chosen where to allow calls to/ from click the “Save” button to confirm your configuration.
*Naming your Outbound Voice Profile*
When selecting traffic type choose “Conversational”.
You can also select individual countries or regions to be allowed for the voice calls. Once you have chosen where to allow calls to/ from click the “Save” button to confirm your configuration.
 *Outbound Voice Profile settings*
Return to your SIP Connection and edit the configuration. Select “Outbound” tab and select your newly created Outbound Voice Profile from a dropdown list.
*Outbound Voice Profile settings*
Return to your SIP Connection and edit the configuration. Select “Outbound” tab and select your newly created Outbound Voice Profile from a dropdown list.
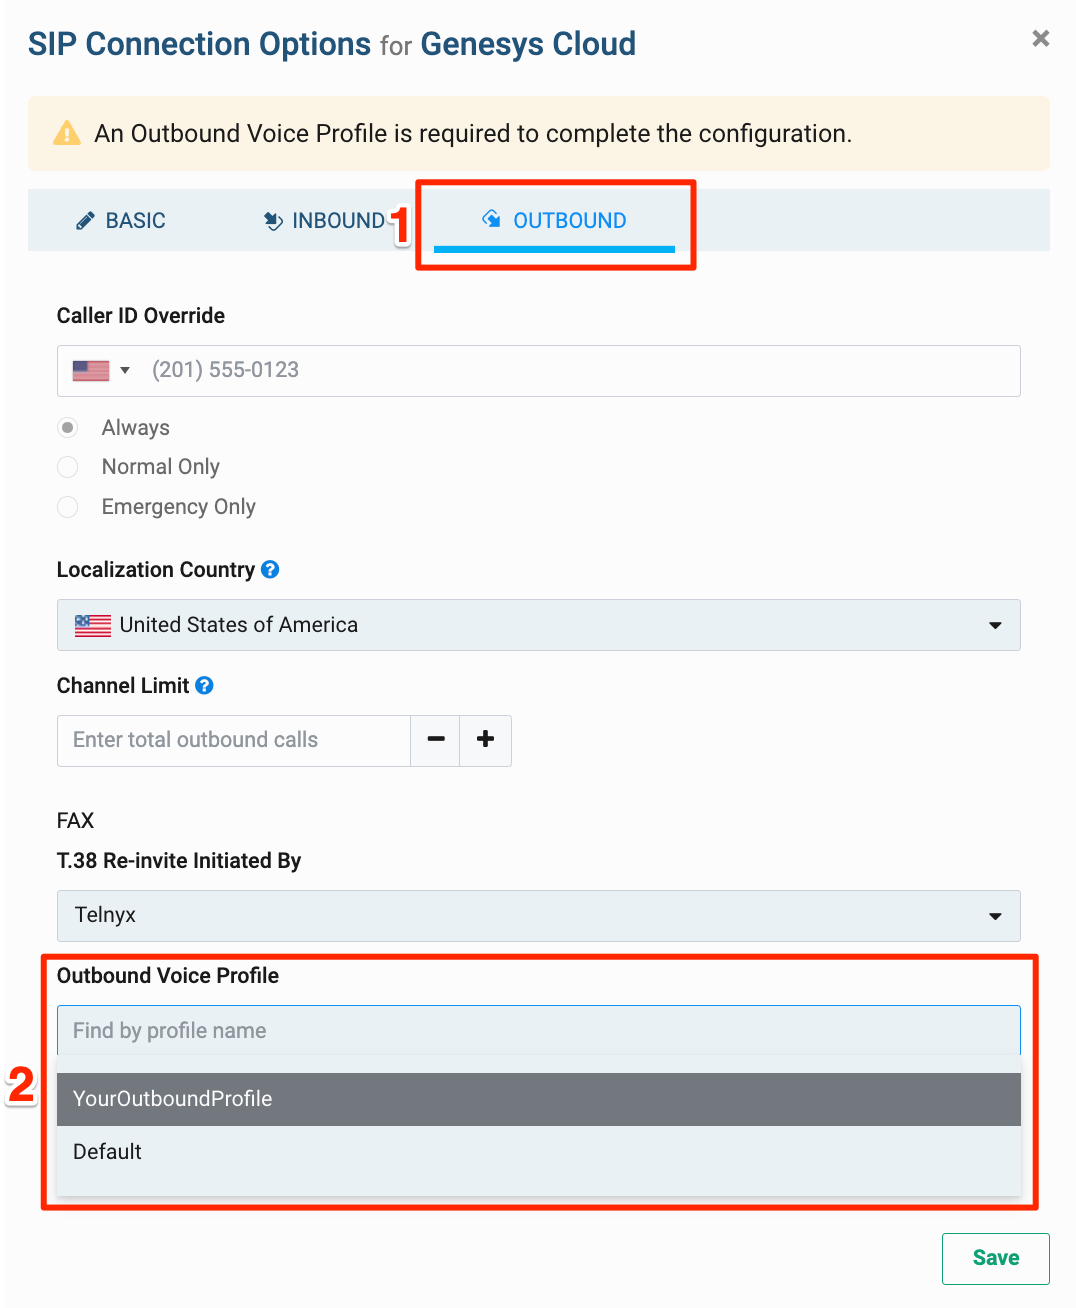 *Add your Outbound Voice Profile to your SIP Connection*
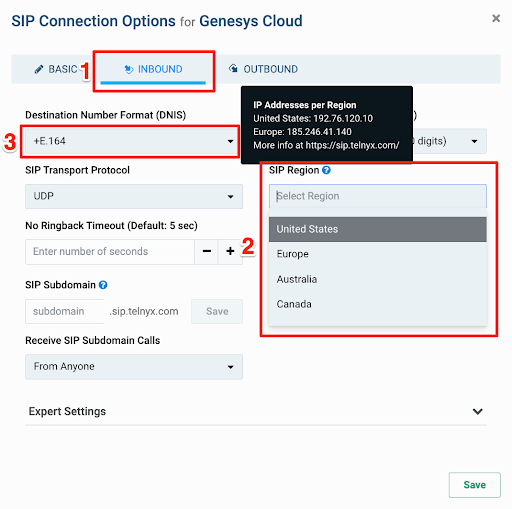
Next, switch to the “Inbound” tab of your SIP connection. Select the nearest “SIP Region” to your Genesys Cloud region. Adjust DNIS and ANI numbers
format to your Genesys Cloud configuration and save the updated configuration.
*Add your Outbound Voice Profile to your SIP Connection*
Next, switch to the “Inbound” tab of your SIP connection. Select the nearest “SIP Region” to your Genesys Cloud region. Adjust DNIS and ANI numbers
format to your Genesys Cloud configuration and save the updated configuration.
 ## Number configuration
On the left-side meny, select the “Numbers” section and navigate to
“My Numbers” tab. For your number purchased select a configured SIP Connection from a dropdown list.
## Number configuration
On the left-side meny, select the “Numbers” section and navigate to
“My Numbers” tab. For your number purchased select a configured SIP Connection from a dropdown list.
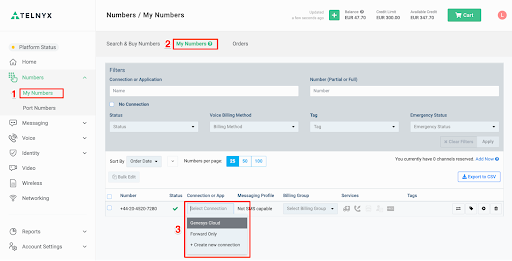 *Navigating to My Numbers*
Note that you can assign the same SIP connection to multiple numbers.
## Configuration in Genesys Cloud
Follow the steps below to create a SIP connection to Genesys Cloud organization.
Before you get started you need to ensure that:
1. The BYOC option is enabled in your Genesys Cloud organization
2. You have admin rights to setup Trunks
3. You have a number purchased and added to "DID Numbers" and routed correctly (for example to the Architect flow)
For assistance, refer to Genesys Resource Center on help.mypurecloud.com for all details about Genesys Cloud configuration.
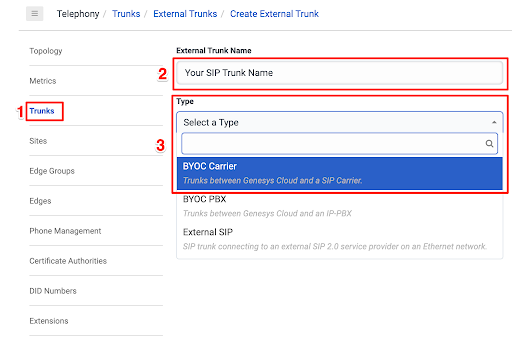
### Create a SIP Trunk
Go to the Admin options and select "Trunks". Provide a name for your SIP trunk and choose “BYOC Carrier” a SIP trunk type.
*Navigating to My Numbers*
Note that you can assign the same SIP connection to multiple numbers.
## Configuration in Genesys Cloud
Follow the steps below to create a SIP connection to Genesys Cloud organization.
Before you get started you need to ensure that:
1. The BYOC option is enabled in your Genesys Cloud organization
2. You have admin rights to setup Trunks
3. You have a number purchased and added to "DID Numbers" and routed correctly (for example to the Architect flow)
For assistance, refer to Genesys Resource Center on help.mypurecloud.com for all details about Genesys Cloud configuration.
### Create a SIP Trunk
Go to the Admin options and select "Trunks". Provide a name for your SIP trunk and choose “BYOC Carrier” a SIP trunk type.
 *Creating a SIP Trunk in Genesys Cloud*
Select "Generic BYOC Carrier" as a subtype.
*Creating a SIP Trunk in Genesys Cloud*
Select "Generic BYOC Carrier" as a subtype.
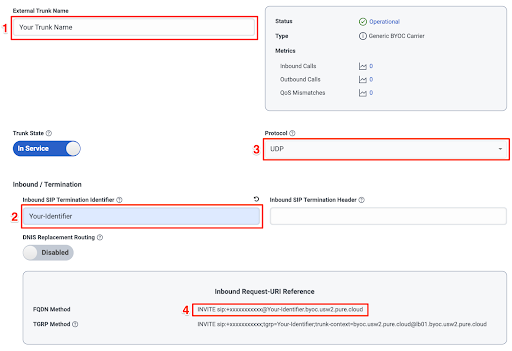
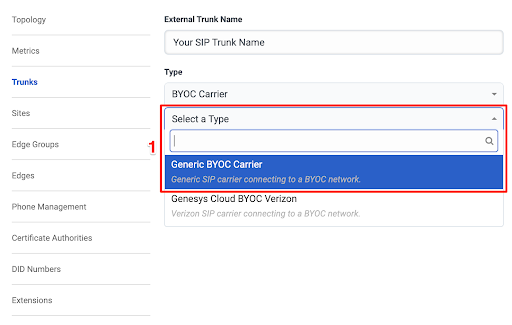 *Select Generic BYOC Carrier*
Provide a name for your SIP Trunk and your Inbound SIP Termination Identifier. This name should match the one configured in the Telnyx SIP Connection for FQDN option.
*Select Generic BYOC Carrier*
Provide a name for your SIP Trunk and your Inbound SIP Termination Identifier. This name should match the one configured in the Telnyx SIP Connection for FQDN option.
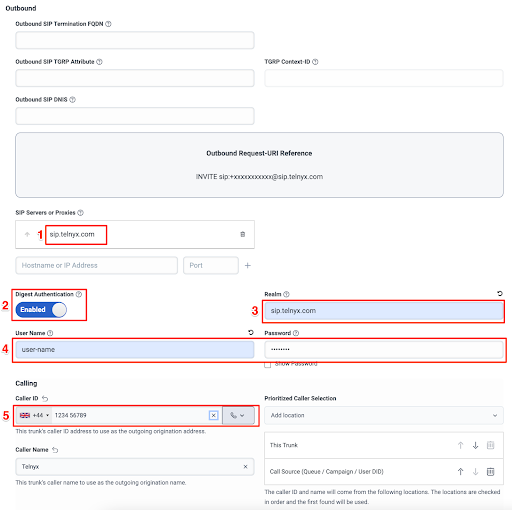
 *Name your connection*
Provide Telnyx SIP interface URL in the “SIP Servers and Proxies” based on your chosen region like sip.telnyx.com, sip.telnyx.eu etc.
Enable “Digest Authentication” and provide in “Realm” field the same URL as used for SIP proxy.
Provide the “User Name” and “Password” which was configured in Telnyx SIP Connection . Setup “Caller ID” with a number purchased in Telnyx platform.
*Name your connection*
Provide Telnyx SIP interface URL in the “SIP Servers and Proxies” based on your chosen region like sip.telnyx.com, sip.telnyx.eu etc.
Enable “Digest Authentication” and provide in “Realm” field the same URL as used for SIP proxy.
Provide the “User Name” and “Password” which was configured in Telnyx SIP Connection . Setup “Caller ID” with a number purchased in Telnyx platform.
 *Manage your connection settings*
In the “SIP Access Control” section, provide the IP addresses of your chosen Telnyx SIP endpoints (addresses are provided on sip.telnyx.com page)
*Manage your connection settings*
In the “SIP Access Control” section, provide the IP addresses of your chosen Telnyx SIP endpoints (addresses are provided on sip.telnyx.com page)
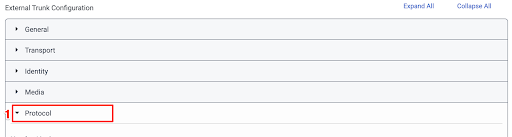
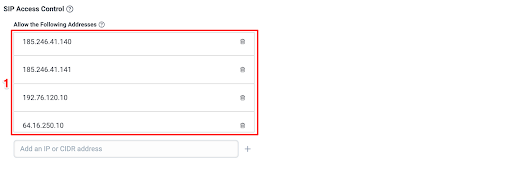 *Add SIP addresses*
Under the 'External Trunk Configuration' section expand the Protocol menu.
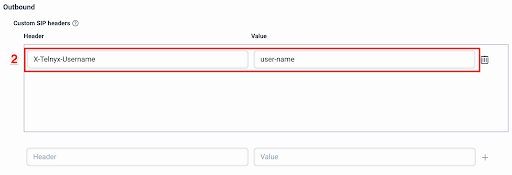
Scroll down to the 'Outbound' configuration and add a custom SIP header “X-Telnyx-Username” with the same value as set for a Digest Authentication
*Add SIP addresses*
Under the 'External Trunk Configuration' section expand the Protocol menu.
Scroll down to the 'Outbound' configuration and add a custom SIP header “X-Telnyx-Username” with the same value as set for a Digest Authentication
 *External Trunk Configuration*
 *Outbound Trunk settings*
## Troubleshooting
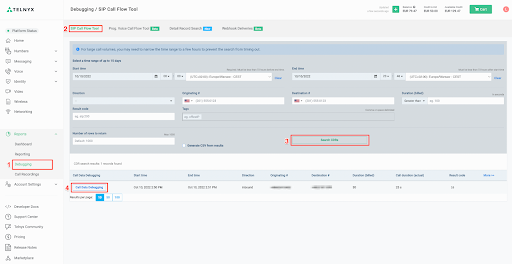
Debugging tools are available in the Telnyx Mission Control Portal where you can troubleshoot any issues with your SIP trunk communication checking SIP call flows, QoS stats and communication to a defined webhooks.
To find and use the debugging tools:
1. Navigate to the “Debugging” menu under “Reporting” in the sidebar
2. Select “SIP Call Flow Tool” in the top bar
3. Specify your search criteria and press “Search CDRs” button
4. From the list of listed calls select a one with “Call Data Debugging” button.
*Outbound Trunk settings*
## Troubleshooting
Debugging tools are available in the Telnyx Mission Control Portal where you can troubleshoot any issues with your SIP trunk communication checking SIP call flows, QoS stats and communication to a defined webhooks.
To find and use the debugging tools:
1. Navigate to the “Debugging” menu under “Reporting” in the sidebar
2. Select “SIP Call Flow Tool” in the top bar
3. Specify your search criteria and press “Search CDRs” button
4. From the list of listed calls select a one with “Call Data Debugging” button.
 *Mission control debugging tools overview*
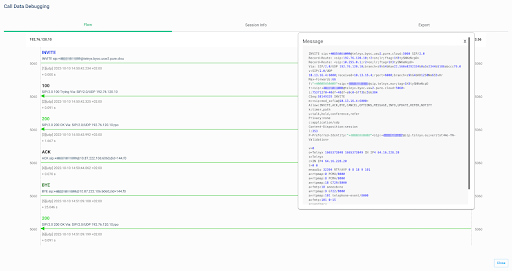
This enables you to review a SIP call flow with the detailed data for each SIP request.
*Mission control debugging tools overview*
This enables you to review a SIP call flow with the detailed data for each SIP request.
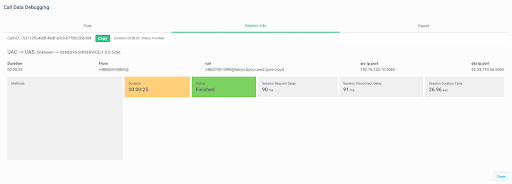
 *Call flow debugging*
You can also check "Session Info" on the next tab or export PCAP data on the "Export" tab for sharing with your team.
*Call flow debugging*
You can also check "Session Info" on the next tab or export PCAP data on the "Export" tab for sharing with your team.
 *PCAP inspection*
If you need any assistance with your setup, reach out to a member of our support team through the chat in the Mission Control Portal.
*PCAP inspection*
If you need any assistance with your setup, reach out to a member of our support team through the chat in the Mission Control Portal.