> ## Documentation Index
> Fetch the complete documentation index at: https://developers.telnyx.com/llms.txt
> Use this file to discover all available pages before exploring further.
# AI assistant integrations
> Connect Telnyx AI Assistants with enterprise platforms like Salesforce, HubSpot, ServiceNow, Zendesk, Microsoft Teams, Notion, Stripe, and more to automate workflows during conversations.
Telnyx AI assistants can integrate with leading enterprise platforms to access customer data, create tickets, update records, and automate workflows directly during conversations.
## Available integrations
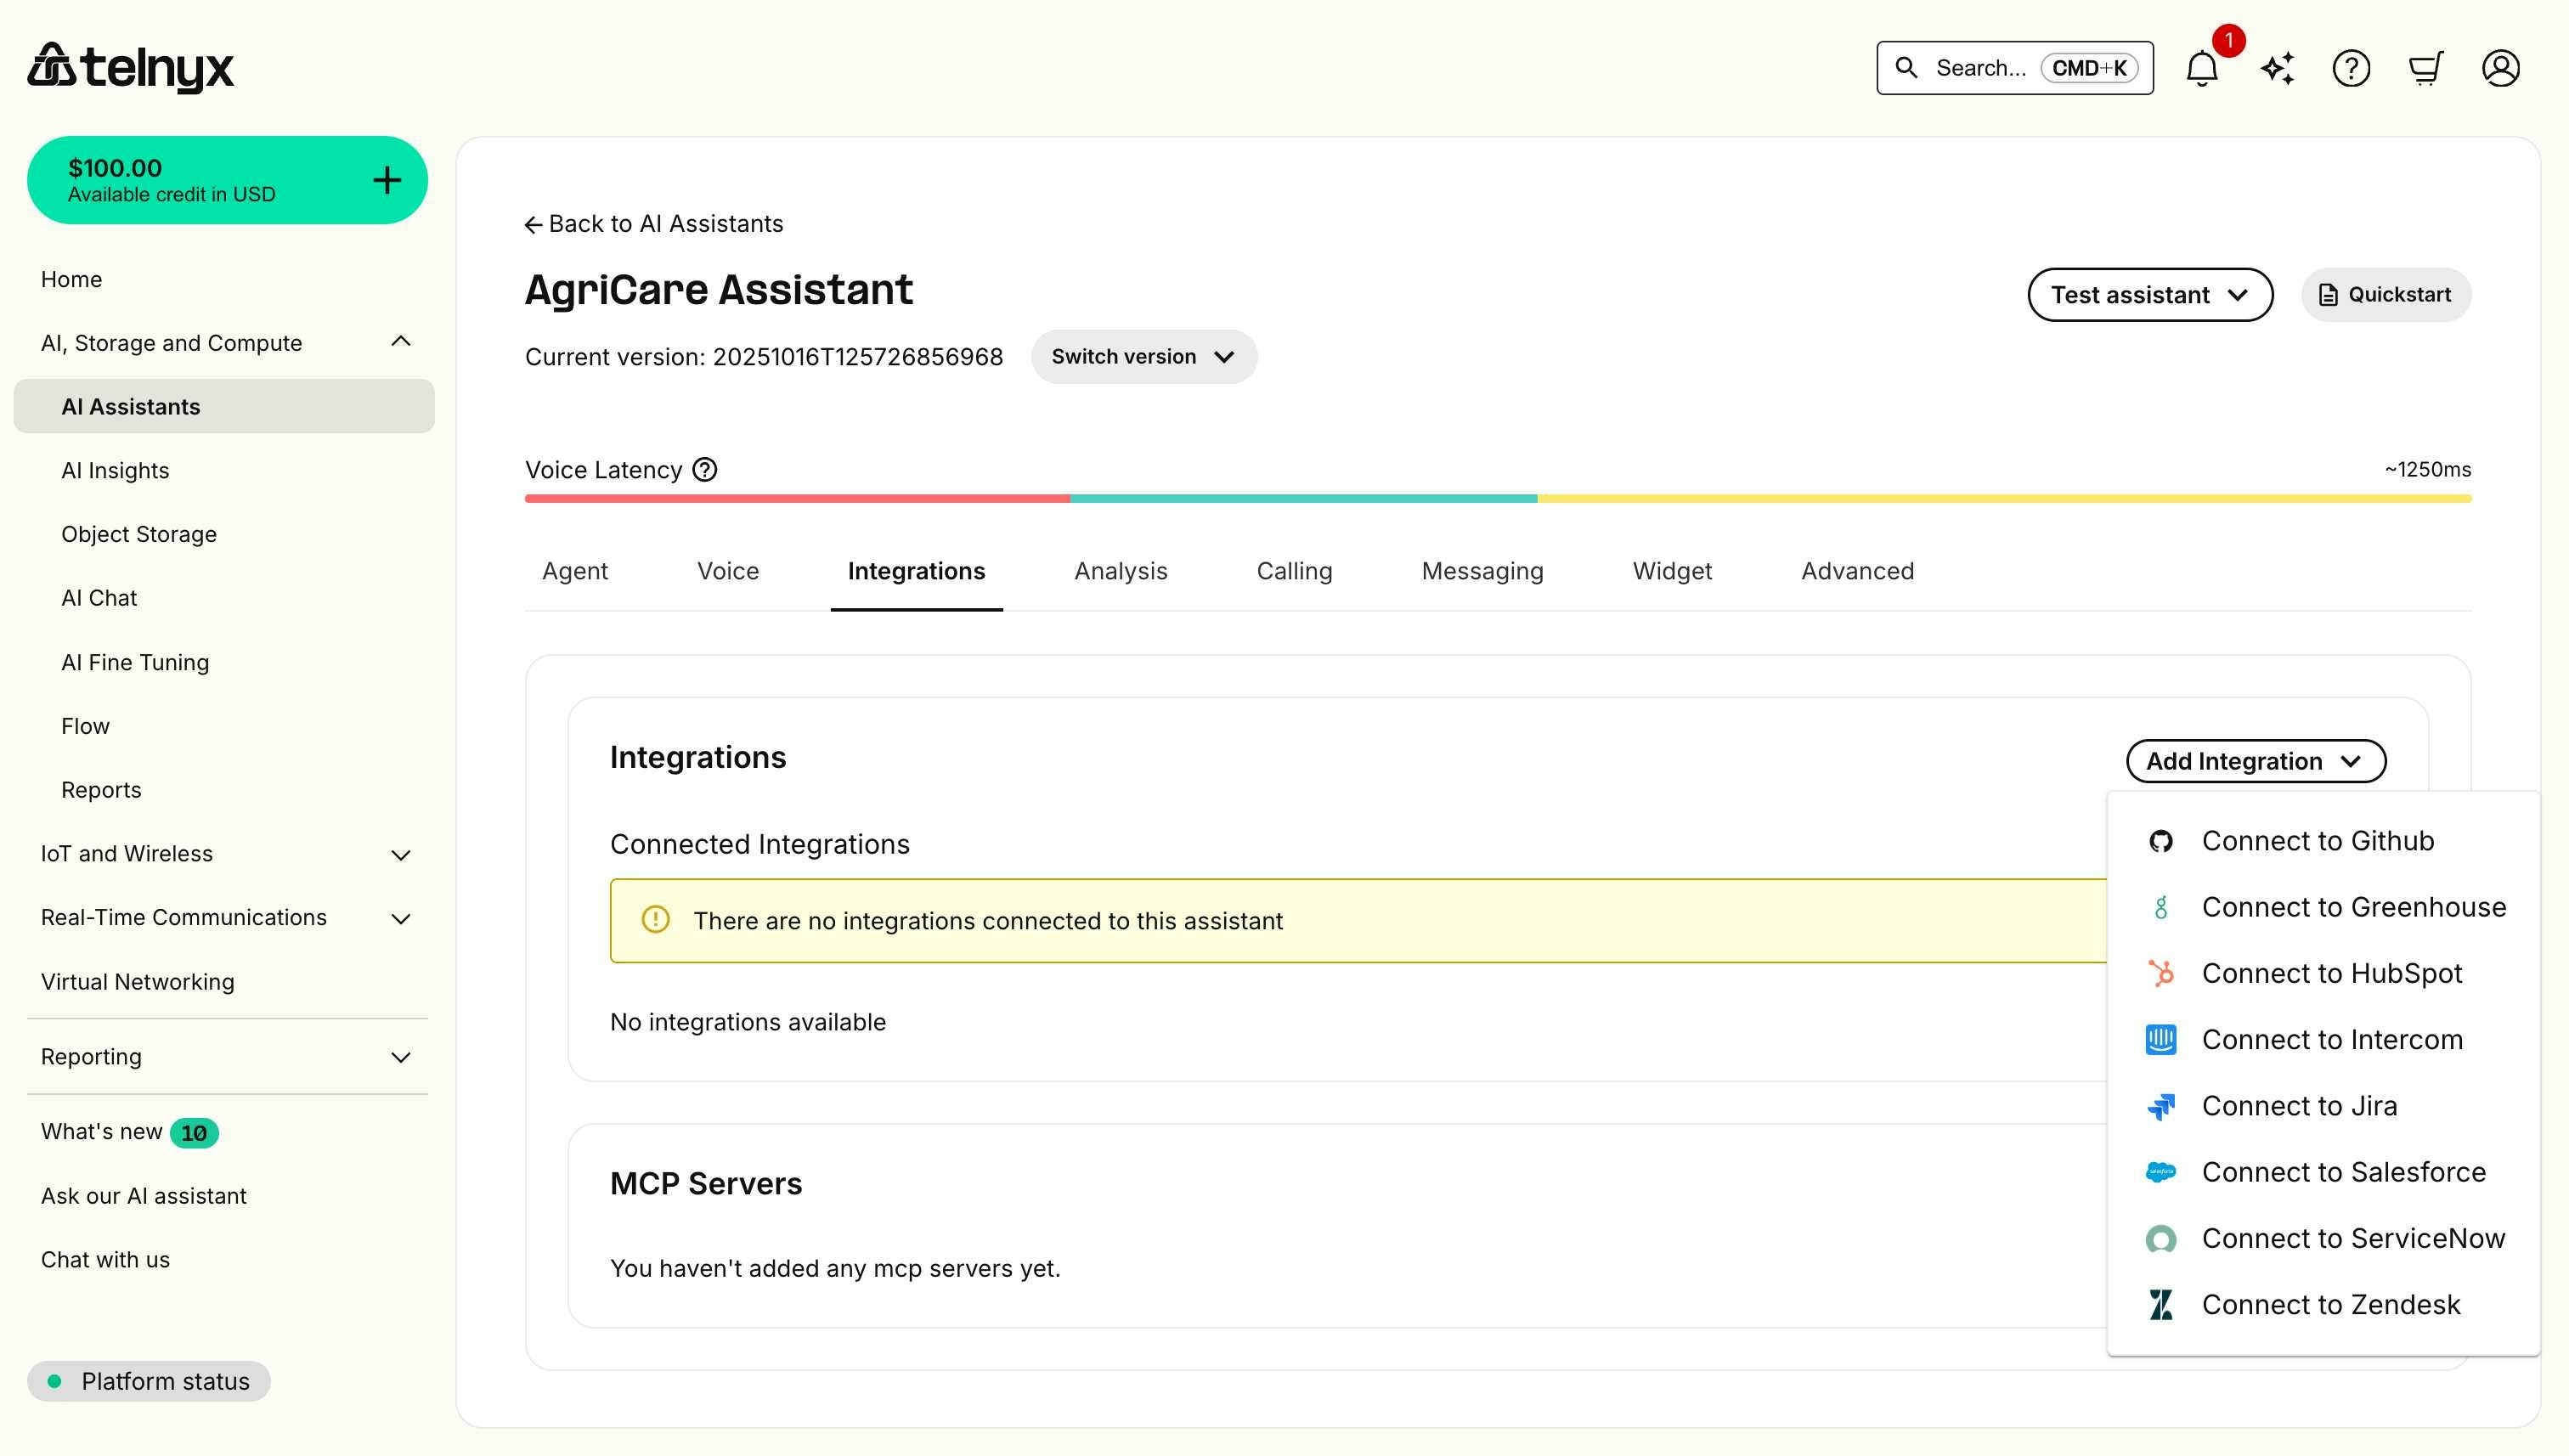
The Integrations tab in the assistant builder offers a growing catalog of enterprise connectors, organized by category. Use the category filter chips at the top of the **Add Integration** section to narrow the list, or browse everything below.
### Sales & CRM
| Integration | Description |
| -------------- | ------------------------------------------------------------------------ |
| **Salesforce** | Manage leads, contacts, accounts, opportunities, tasks, and cases. |
| **HubSpot** | Manage contacts, companies, deals, tickets, and custom objects. |
| **Pipedrive** | Manage deals, contacts, organizations, activities, and pipelines. |
| **Zoho CRM** | Manage leads, contacts, accounts, deals, tasks, and notes. |
| **Gong** | Revenue intelligence: call analysis, deal insights, and user management. |
### Customer Support
| Integration | Description |
| --------------------------- | --------------------------------------------------------------------------- |
| **Zendesk** | Manage tickets, users, organizations, and support operations. |
| **Intercom** | Manage contacts, companies, conversations, and help center articles. |
| **ServiceNow** | Enterprise ITSM: incidents, change requests, problems, and service catalog. |
| **Jira** | Issue tracking, comments, transitions, and project management. |
| **Jira Service Management** | Service desks, customer management, and request lifecycle. |
### Engineering & Product
| Integration | Description |
| ----------- | -------------------------------------------------------------- |
| **GitHub** | Repository, issue, and pull request management. |
| **Jira** | Issue tracking, comments, transitions, and project management. |
| **Linear** | Project management: issues, projects, and team workflows. |
### IT Operations
| Integration | Description |
| --------------------------- | --------------------------------------------------------------------------- |
| **ServiceNow** | Enterprise ITSM: incidents, change requests, problems, and service catalog. |
| **Jira Service Management** | Service desks, customer management, and request lifecycle. |
| **Microsoft Teams** | Manage teams, channels, messages, members, and file operations. |
### Work Management
| Integration | Description |
| ------------ | ----------------------------------------------------------------- |
| **Asana** | Manage tasks, projects, teams, workspaces, and custom fields. |
| **Airtable** | Manage bases, tables, records, fields, comments, and attachments. |
| **Notion** | Manage databases, pages, blocks, users, and content. |
### Knowledge & Documentation
| Integration | Description |
| -------------- | ----------------------------------------------------- |
| **Confluence** | Manage pages, spaces, content, and attachments. |
| **Notion** | Manage databases, pages, blocks, users, and content. |
| **SharePoint** | Manage sites, document libraries, lists, and content. |
| **GitHub** | Repository, issue, and pull request management. |
### Communication & Collaboration
| Integration | Description |
| ------------------- | ------------------------------------------------------------------ |
| **Microsoft Teams** | Manage teams, channels, messages, members, and file operations. |
| **Outlook** | Manage email, calendar events, contacts, and mailbox organization. |
### File Storage & Productivity
| Integration | Description |
| -------------- | ------------------------------------------------------------------ |
| **OneDrive** | Manage files, folders, sharing, and metadata. |
| **Outlook** | Manage email, calendar events, contacts, and mailbox organization. |
| **SharePoint** | Manage sites, document libraries, lists, and content. |
### HR & Recruiting
| Integration | Description |
| ---------------------- | -------------------------------------------------------------------------- |
| **Greenhouse** | ATS: candidates, jobs, applications, scorecards, and recruiting workflows. |
| **SAP SuccessFactors** | Manage employees, time off, performance goals, positions, and recruiting. |
### Scheduling
| Integration | Description |
| ------------ | ------------------------------------------------------------------------------ |
| **Calendly** | Manage scheduling, events, invitees, event types, and organization operations. |
### Design & UX
| Integration | Description |
| ----------- | ------------------------------------------------------------------------------- |
| **Figma** | Manage files, projects, teams, comments, components, styles, and dev resources. |
### Accounting & Finance
| Integration | Description |
| --------------------- | -------------------------------------------------------------------------- |
| **QuickBooks Online** | Accounting: customers, invoices, payments, bills, and financial reporting. |
### E-commerce & Payments
| Integration | Description |
| ----------- | ----------------------------------------------------------------------------- |
| **Shopify** | Manage products, orders, customers, inventory, and store operations. |
| **Stripe** | Payment processing: customers, charges, refunds, subscriptions, and invoices. |
### Testing & Evaluation
| Integration | Description |
| ----------- | ------------------------------------------------------------------------------------------------------------------------- |
| **Coval** | Simulation and evaluation for voice and chat agents — automated testing, regression detection, and production monitoring. |
The integration catalog is expanding regularly. The **Add Integration** section in the assistant builder always reflects the current, complete list — if you see a platform there that isn't documented below, it works the same way: connect it, enter the required credentials, and enable the tools you need.
## Getting started
### Prerequisites
Before connecting an integration, make sure you have:
Active access with the right permissions on the target platform.
Platform-specific keys or tokens required by the integration.
A configured assistant ready to connect the integration.
### Connection workflow
Navigate to [AI Assistants](https://portal.telnyx.com/#/ai/assistants) and open an existing assistant or create a new one.
Select the **Integrations** tab for that assistant.
In the **Add Integration** section, optionally filter by category using the chips (for example *Sales & CRM* or *Customer Support*), pick a provider, and enter the required credentials.
Enable the tools you need, adjust defaults, and save the assistant.
 ## See integrations in action
Watch how Telnyx Voice AI Agents connect to enterprise platforms like ServiceNow to create, update, and resolve tickets through natural voice conversation:
This demonstration shows the integration workflow in the Mission Control Portal and real-time ticket management capabilities that work across all supported platforms.
## Platform-specific setup
Select your integration platform below. If you don't see your platform, scroll horizontally to view all available options.
### GitHub
Connect your AI assistant to GitHub for code hosting, version control, and development workflows.
#### Prerequisites
* GitHub account with repository access.
* Permissions to create personal access tokens.
* Appropriate repository scopes for integration needs.
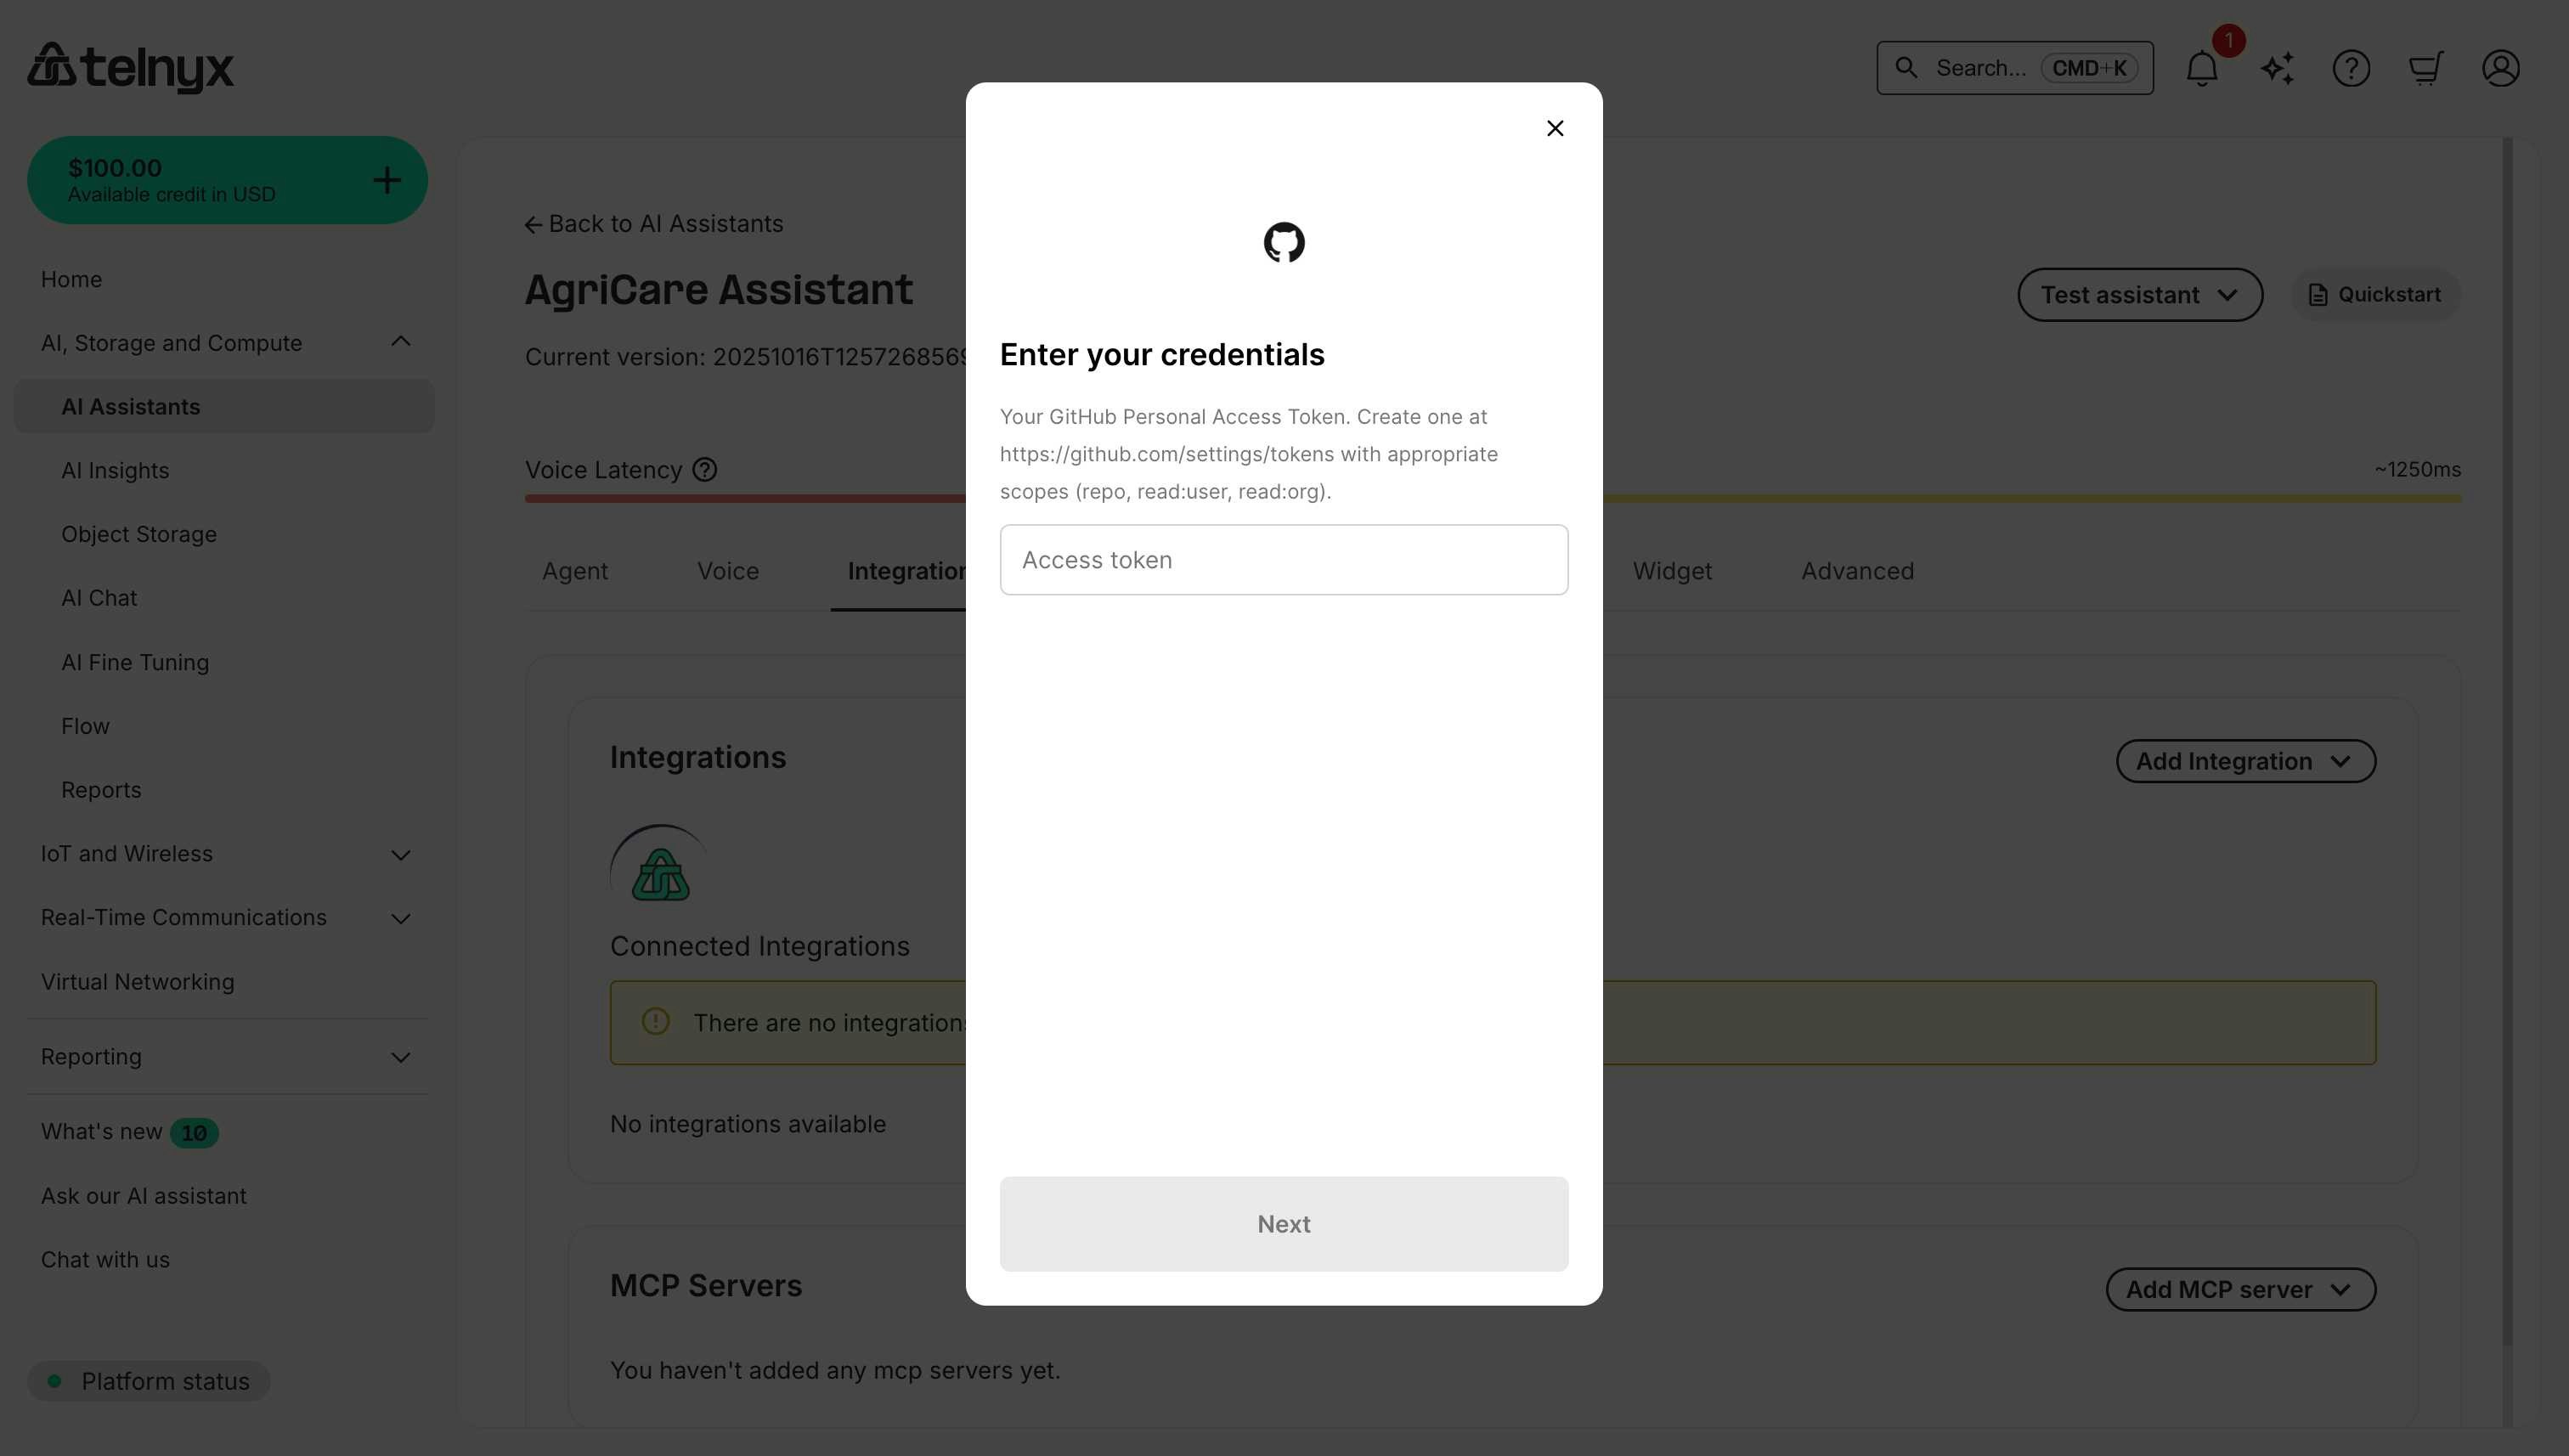
#### Required credentials
When connecting GitHub, you'll need to provide:
Generate a GitHub Personal Access Token at [https://github.com/settings/tokens](https://github.com/settings/tokens) by clicking **Generate new token → Generate new token (classic)** and selecting scopes such as `repo`, `read:user`, and `read:org`, then copy the token (it only appears once).
## See integrations in action
Watch how Telnyx Voice AI Agents connect to enterprise platforms like ServiceNow to create, update, and resolve tickets through natural voice conversation:
This demonstration shows the integration workflow in the Mission Control Portal and real-time ticket management capabilities that work across all supported platforms.
## Platform-specific setup
Select your integration platform below. If you don't see your platform, scroll horizontally to view all available options.
### GitHub
Connect your AI assistant to GitHub for code hosting, version control, and development workflows.
#### Prerequisites
* GitHub account with repository access.
* Permissions to create personal access tokens.
* Appropriate repository scopes for integration needs.
#### Required credentials
When connecting GitHub, you'll need to provide:
Generate a GitHub Personal Access Token at [https://github.com/settings/tokens](https://github.com/settings/tokens) by clicking **Generate new token → Generate new token (classic)** and selecting scopes such as `repo`, `read:user`, and `read:org`, then copy the token (it only appears once).
 #### Available tools
After connecting GitHub, your assistant can:
* **Create issues** - Log bugs, feature requests, or tasks in repositories.
* **Search repositories** - Find repos by name, description, or topics.
* **Manage pull requests** - Create, review, or update PRs.
* **Access code** - Read file contents and repository structure.
* **Manage labels** - Add or remove issue and PR labels.
#### Use cases
**Bug Reporting**
```
Developer: "We have a login bug affecting Safari users"
Assistant: [Creates issue in GitHub repository]
Assistant: [Adds labels: bug, priority:high, browser:safari]
Assistant: "I've created issue #234 in the main repo and notified the team."
```
**Repository Search**
```
Developer: "Find our authentication libraries"
Assistant: [Searches GitHub repos by keyword and topic]
Assistant: "I found 3 authentication repos: auth-service, jwt-utils, and oauth-client."
```
### Greenhouse
Connect your AI assistant to Greenhouse for applicant tracking and recruiting workflows.
#### Prerequisites
* Greenhouse account with API access.
* Access to Greenhouse Dev Center.
* Harvest API permissions.
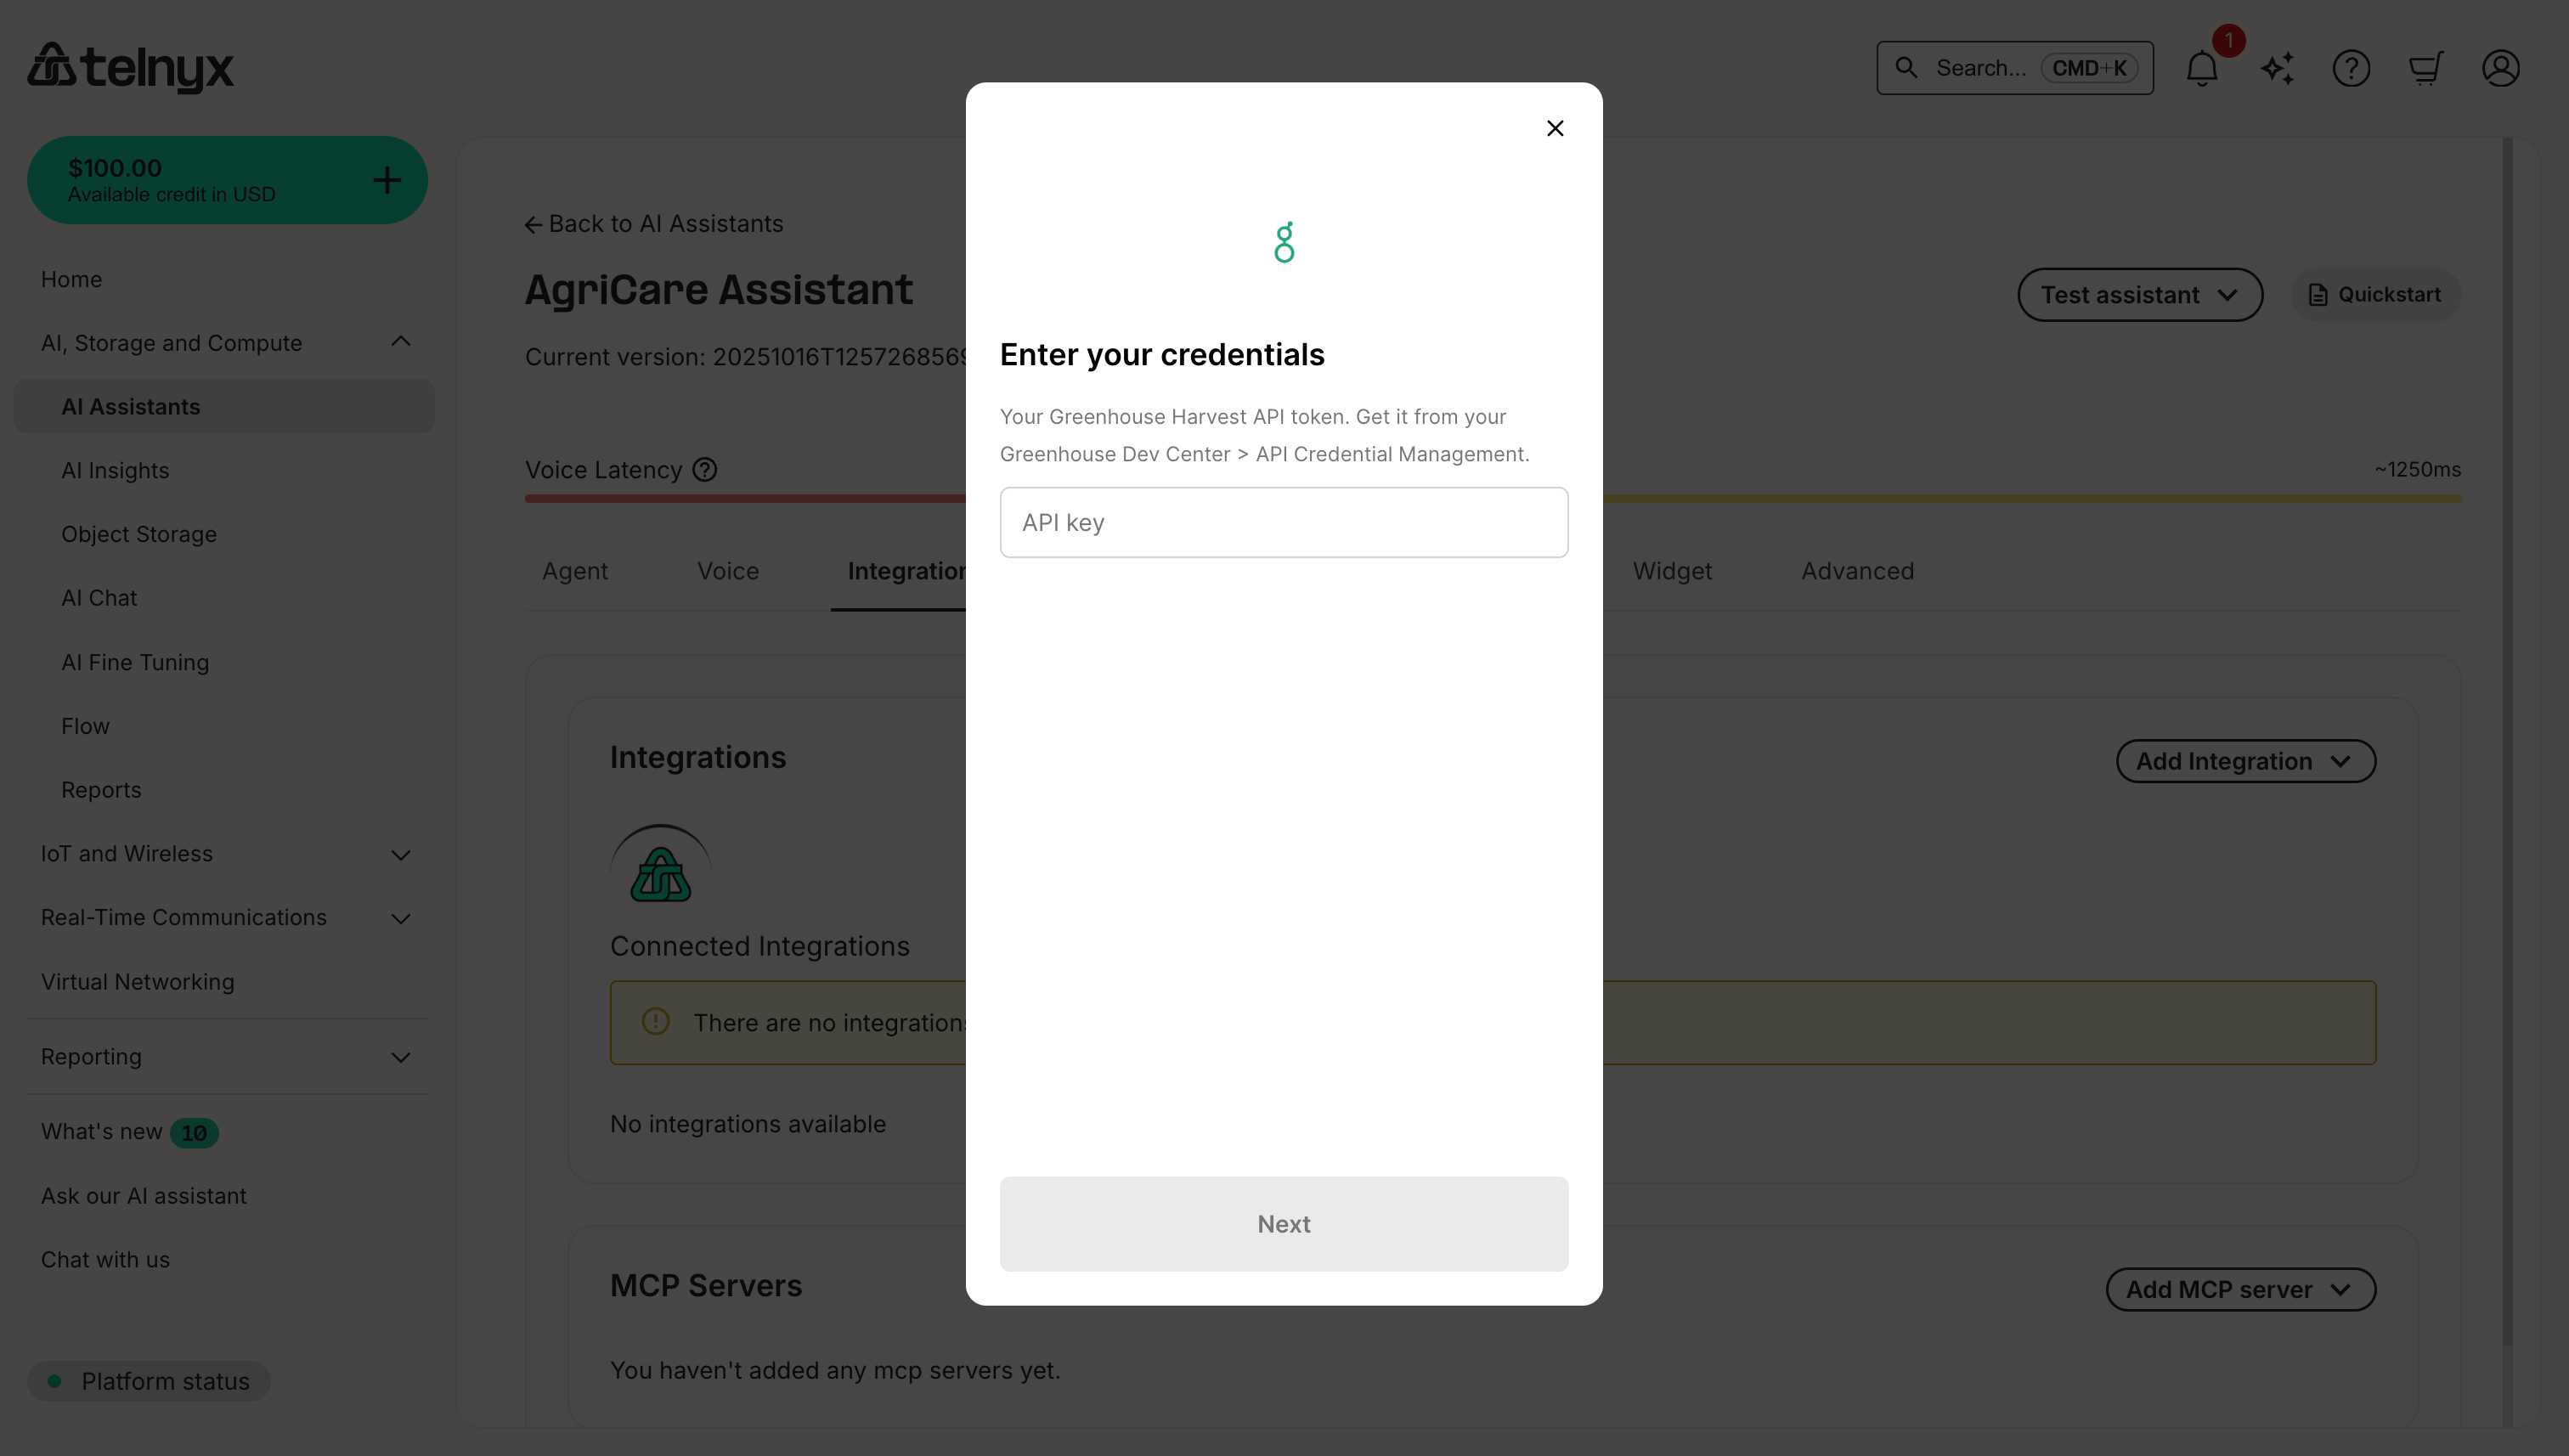
#### Required credentials
When connecting Greenhouse, you'll need to provide:
Log in to Greenhouse, go to **Dev Center → API Credential Management**, create a Harvest API key with the permissions you need, and copy the generated token.
#### Available tools
After connecting GitHub, your assistant can:
* **Create issues** - Log bugs, feature requests, or tasks in repositories.
* **Search repositories** - Find repos by name, description, or topics.
* **Manage pull requests** - Create, review, or update PRs.
* **Access code** - Read file contents and repository structure.
* **Manage labels** - Add or remove issue and PR labels.
#### Use cases
**Bug Reporting**
```
Developer: "We have a login bug affecting Safari users"
Assistant: [Creates issue in GitHub repository]
Assistant: [Adds labels: bug, priority:high, browser:safari]
Assistant: "I've created issue #234 in the main repo and notified the team."
```
**Repository Search**
```
Developer: "Find our authentication libraries"
Assistant: [Searches GitHub repos by keyword and topic]
Assistant: "I found 3 authentication repos: auth-service, jwt-utils, and oauth-client."
```
### Greenhouse
Connect your AI assistant to Greenhouse for applicant tracking and recruiting workflows.
#### Prerequisites
* Greenhouse account with API access.
* Access to Greenhouse Dev Center.
* Harvest API permissions.
#### Required credentials
When connecting Greenhouse, you'll need to provide:
Log in to Greenhouse, go to **Dev Center → API Credential Management**, create a Harvest API key with the permissions you need, and copy the generated token.
 #### Available tools
After connecting Greenhouse, your assistant can:
* **Candidate lookup** - Search for candidates by name, email, or application ID.
* **Interview scheduling** - View and coordinate interview schedules.
* **Application management** - Track application status and progress.
* **Job posting access** - View open positions and job details.
* **Scorecard review** - Access candidate evaluations and feedback.
#### Use cases
**Candidate Status Check**
```
Recruiter: "What's the status of the candidate who interviewed yesterday?"
Assistant: [Searches Greenhouse by interview date]
Assistant: "Sarah Johnson completed her technical interview yesterday. She's in the Reference Check stage."
```
**Interview Coordination**
```
Recruiter: "Schedule the next round for top candidates"
Assistant: [Retrieves candidate list and interview availability]
Assistant: [Checks interviewer calendars]
Assistant: "I can schedule 3 final interviews for next Tuesday and Wednesday."
```
### HubSpot
Connect your AI assistant to HubSpot for marketing, sales, and customer service workflows.
#### Prerequisites
* HubSpot account with API access.
* Private app access token or OAuth credentials.
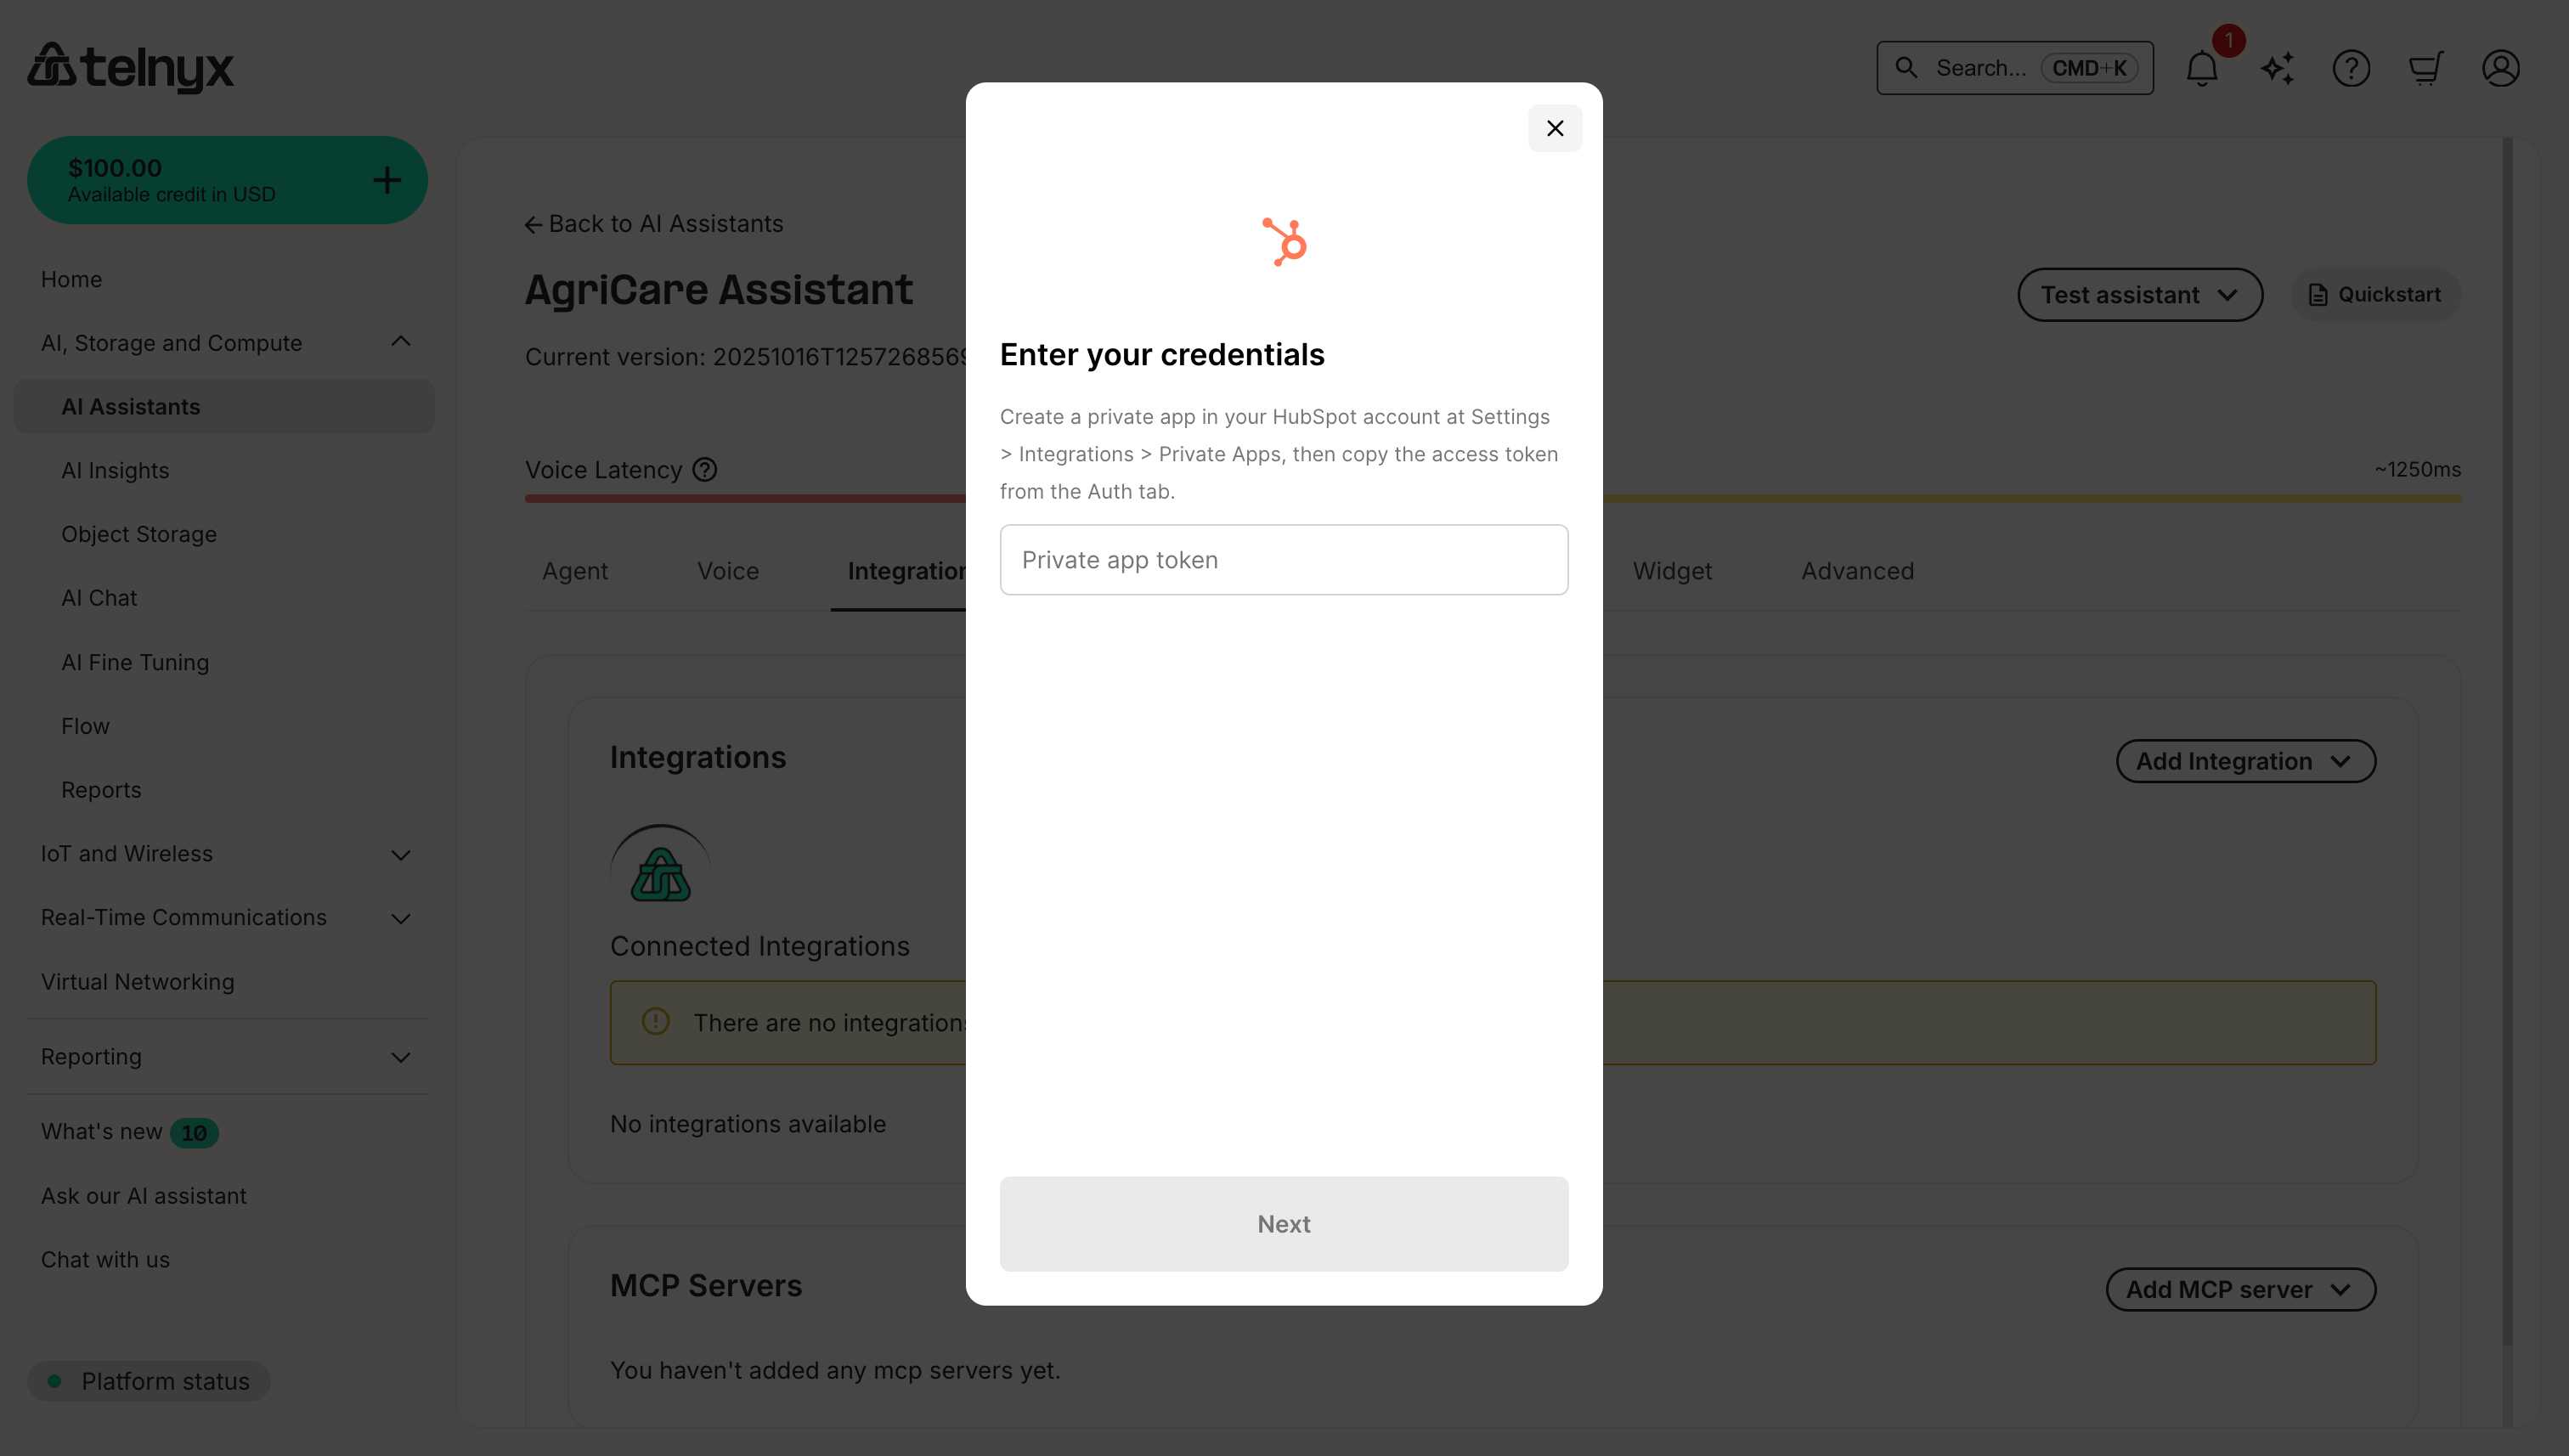
#### Required credentials
When connecting HubSpot, you'll need to provide:
Create a private app in HubSpot (Settings → Integrations → Private Apps) and copy the access token from the **Auth** tab.
#### Available tools
After connecting Greenhouse, your assistant can:
* **Candidate lookup** - Search for candidates by name, email, or application ID.
* **Interview scheduling** - View and coordinate interview schedules.
* **Application management** - Track application status and progress.
* **Job posting access** - View open positions and job details.
* **Scorecard review** - Access candidate evaluations and feedback.
#### Use cases
**Candidate Status Check**
```
Recruiter: "What's the status of the candidate who interviewed yesterday?"
Assistant: [Searches Greenhouse by interview date]
Assistant: "Sarah Johnson completed her technical interview yesterday. She's in the Reference Check stage."
```
**Interview Coordination**
```
Recruiter: "Schedule the next round for top candidates"
Assistant: [Retrieves candidate list and interview availability]
Assistant: [Checks interviewer calendars]
Assistant: "I can schedule 3 final interviews for next Tuesday and Wednesday."
```
### HubSpot
Connect your AI assistant to HubSpot for marketing, sales, and customer service workflows.
#### Prerequisites
* HubSpot account with API access.
* Private app access token or OAuth credentials.
#### Required credentials
When connecting HubSpot, you'll need to provide:
Create a private app in HubSpot (Settings → Integrations → Private Apps) and copy the access token from the **Auth** tab.
 #### Available tools
After connecting HubSpot, your assistant can:
* **Manage contacts** - Create, update, or search contacts.
* **Deal tracking** - Create deals, update deal stages.
* **Ticket management** - Create support tickets, update status.
* **Company records** - Access and update company information.
* **Engagement tracking** - Log calls, emails, and notes.
#### Use cases
**Lead Capture**
```
Prospect: "I'd like a demo of your product"
Assistant: [Creates contact in HubSpot]
Assistant: [Creates deal in pipeline]
Assistant: [Schedules demo meeting]
```
**Support Ticketing**
```
Customer: "I have a billing question"
Assistant: [Searches HubSpot for customer record]
Assistant: [Creates ticket in support pipeline]
Assistant: [Associates ticket with contact and deal]
```
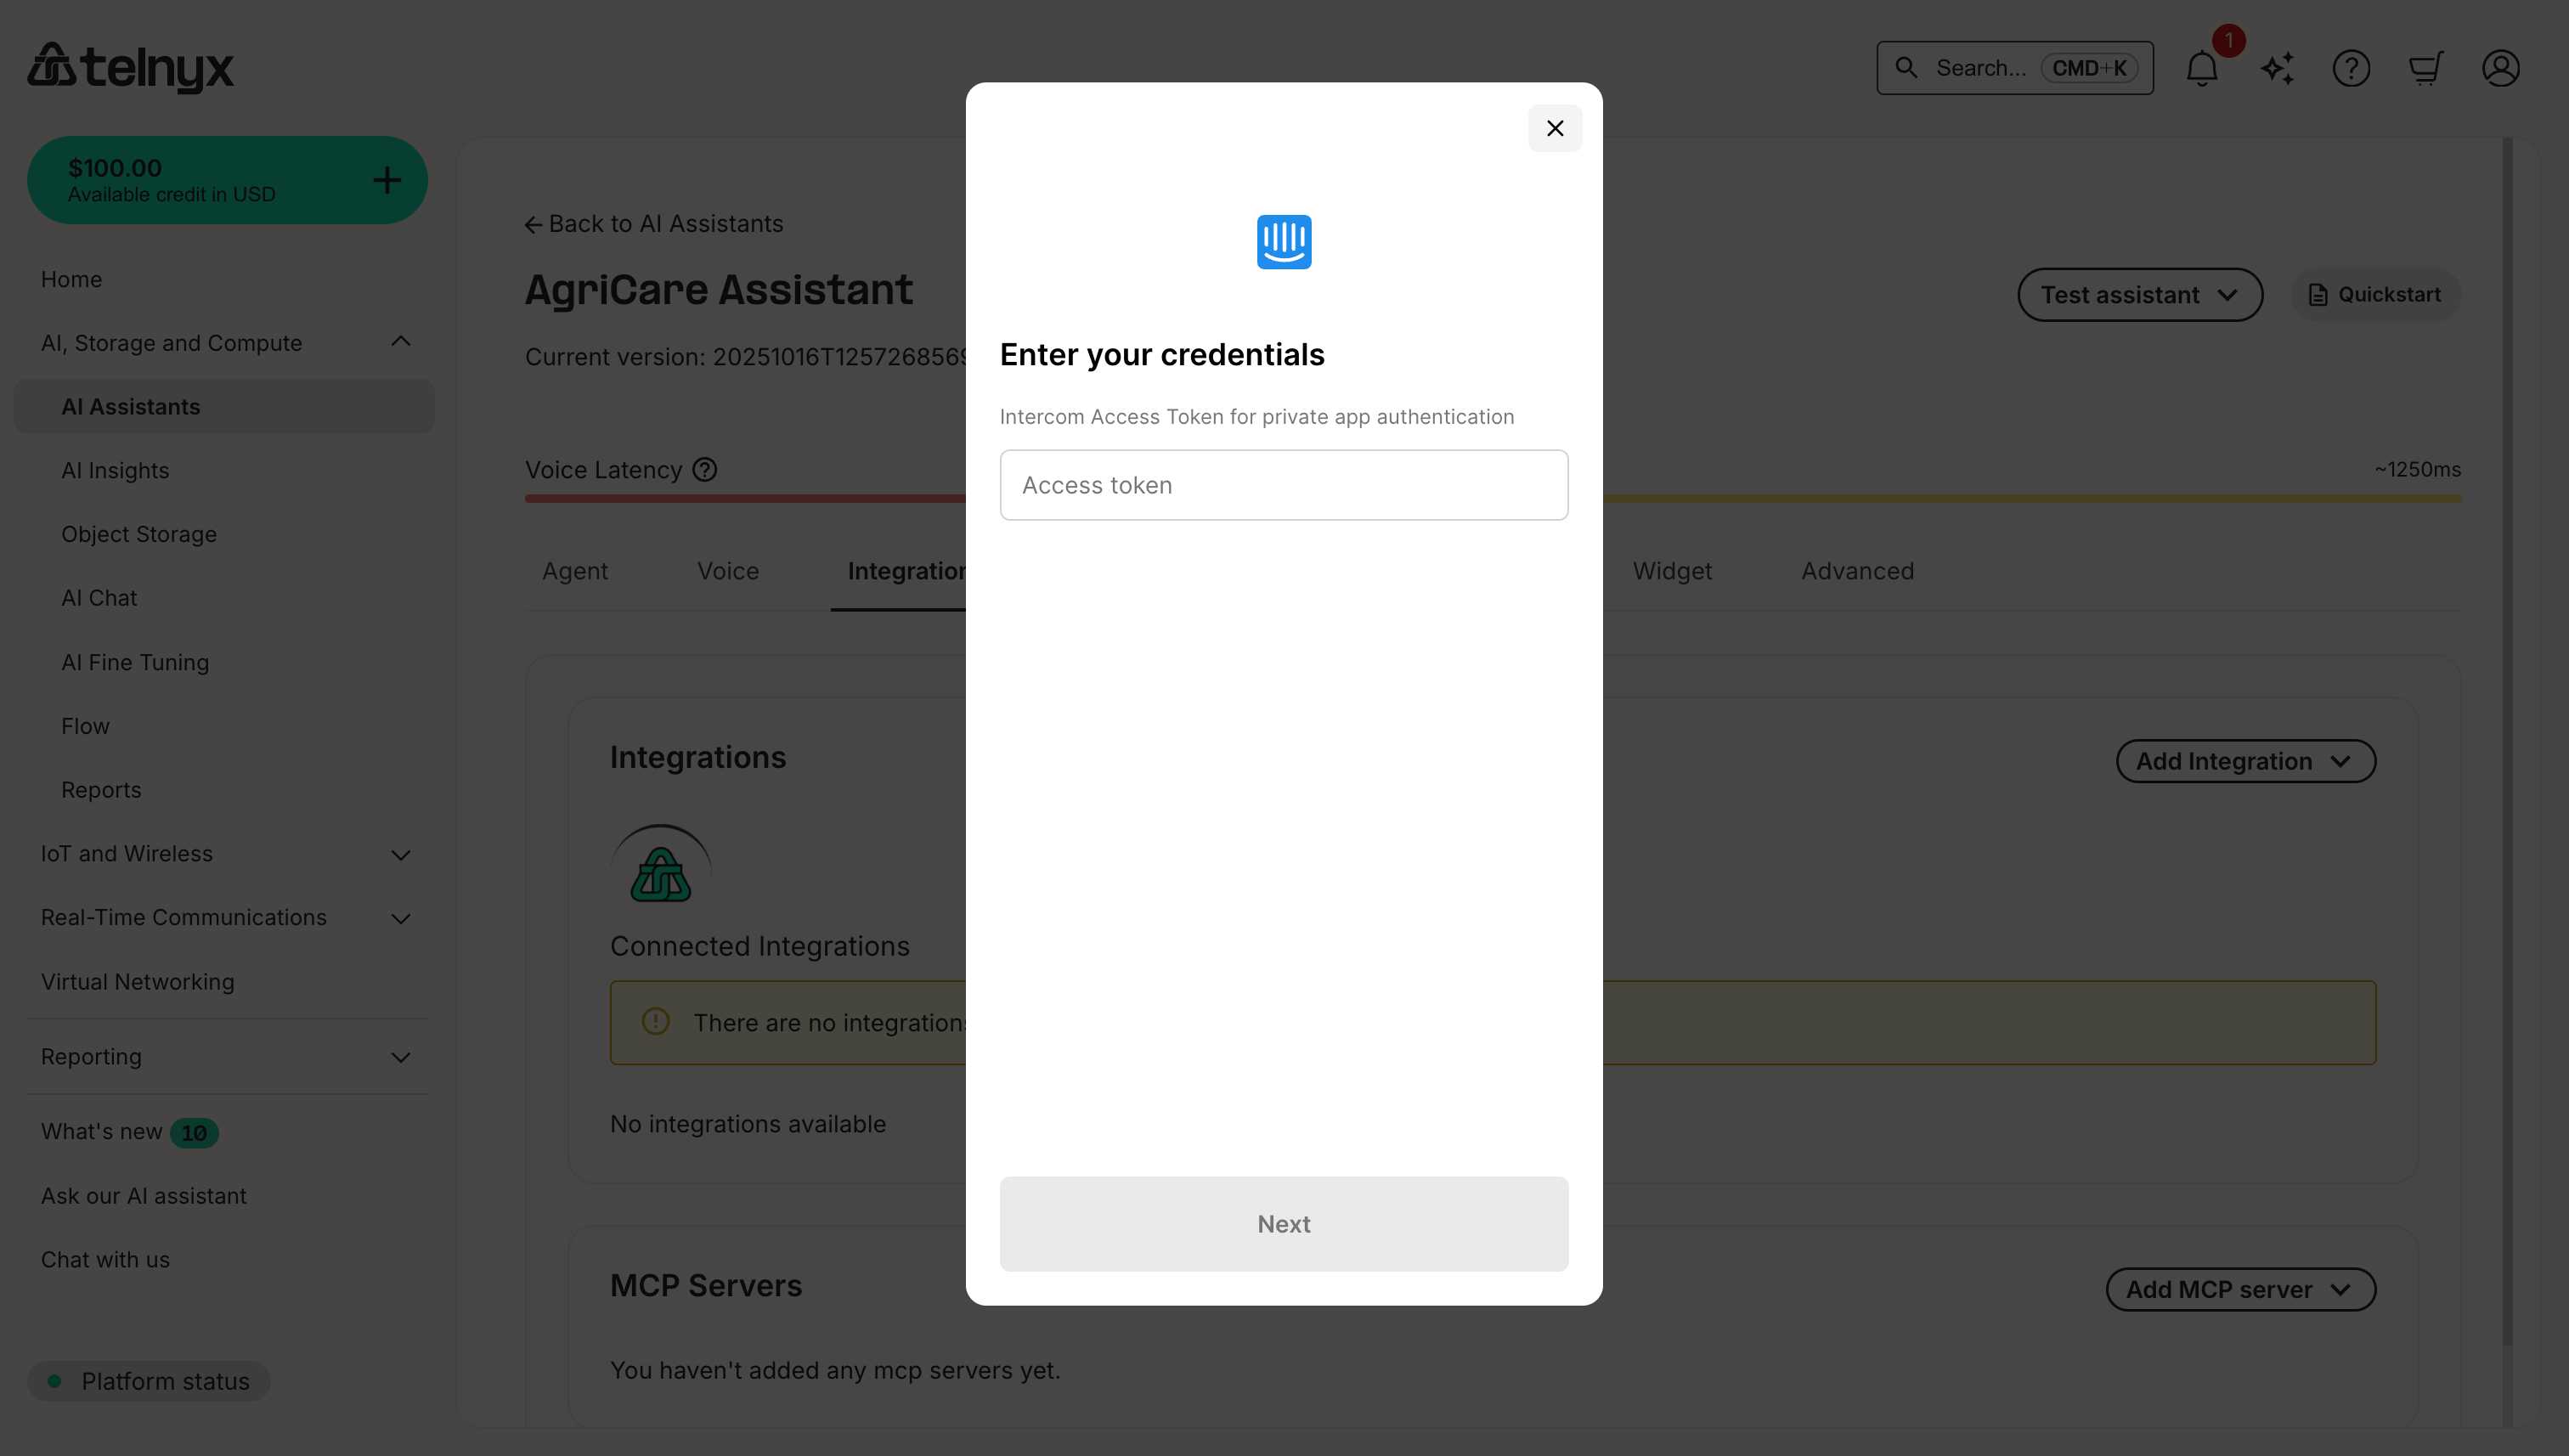
### Intercom
Connect your AI assistant to Intercom for customer messaging and support workflows.
#### Prerequisites
* Intercom account with API access.
* Permissions to create private apps.
* Access token with appropriate scopes.
#### Required credentials
When connecting Intercom, you'll need to provide:
Create a private app in Intercom (Settings → Developers → Developer Hub → Your Apps → New App) and copy the access token from the authentication section.
#### Available tools
After connecting HubSpot, your assistant can:
* **Manage contacts** - Create, update, or search contacts.
* **Deal tracking** - Create deals, update deal stages.
* **Ticket management** - Create support tickets, update status.
* **Company records** - Access and update company information.
* **Engagement tracking** - Log calls, emails, and notes.
#### Use cases
**Lead Capture**
```
Prospect: "I'd like a demo of your product"
Assistant: [Creates contact in HubSpot]
Assistant: [Creates deal in pipeline]
Assistant: [Schedules demo meeting]
```
**Support Ticketing**
```
Customer: "I have a billing question"
Assistant: [Searches HubSpot for customer record]
Assistant: [Creates ticket in support pipeline]
Assistant: [Associates ticket with contact and deal]
```
### Intercom
Connect your AI assistant to Intercom for customer messaging and support workflows.
#### Prerequisites
* Intercom account with API access.
* Permissions to create private apps.
* Access token with appropriate scopes.
#### Required credentials
When connecting Intercom, you'll need to provide:
Create a private app in Intercom (Settings → Developers → Developer Hub → Your Apps → New App) and copy the access token from the authentication section.
 #### Available tools
After connecting Intercom, your assistant can:
* **Access conversation history** - Retrieve past customer interactions and messages.
* **Create notes** - Add internal notes to customer conversations.
* **Update customer attributes** - Modify user data and custom attributes.
* **Search users** - Find customers by email, user ID, or other identifiers.
* **Manage tags** - Add or remove conversation tags for organization.
#### Use cases
**Customer Support Context**
```
Customer: "I need help with my subscription"
Assistant: [Searches Intercom for customer by phone/email]
Assistant: [Reviews conversation history]
Assistant: "I can see you upgraded to Pro last month. How can I help with your subscription?"
```
**User Data Management**
```
Customer: "Please update my company name"
Assistant: [Updates customer attributes in Intercom]
Assistant: [Adds note documenting the change]
Assistant: "I've updated your company name in our system."
```
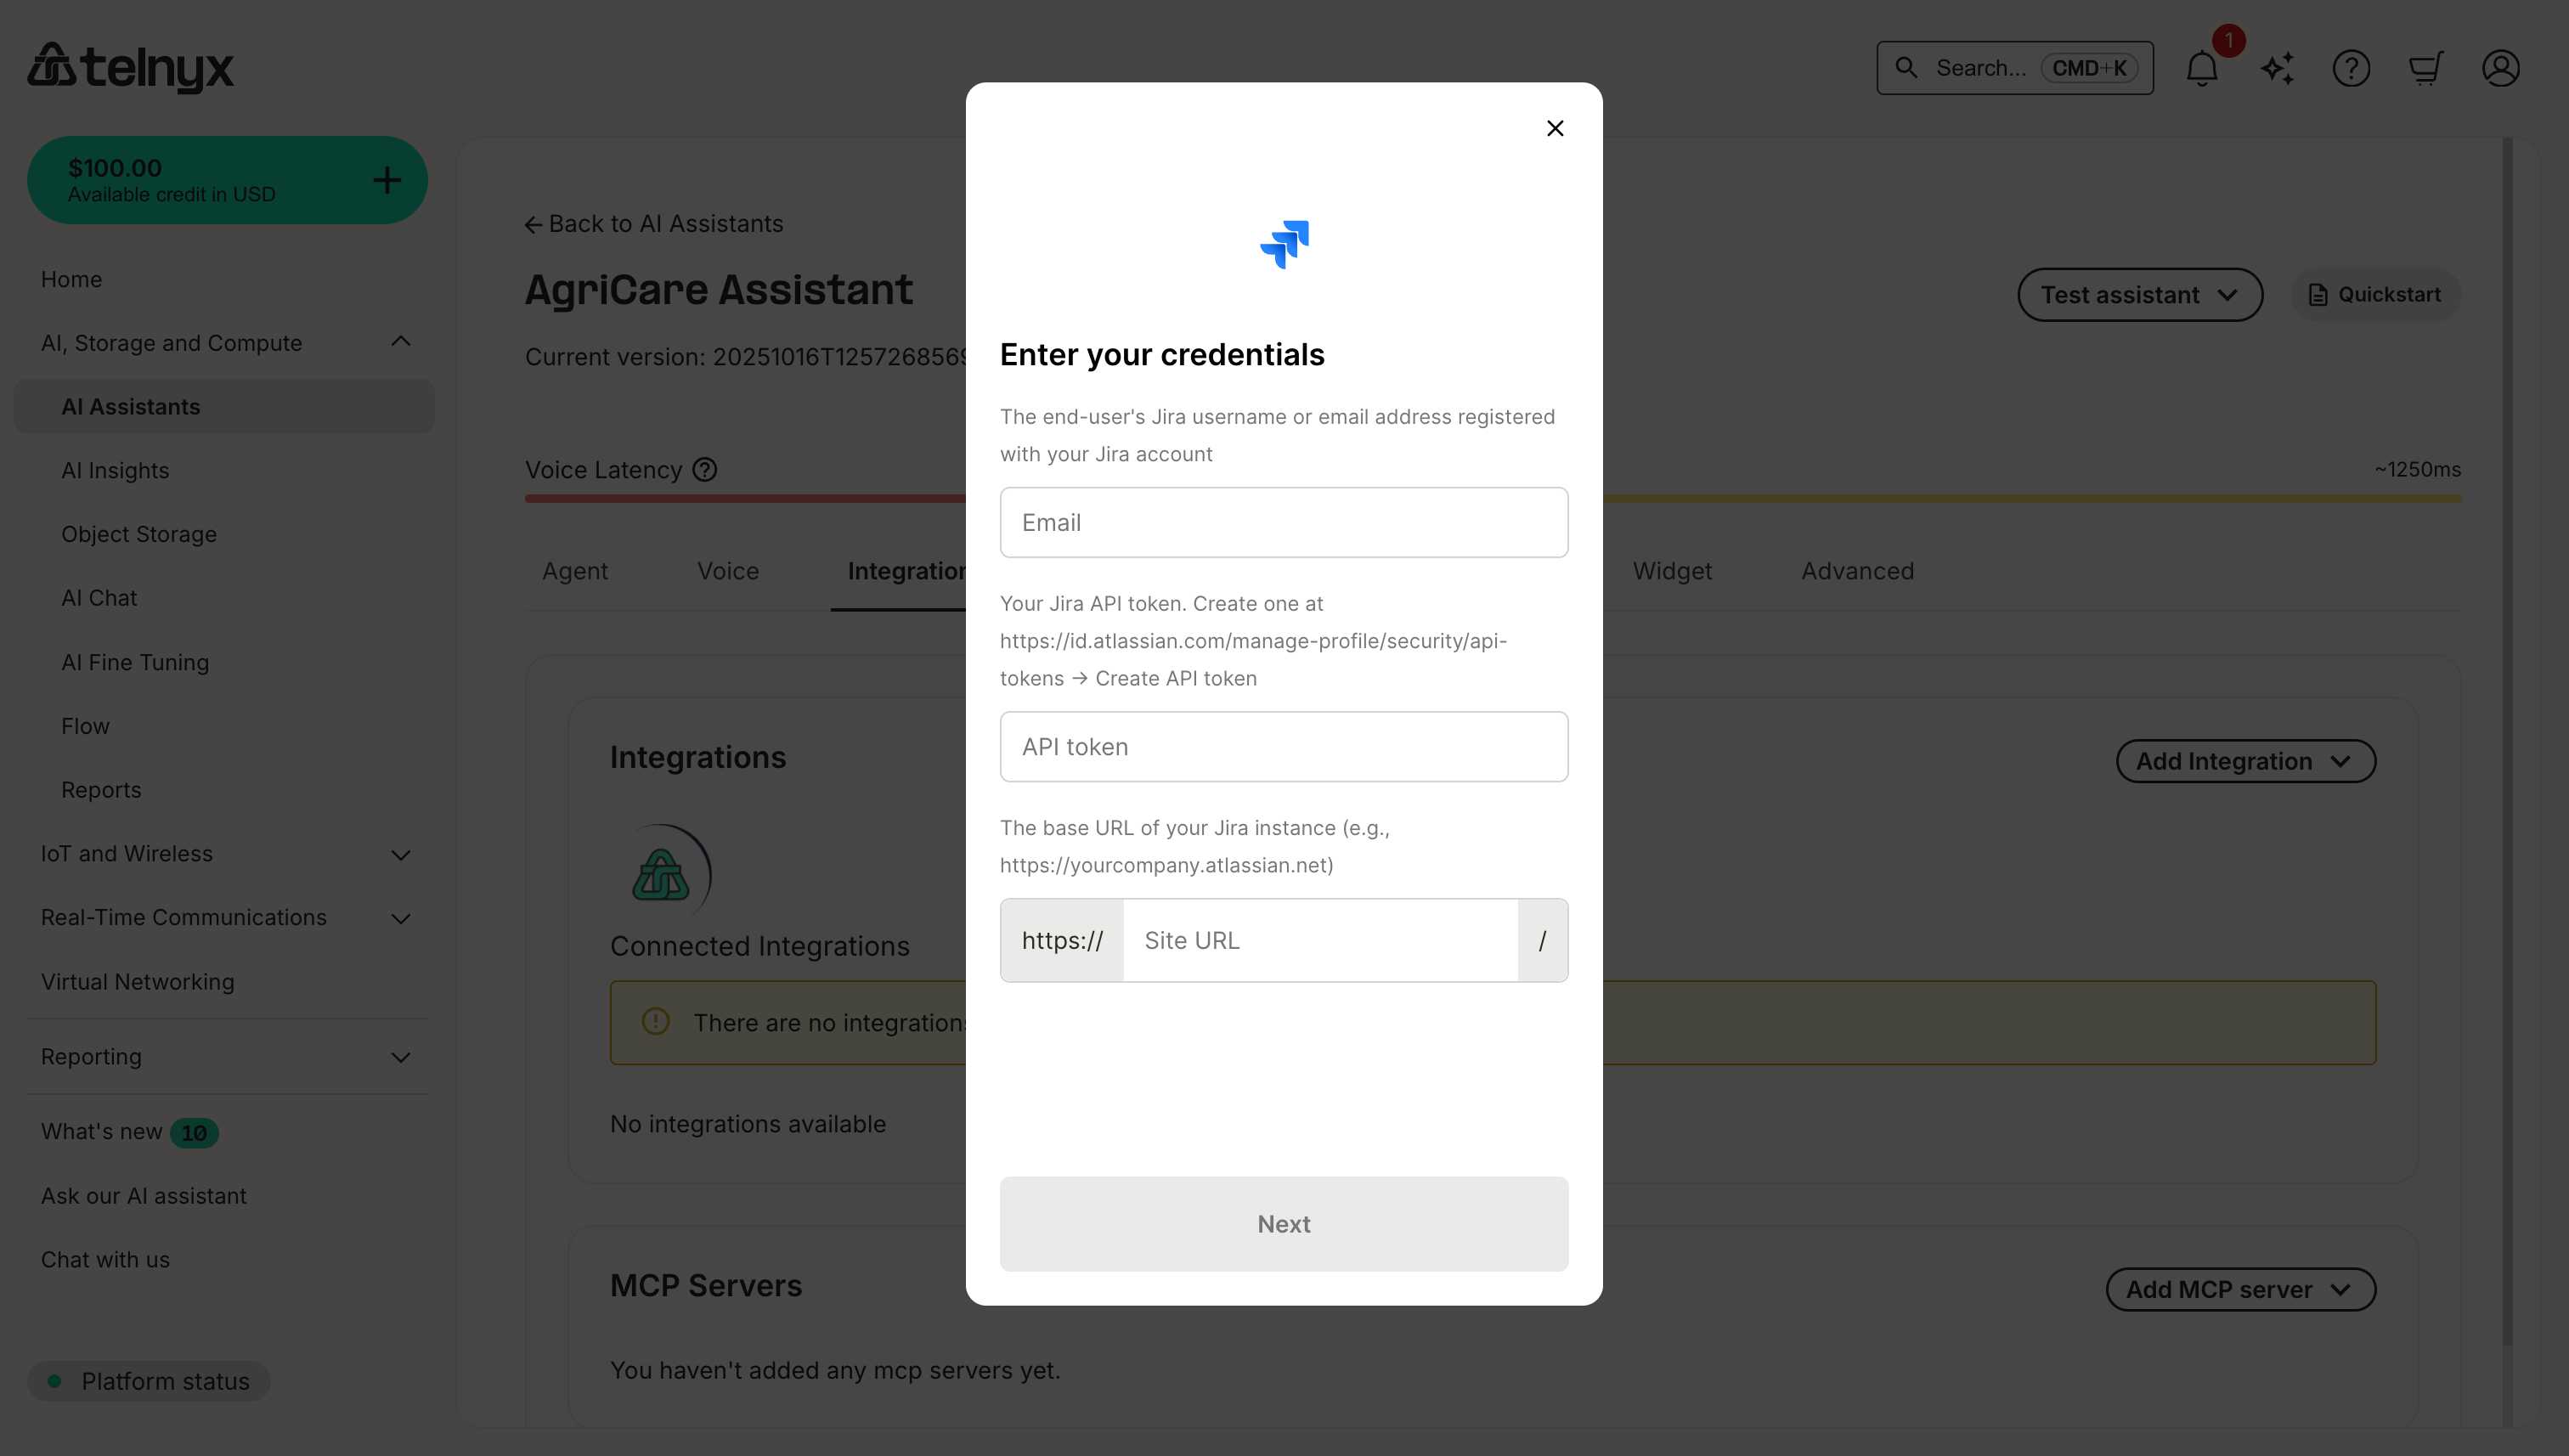
### Jira
Connect your AI assistant to Jira for project management, issue tracking, and software development workflows.
#### Prerequisites
* Jira account (Cloud or Server).
* API token or password.
* Project access and permissions.
#### Required credentials
When connecting Jira, you'll need to provide:
The Jira username or email that has access to the project.
Generate a token at [https://id.atlassian.com/manage-profile/security/api-tokens](https://id.atlassian.com/manage-profile/security/api-tokens) by selecting **Create API token**.
Provide the base URL of your Jira instance (for example `yourcompany.atlassian.net`) without the `https://` prefix.
#### Available tools
After connecting Intercom, your assistant can:
* **Access conversation history** - Retrieve past customer interactions and messages.
* **Create notes** - Add internal notes to customer conversations.
* **Update customer attributes** - Modify user data and custom attributes.
* **Search users** - Find customers by email, user ID, or other identifiers.
* **Manage tags** - Add or remove conversation tags for organization.
#### Use cases
**Customer Support Context**
```
Customer: "I need help with my subscription"
Assistant: [Searches Intercom for customer by phone/email]
Assistant: [Reviews conversation history]
Assistant: "I can see you upgraded to Pro last month. How can I help with your subscription?"
```
**User Data Management**
```
Customer: "Please update my company name"
Assistant: [Updates customer attributes in Intercom]
Assistant: [Adds note documenting the change]
Assistant: "I've updated your company name in our system."
```
### Jira
Connect your AI assistant to Jira for project management, issue tracking, and software development workflows.
#### Prerequisites
* Jira account (Cloud or Server).
* API token or password.
* Project access and permissions.
#### Required credentials
When connecting Jira, you'll need to provide:
The Jira username or email that has access to the project.
Generate a token at [https://id.atlassian.com/manage-profile/security/api-tokens](https://id.atlassian.com/manage-profile/security/api-tokens) by selecting **Create API token**.
Provide the base URL of your Jira instance (for example `yourcompany.atlassian.net`) without the `https://` prefix.
 #### Available tools
After connecting Jira, your assistant can:
* **Create issues** - Create bugs, tasks, stories, or epics.
* **Update issues** - Change status, assignee, or priority.
* **Search issues** - Find issues by project, assignee, or status.
* **Add comments** - Comment on existing issues.
* **Transition issues** - Move issues through workflow states.
#### Use cases
**Bug Reporting**
```
Developer: "Users are reporting a login error"
Assistant: [Creates bug in Jira]
Assistant: [Sets priority to High, component to Authentication]
Assistant: "Created PROJ-1234. I've assigned it to the on-call engineer."
```
**Task Management**
```
Manager: "Create a task to update the documentation"
Assistant: [Creates task in Jira project]
Assistant: [Sets due date based on conversation]
```
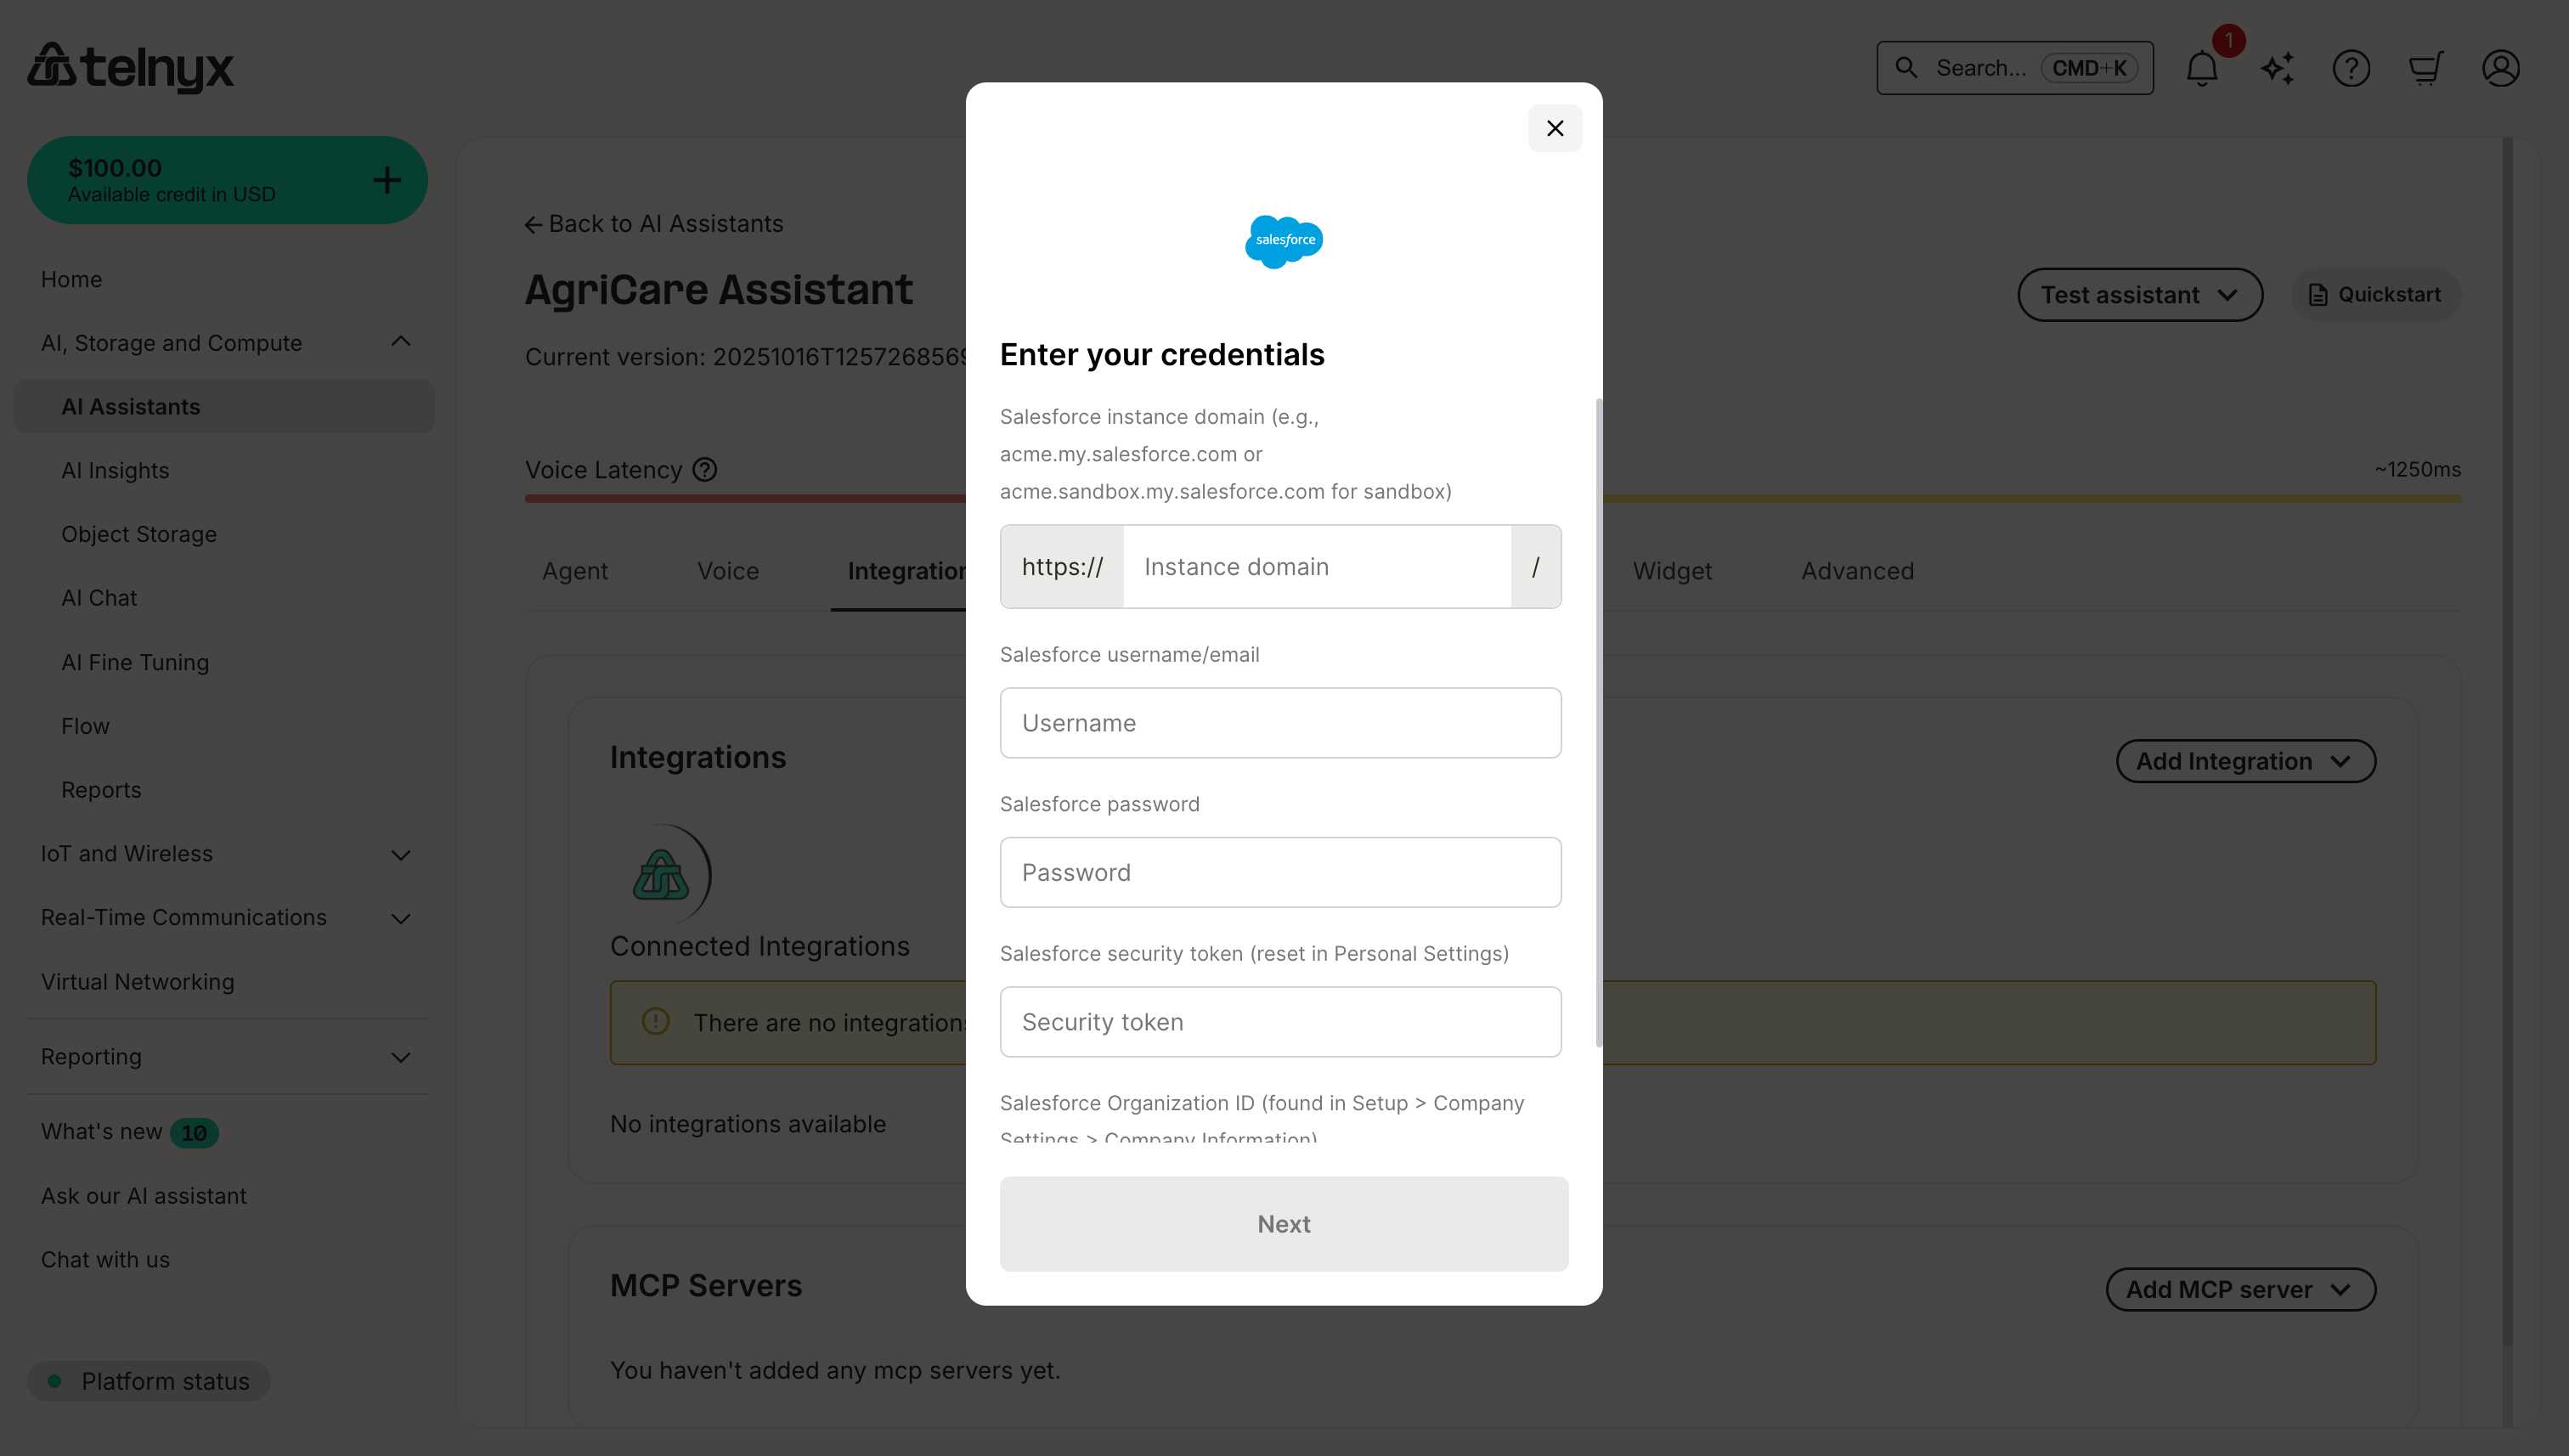
### Salesforce
Connect your AI assistant to Salesforce to access customer records, create cases, update opportunities, and more.
#### Prerequisites
* Salesforce account with API access.
* Username and password.
* Security token (reset in Personal Settings → Reset My Security Token).
* Organization ID (found in Setup → Company Settings → Company Information).
#### Required credentials
When connecting Salesforce, you'll need to provide:
Your Salesforce hostname such as `acme.my.salesforce.com` (production) or `acme.sandbox.my.salesforce.com` (sandbox) without `https://` or trailing `/`.
The Salesforce username or email with integration access.
The password for that Salesforce user.
The security token from Personal Settings → Reset My Security Token (it arrives via email).
Your org ID from Setup → Company Settings → Company Information.
#### Available tools
After connecting Jira, your assistant can:
* **Create issues** - Create bugs, tasks, stories, or epics.
* **Update issues** - Change status, assignee, or priority.
* **Search issues** - Find issues by project, assignee, or status.
* **Add comments** - Comment on existing issues.
* **Transition issues** - Move issues through workflow states.
#### Use cases
**Bug Reporting**
```
Developer: "Users are reporting a login error"
Assistant: [Creates bug in Jira]
Assistant: [Sets priority to High, component to Authentication]
Assistant: "Created PROJ-1234. I've assigned it to the on-call engineer."
```
**Task Management**
```
Manager: "Create a task to update the documentation"
Assistant: [Creates task in Jira project]
Assistant: [Sets due date based on conversation]
```
### Salesforce
Connect your AI assistant to Salesforce to access customer records, create cases, update opportunities, and more.
#### Prerequisites
* Salesforce account with API access.
* Username and password.
* Security token (reset in Personal Settings → Reset My Security Token).
* Organization ID (found in Setup → Company Settings → Company Information).
#### Required credentials
When connecting Salesforce, you'll need to provide:
Your Salesforce hostname such as `acme.my.salesforce.com` (production) or `acme.sandbox.my.salesforce.com` (sandbox) without `https://` or trailing `/`.
The Salesforce username or email with integration access.
The password for that Salesforce user.
The security token from Personal Settings → Reset My Security Token (it arrives via email).
Your org ID from Setup → Company Settings → Company Information.
 #### Available tools
After connecting Salesforce, your assistant can use tools to:
* **Search records** - Find accounts, contacts, leads, opportunities.
* **Create records** - Create new cases, leads, tasks, or opportunities.
* **Update records** - Modify existing records with new information.
* **Query data** - Run SOQL queries for custom data retrieval.
#### Use cases
**Customer Service**
```
Customer: "I need help with my recent order"
Assistant: [Searches Salesforce for customer by phone number]
Assistant: "I found your account, let me check your recent orders..."
```
**Lead Qualification**
```
Prospect: "I'm interested in your enterprise plan"
Assistant: [Creates lead in Salesforce with details from conversation]
Assistant: [Updates lead score based on budget and timeline discussed]
```
**Case Management**
```
Customer: "My service is down"
Assistant: [Creates high-priority case in Salesforce]
Assistant: "I've created case #12345 for you. Our team will reach out within 2 hours."
```
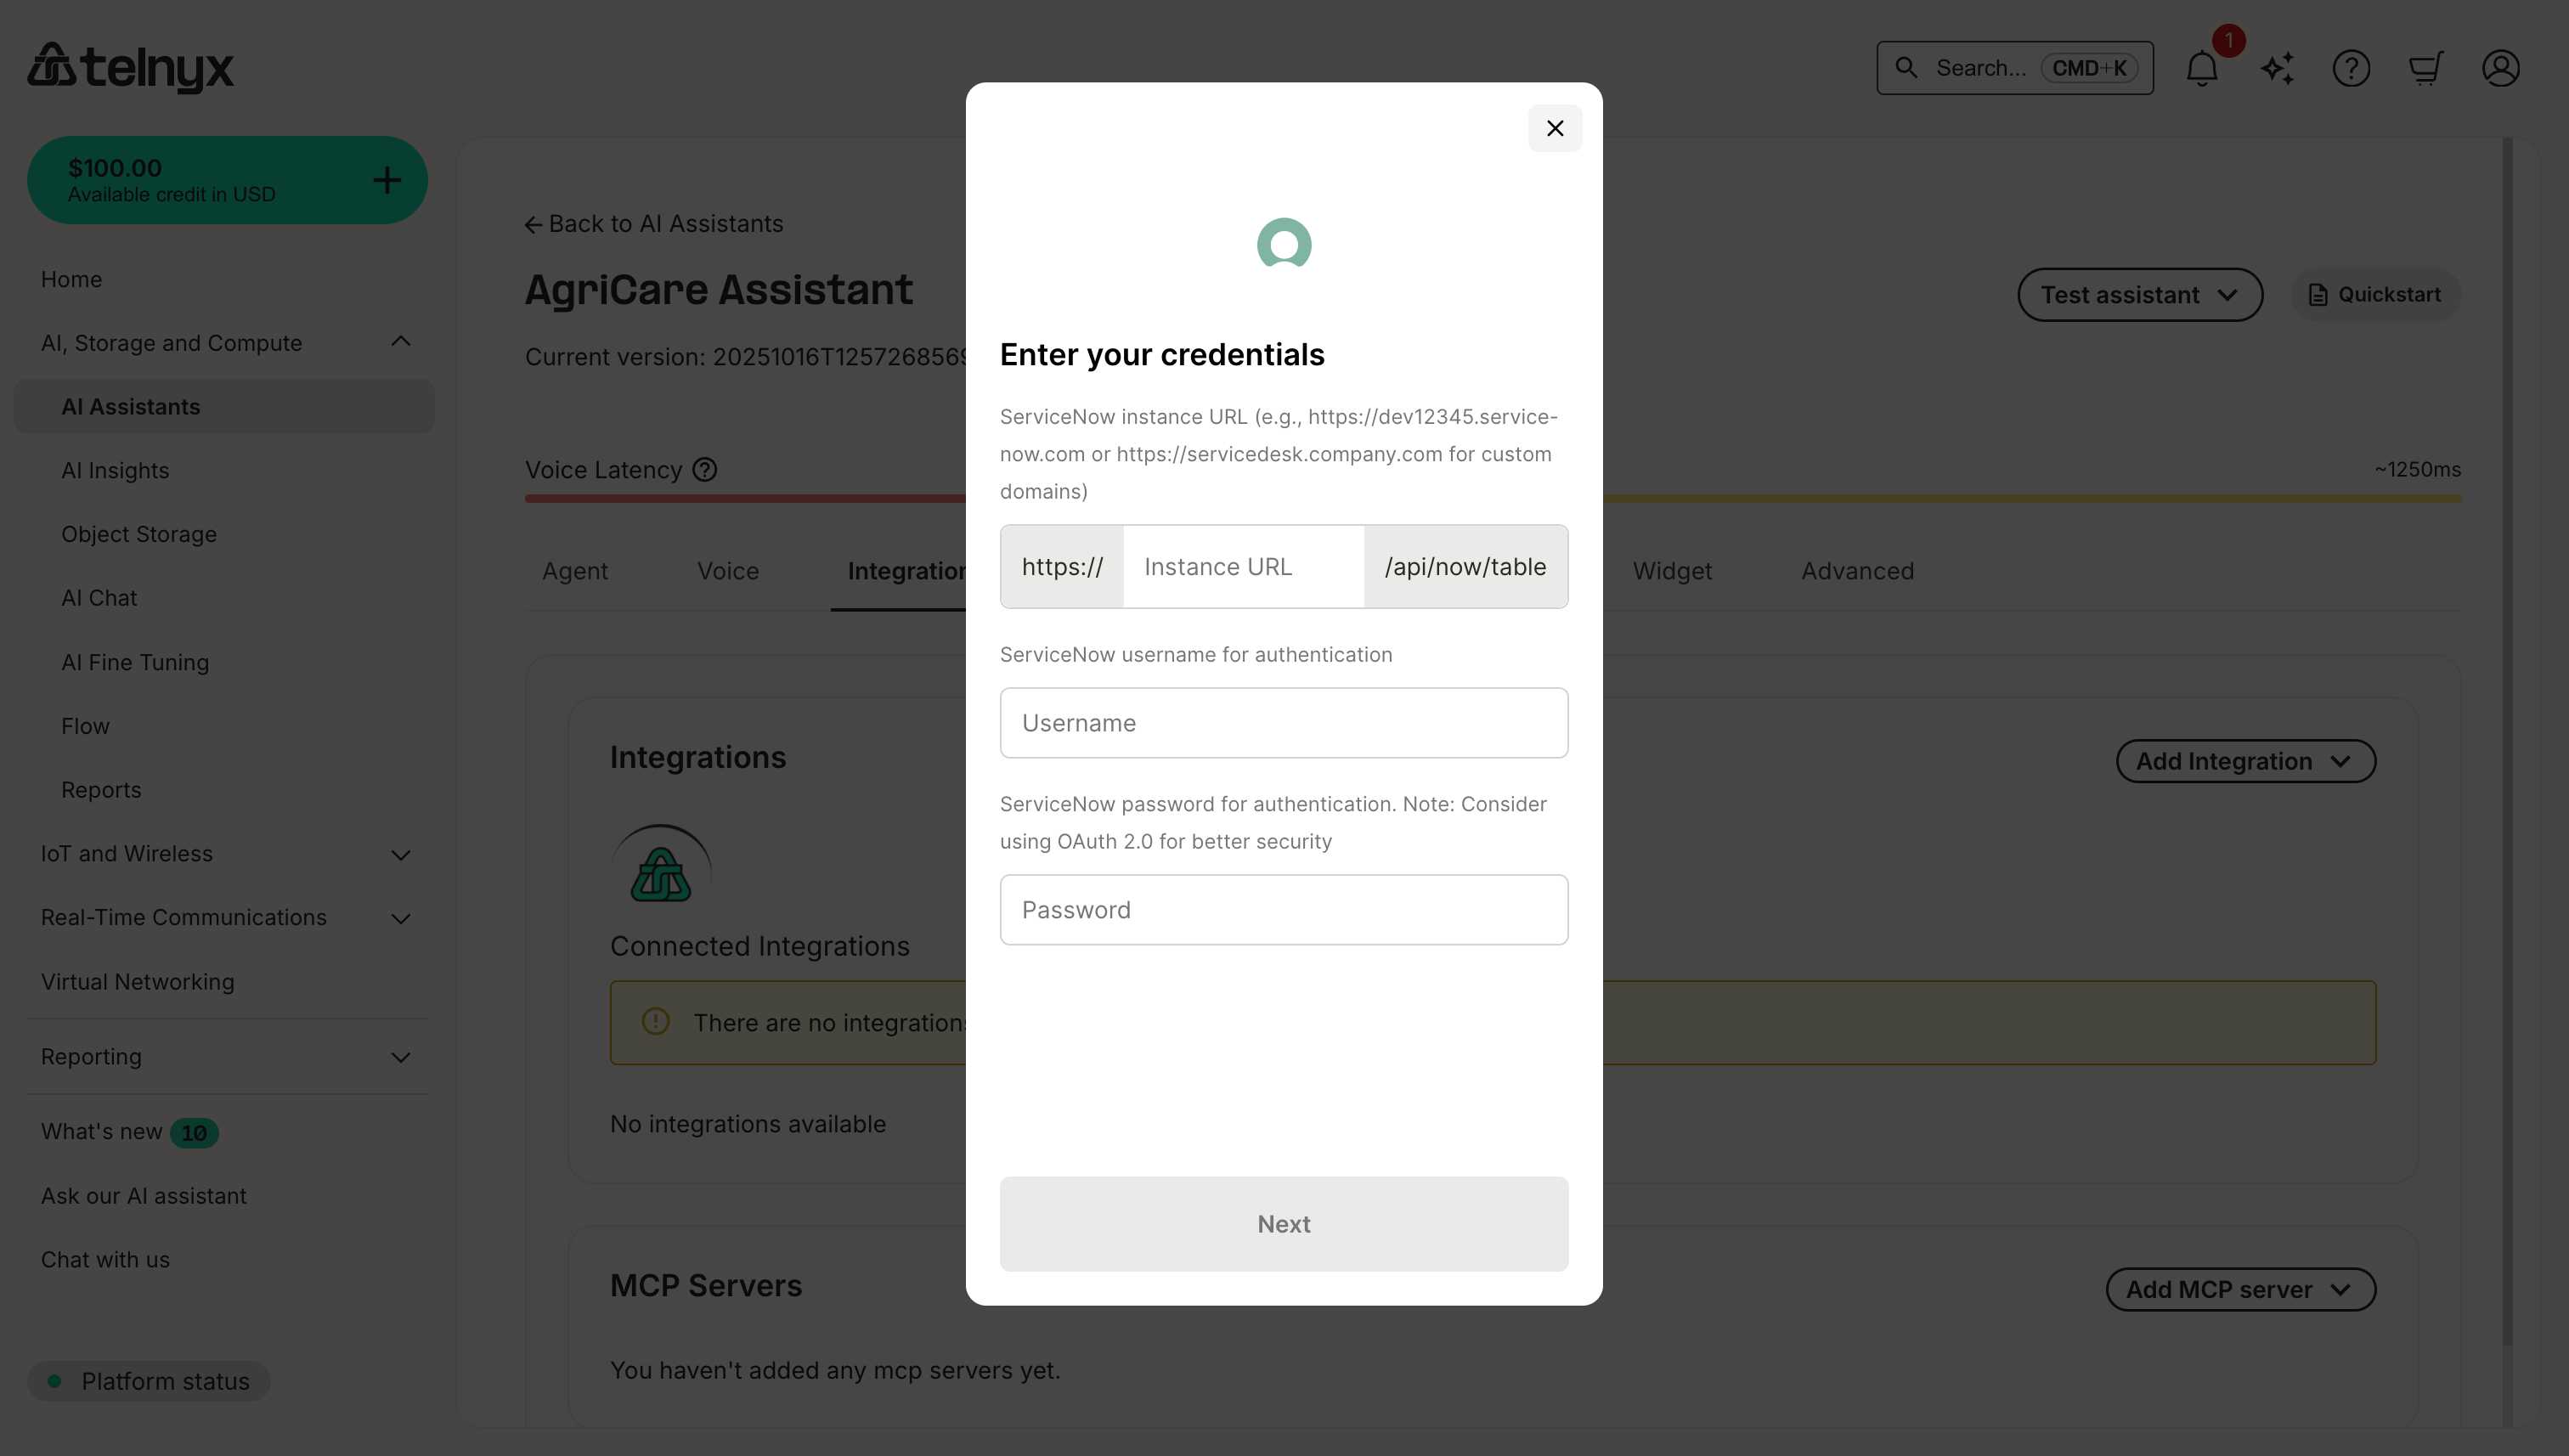
### ServiceNow
Connect your AI assistant to ServiceNow for IT service management, incident tracking, and workflow automation.
#### Prerequisites
* ServiceNow instance with API access.
* User account with appropriate roles (e.g., itil, admin).
* Instance URL and credentials.
#### Required credentials
Provide the ServiceNow hostname, for example `acme.service-now.com` or `acme-dev.service-now.com`.
Supply the ServiceNow user with the necessary roles.
Enter the password for that user.
#### Available tools
After connecting Salesforce, your assistant can use tools to:
* **Search records** - Find accounts, contacts, leads, opportunities.
* **Create records** - Create new cases, leads, tasks, or opportunities.
* **Update records** - Modify existing records with new information.
* **Query data** - Run SOQL queries for custom data retrieval.
#### Use cases
**Customer Service**
```
Customer: "I need help with my recent order"
Assistant: [Searches Salesforce for customer by phone number]
Assistant: "I found your account, let me check your recent orders..."
```
**Lead Qualification**
```
Prospect: "I'm interested in your enterprise plan"
Assistant: [Creates lead in Salesforce with details from conversation]
Assistant: [Updates lead score based on budget and timeline discussed]
```
**Case Management**
```
Customer: "My service is down"
Assistant: [Creates high-priority case in Salesforce]
Assistant: "I've created case #12345 for you. Our team will reach out within 2 hours."
```
### ServiceNow
Connect your AI assistant to ServiceNow for IT service management, incident tracking, and workflow automation.
#### Prerequisites
* ServiceNow instance with API access.
* User account with appropriate roles (e.g., itil, admin).
* Instance URL and credentials.
#### Required credentials
Provide the ServiceNow hostname, for example `acme.service-now.com` or `acme-dev.service-now.com`.
Supply the ServiceNow user with the necessary roles.
Enter the password for that user.
 #### Available tools
After connecting ServiceNow, your assistant can:
* **Create incidents** - Log IT incidents with priority and categorization.
* **Update tickets** - Modify incident status, assignment, or details.
* **Search knowledge base** - Find KB articles for issue resolution.
* **Query records** - Access CMDB, user records, or service catalogs.
#### Use cases
**IT Support**
```
Employee: "My laptop won't connect to WiFi"
Assistant: [Creates incident in ServiceNow]
Assistant: [Categorizes as Network → WiFi]
Assistant: "I've logged incident INC0012345. IT will assist you shortly."
```
**Service Requests**
```
Employee: "I need access to the marketing drive"
Assistant: [Creates service request in ServiceNow]
Assistant: [Routes to appropriate approval group]
```
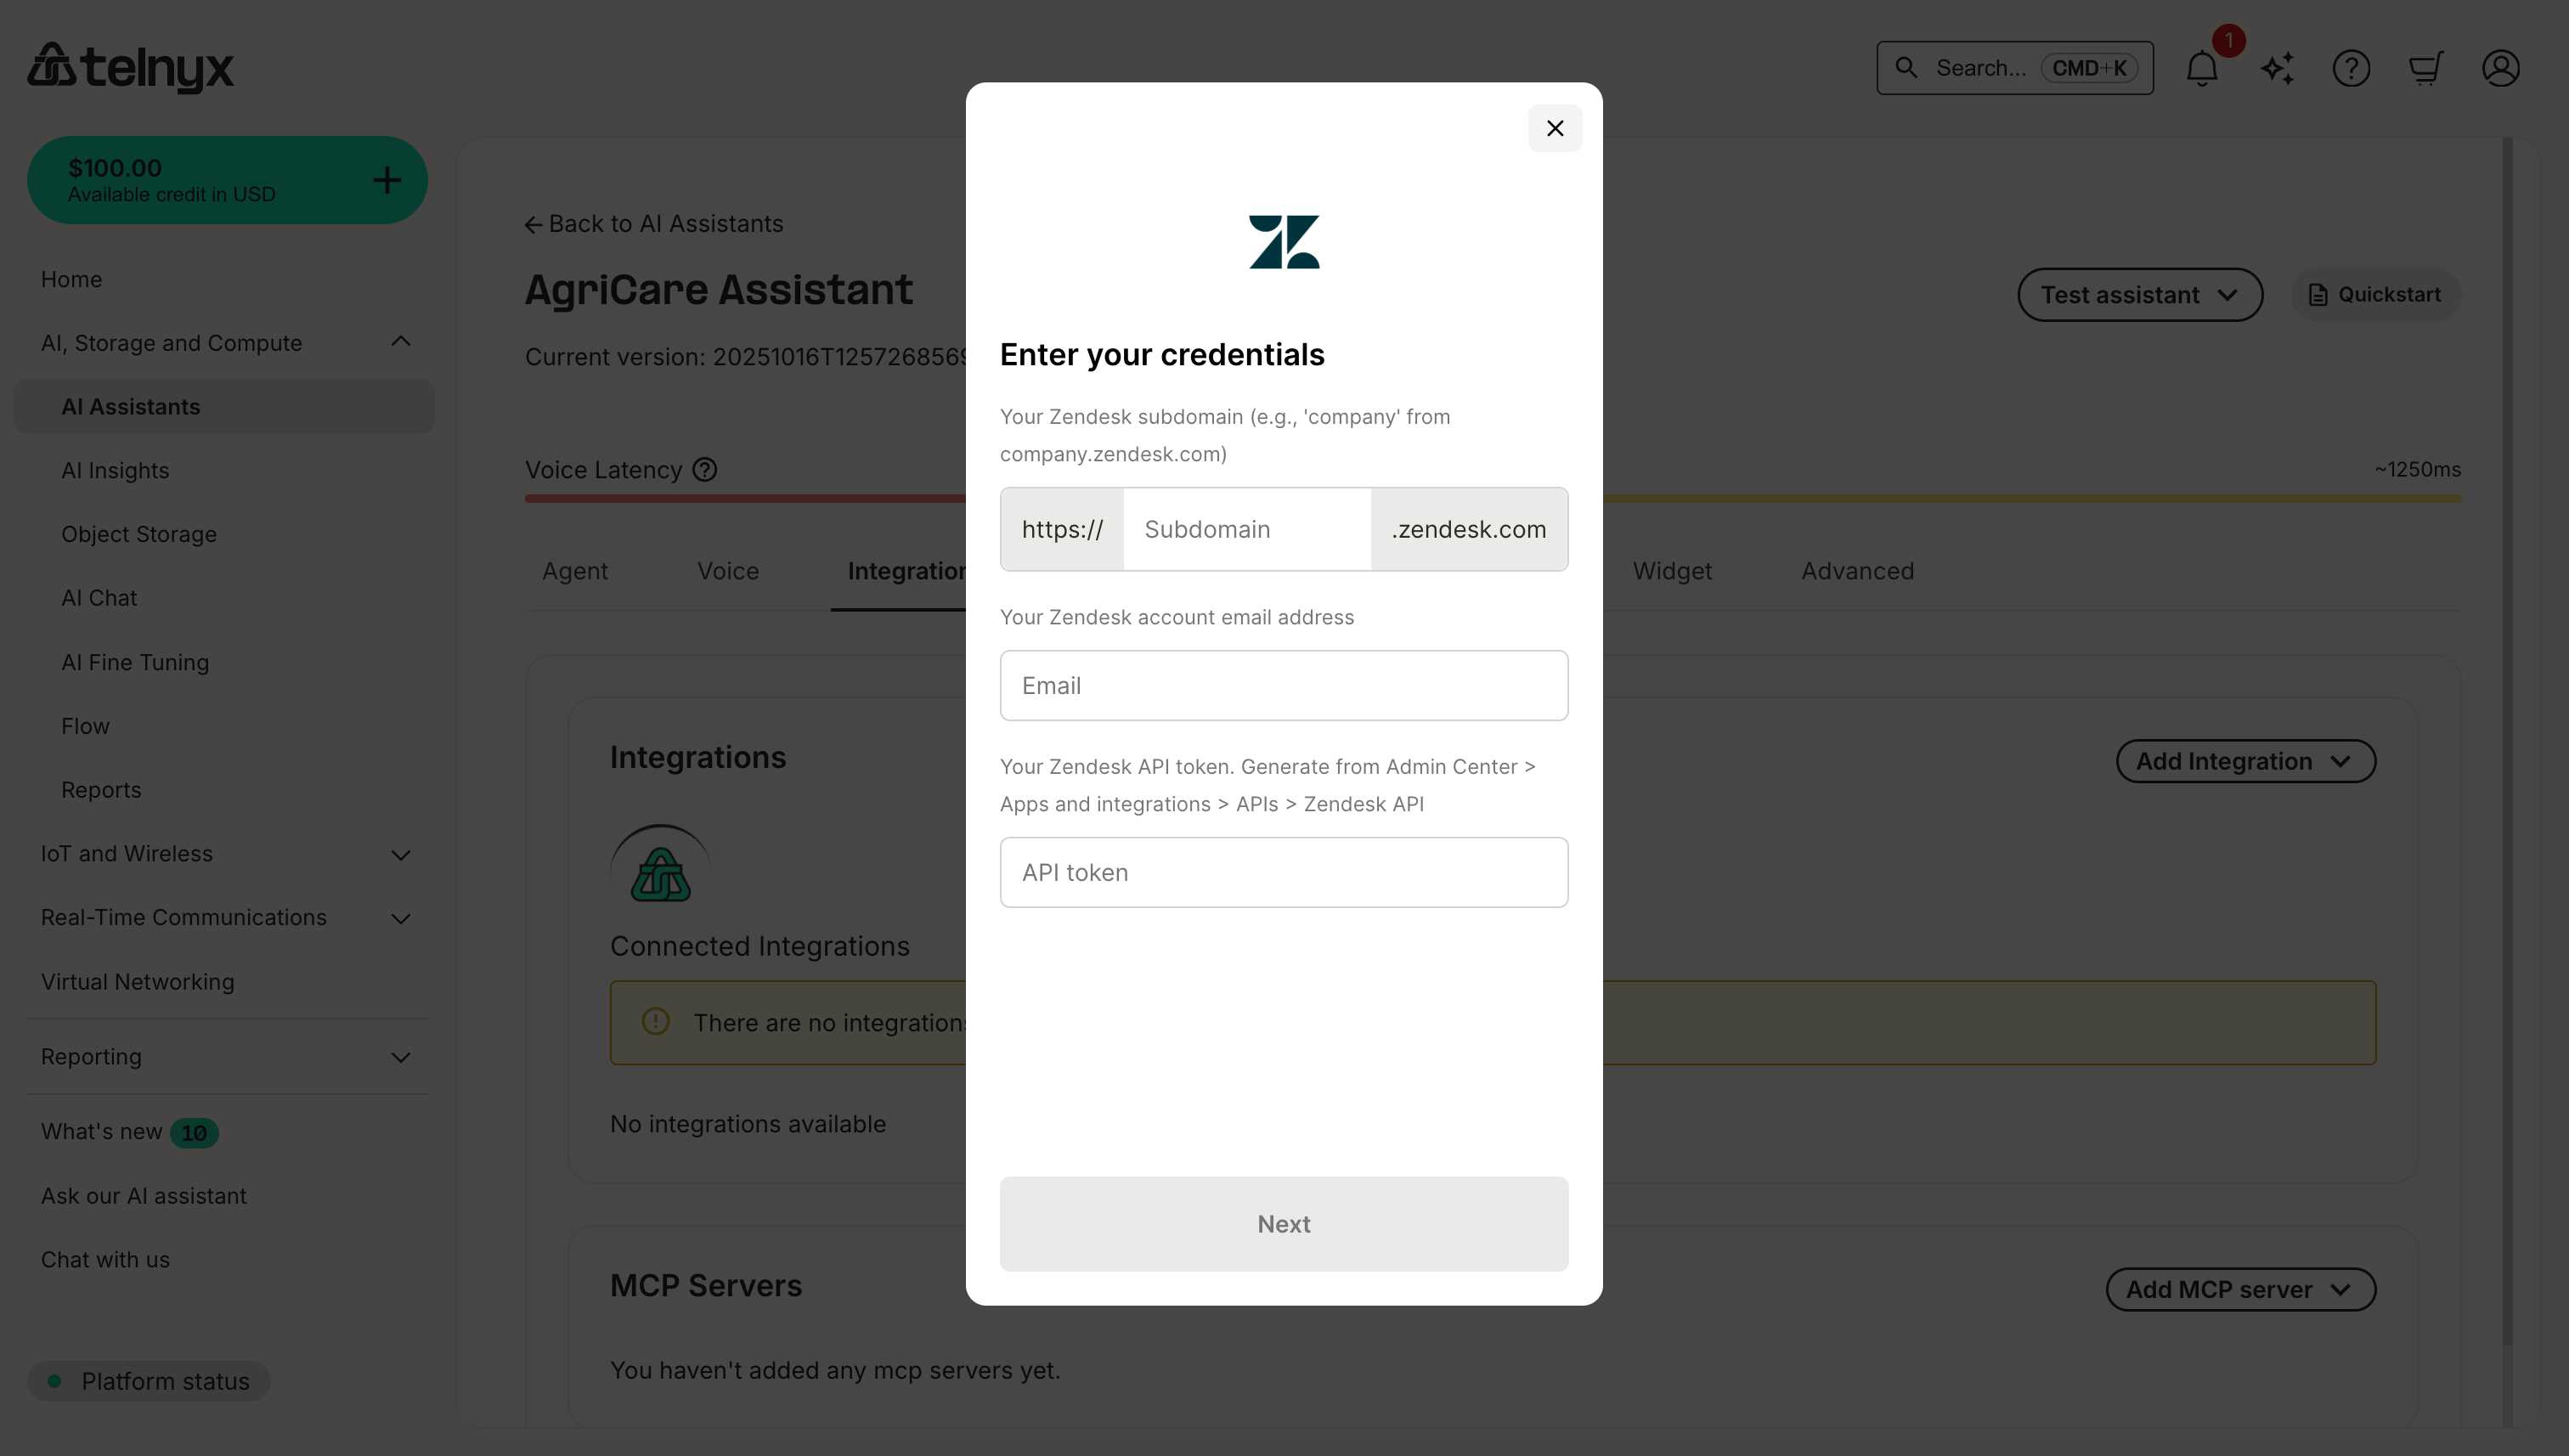
### Zendesk
Connect your AI assistant to Zendesk for customer service and support workflows.
#### Prerequisites
* Zendesk account with API access.
* Admin access to generate API tokens.
* Subdomain and email credentials.
#### Required credentials
When connecting Zendesk, you'll need to provide:
Enter only the subdomain portion (e.g., `company` if your portal is `company.zendesk.com`); the rest is added automatically.
The Zendesk account email that owns the API token.
Generate a token in Admin Center → Apps and integrations → APIs → Zendesk API.
#### Available tools
After connecting ServiceNow, your assistant can:
* **Create incidents** - Log IT incidents with priority and categorization.
* **Update tickets** - Modify incident status, assignment, or details.
* **Search knowledge base** - Find KB articles for issue resolution.
* **Query records** - Access CMDB, user records, or service catalogs.
#### Use cases
**IT Support**
```
Employee: "My laptop won't connect to WiFi"
Assistant: [Creates incident in ServiceNow]
Assistant: [Categorizes as Network → WiFi]
Assistant: "I've logged incident INC0012345. IT will assist you shortly."
```
**Service Requests**
```
Employee: "I need access to the marketing drive"
Assistant: [Creates service request in ServiceNow]
Assistant: [Routes to appropriate approval group]
```
### Zendesk
Connect your AI assistant to Zendesk for customer service and support workflows.
#### Prerequisites
* Zendesk account with API access.
* Admin access to generate API tokens.
* Subdomain and email credentials.
#### Required credentials
When connecting Zendesk, you'll need to provide:
Enter only the subdomain portion (e.g., `company` if your portal is `company.zendesk.com`); the rest is added automatically.
The Zendesk account email that owns the API token.
Generate a token in Admin Center → Apps and integrations → APIs → Zendesk API.
 #### Available tools
After connecting Zendesk, your assistant can:
* **Create tickets** - Log customer support requests with priority and categorization.
* **Search customer history** - Find previous tickets and interactions by customer.
* **Update ticket status** - Modify ticket status, assignment, or priority.
* **Access knowledge base** - Search KB articles for issue resolution.
#### Use cases
**Support Ticketing**
```
Customer: "I'm having an issue with my account login"
Assistant: [Creates ticket in Zendesk]
Assistant: [Categorizes as Account → Login Issues]
Assistant: "I've created ticket #12345. Our support team will reach out within 2 hours."
```
**Customer History Lookup**
```
Customer: "What's the status of my previous request?"
Assistant: [Searches Zendesk by phone number or email]
Assistant: "I found your ticket #12340 from last week. It was resolved on Monday."
```
### Coval
Connect your AI assistant to [Coval](https://www.coval.dev/) for automated simulation, evaluation, and production monitoring of voice and chat agents.
Coval is a **testing and evaluation** tool — unlike the other integrations on this page, it does not add tools your assistant uses during conversations. Instead, it tests and monitors the assistant itself, helping you catch regressions and validate behavior at scale.
#### Prerequisites
* Coval account at [coval.dev](https://www.coval.dev/).
* A configured Telnyx AI assistant to evaluate.
#### Required credentials
When connecting Coval, you'll need to provide:
Log in to your Coval dashboard, navigate to your workspace settings, and copy your API key.
#### Capabilities
After connecting Coval, you can:
* **Automated scenario simulation** — Generate thousands of test scenarios from a few seed cases, covering edge cases and unexpected user behaviors.
* **CI/CD regression testing** — Automatically detect performance regressions on every code change before deploying to production.
* **Production monitoring** — Log live calls, receive instant alerts for performance drops, and replay transcripts and audio.
* **Built-in evaluation metrics** — Measure latency, accuracy, tool-call effectiveness, and instruction compliance across all interactions.
#### Use cases
**Pre-deployment validation**
```
Run hundreds of simulated conversations against your assistant to verify
it handles greetings, edge cases, and tool calls correctly before going live.
```
**Regression testing in CI/CD**
```
Add Coval evaluation steps to your deployment pipeline so every assistant
update is automatically tested against your scenario library.
```
**Production quality monitoring**
```
Monitor live assistant conversations for performance drops, then replay
specific calls to diagnose issues.
```
## Managing integrations
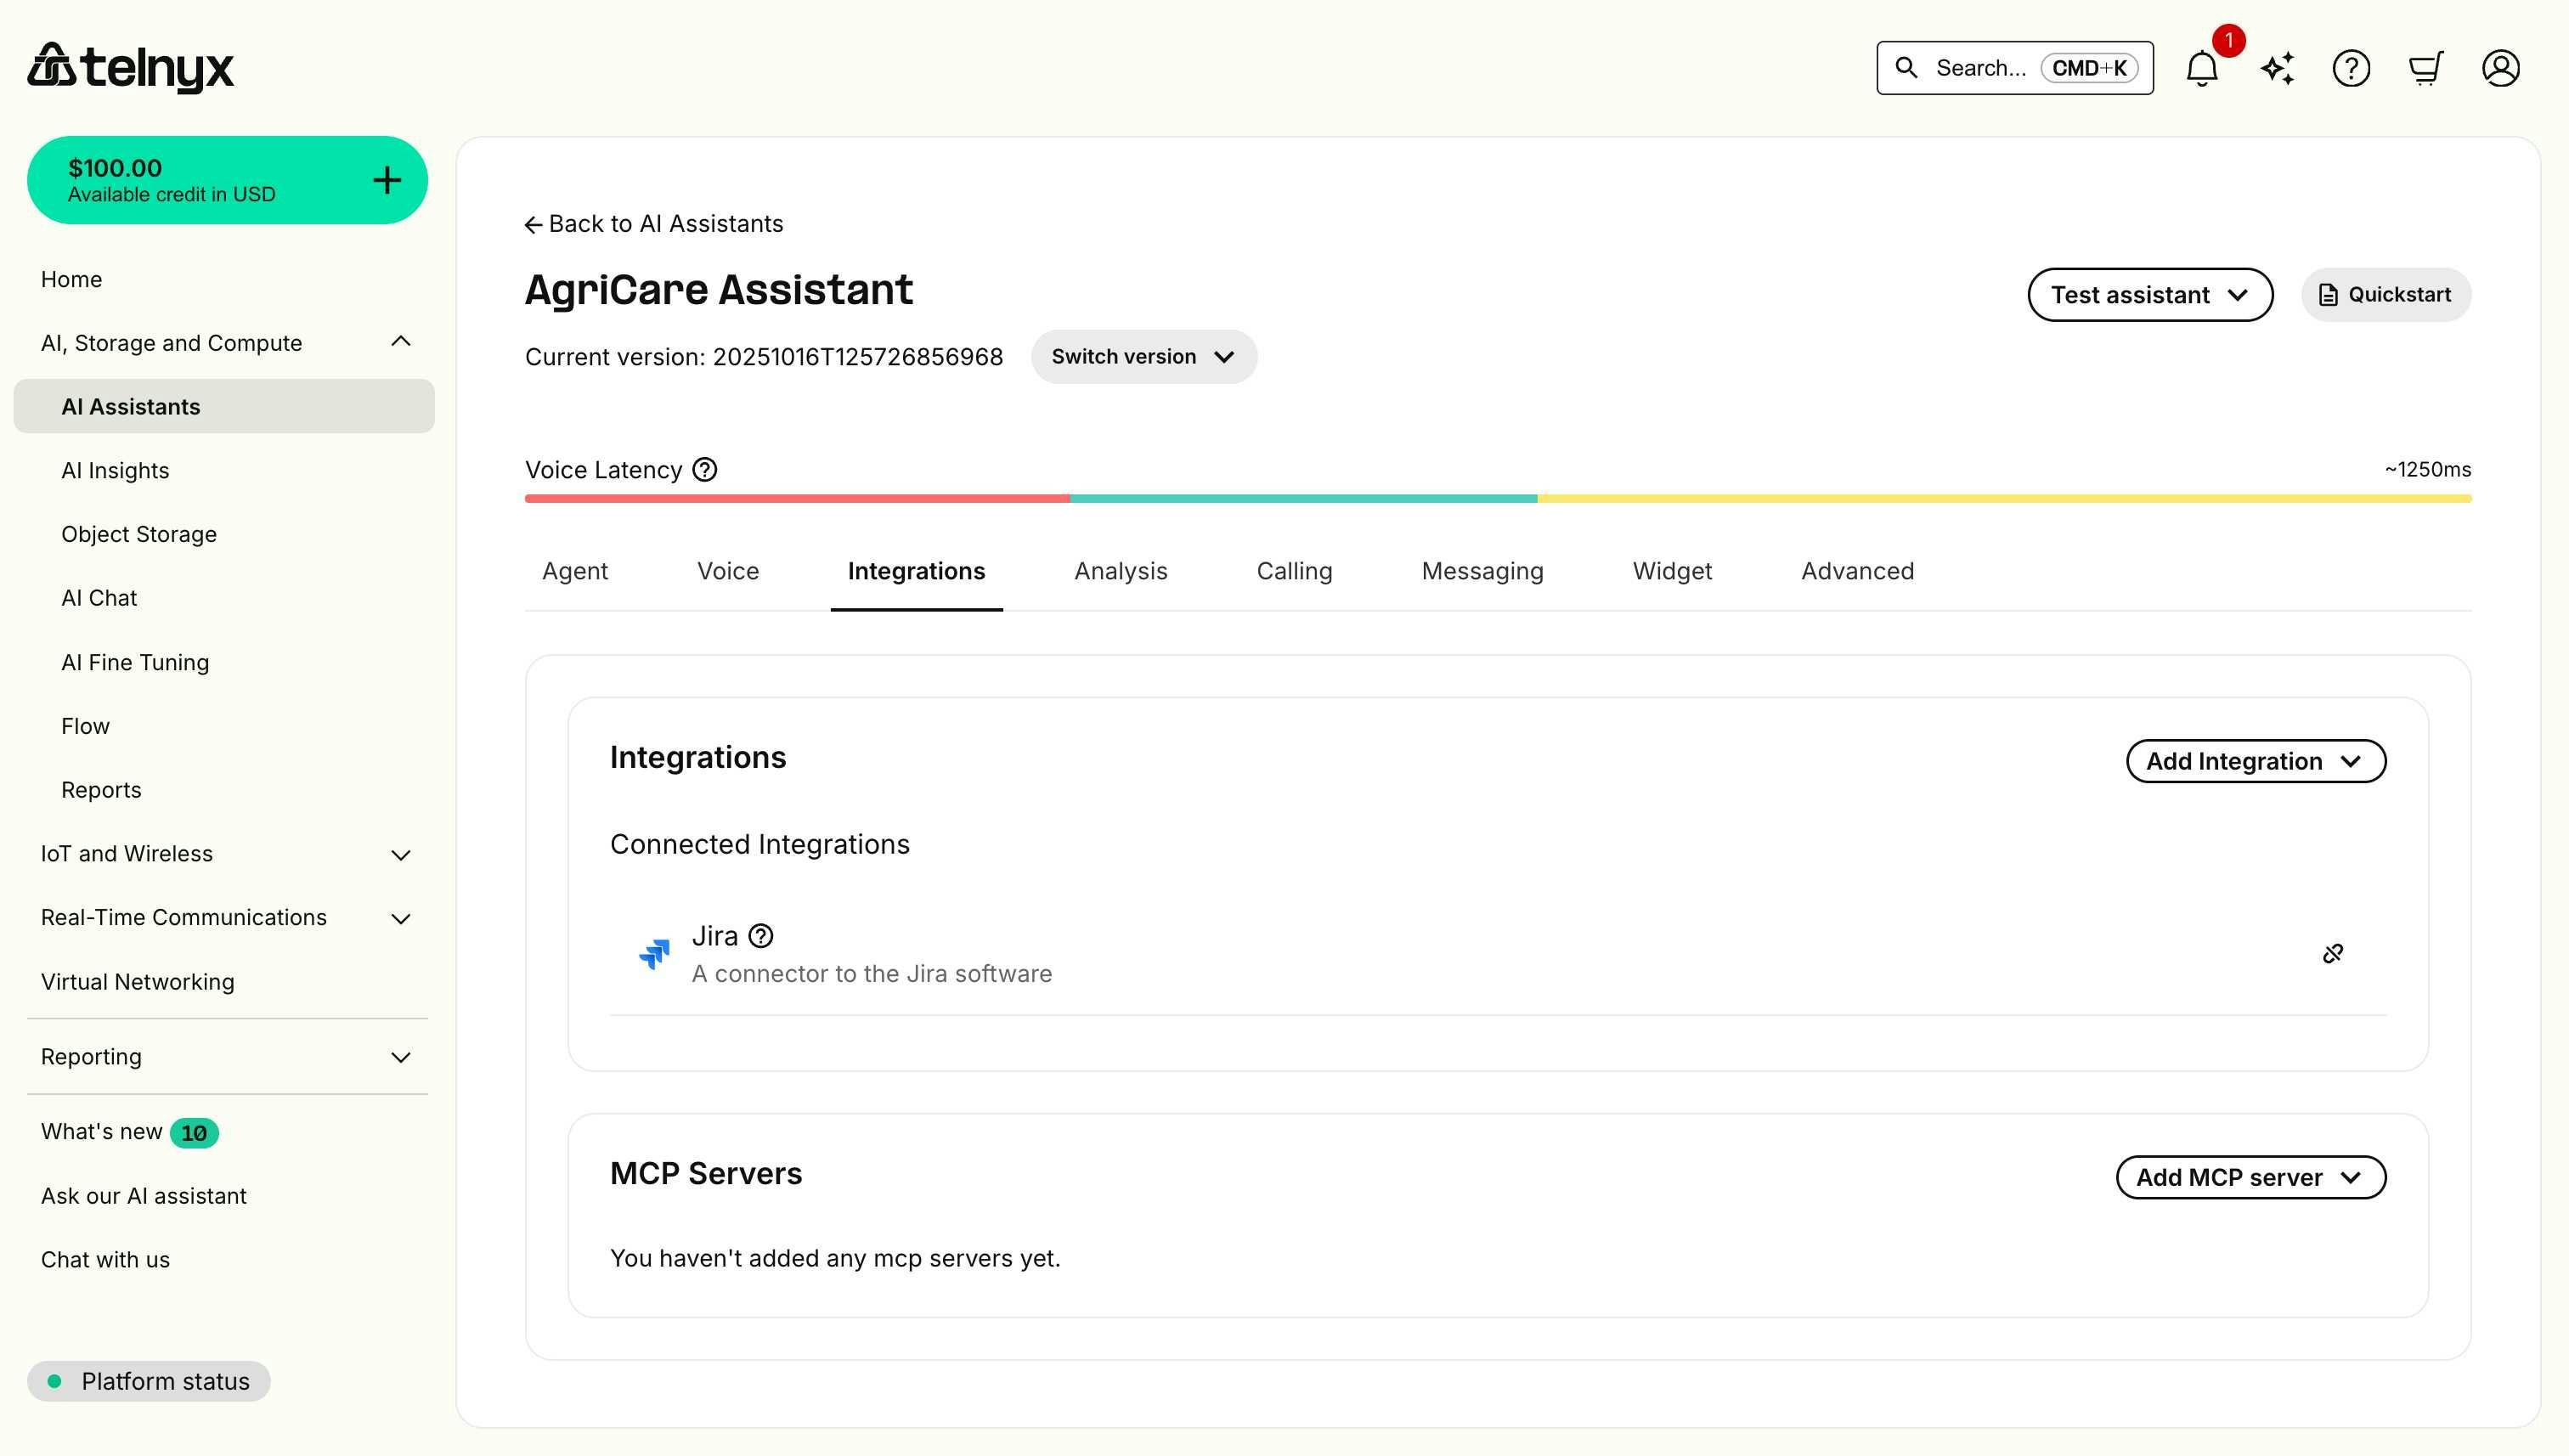
### Viewing connected integrations
Navigate to the assistant you want to review in the Mission Control Portal.
Open the **Integrations** tab.
View everything listed under **Connected Integrations**.
#### Available tools
After connecting Zendesk, your assistant can:
* **Create tickets** - Log customer support requests with priority and categorization.
* **Search customer history** - Find previous tickets and interactions by customer.
* **Update ticket status** - Modify ticket status, assignment, or priority.
* **Access knowledge base** - Search KB articles for issue resolution.
#### Use cases
**Support Ticketing**
```
Customer: "I'm having an issue with my account login"
Assistant: [Creates ticket in Zendesk]
Assistant: [Categorizes as Account → Login Issues]
Assistant: "I've created ticket #12345. Our support team will reach out within 2 hours."
```
**Customer History Lookup**
```
Customer: "What's the status of my previous request?"
Assistant: [Searches Zendesk by phone number or email]
Assistant: "I found your ticket #12340 from last week. It was resolved on Monday."
```
### Coval
Connect your AI assistant to [Coval](https://www.coval.dev/) for automated simulation, evaluation, and production monitoring of voice and chat agents.
Coval is a **testing and evaluation** tool — unlike the other integrations on this page, it does not add tools your assistant uses during conversations. Instead, it tests and monitors the assistant itself, helping you catch regressions and validate behavior at scale.
#### Prerequisites
* Coval account at [coval.dev](https://www.coval.dev/).
* A configured Telnyx AI assistant to evaluate.
#### Required credentials
When connecting Coval, you'll need to provide:
Log in to your Coval dashboard, navigate to your workspace settings, and copy your API key.
#### Capabilities
After connecting Coval, you can:
* **Automated scenario simulation** — Generate thousands of test scenarios from a few seed cases, covering edge cases and unexpected user behaviors.
* **CI/CD regression testing** — Automatically detect performance regressions on every code change before deploying to production.
* **Production monitoring** — Log live calls, receive instant alerts for performance drops, and replay transcripts and audio.
* **Built-in evaluation metrics** — Measure latency, accuracy, tool-call effectiveness, and instruction compliance across all interactions.
#### Use cases
**Pre-deployment validation**
```
Run hundreds of simulated conversations against your assistant to verify
it handles greetings, edge cases, and tool calls correctly before going live.
```
**Regression testing in CI/CD**
```
Add Coval evaluation steps to your deployment pipeline so every assistant
update is automatically tested against your scenario library.
```
**Production quality monitoring**
```
Monitor live assistant conversations for performance drops, then replay
specific calls to diagnose issues.
```
## Managing integrations
### Viewing connected integrations
Navigate to the assistant you want to review in the Mission Control Portal.
Open the **Integrations** tab.
View everything listed under **Connected Integrations**.
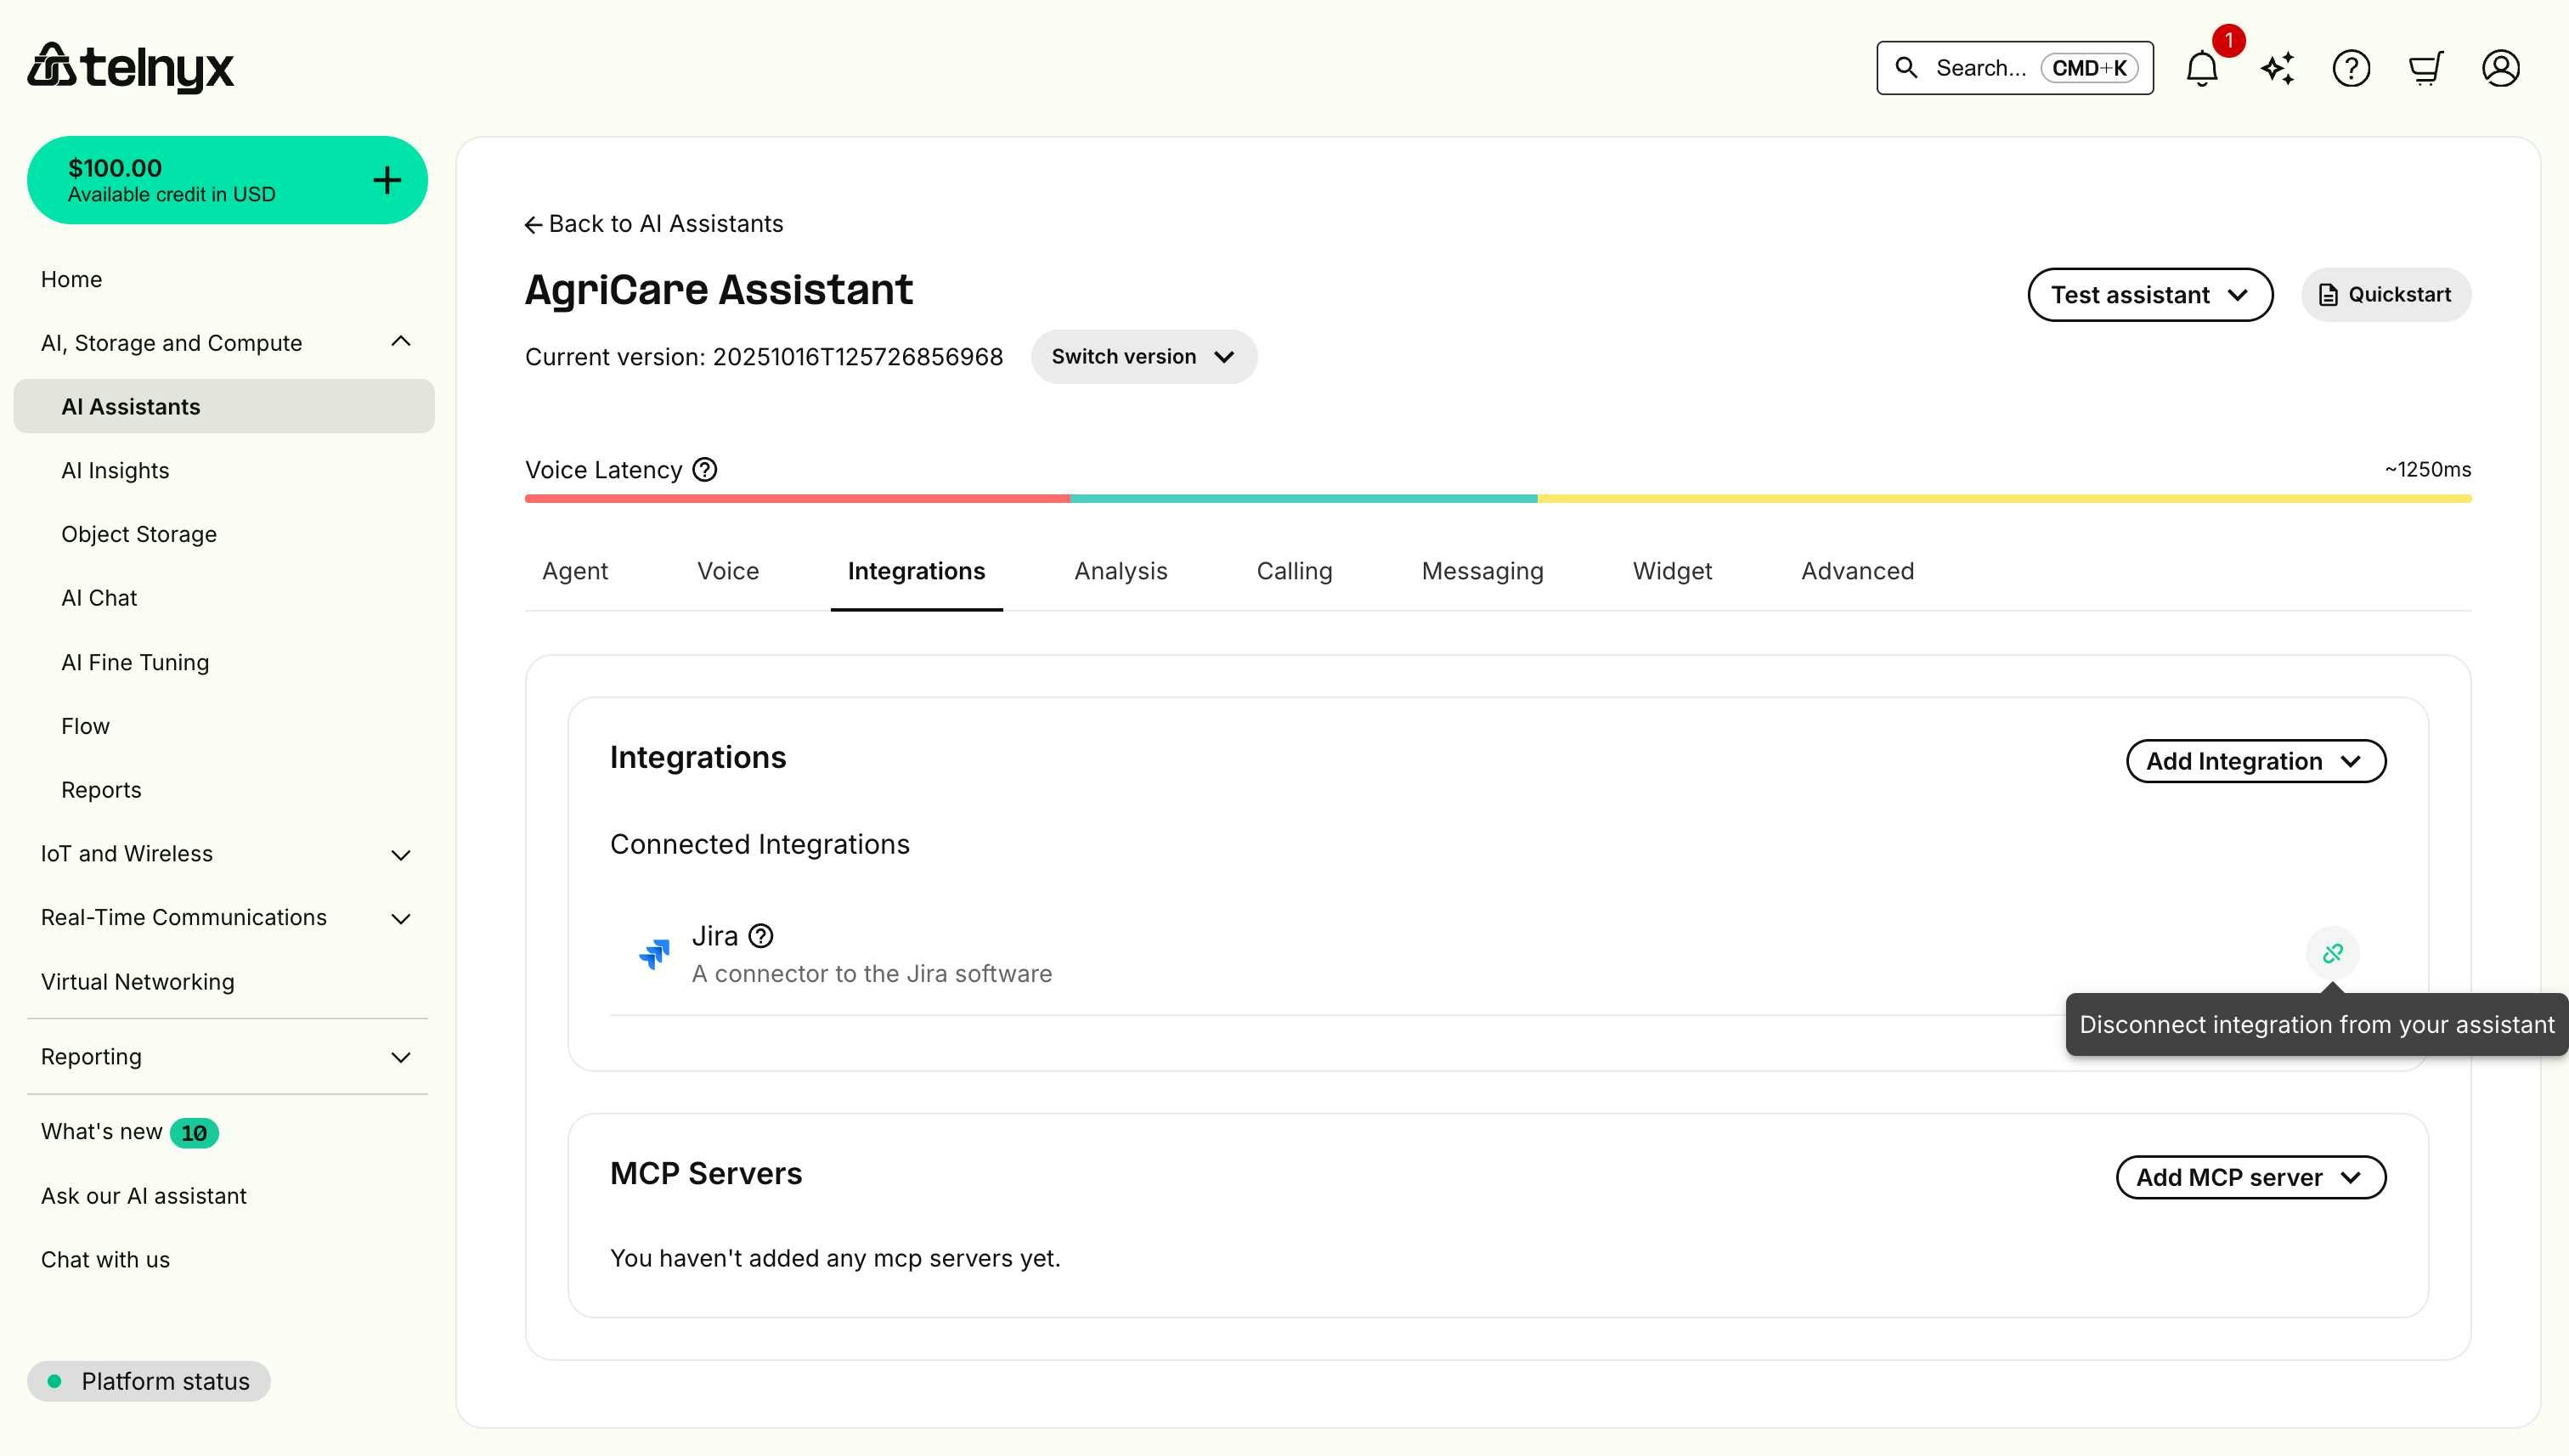
 ### Disconnecting an integration
To disconnect an integration from your assistant:
Navigate to your assistant and open the **Integrations** tab.
Find it within the **Connected Integrations** list.
Click the chain-link **unassign** button.
Approve the confirmation dialog to finish disconnecting.
### Disconnecting an integration
To disconnect an integration from your assistant:
Navigate to your assistant and open the **Integrations** tab.
Find it within the **Connected Integrations** list.
Click the chain-link **unassign** button.
Approve the confirmation dialog to finish disconnecting.
 After disconnecting:
* The integration is removed from this assistant.
* All associated tools are disabled for this assistant.
* The integration moves to **Available Integrations** and can be reconnected later.
Disconnecting an integration only removes it from the current assistant. The integration remains in your account and can be connected to other assistants or reconnected to this one.
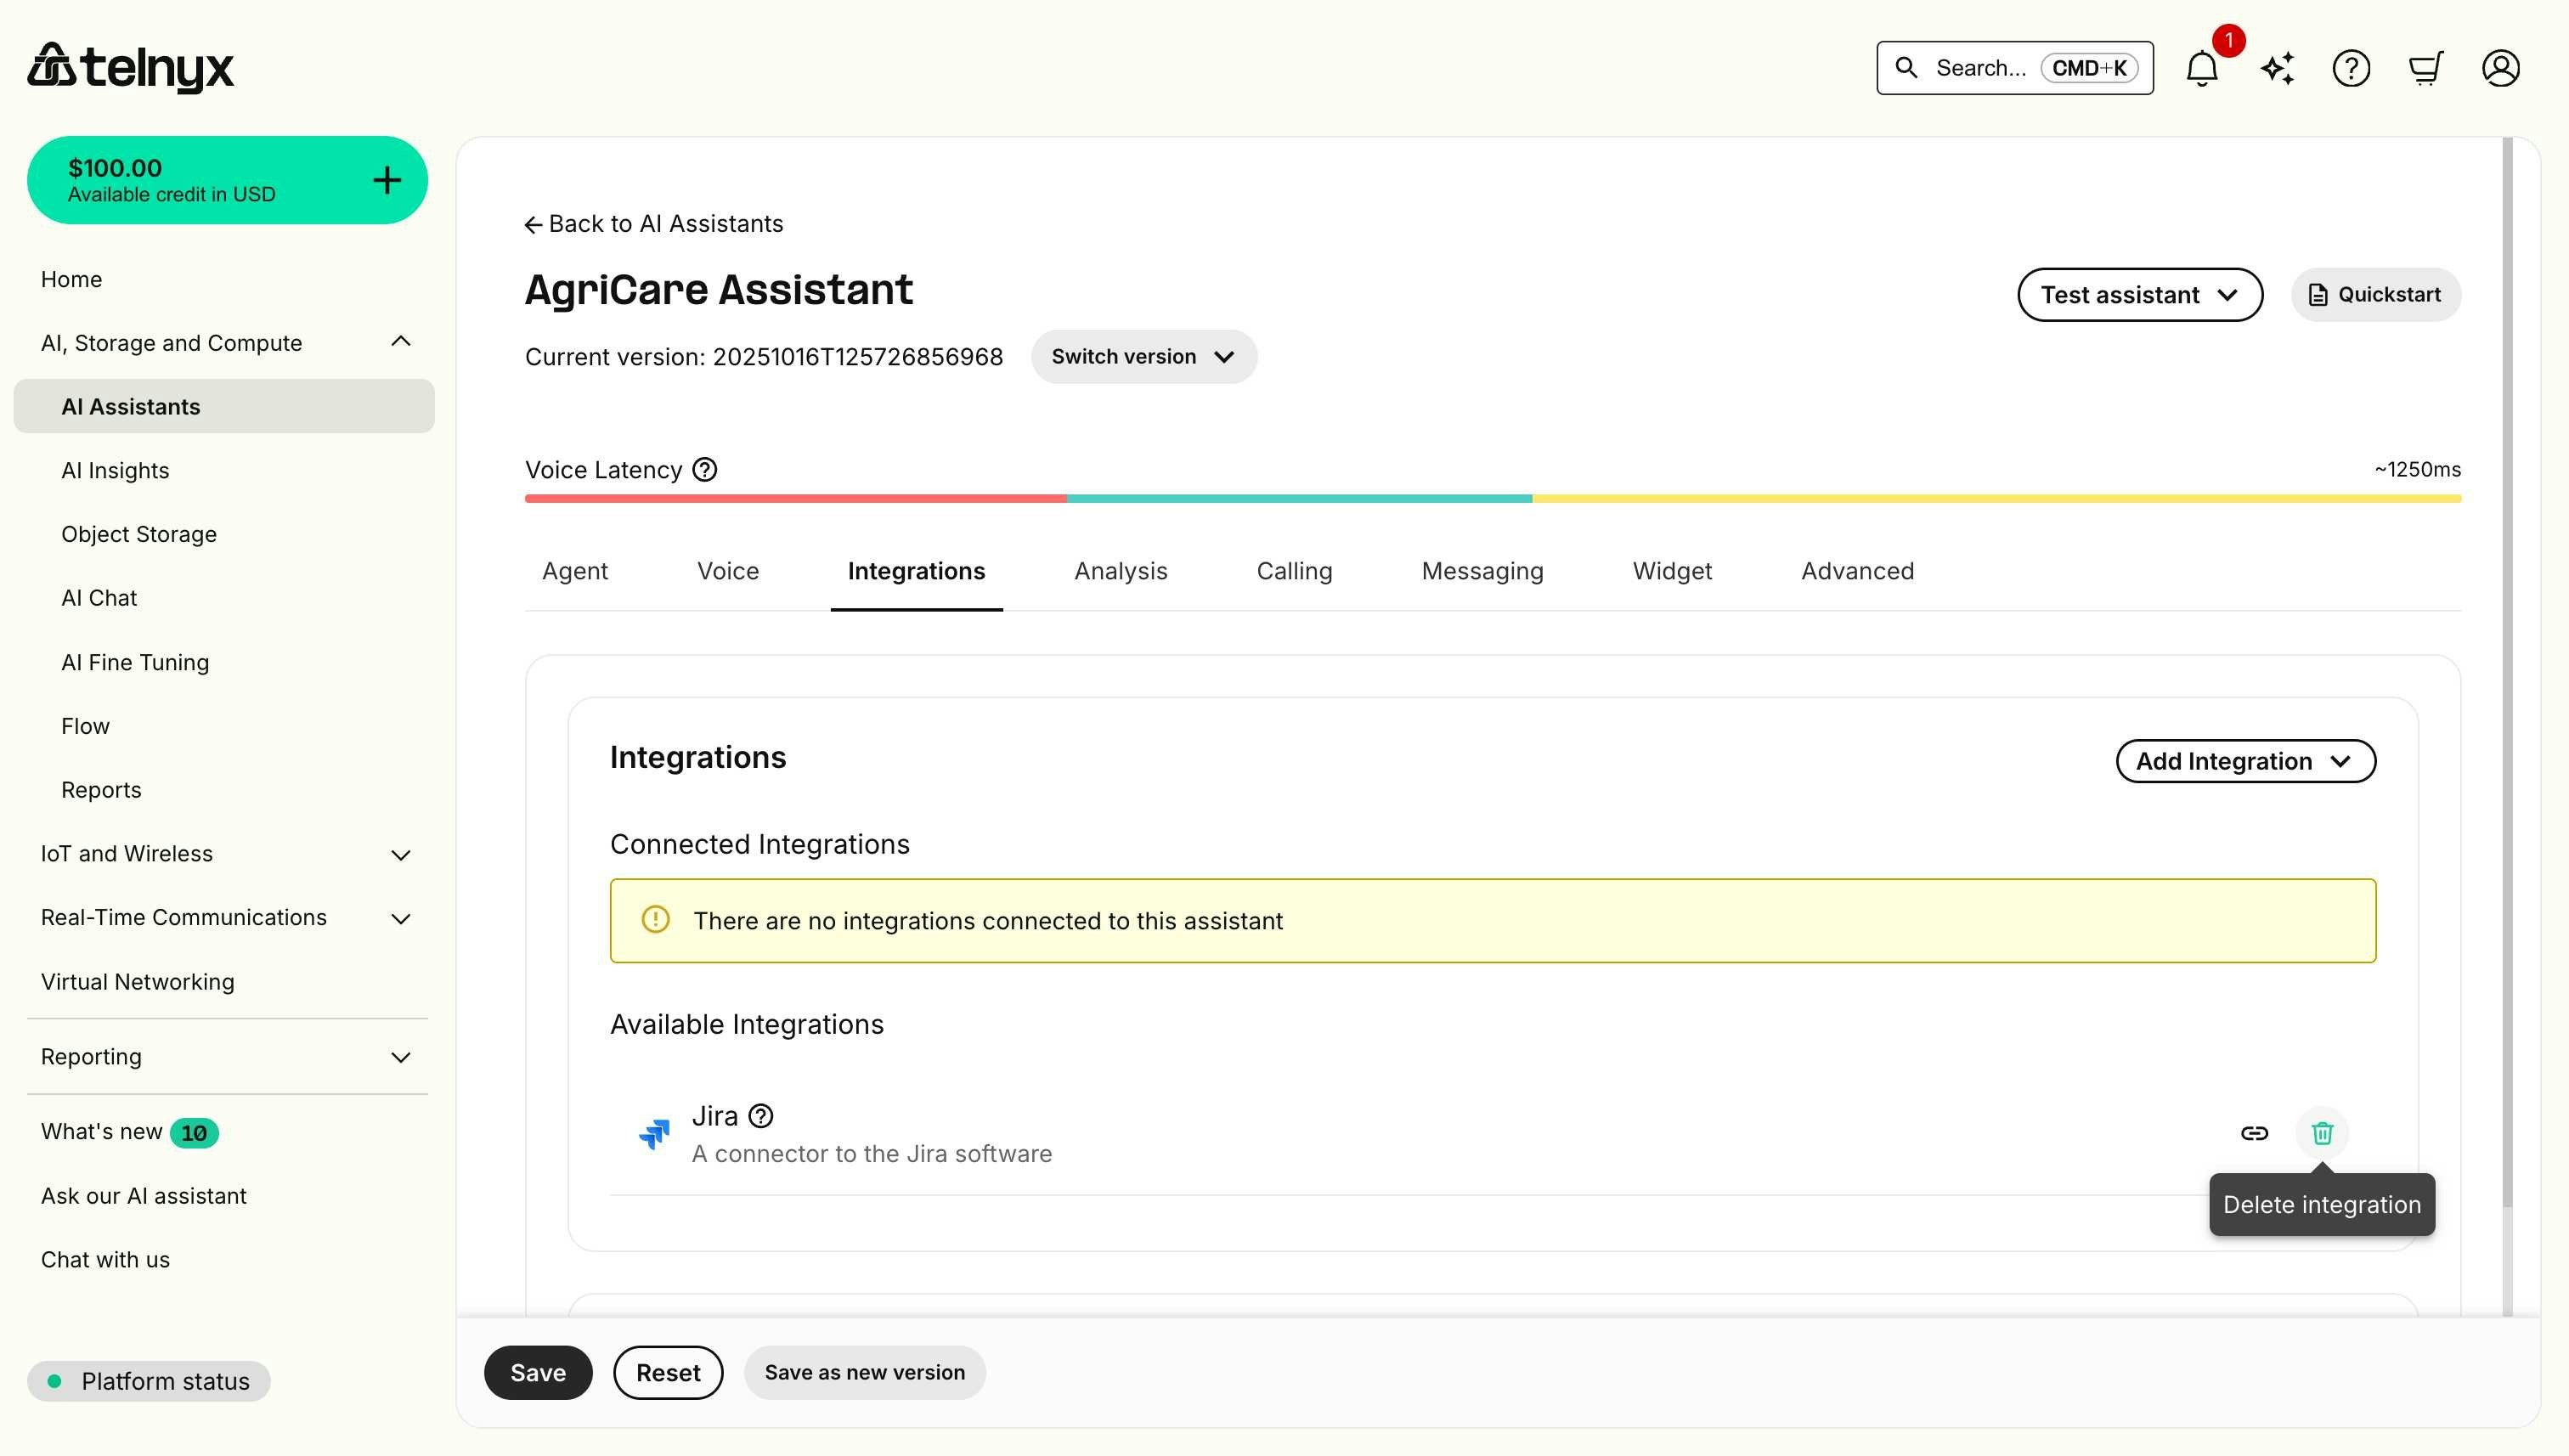
### Deleting an integration
To permanently delete an integration from your account:
Navigate to your AI assistant and open the **Integrations** tab.
Look under **Available Integrations**.
Click the trash icon next to the integration.
Approve the deletion to remove stored credentials permanently.
After disconnecting:
* The integration is removed from this assistant.
* All associated tools are disabled for this assistant.
* The integration moves to **Available Integrations** and can be reconnected later.
Disconnecting an integration only removes it from the current assistant. The integration remains in your account and can be connected to other assistants or reconnected to this one.
### Deleting an integration
To permanently delete an integration from your account:
Navigate to your AI assistant and open the **Integrations** tab.
Look under **Available Integrations**.
Click the trash icon next to the integration.
Approve the deletion to remove stored credentials permanently.
 Deleting an integration permanently removes it from your account, including all stored credentials. You will need to set it up again from scratch if you want to use it in the future.
## Best practices
### Security
Create integration-specific profiles with only the permissions the workflow needs.
Update API tokens and passwords on a routine cadence.
Review integration activity through platform audit logs.
Grant only the scopes required for each integration use case.
Test and validate integrations in non-production environments first.
### Configuration
Enable search/read capabilities first, then gradually introduce write actions.
Document when and how each tool should be used so assistants respond correctly.
Validate integration behavior across multiple conversation scenarios.
Configure sensible defaults (e.g., priority, project) to reduce user input errors.
Define fallback behavior when integration calls fail or return unexpected results.
### Performance
Avoid duplicate searches or redundant requests where possible.
Store reusable values (for example, via dynamic variables) for the duration of a session.
Configure timeout thresholds that balance responsiveness with reliability.
Track provider limits and design workflows to stay within allocation.
## Troubleshooting
### Connection failures
**Symptom**: Unable to connect integration, credentials rejected.
**Solutions**:
* Verify credentials are correct and have not expired.
* Check that the user account has API access enabled.
* Ensure security tokens or API keys are current.
* For Salesforce: Confirm security token is included.
* For cloud platforms: Verify instance URL format (no `https://` or trailing `/`).
### Tools not appearing
**Symptom**: Integration connected but no tools available.
**Solutions**:
* Refresh the page and check again.
* Verify the integration account has required permissions.
* Check that the platform subscription includes API access.
* Disconnect and reconnect the integration.
### Authentication errors during calls
**Symptom**: Tools fail with authentication errors during conversations.
**Solutions**:
* Regenerate API tokens or security tokens.
* Update stored credentials in the integration.
* Verify account has not been locked or suspended.
* Check IP allowlists (if applicable).
### Missing data or records
**Symptom**: Assistant cannot find expected records.
**Solutions**:
* Verify the integration account can access the records.
* Check record permissions and sharing settings.
* Confirm records exist in the platform.
* Verify search parameters and filters.
### Rate limiting
**Symptom**: Integration calls fail with rate limit errors.
**Solutions**:
* Reduce frequency of integration calls.
* Implement caching for frequently accessed data.
* Contact platform support to increase limits.
* Distribute calls across multiple service accounts.
## Next steps
* **[Voice Assistant Quickstart](https://developers.telnyx.com/docs/inference/ai-assistants/no-code-voice-assistant)** - Learn how to create and configure AI assistants.
* **[Workflow](/docs/inference/ai-assistants/workflows)** - Visualize how your integrations and tools connect in your assistant's conversation flow.
* **[Agent Handoff](https://developers.telnyx.com/docs/inference/ai-assistants/agent-handoff)** - Enable multiple specialized assistants with integrations.
* **[Dynamic Variables](https://developers.telnyx.com/docs/inference/ai-assistants/dynamic-variables)** - Pass integration-specific context to your assistant.
* **[API Reference](/api-reference/assistants/list-assistants)** - Programmatic assistant management.
## Related resources
* [Integration Secrets](https://portal.telnyx.com/#/integration-secrets) - Securely store API keys and tokens.
* [AI Assistants Portal](https://portal.telnyx.com/#/ai/assistants) - Configure assistants and integrations.
Deleting an integration permanently removes it from your account, including all stored credentials. You will need to set it up again from scratch if you want to use it in the future.
## Best practices
### Security
Create integration-specific profiles with only the permissions the workflow needs.
Update API tokens and passwords on a routine cadence.
Review integration activity through platform audit logs.
Grant only the scopes required for each integration use case.
Test and validate integrations in non-production environments first.
### Configuration
Enable search/read capabilities first, then gradually introduce write actions.
Document when and how each tool should be used so assistants respond correctly.
Validate integration behavior across multiple conversation scenarios.
Configure sensible defaults (e.g., priority, project) to reduce user input errors.
Define fallback behavior when integration calls fail or return unexpected results.
### Performance
Avoid duplicate searches or redundant requests where possible.
Store reusable values (for example, via dynamic variables) for the duration of a session.
Configure timeout thresholds that balance responsiveness with reliability.
Track provider limits and design workflows to stay within allocation.
## Troubleshooting
### Connection failures
**Symptom**: Unable to connect integration, credentials rejected.
**Solutions**:
* Verify credentials are correct and have not expired.
* Check that the user account has API access enabled.
* Ensure security tokens or API keys are current.
* For Salesforce: Confirm security token is included.
* For cloud platforms: Verify instance URL format (no `https://` or trailing `/`).
### Tools not appearing
**Symptom**: Integration connected but no tools available.
**Solutions**:
* Refresh the page and check again.
* Verify the integration account has required permissions.
* Check that the platform subscription includes API access.
* Disconnect and reconnect the integration.
### Authentication errors during calls
**Symptom**: Tools fail with authentication errors during conversations.
**Solutions**:
* Regenerate API tokens or security tokens.
* Update stored credentials in the integration.
* Verify account has not been locked or suspended.
* Check IP allowlists (if applicable).
### Missing data or records
**Symptom**: Assistant cannot find expected records.
**Solutions**:
* Verify the integration account can access the records.
* Check record permissions and sharing settings.
* Confirm records exist in the platform.
* Verify search parameters and filters.
### Rate limiting
**Symptom**: Integration calls fail with rate limit errors.
**Solutions**:
* Reduce frequency of integration calls.
* Implement caching for frequently accessed data.
* Contact platform support to increase limits.
* Distribute calls across multiple service accounts.
## Next steps
* **[Voice Assistant Quickstart](https://developers.telnyx.com/docs/inference/ai-assistants/no-code-voice-assistant)** - Learn how to create and configure AI assistants.
* **[Workflow](/docs/inference/ai-assistants/workflows)** - Visualize how your integrations and tools connect in your assistant's conversation flow.
* **[Agent Handoff](https://developers.telnyx.com/docs/inference/ai-assistants/agent-handoff)** - Enable multiple specialized assistants with integrations.
* **[Dynamic Variables](https://developers.telnyx.com/docs/inference/ai-assistants/dynamic-variables)** - Pass integration-specific context to your assistant.
* **[API Reference](/api-reference/assistants/list-assistants)** - Programmatic assistant management.
## Related resources
* [Integration Secrets](https://portal.telnyx.com/#/integration-secrets) - Securely store API keys and tokens.
* [AI Assistants Portal](https://portal.telnyx.com/#/ai/assistants) - Configure assistants and integrations.