> ## Documentation Index
> Fetch the complete documentation index at: https://developers.telnyx.com/llms.txt
> Use this file to discover all available pages before exploring further.
# Call Control migration to Voice API
> Migrate from Telnyx Call Control v1 to v2 — endpoint differences, payload changes, webhook updates, and step-by-step tips for porting your code.
Call Control in v1 is now known as Voice API in v2 and has been designed to make migration smooth. This guide highlights the main changes to be aware of when migrating your Call Control application from API v1 to Voice API v2.
Voice API v2 offers the same great call experience but with some changes aimed at making it even easier to have granular-level control over your calls. For new Telnyx users, SDKs available in multiple languages and the introduction of TeXML enable you to get started in minutes. For users with an existing API v1 application, we’ll cover the main changes you should make to migrate to our latest API version.
There are three main areas that require minor changes:
1. API v2 Authentication
2. Webhook Structure and Signature Validation
3. Endpoints for Commands
## 1. API v2 authentication for voice API
Voice API v2 utilizes a different authentication strategy that will require you to generate a new API key for your Voice application. You can do that easily via the [Telnyx Mission Control Portal](https://portal.telnyx.com/#/app/auth/v2).
Once you have logged into your Mission Control Portal account, in the left navigation click “Auth”. Then, ensure that Auth v2 is selected in the horizontal navigation.
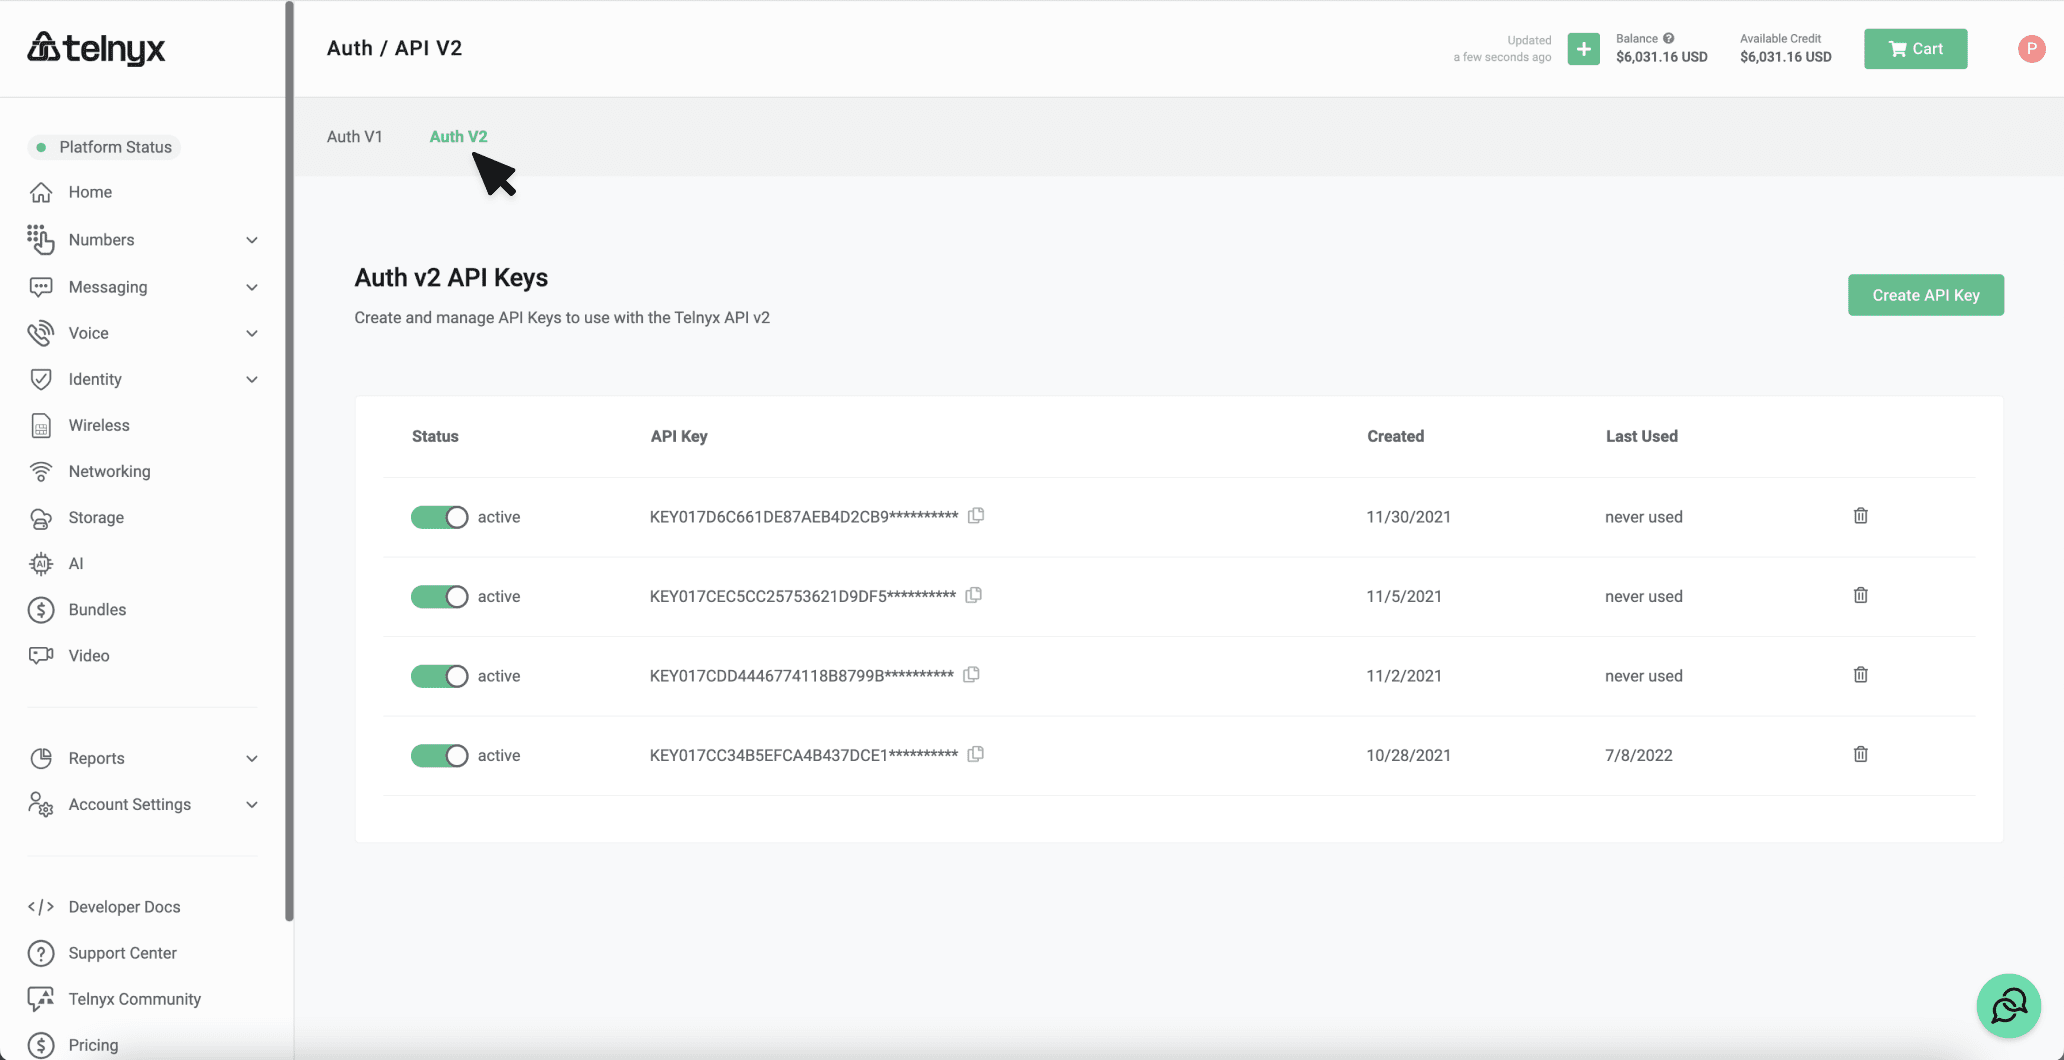 Click “Create Key”. You will be presented with a pop-up reminding you to store your new API key securely. Click “Create” to confirm. You will then be presented with your new v2 key. You will not be able to see the full key again after this point.
Once a key has been successfully created, you can disable or delete it easily from the main Auth v2 page. Information on creation and recent usage of each key is also available.
## 2. Webhook structure and signature validation for voice API
Next, let’s compare the webhook response for when a call is answered in both API v1 and v2 so that we can see the differences:
**API v1:**
```json theme={null}
{
"record_type": "event",
"id": "0ccc7b54-4df3-4bca-a65a-3da1ecc777f0",
"event_type": "call_answered",
"created_at": "2018-02-02T22:25:27.521992Z",
"payload": {
"call_control_id": "AgDIxmoRX6QMuaIj_uXRXnPAXP0QlNfXczRrZvZakpWxBlpw48KyZQ==",
"to": "+18005550199",
"from": "+35319605860",
"connection_id": "7267xxxxxxxxxxxxxx",
"call_leg_id": "428c31b6-7af4-4bcb-b7f5-5013ef9657c1",
"call_session_id": "428c31b6-abf3-3bc1-b7f4-5013ef9657c1",
"client_state": "aGF2ZSBhIG5pY2UgZGF5ID1d",
"state": "answered",
"occurred_at": "2018-02-02T22:25:27.521992Z"
}
}
```
**API v2:**
```json theme={null}
{
"data": {
"record_type": "event",
"id": "0ccc7b54-4df3-4bca-a65a-3da1ecc777f0",
"event_type": "call.answered",
"occurred_at": "2018-02-02T22:25:27.521992Z",
"payload": {
"call_control_id": "AgDIxmoRX6QMuaIj_uXRXnPAXP0QlNfX",
"to": "+18005550199",
"from": "+18005550100",
"connection_id": "7267xxxxxxxxxxxxxx",
"call_leg_id": "428c31b6-7af4-4bcb-b7f5-5013ef9657c1",
"call_session_id": "428c31b6-abf3-3bc1-b7f4-5013ef9657c1",
"client_state": "aGF2ZSBhIG5pY2UgZGF5ID1d",
"state": "answered"
}
}
}
```
#### Data object
Firstly, you will notice that the structure of the payload has changed. There is a top-level `data` object that contains all subsequent information about the webhook. You will also notice that the top level `created_at` field in API v1 has been renamed `occurred_at` - this is the time that the event occurred.
#### Event type naming convention
The naming convention of the `event_type` field has also changed for API v2. While the field names remain in `snake_case`, for `event_type` the call event being described will be in `dot.case` for all call events. Events can contain multiple dots to indicate a relationship.
For example, in API v1 when initiating text-to-speech, if the command is successful, your application will receive a webhook containing `"event_type":"speak_started"`. In API v2, your application would receive `"event_type": "call.speak.started"` for this call event.
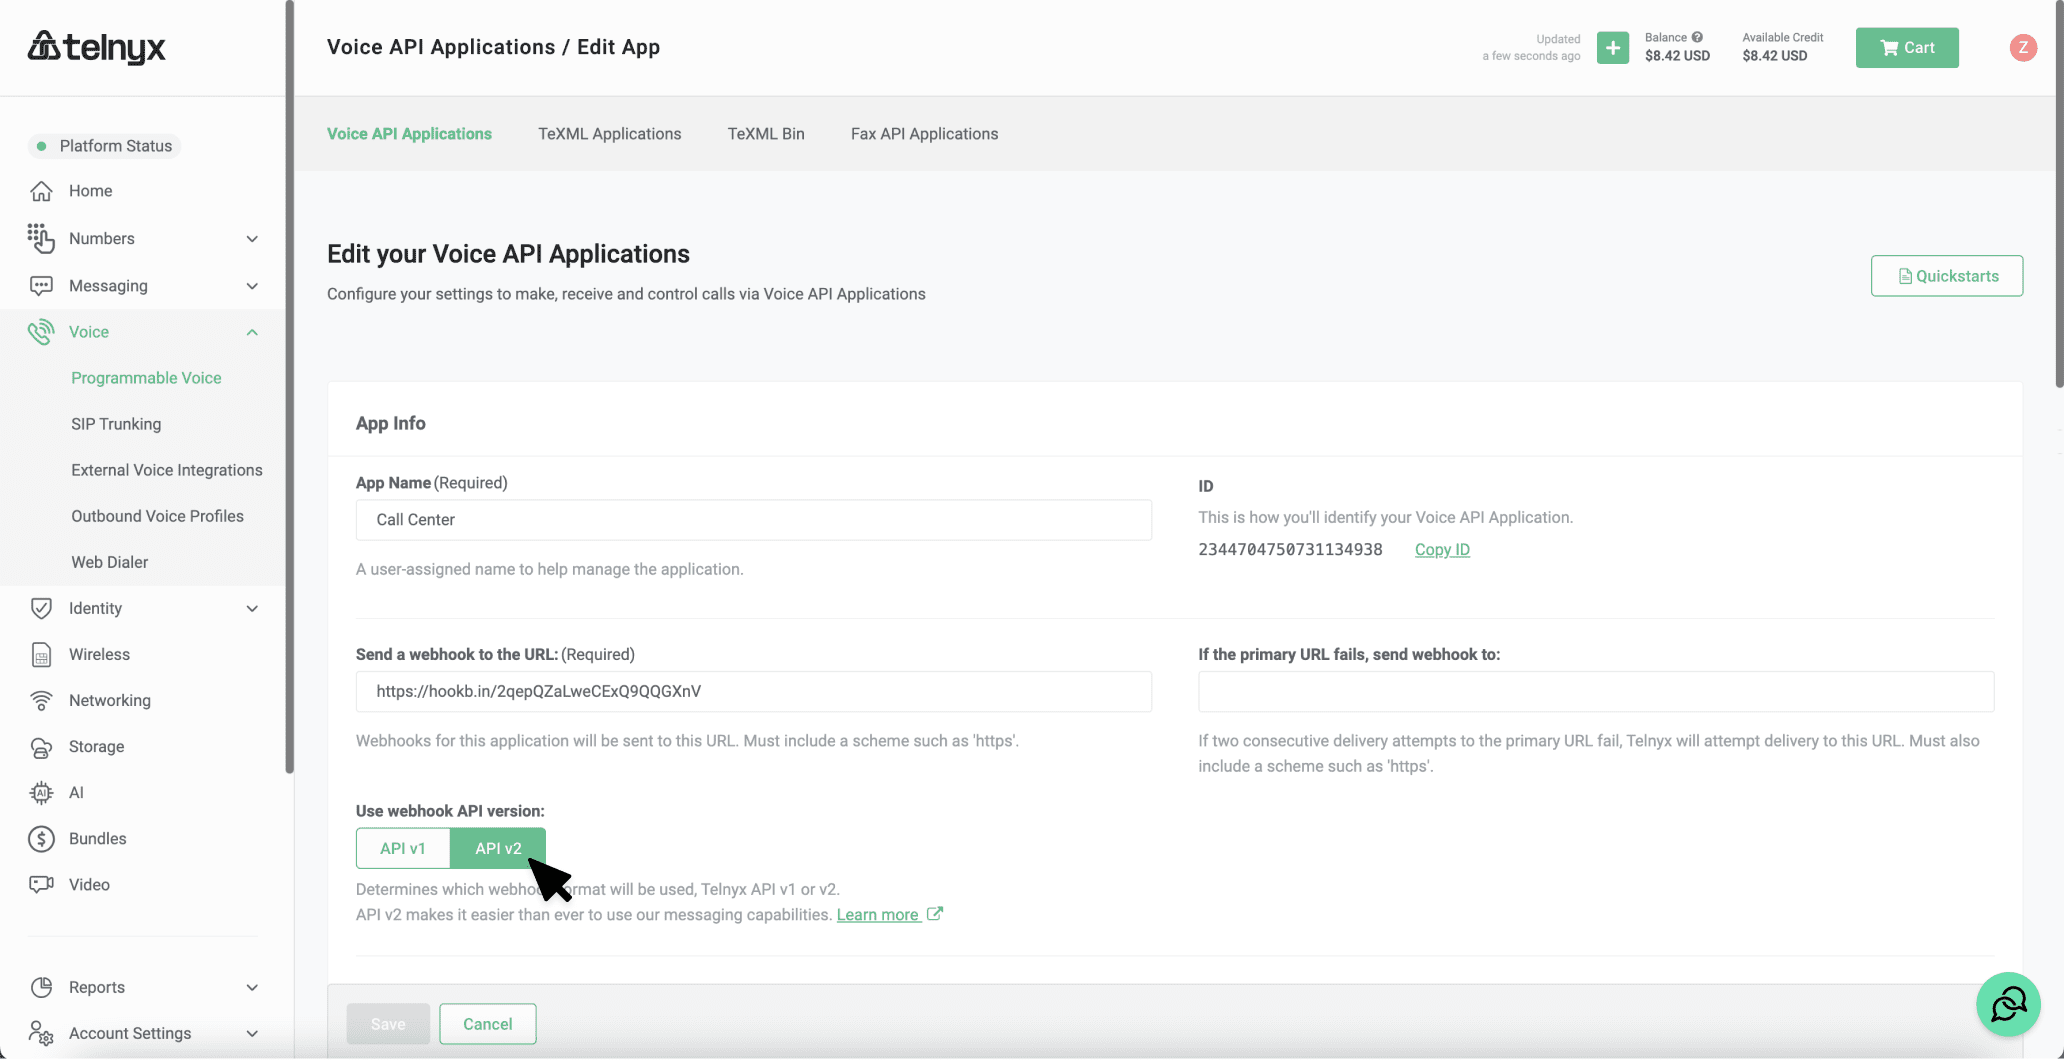
#### Enabling API v2 Webhooks
API v2 webhook structures are not enabled by default. To begin receiving webhooks in the new format, you will need to update your [Call Control Application](https://portal.telnyx.com/#/app/call-control/applications) settings for any application you wish to migrate to API v2.
Click “Create Key”. You will be presented with a pop-up reminding you to store your new API key securely. Click “Create” to confirm. You will then be presented with your new v2 key. You will not be able to see the full key again after this point.
Once a key has been successfully created, you can disable or delete it easily from the main Auth v2 page. Information on creation and recent usage of each key is also available.
## 2. Webhook structure and signature validation for voice API
Next, let’s compare the webhook response for when a call is answered in both API v1 and v2 so that we can see the differences:
**API v1:**
```json theme={null}
{
"record_type": "event",
"id": "0ccc7b54-4df3-4bca-a65a-3da1ecc777f0",
"event_type": "call_answered",
"created_at": "2018-02-02T22:25:27.521992Z",
"payload": {
"call_control_id": "AgDIxmoRX6QMuaIj_uXRXnPAXP0QlNfXczRrZvZakpWxBlpw48KyZQ==",
"to": "+18005550199",
"from": "+35319605860",
"connection_id": "7267xxxxxxxxxxxxxx",
"call_leg_id": "428c31b6-7af4-4bcb-b7f5-5013ef9657c1",
"call_session_id": "428c31b6-abf3-3bc1-b7f4-5013ef9657c1",
"client_state": "aGF2ZSBhIG5pY2UgZGF5ID1d",
"state": "answered",
"occurred_at": "2018-02-02T22:25:27.521992Z"
}
}
```
**API v2:**
```json theme={null}
{
"data": {
"record_type": "event",
"id": "0ccc7b54-4df3-4bca-a65a-3da1ecc777f0",
"event_type": "call.answered",
"occurred_at": "2018-02-02T22:25:27.521992Z",
"payload": {
"call_control_id": "AgDIxmoRX6QMuaIj_uXRXnPAXP0QlNfX",
"to": "+18005550199",
"from": "+18005550100",
"connection_id": "7267xxxxxxxxxxxxxx",
"call_leg_id": "428c31b6-7af4-4bcb-b7f5-5013ef9657c1",
"call_session_id": "428c31b6-abf3-3bc1-b7f4-5013ef9657c1",
"client_state": "aGF2ZSBhIG5pY2UgZGF5ID1d",
"state": "answered"
}
}
}
```
#### Data object
Firstly, you will notice that the structure of the payload has changed. There is a top-level `data` object that contains all subsequent information about the webhook. You will also notice that the top level `created_at` field in API v1 has been renamed `occurred_at` - this is the time that the event occurred.
#### Event type naming convention
The naming convention of the `event_type` field has also changed for API v2. While the field names remain in `snake_case`, for `event_type` the call event being described will be in `dot.case` for all call events. Events can contain multiple dots to indicate a relationship.
For example, in API v1 when initiating text-to-speech, if the command is successful, your application will receive a webhook containing `"event_type":"speak_started"`. In API v2, your application would receive `"event_type": "call.speak.started"` for this call event.
#### Enabling API v2 Webhooks
API v2 webhook structures are not enabled by default. To begin receiving webhooks in the new format, you will need to update your [Call Control Application](https://portal.telnyx.com/#/app/call-control/applications) settings for any application you wish to migrate to API v2.
 #### Webhook signatures
Each messaging webhook event that we send you will include a Telnyx signature. The signature allows you to validate that webhooks were not sent by a third-party.
While API v1 uses an HMAC with the SHA256 hash function to sign webhooks, API v2 uses the [EdDSA](https://en.wikipedia.org/wiki/EdDSA) digital signature scheme with a public key.
In API v1, webhooks can be validated using information in the `X-Telnyx-Signature` header and the raw request payload of the webhook in bytes.
Webhook signing in API V2 uses public key encryption. Telnyx stores a public-private key pair and uses the private key to sign the payload. The public key is available to you so that you can verify the request.
Your public key can be viewed in the [Mission Control Portal](https://portal.telnyx.com/#/app/account/public-key).
The signature for the payload is calculated by building a string that is the combination of the timestamp of when the request was initiated, the pipe `|` character and the JSON payload. The signature is then `Base64` encoded.
```
Base64.encode64("#{timestamp}|#{payload}")
```
The signature (`Base64` encoded) and the timestamp (in Unix format) are assigned to the request headers `telnyx-signature-ed25519` and `telnyx-timestamp` respectively.
You can then use cryptographic libraries in your language of choice to verify the signature using the public key. Refer to the [Telnyx SDKs](/development/sdk) for implementation examples in your preferred language.
## 3. Endpoints for commands (call control)
API v2 commands have different endpoints to API v1 commands. The base URL for API v2 is `https://api.telnyx.com/v2/`
The commands carry out the same functions, just at a different URL.
To answer a call in API v1:
`https://api.telnyx.com/calls/{call_control_id}/actions/answer`
To answer a call in API v2:
`https://api.telnyx.com/v2/calls/{call_control_id}/actions/answer`
For further reading, view the [Call Control API Reference](https://developers.telnyx.com/docs/voice/programmable-voice/voice-api-commands-and-resources) and the [quickstart guide](https://developers.telnyx.com/docs/voice/programmable-voice/sending-commands).
#### Webhook signatures
Each messaging webhook event that we send you will include a Telnyx signature. The signature allows you to validate that webhooks were not sent by a third-party.
While API v1 uses an HMAC with the SHA256 hash function to sign webhooks, API v2 uses the [EdDSA](https://en.wikipedia.org/wiki/EdDSA) digital signature scheme with a public key.
In API v1, webhooks can be validated using information in the `X-Telnyx-Signature` header and the raw request payload of the webhook in bytes.
Webhook signing in API V2 uses public key encryption. Telnyx stores a public-private key pair and uses the private key to sign the payload. The public key is available to you so that you can verify the request.
Your public key can be viewed in the [Mission Control Portal](https://portal.telnyx.com/#/app/account/public-key).
The signature for the payload is calculated by building a string that is the combination of the timestamp of when the request was initiated, the pipe `|` character and the JSON payload. The signature is then `Base64` encoded.
```
Base64.encode64("#{timestamp}|#{payload}")
```
The signature (`Base64` encoded) and the timestamp (in Unix format) are assigned to the request headers `telnyx-signature-ed25519` and `telnyx-timestamp` respectively.
You can then use cryptographic libraries in your language of choice to verify the signature using the public key. Refer to the [Telnyx SDKs](/development/sdk) for implementation examples in your preferred language.
## 3. Endpoints for commands (call control)
API v2 commands have different endpoints to API v1 commands. The base URL for API v2 is `https://api.telnyx.com/v2/`
The commands carry out the same functions, just at a different URL.
To answer a call in API v1:
`https://api.telnyx.com/calls/{call_control_id}/actions/answer`
To answer a call in API v2:
`https://api.telnyx.com/v2/calls/{call_control_id}/actions/answer`
For further reading, view the [Call Control API Reference](https://developers.telnyx.com/docs/voice/programmable-voice/voice-api-commands-and-resources) and the [quickstart guide](https://developers.telnyx.com/docs/voice/programmable-voice/sending-commands).