Why use workflows?
A single prompt works well for open-ended conversations. Workflows are better when the customer journey has structure. With workflows, you can:- Break complex conversations into focused steps: Give each stage its own name and instructions, such as
Intake,Billing,Schedule appointment, orEscalate to specialist. - Route with natural language or deterministic rules: Move between steps when the LLM decides a condition is met, or when a dynamic variable matches a configured value.
- Tune behavior per step: Append or replace the assistant’s main instructions, and optionally override the model or voice for a specific node.
- Route to another assistant: Route from one workflow to another assistant when the conversation should be handled by a different specialist.
- Debug what happened later: Conversation transcripts can show the workflow node associated with assistant messages, so you can connect real conversations back to the workflow design.
How workflows work
A workflow is a directed graph stored on the AI Assistant asconversation_flow.
The graph has two main building blocks:
- Nodes: Conversation steps. A node is either a prompt node (an LLM-driven step with its own label, instructions, instruction mode, model override, and voice override) or a speak node (a deterministic step that plays a fixed scripted message with no LLM turn).
- Edges: Transitions between nodes, or from a node to another assistant. Each edge has a condition that decides when that path should be taken. Conditions can be natural-language (LLM), deterministic (variable comparison), or a default fallback.
Workflows are optional. Assistants without a workflow continue to use their standard assistant-level instructions, model, voice, tools, and settings.
What you can build with workflows
Conversation workflows support the building blocks you need for guided, adaptive customer journeys:- Start from a defined entry point: Choose which node begins the workflow.
- Create focused conversation stages: Add prompt nodes for each step and give each one its own instructions.
- Play scripted lines verbatim: Add speak nodes for greetings, disclosures, or compliance statements that must be delivered word-for-word, with no model turn.
- Control how prompts combine: Append node instructions to the assistant’s base instructions, or replace the base instructions for a specific step.
- Tune individual steps: Override the model, voice, tools, or transcription behavior for a node when that step needs different capabilities.
- Connect steps with conditional routing: Use LLM conditions for natural-language decisions and variable comparisons for deterministic decisions.
- React to tool outcomes: Route based on whether a configured tool succeeds or fails.
- Move across assistants: Send a conversation from one workflow into another assistant when a specialist configuration should take over.
- Review workflow context in transcripts: Use conversation history to understand which workflow step produced assistant messages.
Create a workflow in the Portal
- Open AI Assistants in the Telnyx Portal.
- Select an assistant.
- Open the Workflow tab.
- Enable workflows if the assistant does not already have one.
- Add nodes for each major stage of the conversation.
- Connect nodes with edges and configure the condition for each edge.
- Save the assistant.
Configure workflow nodes
A workflow node represents one active stage of the conversation.Node types
Workflows support two kinds of nodes:- Prompt node: An LLM-driven step. The assistant generates its response from the node’s instructions (combined with the assistant’s base instructions), using the node’s model, voice, and tool settings. Most workflow steps are prompt nodes. This is the default node type.
- Speak node: A deterministic step that plays a fixed, scripted message and then advances. The assistant does not call the model on a speak node, so the wording is exactly what you configure. Use speak nodes for greetings, disclosures, hold messages, compliance statements, or any line that must be delivered verbatim.
Speak node message
A speak node centers on a single Message field that defines the line to deliver.- The message is delivered verbatim — there is no model turn, so the caller hears exactly what you type.
- The message supports
{{variable}}placeholders. Both system variables and custom dynamic variables defined on the assistant are interpolated at runtime, with inline highlighting and autocomplete in the editor. - A speak node must always have exactly one outgoing default edge. Because a speak node does not make a routing decision itself, it advances along this default edge after delivering the message.
Node name
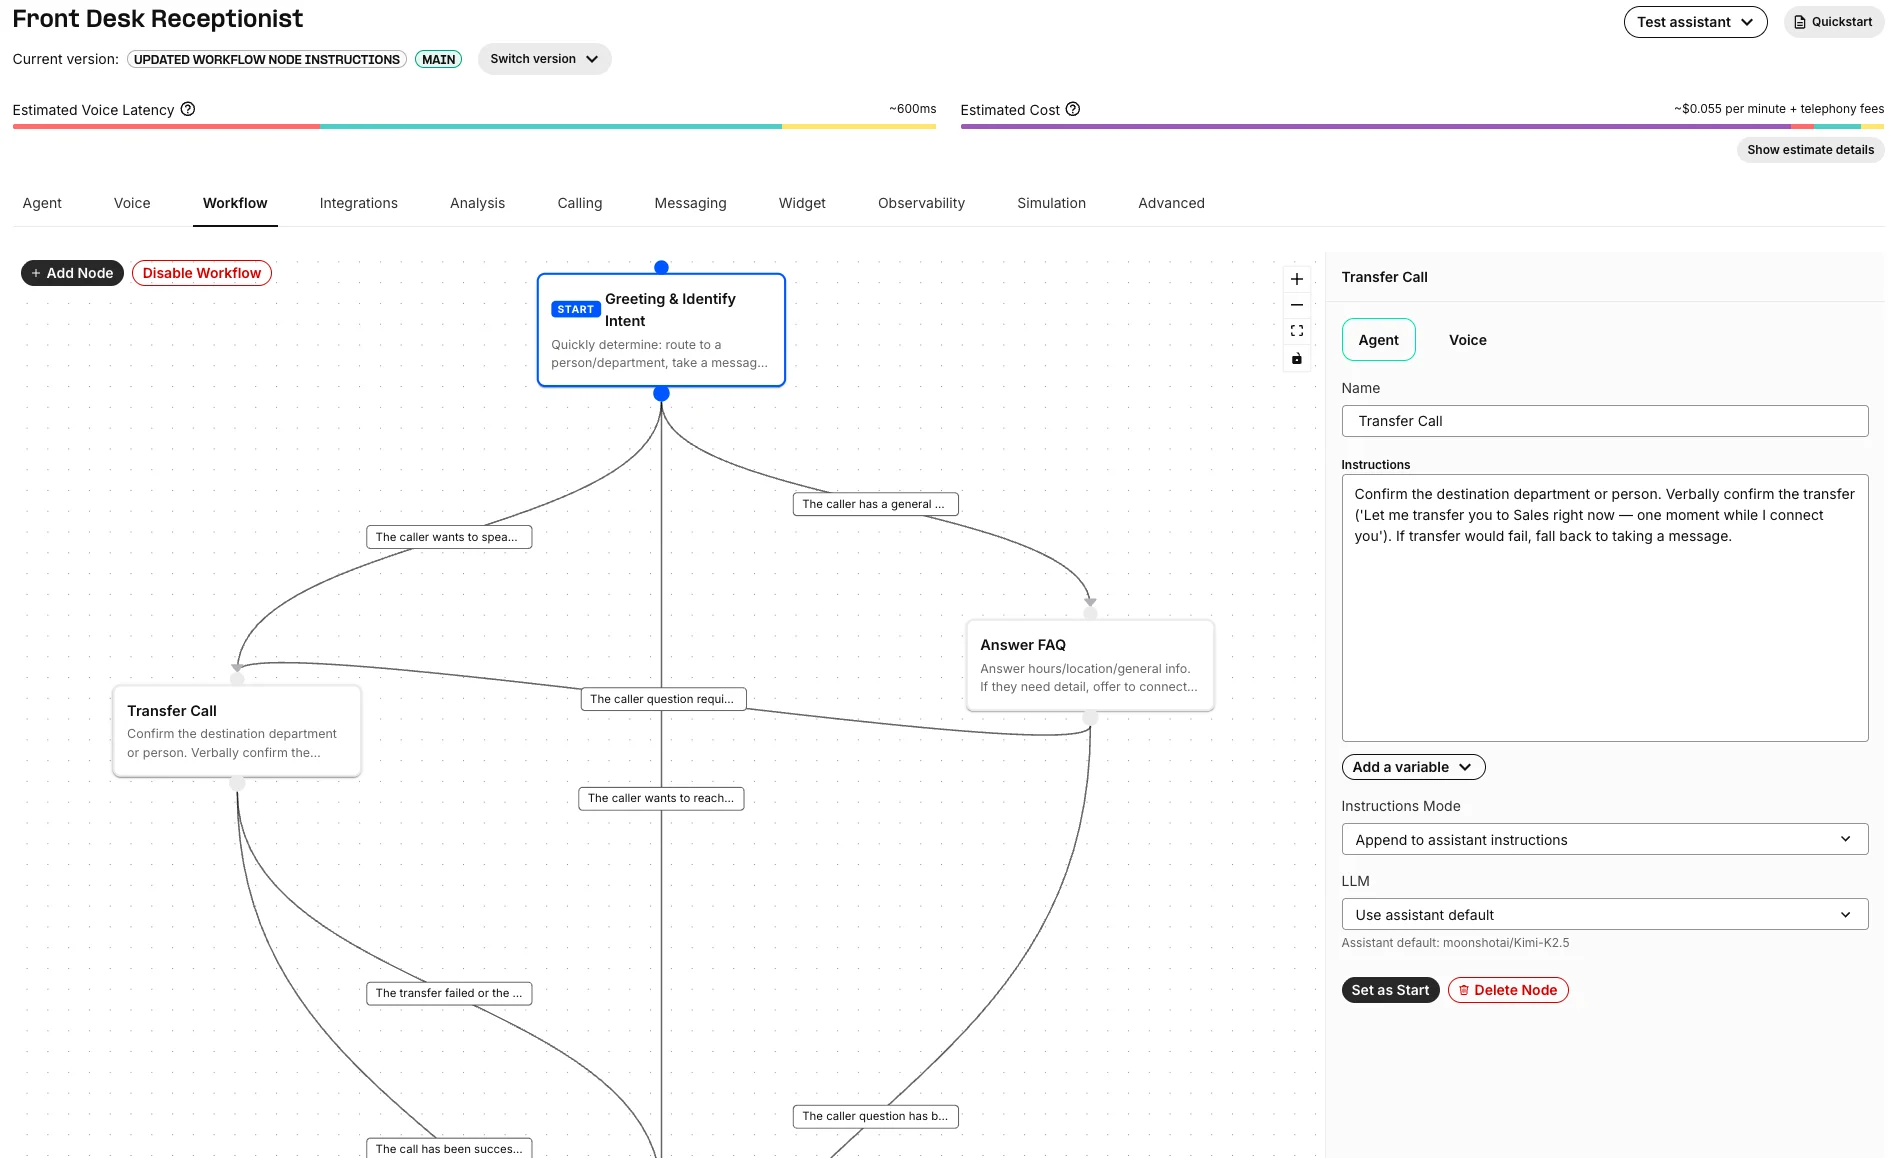
Use short, descriptive names. Node names are visible in the workflow canvas and can appear in conversation transcript context. Good node names:Greeting & Identify IntentAnswer FAQTransfer CallCollect appointment details
Node instructions
Each node has instructions that control the assistant while that node is active. You can choose how the node instructions combine with the assistant’s main instructions:- Append to assistant instructions: Keep the assistant’s base behavior and add step-specific guidance.
- Replace assistant instructions: Use only the node’s instructions for this step.
Tool availability
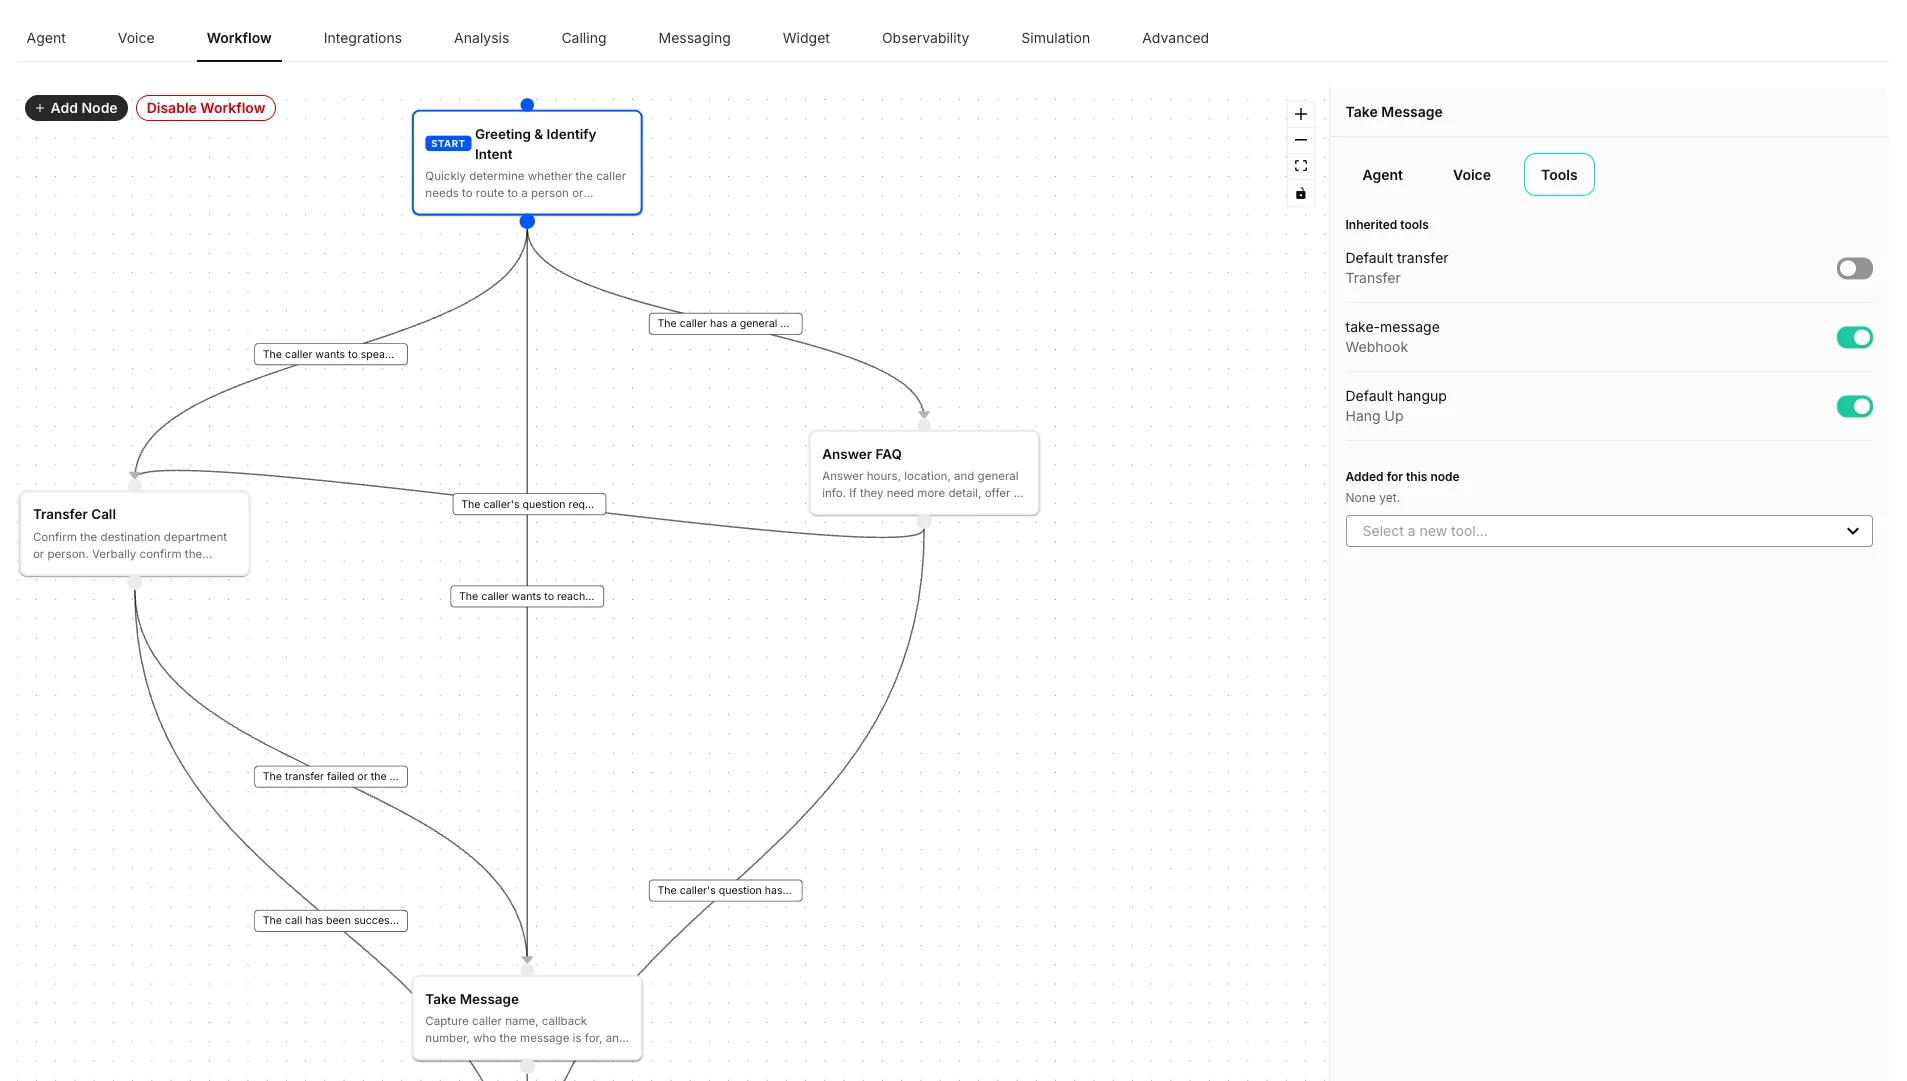
Each node controls which of the assistant’s tools the model can call while that node is active. This lets you configure every tool once on the assistant, then expose only the relevant subset at each step. A node’s Tools tab shows two groups:- Inherited tools: Every tool configured on the assistant. Each tool has a toggle so you can enable or disable it for this specific node. Tools are enabled by default, so a new node starts with the full assistant toolset until you turn tools off.
- Added for this node: Tools attached to this node only. Use the Select a new tool dropdown to add a node-specific tool that should not be available elsewhere in the workflow.
Take Message node might disable the Transfer tool while keeping a take-message webhook and a Hang Up tool enabled, so the assistant can only capture and close out the message during that step.
Model override
A node can use the assistant’s default LLM, or override it with another Telnyx-supported model. Use model overrides when one step needs different reasoning or latency characteristics. For example:- Use a faster model for intake.
- Use a stronger model for complex qualification or policy-heavy decisions.
- Keep the assistant default everywhere except one high-value decision point.
Voice override
A node can inherit the assistant’s default voice, or use a node-specific voice configuration. Voice overrides are useful when different conversation stages should feel different. For example:- Use the standard brand voice during greeting and intent detection.
- Switch to a calmer voice for sensitive support flows.
- Use a different voice when routing to a specialist assistant persona.
Configure workflow edges
An edge defines where the conversation can go next. Each edge has:- Source node: The node the conversation is leaving.
- Target type: Another workflow node, or another assistant.
- Condition type: The logic that decides whether the edge should be followed — an LLM condition, a variable comparison, or a default fallback.
LLM conditions
Use an LLM condition when the routing decision depends on conversation meaning. Example conditions:Variable comparison conditions
Use a variable comparison when the routing decision should be deterministic. Variable comparison conditions can use system variables and custom dynamic variables defined on the assistant. Examples:telnyx_conversation_channel == "phone_call"customer_tier == "enterprise"telnyx_conversation_duration_secs >= 30telnyx_shaken_stir_attestation != "a"
Default conditions
A default condition is a fallback edge that is followed whenever no other outgoing edge’s condition matches. It has no prompt or expression to configure — it simply defines where the conversation goes by default. Default conditions are required for nodes that do not make their own routing decision:- A speak node delivers a scripted message and then advances. It must have exactly one outgoing default edge so the conversation always has a defined next step.
- Default conditions are only valid on edges that leave a speak node. They are not used on edges leaving a prompt node, which route based on LLM or variable comparison conditions.
Configure workflows with the API
You can also configure workflows programmatically through the Assistants API. Workflows are stored on the assistant asconversation_flow.
The API accepts the full workflow graph when you create or update an assistant. To change one node or edge, send the updated conversation_flow object with the assistant update request.
Assistant updates treat
conversation_flow atomically. If you omit the field, the existing workflow is unchanged. If you send conversation_flow: null, the workflow is cleared.Speak nodes and default edges in the API
A speak node uses"type": "speak" and carries its scripted text in the message field instead of instructions. Its single outgoing edge uses a default condition.
"type" field is optional and defaults to "prompt". A default condition takes no prompt or expression, and is only valid on an edge that leaves a speak node.
Route to another assistant
An edge can target another assistant instead of another node in the same workflow. Use assistant routing when a conversation should move to a different specialist configuration, such as:- A sales assistant routing qualified technical questions to a solutions assistant.
- A front-desk assistant routing billing questions to a billing assistant.
- A general support assistant routing high-risk cases to a stricter compliance assistant.
Example workflow patterns
Front desk receptionist
Use one assistant to greet callers, identify intent, and route to the right next step.Appointment booking
Guide the customer through a sequence of required information before confirmation.Escalation after timeout
Use the conversation duration system variable to escalate when the assistant has spent too long in a step.Multi-assistant specialization
Use a workflow edge to route from a general assistant into another assistant.Test and debug workflows
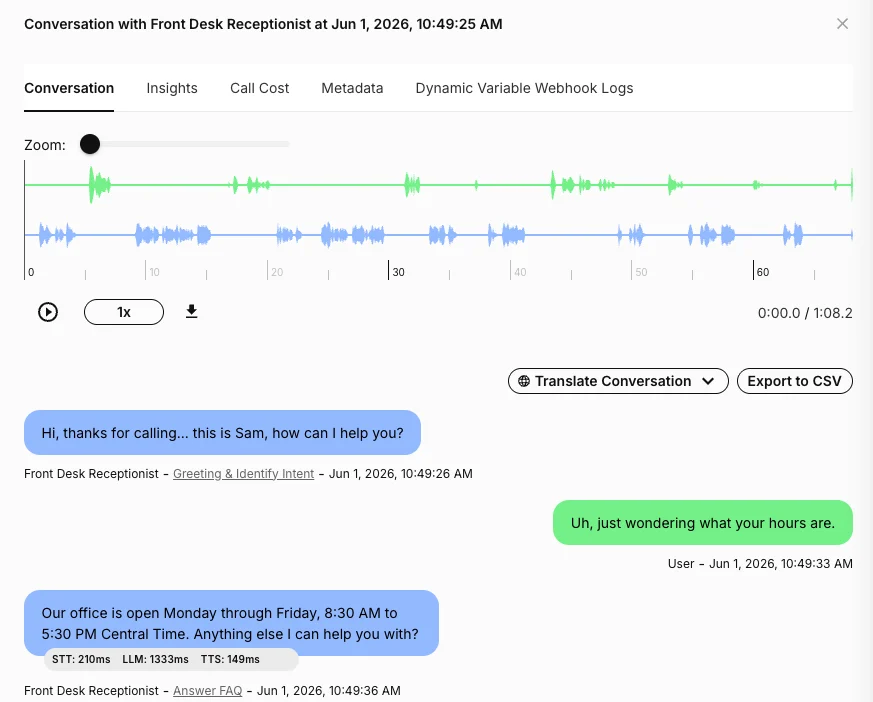
After saving a workflow, test the assistant with realistic conversations that exercise each route. When reviewing conversation history:- Check whether the assistant followed the expected path.
- Look for assistant messages labeled with workflow node context.
- Open the workflow from transcript context when you need to inspect the node that produced a response.
- Review dynamic variable values and webhook behavior if a variable comparison did not route as expected.
Best practices
Keep nodes focused
Each node should represent one clear job. If a node’s instructions cover multiple unrelated tasks, split it into separate nodes.Limit each node to the tools it needs
Configure all of your tools on the assistant, then disable the ones that do not apply on each node. A focused, node-specific toolset gives the model a clear purpose, reduces the chance it calls the wrong tool, and keeps each step predictable. As a rule of thumb, only leave a tool enabled on a node if that step is supposed to be able to use it.Prefer append mode for global rules
Use append mode when the node should keep the assistant’s normal safety rules, brand voice, and business constraints. Use replace mode only when the node truly needs a standalone prompt.Write edge conditions as clear decisions
For LLM conditions, describe the moment when the edge should fire. Avoid vague conditions likebilling. Prefer explicit criteria, such as The caller has a general office-hours, location, or FAQ question.
Use variable comparisons for hard rules
If the condition depends on structured data, use a variable comparison instead of an LLM condition. This makes routing predictable and easier to debug.Avoid too many paths from one node
A node with many outgoing edges is harder to reason about and test. If the routing logic gets complex, add an intermediate triage node.Test every path before production
Run through the happy path, fallback path, escalation path, and at least one negative case for every important node.Related resources
- Dynamic Variables: Personalize prompts and route with runtime data.
- Version Testing and Traffic Distribution: Test assistant changes before sending all traffic to a new version.
- Integrations: Connect assistants to external systems and data sources.